[Spring 01] IOC
Spring_01 IOC
思路: 不用new对象-> IOC思想,Spring托管一切 -> 用xml配置 -> DI 给xml配置下给对象赋值 -> 复杂类型自动注入 -> 干掉xml文件,用注解开发
spring官网:https://spring.io/
下载:
-
projects--overview--spring framework--learn,reference doc, 下载网址: 进Html, Distribution Zip files, 进网站选择版本
-
spring.io,project, 点击 github图标,去github下载
-
web支持,搜 spring maven,找到依赖包 dependence: spring-webmvc,(同时导入spring-jdbc依赖包)
优点:1开源免费,2轻量级非入侵,3控制反转(IOC,面向切面编程(AOP, 4支持事务处理,框架整合的支持
Spring是一个轻量级的控制反转(IOC)和面向切面编程(AOP)的框架(容器)
spring boot快速构建单个微服务(需要基础:spring, springMVC),spring cloud协调一切
1. IOC
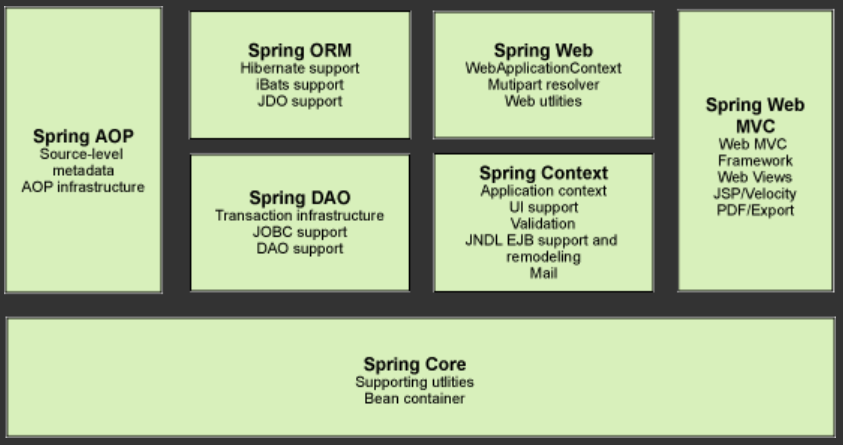
1. 组成
2. IOC理论推导
MVC理论:
Userdao接口
Userdao类1 interface 接口

UserService接口
UserService 类
    private Userdao userdao = new Userdao类1;
	public void method(){调用userdao的方法}
main
    UserService userService;
	userService.method();
//当添加一个需求userdao类2时,需要改变UserService类中的代码
//改变:设计模式的改变, IOC的原型
UserService 类
    private Userdao userdao;
	public setUserdao(Userdao userdao){this.userdao = userdao;}//修改
	public void method(){调用userdao的方法;}
main变为:
    UserService userService;
	userService.setUserdao(new Userdao类());//主动权的改变
	userService.method();
降低耦合,专注业务(不用为了业务的转换去做适配了)IOC原型
+重点:主动权的改变:主动权从业务层(UserService)改变为用户(main)
控制反转是一种通过描述(XML或注解)并通过第三方去生产或获取特定对象的方式。Spring中用IOC容器是实现,方法是依赖注入(DI)。
3. helloSpring
pojo类:
public class Hello{
    private String name;
    get/set/
}
resource中配置xml元数据配置bean,id:实例化的类名,class对应类的位置,property是属性赋值
name是属性名,value为八大数据类型的值,ref为引用类的类型名
<?xml version="1.0" encoding="UTF-8"?>
<beans xmlns="http://www.springframework.org/schema/beans"
       xmlns:xsi="http://www.w3.org/2001/XMLSchema-instance"
       xsi:schemaLocation="http://www.springframework.org/schema/beans
        https://www.springframework.org/schema/beans/spring-beans.xsd">

    <bean id="first" class="com.roy.pojo.Hello">
        <property name="name" value="hello"/>
    </bean>

</beans>
测试类
ApplicationContext context = new ClassPathXmlApplicationContext("beans.xml");
Hello first = (Hello) context.getBean("first");
System.out.println(first.toString());
重要理解:控制反转, 依赖注入
控制: 谁来控制对象的创建,以前是程序本身控制,现在是Spring控制
反转: 程序本身不创建对象,而变成被动的接受
依赖注入: 利用set方法进行注入
注入方法有: set方法 和 构造参数
4. IOC创建对象的方式
默认在加载配置文件的时候调用无参构造获取对象
有参构造获取对象的三种方法:
-
index :(不推荐)
<bean id="" class=""> <constructor-arg index="0" value="123"/> </bean> -
type:(不推荐)
<bean id="" class=""> <constructor-arg type="java.lang.String" value="aaa"/> </bean> -
name 推荐:当属性是对象时,用ref,指向其他的bean
<bean id="" class="">
    <constructor-arg name="属性名" value="值"/>
</bean>
5. Spring的配置
1. alias
<alias name="someID" alias="anotherID"/>
2. bean
id: 对象名
class:类型(包名+类名)
name: 也可以同时取多个别名: name="U1,U2"用逗号、分号或者空格分隔
3. import
<import resource="xxx.xml"/>
6. 依赖注入
1. 构造器注入(必须有有参)
<bean>
	<constructor-arg ....看上面/>
</bean>
2. Setter注入(必须有无参构造器)
依赖:bean的创建依赖于容器
注入:bean的所有属性,由容器来注入
环境搭建:
pojo类Address:
public class Address {
    private String address;
    getter/setter;
    toString;
}
pojo类Student:
public class Student {
    private String name;
    private Address address;
    private String[] books;
    private List<String> hobbies;
    private Map<String,String> card;
    private Set<String> games;
    private String wife;
    private Properties info;
    get/set;
    toString;
}
beans.xml文件:
<?xml version="1.0" encoding="UTF-8"?>
<beans xmlns="http://www.springframework.org/schema/beans"
       xmlns:xsi="http://www.w3.org/2001/XMLSchema-instance"
       xsi:schemaLocation="http://www.springframework.org/schema/beans http://www.springframework.org/schema/beans/spring-beans.xsd">
    <bean id="address" class="com.roy.pojo.Address">
        <property name="address" value="xian"/>
    </bean>
    <bean id="student" class="com.roy.pojo.Student">
        <property name="name" value="roy"/>
        ...
    </bean>
</beans>
测试类:
public static void main(String[] args) {
       ApplicationContext context = new ClassPathXmlApplicationContext("beans.xml");
       Student student = (Student) context.getBean("student");
        System.out.println(student.toString());
    }
对应复杂类型注入方法:
Array:
private String[] books;
<property name="books">
    <array>
        <value>book1</value>
        <value>book2</value>
        <value>book3</value>
    </array>
</property>
List:
private List<String> hobbies;
<property name="hobbies">
    <list>
        <value>hobby1</value>
        <value>hobby2</value>
        <value>hobby3</value>
    </list>
</property>
Map:
private Map<String,String> card;
<property name="card">
    <map>
        <entry key="card1" value="123"/>
        <entry key="card2" value="132"/>
    </map>
</property>
Set:
private Set<String> games;
<property name="games">
    <set>
        <value>gta5</value>
        <value>gta6</value>
    </set>
</property>
Null:
private String wife;
<property name="wife">
    <null/>
</property>
Properties:
private Properties info;
<property name="info">
    <props>
        <prop key="ID">123123</prop>
        <prop key="sex">boy</prop>
    </props>
</property>
3. P-namespace
对应setter注入,简化setter注入
<!--在xml文件中添加xml样式定义-->
xmlns:p="http://www.springframework.org/schema/p"
<!--使用: -->
<bean id="student" class="com.roy.pojo.Student"
      p:name="roy"
      p:address-ref="address"
    />
<!--普通值用p:属性名;    引用值在属性名后面加“-ref”      -->
4. C-namespace
对应构造器注入,简化constructor-args方式
x 1<!--在xml文件中添加xml样式定义-->
xmlns:c="http://www.springframework.org/schema/c"
<bean id="student" class="com.roy.pojo.Student"
      c:name="roy"
      c:address-ref="address"
    />
5. Bean的作用域
在bean标签中添加scope属性, 值为singleton或prototype
作用域还有: request, session, application, 在web开发中使用

 浙公网安备 33010602011771号