Context知识详解
Context知识详解
建议配合context知识架构图食用。
一、什么是Context
贴一个官方解释:
Interface to global information about an application environment. This is an abstract class whose implementation is provided by the Android system. It allows access to application-specific resources and classes, as well as up-calls for application-level operations such as launching activities, broadcasting and receiving intents, etc.
上面的意思:context是一个应用程序环境的全局信息的接口。这是一个抽象类,其实现由Android系统提供。它允许访问特定于应用程序的资源和类,以及对应用程序级操作(如启动活动,广播和接收意图等)的调用。
这个解释可能听起来比较抽象,我的理解是一些Android组件(如activity、service)的运行需要一定的“环境”,就好像我们工作一般都是在办公室 ,休息则是在家里,我们都是处在一定的“环境”下去工作、学习、休息的,Android组件也是类似,它们不能脱离“环境”去运转,而这个“环境”在Android中就是context。
二、Context子类以及其继承关系
先贴个图

由图我们可以看出context有两个子类ContextImpl和ContextWrapper。
ContextWrapper
我们先来看下ContextWrapper。
*/***
* * Proxying implementation of Context that simply delegates all of its calls to*
* * another Context.  Can be subclassed to modify behavior without changing*
* * the original Context.*
* */*
public class ContextWrapper extends Context {
    Context mBase;

    public ContextWrapper(Context base) {
        mBase = base;
    }

    */***
*     * Set the base context for this ContextWrapper.  All calls will then be*
*     * delegated to the base context.  Throws*
*     * IllegalStateException if a base context has already been set.*
*     * *
*     ****@param***base The new base context for this wrapper.*
*     */*
protected void attachBaseContext(Context base) {
        if (mBase != null) {
            throw new IllegalStateException(“Base context already set”);
        }
        mBase = base;
    }

    */***
*     ****@return***the base context as set by the constructor or setBaseContext*
*     */*
public Context getBaseContext() {
        return mBase;
    }

    @Override
    public AssetManager getAssets() {
        return mBase.getAssets();
    }

    @Override
    public Resources getResources() {
        return mBase.getResources();
    }

    @Override
    public PackageManager getPackageManager() {
        return mBase.getPackageManager();
    }

    @Override
    public ContentResolver getContentResolver() {
        return mBase.getContentResolver();
    }

    @Override
    public Looper getMainLooper() {
        return mBase.getMainLooper();
    }

    @Override
    public Context getApplicationContext() {
        return mBase.getApplicationContext();
    }

    @Override
    public void setTheme(int resid) {
        mBase.setTheme(resid);
    }

    */*****@hide****/*
@Override
    public int getThemeResId() {
        return mBase.getThemeResId();
    }

    @Override
    public Resources.Theme getTheme() {
        return mBase.getTheme();
    }
    @Override
    public void startActivity(Intent intent) {
        mBase.startActivity(intent);
    }
    @Override
    public void sendBroadcast(Intent intent) {
        mBase.sendBroadcast(intent);
    }
//...
}
该类直接继承自Context,并实现了Context定义的抽象方法。不过我们看源码发现其实它并未实质的去实现Context定义的操作只是通过mBase调用对应的方法去执行。这个mBase也是一个Context类型的变量,它的赋值是通过attachBaseContext赋值的。我们还知道service和application都是ContextWrapper子类,所以service和application都是Context。
public abstract class Service extends ContextWrapper implements ComponentCallbacks2 {
    //...
}

public class Application extends ContextWrapper implements ComponentCallbacks2 {
    //...
}
ContextWrapper还有一个子类ContextThemeWrapper。
public class ContextThemeWrapper extends ContextWrapper {
    private int mThemeResource;
    private Resources.Theme mTheme;
    private LayoutInflater mInflater;

    public ContextThemeWrapper(Context base, @StyleRes int themeResId) {
        super(base);
        mThemeResource = themeResId;
    }

    public ContextThemeWrapper(Context base, Resources.Theme theme) {
        super(base);
        mTheme = theme;
    }

    @Override
    public Resources getResources() {
        return getResourcesInternal();
    }

    private Resources getResourcesInternal() {
        if (mResources == null) {
            if (mOverrideConfiguration == null) {
                mResources = super.getResources();
            } else if (Build.VERSION.SDK_INT >= 17) {
                final Context resContext = createConfigurationContext(mOverrideConfiguration);
                mResources = resContext.getResources();
            }
        }
        return mResources;
    }

    @Override
    public void setTheme(int resid) {
        if (mThemeResource != resid) {
            mThemeResource = resid;
            initializeTheme();
        }
    }

    public int getThemeResId() {
        return mThemeResource;
    }

    @Override
    public Resources.Theme getTheme() {
        if (mTheme != null) {
            return mTheme;
        }

        if (mThemeResource == 0) {
            mThemeResource = R.style.Theme_AppCompat_Light;
        }
        initializeTheme();

        return mTheme;
    }

    private void initializeTheme() {
        final boolean first = mTheme == null;
        if (first) {
            mTheme = getResources().newTheme();
            Resources.Theme theme = getBaseContext().getTheme();
            if (theme != null) {
                mTheme.setTo(theme);
            }
        }
        onApplyThemeResource(mTheme, mThemeResource, first);
    }
//...
}
可以看出ContextThemeWrapper主要是包含了主题Theme相关的接口,即android:theme属性指定的。而activity则是继承自ContextThemeWrapper。
public class Activity extends ContextThemeWrapper
        implements LayoutInflater.Factory2,
        Window.Callback, KeyEvent.Callback,
        OnCreateContextMenuListener, ComponentCallbacks2,
        Window.OnWindowDismissedCallback {
    //...
}
ContextImpl
由ContextWrapper源码我们知道实际上它并没有实现Context定义的相关操作。那么Context的真实实现类到底是谁呢 答案就是ContextImpl。它是Android系统提供的唯一的Context真实 实现类。
class ContextImpl extends Context {

    @Override
    public void startActivity(Intent intent) {
        warnIfCallingFromSystemProcess();
        startActivity(intent, null);
    }

    @Override
    public void sendBroadcast(Intent intent) {
        warnIfCallingFromSystemProcess();
        String resolvedType = intent.resolveTypeIfNeeded(getContentResolver());
        try {
            intent.prepareToLeaveProcess(this);
            ActivityManager.getService().broadcastIntent(
                    mMainThread.getApplicationThread(), intent, resolvedType, null,
                    Activity.RESULT_OK, null, null, null, AppOpsManager.OP_NONE, null, false, false,
                    getUserId());
        } catch (RemoteException e) {
            throw e.rethrowFromSystemServer();
        }
    }

    @Override
    public Intent registerReceiver(BroadcastReceiver receiver, IntentFilter filter) {
        return registerReceiver(receiver, filter, null, null);
    }

    @Override
    public ComponentName startService(Intent service) {
        warnIfCallingFromSystemProcess();
        return startServiceCommon(service, false, mUser);
    }

    //...

}
由源码看出ContextImpl确是是真实的实现了Context。
三、一个应用Context个数
通过上面Context子类继承关系的分析,一个应用Context个数显而易见。
APP Context总数 = Application(1) + Activity个数+ Service个数;
四、不同的Context之间差异
我们知道Application的生命周期跟应用的生命周期是相同的,所以Application的Context生命周期与应用程序完全相同。同理
Activity或者Service的Context与他们各自类生命周期相同。
由此可知Context使用不当会引起内存泄漏,我们在使用Context时必须要注意其生命周期。
-
尽量使用 Application 的 Context
-
不要让生命周期长于 Activity 的对象持有其的引用
-
尽量不要在 Activity 中使用非静态内部类,因为非静态内部类会隐式持有外部类示例的引用,如果使用静态内部类,将外部实例引用作为弱引用持有。
五、不同Context的应用场景
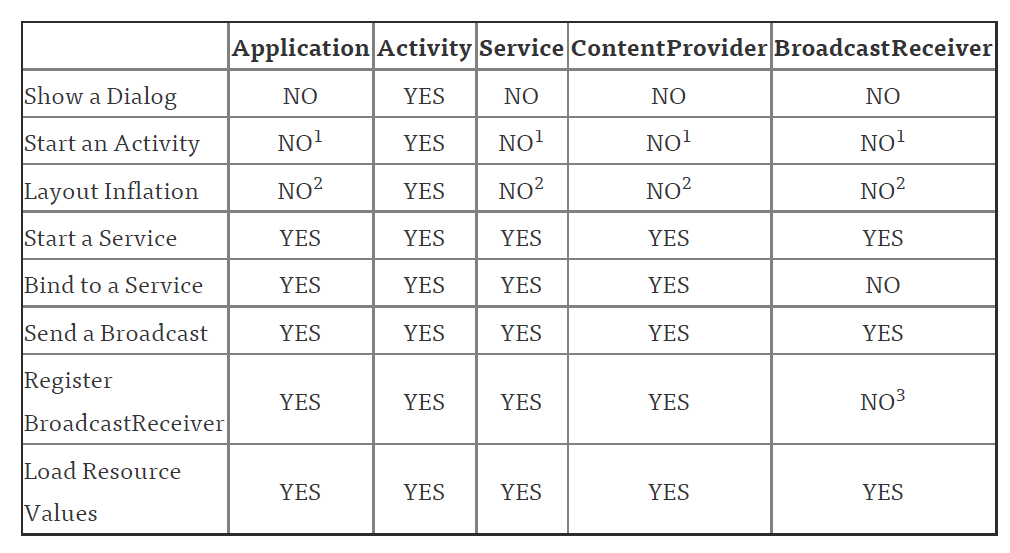
大家注意看到有一些NO上添加了一些数字,其实这些从能力上来说是YES,但是为什么说是NO呢?下面一个一个解释:
数字1:启动Activity在这些类中是可以的,但是需要创建一个新的task。一般情况不推荐。
数字2:在这些类中去layout inflate是合法的,但是会使用系统默认的主题样式,如果你自定义了某些样式可能不会被使用。
数字3:在receiver为null时允许,在4.2或以上的版本中,用于获取黏性广播的当前值。(可以无视)
注:ContentProvider、BroadcastReceiver之所以在上述表格中,是因为在其内部方法中都有一个context用于使用。
以上参考https://blog.csdn.net/lmj623565791/article/details/40481055
由表格我们可以归纳出这样一个结论:操作涉及UI的应该使用Activity做为Context,不涉及UI的Service,Activity,Application等实例都可以。
六、不同Context实例化过程
Activity 中Context实例化过程
在Activity的启动过程中,activity的创建是在ActivityThread.
performLaunchActivity方法中完成的。
//ActivityThread.java
private Activity performLaunchActivity(ActivityClientRecord r,Intent customIntent){
        //...
        ContextImpl appContext=createBaseContextForActivity(r);//1、创建ContextImpl实例
        Activity activity=null;
        try{
        java.lang.ClassLoader cl=appContext.getClassLoader();
        //...
        activity=mInstrumentation.newActivity(
        cl,component.getClassName(),r.intent);//2、创建Activity
        StrictMode.incrementExpectedActivityCount(activity.getClass());
        r.intent.setExtrasClassLoader(cl);
        r.intent.prepareToEnterProcess();
        if(r.state!=null){
        r.state.setClassLoader(cl);
        }
        }catch(Exception e){
        if(!mInstrumentation.onException(activity,e)){
        throw new RuntimeException(
        "Unable to instantiate activity "+component
        +": "+e.toString(),e);
        }
        }

        try{
        Application app=r.packageInfo.makeApplication(false,mInstrumentation);
        if(activity!=null){
        appContext.setOuterContext(activity);//3、调用setOuterContext
        activity.attach(appContext,this,getInstrumentation(),r.token,
        r.ident,app,r.intent,r.activityInfo,title,r.parent,
        r.embeddedID,r.lastNonConfigurationInstances,config,
        r.referrer,r.voiceInteractor,window,r.configCallback);//4、调用attach
        }
       //...
    }
首先通过createBaseContextForActivity创建ContextImpl实例,那我们看下具体是如何创建的
private ContextImpl createBaseContextForActivity(ActivityClientRecord r) {
    final int displayId;
    try {
        displayId = ActivityManager.getService().getActivityDisplayId(r.token);
    } catch (RemoteException e) {
        throw e.rethrowFromSystemServer();
    }

    ContextImpl appContext = ContextImpl.createActivityContext(
            this, r.packageInfo, r.activityInfo, r.token, displayId, r.overrideConfig);
//...
    return appContext;
}
可以看出是调用createActivityContext,那来看下createActivityContext
static ContextImpl createActivityContext(ActivityThread mainThread,
        LoadedApk packageInfo, ActivityInfo activityInfo, IBinder activityToken, int displayId,
        Configuration overrideConfiguration) {
//...
ContextImpl context = new ContextImpl(null, mainThread, packageInfo, activityInfo.splitName,
        activityToken, null, 0, classLoader);

//...
context.setResources(resourcesManager.createBaseActivityResources(activityToken,
        packageInfo.getResDir(),
        splitDirs,
        packageInfo.getOverlayDirs(),
        packageInfo.getApplicationInfo().sharedLibraryFiles,
        displayId,
        overrideConfiguration,
        compatInfo,
        classLoader));
context.mDisplay = resourcesManager.getAdjustedDisplay(displayId,
        context.getResources());
return context;
}
可以看到是调用了ContextImpl得一个构造函数创建的ContextImpl实例然后还给该实例设置了setResources,至此ContextImpl创建完成。但是我们注意到在创建了ContextImpl实例(appContext)之后又调用了setOuterContext
并把当前activity传入,这又是为什么呢? 看下源码
private Context mOuterContext;

final void setOuterContext(Context context) {
    mOuterContext = context;
}
setOuterContext只是简单的把传入的activity赋值给了mOuterContext,这是ContextImpl类中定义的一个变量。通过这个操作ContextImpl就可以持有activity的引用。
setOuterContext之后又调用了activity.attach并把appContext传入。
final void attach(Context context, ActivityThread aThread,
        Instrumentation instr, IBinder token, int ident,
        Application application, Intent intent, ActivityInfo info,
        CharSequence title, Activity parent, String id,
        NonConfigurationInstances lastNonConfigurationInstances,
        Configuration config, String referrer, IVoiceInteractor voiceInteractor,
        Window window, ActivityConfigCallback activityConfigCallback) {
    attachBaseContext(context);
//...
}
//Activity.java
protected void attachBaseContext(Context newBase) {
    super.attachBaseContext(newBase);
    newBase.setAutofillClient(this);
}
Activity的attach我们只关注跟context有关的 那就是调用attachBaseContext,在这个函数内部调用了super.attachBaseContext。我们知道Activity继承自 ContextThemeWrapper, ContextThemeWrapper
继承自 ContextWrapper,所以最终会调用ContextWrapper.attachBaseContext,到这里,ContextWrapper类就可以将它的功能交给ContextImpl类来具体实现。
//ContextWrapper.java
protected void attachBaseContext(Context base) {
    if (mBase != null) {
        throw new IllegalStateException("Base context already set");
    }
    mBase = base;
}
Service中Context实例化过程
private void handleCreateService(CreateServiceData data){
        //...
        Service service=null;
        try{
        java.lang.ClassLoader cl=packageInfo.getClassLoader();
        service=(Service)cl.loadClass(data.info.name).newInstance();//1、创建service
        }catch(Exception e){
        if(!mInstrumentation.onException(service,e)){
        throw new RuntimeException(
        "Unable to instantiate service "+data.info.name
        +": "+e.toString(),e);
        }
        }
        try{
        if(localLOGV)Slog.v(TAG,"Creating service "+data.info.name);

        ContextImpl context=ContextImpl.createAppContext(this,packageInfo);//2、创建ContextImpl实例
        context.setOuterContext(service);//3、设置OuterContext

        Application app=packageInfo.makeApplication(false,mInstrumentation);
        service.attach(context,this,data.info.name,data.token,app,
        ActivityManager.getService()); //4、调用attach
        service.onCreate();
        mServices.put(data.token,service);
        try{
        ActivityManager.getService().serviceDoneExecuting(
        data.token,SERVICE_DONE_EXECUTING_ANON,0,0);
        }catch(RemoteException e){
        throw e.rethrowFromSystemServer();
        }
        }catch(Exception e){
        if(!mInstrumentation.onException(service,e)){
        throw new RuntimeException(
        "Unable to create service "+data.info.name
        +": "+e.toString(),e);
        }
        }
     }
我们看到Service中Context实例的创建流程跟Activity基本是一样的,首先创建Service实例然后创建ContextImpl实例,之后调用setOuterContext最后是attach。
Service中ContextImpl实例是通过函数createAppContext创建的,其内部则是通过ContextImpl的构造函数来创建实例。
static ContextImpl createAppContext(ActivityThread mainThread, LoadedApk packageInfo) {
    if (packageInfo == null) throw new IllegalArgumentException("packageInfo");
    ContextImpl context = new ContextImpl(null, mainThread, packageInfo, null, null, null, 0,
            null);
    context.setResources(packageInfo.getResources());
    return context;
}
setOuterContext操作跟Activity是一样的都是把引用赋值给mOuterContext。
最后就是attch了,下面是service的attach,可以看到它也是调用attachBaseContext,下面的流程跟Activity是一样的最终都是ContextWrapper类将它的功能交给ContextImpl类来具体实现。
public final void attach(
        Context context,
        ActivityThread thread, String className, IBinder token,
        Application application, Object activityManager) {
    attachBaseContext(context);//调用attachBaseContext
    mThread = thread;           // NOTE:  unused - remove?
    mClassName = className;
    mToken = token;
    mApplication = application;
    mActivityManager = (IActivityManager)activityManager;
    mStartCompatibility = getApplicationInfo().targetSdkVersion
            < Build.VERSION_CODES.ECLAIR;
}
Application中的Context的实例化过程
Application 的创建是在LoadedApk.makeApplication中。
//LoadedApk.Java
public Application makeApplication(boolean forceDefaultAppClass,
        Instrumentation instrumentation) {
    if (mApplication != null) {
        return mApplication;
    }
//...
Application app = null;

try {
            java.lang.ClassLoader cl = getClassLoader();
            if (!mPackageName.equals("android")) {
                Trace.traceBegin(Trace.TRACE_TAG_ACTIVITY_MANAGER,
                        "initializeJavaContextClassLoader");
                initializeJavaContextClassLoader();
                Trace.traceEnd(Trace.TRACE_TAG_ACTIVITY_MANAGER);
            }
            ContextImpl appContext = ContextImpl.createAppContext(mActivityThread, this);//1、创建ContextImpl实例
            app = mActivityThread.mInstrumentation.newApplication(
                    cl, appClass, appContext);//2、创建application
            appContext.setOuterContext(app);//3、设置mOuterContext
        } catch (Exception e) {
            if (!mActivityThread.mInstrumentation.onException(app, e)) {
                Trace.traceEnd(Trace.TRACE_TAG_ACTIVITY_MANAGER);
                throw new RuntimeException(
                    "Unable to instantiate application " + appClass
                    + ": " + e.toString(), e);
            }
        }
        mActivityThread.mAllApplications.add(app);
        mApplication = app;
//...
}
可以看到Application中是先创建了ContextImpl实例然后创建Application实例最后调用了setOuterContext。看上去跟Service和Activity相比缺少了attach,而我们知道attach是ContextWrapper类将它的功能交给ContextImpl类来具体实现的过程,Application缺少attach那它是如何实现ContextWrapper的代理过程的呢? 其实Application是有attach的 它在newApplication创建Application的过程中调用的。
public Application newApplication(ClassLoader cl, String className, Context context)
        throws InstantiationException, IllegalAccessException,
        ClassNotFoundException {
    return newApplication(cl.loadClass(className), context);
}

 static public Application newApplication(Class<?> clazz, Context context)
            throws InstantiationException, IllegalAccessException,
            ClassNotFoundException {
        Application app = (Application)clazz.newInstance();

        app.attach(context);//调用application的attach方法
        return app;
    }

final void attach(Context context) {
    attachBaseContext(context);  //调用attachBaseContext
    mLoadedApk = ContextImpl.getImpl(context).mPackageInfo;
}
嗯,这样看application和Service还有Activity的流程基本上是一致的。
至此Application、Service、Activity中context的实例化过程都已分析完了。
七、其他
无侵入式获取全局Context
使用一个ContentProvider,ContentProvider的onCreate()方法调用时,调用getContext()即可获取到Context,再静态变量保存,后续直接获取即可。
public class AppContextProvider extends ContentProvider {
    static Context mContext;
    @Override
    public boolean onCreate() {
        //mContext保存为静态变量
        mContext = getContext();
        return false;
    }

    //...
}

<manifest xmlns:android="http://schemas.android.com/apk/res/android"
        package="com.app.contextprovider">

    <application>
        <!-- 全局Context提供者 -->
        <provider
                android:name=".AppContextProvider"
                android:authorities="${applicationId}.contextprovider"
                android:exported="false" />
    </application>
</manifest>
getApplication和getApplicationContext的区别
首先来看getApplication方法,它只有在Activity和Service中有实现
Activity
/** Return the application that owns this activity. */
public final Application getApplication() {
    return mApplication;
}

Service
/** Return the application that owns this service. */
public final Application getApplication() {
    return mApplication;
}
Activity和Service中getApplication返回的是一个application对象。
getApplicationContext是ContextWrapper提供的方法,由源码可知它调用的是mBase的getApplicationContext()。此处的mBase实际是一个ContextImpl,所以我们看下ContextImpl的getApplicationContext(),可以看到返回的是mPackageInfo.getApplication()(此处的mPackageInfo包含当前应用的包信息、比如包名、应用的安装目录等信息,一般不为空)。
//ContextWrapper
public Context getApplicationContext() {
    return mBase.getApplicationContext();
}

//ContextImpl
public Context getApplicationContext() {
    return (mPackageInfo != null) ?
            mPackageInfo.getApplication() : mMainThread.getApplication();
}
我们知道一个应用只有一个Application所以getApplication和getApplicationContext 实际上都是返回当前应用的Application,它们是同一个对象。这两个函数的区别就是getApplication只能在Activity和Service中调用,而getApplicationContext 的使用范围则要大一些,比如在广播中想要获取全局的Context则需要使用getApplicationContext 而不是getApplication。
以上就是Context相关知识点的整理解析。
本文所有源码基于Android-8.0.0_r1

 浙公网安备 33010602011771号