Sentinel
简介
Sentinel控制台是一个轻量级的控制台应用,它可用于实时查看单机资源监控及集群资源汇总,并提供了一系列的规则管理功能,如流控规则、降级规则、热点规则等。
部署
构建容器镜像
下载jar包
https://github.com/alibaba/Sentinel/releases
构建Dockerfile文件
#java 版本
FROM openjdk:8
#挂载的docker卷
VOLUME /tmp

# 拷贝 jar 包到容器内(jar与Dockerfile在同一个目录)
COPY sentinel-dashboard.jar sentinel-dashboard.jar
# 定义时区参数
ENV TZ=Asia/Shanghai
# 设置时区
RUN ln -snf /usr/share/zoneinfo/$TZ /etc/localtime && echo '$TZ' > /etc/timezone
# 配置启动命令
ENTRYPOINT ["java", "-jar", "/sentinel-dashboard.jar"]
镜像构建命令
docker build -f Dockerfile -t sentinel:04.17.1 .
运行容器
version: '3'
services:
  sentinel:
    image: sentinel:04.17.1
    container_name: sentinel
    ports:
      - 8109:8109
    environment:
      JVM_OPTS: -server -Xmx512M -Xms512M -XX:MaxMetaspaceSize=256M -XX:CompressedClassSpaceSize=50M -XX:ReservedCodeCacheSize=240M -XX:MaxDirectMemorySize=400M
    logging:
      driver: "json-file"
      options:
        max-size: "10m"
        max-file: "1"
    volumes:
      - "/data/sentinel/logs:/root/logs"
      - "/data/sentinel/app-logs:/app-logs"
    command: [
      "--server.port=8109",
      "--logging.file.path=/app-logs"
    ]
部署验证
注:默认登录密码为sentinel/sentinel
http://IP:8109/
Demo
创建sentinel-service模块
该步骤省略
添加相关依赖
<dependency>
    <groupId>com.alibaba.cloud</groupId>
    <artifactId>spring-cloud-starter-alibaba-nacos-discovery</artifactId>
</dependency>
<dependency>
    <groupId>com.alibaba.cloud</groupId>
    <artifactId>spring-cloud-starter-alibaba-sentinel</artifactId>
</dependency>
添加相关配置
server:
  port: 8401
spring:
  application:
    name: sentinel-service
  cloud:
    nacos:
      discovery:
        server-addr: localhost:8848 #配置Nacos地址
    sentinel:
      # 取消控制台懒加载(默认是懒加载机制,只有访问过一次的资源才会被监控)
      eager: true
      transport:
        dashboard: localhost:8080 #配置sentinel dashboard地址
        port: 8719 # Sentinel 客户端与 Sentinel Dashboard 通信的端口,用于上报监控数据(默认值8719,是客户端开启端口)
限流功能
创建RateLimitController类
/**
 * 限流功能
 */
@RestController
@RequestMapping("/rateLimit")
public class RateLimitController {

    /**
     * 按资源名称限流,需要指定限流处理逻辑
     */
    @GetMapping("/byResource")
    @SentinelResource(value = "byResource",blockHandler = "handleException")
    public CommonResult byResource() {
        return new CommonResult("按资源名称限流", 200);
    }
    /**
    * 注意事项:
    * 1、定义的限流方法 myBlockHandler 必须和原方法的返回值、参数保持一致
    * 2、限流方法必须添加 BlockException 参数
    */
    public CommonResult handleException(BlockException exception){
        return new CommonResult(exception.getClass().getCanonicalName(),200);
    }

}
在Sentinel控制台配置流控规则
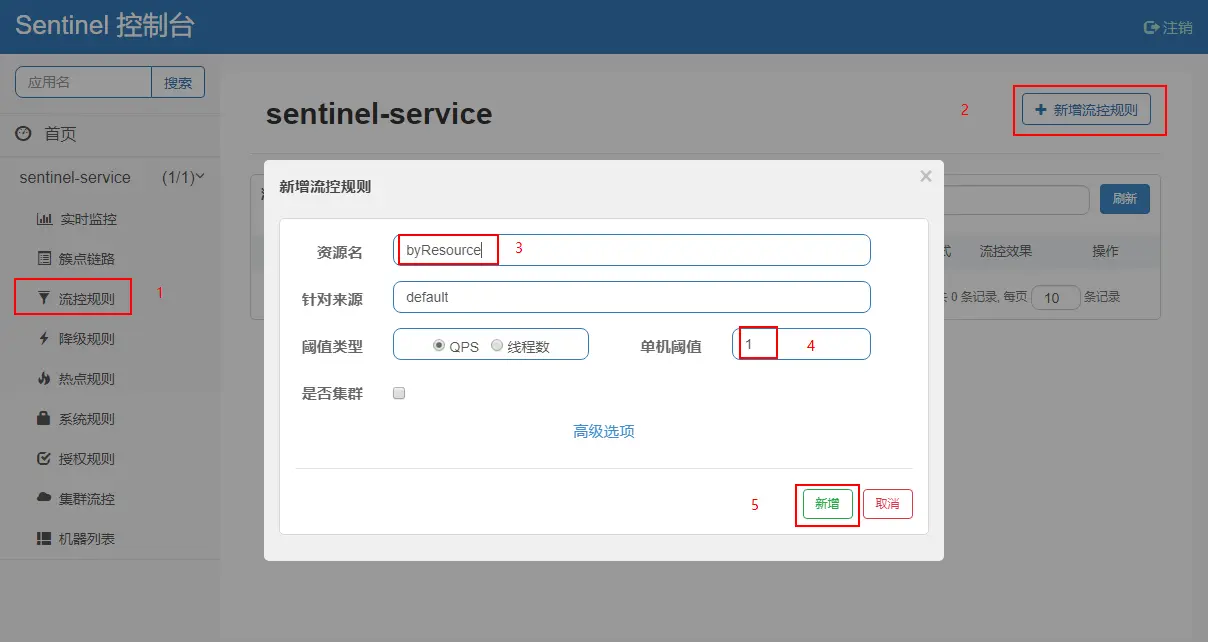
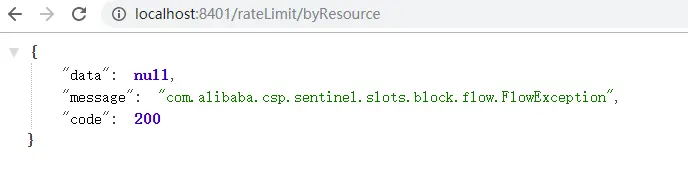
快速访问上述接口,验证是否返回了自定义的限流处理信息
线程隔离
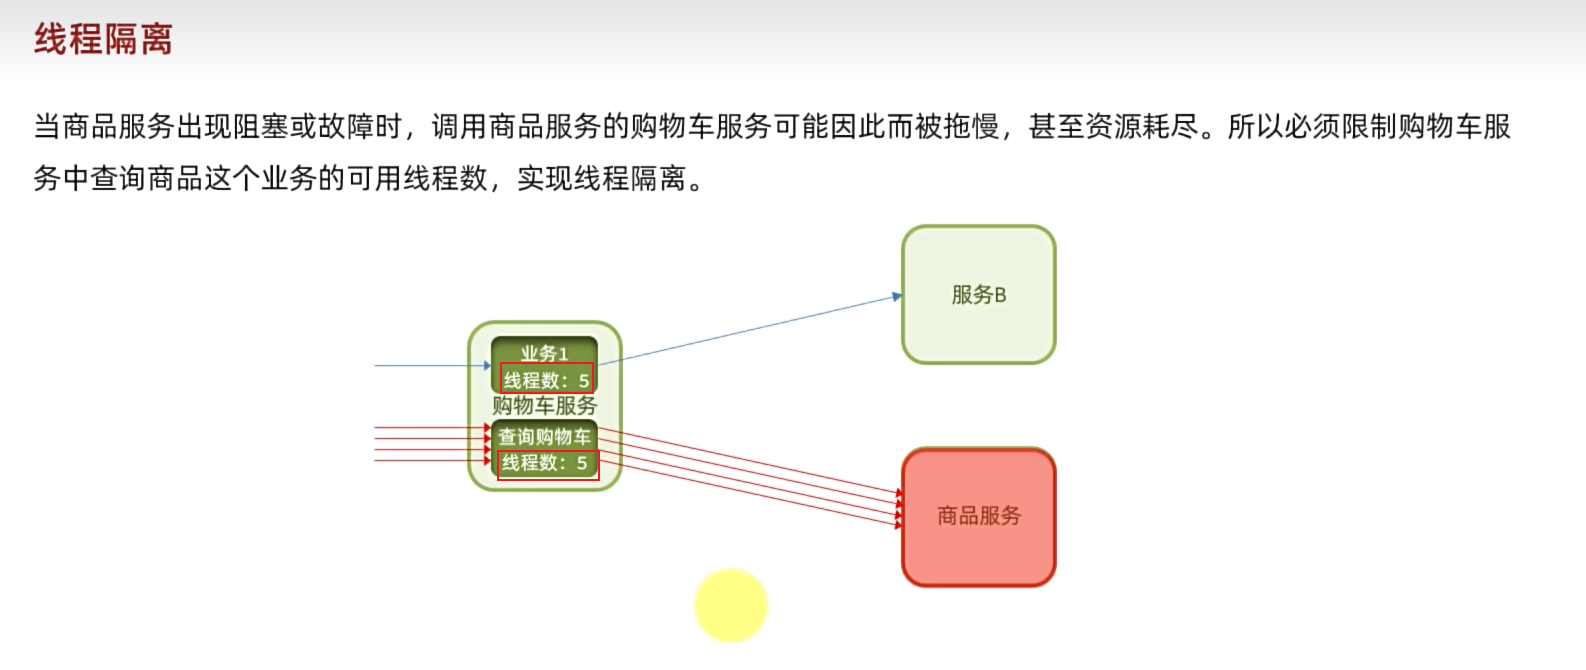
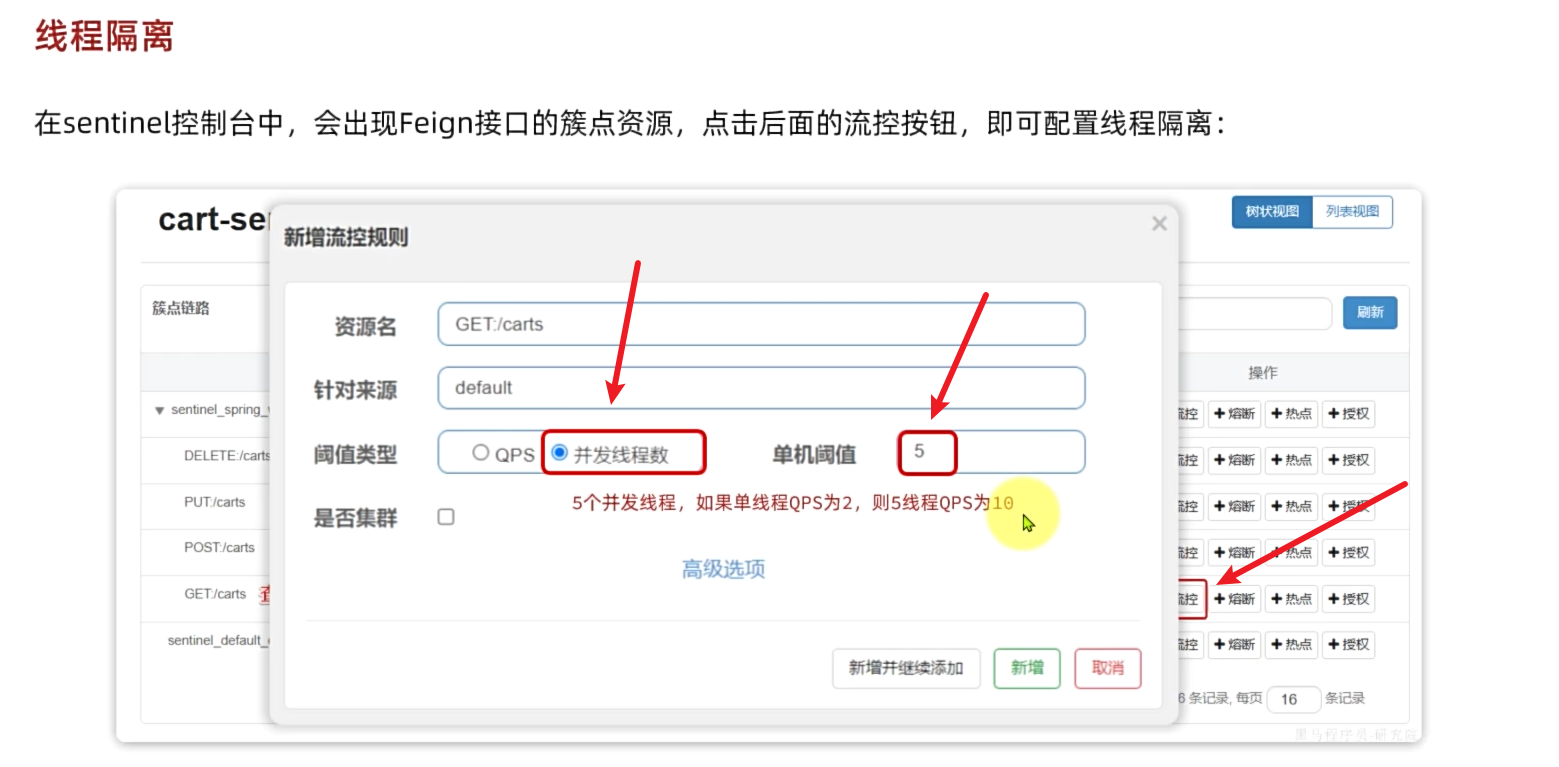
注:表示该接口可以允许5个线程同时访问
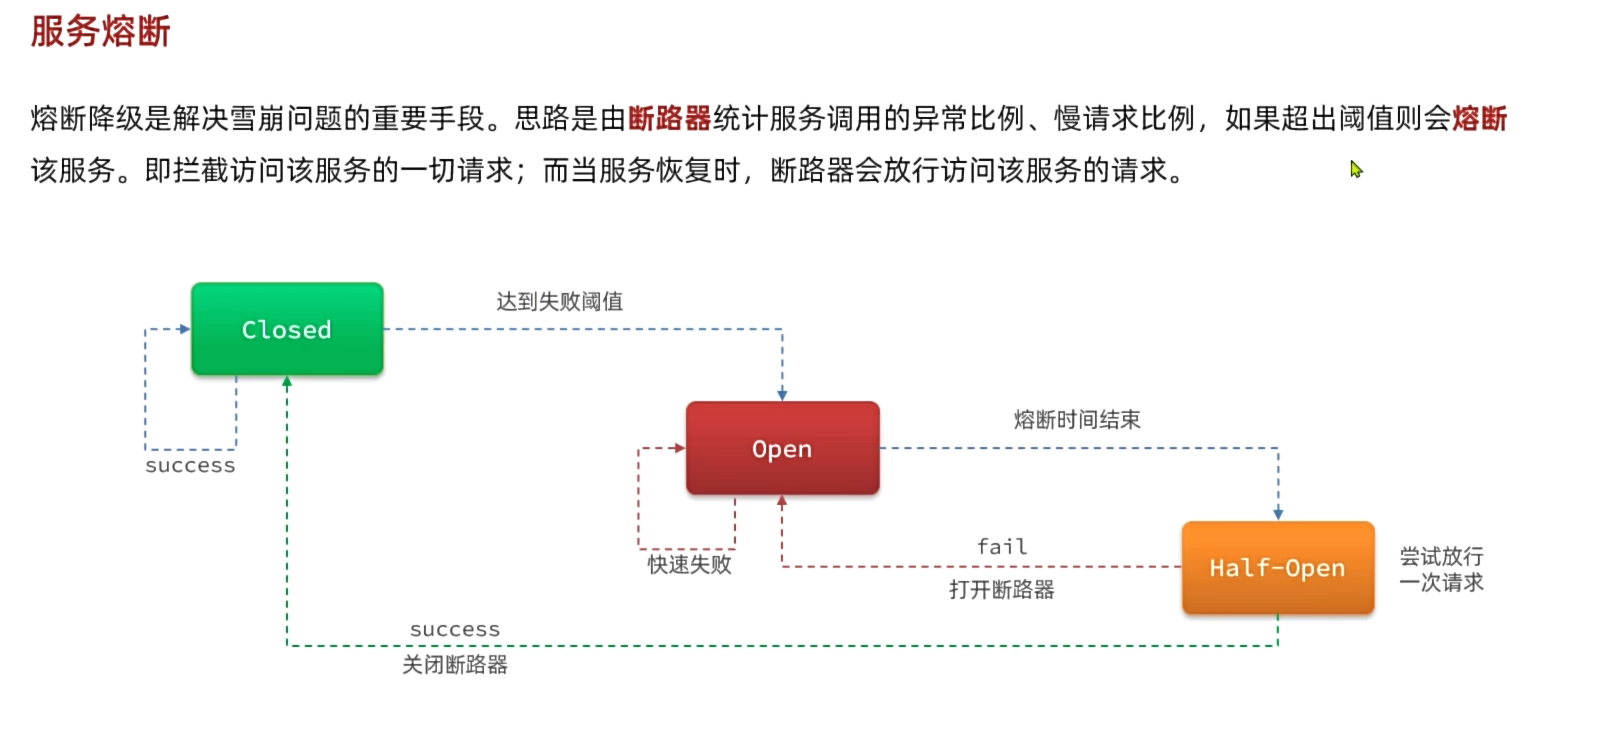
熔断功能
添加配置类
@Configuration
public class RibbonConfig {

    @Bean
    @SentinelRestTemplate
    public RestTemplate restTemplate(){
        return new RestTemplate();
    }
}
添加控制器
/**
* 熔断功能
*/
@RestController
@RequestMapping("/breaker")
public class CircleBreakerController {
private Logger LOGGER = LoggerFactory.getLogger(CircleBreakerController.class);
@Autowired
private RestTemplate restTemplate;
@Value("${service-url.user-service}")
private String userServiceUrl;
@RequestMapping("/fallback/{id}")
@SentinelResource(value = "fallback",fallback = "handleFallback")
public CommonResult fallback(@PathVariable Long id) {
return restTemplate.getForObject(userServiceUrl + "/user/{1}", CommonResult.class, id);
}
@RequestMapping("/fallbackException/{id}")
@SentinelResource(value = "fallbackException",fallback = "handleFallback2", exceptionsToIgnore = {NullPointerException.class})
public CommonResult fallbackException(@PathVariable Long id) {
if (id == 1) {
throw new IndexOutOfBoundsException();
} else if (id == 2) {
throw new NullPointerException();
}
return restTemplate.getForObject(userServiceUrl + "/user/{1}", CommonResult.class, id);
}
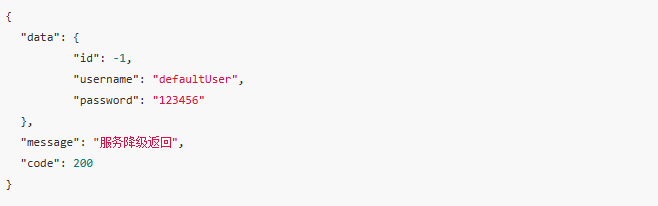
public CommonResult handleFallback(Long id) {
User defaultUser = new User(-1L, "defaultUser", "123456");
return new CommonResult<>(defaultUser,"服务降级返回",200);
}
public CommonResult handleFallback2(@PathVariable Long id, Throwable e) {
LOGGER.error("handleFallback2 id:{},throwable class:{}", id, e.getClass());
User defaultUser = new User(-2L, "defaultUser2", "123456");
return new CommonResult<>(defaultUser,"服务降级返回",200);
}
}
功能验证
由于我们并没有定义id为4的用户,所以访问如下接口会返回服务降级结果:http://localhost:8401/breaker/fallback/4

与Feign 结合使用
在微服务中更常用Feign框架进行远程服务调用
引入相关依赖
<!-- SpringCloud Openfeign -->
<dependency>
    <groupId>org.springframework.cloud</groupId>
    <artifactId>spring-cloud-starter-openfeign</artifactId>
</dependency>
添加相关配置
feign:
  sentinel:
    enabled: true #打开sentinel对feign的支持
在应用启动类上添加@EnableFeignClients启动Feign的功能
创建服务接口
UserService接口
 @FeignClient(value = "nacos-user-service",fallback = UserFallbackService.class)
public interface UserService {
    @PostMapping("/user/create")
    CommonResult create(@RequestBody User user);

    @GetMapping("/user/{id}")
    CommonResult<User> getUser(@PathVariable Long id);

    @GetMapping("/user/getByUsername")
    CommonResult<User> getByUsername(@RequestParam String username);

    @PostMapping("/user/update")
    CommonResult update(@RequestBody User user);

    @PostMapping("/user/delete/{id}")
    CommonResult delete(@PathVariable Long id);
}
UserFallbackService类
 @Component
public class UserFallbackService implements UserService {
    @Override
    public CommonResult create(User user) {
        User defaultUser = new User(-1L, "defaultUser", "123456");
        return new CommonResult<>(defaultUser,"服务降级返回",200);
    }

    @Override
    public CommonResult<User> getUser(Long id) {
        User defaultUser = new User(-1L, "defaultUser", "123456");
        return new CommonResult<>(defaultUser,"服务降级返回",200);
    }

    @Override
    public CommonResult<User> getByUsername(String username) {
        User defaultUser = new User(-1L, "defaultUser", "123456");
        return new CommonResult<>(defaultUser,"服务降级返回",200);
    }

    @Override
    public CommonResult update(User user) {
        return new CommonResult("调用失败,服务被降级",500);
    }

    @Override
    public CommonResult delete(Long id) {
        return new CommonResult("调用失败,服务被降级",500);
    }
}
UserFeignController
 @RestController
@RequestMapping("/user")
public class UserFeignController {
    @Autowired
    private UserService userService;

    @GetMapping("/{id}")
    public CommonResult getUser(@PathVariable Long id) {
        return userService.getUser(id);
    }

    @GetMapping("/getByUsername")
    public CommonResult getByUsername(@RequestParam String username) {
        return userService.getByUsername(username);
    }

    @PostMapping("/create")
    public CommonResult create(@RequestBody User user) {
        return userService.create(user);
    }

    @PostMapping("/update")
    public CommonResult update(@RequestBody User user) {
        return userService.update(user);
    }

    @PostMapping("/delete/{id}")
    public CommonResult delete(@PathVariable Long id) {
        return userService.delete(id);
    }
}
接口调用验证
调用如下接口会发生服务降级,返回服务降级处理信息:http://localhost:8401/user/4
使用Nacos持久化配置规则
默认情况下,当我们在Sentinel控制台中配置规则时,控制台推送规则方式是通过API将规则推送至客户端并直接更新到内存中。一旦我们重启客户端应用,规则将消失;
下面我们介绍下如何将配置规则进行持久化,以存储到Nacos为例。
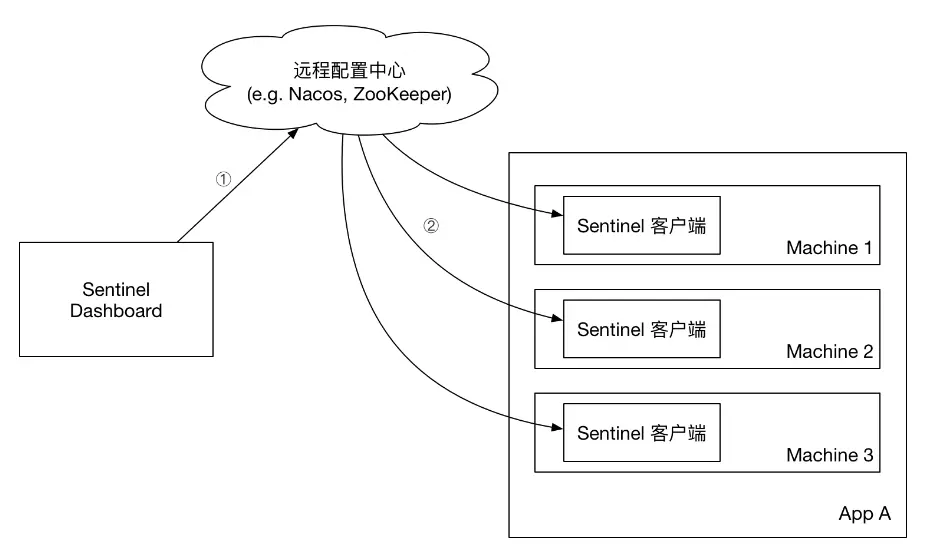
原理示意图
- 首先我们直接在配置中心创建规则,配置中心将规则推送到客户端;
- Sentinel控制台也从配置中心去获取配置信息;
集成步骤
引入相关依赖
<!-- Sentinel Datasource Nacos -->
<dependency>
    <groupId>com.alibaba.csp</groupId>
    <artifactId>sentinel-datasource-nacos</artifactId>
</dependency>
添加相关配置
spring:
cloud:
sentinel:
# 取消控制台懒加载(默认是懒加载机制,只有访问过一次的资源才会被监控)
eager: true
transport:
# 控制台地址
dashboard: localhost:8109
# nacos配置持久化
datasource:
ds1:
nacos:
server-addr: localhost:8848
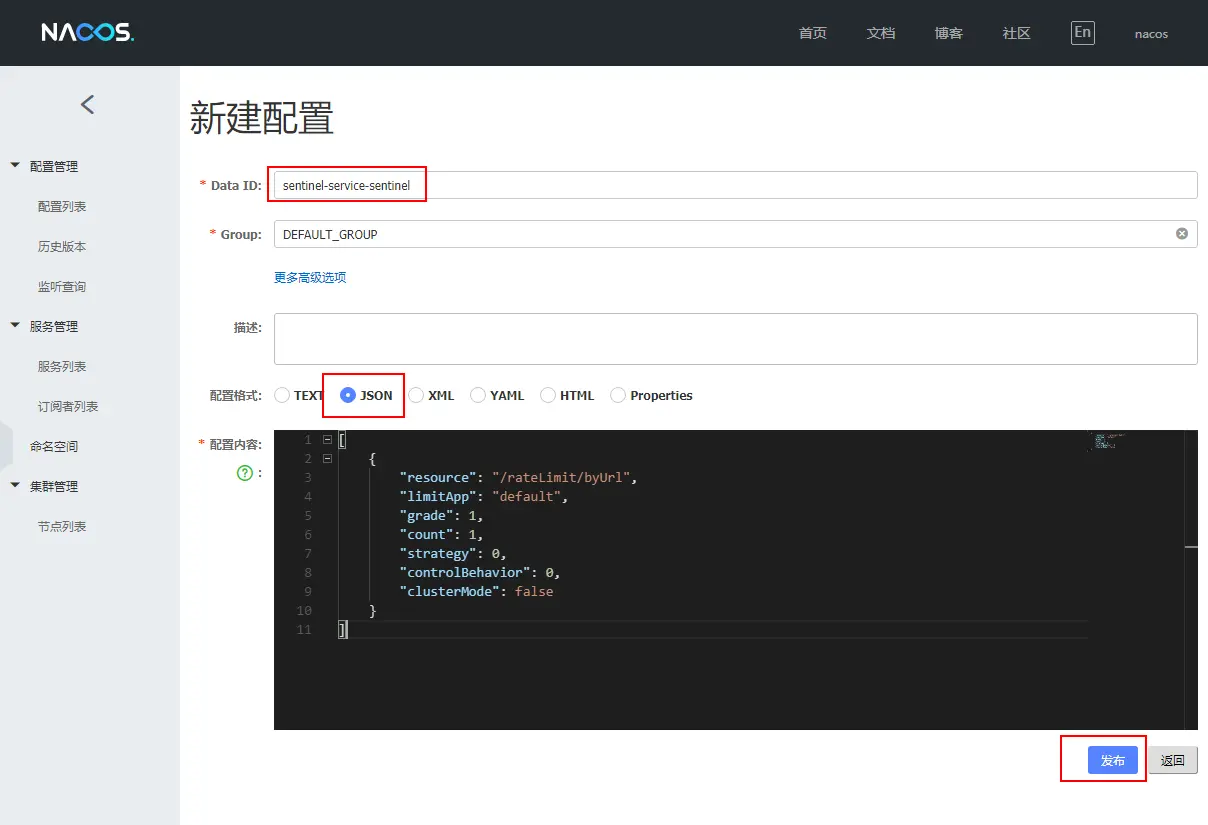
dataId: ${spring.application.name}-sentinel
groupId: DEFAULT_GROUP
data-type: json
rule-type: flow
nacos控制台添加配置
验证配置是否生效
发现Sentinel控制台已经有了如下限流规则
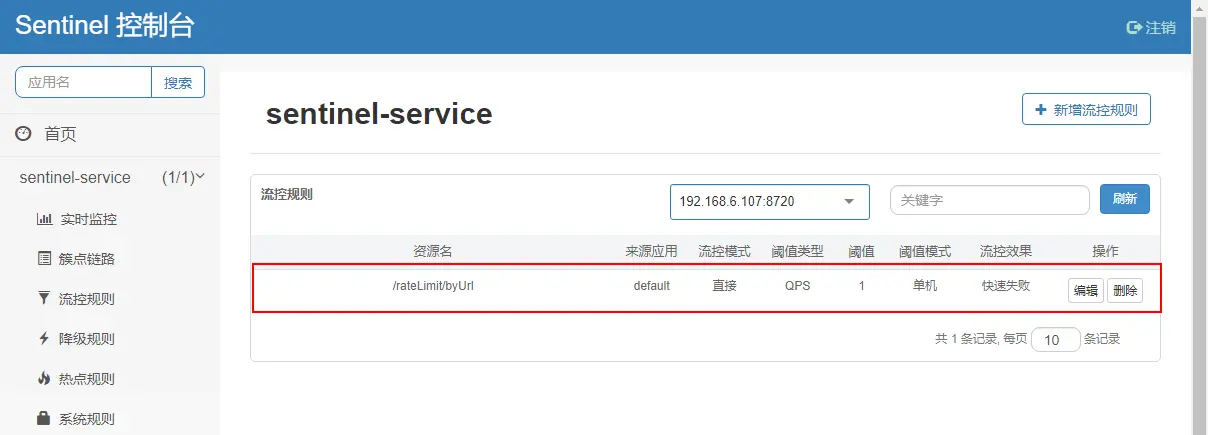
快速访问测试接口,可以发现返回了限流处理信息


 浙公网安备 33010602011771号