


Linux学习80 httpd-2.4高级企业级应用配置实战
一、httpd-2.4的常见配置(2)
1、curl命令
a、解释:curl是基于URL语法在命令行方式下工作的文件传输工具,它支持FTP,FTPS,HTTP,HTTPS,GOPHER,TELNET,DICT,FILE及LDAP等协议。curl支持HTTPS认证,并且支持HTTP的POST,PUT等方法,FTP上传,kerberos认证,HTTP上传,代理服务器,cookies,用户名/密码认证,下载断点续传,上载文件断点续传,http代理服务器管道(proxy tunneling),甚至它还支持IPV6,socks5代理服务器,通过http代理服务器上传文件到FTP服务器等等,功能十分强大。
b、MIME:major/minor,image/png,image/gif
c、curl [options] [URL...]
d、curl的常用选项:
(1)、-A/--user-agent <string> :设置用户代理发送给服务器
[root@www ~]# tail -1 /etc/httpd/logs/wohaoshuai1_access_log
192.168.10.13 - - [18/May/2020:18:58:24 +0800] "GET / HTTP/1.1" 200 16 "-" "curl/7.29.0"
[root@www ~]# curl -A "chrome 100.0" 192.168.10.13
wohaoshuai1.com
[root@www ~]# tail -1 /etc/httpd/logs/wohaoshuai1_access_log
192.168.10.13 - - [18/May/2020:18:58:57 +0800] "GET / HTTP/1.1" 200 16 "-" "chrome 100.0"
(2)、--basic :使用HTTP基本认证
(3)、--tcp-nodelay:使用TCP_NODELAY选项
(4)、-e/--referer <URL>:来源网址
[root@www ~]# curl -A "chrome 100.0" -e "http://www.google.com/search?q=hello" http://192.168.10.13/
wohaoshuai1.com
[root@www ~]# tail -1 /etc/httpd/logs/wohaoshuai1_access_log
192.168.10.13 - - [18/May/2020:19:05:22 +0800] "GET / HTTP/1.1" 200 16 "http://www.google.com/search?q=hello" "chrome 100.0"
(5)、--cacert <file> CA证书(SSL)
(6)、--compressed:要求返回是压缩的格式
(7)、-H/--header <line>:自定义首部信息传递给服务器
(8)、-I/--head:只显示响应报文首部信息
[root@www ~]# curl -I http://192.168.10.13/
HTTP/1.1 200 OK
Date: Mon, 18 May 2020 11:09:25 GMT
Server: Apache/2.4.6 (CentOS) OpenSSL/1.0.2k-fips mod_fcgid/2.3.9
Last-Modified: Fri, 15 May 2020 01:43:16 GMT
ETag: "10-5a5a5efe5a5e9"
Accept-Ranges: bytes
Content-Length: 16
Content-Type: text/html; charset=UTF-8
(9)、--limit-rate <rate>:设置传输速度
(10)、-u/--user <user[:password]>:设置服务器的用户和密码
(11)、-O/--http1.0:使用HTTP 1.0
e、用法:curl [options] [URL...]
2、另一个工具:elinks,他就是一个浏览器

a、elinks [OPTION]... [URL...]
b、常用选项
(1)、--dump:不进入交互模式,而直接将URL的内容输出至标准输出

3、user/group
a、指定以哪个用户的身份运行httpd服务进程
(1)、User apache
(2)、Group apache
[root@www ~]# cat /etc/httpd/conf/httpd.conf|grep -E "^(User|Group)"
User apache
Group apache
(3)、SUexec:我们有时候会用到alias访问其它路径下的资源,假如这个资源属主和数组都不是apache,并且也不能设置为apache,那么我们要怎么办呢?我们httpd有一个不安全的模块叫suexec,我们可以用这个模块来实现。一旦我们用了这个模块alias定义的路径就能访问了。但是这个模块不安全,我们一般不用
[root@www ~]# httpd -M |grep exec
 suexec_module (shared)
4、使用mod_deflate模块压缩页面优化传输速度
a、使用场景
(1)、节约宽带,额外消耗CPU;同时
(2)、压缩适于压缩的资源,例如文本文件
b、设置压缩
(1)、首先确保我们的mod_deflate模块启用起来
[root@www ~]# httpd -M |grep def
 deflate_module (shared)
(2)、我们设置一个过滤器,对类型的过滤只是支持文本类型,因此在过滤时明确说明我们只对文本类型做压缩,其它类型都不做压缩
1)、SetOutputFilter DEFLATE:设置一个过滤器叫DEFLATE,这个过滤器叫什么名字可以自己定义。
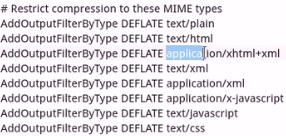
2)、我们根据文件类型做过滤,比如下面的这些
3)、指明压缩比,9是最高的,1是最低的,并不建议使用最高压缩比,因为消耗太多的CPU了

4)、匹配对应属性确定是否做压缩(非必须)
i、如果匹配到是Mozilla/4那么对其做gzip压缩

ii、如果匹配到是Mozilla/4.06 7 或8就不要做压缩

iii、如果匹配到MSIE,那么就只使用gzip进行压缩

c、配置
(1)、编辑配置文件
[root@www ~]# cat /etc/httpd/conf.d/compress.conf
SetOutputFilter DEFLATE
AddOutputFilterByType DEFLATE text/plain
AddOutputFilterByType DEFLATE text/html
AddOutputFilterByType DEFLATE application/xhtml+xml
AddOutputFilterByType DEFLATE text/xml
AddOutputFilterByType DEFLATE application/xml
AddOutputFilterByType DEFLATE text/x-javascript
AddOutputFilterByType DEFLATE text/javascript
AddOutputFilterByType DEFLATE text/css
[root@www ~]# httpd -t
Syntax OK
(2)、我们拷贝一个大一点的文件到对应网站目录下
[root@www ~]# cp /var/log/messages /data/web/wohaoshuai1/messages.html
[root@www ~]# chmod +r /data/web/wohaoshuai1/messages.html
[root@www ~]# ll /data/web/wohaoshuai1/messages.html
-rw-r--r-- 1 root root 161247 5月  18 20:08 /data/web/wohaoshuai1/messages.html
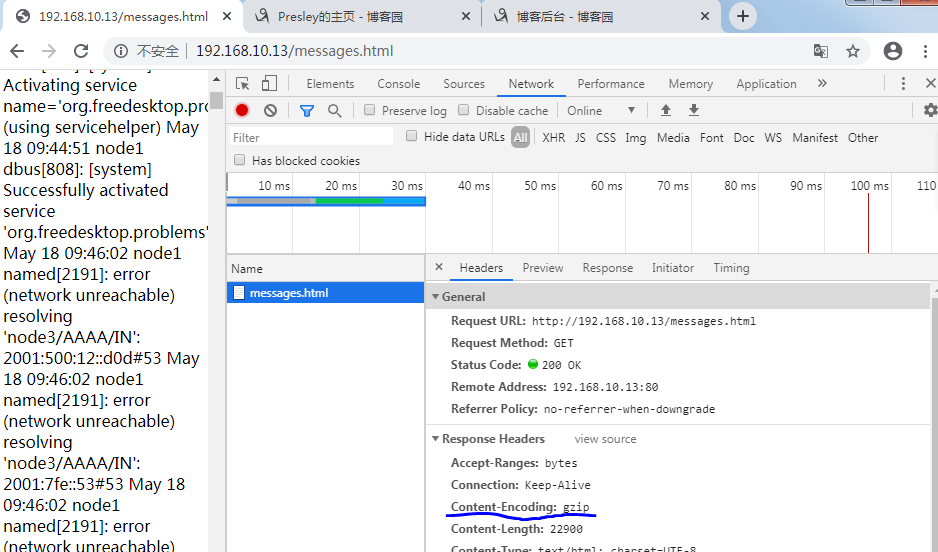
(3)、我们来进行访问可以发现已经被压缩了
5、https,http over ssl
a、我们ssl模块事实上是httpd的额外的模块,被当做单独的包来提供了,而且这个包默认是没有装的,我们要想使用需要先装上,如果自己编译安装的话就不必了
[root@www ~]# yum info mod_ssl
已加载插件:fastestmirror, langpacks
Loading mirror speeds from cached hostfile
已安装的软件包
名称    :mod_ssl
架构    :x86_64
时期       :1
版本    :2.4.6
发布    :90.el7.centos
大小    :224 k
源    :installed
来自源:base
简介    : SSL/TLS module for the Apache HTTP Server
网址    :http://httpd.apache.org/
协议    : ASL 2.0
描述    : The mod_ssl module provides strong cryptography for the Apache Web
         : server via the Secure Sockets Layer (SSL) and Transport Layer
         : Security (TLS) protocols.
(1)、我们可以查看包信息和对应的模块,当我们包安装后httpd自己也就有对应的模块了
[root@www ~]# rpm -ql mod_ssl
/etc/httpd/conf.d/ssl.conf
/etc/httpd/conf.modules.d/00-ssl.conf
/usr/lib64/httpd/modules/mod_ssl.so
/usr/libexec/httpd-ssl-pass-dialog
/var/cache/httpd/ssl
[root@www ~]# httpd -M |grep ssl
 ssl_module (shared)
b、SSL会话的简化过程
(1)、客户端发送可供选择的加密方式,并向服务器请求证书
(2)、服务器端发送证书以及选定的加密方式给客户端
(3)、客户端取得证书并进行证书验证:
如果信任给其发证书的CA:
1)、验证证书来源的合法性;用CA的公钥解密证书上数字签名
2)、验证证书的内容的合法性,完整性验证
3)、检查证书的有效期限
4)、检查证书是否被吊销
5)、证书中拥有者的名字,与访问的目标主机要一致
(4)、客户端生成临时会话密钥(对称密钥),并使用服务器端的公钥加密此数据发送给服务器,完成密钥交换
(5)、服务器用此密钥加密用户请求的资源,响应给客户端
(6)、注意:SSL会话是基于IP地址创建;所以单IP的主机上,仅可以使用一个https虚拟主机
c、回顾几个术语
(1)、PKI:
(2)、CA
(3)、CRL
(4)、x509(v1,v2,v3)
d、配置httpd支持https:
(1)、为服务器申请数字证书
测试:通过私建CA发证书
1)、创建私有CA
2)、在服务器创建证书签署请求
3)、CA签证
(2)、配置httpd支持使用ssl,及使用的证书
yum install -y mod_ssl
(3)、配置文件:/etc/httpd/conf.d/ssl.conf
DocumentRoot
ServerName
SSLCertificateFile
SSLCertificatekeyFile
(4)、测试基于https访问相应的主机
openssl s_client [-connect host:port] [-cert filename] [-CApath directory] [-CAfile filename]
e、https配置
(1)、我们私建一个CA(192.168.10.14)
1)、我们先创建一个私钥
[root@node2 ~]# cd /etc/pki/CA/
[root@node2 CA]# ls
certs  crl  newcerts  private
[root@node2 CA]# (umask 077;openssl genrsa -out /etc/pki/CA/private/cakey.pem 2048)
Generating RSA private key, 2048 bit long modulus
...............+++
......................................................................+++
e is 65537 (0x10001)
[root@node2 CA]# ll /etc/pki/CA/private/
total 4
-rw------- 1 root root 1679 May 19 03:24 cakey.pem
2)、我们生成一个自签证书(这个是需要客户端导入的,客户端不导入的话他就没法拿着这个证书去验证CA服务器颁发给别人的证书是正确的)
[root@node2 CA]# openssl req -new -x509 -key /etc/pki/CA/private/cakey.pem -out /etc/pki/CA/cacert.pem -days 365
You are about to be asked to enter information that will be incorporated
into your certificate request.
What you are about to enter is what is called a Distinguished Name or a DN.
There are quite a few fields but you can leave some blank
For some fields there will be a default value,
If you enter '.', the field will be left blank.
-----
Country Name (2 letter code) [XX]:CN
State or Province Name (full name) []:Beijing
Locality Name (eg, city) [Default City]:Beijing
Organization Name (eg, company) [Default Company Ltd]:wohaoshuai
Organizational Unit Name (eg, section) []:devops
Common Name (eg, your name or your server's hostname) []:ca.wohaoshuai.com
Email Address []:
(2)、我们为我们的ssl服务器(192.168.10.13)创建相应配置
1)、创建相应的ssl目录并且创建相应的私钥
[root@www ~]# mkdir /etc/httpd/ssl
[root@www ~]# (umask 077;openssl genrsa -out /etc/httpd/ssl/httpd_key.pem 1024)
Generating RSA private key, 1024 bit long modulus
.....................................................................++++++
..............++++++
e is 65537 (0x10001)
[root@www ~]# ll /etc/httpd/ssl/httpd_key.pem
-rw------- 1 root root 891 5月  18 20:56 /etc/httpd/ssl/httpd_key.pem
2)、基于私钥文件生成一个证书颁发请求。(下面除了hostname这一项要写客户端访问时的域名之外其它的要和CA自签证书的内容要保持一致,不然他不会给你签的)
[root@www ~]# openssl req -new -key /etc/httpd/ssl/httpd_key.pem -out /etc/httpd/ssl/httpd_csr.pem -days 365
You are about to be asked to enter information that will be incorporated
into your certificate request.
What you are about to enter is what is called a Distinguished Name or a DN.
There are quite a few fields but you can leave some blank
For some fields there will be a default value,
If you enter '.', the field will be left blank.
-----
Country Name (2 letter code) [XX]:CN
State or Province Name (full name) []:Beijing
Locality Name (eg, city) [Default City]:Beijing
Organization Name (eg, company) [Default Company Ltd]:wohaoshuai
Organizational Unit Name (eg, section) []:devops
Common Name (eg, your name or your server's hostname) []:www.wohaoshuai1.com
Email Address []:

Please enter the following 'extra' attributes
to be sent with your certificate request
A challenge password []:
An optional company name []:
3)、我们将请求文件cp到我们的CA服务器
[root@www ~]# scp /etc/httpd/ssl/httpd_csr.pem root@192.168.10.14:/tmp
root@192.168.10.14's password:
httpd_csr.pem                                                                                                                                              100%  668   287.1KB/s   00:00
4)、然后我们在我们的CA服务器192.168.10.14上开始签署,不过在此之前我们还需要在CA服务器上创建index.txt和serial两个文件并且要写一个序列号到文件serial中
[root@node2 CA]# touch /etc/pki/CA/{index.txt,serial}
[root@node2 CA]# echo 01 >> /etc/pki/CA/serial
[root@node2 CA]# ll /etc/pki/CA/
total 8
-rw-r--r--  1 root root 1350 May 19 03:27 cacert.pem
drwxr-xr-x. 2 root root    6 Aug  4  2017 certs
drwxr-xr-x. 2 root root    6 Aug  4  2017 crl
-rw-r--r--  1 root root    0 May 19 03:46 index.txt
drwxr-xr-x. 2 root root    6 Aug  4  2017 newcerts
drwx------. 2 root root   23 May 19 03:24 private
-rw-r--r--  1 root root    3 May 19 03:46 serial
5)、我们来开始签署
[root@node2 CA]# openssl ca -in /tmp/httpd_csr.pem -out /etc/pki/CA/certs/httpd_crt.pem
Using configuration from /etc/pki/tls/openssl.cnf
Check that the request matches the signature
Signature ok
Certificate Details:
        Serial Number: 1 (0x1)
        Validity
            Not Before: May 18 19:52:17 2020 GMT
            Not After : May 18 19:52:17 2021 GMT
        Subject:
            countryName               = CN
            stateOrProvinceName       = Beijing
            organizationName          = wohaoshuai
            organizationalUnitName    = devops
            commonName                = www.wohaoshuai1.com
        X509v3 extensions:
            X509v3 Basic Constraints:
                CA:FALSE
            Netscape Comment:
                OpenSSL Generated Certificate
            X509v3 Subject Key Identifier:
                9C:C2:F0:4D:53:EF:33:1B:70:16:C3:45:15:28:84:F6:24:2E:93:4B
            X509v3 Authority Key Identifier:
                keyid:92:34:4C:4F:9C:8B:11:75:B7:57:8E:9D:D9:7C:85:C8:21:EE:B9:52

Certificate is to be certified until May 18 19:52:17 2021 GMT (365 days)
Sign the certificate? [y/n]:y


1 out of 1 certificate requests certified, commit? [y/n]y
Write out database with 1 new entries
Data Base Updated
6)、然后我们将我们192.168.10.14签好了的证书复制回我们的192.168.10.13
[root@www ssl]# scp root@192.168.10.14:/etc/pki/CA/certs/httpd_crt.pem /etc/httpd/ssl/
root@192.168.10.14's password:
httpd_crt.pem                                                                                                                                              100% 3762     1.0MB/s   00:00
[root@www ssl]# ll /etc/httpd/ssl/
总用量 12
-rw-r--r-- 1 root root 3762 5月  18 21:23 httpd_crt.pem
-rw-r--r-- 1 root root  668 5月  18 21:00 httpd_csr.pem
-rw------- 1 root root  891 5月  18 20:56 httpd_key.pem
(3)、接下来我们配置我们192.168.10.13工作为https模式。他有两种方式,如果你的网站即想能通过http访问又能通过https进行访问,假如我们现在的网站上面建立了多个虚拟主机,都在80端口上,也都在同一个ip上,但他们是基于主机名的,比如我们有三个虚拟主机。现在我们又想提供一个https的虚拟主机,那么这个https虚拟主机就有两种方式使用,第一,和前面说的三个虚拟主机没有任何关系,这个虚拟主机只提供https的访问逻辑。第二,我们为这三个虚拟主机中的某一个提供https访问接口,也就意味着某一站点可以提供http服务也能提供https服务。因为我们一个网站很少只有443没有80的,因为我们访问一个网站时很少键入https。所以只提供https别人有可能默认访问不到的。
1)、首先查看我们对应的默认主机和虚拟主机以及对应的配置文件
[root@www ssl]# httpd -t -D DUMP_VHOSTS
VirtualHost configuration:
*:443                  www.wohaoshuai.com (/etc/httpd/conf.d/ssl.conf:56)
*:80                   is a NameVirtualHost
         default server www.wohaoshuai1.com (/etc/httpd/conf.d/wohaoshuai1.conf:1)
         port 80 namevhost www.wohaoshuai1.com (/etc/httpd/conf.d/wohaoshuai1.conf:1)
         port 80 namevhost www.wohaoshuai2.com (/etc/httpd/conf.d/wohaoshuai2.conf:1)
2)、配置DocumentRoot和ServerName
[root@www ssl]# cat /etc/httpd/conf.d/ssl.conf |grep -E "Docu|^Server"
DocumentRoot "/data/web/wohaoshuai1/" #需要用到ssl虚拟主机的网站资源路径
ServerName www.wohaoshuai1.com:443 #需要用到ssl的虚拟主机
3)、我们重启服务后可以看到相应的443端口已经起来
[root@www ssl]# systemctl restart httpd
[root@www ssl]# netstat -anpt |grep httpd
tcp6       0      0 :::8080                 :::*                    LISTEN      2465/httpd
tcp6       0      0 :::80                   :::*                    LISTEN      2465/httpd
tcp6       0      0 :::443                  :::*                    LISTEN      2465/httpd
4)、然后我们还需要将相应的证书文件配置为我们刚刚签发的文件
[root@www ssl]# cat /etc/httpd/conf.d/ssl.conf |grep -E "^SSLCert"
SSLCertificateFile /etc/httpd/ssl/httpd_crt.pem #签发的证书
SSLCertificateKeyFile /etc/httpd/ssl/httpd_key.pem #自己的私钥
5)、我们现在在我们的浏览器中导入我们CA服务器刚刚的自签证书cacert.pem,然后使用https://www.wohaoshuai1.com访问即可,不过记得在电脑中host文件添加www.wohaoshuai1.com解析
6)、使用openssl 测试访问
[root@www /]# openssl s_client -connect www.wohaoshuai1.com:443 -CAfile /tmp/cacert.pem
7)、然后我们发现我们虽然能成功通过https连接了但是我们访问资源没有权限,因此我们还需要在/etc/httpd/conf.d/ssl.conf中添加相应的资源访问权限
[root@www ~]# cat /etc/httpd/conf.d/ssl.conf |grep -Ev "^#|^$"|grep -EA30 "^<Virtu"
<VirtualHost _default_:443>
DocumentRoot "/data/web/wohaoshuai1/"
ServerName www.wohaoshuai1.com:443
<Directory "/data/web/wohaoshuai1/">
    Options None
    AllowOverride None
    Require all granted
</Directory>
ErrorLog logs/ssl_error_log
TransferLog logs/ssl_access_log
LogLevel warn
SSLEngine on
SSLProtocol all -SSLv2 -SSLv3
SSLCipherSuite HIGH:3DES:!aNULL:!MD5:!SEED:!IDEA
SSLCertificateFile /etc/httpd/ssl/httpd_crt.pem
SSLCertificateKeyFile /etc/httpd/ssl/httpd_key.pem
<Files ~ "\.(cgi|shtml|phtml|php3?)$">
    SSLOptions +StdEnvVars
</Files>
<Directory "/var/www/cgi-bin">
    SSLOptions +StdEnvVars
</Directory>
BrowserMatch "MSIE [2-5]" \
         nokeepalive ssl-unclean-shutdown \
         downgrade-1.0 force-response-1.0
CustomLog logs/ssl_request_log \
          "%t %h %{SSL_PROTOCOL}x %{SSL_CIPHER}x \"%r\" %b"
</VirtualHost>
6、httpd自带的工具程序
a、htpasswd:basic认证基于文件实现时,用到的账号密码文件生成工具
b、apachectl:httpd自带的服务控制脚本,支持start和stop
[root@www /]# apachectl stop
[root@www /]# netstat -anpt|grep httpd
[root@www /]# apachectl start(也可以直接敲httpd)
[root@www /]# netstat -anpt|grep httpd
tcp6       0      0 :::8080                 :::*                    LISTEN      2753/httpd
tcp6       0      0 :::80                   :::*                    LISTEN      2753/httpd
tcp6       0      0 :::443                  :::*                    LISTEN      2753/httpd
c、apxs:由httpd-devel包提供,扩展httpd使用第三方模块的工具
d、rotatelogs:日志滚动工具
e、suexec:访问某些有特殊权限配置的资源时,临时切换至指定用户身份运行。
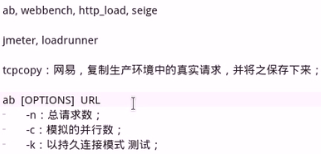
f、ab:apache bench
7、httpd的压力测试工具

 浙公网安备 33010602011771号