

计算机视觉2D几何基元及其变换介绍和OpenCV WarpPerspective源码分析
2D图像几何基元
一般的,表示一个2d几何基元只用两个维度(比如x,y)就可以表示了,但是在计算机视觉研究中,为了统一对2d几何基元的操作(后面讲到的仿射,透射变换),一般会以增广矢量的方式表示几何基元。
齐次坐标将原本n维的坐标用一个n+1维的坐标表示,其两个基本作用为:
1. 区分n维空间的点和向量,一个点的第n+1维为非零值,而向量的n+1维为02. 统一几何基元的旋转,平移,拉伸,投影等操作(只用一个矩阵就可以表示)
2D点:2D点的齐次坐标表示为:![]() ,其中仅在尺度上不同的矢量被视为等同的,被称作为2D投影空间,其次矢量
,其中仅在尺度上不同的矢量被视为等同的,被称作为2D投影空间,其次矢量![]() 可以通过除以最后你一个元素
可以通过除以最后你一个元素![]() 来转换为非齐次矢量X,即:其中,是增广矢量,如果最后w为0,则称此点为理想点或者无穷远点,它没有等同的非齐次表达
来转换为非齐次矢量X,即:其中,是增广矢量,如果最后w为0,则称此点为理想点或者无穷远点,它没有等同的非齐次表达
2D直线:2D直线可以用齐次向量![]() 表示,其对应的直线方程为:
表示,其对应的直线方程为:![]()
![]()
![]()
![]()
![]() ,其规范化表达为
,其规范化表达为![]() ,如果 l = (0,0,1),则包含所有无穷远点
,如果 l = (0,0,1),则包含所有无穷远点
2D圆锥曲线:![]()
![]()
![]()
2D图像变换及示例
![]()
![]() ,其中I是2x2的单位矩阵
,其中I是2x2的单位矩阵
![]()
![]()
![]()
![]()
利用齐次坐标,我们可以把统一2D变换操作
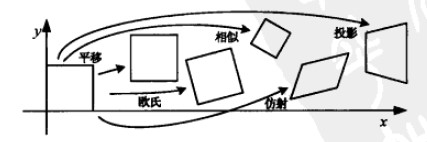
平移变换:
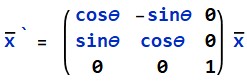
旋转变换:
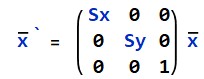
放缩变换(x,y分别放缩):
仿射变换:

投影变换:
因为而仿射变换是投影变化的子集,所有对2D几何基元的操作都以用一个3x3的Homography表示,这样一来对图像的多次2D变换就相当于图像对多个Homography矩阵的乘积,即R = H1*H2*H3...Hn*r
我们用Python代码表示这个过程
 1 import numpy as np
 2 import cv2 as cv
 3 from numba import jit
 4 import matplotlib.pyplot as plt
 5 from matplotlib.font_manager import FontProperties
 6
 7 def MoveT(tx, ty, lastOp = None)->np.ndarray:
 8     op = np.array([[1, 0, tx], [0, 1, ty], [0, 0, 1]], dtype=np.float32)
 9     if lastOp is not None:
10         op = np.dot(op, lastOp)
11     return op
12
13
14 def RotateT(r, lastOp = None)->np.ndarray:
15     op = np.array([[np.cos(r), -np.sin(r), 0], [np.sin(r), np.cos(r), 0], [0, 0, 1]], dtype=np.float32)
16     if lastOp is not None:
17         op = np.dot(op, lastOp)
18     return op
19
20
21 def ZoomT(rx, ry, lastOp = None)->np.ndarray:
22     op = np.array([[rx, 0, 0], [0, ry, 0], [0, 0, 1]], dtype=np.float32)
23     if lastOp is not None:
24         op = np.dot(op, lastOp)
25     return op
26
27 def Transform(imgSrc:np.ndarray, op)->np.ndarray:
28     h, w = imgSrc.shape[:2]
29     imgDst = np.zeros(imgSrc.shape, dtype=imgSrc.dtype)
30     for i in range(h):
31         v1 = np.stack((np.arange(w), np.ones(w)*i, np.ones(w)),axis=-1)
32         v2 = np.dot(v1, op)
33         tpx, tpy, tpz = np.hsplit(v2, 3)
34         for iy, ix, iz, j in zip(tpy, tpx, tpz, range(w)):
35             py, px = int(iy/iz), int(ix/iz)
36             if 0<= py < h and 0 <= px < w:
37                 imgDst[int(py), int(px)] = imgSrc[i, j]
38
39     return imgDst
1 if __name__ == "__main__":
2     font_set = FontProperties(fname=r"c:\windows\fonts\msyh.ttc", size=12)
3     imgSrc = plt.imread("E:/Users/Administrator/pictures/Test/user.jpg")
4     op = np.transpose(MoveT(10,30, RotateT(np.pi/12, ZoomT(1.1, 1.2))))
5
6     imgDst = Transform(imgSrc, op)
7     plt.figure(1), plt.imshow(imgDst), plt.title("Resuult", fontproperties=font_set)
8     plt.show()
我们对图进行了如下操作:
1. 对y尺度放大1.1倍,x尺度放大1.2倍2. 绕z轴(垂直于x,y)旋转π/12度3. x方向移动30像素,y方向移动10像素
 |
 |
| fig1: 原图 | fig2: 仿射变换结果 |
可以看到这个结果并不是很好,在结果中发现一些很明显的空洞,因为我们对图像进行了放大操作和旋转操作,在这一个过程中结果图像的有一些像素的值并不能从仿射变换中得出,从而形成空洞,可见直接直接对图像进行正向变换效果是不好的。下面我们将会看到利用反向变换+插值的方法解决空洞的问题。
利用透射变换来进行倾斜校正
透射变换的一个应用就是拿来校正图像,原理很简单,就是把根据关键点找到变换矩阵
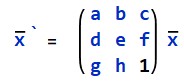
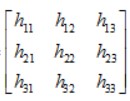
假如使用矩阵![]() ,并且设h33 = 1,那么就要把剩下的8个参数给解出来,8个未知数需要8个方程,又因为从仿射变换的对应关系,可以列方程为:
,并且设h33 = 1,那么就要把剩下的8个参数给解出来,8个未知数需要8个方程,又因为从仿射变换的对应关系,可以列方程为:
 ,并且设h33 = 1,那么就要把剩下的8个参数给解出来,8个未知数需要8个方程,又因为从仿射变换的对应关系,可以列方程为:
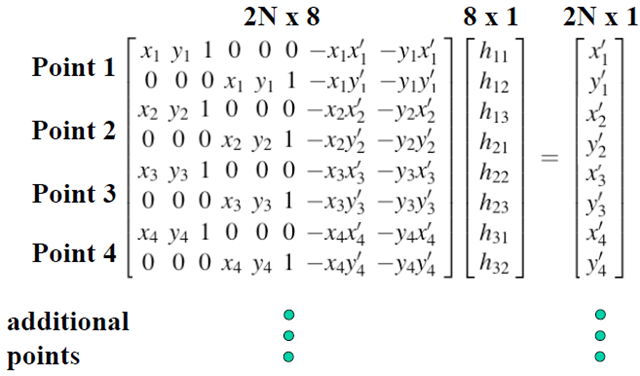
也就是说只要找8个点的以及其两两对应关系,就可以找到透射变换的矩阵,也就可以对图像进行校正了
透射变换有放缩和旋转等操作,正如上一小节所说,如果仅使用正向变换,那么肯定会有空洞现象的发生。如果使用反向变换,那么这个问题也就迎刃而解了,我们要做的就是扫描反向变换的位置,在这里我们可以采用原图像正向变换后上下左右的边界点确定扫描区域,然后一个一个点反向变换回原图像中,并根据原图像来进行插值
Python代码
  1 # WarpCorrection.py
  2
  3 @jit
  4 def BilinearInterpolation(imgSrc:np.ndarray, h, w, sx:float, sy:float)->float:
  5     """
  6     对图片的指定位置做双线性插值
  7     :param imgSrc:源图像
  8     :param h: src的高度
  9     :param w: src的宽度
 10     :param sx: x位置
 11     :param sy: y位置
 12     :return: 所插入的值
 13     """
 14     intSx, intSy = int(sx), int(sy)
 15     if 0 <= intSx  < w - 1 and 0 <= intSy < h - 1:
 16         x1, x2 = intSx, intSx + 1
 17         y1, y2 = intSy, intSy + 1
 18         H1 = np.dot(np.array([x2 - sx, sx - x1]), imgSrc[y1: y2 + 1, x1:x2 + 1])
 19         return H1[0]*(y2 - sy) + H1[1]*(sy - y1)
 20     else:
 21         return imgSrc[intSy, intSx]
 22
 23 def WarpCorrection(imgSrc:np.ndarray, dots:tuple)->np.ndarray:
 24     assert len(dots) == 4
 25
 26     # 四个点的顺序一定要按照左上,右上,右下,左下的顺时针顺序点
 27     d1, d2, d3, d4 = dots
 28     x1, x2, x3, x4 = d1[0], d2[0], d3[0], d4[0]
 29     y1, y2, y3, y4 = d1[1], d2[1], d3[1], d4[1]
 30     assert x1 < x2
 31     assert x4 < x3
 32     assert y1 < y4
 33     assert y2 < y3
 34
 35     objW = np.round(np.sqrt((x1 - x2) ** 2 + (y1 - y2) ** 2))
 36     objH = np.round(np.sqrt((x2 - x3) ** 2 + (y2 - y3) ** 2))
 37
 38     # 在这里我简单地设为把所输入的四个点的位置,通过2D变换,变换为长方形的四个顶点的位置(以x1为起点)
 39     t1, t2, t3, t4 = (y1, x1), (y1, x1 + objW), (y1 + objH, x1 + objW), (y1 + objH, x1),
 40
 41     rx1, rx2, rx3, rx4 = t1[1], t2[1], t3[1], t4[1]
 42     ry1, ry2, ry3, ry4 = t1[0], t2[0], t3[0], t4[0]
 43
 44     # ================Step 0: 根据 8个点两两对应关系找到Homography矩阵================
 45     # 把8个约束写成方程组,以矩阵的形式表达
 46     m = np.array([
 47                   [y1, x1, 1, 0, 0, 0, -ry1 * y1, -ry1 * x1],
 48                   [0, 0, 0, y1, x1, 1, -rx1 * y1, -rx1 * x1],
 49                   [y2, x2, 1, 0, 0, 0, -ry2 * y2, -ry2 * x2],
 50                   [0, 0, 0, y2, x2, 1, -rx2 * y2, -rx2 * x2],
 51                   [y3, x3, 1, 0, 0, 0, -ry3 * y3, -ry3 * x3],
 52                   [0, 0, 0, y3, x3, 1, -rx3 * y3, -rx3 * x3],
 53                   [y4, x4, 1, 0, 0, 0, -ry4 * y4, -ry4 * x4],
 54                   [0, 0, 0, y4, x4, 1, -rx4 * y4, -rx4 * x4],
 55                 ])
 56
 57     vectorSrc = np.array([ry1, rx1, ry2, rx2, ry3, rx3, ry4, rx4])
 58     vectorSrc.shape = (1, 8)
 59     HFlat = np.dot(np.linalg.inv(m), np.transpose(vectorSrc))
 60     a, b, c, d, e, f, g, h = HFlat[0, 0],HFlat[1, 0],HFlat[2, 0],HFlat[3, 0],HFlat[4, 0],HFlat[5, 0],HFlat[6, 0],HFlat[7, 0]
 61
 62     H = np.array([[a, b, c],
 63                   [d, e, f],
 64                   [g, h, 1]], dtype=np.float32)
 65
 66     # ================Step 1: 通过对原图像四个顶点进行正向投射变换,确定目标图像区域================
 67     height, width = imgSrc.shape[:2]
 68     matrixOriginVertex = np.array([[0, 0, 1],
 69                                    [0, width - 1, 1],
 70                                    [height - 1, width - 1, 1] ,
 71                                    [height - 1, 0, 1]])
 72
 73     result = np.dot(matrixOriginVertex, np.transpose(H))
 74     minX = int(min(result[0, 1]/result[0, 2], result[1, 1]/result[1, 2], result[2, 1]/result[2, 2], result[3, 1]/result[3, 2]))
 75     maxX = int(max(result[0, 1]/result[0, 2], result[1, 1]/result[1, 2], result[2, 1]/result[2, 2], result[3, 1]/result[3, 2]))
 76     minY = int(min(result[0, 0]/result[0, 2], result[1, 0]/result[1, 2], result[2, 0]/result[2, 2], result[3, 0]/result[3, 2]))
 77     maxY = int(max(result[0, 0]/result[0, 2], result[1, 0]/result[1, 2], result[2, 0]/result[2, 2], result[3, 0]/result[3, 2]))
 78
 79     # ================Step 2: 反向变换+双二次插值校正图像================
 80     vtr = np.empty((0,3),dtype=np.float32)
 81     for i in range(minY, maxY):
 82         arr1 = np.arange(minX, maxX)
 83         arr2 = np.ones(maxX - minX)
 84         vt1 = np.stack((arr2*i, arr1 , arr2), axis=-1)
 85         vtr = np.concatenate((vtr, vt1), axis=0)
 86
 87     # 请注意,因为传进去的是规范化后(Y, X, 1)的值,所以得到的其实是(y/Z, x/Z, 1/Z的值)
 88     vts = np.dot(vtr,np.linalg.inv(np.transpose(H)))
 89     dstHeight, dstWidth = maxY - minY + 1, maxX - minX + 1
 90     imgDst = np.zeros((dstHeight, dstWidth, imgSrc.shape[2]), dtype=imgSrc.dtype)
 91
 92     for (r, s) in zip(vtr, vts):
 93         ry, rx = int(r[0]), int(r[1])
 94         iy, ix = s[:2]
 95         # 需要解 [y, x] = [iy*(g*y + h*x + 1), ix*(g*y + h*x + 1)]这个方程
 96         TH = np.linalg.inv(np.array([[iy * g - 1, iy * h],
 97                                      [ix * g, ix * h - 1]]))
 98
 99         vxy = np.dot(TH, np.array([[-iy], [-ix]]))
100         sy, sx = vxy[0, 0], vxy[1, 0]
101
102         if 0 <= round(sy) < height and 0 <= round(sx) < width:
103             imgDst[ry - minY, rx - minX] = BilinearInterpolation(imgSrc, height, width, sx, sy)
104
105     return imgDst
这里使用了双二次插值,双二次插值的公式推导如下:
 |
 |
| fig3. 双二次插值公式推导 | fig4. 双二次插值图像解释 |
上面右图所展示的那样,双二次插值其实就是一个加权平均操作,为了和双二次插值的效果做对比,我加了个最邻近插值
继续往程序里面加点东西,来测试下实际效果,在这里我使用了OpenCV的Highgui的包
 1 # -*- coding: utf-8 -*-
 2 import matplotlib.pyplot as plt
 3 from matplotlib.font_manager import FontProperties
 4 from WarpTransform import *
 5 from multiprocessing.dummy import Process
 6
 7 windowCount = int(0)
 8 mainWinName = "source"
 9
10 def WarpImage(imgSrc:np.ndarray, dots:tuple, count)->None:
11     imgBLiner, imgNearest = WarpCorrection(imgSrc, dots)
12
13     winName:str = f"result BLiner {count}"
14     cv.namedWindow(winName)
15     cv.imshow(winName, imgBLiner)
16
17     winName:str = f"result nearest {count}"
18     cv.namedWindow(winName)
19     cv.imshow(winName, imgNearest)
20
21     cv.waitKey(0)
22     cv.destroyWindow(winName)
23
24 class WarpCorrectionMgr:
25     def __init__(self, imgSrc):
26         self.__clickTime = 0
27         self.__imgSrc = imgSrc.copy()
28         self.__imgDrawn = imgSrc.copy()
29         self.__dots = []
30
31     @property
32     def sourceImage(self):
33         return self.__imgSrc
34
35     @property
36     def drawnImage(self):
37         return self.__imgDrawn
38
39     @drawnImage.setter
40     def drawnImage(self, newImg):
41         self.__imgDrawn = newImg
42
43     @property
44     def clickTime(self):
45         return self.__clickTime
46
47     @clickTime.setter
48     def clickTime(self, v):
49         self.__clickTime = v
50
51     @property
52     def dots(self):
53         return self.__dots
54
55     @staticmethod
56     def MouseCallback(event, x, y, flags, param):
57         # 四个点的顺序一定要按照左上,右上,右下,左下的顺时针顺序点
58         if event == cv.EVENT_LBUTTONDBLCLK:
59             clickTime = param.clickTime
60             cv.circle(param.drawnImage, (x, y), 8, (0, 0, 255),-1)
61             param.dots.append((x, y))
62             cv.imshow(mainWinName, param.drawnImage)
63
64             if clickTime + 1 == 4:
65                 global windowCount
66                 p = Process(target=WarpImage, args=(param.sourceImage, param.dots.copy(), windowCount))
67                 p.daemon = True
68                 p.start()
69
70                 param.drawnImage = param.sourceImage.copy()
71                 cv.imshow(mainWinName,param.sourceImage)
72                 param.dots.clear()
73                 windowCount += 1
74
75             param.clickTime = (clickTime + 1) % 4
76
77
78 if __name__ == "__main__":
79     cv.namedWindow(mainWinName)
80     imgSrc = cv.imread("E:/Users/Administrator/pictures/Test/skew.jpg")
81     imgSrc = cv.resize(imgSrc, (int(imgSrc.shape[1]/4), int(imgSrc.shape[0]/4)))
82
83     mgr = WarpCorrectionMgr(imgSrc)
84     cv.setMouseCallback(mainWinName, WarpCorrectionMgr.MouseCallback, mgr)
85
86     cv.imshow(mainWinName, imgSrc)
87     cv.waitKey(0)
88     cv.destroyAllWindows()
为了对比最近邻插值和双二次插值的差别,我把WarpCorrection改了一下:
    # 请注意,因为传进去的是规范化后(Y, X, 1)的值,所以得到的其实是(y/Z, x/Z, 1/Z的值)
    vts = np.dot(vtr,np.linalg.inv(np.transpose(H)))
    dstHeight, dstWidth = maxY - minY + 1, maxX - minX + 1
    imgBLiner = np.zeros((dstHeight, dstWidth, imgSrc.shape[2]), dtype=imgSrc.dtype)
    imgNearest = np.zeros((dstHeight, dstWidth, imgSrc.shape[2]), dtype=imgSrc.dtype)

    for (r, s) in zip(vtr, vts):
        ry, rx = int(r[0]), int(r[1])
        iy, ix = s[:2]
        # 需要解 [y, x] = [iy*(g*y + h*x + 1), ix*(g*y + h*x + 1)]这个方程
        TH = np.linalg.inv(np.array([[iy * g - 1, iy * h],
                                     [ix * g, ix * h - 1]]))

        vxy = np.dot(TH, np.array([[-iy], [-ix]]))
        sy, sx = vxy[0, 0], vxy[1, 0]

        if 0 <= round(sy) < height and 0 <= round(sx) < width:
            imgBLiner[ry - minY, rx - minX] = BilinearInterpolation(imgSrc, height, width, sx, sy)
            imgNearest[ry - minY, rx - minX] = imgSrc[int(round(sy)),int(round(sx))]

    return imgBLiner, imgNearest
运行下程序来看下效果,上面程序的作用就是选中要校正图像的四个角,然后校正(PS:实际运行可能会相当慢,我没做优化)
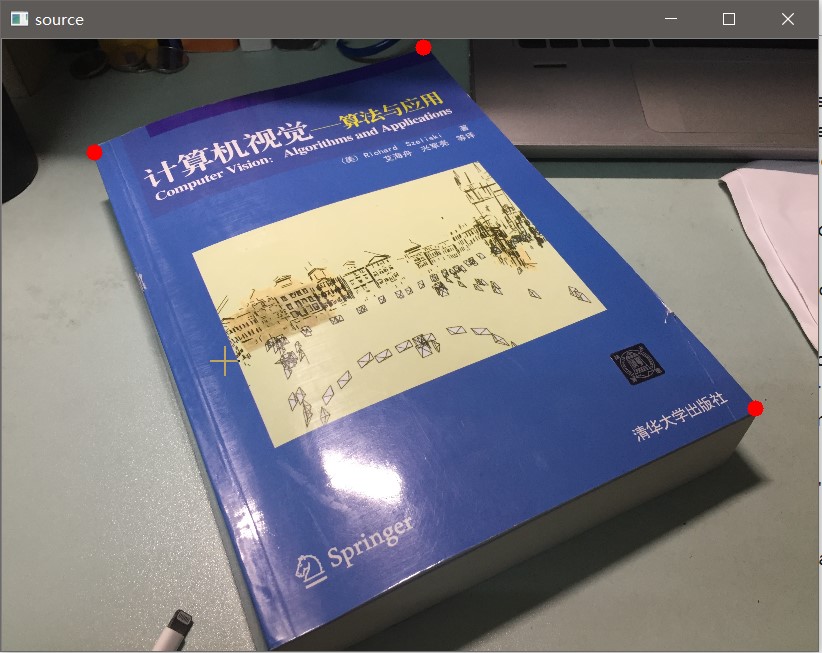
原图
 |
 |
| Fig3. 最近邻插值(边缘很粗糙,看“清华大学出版社”几个字) | Fig4. 双二次插值(毛刺很少,但是图像模糊了) |
OpenCV库中WarpPerspective源代码
其实OpenCV是带了仿射变换和透射变换的API的,先来看下投影变换的源码(在imgwarp.cpp)(部分关键代码,Assert和IPP优化这里不展示了):
 1 void cv::warpPerspective( InputArray _src, OutputArray _dst, InputArray _M0,
 2                           Size dsize, int flags, int borderType, const Scalar& borderValue )
 3 {
 4     Mat src = _src.getMat(), M0 = _M0.getMat();
 5     _dst.create( dsize.area() == 0 ? src.size() : dsize, src.type() );
 6     Mat dst = _dst.getMat();
 7
 8     if( dst.data == src.data )
 9         src = src.clone();
10
11     double M[9];
12     Mat matM(3, 3, CV_64F, M);
13     int interpolation = flags & INTER_MAX;
14
15     // 插入方法不支持INTER_AREA,用INTER_LINEAR代替
16     if( interpolation == INTER_AREA )
17         interpolation = INTER_LINEAR;
18
19     CV_Assert( (M0.type() == CV_32F || M0.type() == CV_64F) && M0.rows == 3 && M0.cols == 3 );
20     M0.convertTo(matM, matM.type());
21
22     //这里源码是这样操作的,如果可以执行IPP,那么就直接执行IPP指令加块操作
23     //如果没有说明传入的变换矩阵已经转置过了,那么执行一次矩阵转置
24     if( !(flags & WARP_INVERSE_MAP) )
25         invert(matM, matM);
26
27     hal::warpPerspectve(src.type(), src.data, src.step, src.cols, src.rows, dst.data, dst.step, dst.cols, dst.rows,
28                         matM.ptr<double>(), interpolation, borderType, borderValue.val);
29 }
 1 namespace hal {
 2
 3 void warpPerspectve(int src_type,
 4                     const uchar * src_data, size_t src_step, int src_width, int src_height,
 5                     uchar * dst_data, size_t dst_step, int dst_width, int dst_height,
 6                     const double M[9], int interpolation, int borderType, const double borderValue[4])
 7 {
 8     Mat src(Size(src_width, src_height), src_type, const_cast<uchar*>(src_data), src_step);
 9     Mat dst(Size(dst_width, dst_height), src_type, dst_data, dst_step);
10
11     Range range(0, dst.rows);
12     WarpPerspectiveInvoker invoker(src, dst, M, interpolation, borderType, Scalar(borderValue[0], borderValue[1], borderValue[2], borderValue[3]));
13
14     //这里是一个opencv执行并行处理的一个方法,真正执行处理的代码在WarpPerspectiveInvoker的函数对象操作符中
15     parallel_for_(range, invoker, dst.total()/(double)(1<<16));
16 }
17
18 } // hal::
  1 class WarpPerspectiveInvoker :
  2     public ParallelLoopBody
  3 {
  4 public:
  5     WarpPerspectiveInvoker(const Mat &_src, Mat &_dst, const double *_M, int _interpolation,
  6                            int _borderType, const Scalar &_borderValue) :
  7         ParallelLoopBody(), src(_src), dst(_dst), M(_M), interpolation(_interpolation),
  8         borderType(_borderType), borderValue(_borderValue)
  9     {
 10         //注意M就是转置矩阵
 11     }
 12
 13     virtual void operator() (const Range& range) const
 14     {
 15         const int BLOCK_SZ = 32;
 16         short XY[BLOCK_SZ*BLOCK_SZ*2], A[BLOCK_SZ*BLOCK_SZ];
 17         int x, y, x1, y1, width = dst.cols, height = dst.rows;
 18
 19         int bh0 = std::min(BLOCK_SZ/2, height);
 20         int bw0 = std::min(BLOCK_SZ*BLOCK_SZ/bh0, width);  //操作块的宽
 21         bh0 = std::min(BLOCK_SZ*BLOCK_SZ/bw0, height);     //操作块的高
 22
 23         //下面的意思是,如果支持SSE4指令,那么就先对转置矩阵进行预处理,下面会继续用到这个pwarp_impl_sse4
 24         #if CV_TRY_SSE4_1
 25         Ptr<opt_SSE4_1::WarpPerspectiveLine_SSE4> pwarp_impl_sse4;
 26         if(CV_CPU_HAS_SUPPORT_SSE4_1)
 27             pwarp_impl_sse4 = opt_SSE4_1::WarpPerspectiveLine_SSE4::getImpl(M);
 28         #endif
 29
 30         //opencv对投射变换的操作是基于块操作的,主要是为了方便可以直接用SSE4指令给操作提速
 31         for( y = range.start; y < range.end; y += bh0 )
 32         {
 33             for( x = 0; x < width; x += bw0 )
 34             {
 35                 int bw = std::min( bw0, width - x);
 36                 int bh = std::min( bh0, range.end - y); // height
 37
 38                 //_XY是一个双通道的Mat,下面remap会用到
 39                 Mat _XY(bh, bw, CV_16SC2, XY), matA;
 40                 Mat dpart(dst, Rect(x, y, bw, bh));
 41
 42                 for( y1 = 0; y1 < bh; y1++ )
 43                 {
 44                     short* xy = XY + y1*bw*2;
 45                     //就是[X,Y,W] = [x,y,1]*M^T的操作
 46                     //注意现在是分块操作,所以才有+ M[1]*(y + y1)这一项
 47                     double X0 = M[0]*x + M[1]*(y + y1) + M[2];
 48                     double Y0 = M[3]*x + M[4]*(y + y1) + M[5];
 49                     double W0 = M[6]*x + M[7]*(y + y1) + M[8];
 50
 51                     //最近邻插值
 52                     if( interpolation == INTER_NEAREST )
 53                     {
 54                         x1 = 0;
 55
 56                         //这里就是刚才上面所说的pwarp_impl_sse4所用到的位置
 57                         #if CV_TRY_SSE4_1
 58                         if (pwarp_impl_sse4)
 59                             pwarp_impl_sse4->processNN(M, xy, X0, Y0, W0, bw);
 60                         else
 61                         #endif
 62                         for( ; x1 < bw; x1++ )
 63                         {
 64                             //计算W
 65                             double W = W0 + M[6]*x1;
 66                             W = W ? 1./W : 0;
 67                             //从齐次坐标变到增广矢量,注意现在是分块操作,所以才有+ M[0]*x1这一项
 68                             //把结果控制在(INT_MIN, INT_MAX)中,由于下面会有把double转为int
 69                             double fX = std::max((double)INT_MIN, std::min((double)INT_MAX, (X0 + M[0]*x1)*W));
 70                             double fY = std::max((double)INT_MIN, std::min((double)INT_MAX, (Y0 + M[3]*x1)*W));
 71                             int X = saturate_cast<int>(fX);
 72                             int Y = saturate_cast<int>(fY);
 73
 74                             xy[x1*2] = saturate_cast<short>(X);
 75                             xy[x1*2+1] = saturate_cast<short>(Y);
 76                         }
 77                     }
 78                     //其他插值方法
 79                     else
 80                     {
 81                         short* alpha = A + y1*bw;
 82                         x1 = 0;
 83
 84                         //原理上同
 85                         #if CV_TRY_SSE4_1
 86                         if (pwarp_impl_sse4)
 87                             pwarp_impl_sse4->process(M, xy, alpha, X0, Y0, W0, bw);
 88                         else
 89                         #endif
 90                         for( ;x1 < bw; x1++ )
 91                         {
 92                             double W = W0 + M[6]*x1;
 93                             //INTER_TAB_SIZE在我的opencv版本就是32,INTER_BITS是5
 94                             //下面的代码是先把值扩大32倍,再左移5位得到一个值
 95                             W = W ? INTER_TAB_SIZE/W : 0;
 96                             double fX = std::max((double)INT_MIN, std::min((double)INT_MAX, (X0 + M[0]*x1)*W));
 97                             double fY = std::max((double)INT_MIN, std::min((double)INT_MAX, (Y0 + M[3]*x1)*W));
 98                             int X = saturate_cast<int>(fX);
 99                             int Y = saturate_cast<int>(fY);
100
101                             xy[x1*2] = saturate_cast<short>(X >> INTER_BITS);
102                             xy[x1*2+1] = saturate_cast<short>(Y >> INTER_BITS);
103
104                             //alpha是remap里面所使用的remapBilinear所要用到的一个参数,这里就不往下看了
105                             alpha[x1] = (short)((Y & (INTER_TAB_SIZE-1))*INTER_TAB_SIZE +
106                                                 (X & (INTER_TAB_SIZE-1)));
107                         }
108                     }
109                 }
110
111                 if( interpolation == INTER_NEAREST )
112                     //直接运行重映射,直接把源点映射到目标位置的点
113                     remap( src, dpart, _XY, Mat(), interpolation, borderType, borderValue );
114                 else
115                 {
116                     Mat _matA(bh, bw, CV_16U, A);
117                     remap( src, dpart, _XY, _matA, interpolation, borderType, borderValue );
118                 }
119             }
120         }
121     }
122
123 private:
124     Mat src;
125     Mat dst;
126     const double* M;
127     int interpolation, borderType;
128     Scalar borderValue;
129 };
OpenCV的仿射变换源码和投影变换的类似,只是仿射变换的矩阵M的元素个数是6个
参考

 浙公网安备 33010602011771号