【WPF学习】第十八章 多点触控输入
多点触控(multi-touch)是通过触摸屏幕与应用程序进行交互的一种方式。多点触控输入和更传统的基于笔(pen-based)的输入的区别是多点触控识别手势(gesture)——用户可移动多根手指以执行常见操作的特殊方式。例如,在触摸屏上放置两根手指并同时移动他们,这通常意味着“放大",而以一根手指为支点转动另一根手指意味着"旋转"。并且因为用户直接在应用程序窗口中进行这些手势,所以每个手势自然会被连接到某个特定的对象。例如,简单的具有多点触控功能的应用程序,可能会在虚拟桌面上显示多幅图片,并且允许用户拖动、缩放以及旋转每幅图片,进而创建新的排列方式。
在智能手机和平板电脑上,多点触控屏幕几乎无处不在。但在普通计算机上,多点触控屏幕较少见。尽管硬件制造商已经产生了触摸屏笔记本电脑和LCD显示器,但传统的笔记本电脑和显示器仍占据主导地位。
这对于希望实验多点触控应用程序的开发人员是一个挑战。到目前位置,最好的方式是投资购买基本的多点触控笔记本。然而,通过多做一点工作,可使用仿真器模拟多点触控输入。基本做饭是为计算机连接多个鼠标并安装来自Multi-Touch Visita开源项目(对于Windows 7该项目也能工作)的驱动程序。具体安装请自觉网上搜着安装步骤。
一、多点触控的输入层次
正如前两章所了解的,WPF允许使用键盘和鼠标的高层次输入(例如单击和文本改变)和低层次输入(鼠标事件以及按键事件)。这很重要,因为有些应用程序需要加以更精细的控制。多点触控输入同样应用了这种多层次的输入方式,并且对于多点触控支持,WPF提供了三个独立的层次:
- 原始触控(raw touch):这是最低级的支持,可访问用户执行的每个触控。缺点是由您的应用程序负责将单独的触控消息组合到一起,并对他们进行解释。如果不准备识别标准触摸手势,反而希望创建以独特方式响应多点触控输入的应用程序,使用原始触控是合理的。一个例子是绘图程序,例如Windows7画图程序,该程序允许用户同时多根手指在触摸屏上绘图。
- 操作(manipulation):这是一个简便的抽象层,该层将原始的多点触控输入转换成更有意义的手势,与WPF控件将一系列MouseDown和MouseUp事件解释为更高级的MouseDoubleClick事件很相似。WPF支持的通用手势包括移动(pan)、缩放(zoom)、选择(rotate)以及轻按(tap)。
- 内置的元素支持(built-in element support):有些元素已对多点触控事件提供了内置支持,从而不需要在编写代码。例如,可滚动的控件支持触控移动,如ListBox、ListView、DataGrid、TextBox以及ScrollViewer。
二、原始触控
与基本的鼠标和键盘事件一样,触控事件被内置到低级的UIElement以及ContentElement类。下表列出了所有触控事件。
表 所有元素的原始触控事件
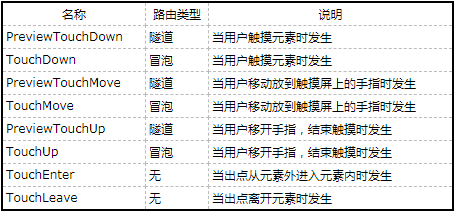
所有这些事件都提供了一个TouchEventArgs对象,该对象提供了两个重要成员。第一个是GetTouchPoint()方法,该方法返回触控事件发生位置的屏幕坐标(还有一些不怎么常用的数据,例如触点的大小)。第二个是TouchDevice属性,该属性返回一个TouchDevice对象。这里的技巧是将每个出点都视为单独设备。因此,如果用户在不同的位置按下两根手指(同时按下或者先按下一根再按下另一根),WPF将它们作为两个触控设备,并为两个触控设备指定唯一的ID。当用户移动这些手指,并且触控事件发生时,代码可以通过ToucheDevice.Id属性区分两个触点。
下面是一个简单的示例:
为了创建这个示例,需要处理TouchDown、TouchMove以及TouchUp事件:
<Window x:Class="Multitouch.MainWindow"
        xmlns="http://schemas.microsoft.com/winfx/2006/xaml/presentation"
        xmlns:x="http://schemas.microsoft.com/winfx/2006/xaml"
        Title="MainWindow" Height="350" Width="525">
    <Canvas x:Name="canvas"  Background="LightBlue"
            TouchDown="Canvas_TouchDown" TouchUp="canvas_TouchUp"
            TouchMove="canvas_TouchMove">

    </Canvas>
</Window>
为了跟踪所有触点,需要作为窗口成员变量存储一个集合。最简洁的方法是存储UIElement对象的集合(为每个激活的椭圆存储一个UIElement对象),是哟该触控设备的ID(该ID是整数)编写索引:
private Dictionary<int, UIElement> movingEllipses = new Dictionary<int, UIElement>();
当用户按下一根手指时,代码创建并配置一个新的椭圆元素(该元素看起来像个小圆)。使用触点在恰当的坐标放置椭圆,并将椭圆元素添加到集合中(根据触控设备的ID编写索引),然后再Canvas面板上显示该椭圆元素:
private void Canvas_TouchDown(object sender, TouchEventArgs e)
        {
            //Create an ellipse to draw at the new contact point
            Ellipse ellipse = new Ellipse();
            ellipse.Width = 30;
            ellipse.Height = 30;
            ellipse.Stroke = Brushes.White;
            ellipse.Fill = Brushes.Green;

            //Position the ellipse at the contact point
            TouchPoint touchPoint = e.GetTouchPoint(canvas);
            Canvas.SetTop(ellipse, touchPoint.Bounds.Top);
            Canvas.SetLeft(ellipse, touchPoint.Bounds.Left);

            //Store the ellipse in the active collection
            movingEllipses[e.TouchDevice.Id] = ellipse;

            //Add the ellipse to the Canvas
            canvas.Children.Add(ellipse);
        }
当用户移动按下的手指时,将触发TouchMove事件。此时,可使用触控设备的ID确定哪个点正在移动。代码需要做的全部工作就是查找对相应的椭圆并更新其坐标:
private void canvas_TouchMove(object sender, TouchEventArgs e)
        {
            //Get the ellipse that corresponds to the current contact point
            UIElement element = movingEllipses[e.TouchDevice.Id];

            //Move it to the new contact point
            TouchPoint touchPoint = e.GetTouchPoint(canvas);
            Canvas.SetTop(element, touchPoint.Bounds.Top);
            Canvas.SetLeft(element, touchPoint.Bounds.Left);
        }
最后,当用户抬起手指时,从跟踪集合中移除椭圆。作为一种选择,您可能也希望从Canvas面板中移除椭圆:
private void canvas_TouchUp(object sender, TouchEventArgs e)
        {
            //Remove the ellipse from the Canvas
            UIElement element = movingEllipses[e.TouchDevice.Id];
            canvas.Children.Remove(element);

            //Remove the ellipse from the tracking collection
            movingEllipses.Remove(e.TouchDevice.Id);
        }
注意:
UIElement还添加了CaptureTouch()和ReleaseTouchCapture()方法,这两个方法与CaptureMouse()和ReleaseMouseCapture()方法类似。当一个元素捕获触控输入后,该元素会接受来自被捕获的触控设备的所有触控事件,即使触控事件是在窗口的其他地方发生的也是如此。但因为可能有多个触控设备,所以多个元素可能同时捕获触控输入,只要每一个捕获来自不同设备的输入即可。
三、操作
对于那些以简明直接的方式使用触控事件的应用程序,例如上面介绍的拖动椭圆示例或画图程序,原始触控是非常好的。但是,如果希望支持标准的触控手势,原始触控不会简化该工作。例如,为了支持旋转,需要探测在同一个元素上的两个触点,跟踪这两个触点的移动情况,并使用一些运算确定一个触点绕另一个触点的转动情况。甚至,伺候还需要添加实际应用相应旋转效果的代码。
幸运的是,WPF未将这些工作完全留给你。WPF为手势提供了更高级别的支持,称为触控操作(manipulation)。通过将元素的IsManipulationEnabled属性设置为True,将元素配置为接受触控操作。然后可响应4个操作时间:ManipulationStaring、ManipulationStared、ManipulationDelta以及ManipulationCompleted。
创建一个实例,该例使用基本的安排在Canvas面板上显示三幅图像。此后用户可使用移动、旋转以及缩放手势来移动、转动、缩小或发达图像。
创建这个示例的第一步是定义Canvas面板并放置三个Image元素。为简化实现,当ManipulationStarting和ManipulationDelta事件从适当的Image元素内部向上冒泡后,在Canvas面板中处理这两个事件:
<Window x:Class="Multitouch.Manipulations"
        xmlns="http://schemas.microsoft.com/winfx/2006/xaml/presentation"
        xmlns:x="http://schemas.microsoft.com/winfx/2006/xaml"
        Title="Manipulations" Height="349" Width="607">
    <Grid>
        <Canvas x:Name="canvas" ManipulationStarting="image_ManipulationStarting"  ManipulationDelta="image_ManipulationDelta">
            <Image Canvas.Top="10" Canvas.Left="10" Width="200" IsManipulationEnabled="True" Source="koala.jpg">
                <Image.RenderTransform>
                    <MatrixTransform></MatrixTransform>
                </Image.RenderTransform>
            </Image>
            <Image Canvas.Top="30" Canvas.Left="350" Width="200" IsManipulationEnabled="True" Source="penguins.jpg">
                <Image.RenderTransform>
                    <MatrixTransform></MatrixTransform>
                </Image.RenderTransform>
            </Image>
            <Image Canvas.Top="100" Canvas.Left="200" Width="200" IsManipulationEnabled="True" Source="tulips.jpg">
                <Image.RenderTransform>
                    <MatrixTransform></MatrixTransform>
                </Image.RenderTransform>
            </Image>
        </Canvas>
    </Grid>
</Window>
上面的表中有一个新的细节。每个图像包含一个MatrixTransform对象,该对象为代码应用移动、旋转以及缩放操作的组合提供了一种简易方式。当前,MatrixTransform对象未执行任何操作,但当操作事件发生时,将使用代码改变。
当用户触摸一幅图像时,将触发ManipulationStarting事件。这是,需要设置操作容器,它是在后面将获得的所有操作坐标的参考点。在该例中,包含图像的Canvas面板是自然自选。还可根据需要选择允许的操作类型。如果不选择操作类型,WPF将监视它识别的所有手势:移动、缩放以及旋转。
private void image_ManipulationStarting(object sender, ManipulationStartingEventArgs e)
        {
            // Set the container (used for coordinates.)
            e.ManipulationContainer = canvas;

            // Choose what manipulations to allow.
            e.Mode = ManipulationModes.All;
        }
当发生操作是(但操作未必结束),触发ManipulationDelta事件。例如,如果用户开始选择一幅图像,将不断触发ManipulationDelta事件,直到用户选择结束并且用户抬起按下的手指为止。
通过使用ManipulationDelta对象将手势的当前状态记录下来,该对象是通过ManipulationDeltaEventArgs.DeltaManipulation属性提供的。本质上,ManipulationDelta对象记录了应当应用到对象的缩放、旋转以及移动的量,这些信息时通过三个简单的属性提供的:Scale、Rotation以及Translation。使用这一信息的技巧是在用户界面中调整元素。
理论上,可通过改变元素的大小和位置来处理缩放和移动细节。但这仍不能应用旋转(而且代码有些凌乱)。更好的方法是使用变换——通过变换对象可采用数学方法改变任何WPF元素的外观。基本思路是获取由ManipulationDelta对象提供的信息,并使用这些信息配置MatrixTransform。尽管这听起来很复杂,但需要使用的代码在使用该特性的每个应用程序中本质上时相同的。看起来如下所示:
private void image_ManipulationDelta(object sender, ManipulationDeltaEventArgs e)
        {
            // Get the image that's being manipulated.
            FrameworkElement element = (FrameworkElement)e.Source;

            // Use the matrix to manipulate the element.
            Matrix matrix = ((MatrixTransform)element.RenderTransform).Matrix;

            var deltaManipulation = e.DeltaManipulation;
            // Find the old center, and apply the old manipulations.
            Point center = new Point(element.ActualWidth / 2, element.ActualHeight / 2);
            center = matrix.Transform(center);

            // Apply zoom manipulations.
            matrix.ScaleAt(deltaManipulation.Scale.X, deltaManipulation.Scale.Y, center.X, center.Y);

            // Apply rotation manipulations.
            matrix.RotateAt(e.DeltaManipulation.Rotation, center.X, center.Y);

            // Apply panning.
            matrix.Translate(e.DeltaManipulation.Translation.X, e.DeltaManipulation.Translation.Y);

            // Set the final matrix.
            ((MatrixTransform)element.RenderTransform).Matrix = matrix;

        }
四、惯性
WPF还有一层构建在基本操作支持之上的特性,称为惯性(intertia)。本质上,通过惯性可以更逼真、更流畅地操作元素。
现在,如果用户用移动手势拖动上例中的一幅图像,当手指从触摸屏上抬起时图像会立即停止移动。但如果启用了惯性特性,那么图像会继续移动非常短的一段时间,正常地减速。该特性为操作提供了势头的效果和感觉。当将元素拖动进他们不能穿过的边界时,惯性还会使元素被弹回,从而使他们的行为像是真实的物理对象。
为给上一个示例添加惯性特性,只需要处理ManipulationInertiaStarting事件。与其他操作事件一样,该事件从一幅图像开始并冒泡至Canvas面板。当用户结束手势并抬起手指释放元素时,触发ManipulationInertiaStarting事件。这是,可使用ManipulationInertiaStartingEventsArgs对象确定当期速度——当操作结束时元素的移动速度——并设置希望的减速度。下面的示例为移动、缩放以及旋转手势添加了惯性:
private void canvas_ManipulationInertiaStarting(object sender, ManipulationInertiaStartingEventArgs e)
        {
            //If the object is moving,decrease its speed by
            //10 inches per second every second
            //deceleration=10 inches * 96 units per inch /(1000 milliseconds)^2
            e.TranslationBehavior = new InertiaTranslationBehavior();
            e.TranslationBehavior.InitialVelocity = e.InitialVelocities.LinearVelocity;
            e.TranslationBehavior.DesiredDeceleration = 10.0 * 96.0 / (1000.0 * 1000.0);

            //Decrease the speed of zooming by 0.1 inches per second every second.
            //deceleration=0.1 inches * 96 units per inch/(1000 milliseconds)^2
            e.ExpansionBehavior = new InertiaExpansionBehavior();
            e.ExpansionBehavior.InitialVelocity = e.InitialVelocities.ExpansionVelocity;
            e.ExpansionBehavior.DesiredDeceleration = 0.1 * 96 / (1000.0 * 1000.0);

            //Decrease the rotation rate by 2 rotations per second every second.
            //deceleration=2*36 degress /(1000 milliseconds)^2

            e.RotationBehavior = new InertiaRotationBehavior();
            e.RotationBehavior.InitialVelocity = e.InitialVelocities.AngularVelocity;
            e.RotationBehavior.DesiredDeceleration=720/(1000.0*1000.0)
        }
为使元素从障碍物自然地被弹回,需要在ManipulationDelta事件中检查是否将元素拖到了错误的位置。如果穿过了一条边界,那么由你负责通过调用ManipulationDeltaEventArgs.ReportBoundaryFeedback()方法进行报告。

 浙公网安备 33010602011771号