springboot整合shiro
shiro三大对象概念
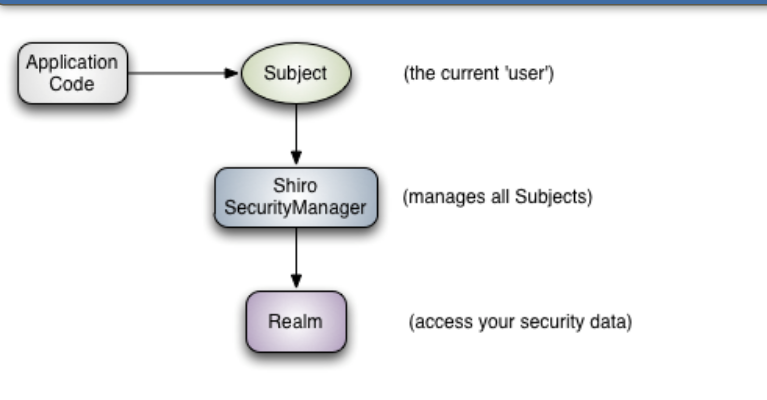
Subject
主体,代表了当前“用户”,这个用户不一定是一个具体的人,与当前应用交互的任何东西都是Subject,如网络爬虫,机器人等;即一个抽象概念;所有Subject都绑定到SecurityManager,与Subject的所有交互都会委托给SecurityManager;可以把Subject认为是一个门面;SecurityManager才是实际的执行者;
SecurityManager
Subject的“幕后”推手是SecurityManager。Subject代表了当前用户的安全操作,SecurityManager则管理所有用户的安全操作。它是Shiro框架的核心,充当“保护伞”,引用了多个内部嵌套安全组件,它们形成了对象图。
Realms
Shiro的第三个也是最后一个概念是Realm。Realm充当了Shiro与应用安全数据间的“桥梁”或者“连接器”。也就是说,当与像用户帐户这类安全相关数据进行交互,执行认证(登录)和授权(访问控制)时,Shiro会从应用配置的Realm中查找很多内容。
从这个意义上讲,Realm实质上是一个安全相关的DAO:它封装了数据源的连接细节,并在需要时将相关数据提供给Shiro。当配置Shiro时,你必须至少指定一个Realm,用于认证和(或)授权。配置多个Realm是可以的,但是至少需要一个。
整合shiro环境
先搭建好一个简单的boot项目 这里不做说明了
导入shiro依赖
        <dependency>
            <groupId>org.apache.shiro</groupId>
            <artifactId>shiro-spring</artifactId>
            <version>1.7.1</version>
        </dependency>
        <dependency>
            <groupId>org.apache.shiro</groupId>
            <artifactId>shiro-spring-boot-web</artifactId>
        </dependency>
简单例子
编写自定义UserRealm类
package com.jie.config;

import org.apache.shiro.authc.AuthenticationException;
import org.apache.shiro.authc.AuthenticationInfo;
import org.apache.shiro.authc.AuthenticationToken;
import org.apache.shiro.authz.AuthorizationInfo;
import org.apache.shiro.realm.AuthorizingRealm;
import org.apache.shiro.subject.PrincipalCollection;
//自定义UserRealm类需要继承该类
public class UserRealm extends AuthorizingRealm {
    //授权
    @Override
    protected AuthorizationInfo doGetAuthorizationInfo(PrincipalCollection principalCollection) {
        System.out.println("执行了授权方法");
        return null;
    }
    //认证
    @Override
    protected AuthenticationInfo doGetAuthenticationInfo(AuthenticationToken authenticationToken) throws AuthenticationException {
        System.out.println("执行了认证方法");
        return null;
    }
}
编写shiro配置类(代码都是套路T-T)
package com.jie.config;


import org.apache.shiro.spring.web.ShiroFilterFactoryBean;
import org.apache.shiro.web.mgt.DefaultWebSecurityManager;
import org.springframework.beans.factory.annotation.Qualifier;
import org.springframework.context.annotation.Bean;
import org.springframework.context.annotation.Configuration;

@Configuration
public class ShiroConfig {
    @Bean
    //如果我们在某个注入点需要另一个 bean,我们需要专门指出它。我们可以通过 @Qualifier 注解来做到这一点。
    public ShiroFilterFactoryBean getShiroFilterFactoryBean(@Qualifier("getDefaultWebSecurityManager") DefaultWebSecurityManager defaultWebSecurityManager){
        ShiroFilterFactoryBean bean=new ShiroFilterFactoryBean();
        //设置安全管理器
        bean.setSecurityManager(defaultWebSecurityManager);
        return bean;
    }
    @Bean
    public DefaultWebSecurityManager getDefaultWebSecurityManager(@Qualifier("userRealm") UserRealm userRealm){
        DefaultWebSecurityManager securityManager=new DefaultWebSecurityManager();
        //关联realm对象
        securityManager.setRealm(userRealm);
        return securityManager;
    }
    //创建realm对象 需要自定义类
    @Bean
    public UserRealm userRealm(){
        return new UserRealm();
    }
}
编写一个主界面 可以跳到测试用的add,update页面
用于后续权限测试管理
<!DOCTYPE html>
<html lang="en" xmlns:th="http://www.thymeleaf.org">
<head>
    <meta charset="UTF-8">
    <title>Title</title>
</head>
<body>
<a th:href="@{/user/add}">add</a> | <a th:href="@{/user/update}">update</a>
</body>
</html>
shiro实现登录拦截
过滤器规则
/*
        anon: 无需认证就可以访问
        authc: 必须认证才能访问
        user: 必需拥有记住我功能才能用
        perms: 拥有对某个资源的权限才能访问
        role: 拥有某个角色权限才能访问
        */
根据上面规则我们给两个页面添加上权限访问
@Bean
    //如果我们在某个注入点需要另一个 bean,我们需要专门指出它。我们可以通过 @Qualifier 注解来做到这一点。
    public ShiroFilterFactoryBean getShiroFilterFactoryBean(@Qualifier("getDefaultWebSecurityManager") DefaultWebSecurityManager defaultWebSecurityManager){
        ShiroFilterFactoryBean bean=new ShiroFilterFactoryBean();
        //设置安全管理器
        bean.setSecurityManager(defaultWebSecurityManager);
        //添加过滤器
        Map<String, String> filterMap = new LinkedMap();
        //添加权限
        filterMap.put("/user/add","authc");
        filterMap.put("/user/update","authc");
        bean.setFilterChainDefinitionMap(filterMap);
        return bean;
    }
运行测试可以发现我们无法访问add,update页面了
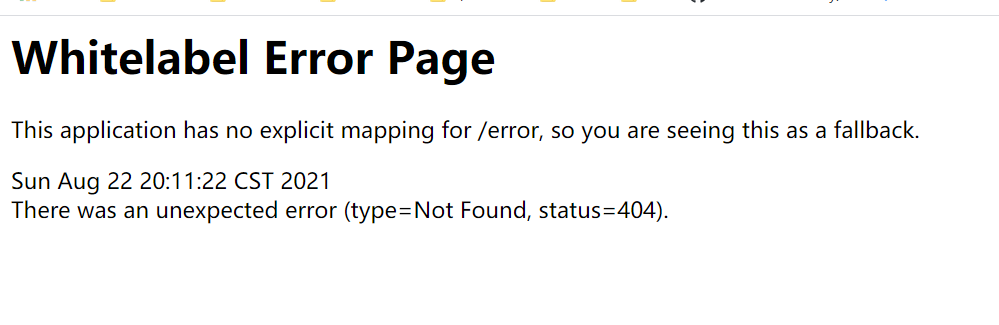
已经实现了简单的权限访问控制了
添加一个登录界面 这里不做说明
然后在设置里添加上这么一句话
 Map<String, String> filterMap = new LinkedMap();
        //添加权限
//        filterMap.put("/user/add","authc");
//        filterMap.put("/user/update","authc");
        filterMap.put("/user/*","authc");
        bean.setFilterChainDefinitionMap(filterMap);
        //设置登录请求
        bean.setLoginUrl("/toLogin");
/toLogin对应写的登录页面路径
之后重新运行项目会发现点add会直接跳转到login页面
实现用户认证
控制类添加该方法
@RequestMapping("/login")
    public String login(String username,String password,Model model){
        //获取当前用户
        Subject subject= SecurityUtils.getSubject();
        //封装当前用户数据
        UsernamePasswordToken token = new UsernamePasswordToken(username, password);
        try {
            //执行登录方法
            subject.login(token);
            return "index";
        }//用户名不存在异常
        catch (UnknownAccountException e){
            model.addAttribute("msg","用户名错误");
            return "login";
        }
        catch (IncorrectCredentialsException e){
            model.addAttribute("msg","密码错误");
            return "login";
        }
    }
设置表单提交跳转到该方法上
<!DOCTYPE html>
<html lang="en" xmlns:th="http://www.thymeleaf.org">
<head>
    <meta charset="UTF-8">
    <title>Title</title>
</head>
<body>
<h1>登录</h1>
<p th:text="${msg}"></p>
<form th:action="@{/login}">
    <p>用户名: <input type="text" name="username"></p>
    <p>密码: <input type="password" name="password"></p>
    <p><input type="submit"></p>
</form>
</body>
</html>
进行测试会发现无论如何我们都登录不了 因为我们认证方法并没有完善
由于还没有连接数据库 我们使用伪造数据
在自定义realm对象 完善认证方法
package com.jie.config;

import org.apache.shiro.authc.*;
import org.apache.shiro.authz.AuthorizationInfo;
import org.apache.shiro.realm.AuthorizingRealm;
import org.apache.shiro.subject.PrincipalCollection;

//自定义UserRealm类需要继承该类
public class UserRealm extends AuthorizingRealm {
    //授权
    @Override
    protected AuthorizationInfo doGetAuthorizationInfo(PrincipalCollection principalCollection) {
        System.out.println("执行了授权方法");
        return null;
    }
    //认证
    @Override
    protected AuthenticationInfo doGetAuthenticationInfo(AuthenticationToken token) throws AuthenticationException {
        System.out.println("执行了认证方法");
        String name="root";
        String password="123456";
        UsernamePasswordToken usertoken=(UsernamePasswordToken) token;
        if(!usertoken.getUsername().equals(name)){
            return null;//抛出UnknownAccountException异常
        }
        //密码认证 安全问题 只能让shiro做 另外两个参数暂时用不到
        return new SimpleAuthenticationInfo("",password,"");
    }
}
运行测试可以发现成功的实现了登录验证!

 浙公网安备 33010602011771号