1-MySQL - 各平台安装MySQL
- download
- for centos
- for windows
- install
- 配置环境变量
- 创建配置文件
- 执行初始化
- 添加MySQL服务到系统的服务中并启动MySQL
- 测试
- 创建密码
- 可能的报错
- 缺少MSVCP120.dll文件
- 应用程序无法正常启动(0xc000007b)。请单机"确定"关闭应用程序。
- 无法定位程序输入点fesetround于动态链接库....
- Fatal error: Can't open and lock privilege tables: Table 'mysql.user' doesn't exist
- 'mysqld' 不是内部或外部命令,也不是可运行的程序或批处理文件。
- [ERROR] InnoDB: Header page consists of zero bytes in datafile: .\ibdata1, Space ID:0, Flags: 0. Please refer to http://dev.mysql.com/doc/refman/5.7/en/innodb-troubleshooting-datadict.html for how to resolve the issue.
- 本地计算机上的mysql服务启动后停止,某些服务在未由其它服务或程序使用时将自动停止。
- ERROR 2003 (HY000): Can't connect to MySQL server on 'localhost' (10060)
- for docker
- for mac
download
这里先告诉大家怎么下载MySQL。
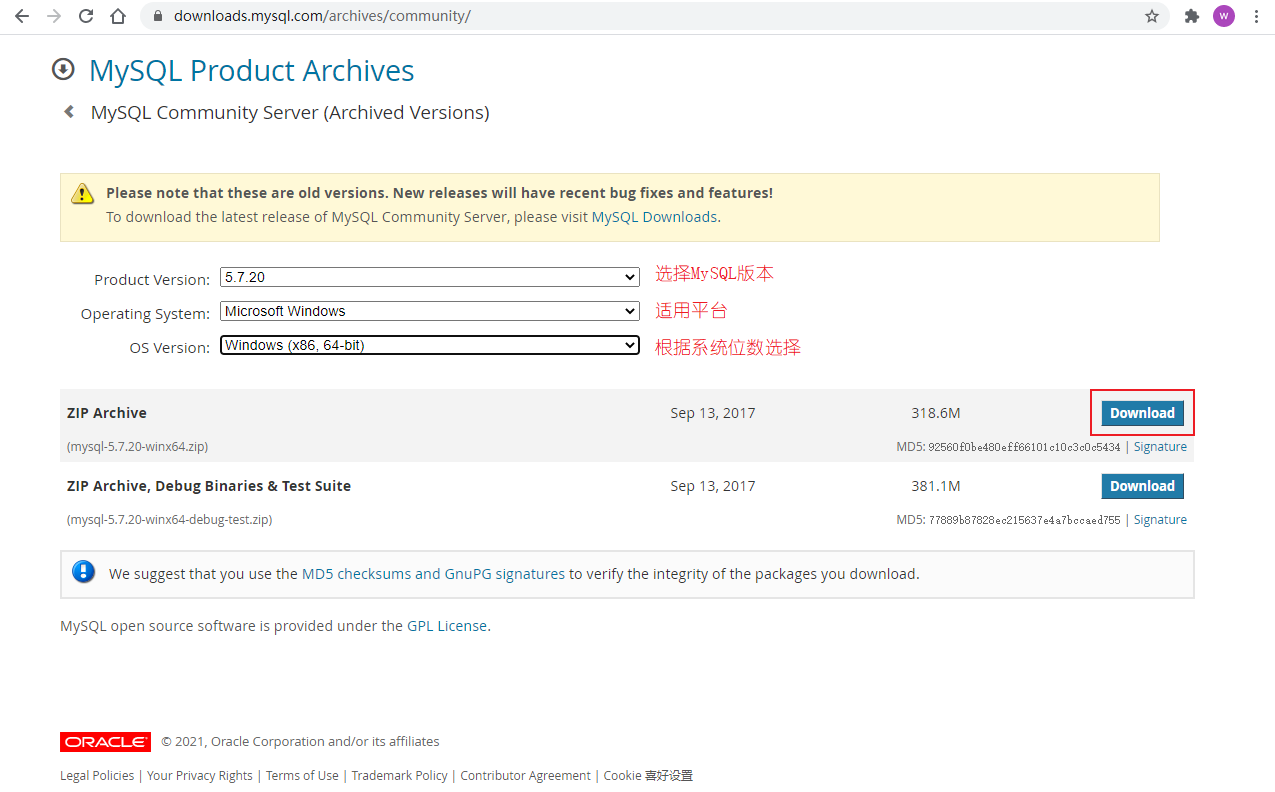
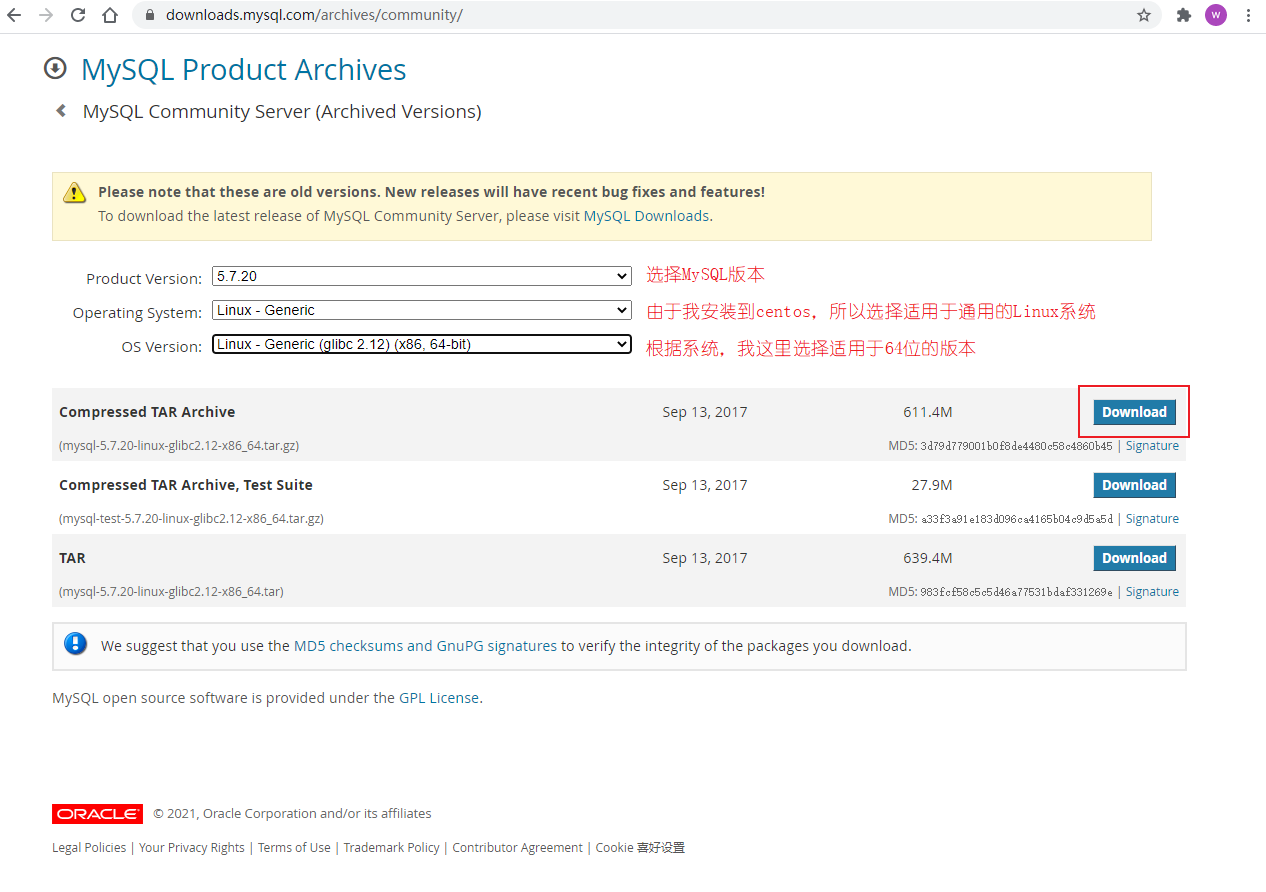
打开官网下载地址:https://downloads.mysql.com/archives/community/,按照截图所示下载即可。
Windows
centos
for centos
centos7.3 + mysql5.7.20
官网下载地址:https://downloads.mysql.com/archives/community/
百度云盘:链接:https://pan.baidu.com/s/1ipuTky_oAgMzrZ-wf1GJgA 提取码:b0gu
接下来演示在一台服务器上配置单个实例和多个实例的配置。
所谓单实例,就是在一个系统中安装一个MySQL服务,多实例,就是在一个系统中安装多个MySQL服务。
单实例配置
在安装之前,如果你的系统曾经安装过mariadb,请先卸载。
yum update -y
yum remove -y mariadb*
好了,开始吧!
install
- 安装依赖包:
yum install -y epel-release
yum install -y cmake gcc-c++ ncurses-devel perl-Data-Dumper boost-doc boost-devel libaio-devel
- 下载、解压缩、重命名,当然,你也可以把原来的压缩包删除掉:
[root@cs ~]# cd /opt/
[root@cs opt]# wget https://downloads.mysql.com/archives/get/p/23/file/mysql-5.7.20-linux-glibc2.12-x86_64.tar.gz
[root@cs opt]# tar -xvf mysql-5.7.20-linux-glibc2.12-x86_64.tar.gz
[root@cs opt]# mv mysql-5.7.20-linux-glibc2.12-x86_64 mysql
[root@cs opt]# rm -rf mysql-5.7.20-linux-glibc2.12-x86_64.tar.gz
[root@cs opt]# ls
mysql
- 添加环境变量:
[root@cs opt]# vim /etc/profile
# 添加如下内容
export PATH=/opt/mysql/bin:$PATH
# 然后source生效
[root@cs opt]# source /etc/profile
- (如果已有请忽略)建立mysql用户组,该用户用来管理MySQL:
[root@cs opt]# useradd mysql
- 创建相关目录并授权:
[root@cs opt]# mkdir /data/mysql -p
[root@cs opt]# chown -R mysql:mysql /opt/mysql/*
[root@cs opt]# chown -R mysql:mysql /data/*
其中:
/opt/mysql/是MySQL软件所在目录。/data/mysql是将来存放MySQL数据的目录。
- 初始化数据库:
# 保证/data/mysql/目录是空的,避免不必要的问题
rm -rf /data/mysql/*
mysqld --initialize-insecure  --user=mysql --basedir=/opt/mysql --datadir=/data/mysql

[root@cs opt]# rm -rf /data/mysql/*
[root@cs opt]# mysqld --initialize-insecure  --user=mysql --basedir=/opt/mysql --datadir=/data/mysql
2020-06-08T01:25:34.199239Z 0 [Warning] TIMESTAMP with implicit DEFAULT value is deprecated. Please use --explicit_defaults_for_timestamp server option (see documentation for more details).
2020-06-08T01:25:34.357149Z 0 [Warning] InnoDB: New log files created, LSN=45790
2020-06-08T01:25:34.381441Z 0 [Warning] InnoDB: Creating foreign key constraint system tables.
2020-06-08T01:25:34.436113Z 0 [Warning] No existing UUID has been found, so we assume that this is the first time that this server has been started. Generating a new UUID: f352c664-a926-11ea-a90d-000c29872edd.
2020-06-08T01:25:34.437057Z 0 [Warning] Gtid table is not ready to be used. Table 'mysql.gtid_executed' cannot be opened.
2020-06-08T01:25:34.438213Z 1 [Warning] root@localhost is created with an empty password ! Please consider switching off the --initialize-insecure option.
上述参数,并不难理解:
--initialize-insecure,表示不安全的初始化。这个参数来自于--initialize参数,在MySQL5.7版本中,在初始化成功后,会生成一个临时密码,相对比较麻烦,所以这里改为--initialize-insecure,初始化时将root用户的登录密码设置为空。--user=mysql,管理MySQL的用户是mysql。--basedir=/opt/mysql,是你MySQL的安装目录。--datadir=/data/mysql,是管理数据的目录。
在初始化完成后,你的MySQL的数据目录,应该有这些文件:
[root@CS opt]# ll /data/mysql/
总用量 110628
-rw-r----- 1 mysql mysql       56 11月 27 14:21 auto.cnf
-rw-r----- 1 mysql mysql      419 11月 27 14:21 ib_buffer_pool
-rw-r----- 1 mysql mysql 12582912 11月 27 14:21 ibdata1
-rw-r----- 1 mysql mysql 50331648 11月 27 14:21 ib_logfile0
-rw-r----- 1 mysql mysql 50331648 11月 27 14:21 ib_logfile1
drwxr-x--- 2 mysql mysql     4096 11月 27 14:21 mysql
drwxr-x--- 2 mysql mysql     8192 11月 27 14:21 performance_schema
drwxr-x--- 2 mysql mysql     8192 11月 27 14:21 sys
- 编写配置文件,编辑
vim /etc/my.cnf,内容如下:
[mysqld]
user=mysql
basedir=/opt/mysql
datadir=/data/mysql
server_id=6
port=3306
socket=/tmp/mysql.sock
[mysql]
socket=/tmp/mysql.sock
prompt=3306 [\\d]>
prompt参数为登录进MySQL客户端的提示信息,当你use到指定的数据库中,该库名将显示在中括号内。
当然,这里提供一份关于字符集的设置的配置文件:
[mysqld]
user=mysql
basedir=/opt/software/mysql
datadir=/data/mysql
server_id=6
port=3306
socket=/tmp/mysql.sock

character-set-server=utf8mb4
collation-server=utf8mb4_unicode_ci
init_connect='SET NAMES utf8mb4'
skip-character-set-client-handshake=true

[client]
default-character-set=utf8mb4

[mysql]
socket=/tmp/mysql.sock
default-character-set=utf8mb4
prompt=3306 [\\d]>
其中character-set-server 和 collation-server 这些设置为utf8mb4字符集是比较容易理解的,就是将MySQL数据库相关的字符集都设置为utf8mb4;
但为了实现客户端utf8连接到MySQL后,使用的也是utf8mb4字符集,就在 mysqld配置中配置了 init_connect='SET NAMES utf8mb4' 表示初始化连接都设置为utf8mb4字符集,再配置一个 skip-character-set-client-handshake = true 忽略客户端字符集设置,不论客户端是何种字符集,都按照init_connect中的设置进行使用,这样就满足了应用的需求。
参考链接:https://blog.csdn.net/yumushui/article/details/49153525
启动MySQL的几种方式
mysql.server
我们可以使用MySQL自带的mysql.server启动MySQL服务。
mysql.server在哪呢?在MySQL安装目录中的support-files目录中:
[root@CS opt]# cd /opt/mysql/support-files/
[root@CS support-files]# ls
magic  mysqld_multi.server  mysql-log-rotate  mysql.server
我们用mysql.server来管理MySQL:
[root@CS support-files]# ./mysql.server start
Starting MySQL.Logging to '/data/mysql/CS.err'.
 SUCCESS!
[root@CS support-files]# ./mysql.server restart
Shutting down MySQL.. SUCCESS!
Starting MySQL. SUCCESS!
[root@CS support-files]# ./mysql.server stop
Shutting down MySQL.. SUCCESS!
配置service启动
在centos6中使用service管理服务,所以,我们来演示下如何使用service来管理MySQL服务:
[root@cs opt]# cp /opt/mysql/support-files/mysql.server /etc/init.d/mysqld
[root@CS opt]# service mysqld start
Starting MySQL. SUCCESS!
[root@CS opt]# service mysqld restart
Shutting down MySQL.. SUCCESS!
Starting MySQL.
[root@CS opt]# service mysqld stop
Shutting down MySQL.. SUCCESS!
配置systemctl
在centos7版本中,可以使用systemctl来替代service了。
编辑vim /etc/systemd/system/mysqld.service文件,内容如下:
[Unit]
Description=MySQL Server
Documentation=man:mysqld(8)
Documentation=http://dev.mysql.com/doc/refman/en/using-systemd.html
After=network.target
After=syslog.target
[Install]
WantedBy=multi-user.target
[Service]
User=mysql
Group=mysql
ExecStart=/opt/mysql/bin/mysqld --defaults-file=/etc/my.cnf
LimitNOFILE = 5000
编辑内容中,只需要将ExecStart=/opt/mysql/bin/mysqld的路径改为你的MySQL安装目录即可,其他的照抄。
完事之后,你就可以使用systemctl命令来管理MySQL服务了,可用命令:
systemctl start mysqld
systemctl restart mysqld
systemctl stop mysqld
systemctl status mysqld
systemctl enable mysqld
此时,你可以在任意位置执行mysql来进入MySQL客户端了,但是此时登录还不要密码。
创建密码
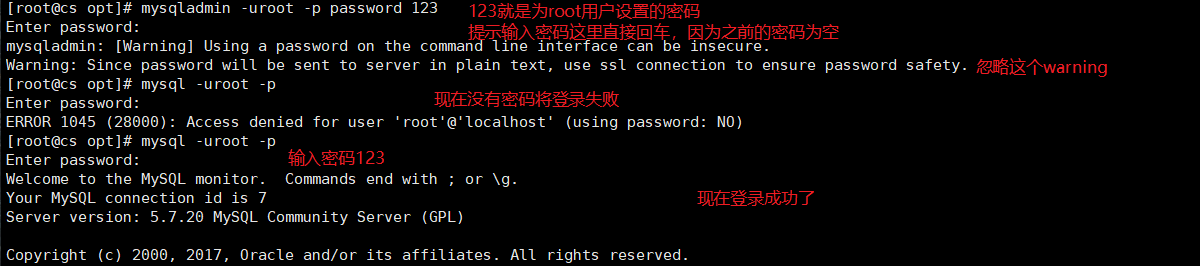
此时,我们能正常的启动/停止MySQL服务了,但在初始化MySQL的时候,我们还没有配置登录密码,现在,我们来创建密码。
为root用户(该用户为本地用户)创建密码:
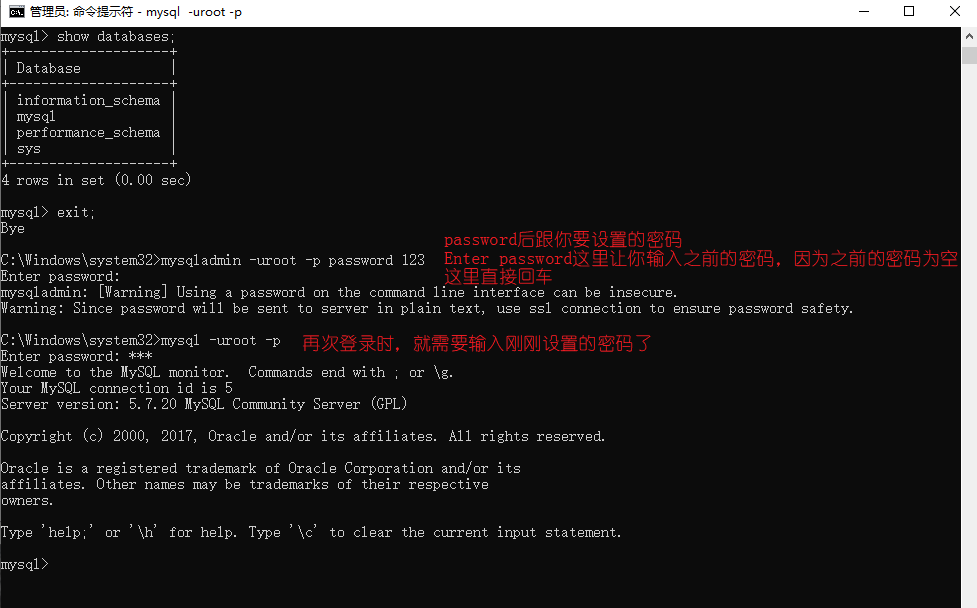
mysqladmin -uroot -p password 123
-p password后面跟你要为root用户设置的密码。
(可选)查看MySQL监听端口:
netstat -lnp|grep 3306
ss -lnp|grep 3306
ps -ef|grep mysqld
参考:老男孩-标杆班级-MySQL-lesson01-简介及安装
多实例配置
see also:https://www.cnblogs.com/Neeo/articles/13527500.html
可能的报错
报错:
[root@CS opt]# mysqld --initialize-insecure --user=mysql --basedir=/opt/mysql/ --datadir=/data/mysql/
2020-11-27T13:53:03.278392Z 0 [Warning] TIMESTAMP with implicit DEFAULT value is deprecated. Please use --explicit_defaults_for_timestamp server option (see documentation for more details).
2020-11-27T13:53:03.280038Z 0 [ERROR] --initialize specified but the data directory has files in it. Aborting.
2020-11-27T13:53:03.280083Z 0 [ERROR] Aborting
原因:提示你数据目录有文件,而初始化的过程中需要保证数据目录为空。
解决:
[root@CS opt]# rm -rf /data/mysql/*
[root@CS opt]# mysqld --initialize-insecure --user=mysql --basedir=/opt/mysql/ --datadir=/data/mysql/
for windows
win10 + mysql-5.7.20-winx64.zip
在Windows平台,有两种方式安装MySQL,zip包和msi两种,我这里推荐以zip包的形式安装。
但我也贴出来我之前写的msi的安装教程:https://www.cnblogs.com/Neeo/p/9438442.html
接下来,演示zip包的MySQL安装。
install
链接:https://pan.baidu.com/s/1MrXPRMs7ABJtnfZRJ40tZw
提取码:mh5g
下载到本地的安装包是zip包,选择一个指定目录进行解压,解压的过程就是安装的过程,解压后的位置就是MySQL的安装位置。
注意,安装目录不允许有中文、空格和其他特殊字符。
如下截图,我将MySQL解压并安装到C盘的根目录:

配置环境变量
拷贝安装目录内的bin路径,并将其添加到系统的环境变量中。


创建配置文件
在你的MySQL安装目录下,手动创建my.ini文件,文件内容如下:
[mysqld]
# 默认端口
port=3306
# mysql的安装目录,也是工作目录
basedir=C:/mysql-5.7.20-winx64
# 数据库存放的目录,data目录无需手动创建,MySQL初始化成功,就会自动创建了
datadir=C:/mysql-5.7.20-winx64/data
# 错误日志,如果启动失败,可以查看这个错误日志,定位错误原因
log_error=C:/mysql-5.7.20-winx64/mysql.err

# 指定默认字符集
character-set-server=utf8mb4
collation-server=utf8mb4_unicode_ci
init_connect='SET NAMES utf8mb4'
skip-character-set-client-handshake=true

[client]
default-character-set=utf8mb4

[mysql]
# 可选的参数当你use到某个数据库中,路径上显示当前数据库的名字
# prompt=[\\d]>

# 关于字符集的设置
default-character-set=utf8mb4
注意,路径分隔符,不要用Windows默认的\,这样会有转义,很可能会导致安装失败,所以路径分隔符要用/。
执行初始化
在任意路径下,以管理员的身份打开终端执行,注意必须是管理员权限!!!!否则报错!!!!!:
mysqld --initialize-insecure
--initialize-insecure,表示不安全的初始化。这个参数来自于--initialize参数,在MySQL5.7版本中,在初始化过程中,会生成一个临时密码(临时密码文件在data目录内的"你的主机名.err"文件),后续处理相对麻烦,所以这里改为--initialize-insecure,初始化时将root用户的登录密码设置为空。
注意,如果报错:提示缺少MSVCP120.dll文件的话,后面有解决办法。
初始化成功如下图:

初始化成功的另一个标志是,在MySQL的安装目录中,会多个data目录,这个data目录是是MySQL在初始化过程中创建的数据目录。

如果你没有发现data目录,说明初始化过程有些问题,重新以管理员的身份打开终端执行初始化命令:
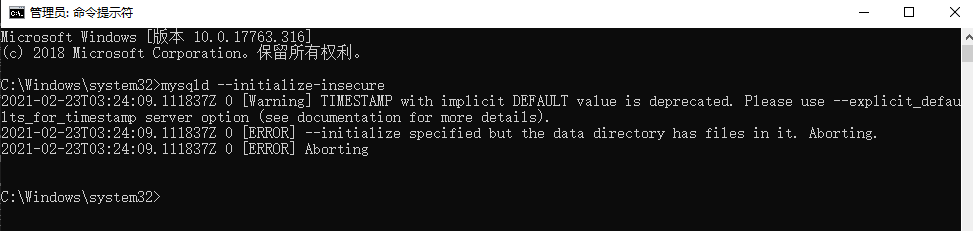
如上图中的ERROR报错,说初始化过程中,data目录内存在文件,初始化被终止。这是因为之前初始化成功了,data目录被创建,期内也有了文件。
当然有了这些提示,说明整个初始化过程成功了。
添加MySQL服务到系统的服务中并启动MySQL
这一步是将MySQL服务添加到系统的服务中,并且设置为自动。然后,我们就可以使用net命令来管理MySQL服务了。注意,也必须是在以管理员身份运行的终端中才能使用net命令管理MySQL服务。
# mysql57表示MySQL服务注册到Windows的服务中的名字
mysqld install mysql57

# 我在Windows上测了下,加--也行,但是好像没有不加--的好使,因为加--的好像从服务中删除不掉,不加--的就能行,所以还是推荐使用不加--的方式吧
# mysqld --install mysql57

# 补充一个删除注册的服务命令
mysqld remove mysql57
# mysqld --remove mysql57

现在系统的服务中就可以找到MySQL了。

但此时MySQL服务还没有启动,你可以在服务中点击启动,也可以在终端中使用net命令来启动/关闭MySQL服务。

ok,现在MySQL服务正常启动了,并且,由于系统服务中的MySQL服务设置的是自动,下次系统启动时,MySQL服务也默认启动了。
测试
当MySQL服务正常启动后,我们就可以尝试使用客户端连接并操作MySQL了。

PS:后续使用客户端连接并操作MySQL时,终端就没有"以管理员身份运行终端"这个要求了,普通权限的终端也可以。
创建密码
以管理员的身份打开终端执行:
mysqladmin -uroot -p password 123
ok,在Windows平台安装MySQL完事了。
补充一个忘记密码的如何找回的操作,参考这个链接
可能的报错
缺少MSVCP120.dll文件
当执行初始化的时候,提示缺少MSVCP120.dll文件。
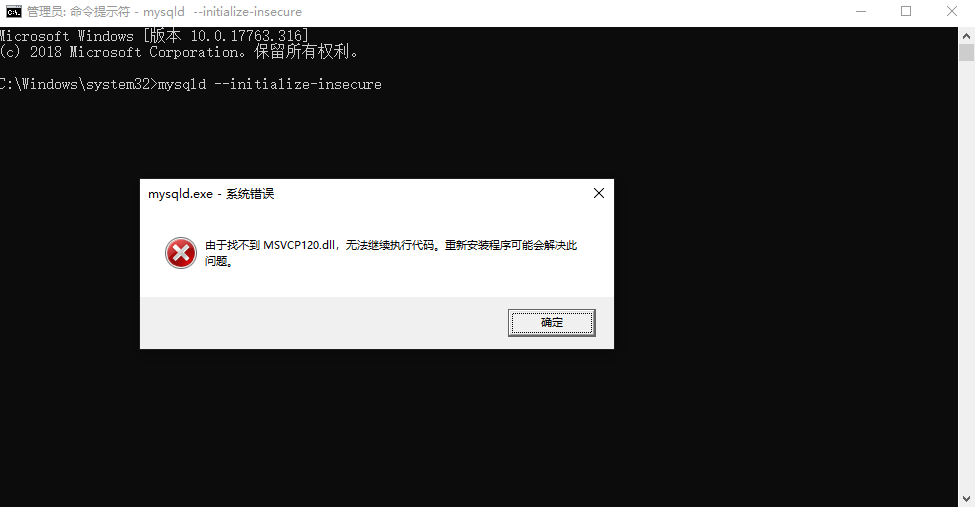
报错原因是,系统缺少Visual C ++可再发行组件包。
扩展:什么是Visual C ++可再发行组件包?
Visual C ++可再发行组件是使用Microsoft的Visual Studio软件开发环境构建的程序或游戏所需的DLL(动态链接库)文件。当程序需要DLL或其他支持文件才能运行时,这称为依赖项。
原文链接:https://www.groovypost.com/howto/fix-visual-c-plus-plus-redistributable-windows-10/
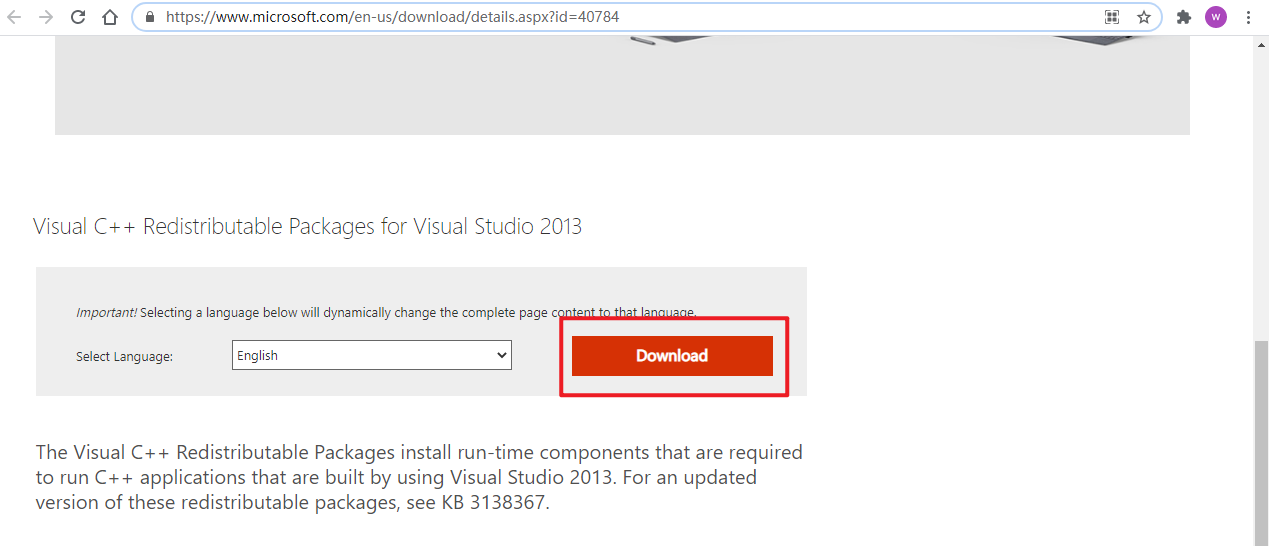
解决办法
-
打开microsoft官网:https://www.microsoft.com/en-us/download/details.aspx?id=40784,点击下载:
-
根据系统位数选择下载:
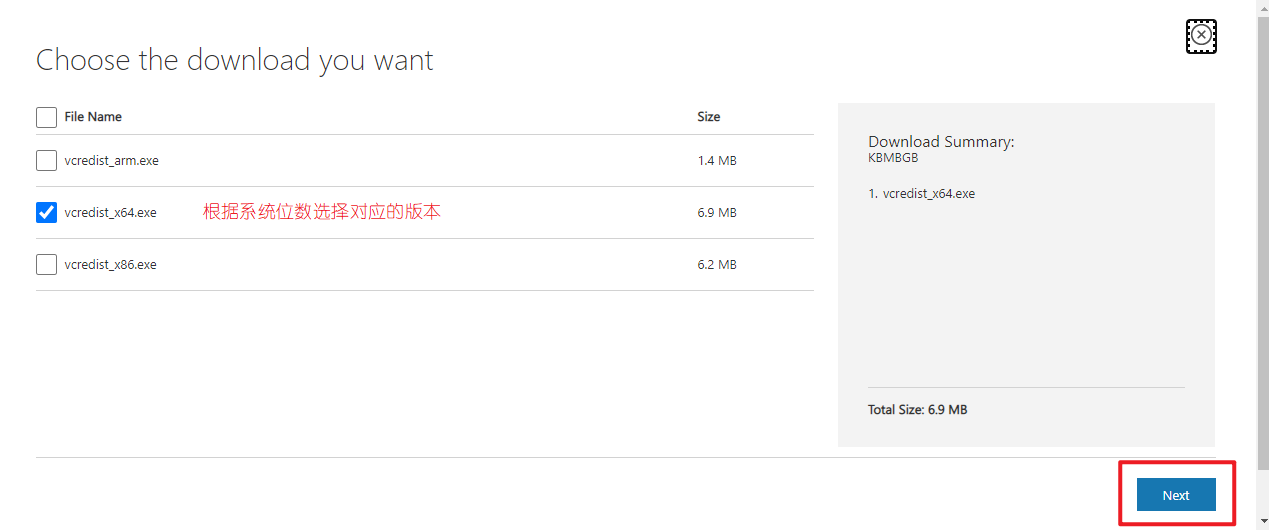
-
以管理员的身份运行,然后默认安装即可。

-
重新以管理员身份打开终端,重新执行初始化步骤吧!
mysqld --initialize-insecure
应用程序无法正常启动(0xc000007b)。请单机"确定"关闭应用程序。
win10 + mysql5.7.30
DirectX_Reair-v4.1.zip链接:https://pan.baidu.com/s/1qXIVYaXfxGWUKZZGeRVHdQ 提取码:ppag

问题原因,我百度了一下,也就是缺少dll文件或者某些文件损坏了。
解决方式,首先还是把上面那个Visual C ++扩展安装包安装下。
然后运行DirectX_Reair-v4.1.zip文件中的exe文件,修复一下,基本就解决了,你再重新执行MySQL的初始化过程。
无法定位程序输入点fesetround于动态链接库....
win10 + mysql5.7.31
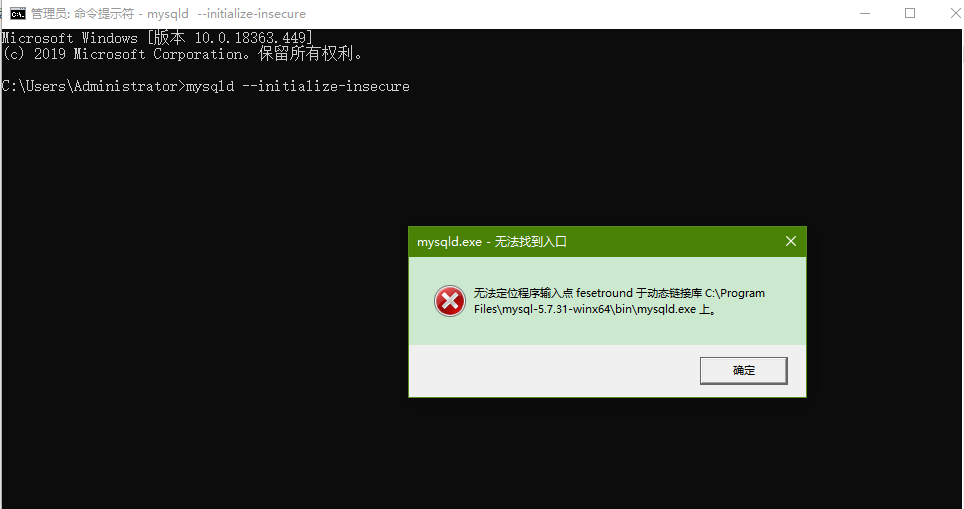
报上面这个错的话,解决办法就是安装Visual C ++的组件,参考上面的安装教程安装吧,这里不在多表。
重新以管理员身份打开终端,重新执行初始化步骤吧!如果失败,删除安装目录中的data目录,然后再尝试。
Fatal error: Can't open and lock privilege tables: Table 'mysql.user' doesn't exist
win10 + mysql5.7.31
这个报错产生的步骤是在执行完初始化和添加到MySQL服务后,使用net start启动MySQL时,提示启动失败,你要看日志,大该包含下面这些个error,总之跟mysql.user表找不到,进而导致创建用户失败,然后启动失败脱不开关系。
2022-03-24T13:43:02.971275Z 0 [ERROR] Fatal error: Can't open and lock privilege tables: Table 'mysql.user' doesn't exist
2022-03-24T13:43:02.973236Z 0 [ERROR] Fatal error: Failed to initialize ACL/grant/time zones structures or failed to remove temporary table files.
2022-03-24T13:43:02.973236Z 0 [ERROR] Can't open the mysql.plugin table. Please run mysql_upgrade to create it.
网上的办法基本上都是Linux下的,搞得我也没招没招的,反正最终尝试了几次,一个不成熟的解决办法:
- 删除安装目录中的data目录。
- 给MySQL整个目录的各个用户都给上完全操作的权限。
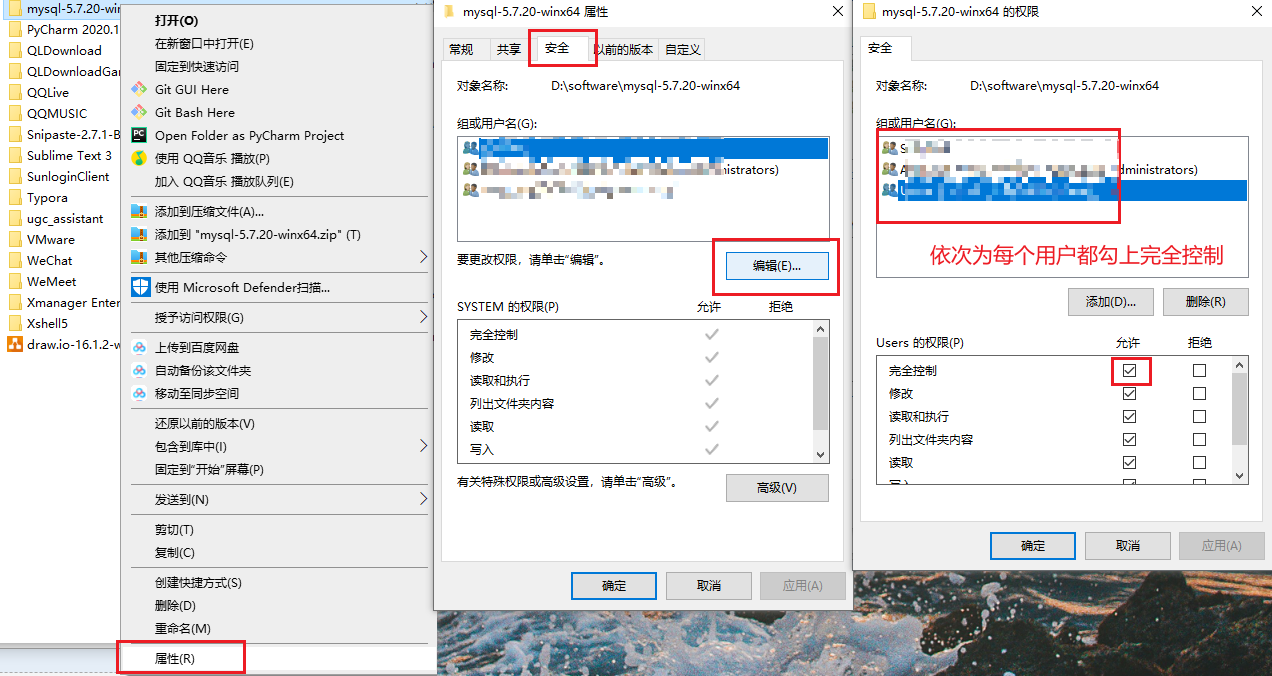
- 再尝试net start。
'mysqld' 不是内部或外部命令,也不是可运行的程序或批处理文件。
win10 + mysql5.7.31
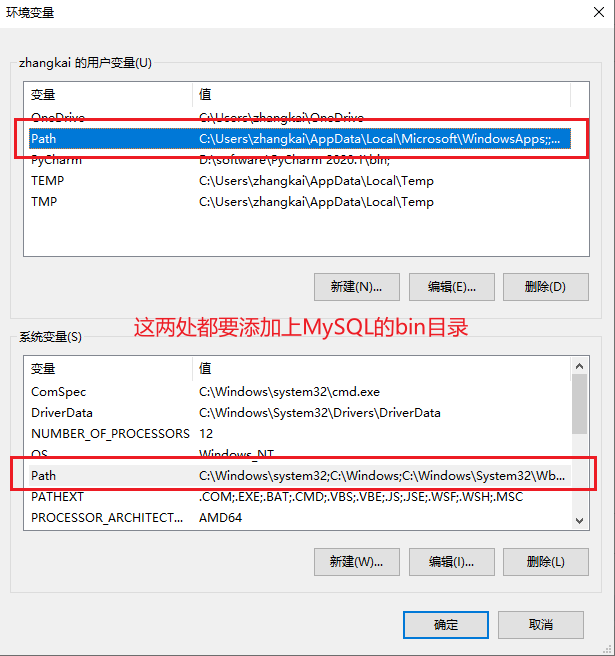
将MySQL的bin目录添加到系统的环境变量之后,终端中使用mysqld或者mysql命令都报错:
'mysqld' 不是内部或外部命令,也不是可运行的程序

# 或者
'mysql' 不是内部或外部命令,也不是可运行的程序
这很明显,是在环境变量中没有找到bin目录,而我们之前明明在系统的环境变量中添加了,却依然找不到,甚至重启电脑,还是不行。
解决办法就是,在用户的变量中也添加上MySQL的bin目录,然后重新打开终端就好了。
[ERROR] InnoDB: Header page consists of zero bytes in datafile: .\ibdata1, Space ID:0, Flags: 0. Please refer to http://dev.mysql.com/doc/refman/5.7/en/innodb-troubleshooting-datadict.html for how to resolve the issue.
win10 + mysql5.7.20
这个报错就是初始化成功(其实没成功,但没报错,误以为成功了),在服务中点击启动时,报的错。
要是打开其错误日志,你大概能找到的error就是跟ibdata有关的报错。
当然,你要是在终端中使用net start命令,启动mysql也提示服务启动失败。
其原因,在初始化成功(其实没成功,但初始化命令没报错,而且data目录中也没有mysql这三个初始的数据库,只有ibdata1等三个文件,这三个文件也有问题!),添加完服务之后,使用net命令启动mysqld失败,或者在服务中点击启动报错:

下面是错误日志:
2022-06-03T04:48:44.602077Z 0 [Warning] TIMESTAMP with implicit DEFAULT value is deprecated. Please use --explicit_defaults_for_timestamp server option (see documentation for more details).
2022-06-03T04:48:44.801734Z 0 [ERROR] InnoDB: Operating system error number 87 in a file operation.
2022-06-03T04:48:44.803728Z 0 [ERROR] InnoDB: File .\ib_logfile101: 'aio write' returned OS error 187. Cannot continue operation
2022-06-03T04:48:44.804725Z 0 [ERROR] InnoDB: Cannot continue operation.
2022-06-03T04:49:02.781610Z 0 [Warning] TIMESTAMP with implicit DEFAULT value is deprecated. Please use --explicit_defaults_for_timestamp server option (see documentation for more details).
2022-06-03T04:49:02.781610Z 0 [Note] --secure-file-priv is set to NULL. Operations related to importing and exporting data are disabled
2022-06-03T04:49:02.781610Z 0 [Note] mysql (mysqld 5.7.20) starting as process 3992 ...
2022-06-03T04:49:02.792580Z 0 [Note] InnoDB: Mutexes and rw_locks use Windows interlocked functions
2022-06-03T04:49:02.793579Z 0 [Note] InnoDB: Uses event mutexes
2022-06-03T04:49:02.793579Z 0 [Note] InnoDB: _mm_lfence() and _mm_sfence() are used for memory barrier
2022-06-03T04:49:02.794576Z 0 [Note] InnoDB: Compressed tables use zlib 1.2.3
2022-06-03T04:49:02.796570Z 0 [Note] InnoDB: Number of pools: 1
2022-06-03T04:49:02.796570Z 0 [Note] InnoDB: Not using CPU crc32 instructions
2022-06-03T04:49:02.801558Z 0 [Note] InnoDB: Initializing buffer pool, total size = 128M, instances = 1, chunk size = 128M
2022-06-03T04:49:02.807541Z 0 [Note] InnoDB: Completed initialization of buffer pool
2022-06-03T04:49:02.823563Z 0 [ERROR] InnoDB: Header page consists of zero bytes in datafile: .\ibdata1, Space ID:0, Flags: 0. Please refer to http://dev.mysql.com/doc/refman/5.7/en/innodb-troubleshooting-datadict.html for how to resolve the issue.
2022-06-03T04:49:02.825558Z 0 [ERROR] InnoDB: Corrupted page [page id: space=0, page number=0] of datafile '.\ibdata1' could not be found in the doublewrite buffer.
2022-06-03T04:49:02.827552Z 0 [ERROR] InnoDB: Plugin initialization aborted with error Data structure corruption
2022-06-03T04:49:03.130062Z 0 [ERROR] Plugin 'InnoDB' init function returned error.
2022-06-03T04:49:03.131061Z 0 [ERROR] Plugin 'InnoDB' registration as a STORAGE ENGINE failed.
2022-06-03T04:49:03.132058Z 0 [ERROR] Failed to initialize plugins.
2022-06-03T04:49:03.132058Z 0 [ERROR] Aborting

2022-06-03T04:49:03.133055Z 0 [Note] Binlog end
2022-06-03T04:49:03.133055Z 0 [Note] Shutting down plugin 'CSV'
2022-06-03T04:49:03.134052Z 0 [Note] mysql: Shutdown complete
解决办法就是,在my.ini文件中追加:
[mysql]
# 可选的参数当你use到某个数据库中,路径上显示当前数据库的名字
# prompt=[\\d]>
[mysqld]
# 默认端口
port=3306
# mysql的安装目录,也是工作目录
basedir=C:/mysql-5.7.20-winx64
# 数据库存放的目录,data目录无需手动创建,MySQL初始化成功,就会自动创建了
datadir=C:/mysql-5.7.20-winx64/data
# 错误日志,如果启动失败,可以查看这个错误日志,定位错误原因
log_error=C:/mysql-5.7.20-winx64/mysql.err
# 指定默认字符集
character-set-server=utf8mb4
# 追加下面这两行配置
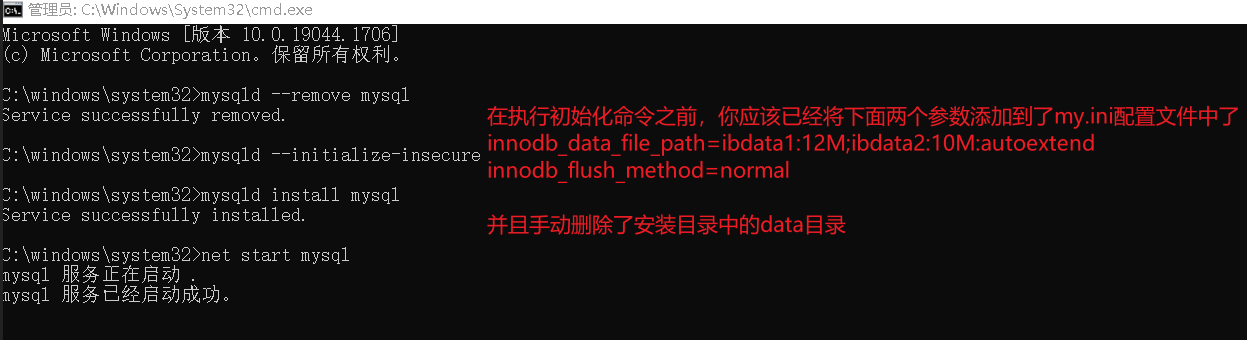
innodb_data_file_path=ibdata1:12M;ibdata2:10M:autoextend
innodb_flush_method=normal
然后删掉之前注册的服务、再删掉之前初始化创建的有问题的data目录,然后再重新执行初始化过程应该就可以了。

参考:
- https://www.likecs.com/show-203996700.html
- https://www.jianshu.com/p/8dda50ee812f?utm_campaign=maleskine&utm_content=note&utm_medium=seo_notes&utm_source=recommendation
本地计算机上的mysql服务启动后停止,某些服务在未由其它服务或程序使用时将自动停止。
win10 + mysql5.7.20
这个报错就是初始化成功(其实没成功,但没报错,误以为成功了),在服务中点击启动时,报的错。
要是打开其错误日志,你大概能找到的error就是跟ibdata有关的报错。
当然,你要是在终端中使用net start命令,启动mysql也提示服务启动失败。
其原因,在初始化成功(其实没成功,但初始化命令没报错,而且data目录中也没有mysql这三个初始的数据库,只有ibdata1等三个文件,这三个文件也有问题!),添加完服务之后,使用net命令启动mysqld失败,或者在服务中点击启动报错:
下面是错误日志:
2022-06-03T04:48:44.602077Z 0 [Warning] TIMESTAMP with implicit DEFAULT value is deprecated. Please use --explicit_defaults_for_timestamp server option (see documentation for more details).
2022-06-03T04:48:44.801734Z 0 [ERROR] InnoDB: Operating system error number 87 in a file operation.
2022-06-03T04:48:44.803728Z 0 [ERROR] InnoDB: File .\ib_logfile101: 'aio write' returned OS error 187. Cannot continue operation
2022-06-03T04:48:44.804725Z 0 [ERROR] InnoDB: Cannot continue operation.
2022-06-03T04:49:02.781610Z 0 [Warning] TIMESTAMP with implicit DEFAULT value is deprecated. Please use --explicit_defaults_for_timestamp server option (see documentation for more details).
2022-06-03T04:49:02.781610Z 0 [Note] --secure-file-priv is set to NULL. Operations related to importing and exporting data are disabled
2022-06-03T04:49:02.781610Z 0 [Note] mysql (mysqld 5.7.20) starting as process 3992 ...
2022-06-03T04:49:02.792580Z 0 [Note] InnoDB: Mutexes and rw_locks use Windows interlocked functions
2022-06-03T04:49:02.793579Z 0 [Note] InnoDB: Uses event mutexes
2022-06-03T04:49:02.793579Z 0 [Note] InnoDB: _mm_lfence() and _mm_sfence() are used for memory barrier
2022-06-03T04:49:02.794576Z 0 [Note] InnoDB: Compressed tables use zlib 1.2.3
2022-06-03T04:49:02.796570Z 0 [Note] InnoDB: Number of pools: 1
2022-06-03T04:49:02.796570Z 0 [Note] InnoDB: Not using CPU crc32 instructions
2022-06-03T04:49:02.801558Z 0 [Note] InnoDB: Initializing buffer pool, total size = 128M, instances = 1, chunk size = 128M
2022-06-03T04:49:02.807541Z 0 [Note] InnoDB: Completed initialization of buffer pool
2022-06-03T04:49:02.823563Z 0 [ERROR] InnoDB: Header page consists of zero bytes in datafile: .\ibdata1, Space ID:0, Flags: 0. Please refer to http://dev.mysql.com/doc/refman/5.7/en/innodb-troubleshooting-datadict.html for how to resolve the issue.
2022-06-03T04:49:02.825558Z 0 [ERROR] InnoDB: Corrupted page [page id: space=0, page number=0] of datafile '.\ibdata1' could not be found in the doublewrite buffer.
2022-06-03T04:49:02.827552Z 0 [ERROR] InnoDB: Plugin initialization aborted with error Data structure corruption
2022-06-03T04:49:03.130062Z 0 [ERROR] Plugin 'InnoDB' init function returned error.
2022-06-03T04:49:03.131061Z 0 [ERROR] Plugin 'InnoDB' registration as a STORAGE ENGINE failed.
2022-06-03T04:49:03.132058Z 0 [ERROR] Failed to initialize plugins.
2022-06-03T04:49:03.132058Z 0 [ERROR] Aborting

2022-06-03T04:49:03.133055Z 0 [Note] Binlog end
2022-06-03T04:49:03.133055Z 0 [Note] Shutting down plugin 'CSV'
2022-06-03T04:49:03.134052Z 0 [Note] mysql: Shutdown complete
解决办法就是,在my.ini文件中追加:
[mysql]
# 可选的参数当你use到某个数据库中,路径上显示当前数据库的名字
# prompt=[\\d]>
[mysqld]
# 默认端口
port=3306
# mysql的安装目录,也是工作目录
basedir=C:/mysql-5.7.20-winx64
# 数据库存放的目录,data目录无需手动创建,MySQL初始化成功,就会自动创建了
datadir=C:/mysql-5.7.20-winx64/data
# 错误日志,如果启动失败,可以查看这个错误日志,定位错误原因
log_error=C:/mysql-5.7.20-winx64/mysql.err
# 指定默认字符集
character-set-server=utf8mb4

# 追加下面这两行配置
innodb_data_file_path=ibdata1:12M;ibdata2:10M:autoextend
innodb_flush_method=normal
然后删掉之前注册的服务、再删掉之前初始化创建的有问题的data目录,然后再重新执行初始化过程应该就可以了。
参考:
- https://www.likecs.com/show-203996700.html
- https://www.jianshu.com/p/8dda50ee812f?utm_campaign=maleskine&utm_content=note&utm_medium=seo_notes&utm_source=recommendation
ERROR 2003 (HY000): Can't connect to MySQL server on 'localhost' (10060)
win7 64位系统 + mysql5.7.20
首先情况是:安装成功、配置文件配置成功、环境变量添加成功、服务启动成功,啥都是好的,就是链接不上:

后来的解决办法是,该电脑防火墙开着呢,然后关闭系统的防火墙就好了.....
for docker
centos7.9 + docker20.10.3
- 拉取镜像:
# docker search mysql
# docker pull mysql:5.5
# docker pull mysql:5.6
docker pull mysql:5.7
- 创建容器并启动,这里有两种启动方式。
第一种,临时使用,删除容器之后,就什么也没有了:
docker run --name mysql -p 3338:3306 -e MYSQL_ROOT_PASSWORD=123 -d mysql:5.6
--name mysql,指定容器名称。-p 3338:3306,3308表示宿主机的对外端口,3306是MySQL容器的运行端口。-e MYSQL_ROOT_PASSWORD=123,为MySQL的root用户设置密码。
第二种,持久化数据到本地,删除容器,本地数据还在:
docker run --name mysql -p 3338:3306 -v /mysql/data:/data/mysql_docker -e MYSQL_ROOT_PASSWORD=123 -d mysql:5.7
-v /mysql/data:/data/mysql_docker,将容器中的/mysql/data挂在到宿主机的/data/mysql_docker目录,达到持久化的目的。
- (可选),进入容器的交互式环境:
docker exec -it mysql bash
你也可以通过容器的对外端口进行远程访问:
宿主机IP:MySQL容器对外暴露的端口

10.0.0.200:3338
for mac
install
从MySQL官网下载
链接:https://downloads.mysql.com/archives/community/
选择版本和平台,然后点击下载即可:

然后就开始安装就好了


这个基于dmg文件的安装过程,其实包含了:
- 安装,默认安装在了
/usr/local/mysql-5.7.31-macos10.14-x86_64/目录,但同时也会在/usr/local下面创建个快捷方式,快捷方式的目录是/usr/local/mysql,我们后续的配置也是基于这个快捷方式来的。 - 初始化,在安装目录下创建data目录用于存放数据,初始化模块数据库以及账户相关等。
所以,让我们牢记几个目录:
# MySQL的安装目录
/usr/local/mysql

# MySQL的数据库目录
/usr/local/mysql/data

# MySQL启动脚本所在目录
/usr/local/mysql/support-files

# MySQL配置文件目录,注意,etc目录需要手动创建
/usr/local/mysql/etc/my.cnf
必要的配置
这一步主要是添加配置文件,和设置快捷启动的配置。
把需要的两个目录创建出来:
cd /usr/local/mysql
mkdir etc
mkdir logs
配置文件
建议在MySQL安装目录下创建 etc/my.cnf 作为MySQL的配置文件。

# 先cd到etc目录
cd /usr/local/mysql/etc

# 然后vim 创建my.cnf文件并添加如下内容,完事保存即可

[mysqld]
port=3306
basedir=/usr/local/mysql
datadir=/usr/local/mysql/data

# 错误日志,需要手动创建 logs 目录
log_error=/usr/local/mysql/logs/error.log
# 指定默认字符集
character_set_server=utf8mb4
MySQL的配置文件按照优先级,会在以下目录中寻找:

为了避免多个版本共存时,配置文件混乱的问题,建议大家还是把配置文件放在当前MySQL的安装目录下。
添加环境变量
为了方便MySQL的启动和停止,我们需要将下面两个目录添加到~/.bash_profile中:
# 1. 打开~/.bash_profile文件
vim ~/.bash_profile

# 然后将下面的路径添加到这个文件中,如果这个文件非空,就添加到最后,如果文件是空的,就添加进去就好了
export PATH=$PATH:/usr/local/mysql/bin:/usr/local/mysql/support-files

# 然后保存退出,执行source命令使其生效
source ~/.bash_profile
授权
再来完成一步重要的操作,防止后续启动报错,那就是给MySQL安装目录777权限:
sudo chmod -R 777 /usr/local/mysql/*
启动和设置密码
启动
如果上面的配置都做了,那么就可以通过下面两个命令来管理MySQL服务:
sudo mysql.server start
sudo mysql.server stop

tengjianfudeMacBook-Air:support-files teng$ sudo mysql.server start
my_print_defaults: [Warning] World-writable config file '/usr/local/mysql/etc/my.cnf' is ignored.
Starting MySQL
.my_print_defaults: [Warning] World-writable config file '/usr/local/mysql/etc/my.cnf' is ignored.
my_print_defaults: [Warning] World-writable config file '/usr/local/mysql/etc/my.cnf' is ignored.
 SUCCESS!
tengjianfudeMacBook-Air:support-files teng$ sudo mysql.server stop
my_print_defaults: [Warning] World-writable config file '/usr/local/mysql/etc/my.cnf' is ignored.
Shutting down MySQL
.. SUCCESS!
看到SUCCESS!就表示启动或者停止成功了。
通过这种以mysql.server脚本的形式,内部是使用 mysqld_safe运行,可以守护我们的MySQL进程,如意外挂掉可自动重启。
mac的话,还有一种在系统偏好设置中搞,不过不推荐:
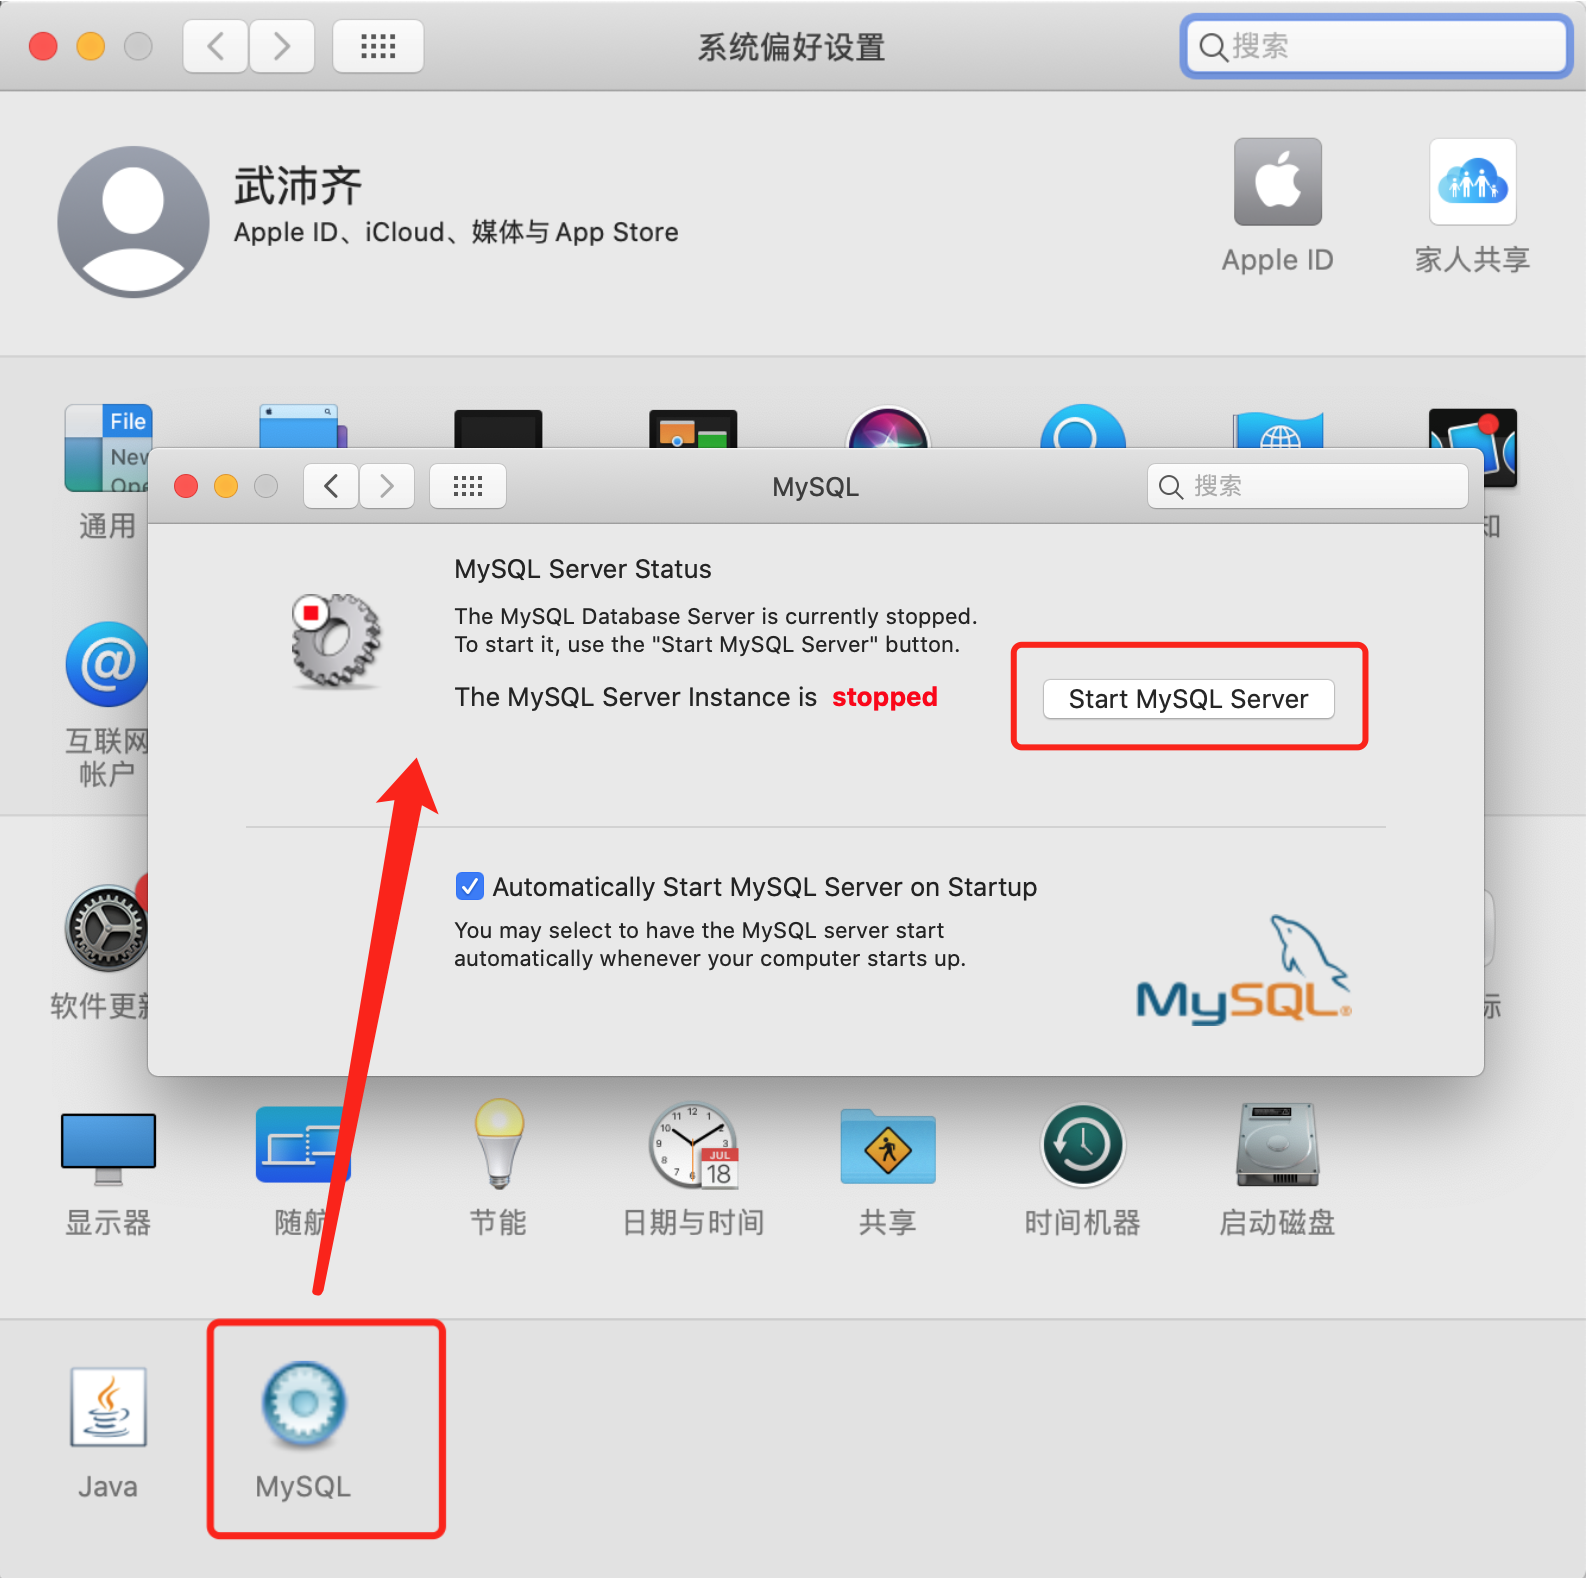
设置密码
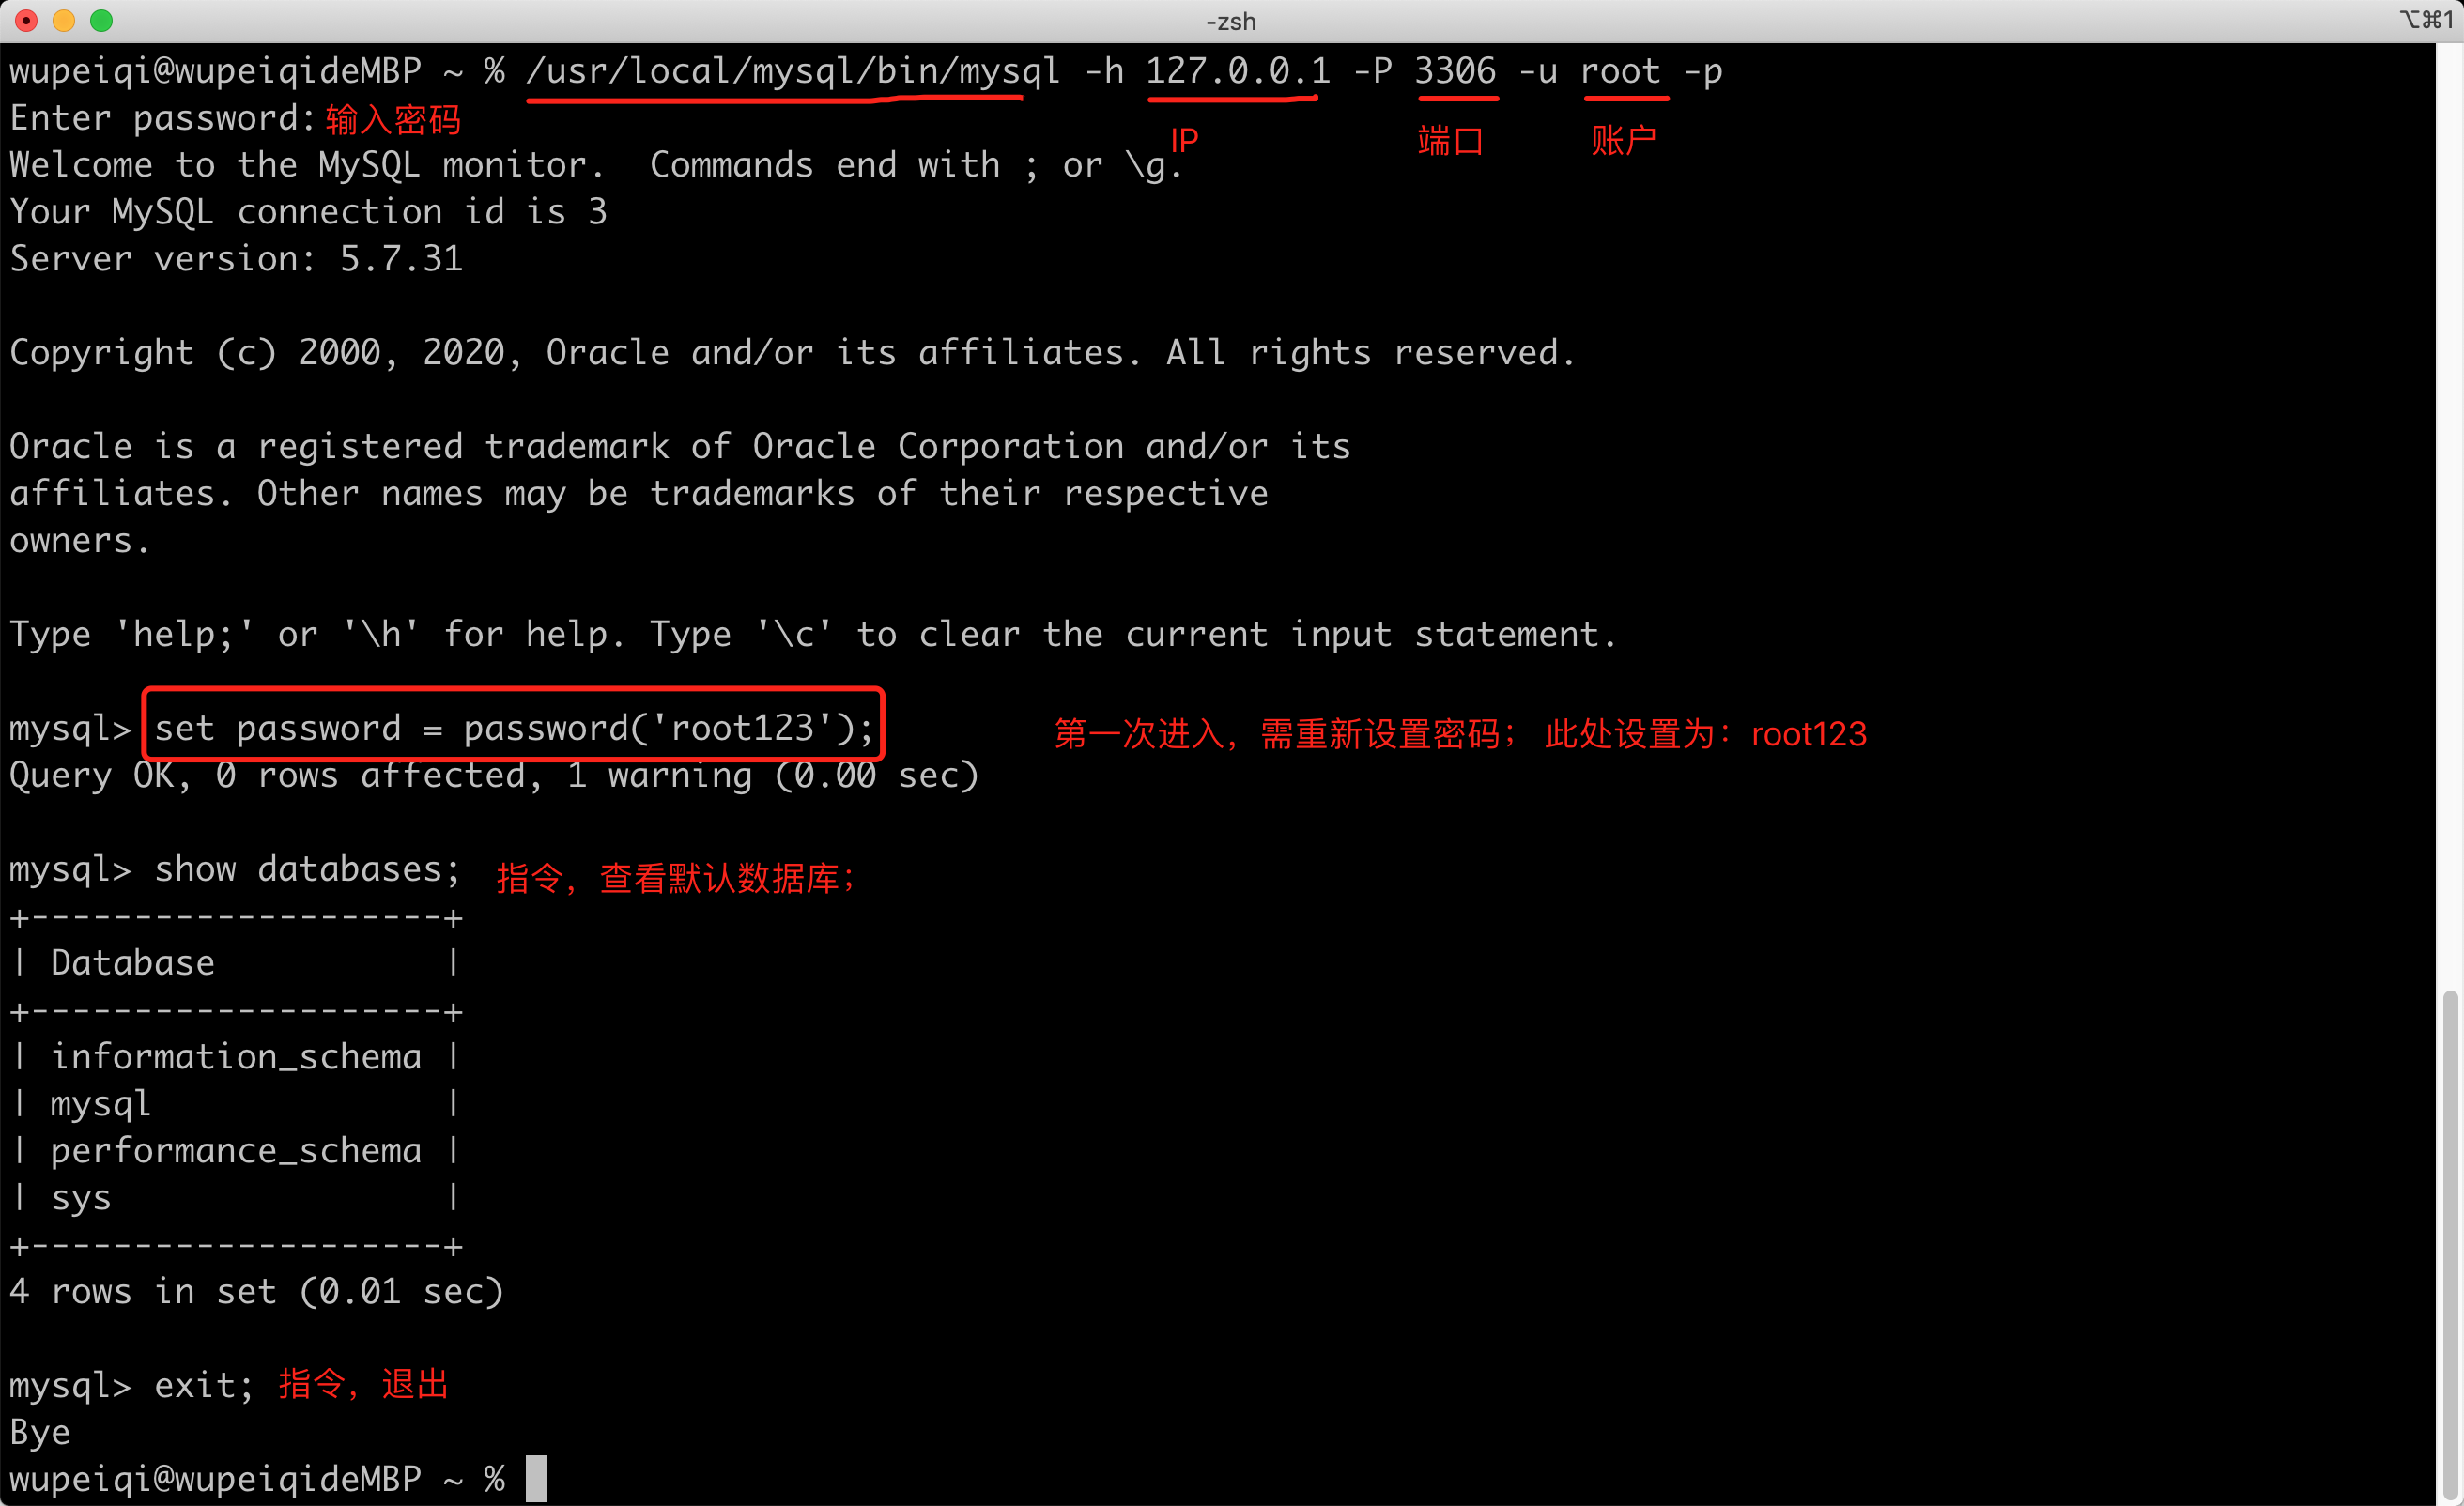
法1
为root用户(该用户为本地用户)创建密码:
mysqladmin -uroot -p password 123
-p password后面跟你要为root用户设置的密码。
法2
常见报错及解决
ERROR! MySQL server PID file could not be found!
执行启动命令,发现报错:
tengjianfudeMacBook-Air:support-files teng$ sudo mysql.server start
my_print_defaults: [ERROR] Found option without preceding group in config file /usr/local/mysql/etc/my.cnf at line 1!
my_print_defaults: [ERROR] Fatal error in defaults handling. Program aborted!
Starting MySQL
.my_print_defaults: [ERROR] Found option without preceding group in config file /usr/local/mysql/etc/my.cnf at line 1!
my_print_defaults: [ERROR] Fatal error in defaults handling. Program aborted!
my_print_defaults: [ERROR] Found option without preceding group in config file /usr/local/mysql/etc/my.cnf at line 1!
my_print_defaults: [ERROR] Fatal error in defaults handling. Program aborted!
 ERROR! The server quit without updating PID file (/usr/local/mysql/data/tengjianfudeMacBook-Air.local.pid).
tengjianfudeMacBook-Air:support-files teng$ sudo mysql.server stop
my_print_defaults: [ERROR] Found option without preceding group in config file /usr/local/mysql/etc/my.cnf at line 1!
my_print_defaults: [ERROR] Fatal error in defaults handling. Program aborted!
 ERROR! MySQL server PID file could not be found!
tengjianfudeMacBook-Air:support-files teng$ sudo /usr/local/mysql/support-files/mysql.server start
my_print_defaults: [ERROR] Found option without preceding group in config file /usr/local/mysql/etc/my.cnf at line 1!
my_print_defaults: [ERROR] Fatal error in defaults handling. Program aborted!
Starting MySQL
.my_print_defaults: [ERROR] Found option without preceding group in config file /usr/local/mysql/etc/my.cnf at line 1!
my_print_defaults: [ERROR] Fatal error in defaults handling. Program aborted!
my_print_defaults: [ERROR] Found option without preceding group in config file /usr/local/mysql/etc/my.cnf at line 1!
my_print_defaults: [ERROR] Fatal error in defaults handling. Program aborted!
 ERROR! The server quit without updating PID file (/usr/local/mysql/data/tengjianfudeMacBook-Air.local.pid).
tengjianfudeMacBook-Air:support-files teng$ sudo /usr/local/mysql/support-files/mysql.server stop
my_print_defaults: [ERROR] Found option without preceding group in config file /usr/local/mysql/etc/my.cnf at line 1!
my_print_defaults: [ERROR] Fatal error in defaults handling. Program aborted!
 ERROR! MySQL server PID file could not be found!
解决办法,就是给MySQL安装目录所有权限:
sudo chmod -R 777 /usr/local/mysql/*

tengjianfudeMacBook-Air:support-files teng$ sudo chmod -R 777 /usr/local/mysql/*
tengjianfudeMacBook-Air:support-files teng$ sudo /usr/local/mysql/support-files/mysql.server start
my_print_defaults: [Warning] World-writable config file '/usr/local/mysql/etc/my.cnf' is ignored.
Starting MySQL
.my_print_defaults: [Warning] World-writable config file '/usr/local/mysql/etc/my.cnf' is ignored.
my_print_defaults: [Warning] World-writable config file '/usr/local/mysql/etc/my.cnf' is ignored.
 SUCCESS!
tengjianfudeMacBook-Air:support-files teng$ sudo /usr/local/mysql/support-files/mysql.server stop
my_print_defaults: [Warning] World-writable config file '/usr/local/mysql/etc/my.cnf' is ignored.
Shutting down MySQL
.. SUCCESS!
tengjianfudeMacBook-Air:support-files teng$ sudo mysql.server start
my_print_defaults: [Warning] World-writable config file '/usr/local/mysql/etc/my.cnf' is ignored.
Starting MySQL
.my_print_defaults: [Warning] World-writable config file '/usr/local/mysql/etc/my.cnf' is ignored.
my_print_defaults: [Warning] World-writable config file '/usr/local/mysql/etc/my.cnf' is ignored.
 SUCCESS!
tengjianfudeMacBook-Air:support-files teng$ sudo mysql.server stop
my_print_defaults: [Warning] World-writable config file '/usr/local/mysql/etc/my.cnf' is ignored.
Shutting down MySQL
.. SUCCESS!
ERROR! The server quit without updating PID file (/usr/local/mysql/data/tengjianfudeMacBook-Air.local.pid)
mac + mysql5.7.31
遇到这个问题,应该是MySQL服务已经启动了,有些时候,MySQL设置了开机启动,但新手不知道这个情况,就直接又执行sudo mysql.server start导致报的错,让人以为是MySQL启动失败了。
所以先看下MySQL服务是否启动:
# 先ps过滤下,看看有没有结果
ps -ef|grep mysqld

# 有的话,你可以直接登录一下看看能否登录进去,登录进去就啥问题都没了。
mysql -uroot -p


当然了,补充个删进程的命令
kill -9 进程号
ERROR 1045 (28000): Access denied for user 'root'@'localhost' (using password: NO)
mac + mysql5.7.31
稀奇古怪的事儿,遇到的还真不少,在MySQL启动成功后(没有设置密码),使用mysql命令登录,死活登录不进去,这也没设置密码啊!!
zhoushaoding@zhoushaodingdeMacBook-Pro mysql % sudo mysql.server start
my_print_defaults: [Warning] World-writable config file '/usr/local/mysql/etc/my.cnf' is ignored.
Starting MySQL
.my_print_defaults: [Warning] World-writable config file '/usr/local/mysql/etc/my.cnf' is ignored.
my_print_defaults: [Warning] World-writable config file '/usr/local/mysql/etc/my.cnf' is ignored.
Logging to '/usr/local/mysql/data/zhoushaodingdeMacBook-Pro.local.err'.
. SUCCESS!
zhoushaoding@zhoushaodingdeMacBook-Pro mysql % mysql -uroot -p
mysql: [Warning] World-writable config file '/usr/local/mysql/etc/my.cnf' is ignored.
Enter password:
ERROR 1045 (28000): Access denied for user 'root'@'localhost' (using password: NO)
zhoushaoding@zhoushaodingdeMacBook-Pro mysql % mysql -uroot -p
mysql: [Warning] World-writable config file '/usr/local/mysql/etc/my.cnf' is ignored.
Enter password:
ERROR 1045 (28000): Access denied for user 'root'@'localhost' (using password: NO)
死活登录不进去......
解决办法,就是管它有没有密码,都重置下密码!!!
主要思路就是关闭授权表登录进去,然后修改密码,然后再重启。
zhoushaoding@zhoushaodingdeMacBook-Pro mysql % sudo mysql.server stop         # 关闭启动的MySQL
Password:
my_print_defaults: [Warning] World-writable config file '/usr/local/mysql/etc/my.cnf' is ignored.
Shutting down MySQL
.. SUCCESS!

zhoushaoding@zhoushaodingdeMacBook-Pro mysql % sudo mysqld_safe --skip-grant-tables --skip-networking &      # 关闭授权表,无验证登录
[1] 23699
zhoushaoding@zhoushaodingdeMacBook-Pro mysql % my_print_defaults: [Warning] World-writable config file '/usr/local/mysql/etc/my.cnf' is ignored.
my_print_defaults: [Warning] World-writable config file '/usr/local/mysql/etc/my.cnf' is ignored.
2022-04-19T12:09:49.6NZ mysqld_safe Logging to '/usr/local/mysql/data/zhoushaodingdeMacBook-Pro.local.err'.
2022-04-19T12:09:49.6NZ mysqld_safe Starting mysqld daemon with databases from /usr/local/mysql/data

zhoushaoding@zhoushaodingdeMacBook-Pro mysql % mysql                                                         # 直接输入mysql登录进去
mysql: [Warning] World-writable config file '/usr/local/mysql/etc/my.cnf' is ignored.
Welcome to the MySQL monitor.  Commands end with ; or \g.
Your MySQL connection id is 2
Server version: 5.7.31 MySQL Community Server (GPL)

Copyright (c) 2000, 2020, Oracle and/or its affiliates. All rights reserved.

Oracle is a registered trademark of Oracle Corporation and/or its
affiliates. Other names may be trademarks of their respective
owners.

Type 'help;' or '\h' for help. Type '\c' to clear the current input statement.

mysql> flush privileges;                                    # 必要的步骤,加载授权表
Query OK, 0 rows affected (0.00 sec)

mysql> alter user root@'localhost' identified by '123';     # 修改root@'localhost'账号对应的密码
Query OK, 0 rows affected (0.00 sec)

mysql> flush privileges;
Query OK, 0 rows affected (0.01 sec)                        # 更新授权表

mysql> exit;
Bye


zhoushaoding@zhoushaodingdeMacBook-Pro mysql % sudo pkill mysqld   # 杀掉无授权启动的MySQL服务
zhoushaoding@zhoushaodingdeMacBook-Pro mysql % 2022-04-19T12:11:30.6NZ mysqld_safe mysqld from pid file /usr/local/mysql/data/zhoushaodingdeMacBook-Pro.local.pid ended

[1]  + done       sudo mysqld_safe --skip-grant-tables --skip-networking
zhoushaoding@zhoushaodingdeMacBook-Pro mysql % sudo mysql.server start
my_print_defaults: [Warning] World-writable config file '/usr/local/mysql/etc/my.cnf' is ignored.
Starting MySQL
.my_print_defaults: [Warning] World-writable config file '/usr/local/mysql/etc/my.cnf' is ignored.
my_print_defaults: [Warning] World-writable config file '/usr/local/mysql/etc/my.cnf' is ignored.
 SUCCESS!

zhoushaoding@zhoushaodingdeMacBook-Pro mysql % mysql -uroot -p123                      # 现在就可以登录进去啦
mysql: [Warning] World-writable config file '/usr/local/mysql/etc/my.cnf' is ignored.
mysql: [Warning] Using a password on the command line interface can be insecure.
Welcome to the MySQL monitor.  Commands end with ; or \g.
Your MySQL connection id is 2
Server version: 5.7.31 MySQL Community Server (GPL)

Copyright (c) 2000, 2020, Oracle and/or its affiliates. All rights reserved.

Oracle is a registered trademark of Oracle Corporation and/or its
affiliates. Other names may be trademarks of their respective
owners.

Type 'help;' or '\h' for help. Type '\c' to clear the current input statement.

mysql> exit;
Bye
zhoushaoding@zhoushaodingdeMacBook-Pro mysql %
相关参数解释:
--skip-grant-tables:关闭授权表,这样就可以无验证登录了。
--skip-networking:关闭TCP/IP,该参数的目的是只能本地通过socket连接登录,保证修改密码时的安全性。
&是后台执行。
至于在修改密码前的flush privileges操作是因为修改密码还是要使用授权表,但是由于mysqld_safe模式启动授权表没有从磁盘加载到内存,所以直接执行alter命令会失败,所以要使用flush privileges命令将授权表加载到内存中,才能修改密码成功。修改的flush privileges让其新密码立即生效。
参考:https://www.cnblogs.com/Neeo/articles/13062703.html#本地管理员用户密码忘记了
command not found: mysql
mac + mysql5.7.31
这一步一般很少遇到,主要现象就是,添加完MySQL的环境变量之后,source之后,当前终端使用mysql命令能登录进去。
但是!新打开个终端,在登录就废了:
zhoushaoding@zhoushaodingdeMacBook-Pro ~ % myql -uroot -p123
zsh: command not found: myql
只有再次source ~/.bash_profile后才能行,这每次都要source谁受得了???
解决办法就是:
zhoushaoding@zhoushaodingdeMacBook-Pro ~ % vim ~/.zshrc
# 添加下面一行命令,然后保存退出
source ~/.bash_profile

zhoushaoding@zhoushaodingdeMacBook-Pro ~ % source ~/.zshrc
zhoushaoding@zhoushaodingdeMacBook-Pro ~ % cat ~/.zshrc
source ~/.bash_profile
完事就能ok了。
参考:https://blog.csdn.net/Chad97/article/details/102533405
欢迎斧正,that's all,see also:

 浙公网安备 33010602011771号