安卓开发-基础篇(更新中)
安卓开发-基础篇
本篇文章算是自己学习的记录和补充,防止以后忘记。如果能够对大家有所帮助那就更好了。本文将会持续更新(根据本人的学习进度),如有问题,欢迎在评论区留言指正。
目录
- 安卓开发-基础篇
- 目录
- 1.简单控件
- 2. 活动Activity
- 参考文章/文献:
1.简单控件
1.1 文本显示(Text,Color)
1.1.1 简要介绍
这里的文本显示主要从两个方面来开始描述,一个是用于写界面的layout层部分,另外一个是正常的Java包部分。
- 在Layout层中,主要以XML形式来展现。常见的写法如下:
activity_main.xml
<?xml version="1.0" encoding="utf-8"?>
<LinearLayout xmlns:android="http://schemas.android.com/apk/res/android"
              android:layout_width="match_parent"
              android:layout_height="match_parent">
              <TextView
                        android:id="@+id"/tv_test"        <!--当前文字的唯一标识-->
                        android:layout_width="wrap_content"
                        android:layout_height="wrap_content"
                        android:text="Hi!">               <!--用于修改当前的文字的内容-->
              </TextView>

</LinearLayout>
2.在后端的Java部分,可以这样来实现
MainActivity.java
public class MainActivity extends AppCompatActivity {

    @Override
    protected void onCreate(Bundle savedInstanceState) {
        super.onCreate(savedInstanceState);
        setContentView(R.layout.activity_main);
        TextView tv_test=findViewById(R.id.test);
        tv_test.setText("你好!");//用于设置当前的文字
    }
}
此外,作为补充,在此简要介绍一下像素。
| 名称 | 解释 |
|---|---|
| px(pixel)像素 | 称为图像元素,是作为图像构成的基本单元,单个像素的大小不固定,随屏幕大小和像素关系变化,一个像素点为1px。 |
| Resolution(分辨率) | 是指屏幕的垂直和水平方向的像素数量,如果分辨率是1920x1080,那就是垂直方向有1920个像素,水平方向有1080个像素。 |
| Dpi(像素密度) | 是指屏幕上每英寸(1英寸=2.54cm)距离中有多少个像素(具体的计算方式见下方) |
| Density(密度) | 是指屏幕上每平方英寸(2.54^2平方厘米)中含有的像素点的数量。 |
| Dip/dp(设备独立像素) | 可以称为dp,长度单位,同一个单位在不同设备上会有不同的显示效果,与设备密度有关(计算方式在下方) |
以4.95英寸1920x1080的手机为例:
Dpi:
- 计算直角边像素数量 19202+10802=2202^2
- 计算DPI:2202/4.95=445
- 则此设备的DPI为44(每英寸的距离中有445个像素)
Density:
上面得到每英寸中有440像素,即Density为每平方英寸中的像素数量,为445^2=198025
Dip:
所有显示在屏幕上的图片均以px为单位,Dip是我们开发中使用的长度单位,最后需要转化成px,1Dip的换算为:
px=dip x dip /160
换算可得:
320 x 480分辨率,3.6寸的手机:dpi为160,1dp=1px
以下是跳过证明的部分结论:
- 对于相同分辨率的手机,屏幕越大,同DP的组件占用屏幕的比例就越小。
- 对于相同尺寸的手机,即使分辨率不同,同DP的组件占用屏幕的比例也相同。
- 根据官方的方法文档,官方的setTextSize方法使用的SP作为单位的。
1.1.2 文本颜色
官方给了部分颜色预设,在Java部分可以通过:
tv_test(TextView的变量名).setTextColor(Color.(可以挑选颜色)BLUE);如果需要自定义颜色的话,可以通过查询颜色的RGB的16进制代码进行输入,具体如下:
tv_test(TextView的变量名).setTextColor(0xff00ff00);//八位表示显示,不透明绿色
tv_test(TextView的变量名).setTextColor(0x00ff00); //六位表示显示,透明绿色
而在前端XML部分,可以使用:
android:textColor="#000000"
1.2 视图 (android:layout_width; android:layout_height;)
1.2.1 视图宽高
在XML前端视图中,主要通过属性:
android:layout_width="wrap_content"
android:layout_height="wrap_content"
来进行实现,宽和高的取值主要有以下3种:
1.match_parent:表示与上级视图一致
2.wrap_content:表示与内容适应
3.以dp和px作为单位
而对于Java部分的来说,在确保XML界面已经设置完备后,需要依次执行以下步骤:
- 调用控件对象的getLayoutParams方法,来获取该控件的布局参数。
- 布局参数的width属性表示宽度,height属性表示高度,修改这两个属性值即可。
- 调用控件对象的setLayoutParams方法,填入修改后的布局使得参数生效。
具体代码样例如下:
//获取tv_test的布局参数(含宽度和高度)
ViewGroup.LayoutParams params=tv_test.getLayoutParams();
//修改布局参数中的宽度数值,注意默认px单位,需要把dp数值转成px数值
params.width= Utils(自己建立的函数,需要自己去替换).dispDpToPx(this,300);
//设置tv_test的参数
tv_test.setLayoutParams(params);
其中,上文的dp转换px的函数如下:
//根据手机的分辨率从dp的单位转换陈px(像素)
public static int dispDpToPx(Context context,float dpValue){
    //获取当前手机的像素密度(1个dp对应几个px)
    float scale=context.getResources().getDisplayMetrics().density;
    //四舍五入取整
    return (int)(dpValue*scale+0.5f);
}
1.2.2 视图间距
设置视图的间距主要有两种方式:
- 采用layout_margin属性,其指定了当前视图与周围平级视图之间的距离。(包括layout_margin、layout_marginLeft、layout_marginTop、layout_marginRight、layout_marginBottom)-------指的是视图与外侧之间的距离。
- 采用padding属性,它指定了当前视图与内部下级视图之间的距离。(包括padding、paddingLeft、paddingTop、paddingRight、paddingBottom)-------指的是视图与内侧之间的关系。
1.2.3 视图对齐方式
设置视图的对齐方式有两种方式:
- 采用layout_gravity属性,它指定了当前视图相对于上级视图的对齐方式。
- 采用gravity属性,它指定了下级视图相对于当前视图的对齐方式。
- layout_gravity与gravity的取值包括:left、top、right、bottom,还可以用竖线来连接各取值,例如"left|top"即为向左上角对齐。
1.3 布局 (Layout)
1.3.1 线性布局LinearLayout
线性布局内部的各视图有两种排列方式:
- orientation属性值为horizontal时,内部视图在水平方向从左到右排列。
- orientation属性值为vertical时,内部视图在垂直方向从上向下排列。
- 若不指定其属性值,默认水平方向排列。
实例:
activity_main.xml
<?xml version="1.0" encoding="utf-8"?>
<LinearLayout xmlns:android="http://schemas.android.com/apk/res/android"
    xmlns:app="http://schemas.android.com/apk/res-auto"
    xmlns:tools="http://schemas.android.com/tools"
    android:layout_width="match_parent"
    android:layout_height="match_parent"
    android:orientation="vertical"
    tools:context=".MainActivity">

    。。。中间为你写的实例部分

</LinearLayout>
在线性布局中,存在着权重的概念,即线性布局中的下级视图各自拥有多大比例的宽高。
其方式是layout_weight,但该属性不得在LinearLayout处设置,而在线性布局中的下级视图中进行设置,表示其下级视图在其中所占据的宽高比例。
- layout_width填为0dp时,layout_weight表示其水平方向的宽度比例
- layout_height填为0dp时,layout_weight表示其垂直方向的高度比例
此处仅举一个实例:
activity_main.xml
<?xml version="1.0" encoding="utf-8"?>
<LinearLayout xmlns:android="http://schemas.android.com/apk/res/android"
    xmlns:app="http://schemas.android.com/apk/res-auto"
    xmlns:tools="http://schemas.android.com/tools"
    android:layout_width="match_parent"
    android:layout_height="match_parent"
    android:orientation="vertical"
    tools:context=".MainActivity">

    <LinearLayout
        android:layout_width="match_parent"
        android:layout_height="wrap_content"
        android:orientation="horizontal">
        <TextView
            android:layout_width="0dp"
            android:layout_height="wrap_content"
            android:layout_weight="1"
            android:text="竖排第一个!"
            />
        <TextView
            android:layout_width="0dp"
            android:layout_height="wrap_content"
            android:layout_weight="1"
            android:text="竖排第二个!"
            />
    </LinearLayout>
</LinearLayout>
1.3.2 相对布局RelativeLayout
相对布局的下级视图位置由其他视图决定。用于确定下级视图位置的参照物分为以下两种:
与该视图自身平级的视图;
该视图的上级视图(也就是它归属的RelativeLayout)
如果不设定下级视图的参照物,那么下级视图默认显示在RelativeLayout的左上角。
有关的其他的具体实现方法可以去查询官方文档:https://developer.android.google.cn/reference/android/widget/RelativeLayout?hl=en#checkLayoutParams(android.view.ViewGroup.LayoutParams)
以下给出部分实例(具体情况可以参照以下实例慢慢调整)
activity_main.xml
<?xml version="1.0" encoding="utf-8"?>
<RelativeLayout xmlns:android="http://schemas.android.com/apk/res/android"
    xmlns:app="http://schemas.android.com/apk/res-auto"
    xmlns:tools="http://schemas.android.com/tools"
    android:layout_width="match_parent"
    android:layout_height="150dp"
    tools:context=".MainActivity">

    <TextView
        android:id="@+id/tv_center"
        android:layout_width="wrap_content"
        android:layout_height="wrap_content"
        android:layout_centerInParent="true"
        android:text="这是参照标签"
        android:textSize="14sp" />

    <TextView
        android:id="@+id/tv_center_horizontal"
        android:layout_width="wrap_content"
        android:layout_height="wrap_content"
        android:layout_centerHorizontal="true"
        android:text="水平中央"
        android:textSize="14sp" />

    <TextView
        android:id="@+id/tv_center_vertical"
        android:layout_width="wrap_content"
        android:layout_height="wrap_content"
        android:layout_centerVertical="true"
        android:text="垂直中央"
        android:textSize="14sp" />

    <!--此左侧对齐会和顶部对齐重叠在一起-->
    <!--    <TextView
            android:id="@+id/tv_parent_left"
            android:layout_width="wrap_content"
            android:layout_height="wrap_content"
            android:layout_alignParentLeft="true"
            android:text="与上级左侧对齐"
            android:textSize="14sp" />-->

    <TextView
        android:id="@+id/tv_parent_right"
        android:layout_width="wrap_content"
        android:layout_height="wrap_content"
        android:layout_alignParentRight="true"
        android:text="与上级右侧对齐"
        android:textSize="14sp" />

    <TextView
        android:id="@+id/tv_parent_top"
        android:layout_width="wrap_content"
        android:layout_height="wrap_content"
        android:layout_alignParentTop="true"
        android:text="与上级顶部对齐"
        android:textSize="14sp" />

    <TextView
        android:id="@+id/tv_parent_bottom"
        android:layout_width="wrap_content"
        android:layout_height="wrap_content"
        android:layout_alignParentBottom="true"
        android:text="与上级底部对齐"
        android:textSize="14sp" />

    <TextView
        android:id="@+id/tv_left_center"
        android:layout_width="wrap_content"
        android:layout_height="wrap_content"
        android:layout_alignTop="@+id/tv_center"
        android:layout_toLeftOf="@+id/tv_center"
        android:text="中间左边"
        android:textSize="14sp" />

    <TextView
        android:id="@+id/tv_right_center"
        android:layout_width="wrap_content"
        android:layout_height="wrap_content"
        android:layout_alignTop="@+id/tv_center"
        android:layout_toRightOf="@+id/tv_center"
        android:text="中间右边"
        android:textSize="14sp" />

    <TextView
        android:id="@+id/tv_above_center"
        android:layout_width="wrap_content"
        android:layout_height="wrap_content"
        android:layout_above="@+id/tv_center"
        android:layout_alignLeft="@+id/tv_center"
        android:text="中间上边"
        android:textSize="14sp" />

    <TextView
        android:id="@+id/tv_bottom_center"
        android:layout_width="wrap_content"
        android:layout_height="wrap_content"
        android:layout_below="@+id/tv_center"
        android:layout_alignRight="@+id/tv_center"
        android:text="中间下边"
        android:textSize="14sp" />
</RelativeLayout>
1.3.3 网格布局GridLayout
网格布支持多行多列的表格排列。
网格布局默认从左向右,从上向下排列,新增了两个属性:
- columnCount属性,它指定了网格的列数,即每行能放多少个视图;
- rowCount属性,它指定了网格的行数,即每列能放多少个视图;
activity_main.xml
<?xml version="1.0" encoding="utf-8"?>
<GridLayout xmlns:android="http://schemas.android.com/apk/res/android"
    xmlns:tools="http://schemas.android.com/tools"
    android:layout_width="match_parent"
    android:layout_height="match_parent"
    android:columnCount="2"
    tools:context=".MainActivity">

    <TextView
        android:layout_width="180dp"
        android:layout_height="60dp"
        android:text="浅红色"
        android:gravity="center"
        android:background="#ffcccc"
        android:textSize="14sp" />

    <TextView
        android:layout_width="180dp"
        android:layout_height="60dp"
        android:text="橙色"
        android:gravity="center"
        android:background="#ffaa00"
        android:textSize="14sp" />

    <TextView
        android:layout_width="180dp"
        android:layout_height="60dp"
        android:text="绿色"
        android:gravity="center"
        android:background="#00ff00"
        android:textSize="14sp" />
    <TextView
        android:layout_width="180dp"
        android:layout_height="60dp"
        android:text="深紫色"
        android:gravity="center"
        android:background="#660066"
        android:textSize="14sp" />
    <TextView
        android:layout_width="180dp"
        android:layout_height="60dp"
        android:text="天蓝色"
        android:gravity="center"
        android:background="#66ccff"
        android:textSize="14sp" />
</GridLayout>
PS:可以将前面所学的视图对齐给结合起来,自己试试。
1.3.4 滚动视图ScrollView
滚动视图有两种:
- ScrollView,它是垂直方向的滚动视图;垂直方向滚动,layout_width属性值设置为match_parent,layout_height属性值设置为wrap_content。
- HorizontalScrollView,它是水平方向的滚动视图;水平方向滚动时,layout_width属性值设置为wrap_content,layout_height属性值设置为match_parent。
具体的实例如下:
activitymain.xml
<?xml version="1.0" encoding="utf-8"?>
<LinearLayout xmlns:android="http://schemas.android.com/apk/res/android"
    xmlns:tools="http://schemas.android.com/tools"
    android:layout_width="match_parent"
    android:layout_height="match_parent"
    android:orientation="vertical"
    tools:context=".MainActivity">

    <!--水平滚动-->
    <HorizontalScrollView
        android:layout_width="wrap_content"
        android:layout_height="200dp">


        <LinearLayout
            android:layout_width="wrap_content"
            android:layout_height="match_parent"
            android:orientation="horizontal">

            <View
                android:layout_width="300dp"
                android:layout_height="match_parent"
                android:background="#aaffff" />

            <View
                android:layout_width="300dp"
                android:layout_height="match_parent"
                android:background="#ffff00" />
        </LinearLayout>
    </HorizontalScrollView>

    <!--垂直滚动-->
    <ScrollView
        android:layout_width="match_parent"
        android:layout_height="wrap_content">

        <LinearLayout
            android:layout_width="wrap_content"
            android:layout_height="match_parent"
            android:orientation="vertical">

            <View
                android:layout_width="match_parent"
                android:layout_height="400dp"
                android:background="#66ccff" />

            <View
                android:layout_width="match_parent"
                android:layout_height="400dp"
                android:background="#ffff00" />
        </LinearLayout>
    </ScrollView>
</LinearLayout>
1.4 按钮(Button)
1.4.1 按钮控件基本介绍
按钮控件Button由TextView派生而来,它们之间的区别有:
- Button拥有默认的按钮背景,而TextView默认没有背景;
- Button内部文本默认居中对齐,TextView内部文本默认靠左对齐;
- Button会默认将英文字母转成大写,而TextView保持原始的英文大小写。(PS:个人实测在目前的最新版2022.2.1.20中,按钮的大小写会正常显示,和文本一样。)
以下是两者的基本形式:
activity_main.xml
<?xml version="1.0" encoding="utf-8"?>
<LinearLayout xmlns:android="http://schemas.android.com/apk/res/android"
    xmlns:tools="http://schemas.android.com/tools"
    android:layout_width="match_parent"
    android:layout_height="match_parent"
    android:orientation="vertical"
    tools:context=".MainActivity">

    <TextView
        android:layout_width="match_parent"
        android:layout_height="wrap_content"
        android:text="以下展示按钮和文字的区别">
    </TextView>
    <Button
        android:layout_width="match_parent"
        android:layout_height="wrap_content"
        android:text="hi!">
    </Button>
    <TextView
        android:layout_width="match_parent"
        android:layout_height="wrap_content"
        android:text="This is test obj">
    </TextView>
</LinearLayout>
与TextView相比,Button新增加了两个新属性:
textAllCaps:它指定了是否要将英文字母全部转为大写,true是对英文进行大写转换,false表示不做操作。
onClick:它用来接管用户的点击动作,指定了点击按钮需要触发什么方法。
1.4.2 直接点击按钮
此处直接给出演示:
此处是较为简单的演示,是事件并发,并不存在线程并发的问题;这些控件本身是线程不安全的,不会在多线程程序里面使用。
activity_main.xml
<?xml version="1.0" encoding="utf-8"?>
<LinearLayout xmlns:android="http://schemas.android.com/apk/res/android"
    xmlns:tools="http://schemas.android.com/tools"
    android:layout_width="match_parent"
    android:layout_height="match_parent"
    android:orientation="vertical"
    tools:context=".MainActivity">

    <TextView
        android:layout_width="match_parent"
        android:layout_height="wrap_content"
        android:text="以下是按钮方法">
    </TextView>
    <Button
        android:layout_width="match_parent"
        android:layout_height="wrap_content"
        android:text="直接点击按钮,使用onClick方式"
        android:onClick="doClick">
    </Button>
    <TextView
        android:id="@+id/tv_result"
        android:layout_width="match_parent"
        android:layout_height="wrap_content"
        android:text="此处查看按钮的点击结果">
    </TextView>
</LinearLayout>
PS:安卓的初始化主要放在onCreate函数中进行。
MainActivity.java
package com.demo;

import androidx.appcompat.app.AppCompatActivity;

import android.os.Bundle;
import android.view.View;
import android.widget.Button;
import android.widget.TextView;

import com.demo.utils.DateUtil;

public class MainActivity extends AppCompatActivity {
    private TextView tv_result;

    @Override
    protected void onCreate(Bundle savedInstanceState) {
        super.onCreate(savedInstanceState);
        setContentView(R.layout.activity_main);
        tv_result = findViewById(R.id.tv_result);

     }
    public void doClick(View view) {
        String desc=String.format("%s 您点击了按钮:%s", DateUtil.getNowTime(),((Button)view).getText());
        tv_result.setText(desc);
    }
}
PS:DateUtil函数如下(自己编写的)
utils/DateUtil.java
package com.demo.utils;

import java.text.SimpleDateFormat;
import java.util.Date;
import java.util.logging.SimpleFormatter;

public class DateUtil {
    public static String getNowTime(){
        SimpleDateFormat sdf=new SimpleDateFormat("HH:mm:ss");
        return sdf.format(new Date());
    }
}
1.4.3 点击事件和长按事件
- 监视器(泛指java中的各式Listener):指专门用于监控控件和动作行为。只有控件发生了指定的动作,监听器才会触发开关去执行对应的代码逻辑。
目前按钮控件中有两种常见的监听器:
- 点击监听器,通过setOnClickListener方法来进行设置,当按钮被按住少于500ms,会触发点击事件。
- 长按监听器,通过setOnLongClickListener方法来进行设置,当按钮被按住超过500ms,会触发长按事件。
PS:给按钮设置监听的时候,需要先去注册一下id。
1.点击事件部分
以下是实例展示部分:
activity_main.xml
<?xml version="1.0" encoding="utf-8"?>
<LinearLayout xmlns:android="http://schemas.android.com/apk/res/android"
    xmlns:tools="http://schemas.android.com/tools"
    android:layout_width="match_parent"
    android:layout_height="match_parent"
    android:orientation="vertical"
    tools:context=".MainActivity">
    <Button
        android:id="@+id/btn_click_single"
        android:layout_width="match_parent"
        android:layout_height="wrap_content"
        android:text="指定单独的点击监听器">
    </Button>

    <Button
        android:id="@+id/btn_click_public"
        android:layout_width="match_parent"
        android:layout_height="wrap_content"
        android:text="自定义按钮--指定单独的点击监听器">
    </Button>

    <Button
        android:id="@+id/btn_click"
        android:layout_width="match_parent"
        android:layout_height="wrap_content"
        android:text="常见实现方法--指定单独的点击监听器">
    </Button>

    <TextView
        android:id="@+id/tv_result"
        android:layout_width="match_parent"
        android:layout_height="wrap_content"
        android:padding="5dp"
        android:gravity="center"
        android:text="点击查看按钮显示内容">
    </TextView>
</LinearLayout>
MainActivity.java
package com.demo;

import androidx.appcompat.app.AppCompatActivity;

import android.os.Bundle;
import android.view.View;
import android.widget.Button;
import android.widget.TextView;

import com.demo.utils.DateUtil;

public class MainActivity extends AppCompatActivity implements View.OnClickListener {
    private TextView tv_result;

    @Override
    protected void onCreate(Bundle savedInstanceState) {
        super.onCreate(savedInstanceState);
        setContentView(R.layout.activity_main);
        tv_result = findViewById(R.id.tv_result);
        //一种较为底层
        Button btn_click_single = findViewById(R.id.btn_click_single);
        btn_click_single.setOnClickListener(new MyOnClickListener(tv_result));

        //公用操作
        Button btn_click_public=findViewById(R.id.btn_click_public);
        btn_click_public.setOnClickListener(this);

        //书上的常见操作---匿名内部类
        Button btn_click=findViewById(R.id.btn_click);
        btn_click.setOnClickListener(new View.OnClickListener() {
            @Override
            public void onClick(View view) {
                String desc = String.format("%s 您点击了按钮:%s", DateUtil.getNowTime(), ((Button) view).getText());
                tv_result.setText(desc);
            }
        });
    }

     //公用操作部分
    @Override
    public void onClick(View view) {
        if(view.getId()==R.id.btn_click_public){
            String desc = String.format("%s 您点击了按钮:%s", DateUtil.getNowTime(), ((Button) view).getText());
            tv_result.setText(desc);
        }
    }

      //一种较为底层--自定义函数部分
    static class MyOnClickListener implements View.OnClickListener {
        private final TextView tv_result;
        public MyOnClickListener(TextView tv_result) {
            this.tv_result=tv_result;
        }
        @Override
        public void onClick(View view) {
            String desc = String.format("%s 您点击了按钮:%s", DateUtil.getNowTime(), ((Button) view).getText());
            tv_result.setText(desc);
        }
    }
}
2.长按事件部分
注意点:
当接口中只有一个方法需要重写时,称其为函数式接口,而函数式接口可以使用lambda表达式(主要结构如下:
btn_long_click.setOnLongClickListener(view -> {
...
return true;
});
具体实例如下:
MainActivity.java
package com.demo;

import androidx.appcompat.app.AppCompatActivity;

import android.os.Bundle;
import android.view.View;
import android.widget.Button;
import android.widget.TextView;

import com.demo.utils.DateUtil;

public class MainActivity extends AppCompatActivity{
    private TextView tv_result;

    @Override
    protected void onCreate(Bundle savedInstanceState) {
        super.onCreate(savedInstanceState);
        setContentView(R.layout.activity_main);
        tv_result = findViewById(R.id.tv_result);
        //书上的常见操作
        Button btn_long_click = findViewById(R.id.btn_longclick_single);
        btn_long_click.setOnLongClickListener(view -> {
            String desc = String.format("%s 您点击了按钮:%s", DateUtil.getNowTime(), ((Button) view).getText());
            tv_result.setText(desc);
            return true;
        });
    }
}
activity_main.xml
<?xml version="1.0" encoding="utf-8"?>
<LinearLayout xmlns:android="http://schemas.android.com/apk/res/android"
    xmlns:tools="http://schemas.android.com/tools"
    android:layout_width="match_parent"
    android:layout_height="match_parent"
    android:orientation="vertical"
    tools:context=".MainActivity">
    <Button
        android:id="@+id/btn_longclick_single"
        android:layout_width="match_parent"
        android:layout_height="wrap_content"
        android:text="指定长按点击监听器">
    </Button>

    <TextView
        android:id="@+id/tv_result"
        android:layout_width="match_parent"
        android:layout_height="wrap_content"
        android:padding="5dp"
        android:gravity="center"
        android:text="点击查看按钮显示内容">
    </TextView>
</LinearLayout>
1.4.4 禁用和恢复按钮
在实际的业务中,按钮通常有两种状态,即不可用和可用状态,它们在外观和功能上的区别如下:
- 不可用按钮:按钮如果不许点击,即使点击无反馈,同时按钮文字为灰色。
- 可用按钮:按钮允许点击,点击按钮会触发点击事件,同时按钮文字为正常的黑色。
是否允许点击由enabled属性控制,属性值为true时表示允许点击,false时表示不允许点击。
具体实例如下:
MainActivity.java
package com.demo;

import androidx.appcompat.app.AppCompatActivity;

import android.graphics.Color;
import android.os.Bundle;
import android.view.View;
import android.widget.Button;
import android.widget.TextView;

import com.demo.utils.DateUtil;

public class MainActivity extends AppCompatActivity implements View.OnClickListener {
    private Button btn_obj;

    @Override
    protected void onCreate(Bundle savedInstanceState) {
        super.onCreate(savedInstanceState);
        setContentView(R.layout.activity_main);

        Button btn_enable = findViewById(R.id.btn_enable);
        Button btn_disable = findViewById(R.id.btn_disable);

        btn_obj = findViewById(R.id.test_obj);
        TextView tv_result = findViewById(R.id.tv_result);

        btn_enable.setOnClickListener(this);
        btn_disable.setOnClickListener(this);
        btn_obj.setOnClickListener(new View.OnClickListener() {
            @Override
            public void onClick(View view) {
                tv_result.setText("已经点击测试按钮!");
            }
        });
    }

    @Override
    public void onClick(View view) {
        int id = view.getId();
        if (id == R.id.btn_enable) {
            //启用当前控件
            btn_obj.setEnabled(true);
            //设置按钮的文字颜色
            btn_obj.setTextColor(Color.BLACK);
        } else if (id == R.id.btn_disable) {
            //关闭当前控件
            btn_obj.setEnabled(false);
            //设置按钮的文字颜色
            btn_obj.setTextColor(Color.GRAY);
        } else {

        }
    }
}
activity_main.xml
<?xml version="1.0" encoding="utf-8"?>
<LinearLayout xmlns:android="http://schemas.android.com/apk/res/android"
    xmlns:tools="http://schemas.android.com/tools"
    android:layout_width="match_parent"
    android:layout_height="match_parent"
    android:orientation="vertical"
    tools:context=".MainActivity">
    <LinearLayout
        android:layout_width="match_parent"
        android:layout_height="wrap_content"
        android:orientation="horizontal">
        <Button
            android:id="@+id/btn_enable"
            android:layout_width="0dp"
            android:layout_weight="1"
            android:layout_height="wrap_content"
            android:text="启动测试按钮"/>
        <Button
            android:id="@+id/btn_disable"
            android:layout_width="0dp"
            android:layout_weight="1"
            android:layout_height="wrap_content"
            android:text="关闭测试按钮"/>
    </LinearLayout>

    <Button
        android:id="@+id/test_obj"
        android:layout_width="match_parent"
        android:layout_height="wrap_content"
        android:text="测试按钮"/>
    <TextView
        android:id="@+id/tv_result"
        android:layout_width="match_parent"
        android:layout_height="wrap_content"
        android:text="这里查看测试按钮的点击结果"/>
</LinearLayout>
此处可能会出现的问题:
如果你不想用if-else,而想用switch来进行R.id的判断。需要保证id为final常量,否则会出现“constant expression required”导致无法运行。具体问题详解原文可以查询:switch case statement error: case expressions must be constant expression或者CSDN:https://blog.csdn.net/sinat_26820899/article/details/48878069
1.5 图像显示
1.5.1 图像视图ImageView
图像视图展示的图片通常位于res/drawable/*目录下,设置图像视图的显示图片有两种方式:
在XML文件中,通过属性android:src设置图片资源,属性值格式形如“@drawable/不含拓展名的图片名称”。
Java中,通过调用setImageResource方法来设置图片资源,方法参数格式形如“R.drawable.不含拓展名的图片名称”。
MainActivity.java
package com.demo;

import androidx.appcompat.app.AppCompatActivity;

import android.graphics.Color;
import android.os.Bundle;
import android.view.View;
import android.widget.Button;
import android.widget.ImageView;
import android.widget.TextView;

import com.demo.utils.DateUtil;

public class MainActivity extends AppCompatActivity{
    private Button btn_obj;

    @Override
    protected void onCreate(Bundle savedInstanceState) {
        super.onCreate(savedInstanceState);
        setContentView(R.layout.activity_main);
        ImageView iv_scale=findViewById(R.id.iv_scale);
        iv_scale.setImageResource(R.drawable.scene);

    }
}
activity_main.xml
<?xml version="1.0" encoding="utf-8"?>
<LinearLayout xmlns:android="http://schemas.android.com/apk/res/android"
    xmlns:tools="http://schemas.android.com/tools"
    android:layout_width="match_parent"
    android:layout_height="match_parent"
    android:orientation="vertical">

    <!--使用之前需要在res/drawable里面先放上自己所选择的图片-->
    <ImageView
        android:id="@+id/iv_scale"
        android:layout_width="match_parent"
        android:layout_height="220dp"
        android:src="@drawable/scene"
        android:scaleType="fitXY"/>
</LinearLayout>
有关于图像视图的缩放问题,ImageView本身默认图片居中显示,可以通过scaleType属性设定。
具体的详细属性以及方法可以查询官方文档:https://developer.android.google.cn/reference/android/widget/ImageView.ScaleType?hl=en
1.5.2 图像按钮ImageButton
ImageButton是显示图片的图像按钮,但它继承自ImageView,并非继承Button。
ImageButton和Button之间的区别有:
- Button既可以显示文本也可以显示图片,ImageButton只能显示图片但不能显示文本。
- ImageButton上的图像可以按照比例缩放,而Buttton通过背景设置的图像会拉伸变形。
- Button只能靠背景显示一张图片,而ImageButton可分别前景和背景显示图片,从而实现两张图片叠加的效果。
使用场景:
有些字符无法使用输入法打出来,或者某些文字以特殊字体展示,适合使用图片将其放入到ImageButton之中。
ImageButton与ImageView之间的区别有:
- ImageButton有默认的按钮背景,ImageView默认没有背景。
- ImageButton默认的缩放类型为center,而ImageView默认的缩放类型为fitCenter。
此处代码与上文代码较为类似,因此不再赘述。
1.5.3 同时展示文本和图像
同时展示文本和图像的可能途径包括:
- 利用LinearLayout对ImageView和TextView的组合布局。
- 通过按钮控件Button的drawable属性设置文本周围的图标。
- drawableTop:指定文字上方的图片
- drawableBottom:指定文字下方的图片
- drawableLeft:指定文字左边的图片
- drawableRight:指定文字右边的图片
- drawablePadding:指定图片和文字的间距
以下是代码实例部分:(其余保持默认即可)
activity_main.xml
<?xml version="1.0" encoding="utf-8"?>
<LinearLayout xmlns:android="http://schemas.android.com/apk/res/android"
    xmlns:tools="http://schemas.android.com/tools"
    android:layout_width="match_parent"
    android:layout_height="match_parent"
    android:orientation="vertical">

    <Button
        android:layout_width="wrap_content"
        android:layout_height="wrap_content"
        android:text="图标在左"
        android:drawableLeft="@mipmap/ic_launcher"/>

    <Button
        android:layout_width="wrap_content"
        android:layout_height="wrap_content"
        android:text="图标在右"
        android:drawableRight="@mipmap/ic_launcher"/>

    <Button
        android:layout_width="wrap_content"
        android:layout_height="wrap_content"
        android:text="图标在上"
        android:drawableTop="@mipmap/ic_launcher"/>

    <Button
        android:layout_width="wrap_content"
        android:layout_height="wrap_content"
        android:text="图标在下"
        android:drawableBottom="@mipmap/ic_launcher"/>
</LinearLayout>
1.5.4 小实战 计算器
需要用到前面5部分的大部分知识,模仿微软的计算器工具,做出一个简化版的计算器。
前端部分:
activity_main.xml
<?xml version="1.0" encoding="utf-8"?>
<LinearLayout xmlns:android="http://schemas.android.com/apk/res/android"
    xmlns:tools="http://schemas.android.com/tools"
    android:layout_width="match_parent"
    android:layout_height="match_parent"
    android:background="#EEEEEE"
    android:orientation="vertical"
    android:padding="5dp">

    <ScrollView
        android:layout_width="match_parent"
        android:layout_height="wrap_content">
        <LinearLayout
            android:layout_width="match_parent"
            android:layout_height="wrap_content"
            android:orientation="vertical">
            <TextView
                android:layout_width="match_parent"
                android:layout_height="wrap_content"
                android:gravity="center"
                android:text="简单计算器"
                android:textSize="20sp">
                <!--你可以扔到res的string中去,用@string/*代替简单计算器,使得代码具有一定保密性-->
            </TextView>
            <TextView
                android:layout_width="match_parent"
                android:layout_height="wrap_content"
                android:background="@color/white"
                android:lines="3"
                android:text="0"
                android:textColor="@color/black"
                android:textSize="25sp"/>
            <GridLayout
                android:layout_width="match_parent"
                android:layout_height="wrap_content"
                android:columnCount="4"
                android:rowCount="5">
                <!--本处自己在res/values下新建dimen.xml文件,canel指CE,可以直接把text换成CE也可-->
                <Button
                    android:id="@+id/btn_canel"
                    android:layout_width="0dp"
                    android:layout_height="@dimen/button_height"
                    android:layout_columnWeight="1"
                    android:gravity="center"
                    android:text="@string/cancel"
                    android:textColor="@color/black"
                    android:textSize="@dimen/button_font_size"/>

                <Button
                    android:id="@+id/btn_divide"
                    android:layout_width="0dp"
                    android:layout_height="@dimen/button_height"
                    android:layout_columnWeight="1"
                    android:gravity="center"
                    android:text="/"
                    android:textColor="@color/black"
                    android:textSize="@dimen/button_font_size"/>

                <Button
                    android:id="@+id/btn_multiply"
                    android:layout_width="0dp"
                    android:layout_height="@dimen/button_height"
                    android:layout_columnWeight="1"
                    android:gravity="center"
                    android:text="x"
                    android:textColor="@color/black"
                    android:textSize="@dimen/button_font_size"/>

                <Button
                    android:id="@+id/btn_clear"
                    android:layout_width="0dp"
                    android:layout_height="@dimen/button_height"
                    android:layout_columnWeight="1"
                    android:gravity="center"
                    android:text="C"
                    android:textColor="@color/black"
                    android:textSize="@dimen/button_font_size"/>
                <Button
                    android:id="@+id/btn_7"
                    android:layout_width="0dp"
                    android:layout_height="@dimen/button_height"
                    android:layout_columnWeight="1"
                    android:gravity="center"
                    android:text="7"
                    android:textColor="@color/black"
                    android:textSize="@dimen/button_font_size"/>

                <Button
                    android:id="@+id/btn_8"
                    android:layout_width="0dp"
                    android:layout_height="@dimen/button_height"
                    android:layout_columnWeight="1"
                    android:gravity="center"
                    android:text="8"
                    android:textColor="@color/black"
                    android:textSize="@dimen/button_font_size"/>
                <Button
                    android:id="@+id/btn_9"
                    android:layout_width="0dp"
                    android:layout_height="@dimen/button_height"
                    android:layout_columnWeight="1"
                    android:gravity="center"
                    android:text="9"
                    android:textColor="@color/black"
                    android:textSize="@dimen/button_font_size"/>

                <Button
                    android:id="@+id/btn_plus"
                    android:layout_width="0dp"
                    android:layout_height="@dimen/button_height"
                    android:layout_columnWeight="1"
                    android:gravity="center"
                    android:text="+"
                    android:textColor="@color/black"
                    android:textSize="@dimen/button_font_size"/>
                <Button
                    android:id="@+id/btn_4"
                    android:layout_width="0dp"
                    android:layout_height="@dimen/button_height"
                    android:layout_columnWeight="1"
                    android:gravity="center"
                    android:text="4"
                    android:textColor="@color/black"
                    android:textSize="@dimen/button_font_size"/>
                <Button
                    android:id="@+id/btn_5"
                    android:layout_width="0dp"
                    android:layout_height="@dimen/button_height"
                    android:layout_columnWeight="1"
                    android:gravity="center"
                    android:text="5"
                    android:textColor="@color/black"
                    android:textSize="@dimen/button_font_size"/>
                <Button
                    android:id="@+id/btn_6"
                    android:layout_width="0dp"
                    android:layout_height="@dimen/button_height"
                    android:layout_columnWeight="1"
                    android:gravity="center"
                    android:text="6"
                    android:textColor="@color/black"
                    android:textSize="@dimen/button_font_size"/>
                <Button
                    android:id="@+id/btn_minus"
                    android:layout_width="0dp"
                    android:layout_height="@dimen/button_height"
                    android:layout_columnWeight="1"
                    android:gravity="center"
                    android:text="-"
                    android:textColor="@color/black"
                    android:textSize="@dimen/button_font_size"/>
                <Button
                    android:id="@+id/btn_1"
                    android:layout_width="0dp"
                    android:layout_height="@dimen/button_height"
                    android:layout_columnWeight="1"
                    android:gravity="center"
                    android:text="1"
                    android:textColor="@color/black"
                    android:textSize="@dimen/button_font_size"/>
                <Button
                    android:id="@+id/btn_2"
                    android:layout_width="0dp"
                    android:layout_height="@dimen/button_height"
                    android:layout_columnWeight="1"
                    android:gravity="center"
                    android:text="2"
                    android:textColor="@color/black"
                    android:textSize="@dimen/button_font_size"/>
                <Button
                    android:id="@+id/btn_3"
                    android:layout_width="0dp"
                    android:layout_height="@dimen/button_height"
                    android:layout_columnWeight="1"
                    android:gravity="center"
                    android:text="3"
                    android:textColor="@color/black"
                    android:textSize="@dimen/button_font_size"/>
                <!--随便从网上找的开根号的图片,本人命名为gen后,扔到了res/drawable内-->
                <ImageButton
                    android:id="@+id/btn_gen"
                    android:layout_width="0dp"
                    android:layout_height="@dimen/button_height"
                    android:layout_columnWeight="1"
                    android:src="@drawable/gen"
                    android:scaleType="centerInside"/>
                <!--
                <Button
                    android:id="@+id/btn_sqrt"
                    android:layout_width="0dp"
                    android:layout_height="@dimen/button_height"
                    android:layout_columnWeight="1"
                    android:gravity="center"
                    android:text="√"
                    android:textColor="@color/black"
                    android:textSize="@dimen/button_font_size"/>-->
                <Button
                    android:id="@+id/btn_1X"
                    android:layout_width="0dp"
                    android:layout_height="@dimen/button_height"
                    android:layout_columnWeight="1"
                    android:gravity="center"
                    android:text="1/X"
                    android:textColor="@color/black"
                    android:textSize="@dimen/button_font_size"/>
                <Button
                    android:id="@+id/btn_0"
                    android:layout_width="0dp"
                    android:layout_height="@dimen/button_height"
                    android:layout_columnWeight="1"
                    android:gravity="center"
                    android:text="0"
                    android:textColor="@color/black"
                    android:textSize="@dimen/button_font_size"/>
                <Button
                    android:id="@+id/btn_dot"
                    android:layout_width="0dp"
                    android:layout_height="@dimen/button_height"
                    android:layout_columnWeight="1"
                    android:gravity="center"
                    android:text="."
                    android:textColor="@color/black"
                    android:textSize="@dimen/button_font_size"/>
                <Button
                    android:id="@+id/btn_cal"
                    android:layout_width="0dp"
                    android:layout_height="@dimen/button_height"
                    android:layout_columnWeight="1"
                    android:gravity="center"
                    android:text="="
                    android:textColor="@color/black"
                    android:textSize="@dimen/button_font_size"/>
            </GridLayout>
        </LinearLayout>
    </ScrollView>
</LinearLayout>
为了方便管理按钮属性,在res/values下新建了dimens.xml文件,详细如下:
<?xml version="1.0" encoding="utf-8"?>
<resources>
    <dimen name="button_font_size">30sp</dimen>
    <dimen name="button_height">75dp</dimen>
</resources>
其他按钮参考如下:https://developer.android.google.cn/guide/topics/ui/controls/button?hl=zh-cn
后端部分:(PS无法运行,逻辑不对,有空再改)
package com.demo;

import androidx.appcompat.app.AppCompatActivity;

import android.graphics.Color;
import android.os.Bundle;
import android.view.View;
import android.widget.Button;
import android.widget.ImageView;
import android.widget.TextView;

import com.demo.utils.DateUtil;

public class MainActivity extends AppCompatActivity implements View.OnClickListener {
    private TextView tv_result;
    //第一个操作数
    private String firstNum = "";
    //运算符
    private String operator = "";
    //第二个操作数
    private String secondNum = "";
    //当前的计算结果
    private String result = "";
    //显示的文本内容
    private String showText = "";


    @Override
    protected void onCreate(Bundle savedInstanceState) {
        super.onCreate(savedInstanceState);
        setContentView(R.layout.activity_main);
        //从布局文件中获取tv_result的文本视图
        tv_result = findViewById(R.id.tv_result);
        //下面给每个按钮控件都注册了点击监听器
        findViewById(R.id.btn_canel).setOnClickListener(this);
        findViewById(R.id.btn_0).setOnClickListener(this);
        findViewById(R.id.btn_1).setOnClickListener(this);
        findViewById(R.id.btn_2).setOnClickListener(this);
        findViewById(R.id.btn_3).setOnClickListener(this);
        findViewById(R.id.btn_4).setOnClickListener(this);
        findViewById(R.id.btn_5).setOnClickListener(this);
        findViewById(R.id.btn_6).setOnClickListener(this);
        findViewById(R.id.btn_7).setOnClickListener(this);
        findViewById(R.id.btn_8).setOnClickListener(this);
        findViewById(R.id.btn_9).setOnClickListener(this);
        findViewById(R.id.btn_1X).setOnClickListener(this);
        findViewById(R.id.btn_cal).setOnClickListener(this);
        findViewById(R.id.btn_clear).setOnClickListener(this);
        findViewById(R.id.btn_divide).setOnClickListener(this);
        findViewById(R.id.btn_dot).setOnClickListener(this);
        findViewById(R.id.btn_plus).setOnClickListener(this);
        findViewById(R.id.btn_minus).setOnClickListener(this);
        findViewById(R.id.btn_multiply).setOnClickListener(this);
        findViewById(R.id.btn_sqrt).setOnClickListener(this);


    }

    @Override
    public void onClick(View view) {
        String inputText;
        if (view.getId() == R.id.btn_sqrt) {
            inputText = "√";
        } else {
            inputText = ((TextView) view).getText().toString();
        }
        int id = view.getId();
        if (id == R.id.btn_clear) {
            //清除
            clear();
        } else if (id == R.id.btn_canel) {
            //取消
        } else if (id == R.id.btn_plus || id == R.id.btn_minus || id == R.id.btn_multiply ||
                id == R.id.btn_divide) {
            //加减乘除
            operator=inputText;//运算符
            refreshText(showText);
        } else if (id == R.id.btn_cal) {
            //等号
            double calculate_result=calculateFour();
            refreshOperate(String.valueOf(calculate_result));
            refreshText(showText+"="+result);
        } else if (id == R.id.btn_sqrt) {
            //开根
            double sqrt_result=Math.sqrt(Double.parseDouble(firstNum));
            refreshOperate(String.valueOf(sqrt_result));
            refreshText(showText+"="+result);
        } else if (id == R.id.btn_1X) {
            //求倒数
            double reciprocal_result=1.0/Double.parseDouble(firstNum);
            refreshOperate(String.valueOf(reciprocal_result));
            refreshText(showText+"√="+result);
        } else {
            //上次的运算结果已经出来了
            if(result.length()>0&&operator.equals("")){
                clear();
            }

            //点击数字或者小数点
            if (operator.equals("")) {
                //无运算符,则继续拼接第一个操作数
                firstNum = firstNum + inputText;
            } else {
                //有运算符,则继续拼接第二个操作数
                secondNum = secondNum + inputText;
            }
            //整数不需要前面的0
            if (showText.equals("0") && inputText.equals(".")) {
                refreshText(inputText);
            } else
                refreshText(showText + inputText);
        }
    }

    //四则运算
    private double calculateFour() {
        if(operator=="+"){
            return Double.parseDouble(firstNum)+Double.parseDouble(secondNum);
        }else if(operator=="-"){
            return Double.parseDouble(firstNum)-Double.parseDouble(secondNum);
        }else if(operator=="x"){
            return Double.parseDouble(firstNum)*Double.parseDouble(secondNum);
        }else if(operator=="/"){
            return Double.parseDouble(firstNum)/Double.parseDouble(secondNum);
        }else {
            System.out.println("非四则运算");
        }
        return 0;
    }

    //清除数据并且初始化
    private void clear(){
        refreshOperate("");
        refreshText("");
    }

    //刷新运算结果
    private void refreshOperate(String new_result){
        result=new_result;
        firstNum=result;
        secondNum="";
        operator="";
    }
    //刷新文本显示
    private void refreshText(String text) {
        showText = text;
        tv_result.setText(showText);
    }
}
2. 活动Activity
2.1 Activity启停活动页面
2.1.1 Activity的启动和结束
1.从当前页面跳转至新页面,代码如下:
- startActivity(new Intent(源界面.this,目标页面.class));
2.从当前页面回到上一个界面,相当于关闭当前界面,返回代码如果代码如下:
- finish(); //结束当前的活动页面
MainActivity.java
package com.wu.prc;

import androidx.appcompat.app.AppCompatActivity;

import android.content.Intent;
import android.os.Bundle;
import android.view.View;

 public class MainActivity extends AppCompatActivity implements View.OnClickListener {

    @Override
    protected void onCreate(Bundle savedInstanceState) {
        super.onCreate(savedInstanceState);
        setContentView(R.layout.activity_main);
        findViewById(R.id.btn_act_next).setOnClickListener(this);
    }

     @Override
     public void onClick(View view) {
         startActivity(new Intent(MainActivity.this,MainActivity2.class));
     }
 }
MainActivity2.java
package com.wu.prc;

import androidx.appcompat.app.AppCompatActivity;

import android.content.Intent;
import android.os.Bundle;
import android.view.View;

 public class MainActivity extends AppCompatActivity implements View.OnClickListener {

    @Override
    protected void onCreate(Bundle savedInstanceState) {
        super.onCreate(savedInstanceState);
        setContentView(R.layout.activity_main);
        findViewById(R.id.btn_act_next).setOnClickListener(this);
    }

     @Override
     public void onClick(View view) {
         startActivity(new Intent(MainActivity.this,MainActivity2.class));
     }
 }
activity_main.xml
<?xml version="1.0" encoding="utf-8"?>
<LinearLayout xmlns:android="http://schemas.android.com/apk/res/android"
    xmlns:app="http://schemas.android.com/apk/res-auto"
    xmlns:tools="http://schemas.android.com/tools"
    android:layout_width="match_parent"
    android:layout_height="match_parent"
    android:gravity="center"
    tools:context=".MainActivity">

    <Button
        android:id="@+id/btn_act_next"
        android:layout_width="wrap_content"
        android:layout_height="wrap_content"
        android:text="跳转至下个界面"/>

</LinearLayout>
activity_main2.xml
<?xml version="1.0" encoding="utf-8"?>
<LinearLayout xmlns:android="http://schemas.android.com/apk/res/android"
    xmlns:app="http://schemas.android.com/apk/res-auto"
    xmlns:tools="http://schemas.android.com/tools"
    android:layout_width="match_parent"
    android:layout_height="match_parent"
    tools:context=".MainActivity2">

    <ImageView
        android:id="@+id/iv_back"
        android:layout_width="40dp"
        android:layout_height="40dp"
        android:padding="5dp"
        android:src="@drawable/ic_back"/>

    <Button
        android:id="@+id/btn_finish"
        android:layout_width="match_parent"
        android:layout_height="wrap_content"
        android:gravity="center"
        android:text="完成"/>
</LinearLayout>
2.1.2 Activity的生命周期
Activity的生命周期是指Activity从创建到销毁的整个过程,这个过程一般分为五个状态。以下是生命周期的基本状态和常用的周期方法。
1.启动状态
onCreate()
Activity创建时调用,进性初始化设置。而当Activity启动,则不可见。
onStart()
Activity即将可见时调用,而Activity可见,不能进行交互。
2.运行状态
Activity处于界面的最前端,他是可见,有焦点的,可以与用户交互的。
Activity处于运行状态时,Android会尽可能的保持这个状态,即使内存不足的情况,Android也会优先销毁栈底的Activity。
3.暂停状态
Activity对用户来说仍然可见,但是无法获取焦点,对用户对他的操作没有反应,此时它处于暂停状态。
onResume()
Activity获取焦点时调用。当Activity可见,可交互。
onPause()
当前Activity被其他Activity覆盖或屏幕锁屏时调用。Activity暂停。
4.停止状态
Activity完全不可见,它处于停止状态。
onStop()
Activity停止。Activity不可见,后台运行。
5.销毁状态
Activity将被清理出内存。
onDestroy()
Activity销毁时调用。
onRestart()
Activity从停止状态到再次启动时调用。
onNewIntent()
重用已有的活动实例。

2.1.3 Activity的启动模式(此模块后期仍需注解和增补)
打开新页面的方法调用顺序为:
- onCreate--->onStart--->onResume
关闭旧页面的方法调用顺序为:
- onPause--->onStop--->onDestroy
主要有两种跳转方式:
     @Override
     public void onClick(View view) {
        Intent intent=new Intent(this,MainActivity2.class);
        intent.setFlags(Intent.FLAG_ACTIVITY_CLEAR_TOP);
        startActivity(intent);
     }
或者
        findViewById(R.id.btn_act_next).setOnClickListener(new View.OnClickListener() {
            @Override
            public void onClick(View view) {
                Intent intent=new Intent(this,MainActivity2.class);
                intent.setFlags(Intent.FLAG_ACTIVITY_CLEAR_TOP);
                startActivity(intent);
            }
        });
Activity的动态/静态启动模式
动态设置与静态设置的区别:
静态设置:在Manifest(XML)中进行配置,在活动执行前进行配置(这里可能描述的不够准确)。
动态设置:在JAVA中,通过设立Flag来进行启动。
1.主要有以下几种静态跳转模式:
1.1 默认启动模式standard
该模式可以被设定,不在manifest设定时候,Activity的默认模式就是standard。在该模式下,启动的Activity会依照启动顺序被依次压入Task中。
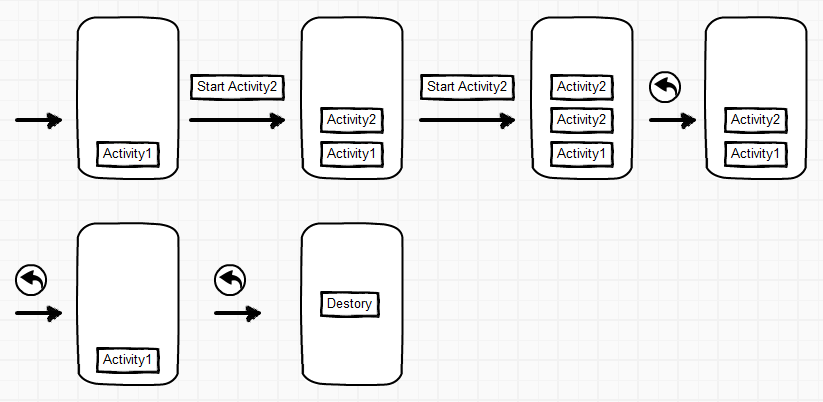
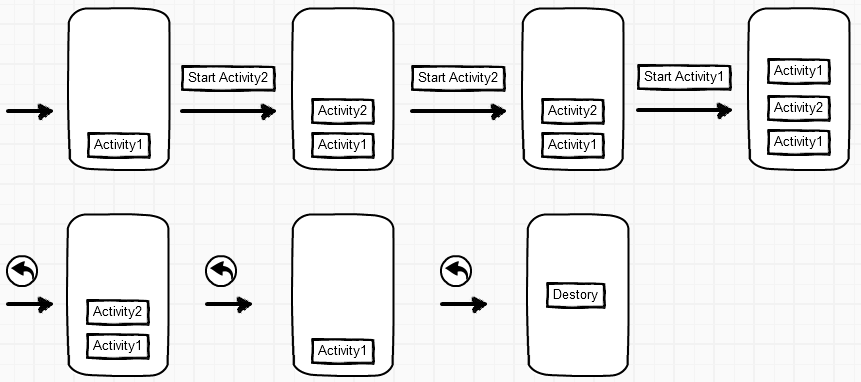
1.2 栈顶复用模式singleTop
在该模式下,如果栈顶Activity为我们要新建的Activity(目标Activity),那么就不会重复创建新的Activity。
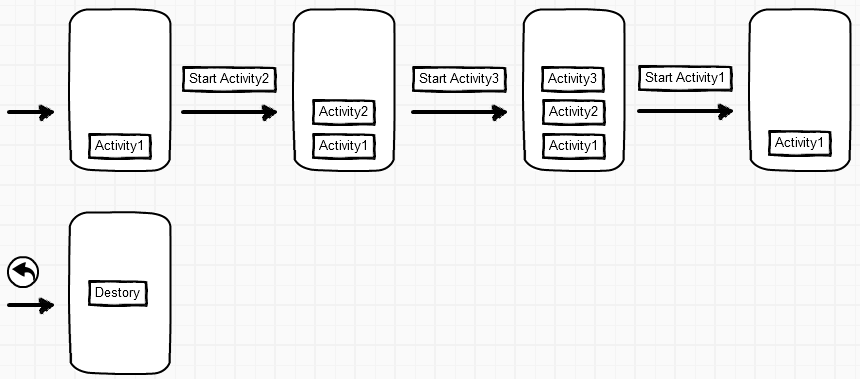
1.3 栈内复用模式singleTask
与singleTop模式相似,只不过singleTop模式是只是针对栈顶的元素,而singleTask模式下,如果task栈内存在目标Activity实例,则:
- 将task内的对应Activity实例之上的所有Activity弹出栈。
- 将对应Activity置于栈顶,获得焦点。
1.4 全局唯一模式singleInstance(较为复杂!)
在该模式下,我们会为目标Activity分配一个新的affinity,并创建一个新的Task栈,将目标Activity放入新的Task,并让目标Activity获得焦点。新的Task有且只有这一个Activity实例。 如果已经创建过目标Activity实例,则不会创建新的Task,而是将以前创建过的Activity唤醒(对应Task设为Foreground状态)
2.动态设置启动模式
通常的话,如果需要使用的话,具体如下:
intent.setFlags(.....);
然后根据个人需要的情况向里面添加Flag即可,以下介绍部分常见的Flag。
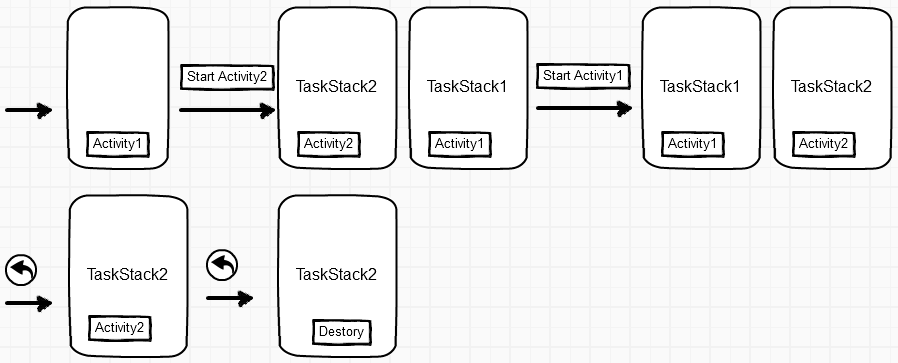
2.1 NEW_TASK
Intent.FLAG_ACTIVITY_NEW_TASK
这个Flag同singleInstance相似:在给目标Activity设立此Flag后,会根据目标Activity的affinity进行匹配:如果已经存在与其affinity相同的task,则将目标Activity压入此Task。反之没有的话,则新建一个task,新建的task的affinity值与目标Activity相同。然后将目标Activity压入此栈。即若有与affinity相同的task,则就地放入task,没有会新建task将Activity放入。
此外,其与singleInstance有一定区别:1.新的Task没有说只能存放一个目标Activity。只是说决定是否新建一个Task。而singleInstance模式下新的Task只能放置一个目标Activity。
2.在同一应用下,如果Activity都是默认的affinity,那么此Flag无效。而singleInstance默认情况也会创建新的Task。
具体说明,建议看他人文章:https://blog.csdn.net/zy_jibai/article/details/80587083
2.2 SINGLE_TOP
Intent.FLAG_ACTIVITY_SINGLE_TOP
此效果和singleTop相同,若栈顶拥有,则不会重复创建新Activity
2.3 CLEAR_TOP
Intent.FLAG_ACTIVITY_CLEAR_TOP
此flag同singleTask类似,当设置此Flag时,目标Activity会检查Task中是否存在此实例,如果没有则添加压入栈,如果有,就将位于Task中的对应Activity其上的所有Activity弹出栈,此时有以下两种情况:
- 如果同时设置Flag_ACTIVITY_SINGLE_TOP,则直接使用栈内的对应Activity,
- 若没有设置,则将栈内的对应Activity销毁重新创建。
2.2 在活动之间传递消息
2.2.1 显式Intent和隐式Intent
Intent是各个组件之间沟通的桥梁,它用于Android各组件之间的通信,主要完成下列工作:
- 表明本次通信请求从哪里来、到哪里去、要怎么走。
- 发起方携带本次通讯所需要的数据内容,接收方从收到的意图中解析数据。
- 发起方若想判断接收方的处理结果,意图就要负责让接收方传回应答的数据内容。
Intent的主要组成部分:
| 元素名称 | 设置方法 | 说明和用途 |
|---|---|---|
| Component | setComponent | 组件,它意图的来源与目标 |
| Action | setAction | 动作,它指定意图的动作行为 |
| Data | setData | 即URL,它指定的动作要操作的数据路径 |
| Category | addCategory | 类别,它指定意图的操作类别 |
| Type | setType | 数据类型,它指定消息的数据类型 |
| Extras | putExtras | 拓展信息,它指定装载的包裹信息 |
| Flags | setFlags | 标志位,它指定活动的启动标志 |
显式Intent
显式Intent,直接指定来源活动与目标活动,属于精确匹配。它有三种构建方式:
在Intent的构造函数中指定
Intent intent=new Intent(this,ActNextActivity.class); //创建一个目标确定的意图调用意图对象的setClass方法指定
Intent intent=new Intent();  //创建一个新意图
intent.setClass(this,ActNextActivity.class);  //设置意图要跳转的目标活动
调用意图对象的setComponent方法指定
Intent intent=new Intent();  //创建一个新意图
//创建包含目标活动在内的组件名称对象
ComponentName component=new ComponentName(this,ActNextActivity.class);
intent.setComponent(component);  //设置意图携带的组件信息
隐式Intent
没有明确指定要跳转的目标活动,只给出一个动作字符串让系统自动匹配,属于模糊匹配。通常App不希望向外部暴露活动名称,只给出一个事先定义好的标记串,按照约定俗成的方式进行跳转,隐式Intent便起到了标记过滤的作用。此动作为标记串,可以自定义动作,也可以是已有的动作,具体如下表:
| Intent系统动作常量名 | 系统动作常量值 | 说明 |
|---|---|---|
| ACTION_MAIN | android.intent.action.MAIN | App启动时的入口 |
| ACTION_VIEW | android.intent.action.VIEW | 向用户显示数据 |
| ACTION_SEND | android.intent.action.SEND | 分享内容 |
| ACTION_CALL | android.intent.action.CALL | 直接拨号 |
| ACTION_DIAL | android.intent.action.DIAL | 准备拨号 |
| ACTION_SENDTO | android.intent.action.SENDTO | 发送短信 |
| ACTION_ANSWER | android.intent.action.ANSWER | 接听电话 |
此处主要写的是Java的部分,目的是跳转至本应用之外的应用
MainActivity2.java
package com.wu.prc;

import androidx.appcompat.app.AppCompatActivity;

import android.content.Intent;
import android.net.Uri;
import android.os.Bundle;
import android.view.View;

public class MainActivity2 extends AppCompatActivity implements View.OnClickListener {

    @Override
    protected void onCreate(Bundle savedInstanceState) {
        super.onCreate(savedInstanceState);
        setContentView(R.layout.activity_main2);
        findViewById(R.id.btn_dial).setOnClickListener(this);
        findViewById(R.id.btn_sms).setOnClickListener(this);
    }

    @Override
    public void onClick(View view){
        int id=view.getId();
        Intent intent=new Intent();
        if(id==R.id.btn_dial){
            //设置意图动作为准备拨号
            intent.setAction(Intent.ACTION_DIAL);
            Uri uri=Uri.parse("tel:119"+"12345");
            intent.setData(uri);
            startActivity(intent);
        }else if(id==R.id.btn_sms){
            //设置意图动作为发短信
            intent.setAction(Intent.ACTION_SENDTO);
            //声明一个发送短信的Uri
            Uri uri2=Uri.parse("smsto:"+"12345");
            intent.setData(uri2);
            startActivity(intent);
        }
    }
}
activity_main2.xml
<?xml version="1.0" encoding="utf-8"?>
<LinearLayout xmlns:android="http://schemas.android.com/apk/res/android"
    xmlns:app="http://schemas.android.com/apk/res-auto"
    xmlns:tools="http://schemas.android.com/tools"
    android:layout_width="match_parent"
    android:layout_height="match_parent"
    android:orientation="vertical"
    tools:context=".MainActivity2">
    <Button
        android:id="@+id/btn_dial"
        android:layout_width="match_parent"
        android:layout_height="wrap_content"
        android:text="打开拨号界面"/>

    <Button
        android:id="@+id/btn_sms"
        android:layout_width="match_parent"
        android:layout_height="wrap_content"
        android:text="打开短信界面"/>
</LinearLayout>
PS:此外,还可以使用default来跳转至自定义的界面,通过此方法可以从A应用跳转至B应用。
AndroidMainifest.xml(你希望跳转的应用内的)
        <activity
            android:name=".MainActivity"
            android:exported="true">
            <intent-filter>
                <action android:name="android.intent.action.MAIN" />

                <category android:name="android.intent.category.LAUNCHER" />
            </intent-filter>

            <intent-filter>
                <action android:name="android.intent.action.NING"/>
                <category android:name="android.intent.category.DEFAULT"/>
            </intent-filter>
        </activity>
你当前操作的应用的Java文件
Intent intent=new Intent();
intent.setAction("android.intent.action.NING");
intent.addCategory(Intent.CATEGORY_DEFAULT);
startActivity(intent);
2.2.2 向下一个Activity发送数据
Intent使用Bundle对象存放待传递的数据信息。
Bundle对象操作各类型数据的读写方法:
数据类型 读方法 写方法 整型数 getInt putInt 浮点数 getFloat putDouble 双精度数 getDouble putDouble 布尔值 getBoolean putBoolean 字符串 getString putString 字符串数组 getStringArray putStringArray 字符串列表 getStringArrayList putStringArrayList 可序列化结构 getSerializable getSerializable
此处仅展示Java部分:
发送数据的部分:
package com.wu.prc;

import androidx.appcompat.app.AppCompatActivity;

import android.content.Intent;
import android.net.Uri;
import android.os.Bundle;
import android.view.View;

public class MainActivity2 extends AppCompatActivity implements View.OnClickListener {

    @Override
    protected void onCreate(Bundle savedInstanceState) {
        super.onCreate(savedInstanceState);
        setContentView(R.layout.activity_main2);
        tv_send=findViewById(R.id.tv_send);
        findViewById(R.id.btn_send).setOnClickListener(this);
    }

    @Override
    public void onClick(View view){
        Intent intent = new Intent(this,ActReceiveActivity.class);
        //创建新包裹
        Bundle bundle = new Bundle();
        bundle.putString("request_time",DateUtil.getNowTime());//是手机内部的实际时间,不一定是现实的实际时间,
        bundle.putString("request_content",tv_send.getText().toString());
        intent。putExtras(bundle);
        startActivity(intent);
    }
}
接受数据的部分:
package com.wu.prc;

import androidx.appcompat.app.AppCompatActivity;

import android.content.Intent;
import android.net.Uri;
import android.os.Bundle;
import android.view.View;

public class ActReceiveActivity extends AppCompatActivity{

    private TextView tv_receive;

    @Override
    protected void onCreate(Bundle savedInstanceState) {
        super.onCreate(savedInstanceState);
        setContentView(R.layout.activity_act_receive);
        tv_receive=findViewById(R.id.tv_receive);
        Bundle bundle=getIntent().getExtras();
        String request_time=bundle.getString("request_time");
        String request_content=bundle.getString("request_content");
        String desc=String.format("收到请求消息:\n请求时间%s\n请求内容为%s",request_time,request_content);
        tv_receive.setText(desc);
    }
}
=2023/7/3更新=================
2.3 为活动补充附加信息
2.3.1 利用资源文件配置字符串
利用res文件夹下的strings.xml文件来有效的替代程序中的特定字符串,可以有效的提高程序的安全性。
2.3.2 利用元数据传递配置信息
2.3.3 给应用页面注册快捷方式
=2024/1/28更新=================
现在实际中开始使用UNIAPP开发了,这个到时候用到再更新吧
参考文章/文献:
1.CSDN.https://blog.csdn.net/sinat_26820899/article/details/48878069
2.CSDN.https://blog.csdn.net/l1934499576/article/details/115677568
3.CSDN.https://blog.csdn.net/zy_jibai/article/details/80587083

 浙公网安备 33010602011771号