Android学习小记1(上)---界面布局
观前提示:本文主要是平时学习的课堂作业结合上课知识所进行的一次总结。其中存在着一些口语化和不专业的描述,恳请指正。
目录:
1.1 View与ViewGroup
1.2布局管理器
1.2.1相对布局管理器(RelativeLayout)
1.2.1.1根据父容器来进行定位的方法
1.2.1.2根据兄弟组件来进行定位
1.2.1.3外边距margin(偏移)—设置组件与父容器的边距,又叫偏移
1.2.1.4内边距(padding)填充----设置组件内部元素间的边距,(例如Textview里的字体位置)
1.2.2线性布局管理器(LinearLayout)
垂直线性布局管理器:(android:orientation="vertical")
水平线性布局管理器(android:orientation="horizontal")
1.1 View与ViewGroup
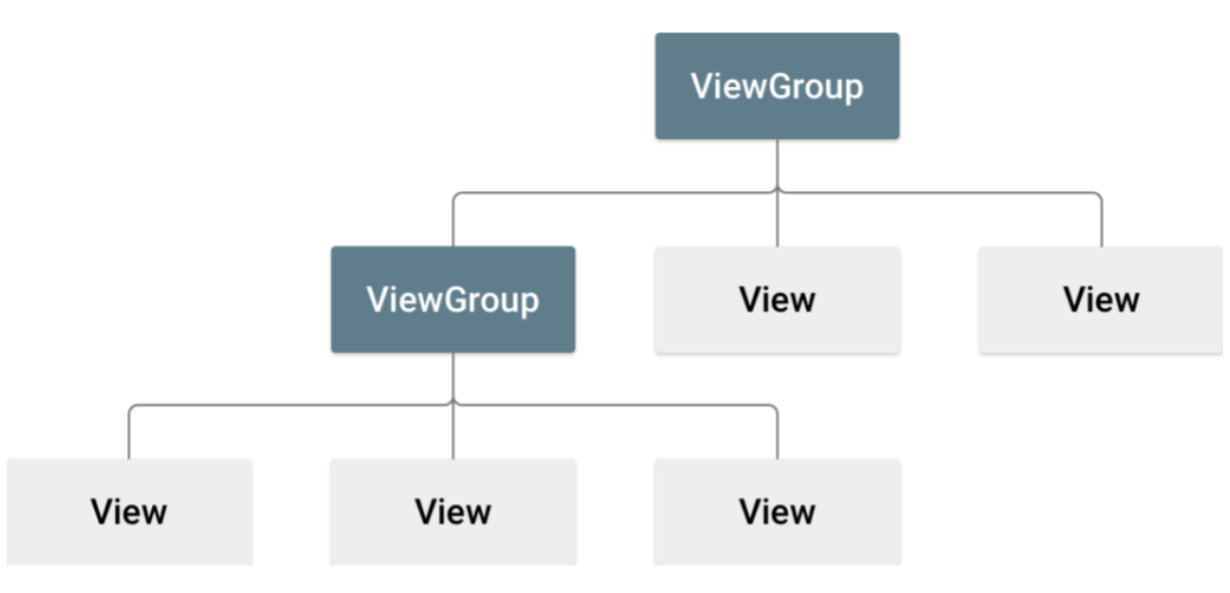
View通常指的是用户界面组件的基本构建块,用窗户来进行类比的话,窗户上的每一片玻璃都是View。它通常呈现矩形,负责提供组件绘制和事件的处理方法,也是后面的所有布局的背景(UI组件的基类)。通常在View(视图)中,有以下几类操作:设置属性、设置焦点、设置监听器、设置可见性。
而ViewGroup在Android中代表了容器,用窗户来进行类比的话,它代表了窗口框,用于控制玻璃(View)的位置。ViewGroup通常继承自View类,作为一个抽象类,实际运用中主要使用ViewGroup的子类作为容器。
————摘自Android官方文档(和部分修改)
通常来说,我们在实际开发中主要关注View(视图)主要是:位置、大小、内边距和边距。(对我这个初学者来说,还没有学到动画那边,现在也用不上)本文仅介绍相对布局管理器和线性布局管理器.
View家族的层次结构如下:
1.2布局管理器
在Android中,每个组件在窗体都有具体的位置和大小,Android主要提供了以下5种布局管理器:
相对布局管理器(RelativeLayout):通过相对定位的方式来控制组件的摆放位置。
线性布局管理器(LinearLayout):是指在垂直或水平方向上依次摆放组件。
帧布局管理器(FrameLayout):没有任何定位方式,在默认情况下,所以组件都会摆放在容器的左上角,逐个覆盖。
表格布局管理器(TableLayout):使用表格的方式按行、列摆放组件。
绝对布局管理器(AbsoluteLayout):通过绝对定位(X,Y坐标)的方式来控制组件的摆放位置。(在Android2.0中标记已经过期,在Android4.0后,提供了网格布局管理器(GridLayout)来实现跨行、列摆放组件。)
布局管理器的嵌套分类图:
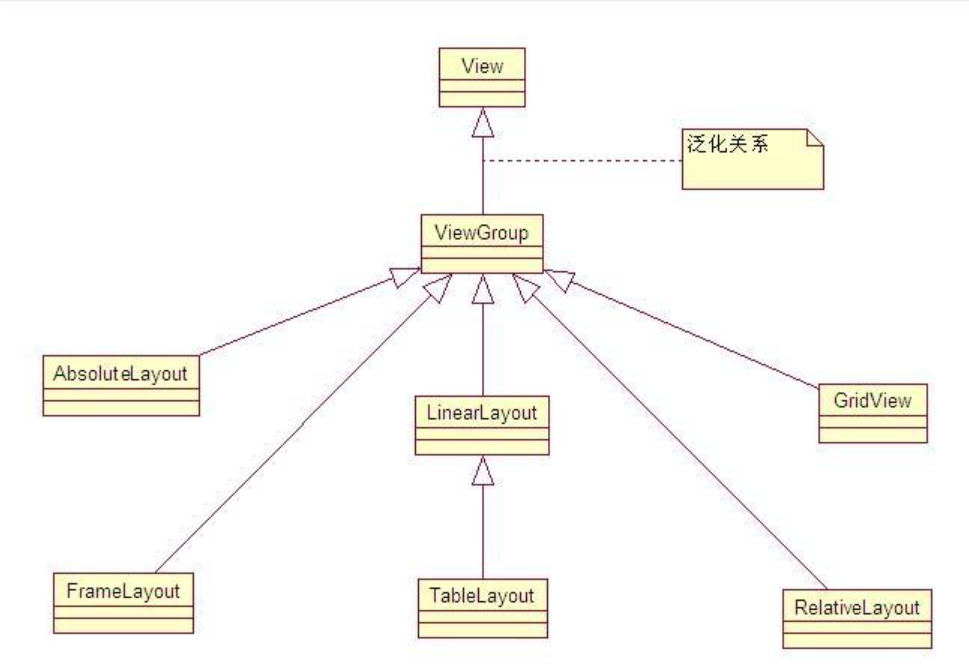
PS:AbsoluteLayout目前已经被弃用(已过期)
1.2.1相对布局管理器(RelativeLayout)
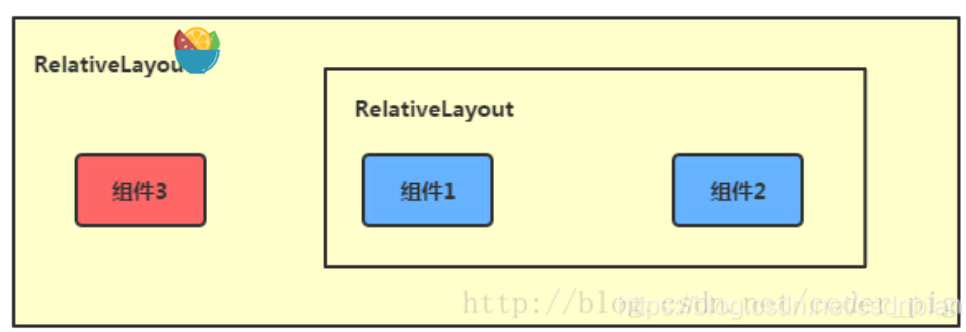
通过相对定位的方式让组件出现在布局的任何位置。注意点:
- 需要有一个参考对象,其余组件依照它来进行排序
- 可以用于消除嵌套视图组,使得布局层次扁平化,提高其性能(多层LinearLayout可以用一个RelativeLayout来进行替换
- 拥有Java和xml两种方式来进行描绘RelativeLayout
它的两个重要属性:
- android:gravity----设置布局中的各个控件的布局对齐方式
- android:ignireGravity----设置了该属性为ture的属性组件,将不受Gravity属性的影响
1.2.1.1根据父容器来进行定位的方法
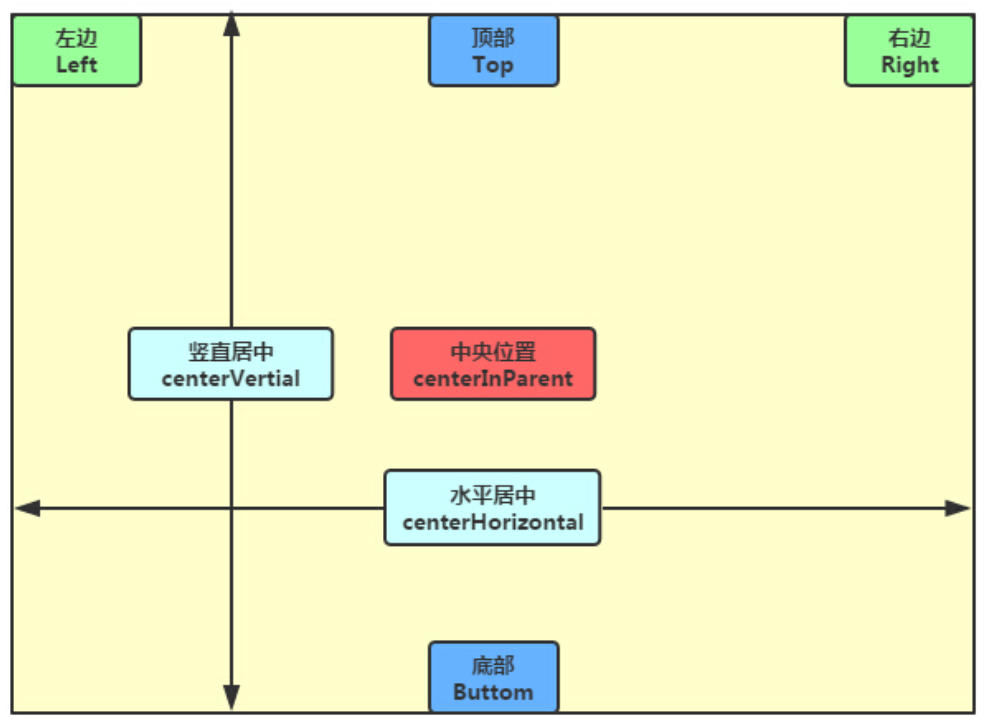
- layout_alignParentLeft----layout_alignStart----左对齐
- layout_alignParentRight----layout_alignEnd----右对齐
- layout_alignParentTop----顶部对齐
- layout_alignParentBottom----底部对齐
- layout_centerHorizontal----水平居中
- layout_centerVertical----垂直居中
- layout_centerInParent----中间位置—取值:true,false
1.2.1.2根据兄弟组件来进行定位
- layout_toLeftOf----layout_toStartOf----参考组件的左边----取值:相对的id名
- layout_toRightOf----layout_toEndOf----参考组件的右边
- layout_above----参考组件上边
- layout_below----参考组件的下方
- layout_alignTop----对其参考组件的上边界
- layout_alignBottom-----对其参考组件的下边界
- layout_alignRight----layout_alignEnd----对其参考组件的右边界
- layout_alignLeft----layout_alignStart----对其参考组件的左边界
1.2.1.3外边距margin(偏移)—设置组件与父容器的边距,又叫偏移
- layout_margin----设置组件上下左右的偏移量
- layout_marginLeft----layout_marginStart----设置组件离左边的偏移量
- layout_marginRight----layout_marginEnd----设置组件离右边的偏移量
- layout_marginTop----设置组件离上边的偏移量
- layout_marginBottom----设置组件离底边的偏移量
- layout_marginHorizontal----设置组件离水平的偏移量
- layout_marginVertical----设置组件离垂直的偏移量
1.2.1.4内边距(padding)填充----设置组件内部元素间的边距,(例如Textview里的字体位置)
- android:padding—往内部控件部的上下左右填充一定边距
- paddingLeft----paddingStart----往内部控件的左填充一定边距
- paddingRight----paddingEndaa往内部控件的右部填充一定边距
- paddingTop----往内部控件的上部填充一定边距
- paddingBottom----往内部控件的底部填充一定边距
- paddingHorizontal----水平填充
- paddingVertical----垂直填充
1.2.2线性布局管理器(LinearLayout)
线性布局管理器是我们在开发学习中常用的布局方式,因为其容易实现,而且可以通过简单的嵌套就可以完成许多较为复杂的布局.
在开发之中,主要使用的是android:orientation属性来完成基本的操作,android:orientation有两个基本属性:vertical和horizontal.
垂直线性布局管理器:(android:orientation="vertical")
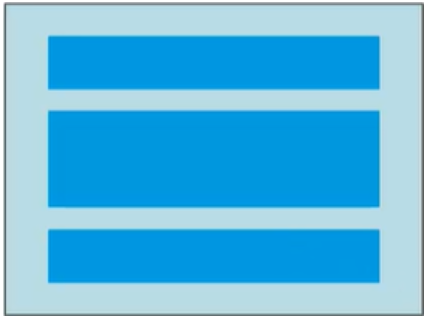
一行仅能放置一个组件.
水平线性布局管理器(android:orientation="horizontal")
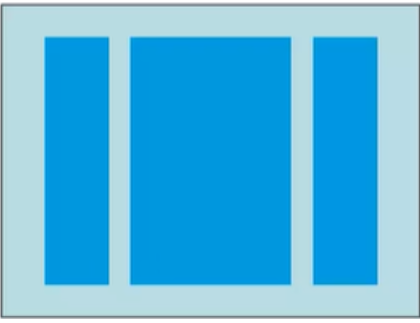
一列仅能放置一个组件.
常用属性:
layout_gravity(设置布局中控件的位置)
- top 上
- bottom 下
- left 左
- right 右,
- center_vertical 垂直居中
- center_horizontal 水平居中
- center 居中
orientation(布局排列方式)
- vertical 默认-垂直排列
- horizontal 水平排列
layout_gravity(控制该组件在父容器里的对齐方式)
layout_weight(布局宽度) layout_height(布局高度)
- 数字(通常不直接写)
- wrap_content 组件实际大小
- match_parent 与父容器同宽
- 均等分布,全部加上:android:layout_weight=“1”
剩余空间全给一个:在其上加上:android:layout_weight=“1”
从别的博客借用的实例:
<LinearLayout xmlns:android="http://schemas.android.com/apk/res/android"
    xmlns:tools="http://schemas.android.com/tools"
    android:layout_width="match_parent"
    android:layout_height="match_parent"
    tools:context="${relativePackage}.${activityClass}"
    android:orientation="horizontal"
    >
	<Button
	    android:layout_weight="1"
	    android:layout_width="wrap_content"
	    android:layout_height="wrap_content"
	    android:text="1"
	    android:background="#ff0000"
	    />
	<Button
	    android:layout_weight="4"
	    android:layout_width="wrap_content"
	    android:layout_height="wrap_content"
	    android:text="2"
	    android:background="#00ff00"
	    />
	<Button
	    android:layout_weight="1"
	    android:layout_width="wrap_content"
	    android:layout_height="wrap_content"
	    android:text="3"
	    android:background="#ffff00"
	    />
</LinearLayout>
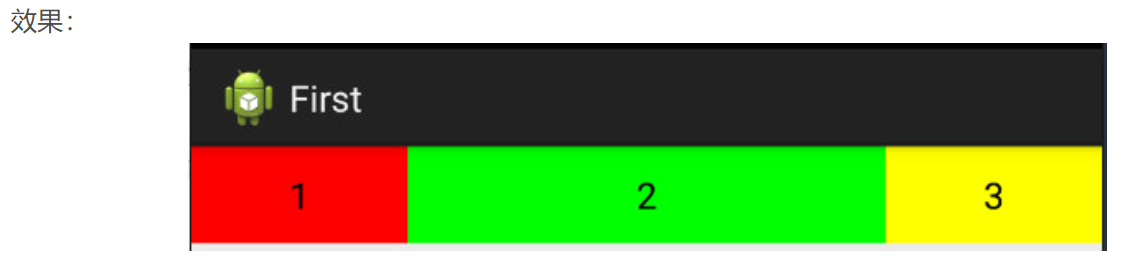
这里是将整个页面分成1+4+1=6份,然后红色占1/6,绿色占2/3,黄色占1/6.
backgrount(布局背景)
- 为该组件设置一个背景图片(已经预先放在res的图片)
- 单一颜色覆盖
layout_weight(布局宽度)layout_height(布局高度)
- 数字(通常不直接写)
- wrap_content 组件实际大小
- match_parent 与父容器同宽
id属性
- 引用id:@id
- 设置id:@+id
- java文件找id:findViewById(R.id.你的详细id)
我自己做的布局实例(有点丑),包含了主要组件,Spinners(下拉框)的内容通过监听器写在了java中,具体会在下一次(大概)展示:
activity_main.java
<?xml version="1.0" encoding="utf-8"?>
<LinearLayout xmlns:android="http://schemas.android.com/apk/res/android"
    xmlns:app="http://schemas.android.com/apk/res-auto"
    xmlns:tools="http://schemas.android.com/tools"
    android:layout_width="match_parent"
    android:layout_height="match_parent"
    android:orientation="vertical"
    tools:context=".MainActivity">
    <!--姓名-编辑框-->
    <LinearLayout
        android:layout_width="368dp"
        android:layout_height="wrap_content"
        tools:layout_editor_absoluteY="0dp"
        android:orientation="horizontal"
        tools:layout_editor_absoluteX="8dp">
        <TextView
            android:layout_width="wrap_content"
            android:layout_height="40dp"
            android:textSize="18sp"
            android:textColor="@android:color/background_dark"
            android:text="姓名">
        </TextView>
        <EditText
            android:layout_width="match_parent"
            android:layout_height="50dp"
            android:hint="请输入姓名"
            android:id="@+id/Stuname">
        </EditText>
    </LinearLayout>
    <!--学号-编辑框-->
    <LinearLayout
            android:layout_width="368dp"
            android:layout_height="wrap_content"
            tools:layout_editor_absoluteY="0dp"
            android:orientation="horizontal"
            tools:layout_editor_absoluteX="8dp">
            <TextView
                android:layout_width="wrap_content"
                android:layout_height="40dp"
                android:textSize="18sp"
                android:textColor="@android:color/background_dark"
                android:inputType="number"
                android:text="学号">
            </TextView>
            <EditText
                android:layout_width="match_parent"
                android:layout_height="50dp"
                android:hint="请输入学号"
                android:id="@+id/StuNum">
            </EditText>
    </LinearLayout>
    <!--性别-单选框-->
    <RadioGroup
       android:layout_width="match_parent"
       android:layout_height="40dp"
       android:orientation="horizontal">
        <TextView
            android:layout_width="wrap_content"
            android:layout_height="40dp"
            android:textSize="18sp"
            android:textColor="@android:color/background_dark"
            android:text="性别">
        </TextView>
       <RadioButton
           android:id="@+id/man"
           android:layout_width="50dp"
           android:layout_height="wrap_content"
           android:text="男"/>
       <RadioButton
           android:id="@+id/woman"
           android:layout_width="50dp"
           android:layout_height="wrap_content"
           android:text="女"/>
   </RadioGroup>
    <!--学院-下拉框(二级联动)-->
    <LinearLayout
        android:layout_width="368dp"
        android:layout_height="wrap_content"
        android:orientation="horizontal">
        <TextView
            android:layout_width="wrap_content"
            android:layout_height="40dp"
            android:textSize="18sp"
            android:textColor="@android:color/background_dark"
            android:text="学院" />
        <Spinner
            android:id="@+id/Stuacademy"
            android:layout_width="match_parent"
            android:layout_height="wrap_content" />
    </LinearLayout>
    <!--专业-下拉框(二级联动)-->
    <LinearLayout
        android:layout_width="368dp"
        android:layout_height="wrap_content"
        android:orientation="horizontal">
        <TextView
            android:layout_width="wrap_content"
            android:layout_height="40dp"
            android:textSize="18sp"
            android:textColor="@android:color/background_dark"
            android:text="专业" />
        <Spinner
            android:id="@+id/Stumajor"
            android:layout_width="match_parent"
            android:layout_height="wrap_content" />
    </LinearLayout>
    <!--爱好-复选框-->
    <LinearLayout
        android:layout_width="match_parent"
        android:layout_height="wrap_content"
        android:orientation="horizontal">
        <TextView
            android:layout_width="wrap_content"
            android:layout_height="40dp"
            android:textSize="18sp"
            android:textColor="@android:color/background_dark"
            android:text="爱好" />
        <CheckBox
            android:layout_width="wrap_content"
            android:layout_height="wrap_content"
            android:text="文学"/>
        <CheckBox
            android:layout_width="wrap_content"
            android:layout_height="wrap_content"
            android:text="体育"/>
        <CheckBox
            android:layout_width="wrap_content"
            android:layout_height="wrap_content"
            android:text="音乐"/>
        <CheckBox
            android:layout_width="wrap_content"
            android:layout_height="wrap_content"
            android:text="美术"/>
    </LinearLayout>
    <!--按钮-->
    <Button
        android:id="@+id/StuAdd"
        android:onClick="Add"
        android:layout_width="fill_parent"
        android:layout_height="40dp"
        android:background="#3F51B5"
        android:textColor="#FFFFFF"
        android:textSize="18sp"
        android:text="注册"/>
</LinearLayout>
效果:

MainActivity.java(仅仅提取了最基本的部分)
public class MainActivity extends AppCompatActivity {
     @Override
     protected void onCreate(Bundle savedInstanceState) {
          super.onCreate(savedInstanceState);
          setContentView(R.layout.activity_main);
   }
}
参考文档:
1.官方文档:https://developer.android.google.cn/docs
2.相对布局管理器参考:https://blog.csdn.net/csdnbian/article/details/108818528
3.线性布局管理器参考https://blog.csdn.net/csdnbian/article/details/108812119

 浙公网安备 33010602011771号