
「课件」原创 => Vue3【转载请标明出处】
Zero·前言
0.0 Vscode 插件
- 别名路径跳转
- AutoScssStruct4Vue
- Chinese (Simplified) (简体中文) Language Pack fo
- Code Runner
- Aya Vue3 extension Pack
- Live Preview
- Live Server
- Material Icon Theme
- px to rem & rpx & vw (cssrem)
- Smart Clicks
- Vue VSCode Snippets
- vue-helper
- Vetur(vue3 环境下禁用)
0.1 ESLint 异常提示
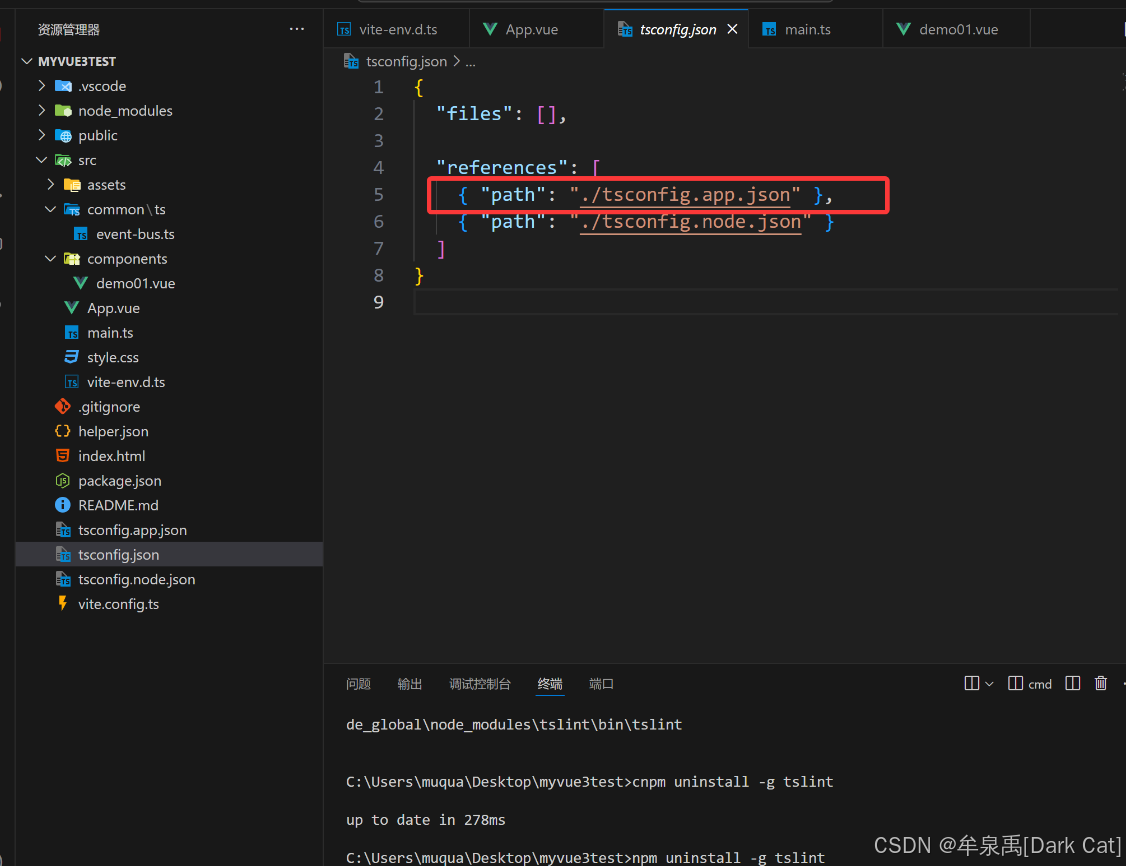
{
  "extends": "@vue/tsconfig/tsconfig.dom.json",
  "compilerOptions": {
    "tsBuildInfoFile": "./node_modules/.tmp/tsconfig.app.tsbuildinfo",

    /* Linting */
    "noImplicitAny": false,
    "strict": true,
    "noUnusedLocals": true,
    "noUnusedParameters": true,
    "noFallthroughCasesInSwitch": true,
    "noUncheckedSideEffectImports": true
  },
  "include": ["src/**/*.ts", "src/**/*.tsx", "src/**/*.vue"]
}
0.2 vite-env.d.ts
/// <reference types="vite/client" />
declare module "*.vue" {
    import type { DefineComponent } from "vue";
    const vueComponent: DefineComponent<{}, {}, any>;
    export default vueComponent;
}
第一章·Vue3
1.1 Vue3 对比 Vue2 改变之处
- 组合式API:都可以写到一堆里面,毕竟类型是不一样的,所以不用分来分去的,然后再用代码块框住了。
<script>
    data() {
        return {

        }
    },
    methods: { // 这就是选项式 API
    }
</script>
-
setup():在 beforeCreated() 与 created() 两个钩子之前。
-
reactive、ref:用 reactive(复杂变量)、ref(简单变量) 将变量赋予 响应式的能力。
-
watch、computed 写法上有变化
-
每个vue文件,不再强制要求 必须有且只能有一个 div 元素作为 根元素
-
vue3 项目用 Vite 进行打包(速度相较于webpack得到了很大的提升)
-
vue3 项目用 Pinia 来进行状态管理
-
Vue2 响应式依赖于
object.defineProperty():Object.defineProperty()会直接修改对象的内部属性描述符(property descriptor)。每个属性都会有一组描述符来控制该属性的行为。Object.defineProperty()通过设置或修改这些描述符来实现对属性的精细控制,包括getter和setter。 -
Vue3 响应式依赖于
Proxy():你可以一次性通过代理整个对象,对所有的属性访问进行拦截,不需要手动为每个属性添加getter和setter,所以实现响应式可能更加的简洁。而之所以采用它的原因,还有就是 Proxy 可扩展性强、比较万能。它甚至能拦截方法的调用、数组的访问等多种行为 -
打包后体积更小
-
主张 按需导入
1.2 创建项目
- 安装 Vue VSCode Snippets

npm create vite@latest
npm i
npm run dev


- main.ts
import { createApp } from 'vue'
import './style.css'
import App from './App.vue'

const app = createApp(App);
app.mount('#app')
1.3 setup 的两种写法
- 传统写法
<template>
  <div>
    <button @click="printCount">{{ count }}</button>
  </div>
</template>

<script lang="ts">
import { ref } from "vue";
export default {
  setup() {
    const count = ref(1);
    const printCount = () => {
      count.value += 1;
    };
    return {
      count,
      printCount,
    };
  },
};
</script>

<style scoped></style>
- 简写方式
<template>
  <div>
    <button @click="printCount">{{ count }}</button>
  </div>
</template>

<script setup lang="ts">
import { ref } from "vue";
const count = ref(1);
const printCount = () => {
  count.value += 1; // 如果用 ref 修饰,那么 值就必须得 变量.value
};
</script>

<style scoped></style>
1.4 computed、watch
- computed
computed: {
    aa(){
        return this.aaTemp * 2;
    }
}
const aa = computed(() => {
    return aaTemp.value * 2;
})
- watch
浅层监听
  watch: {
    // 监听 'message' 的变化
    message(newValue, oldValue) {
      console.log(`message changed from "${oldValue}" to "${newValue}"`);
    },
    // 监听 'count' 的变化
    count(newCount, oldCount) {
      console.log(`count changed from ${oldCount} to ${newCount}`);
    }
  }
const age = ref(23);
const count = ref(1)
/*watch(age, (newVal, oldVal) => {
    console.log(`${oldVal} to ${newVal}`)
})*/
watch([age, count], (newVal, oldVal) => { // 多个监听
    console.log(`${oldVal} to ${newVal}`) // 此时这里 的 oldVal 与 newVal 返回的就是数组了 ~
})
深层监听
watch: {
    // 深度监听 `user` 对象的变化
    user: {
      handler(newUser, oldUser) {
        console.log('user object changed:', newUser, oldUser);
      },
      deep: true
      // immediate: true  // 立即执行
    }
  }
const age = ref(23);
const count = ref(1)
/*watch(age, (newVal, oldVal) => {
    console.log(`${oldVal} to ${newVal}`)
})*/
watch([age, count], (newVal, oldVal) => { // 多个监听
    console.log(`${oldVal} to ${newVal}`) // 此时这里 的 oldVal 与 newVal 返回的就是数组了 ~
}, {immediate: true, deep: true}) // 深层监听、立即执行
监听某个属性
  watch: {
    // 监听 `user.age` 属性的变化
    'user.age'(newAge, oldAge) {
      console.log(`Age changed from ${oldAge} to ${newAge}`);
    }
  }
watch(() => user.age, (newVal, oldVal) => {
    console.log(`${oldVal} to ${newVal}`)
})
如果监听的是 复杂对象,用的 reactive 修饰,则第一个参数必须 写成 箭头函数。
const age = ref(23);
const count = ref(1)
/*watch(age, (newVal, oldVal) => {
    console.log(`${oldVal} to ${newVal}`)
})*/
watch([() => age, () => count], (newVal, oldVal) => { // 多个监听
    console.log(`${oldVal} to ${newVal}`) // 此时这里 的 oldVal 与 newVal 返回的就是数组了 ~
}, {immediate: true, deep: true}) // 深层监听、立即执行
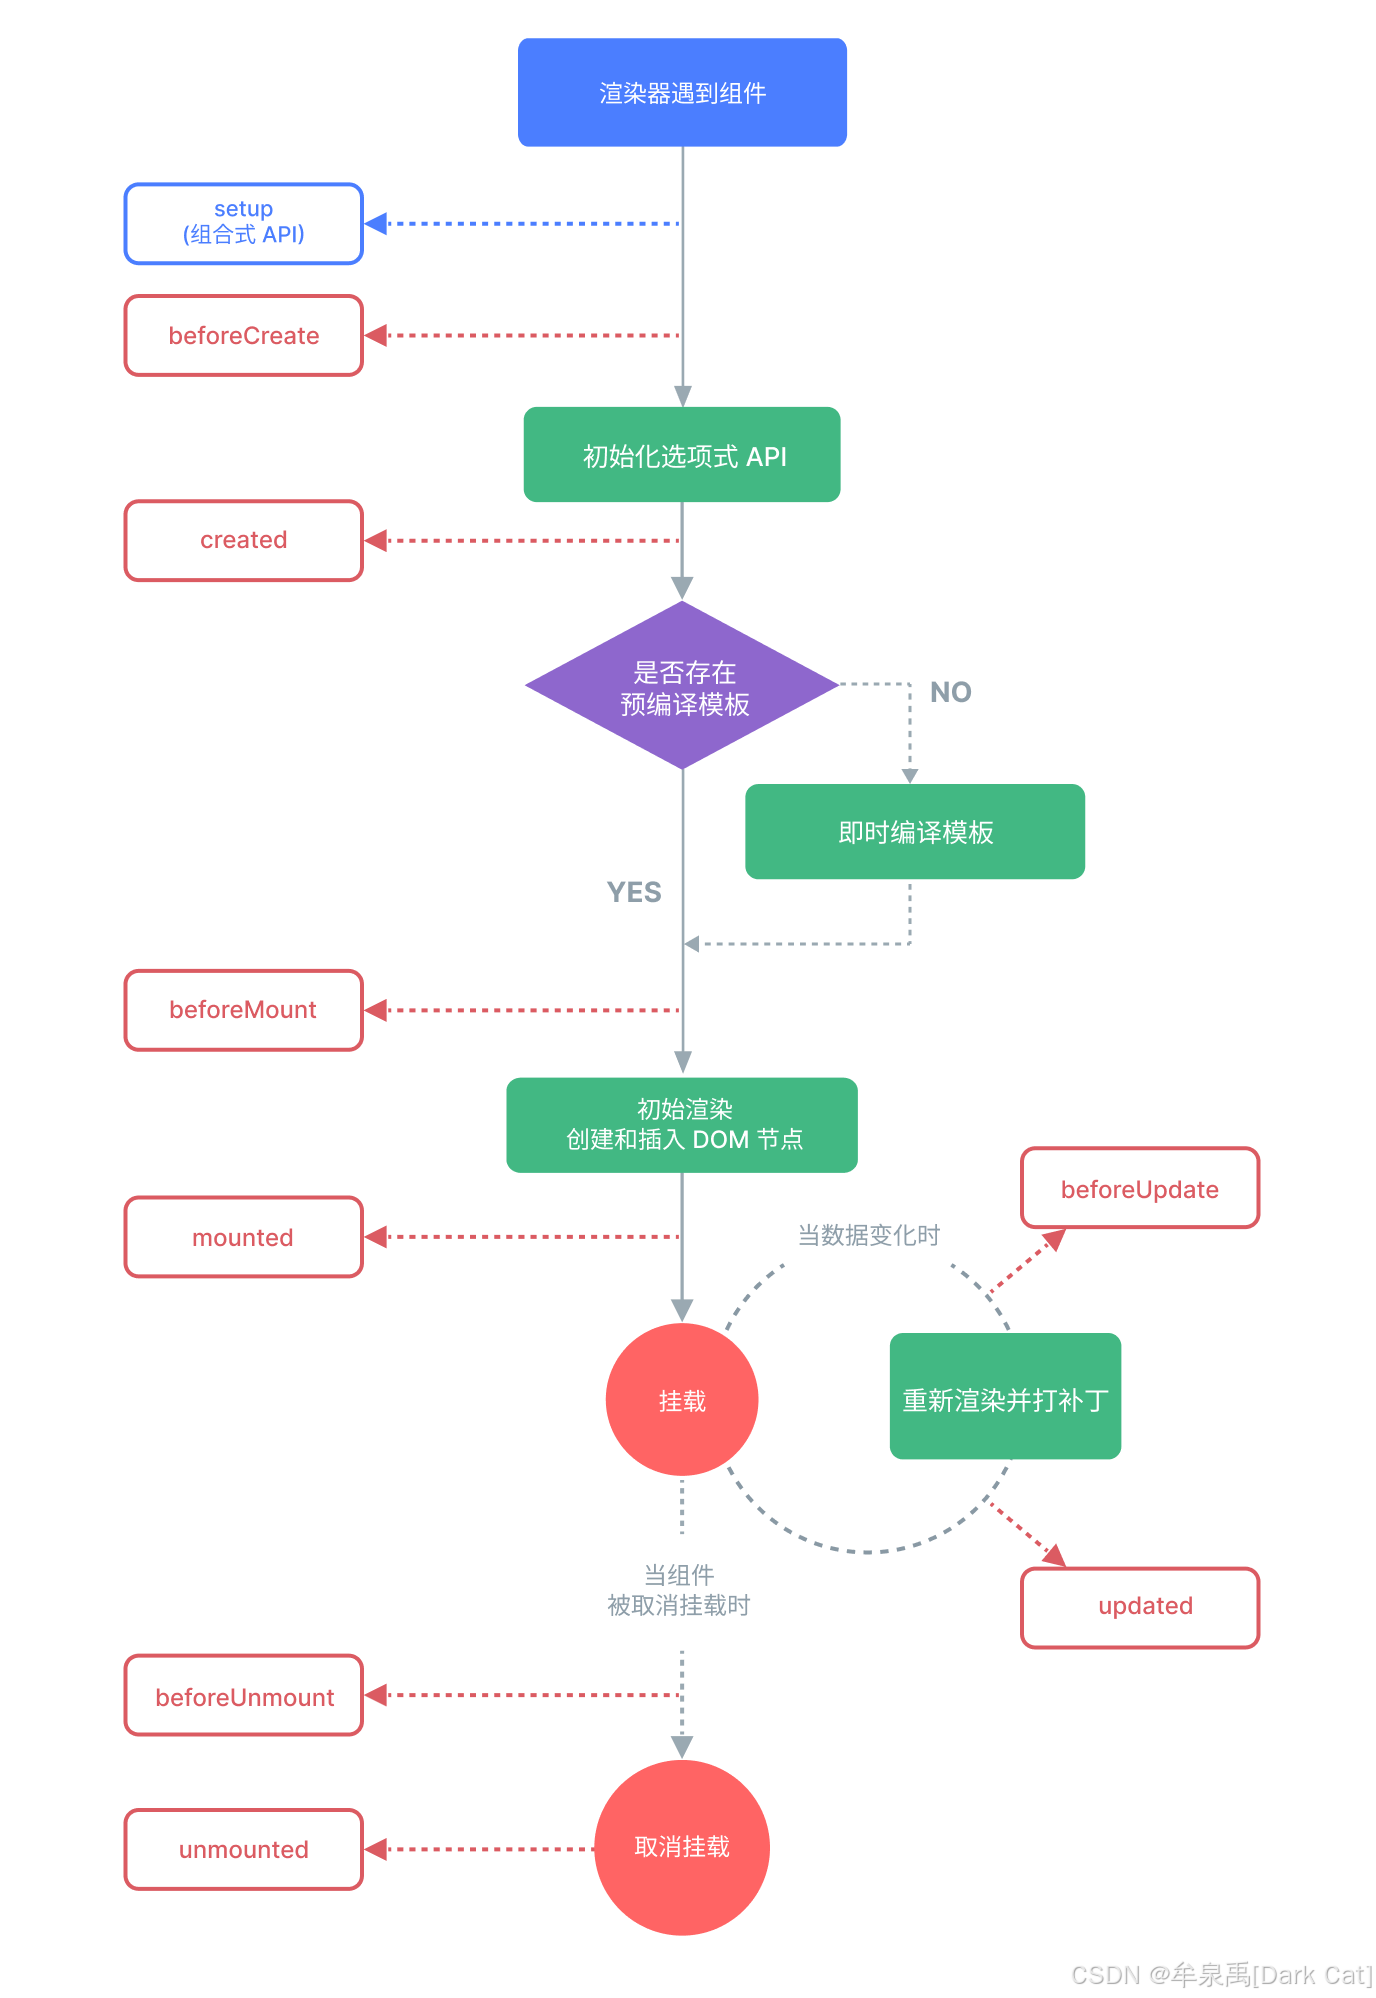
1.5 生命周期钩子
beforeMount => onBeforeMount
mounted => onMounted
beforeUpdate => onBeforeUpdate
updated => onUpdated
beforeDestroy => onBeforeUnmount
destroyed => onUnmounted
<template>
  <div></div>
</template>

<script setup>
import { onBeforeMount, onMounted, ref } from "vue";

const count = ref(0);
onBeforeMount(() => {
  alert("onBeforeMount");
});
</script>

<style lang="scss" scoped></style>
1.6 父子组件通信
- 引入组件的方式
demo01.vue
<template>
  <div>我是组件01</div>
</template>

<script setup></script>

<style lang="scss" scoped></style>
App.vue
<template>
  <div>
    <demo01></demo01>
  </div>
</template>

<script setup>
import demo01 from "./components/demo01.vue";
</script>

<style lang="scss" scoped></style>

- props 改为使用 defineProps() 宏函数
demo01.vue
<template>
  <div style="display: flex; flex-direction: column">
    <div v-for="(item, index) in dataList" :key="index">
      {{ item.name }}
    </div>
  </div>
</template>

<script setup>
// 无校验 props
// defineProps(["dataList"]);
// 有校验 props
defineProps({
  dataList: {
    type: String,
    required: true,
    default: [],
  },
});
</script>

<style lang="scss" scoped></style>
App.vue
<template>
  <div>
    <demo01 :dataList="dataList"></demo01>
  </div>
</template>

<script setup>
import { reactive } from "vue";
import demo01 from "./components/demo01.vue";
const dataList = reactive([
  {
    id: 1,
    name: "fq",
  },
]);
</script>

<style lang="scss" scoped></style>
- emit 改为使用 defineEmits()
demo01.vue
<template>
  <div style="display: flex; flex-direction: column">
    <div v-for="(item, index) in dataList" :key="index">
      {{ item.name }}
    </div>
    <el-button type="primary" @click="sendMsgB">sendMsgB</el-button>
  </div>
</template>

<script setup lang="ts">
import type { PropType } from "vue";

// 无校验 props
// defineProps(["dataList"]);
// 有校验 props
interface Item {
  name: string;
}
const props = defineProps({
  dataList: {
    type: Array as PropType<Item[]>,
    required: true,
    default: [],
  },
});
const emit = defineEmits(["sendMsg", "sendMsgB"]);
const sendMsg = () => {
  emit("sendMsg", "你好");
};
const sendMsgB = () => {
  emit("sendMsgB", props.dataList);
};
</script>

<style lang="scss" scoped></style>
- App.vue
<template>
  <demo01 @send-msg-b="onSendMsgB" :data-list="dataList"></demo01>
</template>

<script setup>
import { reactive } from "vue";
import demo01 from "./components/demo01.vue";

const dataList = reactive([
  {
    id: 1,
    name: "fq",
  },
]);

const onSendMsgB = (ret) => {
  console.log(ret);
};
</script>

<style lang="scss" scoped></style>
1.7 ref 属性
- demo01.vue
<template>
  <div style="display: flex; flex-direction: column">
    <div v-for="(item, index) in dataList" :key="index">
      {{ item.name }}
    </div>
    <el-button type="primary" @click="sendMsgB">sendMsgB</el-button>
  </div>
</template>

<script setup lang="ts">
import type { PropType } from "vue";

// 无校验 props
// defineProps(["dataList"]);
// 有校验 props
interface Item {
  name: string;
}
const props = defineProps({
  dataList: {
    type: Array as PropType<Item[]>,
    required: true,
    default: [],
  },
});
const emit = defineEmits(["sendMsg", "sendMsgB"]);
const sendMsg = () => {
  emit("sendMsg", "你好");
};
const sendMsgB = () => {
  emit("sendMsgB", props.dataList);
};

// 暴露组件中的 数据 和 方法
defineExpose({
  dataList: props.dataList,
  sendMsg,
});
</script>

<style lang="scss" scoped></style>
- App.vue
<template>
  <demo01
    ref="demo01Ref"
    @send-msg-b="onSendMsgB"
    @send-msg="onSendMsg"
    :data-list="dataList"
  ></demo01>
</template>

<script setup>
import { onMounted, reactive, ref } from "vue";
import demo01 from "./components/demo01.vue";

const dataList = reactive([
  {
    id: 1,
    name: "fq",
  },
]);

const onSendMsgB = (ret) => {
  console.log(ret);
};

const onSendMsg = (ret) => {
  console.log("onSendMsg", ret);
};

const demo01Ref = ref(null);
onMounted(() => {
  demo01Ref.value?.sendMsg();
});
</script>

<style lang="scss" scoped></style>
1.8 provide、inject
provide:只能是上级组件去使用,比如 父组件、爷爷组件...
inject:只能是下级组件去使用,比如 子组件...
所以,provide与inject 主要是用来 实现跨层传递的!
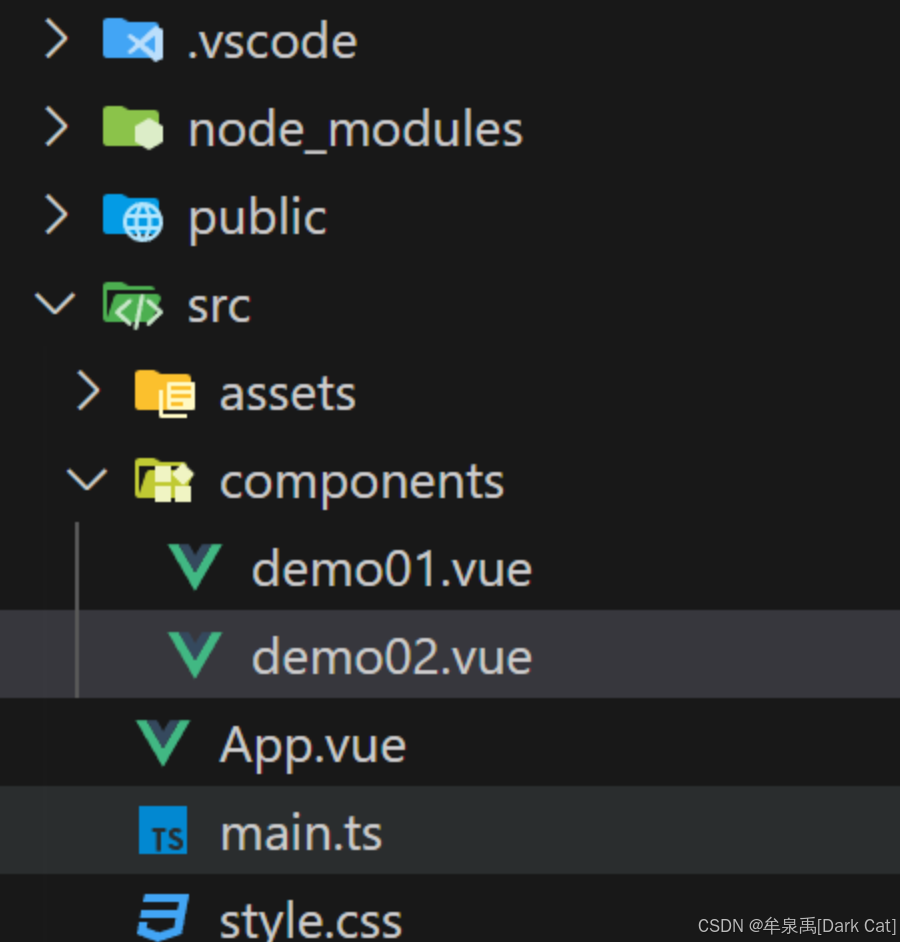
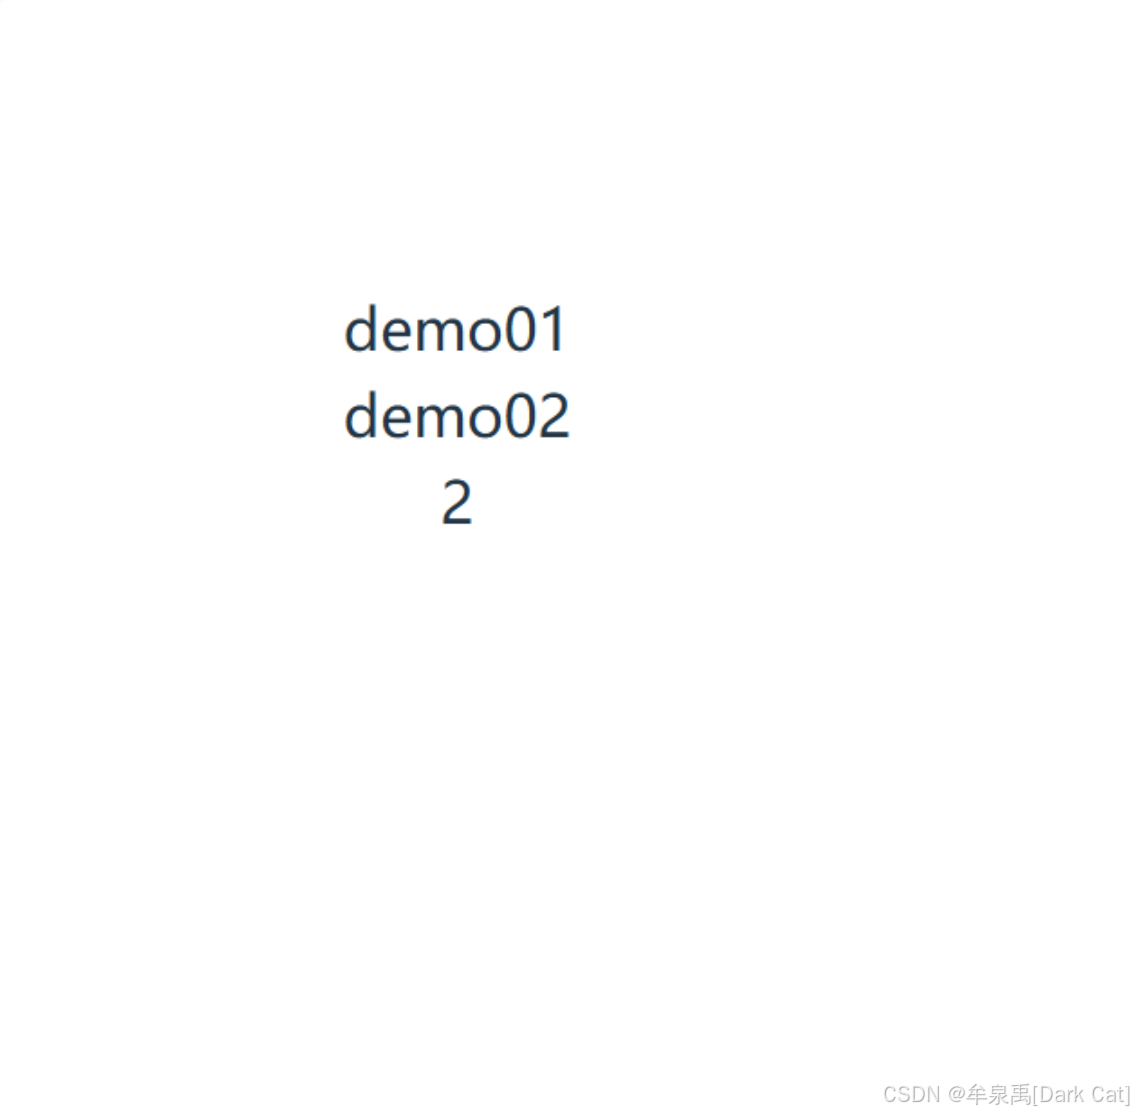
- demo01.vue
<template>
  <div>demo01</div>
  <demo02></demo02>
</template>

<script lang="ts" setup>
import demo02 from "./demo02.vue";
</script>

<style lang="scss" scoped></style>
- demo02.vue
<template>
  <div>demo02</div>
  <div>{{ fk }}</div>
</template>

<script lang="ts" setup>
import { inject } from "vue";

let fk: any = inject("fk");
</script>

<style lang="scss" scoped></style>
- App.vue
<template>
  <div>
    <demo01></demo01>
  </div>
</template>

<script lang="ts" setup>
import { provide, ref } from "vue";
import demo01 from "./components/demo01.vue";
const fk = ref(2);
provide("fk", fk); // 向下级组件传递
</script>

<style lang="scss" scoped></style>
1.9 事件总线
cnpm i mitt
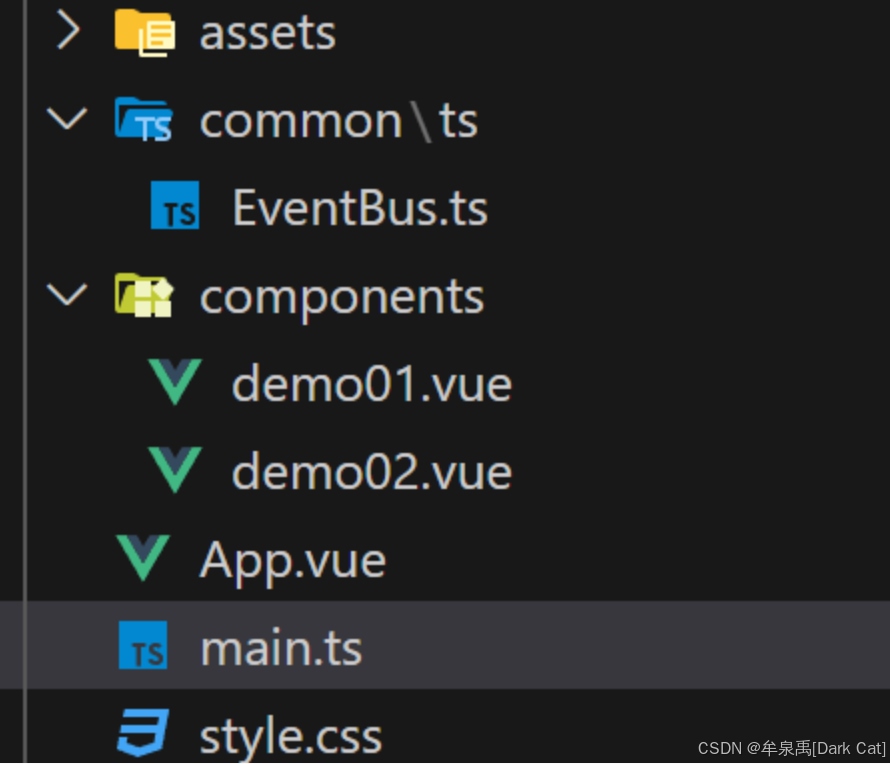
- main.ts
import { createApp } from 'vue'
import './style.css'
import App from './App.vue'
import EventBus from '../src/common/ts/EventBus.ts'
let app = createApp(App);
globalThis.$eventBus = EventBus;
app.mount("#app")
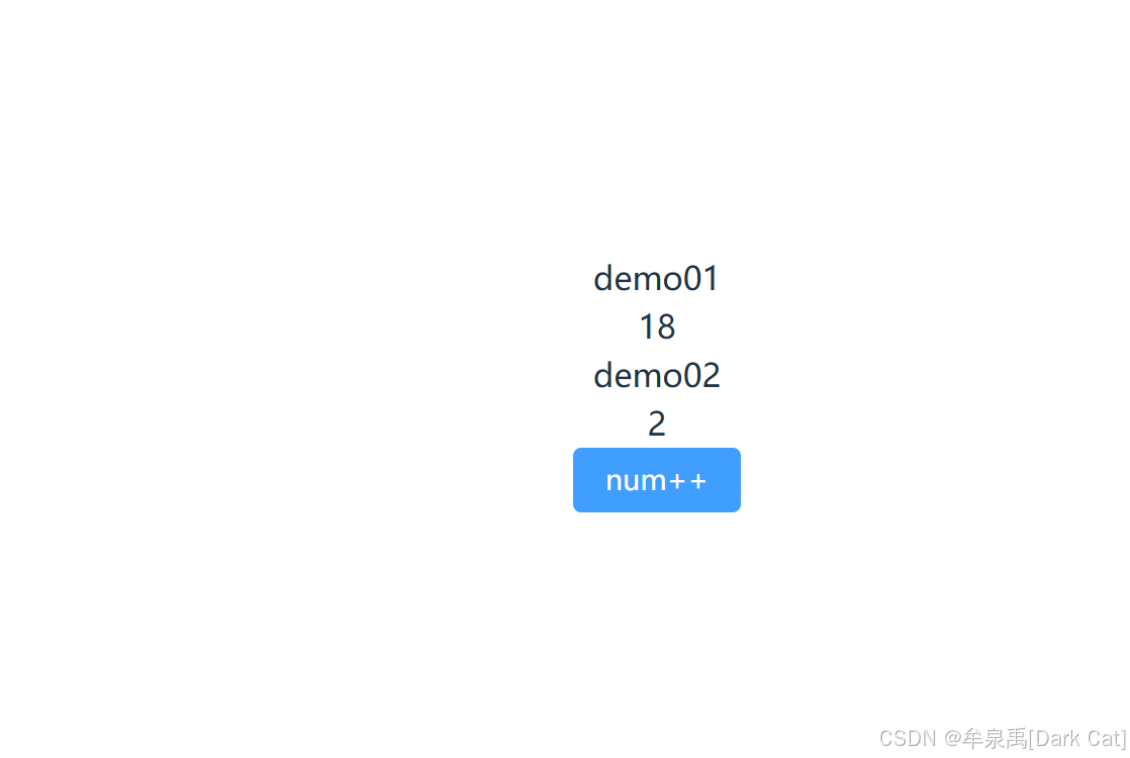
- demo01.vue
<template>
  <div>demo01</div>
  {{ num }}
  <demo02></demo02>
</template>

<script lang="ts" setup>
import { ref } from "vue";
import demo02 from "./demo02.vue";
const num = ref(1);

globalThis.$eventBus.on("refreshDemo01", () => {
  // alert("refreshDemo01");
  num.value++;
});
</script>

<style lang="scss" scoped></style>
- demo02.vue
<template>
  <div>demo02</div>
  <div>{{ fk }}</div>
</template>

<script lang="ts" setup>
import { inject } from "vue";

let fk: any = inject("fk");
</script>

<style lang="scss" scoped></style>
- App.vue
<template>
  <div>
    <demo01></demo01>
    <el-button @click="handleNumPlus" type="primary">num++</el-button>
  </div>
</template>

<script lang="ts" setup>
import { provide, ref } from "vue";
import demo01 from "./components/demo01.vue";
const fk = ref(2);
provide("fk", fk); // 向下级组件传递
const handleNumPlus = () => {
  globalThis.$eventBus.emit("refreshDemo01");
};
</script>

<style lang="scss" scoped></style>
第二章·TypeScript
2.1 类型写法
- 复杂类型与简单类型定义、声明
export {} // 让每个文件都是一个 单独的模块
let name:string | number = 'mqy'; // string | number 可以允许多种类型进行赋值,这也被称为 联合类型
name = 22;

interface Info { // 定义一个复杂类型
    name: string,
    age: number
}

interface People {
    id: string,
    info?: Info // 这个属性可以有,也可以没有, type 也支持这种写法
}

const people:People = {
    id: '01',
    info: {
        name: "SSSS",
        age: 23
    }
}

console.log(people)
- 类型断言
它本质上是对 TypeScript 类型推断的“覆盖”,并假设开发者知道自己的代码比 TypeScript 推断出来的类型更准确(doge)。
// 我就直接断言它的类型 HTMLImageElement (img元素)
const imgDemo = document.getElementById("imgDemo") as HTMLImageElement
console.log(imgDemo.src) // 此时就支持智能提示了~ 嘻嘻
- vue 中写法
const name = ref<string | number>('mqy')

const computedDemo = computed(() => {
    return count.value * 2; // computed
})

const Click = (e: Event) => {
    console.log(e.target as HTMLButtonElement) // as 断言很好用
}

const autoFocusInput = ref<null | HTMLInputElement>(null)
onMounted(async () => {
    await nextTick();
    autoFocusInput.value?.focus(); // 如果报可能为 null,那么就用 ? 即可
})

// 如果是自定义的组件,那么声明上可能 写起来费劲一些 ~
<ComponentsDemo01 ref="componentsDemo01"></ComponentsDemo01>

const componentsDemo01 = ref<InstanceType<typeof ComponentsDemo01> | null>(null); // InstanceType 可以拿到一个实例的 类型,typeof ComponentsDemo01 会返回一个 ComponentsDemo01类型的实例
2.2 interface 与 type 区别
interface 主要用于定义对象的结构或接口。
type 主要用于定义更广泛的类型,除了可以定义对象结构,还可以用于联合类型、交叉类型、元组、基本类型等。
- 定义对象的类型
// 使用 interface 定义对象类型
interface Person {
  name: string;
  age: number;
}

// 使用 type 定义对象类型
type PersonType = {
  name: string;
  age: number;
};
- 不同的扩展方式
// 使用 interface 扩展接口
interface Employee extends Person { // 可以继承某个接口来进行扩展
  employeeId: number;
}

// 使用 type 交叉类型 即以 组合的方式来进行扩展
type EmployeeType = PersonType & { employeeId: number };
- 是否允许重名合并
// 使用 interface 声明合并
interface Person {
  name: string;
}
interface Person {
  age: number;
}

// 合并后的 Person 接口
// interface Person {
//   name: string;
//   age: number;
// }


// 使用 type 定义同名类型会报错
type PersonType = {
  name: string;
};
type PersonType = {  // 错误:Duplicate identifier 'PersonType'.
  age: number;
};
很显然 type 不允许重名合并,但反而显得 type 更加的严谨!
- 更契合ts
interface 主要用于定义对象类型的结构,尽管它也能与 class 结合使用,但它不支持像联合类型、交叉类型等更复杂的类型结构。所以,实际上并不是很契合 ts 对类型的定义。
// 使用 type 定义联合类型
type Status = 'active' | 'inactive';

// 使用 type 定义交叉类型
type Employee = Person & { employeeId: number };

// 使用 type 定义元组
type Point = [number, number];

// 使用 type 定义映射类型
type PersonMap = {
  [key: string]: Person;
};
反观 type 是一种更强大的工具,能够处理基本类型、联合类型、交叉类型、元组、映射类型等,几乎可以定义任何类型。
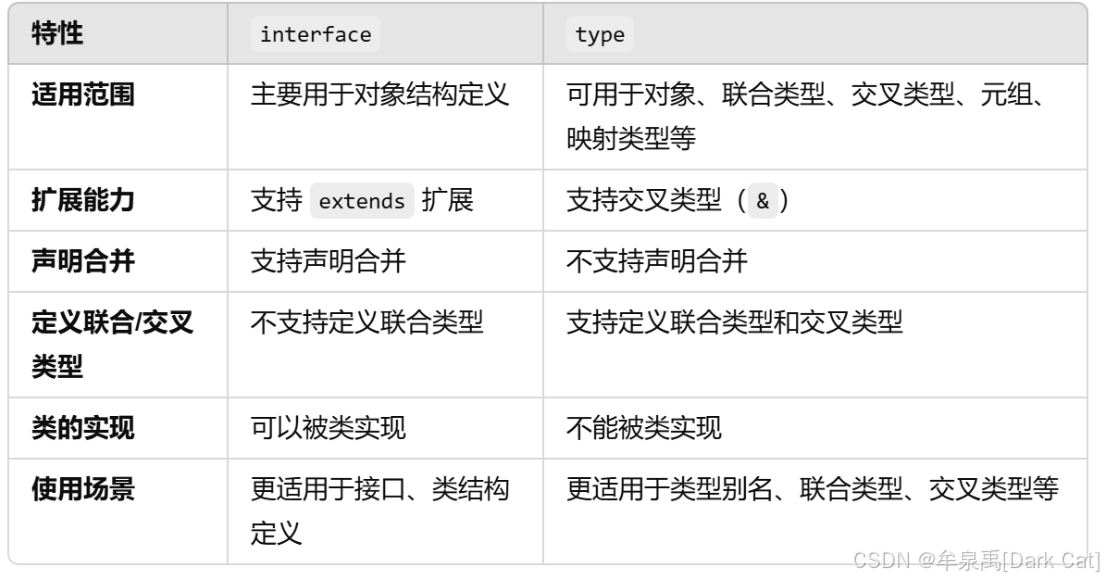
但可能对于 后端程序员 转 前端来说,使用传统的 interface 与 class 较多,只有逼不得已需要灵活的 type 时,才会去使用 type
2.3 props 写法
其实就是提前写好每个 prop 的类型,还有它是否必选。然后改用 withDefaults 来设置默认值
type PropsType = {
  name: string;
  age?: number;
};

const props = withDefaults(defineProps<PropsType>(), {
  age: 23
});
- App.vue
<template>
  <div>
    <demo01 :name="'21213'"></demo01>
    <el-button @click="handleNumPlus" type="primary">num++</el-button>
  </div>
</template>

<script lang="ts" setup>
import { provide, ref } from "vue";
import demo01 from "./components/demo01.vue";
const fk = ref(2);
provide("fk", fk); // 向下级组件传递
const handleNumPlus = () => {
  globalThis.$eventBus.emit("refreshDemo01");
};
</script>

<style lang="scss" scoped></style>
2.4 emits 写法
也是如 props 的写法,提前把类型 声明好,然后让宏函数用泛型来使用这个类型。
type Emits = {
  (name: "msg", data: string): void;
};
const emit = defineEmits<Emits>();
const handleXiXi = () => {
  emit("msg", "嘻嘻");
};
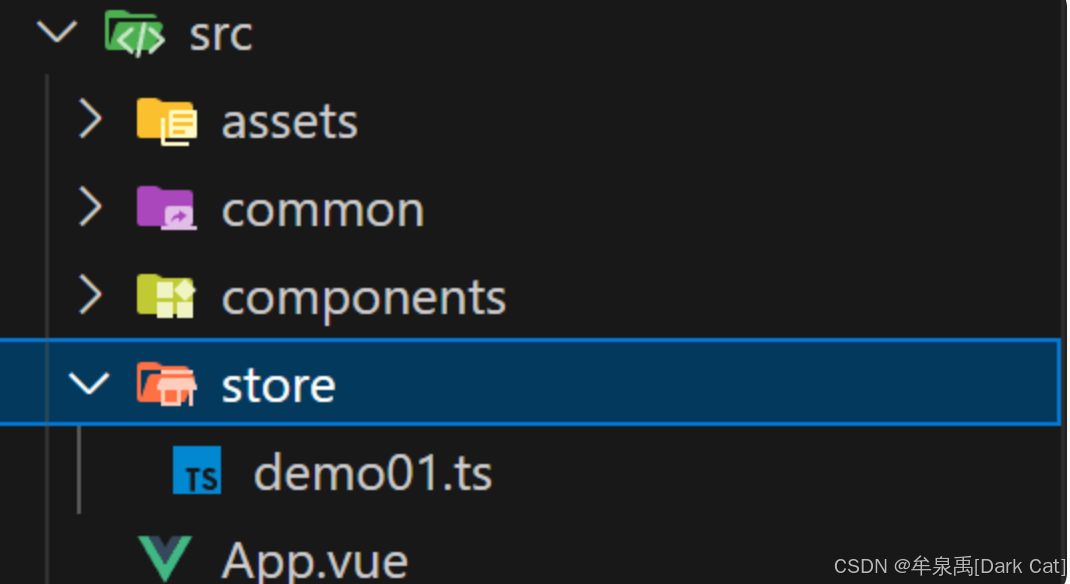
2.5 pinia
pinia 是vue3 时代取代 vuex 而被发明出来的产物。
自动分模块、组合式API、比vuex简单易懂
cnpm i pinia
- main.ts
import {createApp} from 'vue'
import App from './App.vue'
import {createPinia} from 'pinia'

const pinia = createPinia();
const app = createApp(App);

app.use(pinia)
app.mount('#app')
- 传统写法
demo01.ts
import {defineStore} from 'pinia'


type StateType = {
    demo01Age: number
}

export const useDemo01Store = defineStore('demo01', {
    state: (): StateType => {
        return {
            demo01Age: 1
        }
    },
    actions: {
        increment() {
            this.demo01Age++
        }
    },
    getters: { // 这个实际上就是 计算属性,哈哈 ~
        doubleAge(state): number {
            return state.demo01Age*2;
        }
    }
})
demo01.vue
<template>
  <div>demo01</div>
  {{ demo01Store.demo01Age }}
  <demo02></demo02>
  <el-button @click="demo01Store.increment" type="primary">嘻嘻</el-button>
</template>

<script lang="ts" setup>
import { ref } from "vue";
import { useDemo01Store } from "../store/demo01";

const demo01Store = useDemo01Store();
</script>

<style lang="scss" scoped></style>
- 自由式写法
demo01.ts
import {defineStore} from 'pinia'
import { computed, ref } from 'vue'

export const useDemo01Store = defineStore('demo01', () => {
    const demo01Age = ref<number>(0)

    const increment = () => {
        demo01Age.value++;
    }

    const doubleDemo01Age = computed(() => {
        return demo01Age.value * 2
    })

    return {
        demo01Age,
        increment,
        doubleDemo01Age
    }
})
demo01.vue
<template>
  <div>demo01</div>
  {{ demo01Store.demo01Age }}
  <demo02></demo02>
  <el-button @click="demo01Store.increment" type="primary">嘻嘻</el-button>
</template>

<script lang="ts" setup>
import { ref } from "vue";
import { useDemo01Store } from "../store/demo01";

const demo01Store = useDemo01Store();
</script>

<style lang="scss" scoped></style>

 浙公网安备 33010602011771号