
「课件」原创 => TypeScript 基础【转载请标明出处】
Zero 章
声明:我本人是跟 小满老师,学习的 TS。整个过程学的那叫一个痛苦~ 但是我仍然感谢小满!本课件,或多或少会参考小满老师的课件,如有侵权,我会下架!但本课件里面,更多的是我自己的理解和感悟,我实在不希望被告抄袭 ~
0.1 前置知识
-
HTML、CSS、JS(默认是 ES6 规范)
入门程度基础知识 -
ES6 ~ ES8
-
主机上部署了 Node.js(使用过 NVM 和 NRM)
TS 的原理 => TS 作者自己定义的语法,然后编写的 文件内容,最后翻译为 JS 文件。所以归根到底还是 JS
0.2 安装 TS 和 ts-node
npm i typescript -g

npm i ts-node -g # 使用 ts-node *.ts 就可以执行 ts文件
0.3 简单构建 TS 项目
tsc --init # 生成 tsconfig.json => ts 编译配置文件

npm init -y # 生成 package.json 管理第三方库的配置文件 也可以用 npm install typescript -D

npm i @types/node -D # 生成 node_modules 目录 Node.js 的类型定义文件,它们是 TypeScript 社区为 Node.js 编写的类型声明文件。@types/node 包含了 Node.js 标准库的类型定义文件,-D 选项表示将 @types/node 安装为开发依赖(devDependency),因为类型定义文件通常只在开发阶段用到,不会被打包到生产环境中。当然了,如果你还用到其它的第三方库,你还是得 npm i xxx 自行安装,这玩意没人管你。
- tsconfig.json 内容修改
"strict": false, 这是一个坑儿 ~,首先我们需要知道的是 ts 其实最后是通过一些模板然后翻译为 js 的,所以最好最好是 不要开启 严格检测。js "自由" 是最好的!否则一些 明明在 ts 上是很正常的操作,翻译后可能会提示一些错误。
0.4 tsconfig.json
tsconfig.json => ts 编译配置文件
- 开发时 => 常用配置
// 常用配置
{
  /*
      tsconfig.json是ts编译器的配置文件,ts可以根据它的信息来对待吗进行编译 可以再tsconfig中写注释
      include : 用来指定哪些文件需要被编译
      exclude : 用来指定哪些文件不需要被编译 :默认node_module
      extends : 用来指定继承的配置文件
      files   : 用来指定被编译的文件列表,只有编译少量文件才使用
      compilerOptions : 编译器的选项是配置文件中非常重要也是非常复杂的配置选项
  */
  "include":[
    // ** : 任意目录 , * : 任意文件
    "./src/**/*"
  ],
  "exclude": [
    "./src/hello/**/*"
  ],
  // "extends": "./configs/base",
  "files": [
    "1.ts",
    // "2.ts"
  ],
  "compilerOptions": {
    // 用来指定 ES 版本 ESNext : 最新版。 'ES3', 'ES5', 'ES6'/'ES2015', 'ES2016', 'ES2017', 'ES2018', 'ES2019', 'ES2020', 'ESNext'
    "target": "ES2020",
    // 指定要使用模块化的规范 : 'None', 'CommonJS', 'AMD', 'System', 'UMD', 'ES6'/'ES2015', 'ES2020' or 'ESNext'
    "module": "ESNext",
    // 用来指定项目中要使用的库 'ES5', 'ES6', 'ES2015', 'ES7', 'ES2016', 'ES2017', 'ES2018', 'ESNext', 'DOM', 'DOM.Iterable',
    //                          'WebWorker', 'ScriptHost', 'ES2015.Core', 'ES2015.Collection', 'ES2015.Generator', 'ES2015.Iterable',
    //                          'ES2015.Promise', 'ES2015.Proxy', 'ES2015.Reflect', 'ES2015.Symbol', 'ES2015.Symbol.WellKnown',
    //                          'ES2016.Array.Include', 'ES2017.object', 'ES2017.Intl', 'ES2017.SharedMemory', 'ES2017.String',
    //                          'ES2017.TypedArrays', 'ES2018.Intl', 'ES2018.Promise', 'ES2018.RegExp', 'ESNext.AsyncIterable',
    //                          'ESNext.Array', 'ESNext.Intl', 'ESNext.Symbol'
    // 运行在浏览器中不用设置,运行在node或其他中才需要设置
    // "lib":[],
    // 用来指定编译后文件的存放位置
    "outDir":"./dist",
    // 将代码合并为一个文件,设置之后所有的全局作用域中的代码会合并到同一个文件中 但是只能在  'amd' and 'system' 中才能使用
    // "outFile": "./dist/app.js",
    // 是否对js文件进行编译,默认false
    "allowJs": false,
    // 是否检查js代码是否符合语法规范,默认false
    "checkJs": false,
    // 是否移除注释,默认false
    "removeComments":false,
    // 是否不生成编译后文件,默认false
    "noEmit": false,
    // 当有错误时是否生成文件,默认false
    "noEmitOnError": false,
    // 是否生成sourceMap,默认false  这个文件里保存的,是转换后代码的位置,和对应的转换前的位置。有了它,出错的时候,通过断点工具可以直接显示原始代码,而不是转换后的代码。
    "sourceMap":false,

    // 所有的严格检查的总开关,默认false
    "strict": false,
    // 编译后的文件是否开启严格模式,默认false
    "alwaysStrict": false,
    // 不允许隐式的any,默认false(允许)
    "noImplicitAny": false,
    // 不允许隐式的this,默认false(允许)
    "noImplicitThis": false,
    // 是否严格的检查空值,默认false 检查有可能为null的地方
    "strictNullChecks": true,
    // 是否严格检查bind、call和apply的参数列表,默认false  检查是否有多余参数
    "strictBindCallApply":false,
    // 是否严格检查函数的类型,
    "strictFunctionTypes":false,
    // 是否严格检查属性是否初始化,默认false
    "strictPropertyInitialization":false,

    // 是否检查switch语句包含正确的break,默认false
    "noFallthroughCasesInSwitch":false,
    // 检查函数没有隐式的返回值,默认false
    "noImplicitReturns":false,
    // 是否检查检查未使用的局部变量,默认false
    "noUnusedLocals":false,
    // 是否检查未使用的参数,默认false
    "noUnusedParameters":false,

    // 是否检查不可达代码报错,默认false   true,忽略不可达代码 false,不可达代码将引起错误
    "allowUnreachableCode":false
  }
}
// 最全配置下方参考:
// https://www.tslang.cn/docs/handbook/compiler-options.html
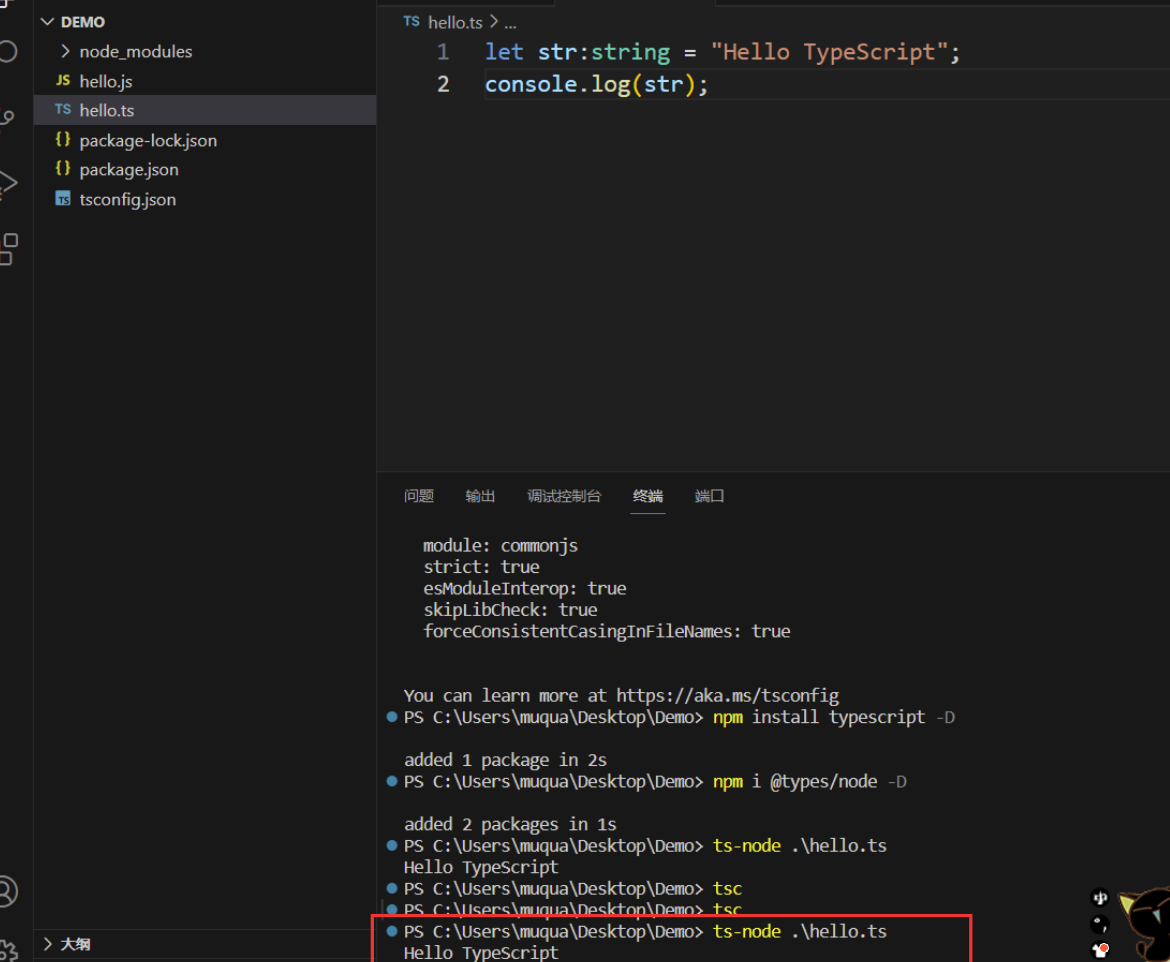
0.5 Hello TypeScript
- 新建 hello.ts
// 变量:类型约束 => 初识 TS 就要从这里开始 ~
let str:string = "Hello TypeScript";
console.log(str);
"约束" 一词,在 TS 中展现的淋淋尽致!它比一些强类型语言更加的突出,甚至是 奇奇怪怪
- 手动编译
tsc # 直接就把当前目录下 *.ts 文件全编译了 ~
- 监听编译
tsc -w *.ts # 监听 这个 ts文件 一旦改动就会自动编译为 js 文件
- 执行 ts 文件 或 js 文件
ts-node *.ts / *.js
0.6 命名空间 namespace
我们在开发的时候,肯定是要去避免 不同文件中 同名的冲突的。所以有了 namespace 命名空间这个东西!
namespace index {
    // export 是导出的作用,使得其它地方可以用到 里面的元素
    export let a = 1
    export const add = (a: number, b: number) => a + b
    namespace index2 {
        // 支持嵌套
    }
}

// namespace 同名也支持 合并
namespace index {
    export let b = 2
}

console.log(index.a) // 只有 export a, 才能调用 a
console.log(index.b)
namespace 不难理解(只要你是科班出身的、学过 C++ 入门刚开始基础的部分,就会觉得这东西很熟悉。)
0.6.1 解决多文件内容上 => 命名冲突
- demo.ts
export namespace demo {
    export let a = 1
    export let b = 2
}

export namespace vxAPP {
    export const sendMsg = (msg:string) => {
        console.log(msg);
    }
}
- test.ts
import {demo, vxAPP} from "./demo"; // 导入这个文件里面的 demo 命名空间
import a = demo.a // 这种是直接导入这个 a,相当于简化了放到了 a 里面
console.log(a)
vxAPP.sendMsg("Hello namespace")
const sendMsg = (msg:string) => {
        console.log(msg);
}
sendMsg("hello.ts")

0.7 import
import 在这里,还可以导入 第三方库。这个不陌生 吧 ~
import 变量名 from '第三方库'
import {库内元素A, 库内元素B} from '第三方库'
import $ from "JQuery"; // 欸~ 这不就导入 JQuery 了嘛 ~
我们还要介绍一个,现在不推荐 使用的 三斜线指令
0.7.1 不推荐的三斜线指令
首先要使用 三斜线指令 是通过注释的方式,然后实现 import 的效果,我们可以把好几个文件融合生成 一个 JS 文件。然后还可以把生成内容里面的 注释给干掉。
- 使用前提
在使用三斜线指令的时候,把它俩 添加到 tsconfig.json 里面去。才可以使用哟。。
 "outFile": "./js/index.js",  /*只生成一个文件 index.js*/
 "removeComments": true,
- index2.ts
namespace A {
    export const fn = () => 'a'
}
- index3.ts
namespace A {
    export const fn2 = () => 'b'
}
- index.ts
///<reference path="./index2.ts" />
///<reference path="./index3.ts" />


console.log(A);
首先,大家千万别激动。这玩意现在已经不建议用了 ~ ~
它呢,必须得编译到 一个 js 文件里!并且也只能 去调用 生成的 js 文件。
///
编译之后,就运行 ts-node .\js\index.js 即可!
0.7.2 声明文件 d.ts(等同于C语言的 .h 文件)
当使用第三方库时,我们需要引用它的声明文件,才能获得对应的代码补全、接口提示等功能。为啥会有这东西呢?因为我们 ts 不就是规范和约束 js 的吗?那么js 的一些库,人家压根就没有约束呀。。所以你得专门写一个 d.ts 声明文件,对这个库里面的内容做约束。
我们使用 import 导入第三方库里面东西的时候,有时候会爆红。而有的并不会(在 npm i @types/node -D 之后,就已经安装了很多标准库 和对应的声明文件),但是但是,有些库是没写声明文件的。这就导致了我们 import 会爆红。因为它没有声明。
- 解决方案:
- npm i --save-dev @types/express 直接给你自动给的写很多的声明文件,它们都在 node_modules 目录下的 @types 里面
- 自己手写 d.ts(一般都是为自己写的第三方库,编写声明文件,让ts的使用者能够直接使用)
大家感兴趣的话,可以去 看一些 d.ts 的文件内容,然后自行学习。咱们一个干后端的 ~ 学这 J8 干嘛。。
0.8 declare 全局声明
declare 其实也是 d.ts 声明文件要用到的重要关键字!
声明全局(包括我们学过的所有的东西,都可以用它声明全局)
declare let a:number // 声明全局的 a 变量
// 此时局部变量的作用域就很明显了,它只能出现在 {} 这种代码块的内容,即与 直接显现在文档里面的 全局变量分开才能发挥其局部的作用。
{
    let a = 10
    console.log(a);
}
a = 20
console.log(a);
第一章·TS 类型
1.1 内置类型
这里给大家先复习一下 JS 中的两种对象。
对象字面量 {}:
let obj = {};
- 这种方式创建的对象是一个普通的 JavaScript 对象,也称为对象字面量或对象字面量语法。它是一种简洁创建对象的方式。
- 这种方式创建的对象没有原型链或构造函数,它们仅仅是简单的键值对集合。
- 适合用于创建临时的简单对象或作为数据结构。
类 Class:
class A {}
let a = new A();
- 使用类和构造函数创建的对象具有更多的功能性。类可以有构造函数和方法,允许面向对象的编程方式。
- 类可以被继承,可以拥有属性和方法,可以实现接口等。
- 使用类创建的对象通常用于更复杂的应用程序,需要更多的功能和结构化的代码组织。
因此,选择使用对象字面量还是类取决于你的需求。如果你只是需要一个简单的数据容器或者临时存储一些键值对,那么对象字面量可能是更好的选择。但是如果你需要创建一个具有更多功能和结构的对象,那么类可能更适合。
**TS 内置类型 => **
-
顶级类型:any(任意类型)、unknown(未知类型)
unkonwn 类型只能赋值给自身类型的变量 或 any 类型的变量,其它类型不行!但是 any 类型随便。
unkonwn 类型很傻逼,它也没办法.属性和调用方法
-
Object 是祖宗类型 等价于 {} 它俩只是换个写法、而 object 只能存储 引用类型 (如:
[]``{}``() => {} 箭头函数...) -
Number、String、Boolean(包装类是吧,哈哈 ~)
-
number、string、boolean(基本类型)
-
never: 一般表达的是 有问题的状态!实际开发中,一般都是用不到的。也就拿它 做个爆红的提示
1.2 interface 接口
如果不用 class 去创建类模版,然后不采取 new 引用类型() 的方式去创建对象的话,这个 js 对象本身就是个 类似于临时类的存在,只不过会直接返回 该临时类的 对象罢了。
那么既然它是临时的类,就也可以用 interface 进行规范,毕竟 interface 是接口嘛,而此时的用法就是 把 interface 作为类型来用。
interface B {
    xxx:string,
}
interface A extends B {
    name:string,
    age:number,
    gender?:string, // 该属性可以有,也可以没有,并不强制性要求存在
    readonly f:() => boolean // 声明一个函数返回的是 boolean 值,readonly 修饰后,那么被 A 规范的对象,关于改方法 就不能随便改了
    [propName:string]:any // 这东西叫索引签名, propName 是 string 类型的, 但是 value 值 是 any 任意类型,这样的话,我们就可以 允许用 A 规范的 对象在声明的时候,可以在 name 和 age 的下面 随便声明任何类型的东西
}

let a:A = {
    xxx: "我是B接口继承过来的",
    name: "MQy",
    age: 88,
    a:1,
    b:2,
    c:3
}
1.2.1 interface 规范函数
interface 开始魔幻起来了 ~ 大家千万要抗住!
interface Fn {
    (name:string, age:number):number[]
} // 可以理解为 函数式接口,只有一个方法
let f:Fn = (name, age) => {
    return [1]
}
console.log(f('mqy', 18)[0]);
1.2.2 interface 规范数组
interface X { // 可以当成数据结构
    name: string
} // 如果是一个属性,那就属于该属性了

let arr:X[] = ["小满", "胡萝卜"]
- 二维数组定义
// 第一种风格
let arr:number[][] = [[1],[2],[3]]
// 第二种风格
let arr:Array<Array<number>> = [[1],[2],[3]]
1.2.3 剩余参数(本质是数组)
function a(...args:any[]) {
    console.log(args)
}

a(1,2,3,4,5)

// IArguments 可以直接拿到 更加详细的 args 剩余参数的数据
function b(...args:string[]) {
    let a:IArguments = arguments
    console.log(a)
}

b("1","2","3")

1.3 联合类型和交叉类型
- 联合类型:可能有多个类型需要接收!支持不同类型。
let a:number | string = 12345
a = "2222"

// 后端程序员偷懒 返回 boolean 数据为 0 或 1
let fn = function (retBoolean:number | boolean) boolean {
    return !!retBoolean; // !! 两个感叹号就可以 把 0 1 强转为 true 和 false,如果本身就是 boolean 类型,那么就不会 去进行转换!
}
- 交叉类型:就是把两个类型合并在一起了,我们传参的时候可能需要 用 {} js 对象这种 形式把这俩类型需要的数据全部包裹上。
interface People {
    name: string,
    age: number
}

interface Man {
    gender: number
}

const mqy = (man:People & Man): void => {
    console.log(man);
}

mqy({
    name: "mqy",
    age: 22,
    gender: 1
})
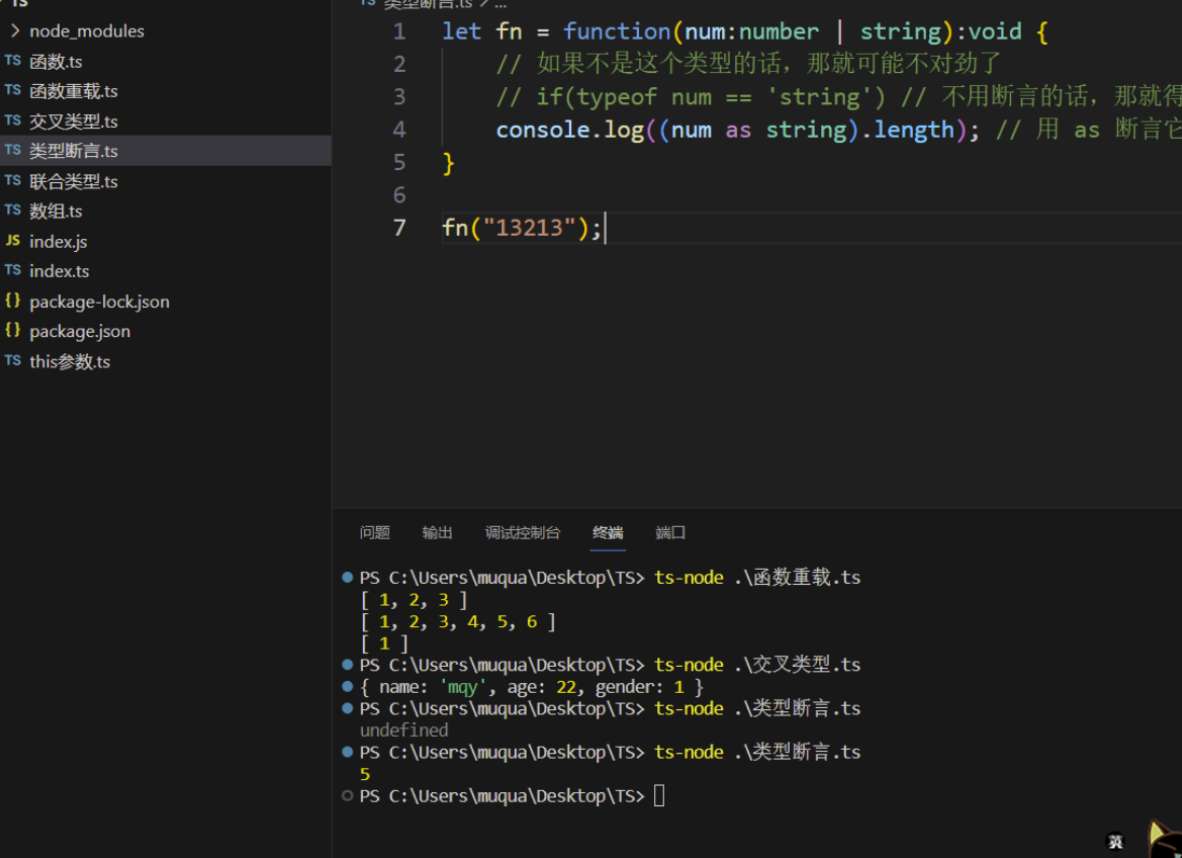
1.4 类型断言
如果我们使用了 联合类型,那么就有可能并不知道 它到底是什么类型的。而我们在使用一些 方法和属性的时候,就可能会报错。这时候,我们就要对它 进行断言!
断言它可能就是这个类型,对的!所以我们可以使用这个类型的方法和属性。
let fn = function(num:number | string):void {
    // 如果不是这个类型的话,那就可能不对劲了
    // if(typeof num == 'string') // 不用断言的话,那就得这么做,当然实际开发其实是推荐这样做的!
    console.log((num as string).length);  // 用 as 断言它就是 string
    // console.log(<string>num.length); // 这样也是 断言的一种写法 <断言类型>
}

fn("13213");
1.5 回顾 class 类
如果可以的话,肯定是推荐 声明一个 class 类模版,然后 new 一个对象。而不是说 直接临时的类然后返回一个 js 普通对象。
// 类实现 接口
interface CarInterface {
    // 作用域修饰符我们就不讲了吧 ~
    private engine:string
    public disp:() => void
}
class Car implements CarInterface{
    engine:string; // 字段

    constructor(engine:string) { // 构造函数
        this.engine = engine
    }

    disp():void { // 方法
        console.log("发动机为 :   "+this.engine)
    }
}

let sss:CarInterface = new Car("Engine 1")
let ssss:Car = new Car("Engine 1")

// 类的继承
class Shape {
   Area:number

   constructor(a:number) {
      this.Area = a
   }
}

class Circle extends Shape {
   disp():void {
      console.log("圆的面积:  "+this.Area)
   }
}

var obj = new Circle(223);
obj.disp()

// 方法重写
class PrinterClass {
   doPrint():void {
      console.log("父类的 doPrint() 方法。")
   }
}

class StringPrinter extends PrinterClass {
   doPrint():void {
      super.doPrint() // 调用父类的函数
      console.log("子类的 doPrint()方法。")
   }
}
// static 修饰符
class StaticMem {
   static num:number;

   static disp():void {
      console.log("num 值为 "+ StaticMem.num)
   }
}

StaticMem.num = 12     // 初始化静态变量
StaticMem.disp()       // 调用静态方法

// 访问修饰符
定义了两个变量 str1 和 str2,str1 为 public,str2 为 private,
实例化后可以访问 str1,如果要访问 str2 则会编译错误。

class Encapsulate {
   str1:string = "hello"
   private str2:string = "world"
}

var obj = new Encapsulate()
console.log(obj.str1)   // 可访问
console.log(obj.str2)   // 编译错误, str2 是私有的
1.6 对象合并和类的合并
- 对象合并(Object.assign)
interface Name {
    name:string
}

interface Age {
    age: number
}

interface Gender {
    gender: number
}

let peopleName:Name = {
    name: "mqy"
}

let peopleAge:Age = {
    age: 22
}

let peopleGender:Gender = {
    age: 1
}

const people = Object.assign(peopleName, peopleAge, peopleGender)
- 类的合并
class A {
    type:boolean = false;
    changeType() {
        this.type = !this.type
    }
}

class B {
    name:string = "张三";
    getName():string {
        return this.name;
    }
}

// 把类融合,可以用 implements 实现 A, B 类
class C implements A, B {
    type:boolean
    changeType:() => void();
    name: string;
    getName:() => string
}

// 还有更好的方法 Object.getOwnPropertyNames() 可以获取对象自身的属性,除了它继承来的属性。。我们都能拿到

// 我们可以 定义方法 f() 然后遍历生成一下,其实这属于超纲的内容,小demo算是
function f(mergeClass:any, itemClass:any[]){
    itemClass.forEach(item => {
     Object.getOwnPropertyNames(item.prototype).forEach(name => {
            mergeClass.prototype[name] = item.prototype[name]
        })
    })
}
1.7 抽象类
abstract class temp {
    name:string
    constructor (name?:string){
        this.name = name;
    }
    getName():string { // 普通方法可以有实现
        return this.name;
    }
    abstract init(name: string): void // 只能由继承它的子类去实现

}
1.8 元祖类型
let arr:[number, string] = [1,2] // ts 中的元祖类型 规范的是 每个元素的类型,并不是 python 里面的不可更改.
let arr:[x:number, y?:boolean] = [1] // 这样子就是第二个元素可以不用非得填进去了
- 可以用
constreadonly实现 python 元祖的效果
const let arr:readonly [number, string] = [1,2] // 这样的话就是 python 的元祖了
1.9 type 类型
在 TypeScript 中,type 关键字用于创建类型别名(Type Aliases),可以用来定义任意的类型。类型别名允许我们给现有类型起一个新名字,使得代码更加清晰易读,并且方便维护和重用。
但真实开发中,常用它来 编写数据结构的类型
type Point = {
  x: number;
  y: number;
};

const point: Point = { x: 10, y: 20 };
所以我一直都感觉它是类似于 typedef strcut 的存在!
- 类型推论和类型别名
类型推论是 js 本身就有的功能,不解释。
类型别名其实不就是 某些类型赋值给 type 类型的变量。
type nArr = number[]
let str:nArr = [1,2,3]
type strOrnum = number | string
type ret = 1 extends never ? never : number // 如果 1 的父类是 never 的话
1.10 enum 枚举类型
enum Color { // 比 JAVA 的枚举类 简单多了
    red = "red",
    green = "green",
    blue = "blue"
}
// enum 前面的修饰符 只能是 const 锁变量为常量修饰符

console.log(Color.red);
console.log(Color.green);
console.log(Color.blue);
let key = Color['red']; // 这样的话就可以 存储 enum 里面的枚举名
console.log(key)
1.11 never 类型
never 一般表达的是 有问题的状态!实际开发中,一般都是用不到的。也就拿它 做个爆红的提示
type dada = '唱' | '跳' | 'rap' | '篮球'

function ffff(value:dada) {
    switch(value) {
        case "唱": {
            break;
        }
        case "跳": {
            break;
        }
        case "rap": {
            break;
        }
        default: {
            const error:never = value; // 这也被 称为 兜底逻辑
            // 就是如果 你的 value 添加了一个新的类型 那么你没加入 case 判断,这里就会爆红
            break
        }
    }
}
1.12 symbol 类型
Symbol 是 JavaScript 语言中的一种新特性,它用于创建唯一标识符。在 ES6(ECMAScript 2015)中引入了 Symbol 类型,它是 JavaScript 的第七种基本数据类型。与之前的六种基础数据类型不同,Symbol 不是内置的对象或类,而是一种原始数据类型。它的主要用途是在对象的键中使用,以避免属性名称的冲突。
由 ES6 新增的 [变量名] 语法,就可以让 Symbol 变量去充当 标识符。但是 它并不能由 for-each 便利获取到
so,实际开发几乎用不到。。是一个很多此一举的类型。谁真的闲的用它作为属性名呀。。
const level:symbol = Symbol("level");
let student = {
    name: "小明",
    age: 12,
    [level]: "优秀"
}

console.log(student);
for(let x in student){

    // console.log(x); // 肯定取不到 symbol 那个属性
    console.log(x);
}

// 可以取到 Symbol
Object.getOwnPropertySymbols(student);
// 但由于我们需要 同时能取到 Symbol 和 普通属性,所以 ES6 新增了方法,并且很简短
console.log(Reflect.ownKeys(student));
-
Symbol 注意事项
-
我们都知道在 Javascript中函数跟对象没差儿,都是地址嘛,是引用类型,而Symbol 这个东西很明显是一个函数()对吧。好好好!那么为啥Symbol就是原始类型呢?
答:官方发明这个玩意的时候,直接不让其 new 创建对象,即构造方法的 作用消失。那么它自然也就不能是引用类型,只能是 原始类型。在用 Symbol 作为参数的时候,传递的也只是值,而非引用对象。
- 为什么 Symbol() 里面的值一样,但是两个变量 === 返回 false ?
首先,Symbol() 里面的值,我们称之为 "描述值",它是不会影响 Symbol 的唯一性的!
Symbols 的唯一性:指的是通过内部的 Symbol 注册表来实现的。在 JavaScript 引擎内部,存在一个全局的 Symbol 注册表,用于存储所有创建的 Symbol。可以看下面的这个注册表 的简易图:
Symbol Registry
+-------------------------------------------+
| Symbol("level", SymbolId: 123) |
| Symbol("level", SymbolId: 456) |
| Symbol("other", SymbolId: 789) |
+-------------------------------------------+很显然,虽然你是相同的描述,但注册的确确实实是 两个,ID 是不一样的!
所以也就是两个不同的 Symbol,它们只不过是 描述值一样而已。
- Symbol.for() 注册表中寻找 Symbol 实例(找到第一个就不会再去找)如果没找到,就会自动创建一个
console.log(Symbol.for("level") === Symbol.for("level")) // 这个肯定返回 true
1.13 回顾 set、map
let set:Set<number> = new Set([1,1,1,1,2,3,4]);
console.log(set);
let map:Map<any,any> = new Map();
let Arr = [1,2,3]
map.set(Arr, 'asd')
console.log(map.get(Arr));
第二章·TS 函数
2.1 默认值与可空null 参数
function ffff(num?:number, str?:string){ // 这样子写就是这个参数可以传递过来 null 空的
    if(num != null && str != null){
        console.log(num + str);
    }
}

ffff(12,"sss");
function add(a: number = 0, b: number = 0): number{ // 参数可以有默认值
    return a + b
}

console.log(add())
2.2 this 的类型可以被定义
如果我们想使用 this关键字,那么我们在函数的参数列表中,第一个参数必须要定义 this 的类型,然后 我们在 函数当中才能使用 this
interface Obj {
    user:number[]
    add:(this:Obj, num:number) => void
}

let obj:Obj = {
    user:[1,2,3],
    add: function(this:Obj, num:number) {
        this.user.push(num)
    }
}

obj.add(4)
console.log(obj.user)
就是 ts 规定,如果你真的想要用到 this 关键字,那么请你 把 this 声明和写在第一个参数上。并且规范它的类型。
2.3 函数声明与函数重载
如果光写函数头部,而不写具体的函数体实现,那么我们认为这就是 函数声明!!学过 C/C++ 应该清楚无比~
在 ts 中,同名函数是会重载的,而我们引入了 函数声明之后 + 重载 就会有一些新奇的用法!!!
即,可以先声明这些同名函数,然后用 一个 函数实现 涵盖好几个的函数声明。ts 还真能做到
// 假设有一个名为 User 的类
class User {
    constructor(public id: number, public name: string) {}
}

// 定义一个函数,根据不同的参数类型,返回不同的值
function processInput(input: number): number;
function processInput(input: string): string;
function processInput(input: User): string;

// 实现函数重载
function processInput(input: number | string | User): number | string {
    if (typeof input === 'number') {
        return input * 2;
    } else if (typeof input === 'string') {
        return input.toUpperCase();
    } else {
        return `User ID: ${input.id}, Name: ${input.name}`;
    }
}

// 使用函数
console.log(processInput(123)); // 输出:246
console.log(processInput('hello')); // 输出:HELLO
console.log(processInput(new User(1, 'Alice'))); // 输出:User ID: 1, Name: Alice
2.4 内置对象
2.4.1 ECMAScript 的内置对象
JavaScript 中有很多内置对象,它们可以直接在 TypeScript 中当做定义好了的类型。
内置对象是指根据标准在全局作用域(Global)上存在的对象。这里的标准是指 ECMAScript 和其他环境(比如 DOM)的标准。
常用内置对象:Number Date RegExp(正则表达式) Error(错误信息) XMLHttprequest(xhr 异步请求)
什么叫内置对象呢,就是 TS 本身默认给我们内置 提供好的 类型规范,就是它给我们写的 interface。然后让我们以这些为类型,去 new 这个对象 对的,还出现了 new 关键字。。所以有的时候我就觉得 TS 挺奇怪的。
let b: Boolean = new Boolean(1);
let e: Error = new Error('Error occurred');
let d: Date = new Date();
let r: RegExp = /[a-z]/;
let local:Storage = localStorage
let lo:Location = location
let promise:Promise<string> = new Promise((resolove) => {resolove("mqy")});
let cookie:string = document.cookie
2.4.2 DOM 和 BOM 的内置对象
Document、HTMLElement、Event、NodeList NodeListOf<元素类型>等。TypeScript 中会经常用到这些类型:
let body: HTMLElement = document.body; // HTML 文档里面的标签or元素
let allDiv: NodeList = document.querySelectorAll('div'); // 如果该元素很多很多,那就用 NodeList 类型包裹

let div:NodeListOf<HTMLDivElement | HTMLElement> = document.querySelectorAll("div");

document.addEventListener('click', function(e: MouseEvent) { // 还可以添加事件监听,直接咔一下都不需要咱们 html 文档上标注
  // Do something
});
2.5 回顾 Pormise
在 TypeScript 中,Promise 是用于处理异步操作的对象。它表示一个可能在未来某个时间点完成或失败的操作,并返回操作结果或错误。
Promise 可以有三种状态:
- pending(进行中):Promise 的初始状态,表示操作正在进行中。
- fulfilled(已完成):表示操作成功完成。
- rejected(已拒绝):表示操作失败。
创建 Promise 对象时,需要传递一个执行器函数(executor function),它接受两个参数:resolve 和 reject。通过调用 resolve 函数,可以将 Promise 状态从 pending 变为 fulfilled,并传递操作结果。通过调用 reject 函数,可以将 Promise 状态从 pending 变为 rejected,并传递操作失败的原因。
Promise 提供了链式调用的机制,可以通过 then 方法注册成功状态的处理函数,通过 catch 方法注册失败状态的处理函数。这样可以对异步操作进行更加清晰和结构化的处理。
下面是一个使用 Promise 的示例:
function fetchData(): Promise<string> {
    // 新建一个异步对象,它创建的时候 接收的是一个 函数,这个函数参数有 resolve,reject
    // 这俩参数其实 也是函数,我们把参数是函数的情况 称为 回调函数
    return new Promise<string>((resolve, reject) => {
        // 执行的是一个定时器
        setTimeout(() => {
            const data = 'Data fetched successfully';
            if(data){
                resolve(data); // 模拟操作成功
            }else{
                reject(new Error('Failed to fetch data')); // 模拟操作失败
            }
        }, 2000); // 定时器
    })
}

function errorF(error:Error):void{
    console.log(error);
}
// 然后我们在调用这个 异步对象的时候,就可以用 then 和 catch 两个.方法 来绑定 resolve,reject 这两个参数
fetchData().then((data) => { // .then 里面的函数就是 resolve 的实参
    console.log(data);
}).catch(errorF)
第三章·回顾 => 生成器、迭代器和解构
3.1 生成器
function* g() { // 哟~ 你跟 function 长这么像?
    yield Promise.resolve(114514); // 元素 1
    yield 1;
    yield "1314";
}

let i = g(); // 把生成器拿到了
console.log(i.next());
console.log(i.next());
console.log(i.next());

3.2 迭代器
迭代器就是为对象封装了一个表,表里面存储的是能够顺序找到 每个元素的索引或地址。反正就是肯定能找到。
然后迭代器的使用类似于 生成器,都是通过 .next() 就可以拿到下一个元素。
当对象有 Symbol.iterator 方法的时候,我们就认为它是可以迭代的。一些内置的类型 Array Set Map String 等。就可以直接使用 for..of 语法糖 来进行迭代遍历。
3.2.1 **for..in 与 for..of **
for..in迭代的是对象的 键 的列表,而for..of则迭代对象的键对应的值。
let list = {4,5,6}

for(let i in list){
    console.log(i); // 键
}

// for..of 更关注与迭代对象的值
for(let x of list) {
    console.log(x); // 值
}
3.2.2 for..of 简易原理
// for..of 差不多意思去实现的
const each = (obj:any) => {
    let It:any = obj[Symbol.iterator]() // 拿到这个方法
    let next:any = It.next() // 这个方法会返回一个对象,该对象呢还有 next() 方法
    while(!next.done){ // 如果是 false 则一直循环
        console.log(next.value)
        next = It.next()
    }
}

function args(...arr:any) {
    // let map:Map<string,number> = new Map();
    // map.set("xx",11);
    // map.set("aa",22);
    for(let x of arguments){
        console.log(x)
    }
    each(arguments)
}

args(1,2,3,4);
3.2.3 实现 for..of 遍历普通对象
下面的这种玩法,可能会对你理解迭代器有更深的领悟。当然 ~ 我这个菜鸡也没看过 这块底层的代码。
// 额。。每个人的 实现方式不同,不喜勿喷
class xxnxx {
    max:number
    current:number
    arr:Array<any>
    constructor(forOF:any){
        this.max = 0;
        this.current = 0;
        this.arr = new Array();
        for(let i in forOF){
            this.arr.push(i);
            this.max++;
        }
    }
    next(){
        if(this.current == this.max){
            return {
                value: undefined,
                done: true
            }
        }
        return {
            value: this.arr[this.current++],
            done: false
        }
    }
}

let forOF = {
    name:"小明",
    age: 18,
    [Symbol.iterator](){
        return new xxnxx(this);
    }
}

for(let i of forOF){
    console.log(i);
}
3.3 解构
let [a,b,c] = [4,5,6] // 底层是使用的迭代器
console.log(a,b,c)
let arr = [1,2,3,4]
let x = {...arr};  // 其实这个底层也是使用了迭代器
console.log(x);
第四章·泛型
4.1 快速入门
你可以把泛型理解为预确定类型,就是在这个类型没有确定之前,我们需要写一个占位符来进行占位。等待着类型来真正的确定它!
function tempxxx<T1>(a:T1,b:T1):Array<T1>{
    return [a, b];
}

console.log(tempxxx(1,2));
console.log(tempxxx(true,false))

function add(T, K)(a:T, b:K):Array<T | K>{ // 这个元素可能是 T 类型也可能是 K 类型
    return [a,b]
}

// 类型别名
type A<T> = string | number | T
let a:A<boolean> = true
let a:A<null> = null

// interface
interface Data<T> {
    msg: T
}

// 泛型也有默认的确定类型
function add<T = number, K = number>(a:T, b:k):Array<T | k> {
    return [a,b]
}

add(false, '1');
4.2 泛型约束
我们其实可以用 extends 来告诉泛型 T 你的父亲只能是 xxx,也就是你的待确定类型只能是谁的儿子。
function add<T extends number>(a:T, b:T){
    return a + b;
} // 这样子写 它就不会标红,因为它明确的知道 你也就是 number 的儿子或者 number 了,加法是没问题的。
4.3 keyof
用来提取对象属性作为字面量类型
有时候我们开发一些框架,可能会有这样的需求。其实 我们学 ts 或 js 没必要学这么细致,但是讲课肯定都得讲。
// 有时候我们是要对泛型进行 对象属性的约束
// 而 keyof 操作符可以接受一个对象类型作为参数,返回该对象属性名组成的字面量联合类型
// 毕竟这样子写 "name" | "age" | ...  是非法的,会爆红,而且很麻烦。。
let obj = {
    name: "mqy",
    age: 18
}

/*function ob1<T extends object, K extends "name" | "age">(obj:T, key:K){
    return obj[key]; // 这样的约束就是不允许的,会爆红
}*/
function ob<T extends object, K extends keyof T> (obj:T, key:K) {
    return obj[key];
}
console.log(ob(obj,"name"));
4.4 自动遍历声明属性
interface Data {
    name: string
    age: number
}

// type 其实可以有类型别名的作用,也可以是类似于结构体,我们可以自己设计一个类型
type Options <T extends object> = {
    // 这种遍历生成 的方式,也算是一种奇怪的玩法,可以作为了解
    // Key in keyof T 就是遍历 name, age 这些属性名
    readonly [Key in keyof T]:T[key]
}

type B = Options<Data> // 你看,它就自己生成了。
/* 这个结构体类型就生成了
{
    name: string
    age: number
}
*/
第五章·Decorator 装饰器(类似于反射机制)
5.1 装饰类
Ts 的装饰器,可以作用在 属性、类、方法、参数... 上面,作用的地方很多。作用之后,就可以操作 目标。
"experimentalDecorators": true,开启 装饰类的支持!

const classDecorator: ClassDecorator = (target:Function) => {
    target.prototype.getVal = function <T>(val: T): T {
        return val;
    }
}

@classDecorator
class A {
    constructor() {

    }
}

const a = new A();
console.log((a as any).getVal(10)); // 输出:10
5.2 装饰器提层用法(装饰工厂)
这种用法也被称为 装饰工厂
那么我们就 举个模拟工厂模式的例子
class B{
    name:string;
}
// new() 类型表示一个可以实例化的构造函数的类型。
const decoratorFactory = (Obj:new() => any): ClassDecorator => {
    return (target: Function) => {
        target.prototype.getObj = () => {
            return new Obj();
        }
    }
}

const classDecorator: ClassDecorator = (target:Function) => {
    target.prototype.getVal = function <T>(val: T): T {
        return val;
    }
}

// 装饰器,这名字起的。是不是就是因为 像装饰品一样,装饰多个呀
@classDecorator
@decoratorFactory(B)
class BFactory {

}

const bFactory = new BFactory();
let b = (bFactory as any).getObj();
b.name = "mqy";
console.log(b);
console.log((bFactory as any).getVal(123))
5.3 装饰属性、参数和方法
ts 装饰器如果是 装饰属性、参数和方法,则更加偏向于 AOP 编程思想,就是在 目标诞生的时候,我们要做些什么。
- 装饰属性
const MyPropertyDecorator:PropertyDecorator = (target: any, propertyKey: string) => {
    console.log("我仅仅想输出");
    console.log(propertyKey, target);

}

class MyClass {
    @MyPropertyDecorator
    myProperty: string;

    constructor(myProperty: string) {
        this.myProperty = myProperty;
    }
}

const instance = new MyClass("example");
- 装饰方法:MethodDecorator
- 装饰参数:ParameterDecorator
5.4 reflect-metadata(支持反射功能的库)
reflect-metadata 是一个用于在 TypeScript 中提供反射功能的库,它允许你在运行时访问类型和成员的元数据信息。这对于实现一些高级功能,比如依赖注入、ORM(对象关系映射)等非常有用。但实际上也只不过是在效果上跟反射机制一样,属于是强制实现出来的。它是弄了一个东西叫 元数据,然后附加在类或属性上面,然后你对这个元数据进行一些操作。那玩来玩去都是搞这个元数据,其实对人家 本身没影响。除非你利用这些元数据去玩一些操作。
以下是一个简单的示例,演示了如何在 TypeScript 中使用 reflect-metadata 库:
首先,确保你已经安装了 reflect-metadata 库,可以通过以下命令安装:
npm install reflect-metadata
import "reflect-metadata";

// 定义一个装饰器,用于将元数据附加到类上
function MyClassMetadata(metadata: string) {
    return function(target: any) {
        Reflect.defineMetadata("myClassMetadata", metadata, target);
    };
}

// 定义一个装饰器,用于将元数据附加到属性上
function MyPropertyMetadata(metadata: string) {
    return function(target: any, propertyKey: string) {
        Reflect.defineMetadata("myPropertyMetadata", metadata, target, propertyKey);
    };
}

// 应用装饰器并添加元数据到类和属性上
@MyClassMetadata("This is class metadata")
class MyClass {
    @MyPropertyMetadata("This is property metadata")
    myProperty: string;
}


// 获取属性的元数据
const propertyMetadata = Reflect.getMetadata("myPropertyMetadata", MyClass.prototype, "myProperty");
console.log("Property metadata:", propertyMetadata);
第六章·TS 构建项目
6.1 rollup 构建
安装依赖
1. 全局安装rollup npm install rollup -g

2. 安装TypeScript npm install typescript -D

3. 安装TypeScript 转换器 npm install rollup-plugin-typescript2 -D

4. 安装代码压缩插件 npm install rollup-plugin-terser -D

5. 安装rollupweb服务 npm install rollup-plugin-serve -D

6. 安装热更新 npm install rollup-plugin-livereload -D

7. 引入外部依赖 npm install rollup-plugin-node-resolve -D

8. 安装配置环境变量用来区分本地和生产  npm install cross-env -D

9. 替换环境变量给浏览器使用 npm install rollup-plugin-replace -D
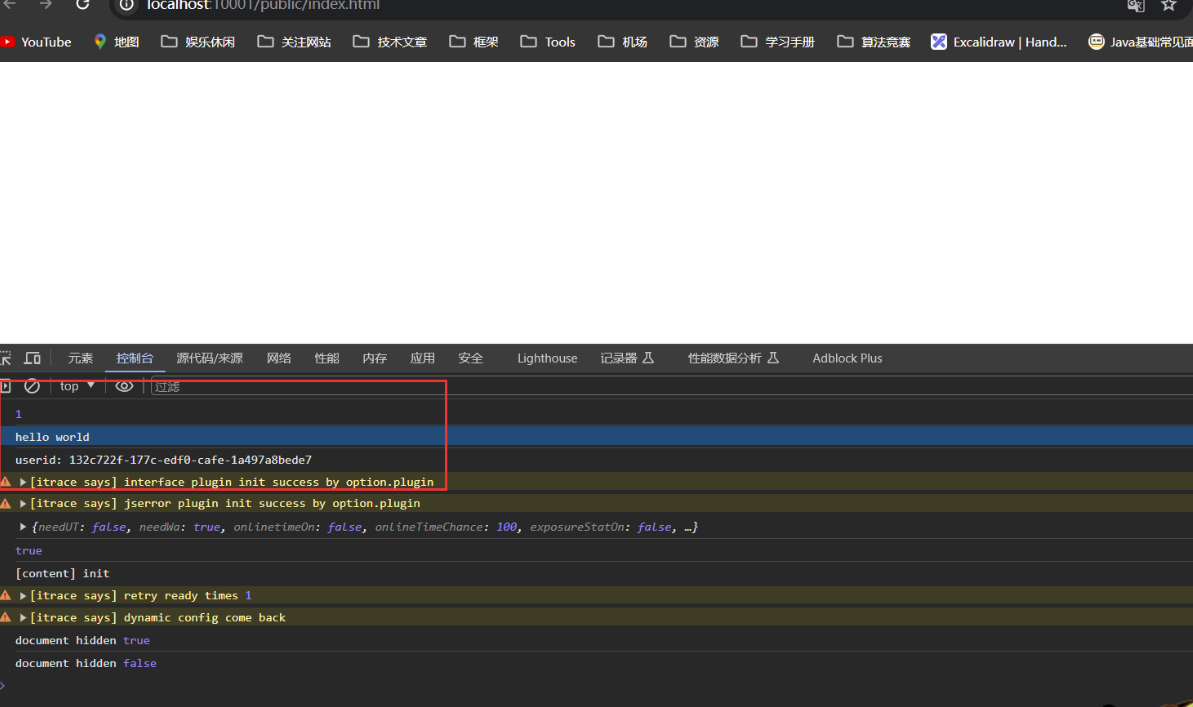
创建 public 目录存放前端界面文件、src 目录 存放 ts 文件
index.html
<!DOCTYPE html>
<html lang="en">
<head>
    <meta charset="UTF-8">
    <meta name="viewport" content="width=device-width, initial-scale=1.0">
    <title>Document</title>
</head>
<body>
    <script src="../lib/index.js"></script>
</body>
</html>
main.ts
let a:number = 1;
console.log(a)
let str:string = "hello world"
console.log(str)
修改 package.json 内容
{
  "name": "rollupTs",
  "version": "1.0.0",
  "description": "",
  "main": "index.js",
  "scripts": {
    "test": "echo \"Error: no test specified\" && exit 1",
    "dev": "cross-env NODE_ENV=development  rollup -c -w",
    "build":"cross-env NODE_ENV=produaction  rollup -c"
  },
  "keywords": [],
  "author": "",
  "license": "ISC",
  "devDependencies": {
    "cross-env": "^7.0.3",
    "rollup-plugin-livereload": "^2.0.5",
    "rollup-plugin-node-resolve": "^5.2.0",
    "rollup-plugin-replace": "^2.2.0",
    "rollup-plugin-serve": "^1.1.1",
    "rollup-plugin-terser": "^7.0.2",
    "rollup-plugin-typescript2": "^0.36.0",
    "typescript": "^5.3.3"
  }
}
项目根目录下 创建 rollup.config.js
console.log(process.env);
import ts from 'rollup-plugin-typescript2'
import path from 'path'
import serve from 'rollup-plugin-serve'
import livereload from 'rollup-plugin-livereload'
import { terser } from 'rollup-plugin-terser'
import resolve from 'rollup-plugin-node-resolve'
import repacle from 'rollup-plugin-replace'

const isDev = () => {
    return process.env.NODE_ENV === 'development'
}
export default {
    input: "./src/main.ts",
    output: {
        file: path.resolve(__dirname, './lib/index.js'),
        format: "umd",
        sourcemap: true
    },

    plugins: [
        ts(),
        terser({
            compress: {
                drop_console: !isDev()
            }
        }),
        repacle({
            'process.env.NODE_ENV': JSON.stringify(process.env.NODE_ENV)
        }),
        resolve(['.js', '.ts']),
        isDev() && livereload(),
        isDev() && serve({
            open: true,
            openPage: "/public/index.html"
        })
    ]
}
tsc --init 生成 tsconfig.json 并且配置
{
  "compilerOptions": {
    /* Visit https://aka.ms/tsconfig.json to read more about this file */

    /* Projects */
    // "incremental": true,                              /* Enable incremental compilation */
    // "composite": true,                                /* Enable constraints that allow a TypeScript project to be used with project references. */
    // "tsBuildInfoFile": "./",                          /* Specify the folder for .tsbuildinfo incremental compilation files. */
    // "disableSourceOfProjectReferenceRedirect": true,  /* Disable preferring source files instead of declaration files when referencing composite projects */
    // "disableSolutionSearching": true,                 /* Opt a project out of multi-project reference checking when editing. */
    // "disableReferencedProjectLoad": true,             /* Reduce the number of projects loaded automatically by TypeScript. */

    /* Language and Environment */
    "target": "es2016",                                  /* Set the JavaScript language version for emitted JavaScript and include compatible library declarations. */
    // "lib": [],                                        /* Specify a set of bundled library declaration files that describe the target runtime environment. */
    // "jsx": "preserve",                                /* Specify what JSX code is generated. */
    // "experimentalDecorators": true,                   /* Enable experimental support for TC39 stage 2 draft decorators. */
    // "emitDecoratorMetadata": true,                    /* Emit design-type metadata for decorated declarations in source files. */
    // "jsxFactory": "",                                 /* Specify the JSX factory function used when targeting React JSX emit, e.g. 'React.createElement' or 'h' */
    // "jsxFragmentFactory": "",                         /* Specify the JSX Fragment reference used for fragments when targeting React JSX emit e.g. 'React.Fragment' or 'Fragment'. */
    // "jsxImportSource": "",                            /* Specify module specifier used to import the JSX factory functions when using `jsx: react-jsx*`.` */
    // "reactNamespace": "",                             /* Specify the object invoked for `createElement`. This only applies when targeting `react` JSX emit. */
    // "noLib": true,                                    /* Disable including any library files, including the default lib.d.ts. */
    // "useDefineForClassFields": true,                  /* Emit ECMAScript-standard-compliant class fields. */

    /* Modules */
    "module": "ES2015",                                /* Specify what module code is generated. */
    // "rootDir": "./",                                  /* Specify the root folder within your source files. */
    // "moduleResolution": "node",                       /* Specify how TypeScript looks up a file from a given module specifier. */
    // "baseUrl": "./",                                  /* Specify the base directory to resolve non-relative module names. */
    // "paths": {},                                      /* Specify a set of entries that re-map imports to additional lookup locations. */
    // "rootDirs": [],                                   /* Allow multiple folders to be treated as one when resolving modules. */
    // "typeRoots": [],                                  /* Specify multiple folders that act like `./node_modules/@types`. */
    // "types": [],                                      /* Specify type package names to be included without being referenced in a source file. */
    // "allowUmdGlobalAccess": true,                     /* Allow accessing UMD globals from modules. */
    // "resolveJsonModule": true,                        /* Enable importing .json files */
    // "noResolve": true,                                /* Disallow `import`s, `require`s or `<reference>`s from expanding the number of files TypeScript should add to a project. */

    /* JavaScript Support */
    // "allowJs": true,                                  /* Allow JavaScript files to be a part of your program. Use the `checkJS` option to get errors from these files. */
    // "checkJs": true,                                  /* Enable error reporting in type-checked JavaScript files. */
    // "maxNodeModuleJsDepth": 1,                        /* Specify the maximum folder depth used for checking JavaScript files from `node_modules`. Only applicable with `allowJs`. */

    /* Emit */
    // "declaration": true,                              /* Generate .d.ts files from TypeScript and JavaScript files in your project. */
    // "declarationMap": true,                           /* Create sourcemaps for d.ts files. */
    // "emitDeclarationOnly": true,                      /* Only output d.ts files and not JavaScript files. */
      "sourceMap": true,                                /* Create source map files for emitted JavaScript files. */
    // "outFile": "./",                                  /* Specify a file that bundles all outputs into one JavaScript file. If `declaration` is true, also designates a file that bundles all .d.ts output. */
    // "outDir": "./",                                   /* Specify an output folder for all emitted files. */
    // "removeComments": true,                           /* Disable emitting comments. */
    // "noEmit": true,                                   /* Disable emitting files from a compilation. */
    // "importHelpers": true,                            /* Allow importing helper functions from tslib once per project, instead of including them per-file. */
    // "importsNotUsedAsValues": "remove",               /* Specify emit/checking behavior for imports that are only used for types */
    // "downlevelIteration": true,                       /* Emit more compliant, but verbose and less performant JavaScript for iteration. */
    // "sourceRoot": "",                                 /* Specify the root path for debuggers to find the reference source code. */
    // "mapRoot": "",                                    /* Specify the location where debugger should locate map files instead of generated locations. */
    // "inlineSourceMap": true,                          /* Include sourcemap files inside the emitted JavaScript. */
    // "inlineSources": true,                            /* Include source code in the sourcemaps inside the emitted JavaScript. */
    // "emitBOM": true,                                  /* Emit a UTF-8 Byte Order Mark (BOM) in the beginning of output files. */
    // "newLine": "crlf",                                /* Set the newline character for emitting files. */
    // "stripInternal": true,                            /* Disable emitting declarations that have `@internal` in their JSDoc comments. */
    // "noEmitHelpers": true,                            /* Disable generating custom helper functions like `__extends` in compiled output. */
    // "noEmitOnError": true,                            /* Disable emitting files if any type checking errors are reported. */
    // "preserveConstEnums": true,                       /* Disable erasing `const enum` declarations in generated code. */
    // "declarationDir": "./",                           /* Specify the output directory for generated declaration files. */
    // "preserveValueImports": true,                     /* Preserve unused imported values in the JavaScript output that would otherwise be removed. */

    /* Interop Constraints */
    // "isolatedModules": true,                          /* Ensure that each file can be safely transpiled without relying on other imports. */
    // "allowSyntheticDefaultImports": true,             /* Allow 'import x from y' when a module doesn't have a default export. */
    "esModuleInterop": true,                             /* Emit additional JavaScript to ease support for importing CommonJS modules. This enables `allowSyntheticDefaultImports` for type compatibility. */
    // "preserveSymlinks": true,                         /* Disable resolving symlinks to their realpath. This correlates to the same flag in node. */
    "forceConsistentCasingInFileNames": true,            /* Ensure that casing is correct in imports. */
    /* Type Checking */
    "strict": true,                                      /* Enable all strict type-checking options. */
    // "noImplicitAny": true,                            /* Enable error reporting for expressions and declarations with an implied `any` type.. */
    // "strictNullChecks": true,                         /* When type checking, take into account `null` and `undefined`. */
    // "strictFunctionTypes": true,                      /* When assigning functions, check to ensure parameters and the return values are subtype-compatible. */
    // "strictBindCallApply": true,                      /* Check that the arguments for `bind`, `call`, and `apply` methods match the original function. */
    // "strictPropertyInitialization": true,             /* Check for class properties that are declared but not set in the constructor. */
    // "noImplicitThis": true,                           /* Enable error reporting when `this` is given the type `any`. */
    // "useUnknownInCatchVariables": true,               /* Type catch clause variables as 'unknown' instead of 'any'. */
    // "alwaysStrict": true,                             /* Ensure 'use strict' is always emitted. */
    // "noUnusedLocals": true,                           /* Enable error reporting when a local variables aren't read. */
    // "noUnusedParameters": true,                       /* Raise an error when a function parameter isn't read */
    // "exactOptionalPropertyTypes": true,               /* Interpret optional property types as written, rather than adding 'undefined'. */
    // "noImplicitReturns": true,                        /* Enable error reporting for codepaths that do not explicitly return in a function. */
    // "noFallthroughCasesInSwitch": true,               /* Enable error reporting for fallthrough cases in switch statements. */
    // "noUncheckedIndexedAccess": true,                 /* Include 'undefined' in index signature results */
    // "noImplicitOverride": true,                       /* Ensure overriding members in derived classes are marked with an override modifier. */
    // "noPropertyAccessFromIndexSignature": true,       /* Enforces using indexed accessors for keys declared using an indexed type */
    // "allowUnusedLabels": true,                        /* Disable error reporting for unused labels. */
    // "allowUnreachableCode": true,                     /* Disable error reporting for unreachable code. */
    /* Completeness */
    // "skipDefaultLibCheck": true,                      /* Skip type checking .d.ts files that are included with TypeScript. */
    "skipLibCheck": true                                 /* Skip type checking all .d.ts files. */
  }
}
npm run build
这个其实就是构建一下 ~,然后你就会发现 index.js 和 index.js.map 都生成了。

npm run dev
然后就运行这个项目就完事了 ~ 它就自动开监控了,就是你改什么ts啥的,都会自动改js,自动生成。
6.2 webpack 构建
安装依赖
安装webpack   npm install webpack -D

webpack4以上需要 npm install  webpack-cli -D

编译TS  npm install ts-loader -D

TS环境 npm install typescript -D

热更新服务 npm install  webpack-dev-server -D

HTML模板 npm install html-webpack-plugin -D
tsc --init
生成 tsconfig.json
新建需要的目录
-
src- index.ts
let a:number = 1; console.log(a) let str:string = "hello world" console.log(str); -
public
- index.html
<!DOCTYPE html>
<html lang="en">
<head>
    <meta charset="UTF-8">
    <meta name="viewport" content="width=device-width, initial-scale=1.0">
    <title>Document</title>
</head>
<body>
    <script src="../dist/index.js"></script>
</body>
</html>
webpack.config.js
const path = require('path')
const htmlWebpackPlugin = require('html-webpack-plugin')
module.exports = {
    entry: "./src/index.ts",
    mode: "development",
    output: {
        path: path.resolve(__dirname, './dist'),
        filename: "index.js"
    },
    stats: "none",
    resolve: {
        extensions: ['.ts', '.js'],
        alias: {
            '@': path.resolve(__dirname, './src')
        }
    },
    module: {
        rules: [
            {
                test: /\.ts$/,
                use: "ts-loader"
            }
        ]
    },
    devServer: {
        port: 1988,
        proxy: {}
    },
    plugins: [
        new htmlWebpackPlugin({
            template: "./public/index.html"
        })
    ]
}
修改 package.json 的内容
{
  "name": "webpackTs",
  "version": "1.0.0",
  "description": "",
  "main": "index.js",
  "scripts": {
    "test": "echo \"Error: no test specified\" && exit 1",
    "dev": "webpack-dev-server",
    "build":"webpack"
  },
  "keywords": [],
  "author": "",
  "license": "ISC",
  "devDependencies": {
    "html-webpack-plugin": "^5.6.0",
    "ts-loader": "^9.5.1",
    "typescript": "^5.3.3",
    "webpack": "^5.90.0",
    "webpack-cli": "^5.1.4",
    "webpack-dev-server": "^4.15.1"
  }
}
tsc --init
生成 tsconfig.json

 浙公网安备 33010602011771号