
用python爬取豆瓣电影短评
一、选题的背景
想要了解电影的具体短评趋势。
通过网络爬虫以及数据的可视化分析,在数据表格以及图表中更加具体明了的看出电影的短评趋势。
随着现代化社会的日益进步及其电影业的发展,从无声到有声在逐渐的发展到三维空间的影视效果,电影的发展都是我们生活进步的一个缩影。 但是对于电影大家都有不同的个人评判准则,要想从多角度的评价一部电影我们就需要从大众的评价中获得大势所趋。而且可以通过分析大众的数据得到一个相对认可的结果。
二、主题式网络爬虫设计方案
1.主题式网络爬虫名称:爬取豆瓣电影短评
2.主题式网络爬虫爬取的内容与数据特征分析:爬取豆瓣电影短评(热门)的抓取,及其可视化
3.主题式网络爬虫设计方案概述(包括实现思路与技术难点):
操作环境 python3.9.7 ; jupyter ; windows10
所需相关的库包含
pip install requests ;pip install matplotlibpip ; pip install xlrd ; pip install xlwt
pip install bs4 ; pip install lxml ; pip install wordcloud ; pip install jieba
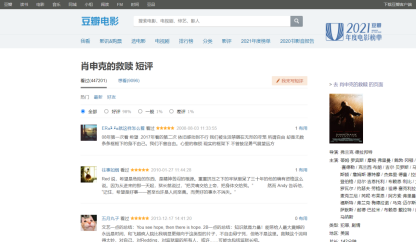
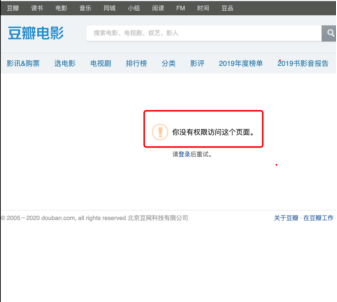
方案概述:首先访问豆瓣里的任意一部电影,这里以“肖申克的救赎”为例。打开“肖申克的救赎”就可以发现它是非动态渲染的页面,也就是传统的渲染方式,这边的话直接请求这个url即可获取数据。但是翻着翻着页面你就会发现:未登录用户只能访问优先的界面,登录的用户才能有权限去访问后面的页面。
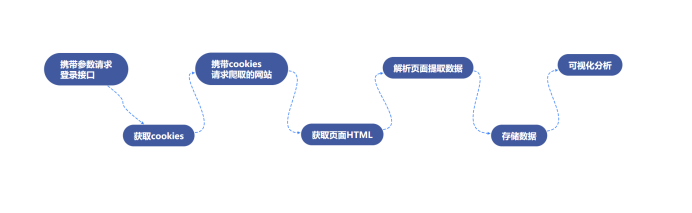
所以说整个流程应该修改为:登录——> 爬虫——>存储——>可视化分析。
三、主题页面的结构特征分析
1.主题页面的结构与特征分析
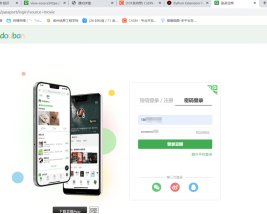
URL:https://accounts.douban.com/passport/login?source=movie(豆瓣的登陆地址)
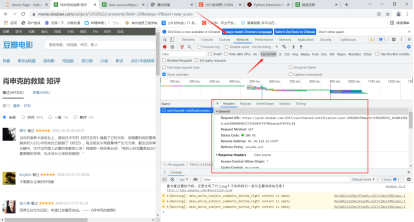
进去后有个密码登录栏,我们要分析在登录的途中发生了啥,不仅要用F12控制台,还要使用Fidder抓包。
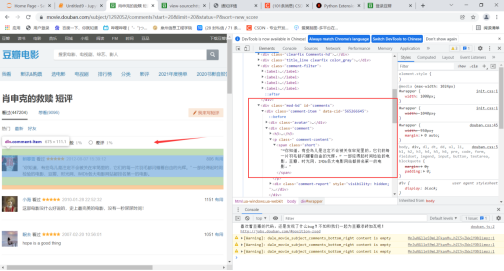
2.Htmls 页面解析
查看请求的参数发现就是普通请求,无加密
所以登录模块的代码如下
 1 url='https://accounts.douban.com/passport/login?source=movie'
 2 header={'user-agent':'Mozilla/5.0 (Windows NT 10.0; WOW64) AppleWebKit/537.36 (KHTML, like Gecko) Chrome/73.0.3683.86 Safari/537.36',
 3 'Referer': 'https://accounts.douban.com/passport/login_popup?login_source=anony',
 4         'Origin': 'https://accounts.douban.com',
 5  'content-Type':'application/x-www-form-urlencoded',
 6  'x-requested-with':'XMLHttpRequest',
 7  'accept':'application/json',
 8  'accept-encoding':'gzip, deflate, br',
 9  'accept-language':'zh-CN,zh;q=0.9',
10  'connection': 'keep-alive'
11  ,'Host': 'accounts.douban.com'
12  }
13 data={
14     'ck':'',
15     'name':'',
16     'password':'',
17     'remember':'false',
18     'ticket':''
19 }
20 def login(username,password):
21     global  data
22     data['name']=username
23     data['password']=password
24     data=urllib.parse.urlencode(data)
25     print(data)
26     req=requests.post(url,headers=header,data=data,verify=False)
27     cookies = requests.utils.dict_from_cookiejar(req.cookies)
28     print(cookies)
29     return cookies
四、网络爬虫程序设计
1.数据爬取与采集
登陆完成之后,我们就可以携带登录的信息访问网站爬取信息了。虽然它是传统交互方式,但是每当你切换页面时候会发现有个ajax请求。
不过在具体的实现上,我们使用requests发送请求获取结果,使用BeautifulSoup去解析html格式文件。
而我们所需要的数据也很容易分析对应部分。

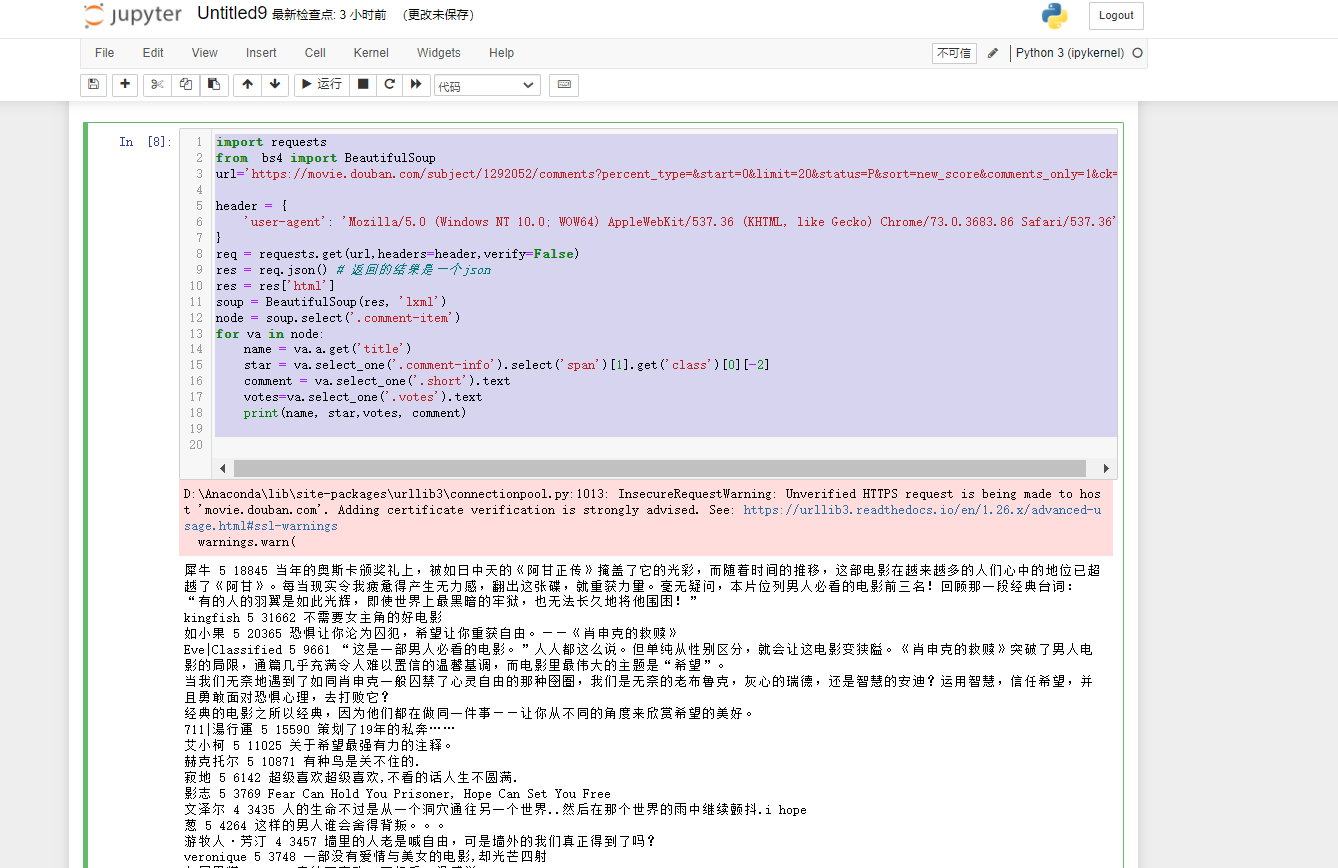
实现的代码以及在(Jupyter中运行的结果为)为:
 1 import requests
 2 from  bs4 import BeautifulSoup
 3 url='https://movie.douban.com/subject/1292052/comments?percent_type=&start=0&limit=20&status=P&sort=new_score&comments_only=1&ck=C7di'
 4
 5 header = {
 6     'user-agent': 'Mozilla/5.0 (Windows NT 10.0; WOW64) AppleWebKit/537.36 (KHTML, like Gecko) Chrome/73.0.3683.86 Safari/537.36',
 7 }
 8 req = requests.get(url,headers=header,verify=False)
 9 res = req.json() # 返回的结果是一个json
10 res = res['html']
11 soup = BeautifulSoup(res, 'lxml')
12 node = soup.select('.comment-item')
13 for va in node:
14     name = va.a.get('title')
15     star = va.select_one('.comment-info').select('span')[1].get('class')[0][-2]
16     comment = va.select_one('.short').text
17     votes=va.select_one('.votes').text
18     print(name, star,votes, comment)
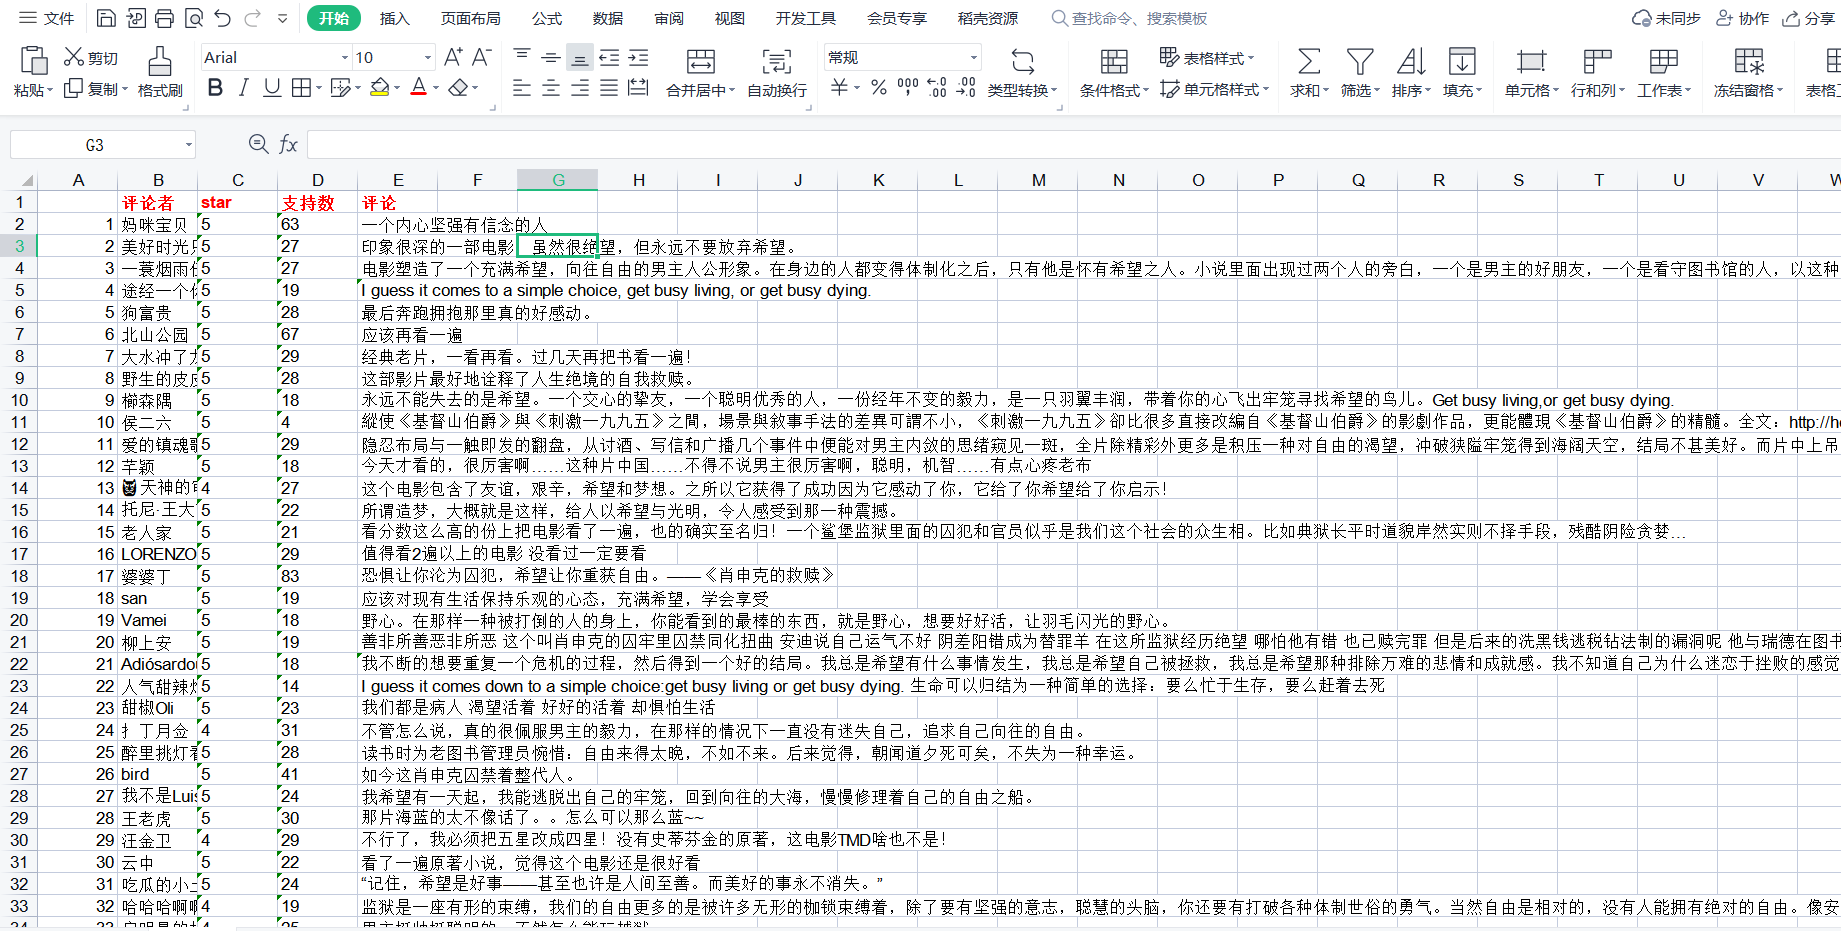
2.储存
数据爬取完就要考虑存储,我们将数据储存到cvs中。
使用xlwt将数据写入excel文件中,xlwt基本应用实例:
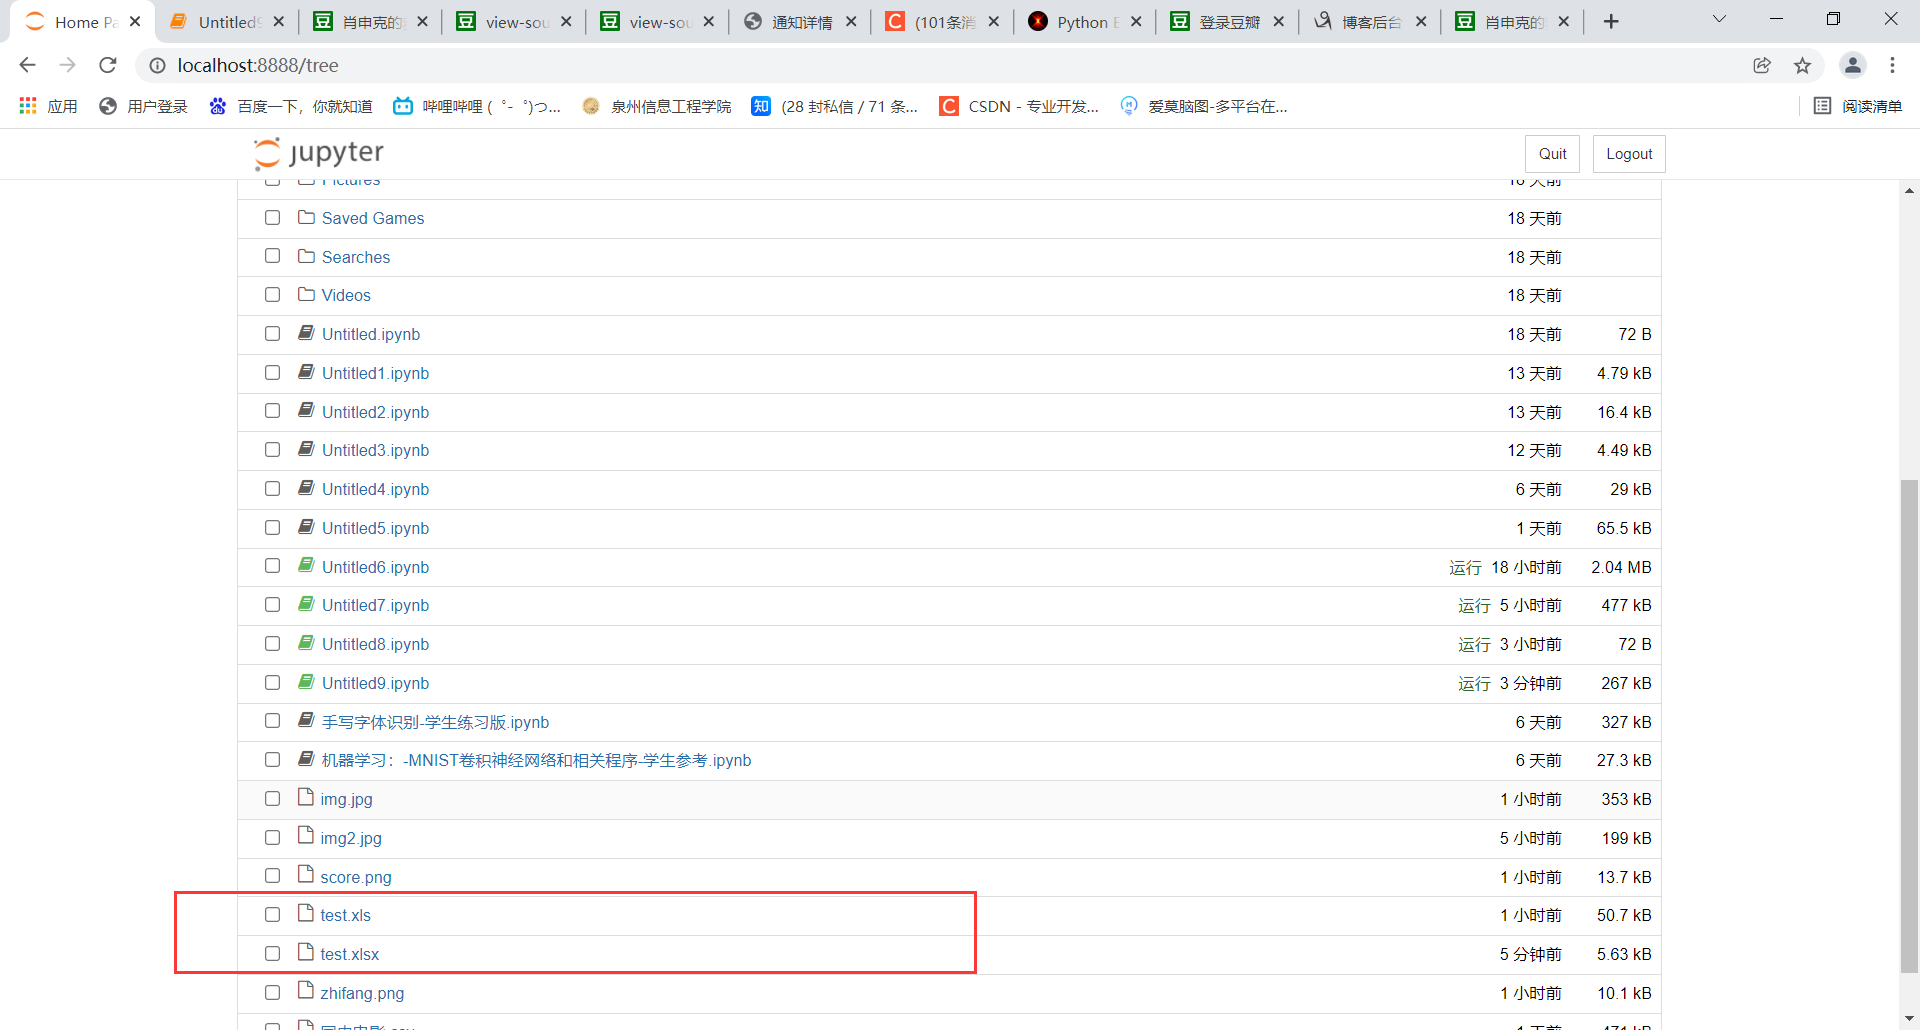
 1 import xlwt
 2
 3 #创建可写的workbook对象
 4 workbook = xlwt.Workbook(encoding='utf-8')
 5 #创建工作表sheet
 6 worksheet = workbook.add_sheet('sheet1')
 7 #往表中写内容,第一个参数 行,第二个参数列,第三个参数内容
 8 worksheet.write(0, 0, 'bigsai')
 9 #保存表为test.xlsx
10 workbook.save('test.xlsx')
使用xlrd读取excel文件中
1 import xlrd
2 #读取名称为test.xls文件
3 workbook = xlrd.open_workbook('test.xls')
4 # 获取第一张表
5 table =  workbook.sheets()[0]  # 打开第1张表
6 # 每一行是个元组
7 nrows = table.nrows
8 for i in range(nrows):
9     print(table.row_values(i))#输出每一行
Jupyter中运行的结果为
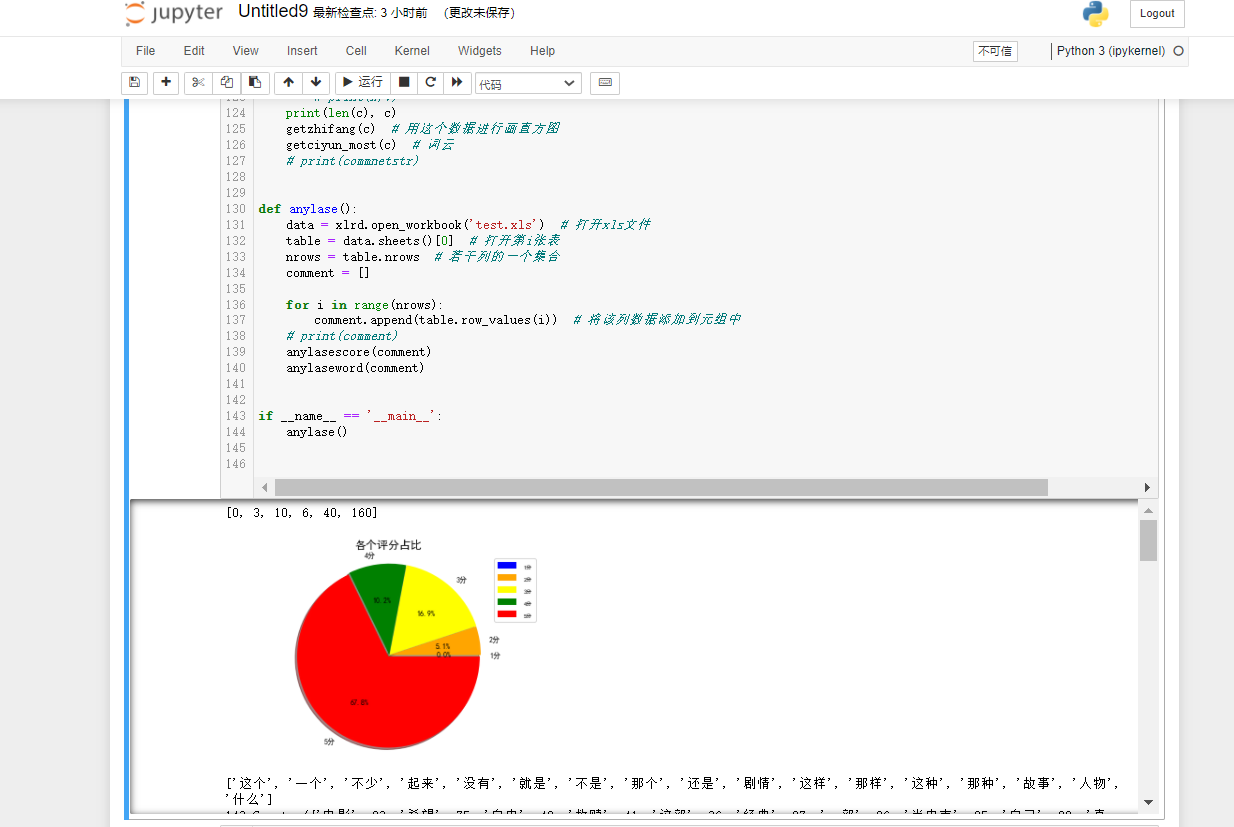
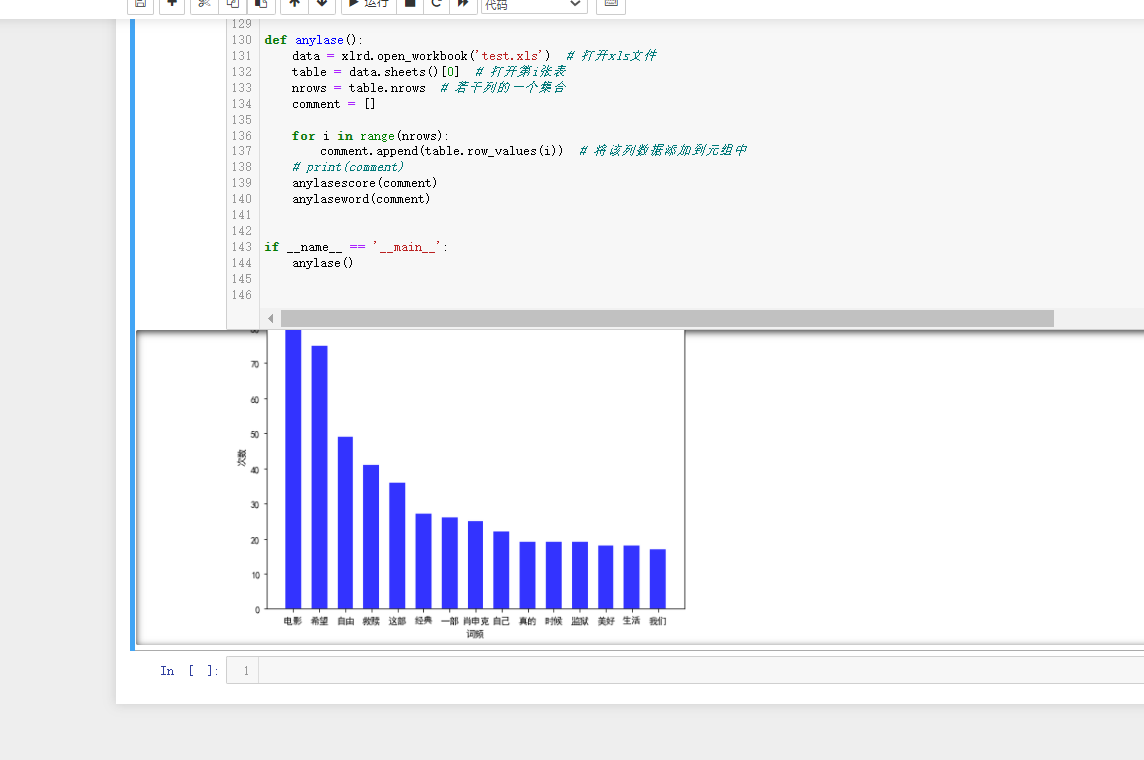
3.可视化分析
我们要对评分进行统计、词频统计。还有就是生成词云展示。而对应的就是matplotlib、WordCloud库。
实现的逻辑思路:读取xls的文件,将评论使用分词处理统计词频,统计出现最多的词语制作成直方图和词语。将评星数量做成饼图展示一下,主要代码均有注释,具体的代码为:
  1 import matplotlib.pyplot as plt
  2 import matplotlib
  3 import jieba
  4 import jieba.analyse
  5 import xlwt
  6 import xlrd
  7 from wordcloud import WordCloud
  8 import numpy as np
  9 from collections import Counter
 10 # 设置字体 有的linux字体有问题
 11 matplotlib.rcParams['font.sans-serif'] = ['SimHei']
 12 matplotlib.rcParams['axes.unicode_minus'] = False
 13
 14
 15 # 类似comment 为评论的一些数据 [  ['1','名称','star星','赞同数','评论内容']  ,['2','名称','star星','赞同数','评论内容'] ]元组
 16 def anylasescore(comment):
 17     score = [0, 0, 0, 0, 0, 0]  # 分别对应0 1 2 3 4 5分出现的次数
 18     count = 0  # 评分总次数
 19     for va in comment:  # 遍历每条评论的数据  ['1','名称','star星','赞同数','评论内容']
 20         try:
 21             score[int(va[2])] += 1  # 第3列 为star星 要强制转换成int格式
 22             count += 1
 23         except Exception as e:
 24             continue
 25     print(score)
 26     label = '1分', '2分', '3分', '4分', '5分'
 27     color = 'blue', 'orange', 'yellow', 'green', 'red'  # 各类别颜色
 28     size = [0, 0, 0, 0, 0]  # 一个百分比数字 合起来为100
 29     explode = [0, 0, 0, 0, 0]  # explode :(每一块)离开中心距离;
 30     for i in range(1, 5):  # 计算
 31         size[i] = score[i] * 100 / count
 32         explode[i] = score[i] / count / 10
 33     pie = plt.pie(size, colors=color, explode=explode, labels=label, shadow=True, autopct='%1.1f%%')
 34     for font in pie[1]:
 35         font.set_size(8)
 36     for digit in pie[2]:
 37         digit.set_size(8)
 38     plt.axis('equal')  # 该行代码使饼图长宽相等
 39     plt.title(u'各个评分占比', fontsize=12)  # 标题
 40     plt.legend(loc=0, bbox_to_anchor=(0.82, 1))  # 图例
 41     # 设置legend的字体大小
 42     leg = plt.gca().get_legend()
 43     ltext = leg.get_texts()
 44     plt.setp(ltext, fontsize=6)
 45     plt.savefig("score.png")
 46     # 显示图
 47     plt.show()
 48
 49
 50 def getzhifang(map):  # 直方图二维,需要x和y两个坐标
 51     x = []
 52     y = []
 53     for k, v in map.most_common(15):  # 获取前15个最大数值
 54         x.append(k)
 55         y.append(v)
 56     Xi = np.array(x)  # 转成numpy的坐标
 57     Yi = np.array(y)
 58
 59     width = 0.6
 60     plt.rcParams['font.sans-serif'] = ['SimHei']  # 用来正常显示中文标签
 61     plt.figure(figsize=(8, 6))  # 指定图像比例: 8:6
 62     plt.bar(Xi, Yi, width, color='blue', label='热门词频统计', alpha=0.8, )
 63
 64     plt.xlabel("词频")
 65     plt.ylabel("次数")
 66     plt.savefig('zhifang.png')
 67     plt.show()
 68     return
 69
 70
 71 def getciyun_most(map):  # 获取词云
 72     # 一个存对应中文单词,一个存对应次数
 73     x = []
 74     y = []
 75     for k, v in map.most_common(300):  # 在前300个常用词语中
 76         x.append(k)
 77         y.append(v)
 78     xi = x[0:150]  # 截取前150个
 79     xi = ' '.join(xi)  # 以空格 ` `将其分割为固定格式(词云需要)
 80     print(xi)
 81     # backgroud_Image = plt.imread('')  # 如果需要个性化词云
 82     # 词云大小,字体等基本设置
 83     wc = WordCloud(background_color="white",
 84                    width=1500, height=1200,
 85                    # min_font_size=40,
 86                    # mask=backgroud_Image,
 87                    font_path="simhei.ttf",
 88                    max_font_size=150,  # 设置字体最大值
 89                    random_state=50,  # 设置有多少种随机生成状态,即有多少种配色方案
 90                    )  # 字体这里有个坑,一定要设这个参数。否则会显示一堆小方框wc.font_path="simhei.ttf"   # 黑体
 91     # wc.font_path="simhei.ttf"
 92     my_wordcloud = wc.generate(xi)  #需要放入词云的单词 ,这里前150个单词
 93     plt.imshow(my_wordcloud)  # 展示
 94     my_wordcloud.to_file("img.jpg")  # 保存
 95     xi = ' '.join(x[150:300])  # 再次获取后150个单词再保存一张词云
 96     my_wordcloud = wc.generate(xi)
 97     my_wordcloud.to_file("img2.jpg")
 98
 99     plt.axis("off")
100
101
102 def anylaseword(comment):
103     # 这个过滤词,有些词语没意义需要过滤掉
104     list = ['这个', '一个', '不少', '起来', '没有', '就是', '不是', '那个', '还是', '剧情', '这样', '那样', '这种', '那种', '故事', '人物', '什么']
105     print(list)
106     commnetstr = ''  # 评论的字符串
107     c = Counter()  # python一种数据集合,用来存储字典
108     index = 0
109     for va in comment:
110         seg_list = jieba.cut(va[4], cut_all=False)  ## jieba分词
111         index += 1
112         for x in seg_list:
113             if len(x) > 1 and x != '\r\n':  # 不是单个字 并且不是特殊符号
114                 try:
115                     c[x] += 1  # 这个单词的次数加一
116                 except:
117                     continue
118         commnetstr += va[4]
119     for (k, v) in c.most_common():  # 过滤掉次数小于5的单词
120         if v < 5 or k in list:
121             c.pop(k)
122             continue
123         # print(k,v)
124     print(len(c), c)
125     getzhifang(c)  # 用这个数据进行画直方图
126     getciyun_most(c)  # 词云
127     # print(commnetstr)
128
129
130 def anylase():
131     data = xlrd.open_workbook('test.xls')  # 打开xls文件
132     table = data.sheets()[0]  # 打开第i张表
133     nrows = table.nrows  # 若干列的一个集合
134     comment = []
135
136     for i in range(nrows):
137         comment.append(table.row_values(i))  # 将该列数据添加到元组中
138     # print(comment)
139     anylasescore(comment)
140     anylaseword(comment)
141
142
143 if __name__ == '__main__':
144     anylase()
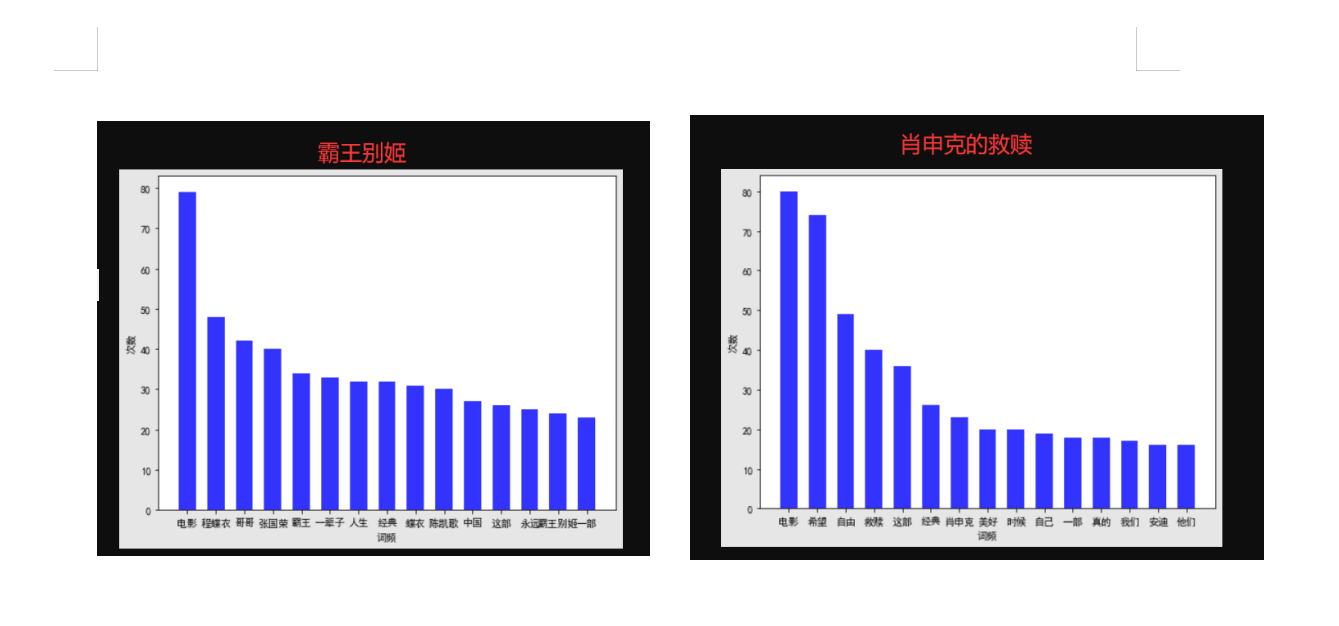
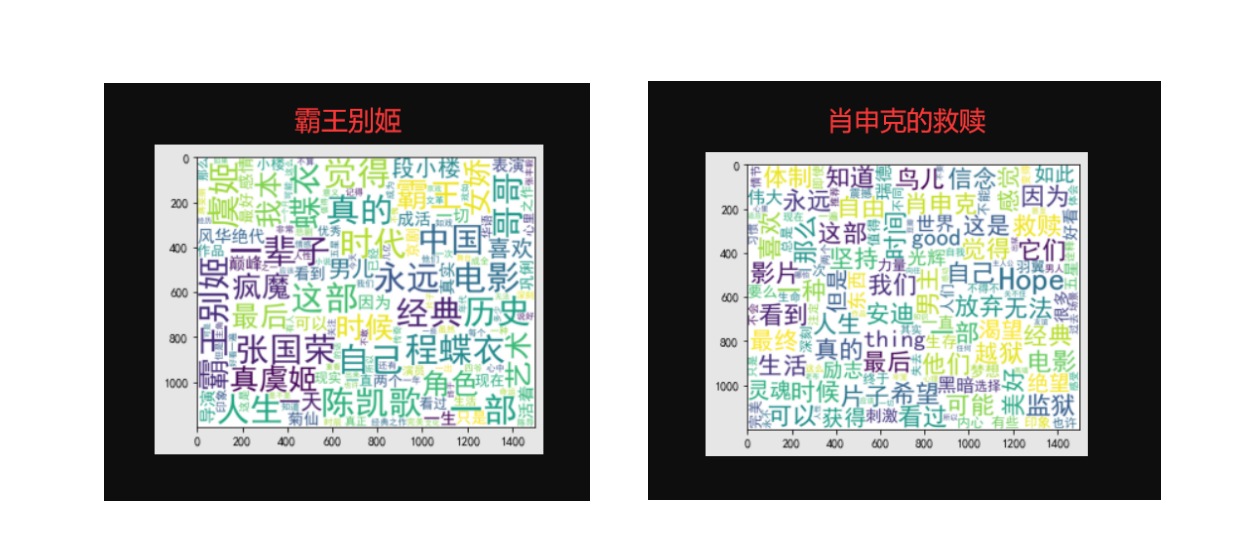
Jupyter中运行的结果为
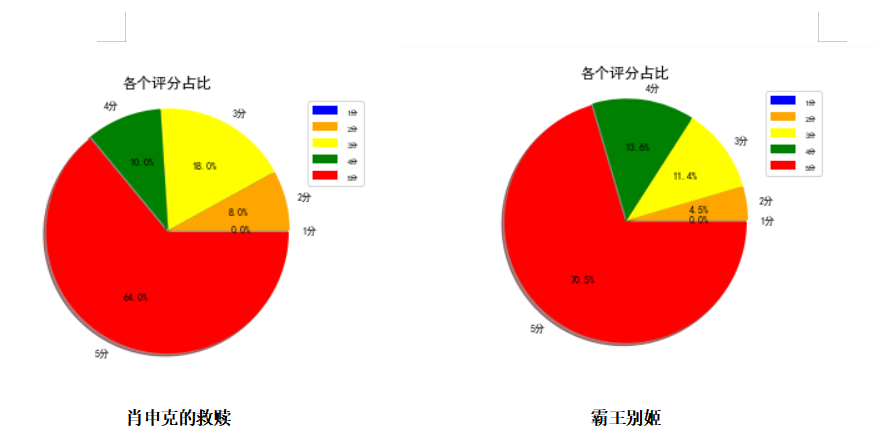
这里我选了肖申克的救赎和霸王别姬这两部电影的一些数据,两个电影评分比例对比为:
完整代码
  1 import requests
  2 from bs4 import BeautifulSoup
  3 import urllib.parse
  4
  5 import xlwt
  6 import xlrd
  7
  8 # 账号密码
  9 def login(username, password):
 10     url = 'https://accounts.douban.com/j/mobile/login/basic'
 11     header = {
 12         'user-agent': 'Mozilla/5.0 (Windows NT 10.0; WOW64) AppleWebKit/537.36 (KHTML, like Gecko) Chrome/73.0.3683.86 Safari/537.36',
 13         'Referer': 'https://accounts.douban.com/passport/login_popup?login_source=anony',
 14         'Origin': 'https://accounts.douban.com',
 15         'content-Type': 'application/x-www-form-urlencoded',
 16         'x-requested-with': 'XMLHttpRequest',
 17         'accept': 'application/json',
 18         'accept-encoding': 'gzip, deflate, br',
 19         'accept-language': 'zh-CN,zh;q=0.9',
 20         'connection': 'keep-alive'
 21         , 'Host': 'accounts.douban.com'
 22     }
 23     # 登陆需要携带的参数
 24     data = {
 25         'ck' : '',
 26         'name': '',
 27         'password': '',
 28         'remember': 'false',
 29         'ticket': ''
 30     }
 31     data['name'] = username
 32     data['password'] = password
 33     data = urllib.parse.urlencode(data)
 34     print(data)
 35     req = requests.post(url, headers=header, data=data, verify=False)
 36     cookies = requests.utils.dict_from_cookiejar(req.cookies)
 37     print(cookies)
 38     return cookies
 39
 40 def getcomment(cookies, mvid):  # 参数为登录成功的cookies(后台可通过cookies识别用户,电影的id)
 41     start = 0
 42     w = xlwt.Workbook(encoding='ascii')  # #创建可写的workbook对象
 43     ws = w.add_sheet('sheet1')  # 创建工作表sheet
 44     index = 1  # 表示行的意思,在xls文件中写入对应的行数
 45     while True:
 46         # 模拟浏览器头发送请求
 47         header = {
 48             'user-agent': 'Mozilla/5.0 (Windows NT 10.0; WOW64) AppleWebKit/537.36 (KHTML, like Gecko) Chrome/73.0.3683.86 Safari/537.36',
 49         }
 50         # try catch 尝试,一旦有错误说明执行完成,没错误继续进行
 51         try:
 52             # 拼凑url 每次star加20
 53             url = 'https://movie.douban.com/subject/' + str(mvid) + '/comments?start=' + str(
 54                 start) + '&limit=20&sort=new_score&status=P&comments_only=1'
 55             start += 20
 56             # 发送请求
 57             req = requests.get(url, cookies=cookies, headers=header)
 58             # 返回的结果是个json字符串 通过req.json()方法获取数据
 59             res = req.json()
 60             res = res['html']  # 需要的数据在`html`键下
 61             soup = BeautifulSoup(res, 'lxml')  # 把这个结构化html创建一个BeautifulSoup对象用来提取信息
 62             node = soup.select('.comment-item')  # 每组class 均为comment-item  这样分成20条记录(每个url有20个评论)
 63             for va in node:  # 遍历评论
 64                 name = va.a.get('title')  # 获取评论者名称
 65                 star = va.select_one('.comment-info').select('span')[1].get('class')[0][-2]  # 星数好评
 66                 votes = va.select_one('.votes').text  # 投票数
 67                 comment = va.select_one('.short').text  # 评论文本
 68                 print(name, star, votes, comment)
 69                 ws.write(index, 0, index)  # 第index行,第0列写入 index
 70                 ws.write(index, 1, name)  # 第index行,第1列写入 评论者
 71                 ws.write(index, 2, star)  # 第index行,第2列写入 评星
 72                 ws.write(index, 3, votes)  # 第index行,第3列写入 投票数
 73                 ws.write(index, 4, comment)  # 第index行,第4列写入 评论内容
 74                 index += 1
 75         except Exception as e:  # 有异常退出
 76             print(e)
 77             break
 78     w.save('test.xls')  # 保存为test.xls文件
 79
 80
 81 if __name__ == '__main__':
 82     username = input('输入账号:')
 83     password = input('输入密码:')
 84     cookies = login(username, password)
 85     mvid = input('电影的id为:')
 86     getcomment(cookies, mvid)
 87
 88 import matplotlib.pyplot as plt
 89 import matplotlib
 90 import jieba
 91 import jieba.analyse
 92 import xlwt
 93 import xlrd
 94 from wordcloud import WordCloud
 95 import numpy as np
 96 from collections import Counter
 97 # 设置字体 有的linux字体有问题
 98 matplotlib.rcParams['font.sans-serif'] = ['SimHei']
 99 matplotlib.rcParams['axes.unicode_minus'] = False
100
101
102 # 类似comment 为评论的一些数据 [  ['1','名称','star星','赞同数','评论内容']  ,['2','名称','star星','赞同数','评论内容'] ]元组
103 def anylasescore(comment):
104     score = [0, 0, 0, 0, 0, 0]  # 分别对应0 1 2 3 4 5分出现的次数
105     count = 0  # 评分总次数
106     for va in comment:  # 遍历每条评论的数据  ['1','名称','star星','赞同数','评论内容']
107         try:
108             score[int(va[2])] += 1  # 第3列 为star星 要强制转换成int格式
109             count += 1
110         except Exception as e:
111             continue
112     print(score)
113     label = '1分', '2分', '3分', '4分', '5分'
114     color = 'blue', 'orange', 'yellow', 'green', 'red'  # 各类别颜色
115     size = [0, 0, 0, 0, 0]  # 一个百分比数字 合起来为100
116     explode = [0, 0, 0, 0, 0]  # explode :(每一块)离开中心距离;
117     for i in range(1, 5):  # 计算
118         size[i] = score[i] * 100 / count
119         explode[i] = score[i] / count / 10
120     pie = plt.pie(size, colors=color, explode=explode, labels=label, shadow=True, autopct='%1.1f%%')
121     for font in pie[1]:
122         font.set_size(8)
123     for digit in pie[2]:
124         digit.set_size(8)
125     plt.axis('equal')  # 该行代码使饼图长宽相等
126     plt.title(u'各个评分占比', fontsize=12)  # 标题
127     plt.legend(loc=0, bbox_to_anchor=(0.82, 1))  # 图例
128     # 设置legend的字体大小
129     leg = plt.gca().get_legend()
130     ltext = leg.get_texts()
131     plt.setp(ltext, fontsize=6)
132     plt.savefig("score.png")
133     # 显示图
134     plt.show()
135
136
137 def getzhifang(map):  # 直方图二维,需要x和y两个坐标
138     x = []
139     y = []
140     for k, v in map.most_common(15):  # 获取前15个最大数值
141         x.append(k)
142         y.append(v)
143     Xi = np.array(x)  # 转成numpy的坐标
144     Yi = np.array(y)
145
146     width = 0.6
147     plt.rcParams['font.sans-serif'] = ['SimHei']  # 用来正常显示中文标签
148     plt.figure(figsize=(8, 6))  # 指定图像比例: 8:6
149     plt.bar(Xi, Yi, width, color='blue', label='热门词频统计', alpha=0.8, )
150
151     plt.xlabel("词频")
152     plt.ylabel("次数")
153     plt.savefig('zhifang.png')
154     plt.show()
155     return
156
157
158 def getciyun_most(map):  # 获取词云
159     # 一个存对应中文单词,一个存对应次数
160     x = []
161     y = []
162     for k, v in map.most_common(300):  # 在前300个常用词语中
163         x.append(k)
164         y.append(v)
165     xi = x[0:150]  # 截取前150个
166     xi = ' '.join(xi)  # 以空格 ` `将其分割为固定格式(词云需要)
167     print(xi)
168     # backgroud_Image = plt.imread('')  # 如果需要个性化词云
169     # 词云大小,字体等基本设置
170     wc = WordCloud(background_color="white",
171                    width=1500, height=1200,
172                    # min_font_size=40,
173                    # mask=backgroud_Image,
174                    font_path="simhei.ttf",
175                    max_font_size=150,  # 设置字体最大值
176                    random_state=50,  # 设置有多少种随机生成状态,即有多少种配色方案
177                    )  # 字体这里有个坑,一定要设这个参数。否则会显示一堆小方框wc.font_path="simhei.ttf"   # 黑体
178     # wc.font_path="simhei.ttf"
179     my_wordcloud = wc.generate(xi)  #需要放入词云的单词 ,这里前150个单词
180     plt.imshow(my_wordcloud)  # 展示
181     my_wordcloud.to_file("img.jpg")  # 保存
182     xi = ' '.join(x[150:300])  # 再次获取后150个单词再保存一张词云
183     my_wordcloud = wc.generate(xi)
184     my_wordcloud.to_file("img2.jpg")
185
186     plt.axis("off")
187
188
189 def anylaseword(comment):
190     # 这个过滤词,有些词语没意义需要过滤掉
191     list = ['这个', '一个', '不少', '起来', '没有', '就是', '不是', '那个', '还是', '剧情', '这样', '那样', '这种', '那种', '故事', '人物', '什么']
192     print(list)
193     commnetstr = ''  # 评论的字符串
194     c = Counter()  # python一种数据集合,用来存储字典
195     index = 0
196     for va in comment:
197         seg_list = jieba.cut(va[4], cut_all=False)  ## jieba分词
198         index += 1
199         for x in seg_list:
200             if len(x) > 1 and x != '\r\n':  # 不是单个字 并且不是特殊符号
201                 try:
202                     c[x] += 1  # 这个单词的次数加一
203                 except:
204                     continue
205         commnetstr += va[4]
206     for (k, v) in c.most_common():  # 过滤掉次数小于5的单词
207         if v < 5 or k in list:
208             c.pop(k)
209             continue
210         # print(k,v)
211     print(len(c), c)
212     getzhifang(c)  # 用这个数据进行画直方图
213     getciyun_most(c)  # 词云
214     # print(commnetstr)
215
216
217 def anylase():
218     data = xlrd.open_workbook('test.xls')  # 打开xls文件
219     table = data.sheets()[0]  # 打开第i张表
220     nrows = table.nrows  # 若干列的一个集合
221     comment = []
222
223     for i in range(nrows):
224         comment.append(table.row_values(i))  # 将该列数据添加到元组中
225     # print(comment)
226     anylasescore(comment)
227     anylaseword(comment)
228
229
230 if __name__ == '__main__':
231     anylase()
五、总结
经过对主题数据的分析与可视化,可以清晰明了的得出电影的短评趋势及其各项热门关键词数量。 达到预期目标。
在完成此设计过程中,掌握了如何一 一寻找对应的URL,及其Htmls 页面解析,节点(标签)查找方法,以及数据的可视化处理。
从中学会了不少函数及其若有报错解决相关库的安装方法。
需改进:若能够进一步筛选掉低俗无用短评,再将其形成文件就能够将结果得以优化。

