Nexus升级、license安装和恢复密码
原文链接:https://blog.csdn.net/ligang636/article/details/42386639
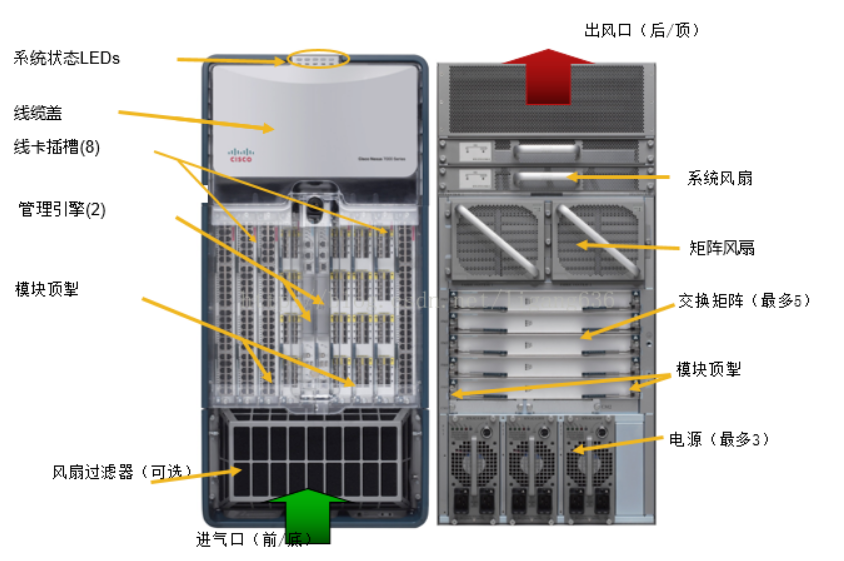
一、Nexus系列物理硬件
1.1 Nexus 7010
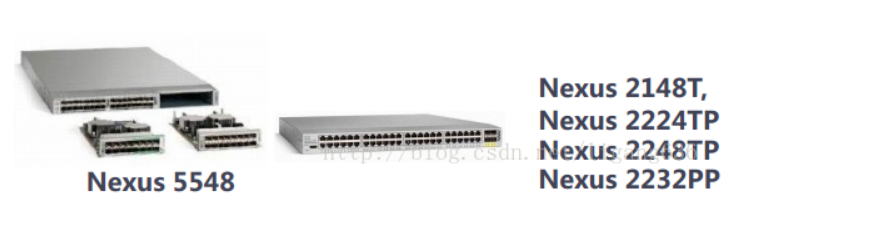
1.2 Nexus 5K/2K
1.3 N7K引擎
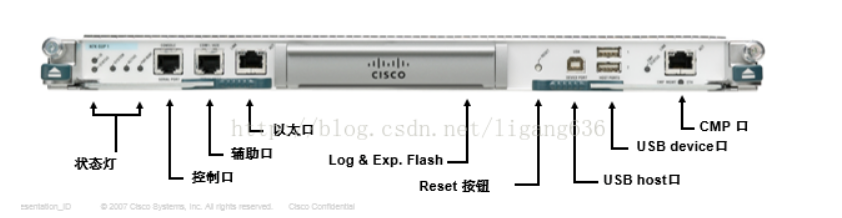
1.3.1 Supervisor 1

Supervisor 2
四核CPU,2.12Ghz
NX-OS需要6.1以上的版本支持;
12GB内存
不支持CMP管理;
1.3.2 Supervisor 2/2e
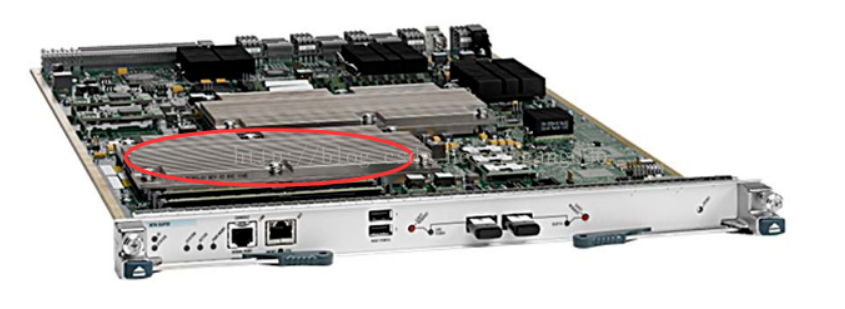
Supervisor 2e
2个四核CPU,2.12GHz
NX-OS需要6.1以上的版本支持;
32GB内存;
不支持CMP管理;
支持最多45个Nexus 2K扩展(具体数量不明确)
二、Nexus NX-OS开机初始化
2.1 系统升级和license安装
2.1.1 NX-OS系统升级
NX-OS升级需要用到两个文件,且必须保证同时升级并安装!这两个文件为:
1、 NX-OS system software:用于系统功能实现;
2、 NX-OS Kick Start:用于系统的启动和运行;
SRCB现网生产网络
Nexus 7K系统版本为:version 5.2(7);
Nexus 5K系统版本为:version5.1(3)N2(1b)
以Nexus 7K为例,目前现网N7K引擎均为1代supervisor,而新一批采购的N7K均标配的是2代引擎,且2代引擎必须安装6.X以上的系统文件。
目前在模拟环境的N7K(2代supervisor)安装的是6.2.10,用到的两个安装文件为:
n7000-s2-dk9.6.2.10.bin
n7000-s2-kickstart.6.2.10.bin
将文件拷贝到bootflash中:
1. 将IOS镜像文件导入bootflash: 5、6 引擎都需要导入
2. 使用 umount usb1 退出U盘
升级(2种升级方式):
##N7K可以使用ISSU不间断业务升级,如下:
install all kickstart bootflash: n7000-s2-kickstart.6.2.10.bin system bootflash:n7000-s2-dk9.6.2.10.bin
备注:这条命令执行后,主引擎先安装升级程序,然后重启,主切换到备,备引擎再安装升级,待主引擎起来后,备引擎进入重启。
##还有一种是冷启动,强制升级
(config)# boot kickstart bootflash: n7000-s2-kickstart.6.2.10.bin sup-1 sup-2
(config)# boot system bootflash: n7000-s2-dk9.6.2.10.bin sup-1 sup-2
#copy run start
#show boot
# reload
备注:Nexus 5K、3K只能使用冷启动方式强制升级!
2.1.2 EPLD升级(electronic programmable logic devices)
1. 将EPLD文件导入bootflash:5、6 引擎都需要导入
2. 使用 umount usb1 退出U盘
3. 升级命令: N7K-VDC1-FOR-MGT # install all epld bootflash:n7000-s1-epld.6.0.1.img(根据具体的EPLD文件版本)
注意:在敲完此命令后,系统会检查EPDL版本情况,如下:
在检测完成后,需要你确认是否升级(显示时间很短,需要关注):
The above modulesrequire upgrade.
Do you want tocontinue (y/n) ? [n] y----------------需要敲Y
Compatibilitycheck:
Module Type Upgradable Impact Reason
------ ---- ---------- ---------- ------
1 LC Yes disruptive Module Upgradable
3 LC Yes disruptive Module Upgradable
5 SUP Yes disruptive Module Upgradable
6 SUP Yes disruptive Module Upgradable
8 LC Yes disruptive Module Upgradable
10 LC Yes disruptive Module Upgradable
1 Xbar Yes disruptive Module Upgradable
2 Xbar Yes disruptive Module Upgradable
3 Xbar Yes disruptive Module Upgradable
1 FAN Yes disruptive Module Upgradable
2 FAN Yes disruptive Module Upgradable
3 FAN Yes disruptive Module Upgradable
4 FAN Yes disruptive Module Upgradable
Copycomplete, now saving to disk (please wait)...
RetrievingEPLD versions... Please wait.
Imageswill be upgraded according to following table:
Module Type EPLD Running-Version New-Version Upg-Required
------ ---- ------------- --------------- ----------- ------------
1 LC Power Manager 4.008 4.008 No
1 LC IO 2.007 2.007 No
1 LC Forwarding Engine 1.006 1.006 No
1 LC CDL 2.004 2.004 No
3 LC Power Manager 4.006 4.008 Yes
3 LC IO 1.003 1.006 Yes
3 LC Forwarding Engine 1.006 1.006 No
3 LC SFP 1.004 1.004 No
5 SUP Power Manager 3.009 3.009 No
5 SUP IO 3.028 3.028 No
5 SUP Inband 1.008 1.008 No
5 SUP Local Bus CPLD 3.000 3.000 No
5 SUP CMP CPLD 6.000 6.000 No
6 SUP Power Manager 3.009 3.009 No
6 SUP IO 3.028 3.028 No
6 SUP Inband 1.008 1.008 No
6 SUP Local Bus CPLD 3.000 3.000 No
6 SUP CMP CPLD 6.000 6.000 No
8 LC Power Manager 4.006 4.008 Yes
8 LC IO 1.003 1.006 Yes
8 LC Forwarding Engine 1.006 1.006 No
8 LC SFP 1.004 1.004 No
10 LC Power Manager 4.008 4.008 No
10 LC IO 2.007 2.007 No
10 LC Forwarding Engine 1.006 1.006 No
10 LC CDL 2.004 2.004 No
1 Xbar Power Manager 2.009 2.010 Yes
2 Xbar Power Manager 2.009 2.010 Yes
3 Xbar Power Manager 2.009 2.010 Yes
1 FAN Fan Controller (1) 0.007 0.007 No
1 FAN Fan Controller (2) 0.007 0.007 No
2 FAN Fan Controller (1) 0.007 0.007 No
2 FAN Fan Controller (2) 0.007 0.007 No
3 FAN Fan Controller (1) 0.007 0.007 No
3 FAN Fan Controller (2) 0.007 0.007 No
4 FAN Fan Controller (1) 0.007 0.007 No
4 FAN Fan Controller (2) 0.007 0.007 No
The above modulesrequire upgrade.
Doyou want to continue (y/n) ? [n] y
4. 检查(每块板卡都需要检测):
Ø show version module 1
Ø show version module 1 epld
Ø show version fan 1 epld
Ø show version xbar 1 epld
2.1.3 License 安装
1. n7000# show license host-id ---------------收集设备host-id
2. 通过key以及host-id在cisco内网上提交license申请并copy到bootflash:
3. n7000# install license bootflash:license_file.lic --------------安装申请的license
4. show license usage --------------检测license 使用情况
5. N7000# sh license usage
Feature Ins Lic Status Expiry Date Comments
Count
--------------------------------------------------------------------------
------
ENHANCED_LAYER2_PKG No - Unused -
SCALABLE_SERVICES_PKG No - Unused -
TRANSPORT_SERVICES_PKG No - Unused -
LAN_ADVANCED_SERVICES_PKG Yes - Unused Never -
LAN_ENTERPRISE_SERVICES_PKG Yes - Unused Never
2.2 开机配置
2.2.1 带外管理配置
2.2.1.1 传统mgmt口管理
NX-OS默认采用VRF的管理方式进行配置,其管理口mgmt默认VRF为management. 所以配置带外路由时不能在全局路由表下,而应到VRF context模式下进行配置!
例:
interface mgmt0
description For_management_and_keepalive
no cdp enable
ip address 172.20.1.1/24
vrf context management
ip route 10.1.128.0/24 172.20.0.250 name management
2.2.1.2 CMP口管理
CMP(Control and Monitor Processor)口在2代引擎中已经被剔除。
Nexus 7010在引擎上支持独立的CPU、memory、Flash硬件,运行一个基于linux的操作系统,通过CMP口提供“lights-out”熄灯式带外管理功能。
通过CMP口带外管理,可以直接监控引擎,接管引擎,重启引擎。在引擎出现故障,传统带外无法登录管理时,可以直接通过CMP口接管整个Nexus系统。从CMP口能够重启整台机器。
Ø 在NX-OS CLI下配置CMP
interface cmp-mgmt module [5 | 6] //必须配置CMP口IP和网关
ipaddress X.X.X.X/24
ipdefault-gateway X.X.X.Y
Ø 从NX-OS CLI切换到CMP进行配置
N7K-demo#attach cmp
N7K-demo-cmp5#conf t
N7K-demo-cmp5# interface cmp-mgmt
N7K-demo-cmp5(config)# ip addressX.X.X.X/24
N7K-demo-cmp5(config)# ip default-gatewayX.X.X.Y
N7K-demo#attach cp
//连接到管理引擎的console口(cp). 一旦你连接到cp,你可以做任何正常连接cp时你能做的事
N7K-demo-cmp5#reload cp //重启引擎5,会引起主备引擎切换
N7K-demo-cmp5#reload system //重启整台Nexus
2.2.2 远程登录配置
2.2.2.1 telnet登录
NX-OS的telnet默认是关闭的,在设备加电初始化时一定不要忘记将telnet的功能打开。且NX-OS不需要到line下配置login local,该feature打开后即可使用本地帐号登陆设备。
(config)# feature telnet //打开telnet功能
2.2.2.2 SSH登录
NX-OS默认开启SSH,推荐使用该方式进行设备管理,因telnet明文传输,缺乏安全性。
(config)#feature ssh //打开SSH功能,默认为开启状态
2.3 密码重置
2.3.1 Nexus 7K密码重置
1、抽离standby引擎,关电重启,ctrl + C,中断系统启动过程;
2、进入loader>
3、引导kickstart镜像
loader> boot n7000-s1-kickstart.5.2.7.bin
4、进入switch(boot)#
5、修改admin密码
switch(boot)# configure terminal
switch(boot-config)# admin-password cisco@123
WARNING! Remote Authentication for login through console has been
disabled
switch(boot-config)# exit
6、加载系统镜像
switch(boot)# dir bootflash:
switch(boot) # load bootflash:n7000-s1-dk9.5.2.7.bin
7、使用admin新密码进入系统
switch login: admin
Password: cisco@123
8、(可选)保险起见,再新建一个本地帐号
switch# configure terminal
switch(config)# username admin password cisco@123 rolenetwork-admin
switch(config)# exit
9、保存系统配置(需等系统稳定下来)
switch# copy running-config startup-config
10、系统reload重启,插入standby同步配置。
2.3.2 Nexus 5K密码重置
1、 关机重启
2、 当看到“Loadingsystem software”字样时,快速按“Ctrl +】”
3、 系统进入boot模式
switch(boot)#configure terminal
switch(boot-config)# admin-password cisco@123
WARNING! Remote Authentication for loginthrough console has been
disabled
switch(boot-config)# exit
switch(boot)# dir bootflash:
switch(boot)# load bootflash:n7000-s1-dk9.5.2.7.bin
4、接下来的操作与N7K类似
---------------------
作者:当当doudou
来源:CSDN
原文:https://blog.csdn.net/ligang636/article/details/42386639
版权声明:本文为博主原创文章,转载请附上博文链接!

