
STL源码剖析——序列式容器#2 List
list就是链表的实现,链表是什么,我就不再解释了。list的好处就是每次插入或删除一个元素,都是常数的时空复杂度。但遍历或访问就需要O(n)的时间。
List本身其实不难理解,难点在于某些功能函数的实现上,例如我们会在最后讨论的迁移函数splice()、反转函数reverse()、排序函数sort()等等。
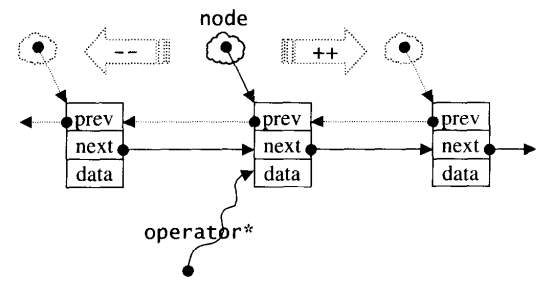
list的结点
设计过链表的人都知道,链表本身和链表结点是不一样的结构,需要分开设计,这里的list也不例外,以下是STL list的结点结构:
1 template <class T>
2 struct __list_node {
3     typedef void* void_pointer;
4     void_pointer next;
5     void_pointer prev;
6     T data;
7 };
从结点结构可以看出,list是一个双向链表,有指向前一结点的prev指针,指向下一结点的next指针。

list的迭代器
显然,list的迭代器本身是什么类型早已由其本身的数据结构所决定,list的双向链表,不支持随机存取,只能是双向迭代器(Bidirectional Iterators)。另外,list的迭代器应该支持正确的递增、递减、取值、成员取用等操作。
以下是list迭代器的源码:
 1 template<class T, class Ref, class Ptr>
 2 struct __list_iterator { // 未继承 std::iterator
 3     typedef __list_iterator<T, T&, T*> iterator;
 4     typedef __list_iterator<T, const T&, const T*> const_iterator;
 5     typedef __list_iterator<T, Ref, Ptr> self;
 6     // 未继承 std::iterator,所以必须自行撰写五个必要的迭代器相应类型
 7     typedef bidirectional_iterator_tag iterator_category; // (1)双向迭代器类型
 8     typedef T value_type; // (2)
 9     typedef Ptr pointer; // (3)
10     typedef Ref reference; // (4)
11     typedef __list_node<T>* link_type;
12     typedef size_t size_type;
13     typedef ptrdiff_t difference_type; // (5)
14     link_type node; // node就是一个指向链表节点的指针
15
16     __list_iterator(link_type x) : node(x) {}
17     __list_iterator() {}
18     __list_iterator(const iterator& x) : node(x.node) {}
19     // 迭代器必要的操作
20     bool operator==(const self& x) const { return node == x.node; }
21     bool operator!=(const self& x) const { return node != x.node; }
22     // * 取值符号,data是T类型,而reference是T&,返回reference,说明支持当作左值
23     reference operator*() const { return (*node).data; }
24 #ifndef __SGI_STL_NO_ARROW_OPERATOR
25     //不太能理解
26     pointer operator->() const { return &(operator*()); }
27 #endif /* __SGI_STL_NO_ARROW_OPERATOR */
28
29     //关键:对迭代器累加 1,就是前进一个节点
30     self& operator++() {
31         node = (link_type)((*node).next);    //next为void*,強制转为指向节点的指针类型(__list_node<T>*)
32         return *this;    //迭代器对象本身没有前进后退这一说法,前进后退的是隐藏在迭代器里的成员node
33     }
34     self operator++(int) {    //后缀++
35         self tmp = *this;
36         ++*this;
37         return tmp;
38     }
39     // 对迭代器累减 1,就是后退一个节点
40     self& operator--() {
41         node = (link_type)((*node).prev); // 同理
42         return *this;
43     }
44     self operator--(int) {    //后缀--
45         self tmp = *this;
46         --*this;
47         return tmp;
48     }
49 };
于我而言,我觉得都比较容易理解,唯一不太懂的就是operator->()函数,这里讲一下我的理解,但不知道对不对,其返回的是&(operator*()),而operator*()我们知道返回的是data变量的引用,前面有个取址符号&,说明返回的是data变量的地址?然后返回的类型是pointer,即T*,总的来说返回的是一个T类型指针,该指针指向data变量所在的地址?好像合理,那该怎么使用?可能是it->data时我们能继续当它是指针然后it->data->?
list的数据结构
由上述可知,list是一个双向链表,但不仅如此,它还是个环状双向链表,为什么这么设计?因为这样用一个节点指针就能表示整个链表,何为表示整个链表?就是说我们能够从这一个节点出发,顺序遍历整个链表以及逆序遍历整个链表,而非环状不能做到如此,除非用两个节点(一个头、一个尾)才能表示整个链表。双向链表做成环状很简单,我们用一个节点指针指向链表尾部的一个空白结点(也可以说是头部之前的一个空白结点),该空白结点连接了链表的头部和尾部。
 1 template <class T, class Alloc = alloc> // 預設使用 alloc 為配置器
 2 class list {
 3 protected:
 4     typedef __list_node<T> list_node;
 5 public:
 6     typedef list_node* link_type;
 7
 8 protected:
 9     link_type node; // 永远指向最后结点的下一节点。该结点无元素值,代表空节点。
10                     // 其 next 节点永远是头节点
11 };
这可能会有疑问,为什么不让首尾直接相连,而要隔一个空白结点呢?因为有一个空白结点,符合STL对于区间“前闭后开[, )”的要求,成为last迭代器所指。这么一来,一些功能函数的设计就变得很简单:
 1 iterator begin() { return (link_type)((*node).next); }
 2 const_iterator begin() const { return (link_type)((*node).next); }
 3
 4 iterator end() { return node; }
 5 const_iterator end() const { return node; }
 6
 7 bool empty() const { return node->next == node; }
 8 size_type size() const {
 9     size_type result = 0;
10     distance(begin(), end(), result);
11     return result;
12 }
13
14 // 取头节点的內容(元素值)。
15 reference front() { return *begin(); }
16 const_reference front() const { return *begin(); }
17 // 取尾节点的內容(元素值)。
18 reference back() { return *(--end()); }
19 const_reference back() const { return *(--end()); }

list的构造与内存管理
与Vector类似,list也定义了一个simple_alloc<>对象来负责空间配置事宜,其第一个类型参数为结点类__list_node<T>,为的是每次都分配一个节点大小的空间,第二个类型参数为alloc空间配置器。
1 template <class T, class Alloc = alloc> // 预设使用alloc为配置器
2 class list {
3 protected:
4     typedef void* void_pointer;
5     typedef __list_node<T> list_node;
6     // 专属分配空间的对象,每次配置一个节点的大小
7     typedef simple_alloc<list_node, Alloc> list_node_allocator;
以下4个函数分别用来配置、释放、构造、销毁一个节点:
 1 protected:
 2     // 配置一个节点并将其返回
 3     link_type get_node() { return list_node_allocator::allocate(); }
 4     // 释放一个节点
 5     void put_node(link_type p) { list_node_allocator::deallocate(p); }
 6     // 构造一个节点(配置空间并赋予值)并返回
 7     link_type create_node(const T& x) {
 8         link_type p = get_node();
 9         __STL_TRY{
10             construct(&p->data, x);
11         }
12         __STL_UNWIND(put_node(p));
13         return p;
14     }
15     // 摧毁一个节点(析构并释放)
16     void destroy_node(link_type p) {
17         destroy(&p->data);
18         put_node(p);
19     }
list提供了很多种构造函数,第一个就是默认构造函数,允许我们不指定任何参数而创建一个空的list:
1 public:
2     list() { empty_initialize(); } // 产生一个空链表
3 protected:
4     void empty_initialize() {
5         node = get_node(); // 配置一个节点空间,令 node 指向它。为空白节点
6         node->next = node; // 令 node 头尾都指向自己,不设元素值。
7         node->prev = node;
8     }
第二个就是比较常用的,构造n个值为value的节点,第三个就是构造n个结点,内容用T类型的默认构造函数填充,两个构造函数虽然用法不一,但实际上都转调用了同一个函数:
 1 public:
 2     list(size_type n, const T& value) { fill_initialize(n, value); }
 3     list(int n, const T& value) { fill_initialize(n, value); }
 4     list(long n, const T& value) { fill_initialize(n, value); }
 5     explicit list(size_type n) { fill_initialize(n, T()); }
 6 protected:
 7     void fill_initialize(size_type n, const T& value) {
 8             empty_initialize();
 9         __STL_TRY{
10             insert(begin(), n, value);
11         }
12         __STL_UNWIND(clear(); put_node(node));
13     }
对就是fill_initialize(),而fill_initialize()自己也精明的很,我就创建一个空链表,然后就撒手不管了,全交给insert()函数,能看出这样能把构造变成原子操作,能就n个节点全部构造好,不然就一个都不构造。另外,在push_back()函数里也是把自己的工作外包了给insert()函数,可见insert()函数承担了太多,当然我们会在稍后重点学习Insert()函数。
1     // 安插一个节点,做为头节点
2     void push_front(const T& x) { insert(begin(), x); }
3     // 安插一个节点,做为尾节点
4     void push_back(const T& x) { insert(end(), x); }
insert()具有多个版本,其中最简单的一种,就是在指定位置插入一个节点:
 1     // 在迭代器 position 所指位置安插一個节点,內容为 x。
 2     iterator insert(iterator position, const T& x) {
 3         link_type tmp = create_node(x); // 产生一个节点(值为x)
 4                                         // 调整前后指针,使 tmp 安插进去。
 5         tmp->next = position.node;
 6         tmp->prev = position.node->prev;
 7         (link_type(position.node->prev))->next = tmp;
 8         position.node->prev = tmp;
 9         return tmp;
10     }
而其余的版本都是在反复调用上面这个版本罢了:
 1   template <class T, class Alloc>
 2     void list<T, Alloc>::insert(iterator position, size_type n, const T& x) {
 3         for (; n > 0; --n)
 4             insert(position, x);
 5     }
 6     template <class T, class Alloc>
 7     void list<T, Alloc>::insert(iterator position,
 8         const_iterator first, const_iterator last) {
 9         for (; first != last; ++first)
10             insert(position, *first);
11     }
12     template <class T, class Alloc>
13     void list<T, Alloc>::insert(iterator position, const T* first, const T* last)
14     {
15         for (; first != last; ++first)
16             insert(position, *first);
17     }
18     void list<T, Alloc>::insert(iterator position,
19         InputIterator first, InputIterator last) {
20         for (; first != last; ++first)
21             insert(position, *first);
22     }
所谓的插入,就是指 指定位置的前方,这是STL的插入规范。另外,不像vector,list所有的插入操作都不会影响现有迭代器的有效性。

list的元素操作
- erase(iterator position) —— 移除迭代器position所指节点
1     iterator erase(iterator position) {
2         //断开当前节点连接,并将前后节点相连
3         link_type next_node = link_type(position.node->next);
4         link_type prev_node = link_type(position.node->prev);
5         prev_node->next = next_node;
6         next_node->prev = prev_node;
7         destroy_node(position.node);
8         return iterator(next_node);
9     }

- pop_front() —— 移除头节点
1 void pop_front() { erase(begin()); }
- clear() —— 清除所有节点(整个链表)
 1     template <class T, class Alloc>
 2     void list<T, Alloc>::clear()
 3     {
 4         link_type cur = (link_type)node->next; // 切记,list类内有一node节点指针指向链表末尾的空白结点,这里就是begin()
 5         while (cur != node) { // 遍历链表
 6             link_type tmp = cur;
 7             cur = (link_type)cur->next;
 8             destroy_node(tmp); // 逐一摧毁节点
 9         }
10         // 恢復 node 原始狀態
11         node->next = node;
12         node->prev = node;
13     }
- remove(const T& value) —— 将值为value的所有元素移除
 1     template <class T, class Alloc>
 2     void list<T, Alloc>::remove(const T& value) {
 3         iterator first = begin();
 4         iterator last = end();
 5         while (first != last) { // 遍历链表
 6             iterator next = first;
 7             ++next;        //next指针负责前进一格,并与之比较
 8             if (*first == value) erase(first); // 找到就移除
 9             first = next;
10         }
11     }
- unique() —— 移除值相同的连续元素,只有相同且连续的元素才会被移除,移除剩一个
 1     template <class T, class Alloc>
 2     void list<T, Alloc>::unique() {
 3         iterator first = begin();
 4         iterator last = end();
 5         if (first == last) return;
 6         iterator next = first;
 7         //next前进一格探路,相同排掉,不同叫first跟上
 8         while (++next != last) {
 9             if (*first == *next)
10                 erase(next);
11             else
12                 first = next;
13             next = first;
14         }
15     }
比较难的几个函数来了,相比于上面这些小打小闹的弟弟,这些函数确实不易理解,尤其是排序函数sort(),其高超的算法逻辑使我瞠目结舌,作者造轮子的能力太强了。
- transfer(iterator position, iterator first, iterator last) —— 将[first, last)内的所有元素移动到position之前。
 1 protected:
 2     void transfer(iterator position, iterator first, iterator last) {
 3         if (position != last) {
 4             //处理各节点的next
 5             (*(link_type((*last.node).prev))).next = position.node; // (1)    last的上一结点(next)与position相连
 6             (*(link_type((*first.node).prev))).next = last.node; // (2)        first的上一节点(next)与last相连
 7             (*(link_type((*position.node).prev))).next = first.node; // (3)    position的上一节点(next)与first相连
 8
 9             link_type tmp = link_type((*position.node).prev); // (4)        用一节点指针记录position的上一节点tmp,因为下一步position的上一节点就应该是last的上一节点了
10
11             //处理各节点的prev
12             (*position.node).prev = (*last.node).prev; // (5)                position(prev)与last的上一节点相连
13             (*last.node).prev = (*first.node).prev; // (6)                    last节点(prev)与first的上一节点相连
14             (*first.node).prev = tmp; // (7)                                first节点(prev)与原是position上一节点的节点tmp相连
15         }
16     }
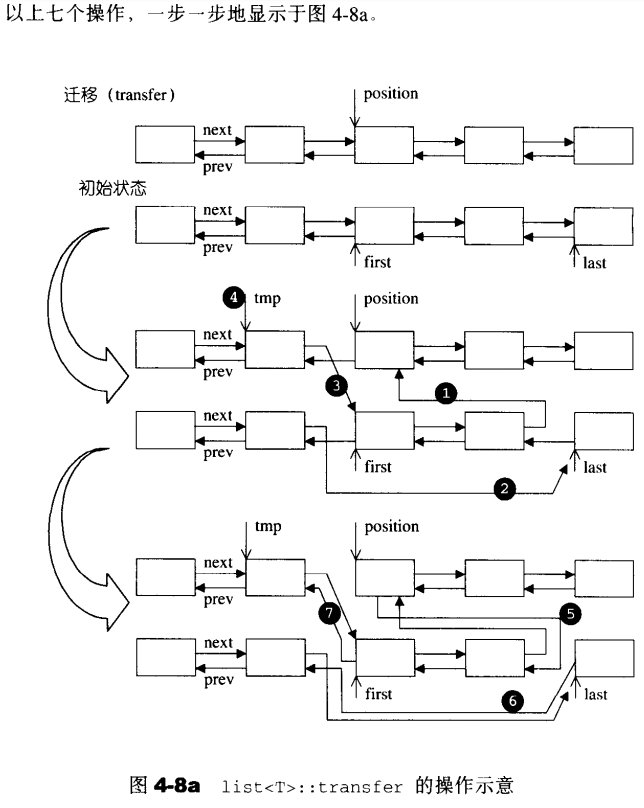
要注意的是,transfer所接受的区间是没有限制的(从源码也可以看出),这意味着[first, last)与position可以来自同一个链表,甚至position就在[first, last)区间内都行,只是从结果来看前者还能得到想要的答案,后者就有点奇怪了。
从protected可知,我们并不能直接使用transfer,而是使用到transfer的公开接口为:
- splice(iterator position, list& x) —— 将x接合与position所指位置前,注意x必须不同于*this(调用者本身),将自身链表接合在自身链表的某一位置上毫无意义。
1 void splice(iterator position, list& x) {
2  if (!x.empty())
3  transfer(position, x.begin(), x.end());
4  }
- splice(iterator position, list&, iterator i) —— 将 i 所指元素接合于position所指位置之前,position与 i 可来自于同一链表
1     void splice(iterator position, list&, iterator i) {
2         iterator j = i;
3         ++j;
4         if (position == i || position == j) return;        //position == j 说明i已经在position前面了
5         transfer(position, i, j); //[i, j)
6     }
- merge(list<T, Alloc>& x) —— 将 x 合并到*this身上。两个lists的内容都必须经过递增排序,注意,这是链表自底向上归并排序用到的重要函数。
 1     template <class T, class Alloc>
 2     void list<T, Alloc>::merge(list<T, Alloc>& x) {
 3         iterator first1 = begin();
 4         iterator last1 = end();
 5         iterator first2 = x.begin();
 6         iterator last2 = x.end();
 7         // 注意:前提是,兩个 lists 都已经过递增排序,
 8         while (first1 != last1 && first2 != last2)
 9             if (*first2 < *first1) {
10                 iterator next = first2;
11                 transfer(first1, first2, ++next); //[first2,++first2) 放在first1所指位置的前面
12                 first2 = next;
13             }
14             else
15                 ++first1;
16         if (first2 != last2) transfer(last1, first2, last2);        //如果first1已经到尾而first2还有,将剩下的全部放到first1后面
17     }
- reverse() —— 反转链表
 1     template <class T, class Alloc>
 2     void list<T, Alloc>::reverse() {
 3         // 以下判断,如果是空白链表,或仅有一个元素,就不做任何动作。
 4         // 使用 size() == 0 || size() == 1 來判断,虽然也可以,但是比较慢。
 5         if (node->next == node || link_type(node->next)->next == node) return;
 6         iterator first = begin();
 7         ++first;
 8         while (first != end()) {
 9             iterator old = first;
10             ++first;
11             transfer(begin(), old, first);    //逐个元素往链表头前面移动,最终反转
12         }
13     }
因为STL的算法sort()只接受随机迭代器(Random Access Iteartor),但list只有双向迭代器(Bidirectional Iterator),所以不能使用,为此STL为list设计了专有的sort(),侯捷老师书上说该函数使用了quick sort,但我觉得它更像是merge sort。因为丝毫没有快排的特征。存疑。
 1     template <class T, class Alloc>
 2     void list<T, Alloc>::sort() {
 3         // 以下判断,如果是空白链表,或仅有一个元素,就不做任何动作。
 4         if (node->next == node || link_type(node->next)->next == node) return;
 5         // 我们应该知道,归并排序一般需要一个临时数组来存放合并后的数据
 6         list<T, Alloc> carry;
 7         list<T, Alloc> counter[64];        //这个就是临时数组,第i个链表存放2的i次方个数据,设计者认为64次合并已经是足够大了,毕竟2的64次方是个很大的数据量了。
 8         int fill = 0;
 9         while (!empty()) {
10             carry.splice(carry.begin(), *this, begin());    //只要调用者的链表非空,就将链表的头节点移动到carry里面,每次就移一个节点,就是头节点。注意由transfer源码知,是移动而非复制
11                 int i = 0;
12                 //i每次从0开始,这说明每次都会按顺序遍历counter的各个连续非空链表,空就退出
13                 //进入到循环,意味着counter[i]非空
14                 //而carry绝不会为空,因为从循环内得知,先把carry数组合并到counter[i]里,然后又把它放回carry里,所以carry绝非空
15                 //从循环内的carry.swap(counter[i++])得知carry存放的都是上一个counter数据(因为是先swap再自增i再进入下一循环),而counter[i]只要是非空,里面存放的数据量肯定就是2的i次方
16                 //carry存放的也是2的i次方的数据量,而counter[i]本身也存放了2的i次方的数据量,两者一合并,就变成了2的i+1次方的数据量,已经大于counter[i]所能存放的数据量,所以把它转回到carry里,在下一循环中放到下一个counter链表中(也即是counter[i++],这也解释了为什么本次循环中carry存放的也是2的i次方的数据量,因为该数据来自上一次循环的counter[i-1])
17             while (i < fill && !counter[i].empty()) {
18                 counter[i].merge(carry);
19                 carry.swap(counter[i++]);
20             }
21             //22
23             //这里有两个作用
24             //1.是因为i == fill而终止的循环,此时counter[i]肯定为空(在此之前从未使用过counter[fill]),而carry肯定有数据(来自counter[i-1]),把carry数据转给空的counter[i],此时counter[i]的数据量为2的i次方
25             //  为什么是2的i次方,是因为i == fill而终止的循环,代表count[i-1]放的数据已经超过2的i-1次方,所以转给carry,并把i自增,终止循环,才能给到counter[i]
26             //2.是因为counter[i]为空而终止的循环,将存放在carry的来自上一个counter的数据转给counter[i],
27             carry.swap(counter[i]);
28             //fill代表的是目前开放的最大counter,只有i==fill才自增,而其上一句是carry.swap(counter[i]);将carry的数据转到counter[fill]里,说明只有当counter[fill]有数据了,fill才自增(才开放下一个counter)
29             //如果i没到fill,说明目前从调用者链表里拿的数据量还不足2的fill次方。不足以开放下一个counter。
30             if (i == fill) ++fill;
31         }
32         for (int i = 1; i < fill; ++i)
33             counter[i].merge(counter[i - 1]);
34         swap(counter[fill - 1]);
35     }
我真的很想把这段代码用文字的方式解释清楚,我尽力了,但还是太难了,上面的注释看得懂最好,看不懂最好自己用数据走一下这个函数的流程,大概就能懂了。我对这段代码真是佩服得五体投地。是真的只可意会不可言传。

 浙公网安备 33010602011771号