

Vue-4
(一)组件
- 组件的生命周期
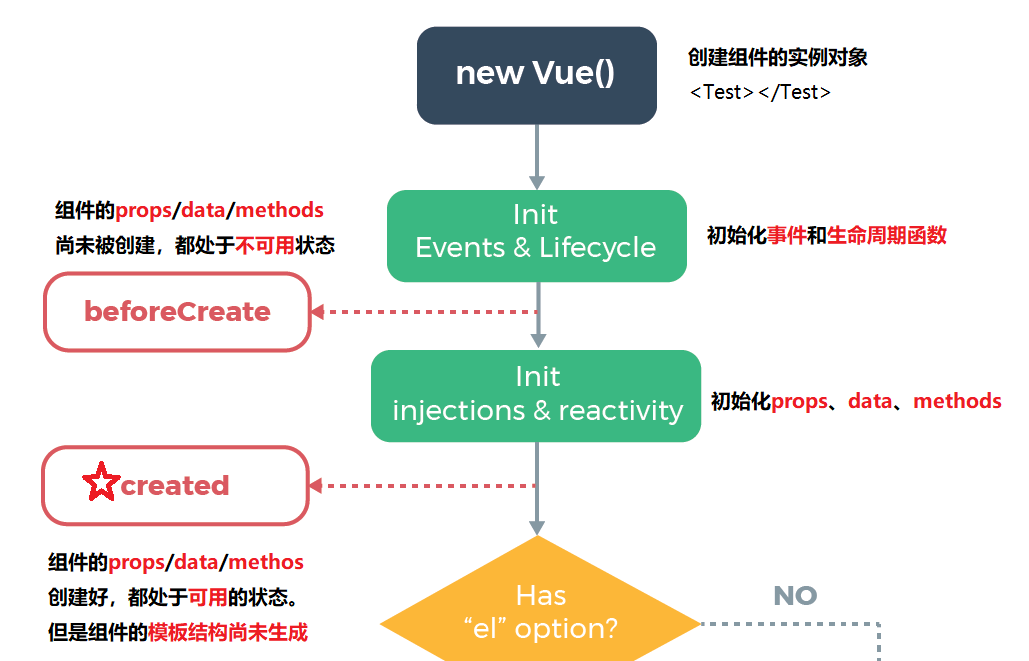
生命周期是指一个组件从创建->运行->销毁的整个阶段,强调的是一个时间段
生命周期函数是由vue框架提供的内置函数,会伴随着组件的生命周期,自动按次序执行
-
- 组件生命周期的第一个阶段:组件创建阶段(对于一个组件方法从头到尾只能执行一次)
- beforeCreate和created
- 组件生命周期的第一个阶段:组件创建阶段(对于一个组件方法从头到尾只能执行一次)
<template>
    <div class="test">
        <h4>Test.vue组件--->{{x}}本图书</h4>
    </div>
</template>

<script>
    const axios = require('axios');
    export default{
        props: ['info'],
        data(){
            return {
                message: 'coca cola',
                books: [],
                x: 0
            }
        },
        methods: {
            show(){
                console.log("调用了Test组件的show方法")
            },
            //使用ajax请求图书列表的数据
            initBooks(){
                axios({
                    methos: 'GET',
                    url: 'http://127.0.0.1:8000/books'
                }).then(json=>{
                    this.x = json.data.length;
                    this.books = json.data;
                    console.log(json.data);
                })
            }
        },
        //创建阶段的第一个生命周期
        beforeCreate() {
            // console.log(this.info);//Error in beforeCreate hook
            console.log(this.message);//undefined
            // this.show();//this.show is not a function
        },
        /*
            created生命周期函数,非常常用
            经常在它里面,调用methods中的方法,请求服务器数据
            并且,把请求到的数据,转存到data中,供template模板渲染的时候使用
         */
        created() {
            console.log(this.info);//bh
            console.log(this.message);//coca cola
            this.show();//调用了Test的组件方法
            this.initBooks();
        }

    }
</script>

<style lang="less" scoped>
    .test {
        background-color: gold;
        height: 200px;
    }
</style>
-
-
- beforeMount和Mounted
-
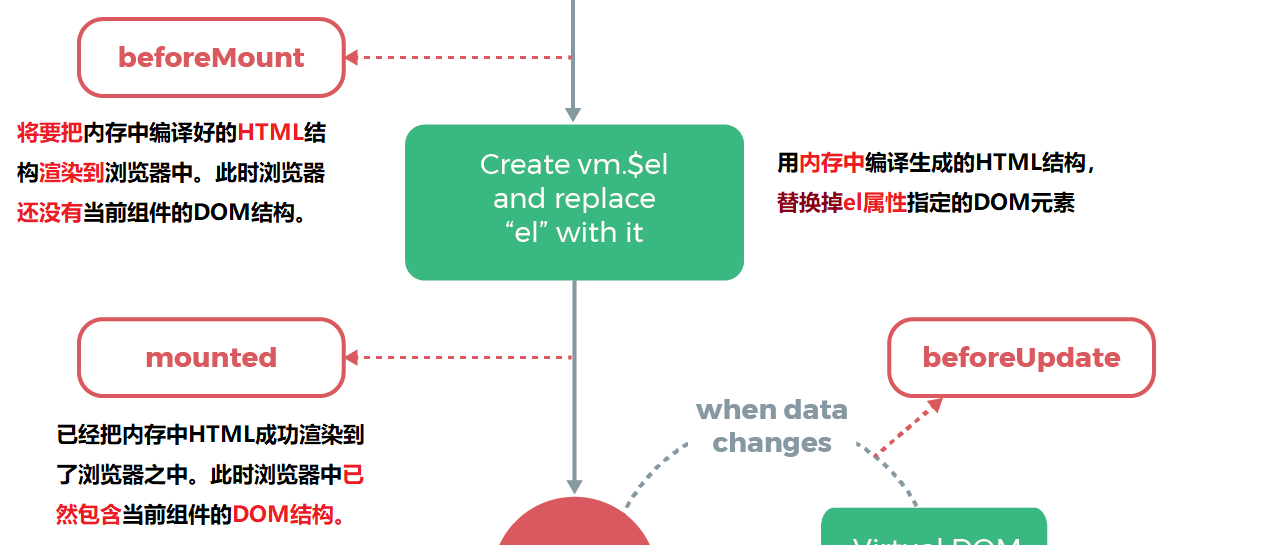
     beforeMount() {
            const h4 = document.querySelector("h4");
            console.log(h4);//null
        },
        //如果要操作当前组件的DOM,最早只能在mounted阶段执行
        mounted() {
            const h4 = document.querySelector("h4");
            console.log(h4);//<h4></h4>
        }
-
- 组件生命周期的第二个阶段:组件运行阶段

     //在重新渲染DOM结构之前
        //data中的数据是最新的,但DOM结构中元素的值仍是旧值
        beforeUpdate() {
            const p = document.querySelector(".test p");
            console.log(p.innerHTML);//message的值是:coca cola
            console.log(this.message);//coca cola~
        },
        //在渲染之后,DOM结构中的值和data中的数据保持一致
        updated() {
            const p = document.querySelector(".test p");
            console.log(p.innerHTML);//message的值是:coca cola~
            console.log(this.message);//coca cola~
        }
-
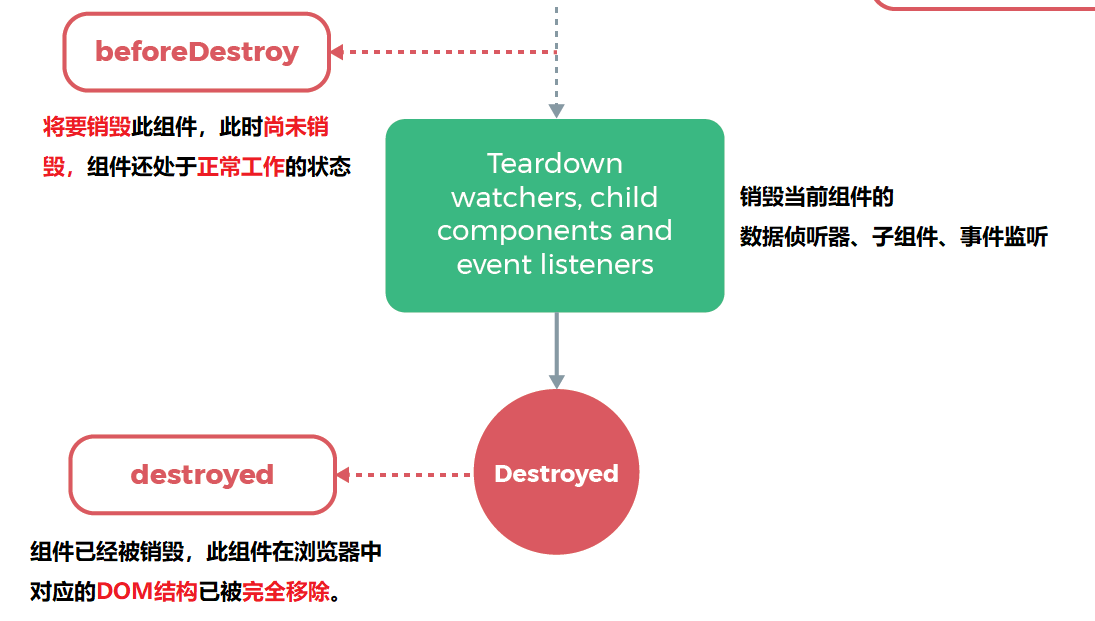
- 组件生命周期的第三个阶段:组件销毁阶段
- 组件之间的数据共享
在项目开发中,组件之间最常见的关系是
-
- 父子关系
- 父组件向子组件共享数据:需要使用自定义属性
<!-- 父 -->
<template>
    <div class="left">
        这是一个Left子组件
        <Count :init = "9" :message = "message"></Count>
    </div>
</template>

<script>
    import Count from '@/components/Count.vue'
    export default {
        data(){
            return {
                message: " I'm your father "
            }
        },
        components: {
            'Count': Count
        }
    }
</script>
<!-- 子 -->
<template>
    <div>
        <h5>Count组件</h5>
        <p>count的值是:{{count}}</p>
        <!-- 当代码方法只有一行代码时,可以直接写在引号内 -->
        <!-- vue规定:组件中封装的自定义属性时只读的,程序员不能直接修改props的值,否则会报错 -->
        <button @click="count++">+1</button>
        <p>父组件传递过来的值:{{message}}</p>
    </div>
</template>

<script>
    export default {
        //在声明自定义属性时,可以通过type来定义属性的值的类型
        //自定义属性A: {/*配置选项*/}
        props: {
            init: {
                default: 0,
                type: Number,
                //为必填项,必填项校验,检验视为有传值,和默认值没有关系
                required: true
            },
            message: {

            }
        },
-
-
- 子组件向父组件传递数据:可以使用自定义事件,使用$emit调用触发numchange事件
-
<!-- 父 -->
<Right @numChange="getNum"></Right>
<script>
export default{
  methods:{
        changeName(){
            //在组件中,this表示当前组件的实例对象实例
            this.username = 'BBH';
        },
        getNum(val){
            this.count = val
        }
    }
}
</script>
<!-- 子 -->
<template>
    <div class="right">这是一个Right子组件
        <p>我有{{count}}朵玫瑰</p>
        <button @click="add">buy</button>
    </div>
</template>

<script>
    export default{
        data() {
            return {
                //子组件自己的数据,将来希望把count值传递给父组件
                count: 0
            }
        },
        methods:{
            add(){
                this.count+=1;
                //修改数据时,通过$emit触发自定义事件
                this.$emit("numChange",this.count);
            }
        }
    }
</script>
-
- 兄弟关系
- vue2.x:兄弟之间共享数据的方案为EventBus
- 创建EventBus.js模块,并向外共享一个Vue的实例对象
- 在数据发送方,调用bus.$emit('事件名称','要发送的数据')方法触发自定义事件
- 在数据接受放,调用bus.$on('事件名称','要发送的数据')方法注册一个自定义事件
- vue2.x:兄弟之间共享数据的方案为EventBus
- 兄弟关系
<!-- 兄弟A:数据发送方 -->
<template>
    <div class="left">
        这是一个Left子组件
        <button @click="send">发送数据</button>
    </div>
</template>
<script>
    import bus from './eventBus.js'
    export default {
        data(){
            return {
                info: "tomarrow is 0506"
            }
        },
        methods:{
            send(){
                bus.$emit('share',this.info);
            }
        }
    }
</script>
// evenBus.js
import Vue from "vue"
export default new Vue()
<!-- 兄弟B:数据接收方 -->
<template>
    <div class="right">这是一个Right子组件
        <p>从Left接收到的数据{{messageFromLeft}}</p>
    </div>
</template>
<script>
    import bus from './eventBus.js'
    export default{
        created() {
            bus.$on('share',val=>{
                this.messageFromLeft = val;
            })
        }
    }
</script>
(二)ref引用
vue:MVVM 在vue中程序员不需要操作DOM,程序员只需要把数据维护好(数据驱动视图)
结论:在vue项目中强烈不建议大家安装和使用jQuery
- ref简介
ref用来辅助开发者在不依赖jQuery的情况下,获取DOM元素或组件的引用
在每个vue的组件实例中,都包含一个$refs对象,里面存储着对应的DOM元素或组件的引用。默认情况下,组建的$refs指向一个空对象
<template>
    <div class="box">
        <p ref="myp">这是一个App根组件</p>
        <button @click="showthis">打印this</button>
    </div>
</template>
<script>
export default{
    methods: {
        showthis(){
            //当前App组件的实例对象
            this.$refs.myp.style.color = 'pink';
        }
    }
}
</script>
- 使用ref操作vue实例
<template>
    <button type="button" @click="reset">重置Test组件中的count值</button>
    <Test ref="comTest" info = 'bh' v-if="flag"></Test>
</template>
<script>
    export default{
        methods: {
            reset(){
            this.$refs.comTest.x = 0;
          }
        }
    }
</script>
- this.$nextTick(cb)的使用场景
     change(){
            this.isVisible = !this.isVisible;
            //由于内存刚添加了dom元素,还没有渲染到页面上
            //this.$refs.input01.focus()报错
            //组件的$nextTick(cb)会把cb回调函数推迟到下一个DOM更新周期之后执行
            //通俗的理解是:等组建的DOM更新完成之后,再执行cb回调函数,从而能够保证可以操作到最新的DOM元素
            this.$nextTick(()=>{
                this.$refs.input01.focus()
            });
        }
(三)数组的方法
- some方法
<!DOCTYPE html>
<html>
    <head>
        <meta charset="utf-8">
        <title></title>
    </head>
    <body>
        <script type="text/javascript">
            const arr = ['red','orange','yellow','green','blue','purple'];
            //forEach循环一旦开始就无法在中间被停止
            arr.some((item,index)=>{
                if(item === 'green'){
                    //在找到对应的项之后,可以通过return true终止循环
                    console.log(index);
                    return true;
                }
            });
        </script>
    </body>
</html>
- every
<!DOCTYPE html>
<html>
    <head>
        <meta charset="utf-8">
        <title></title>
    </head>
    <body>
        <script type="text/javascript">
            const arr = [1,2,3,4,5];
            console.log(arr.every((item)=>item < 10));
        </script>
    </body>
</html>
- reduce
<!DOCTYPE html>
<html>
    <head>
        <meta charset="utf-8">
        <title></title>
    </head>
    <body>
        <script type="text/javascript">
            const arr = [
                {id: 1, name: '西瓜', state: true, price: 10,count: 21},
                {id: 2, name: '荔枝', state: false, price: 15,count: 34},
                {id: 3, name: '葡萄', state: true, price: 12,count: 78},
                {id: 1, name: '草莓', state: true, price: 20,count: 56},
            ];
            //把购物车数组中已勾选的水果总价累加起来
            // let count = 0;
            // arr.filter(item=>item.state).every(item=>count+=item.price*item.count)
            // console.log(count);2266

            // arr.filter(item=>item.state).reduce((累加的结果,当前循环项)=>{},初始值)
            let res = arr.filter(item=>item.state).reduce((amt,item)=>{return amt+=item.price*item.count},0);
            console.log(res);//2266
            //reduce的简化写法
            res = arr.filter(item=>item.state).reduce((amt,item)=>amt+=item.price*item.count,0);
            console.log(res);//2266
        </script>
    </body>
</html>
(四)购物车案例
<template>
  <div class="app-container">
      <Header></Header>
      <Goods v-for="item in data" :id = "item.id" :title="item.goods_name" :pic = "item.goods_img" :price="item.goods_price"
      :state="item.goods_state" :count="item.goods_count" :key = "item.id" @state-change = "changeState">
      </Goods>
      <Footer ref="footer" :isfull="false" :amount="amout" :all="count" @full-change = "checkBox"></Footer>
  </div>

</template>

<script>
    const axios = require("axios");
    import Header from '@/components/Header/Header.vue'
    import Footer from '@/components/Footer/Footer.vue'
    import Goods from '@/components/Goods/Goods.vue'
    import Counter from '@/components/Counter/Counter.vue'
    import bus from '@/components/eventBus.js'
    //url地址https://www.escook.cn/api/cart
    export default{
        data(){
            return {
                //数据
                data: [],
                //总数
                count: 0,
                //总价
                amout: 0
            }
        },
        methods: {
            //更换商品状态
            changeState({id,value}){
                this.data.some(item=>{
                    if(item.id === id){
                        item.goods_state = value;
                        return true;
                    }
                });
            },
            checkBox(state){
                this.data.forEach(item=>item.goods_state = state);
            }
        },
        watch: {
            data: {
                handler(newVal,oldVal){
                    this.amout = this.data.filter(item=>item.goods_state).reduce((amt,item)=>amt+=item.goods_price*item.goods_count,0);
                    this.count = this.data.filter(item=>item.goods_state).reduce((amt,item)=>amt+item.goods_count,0);
                    bus.$on('share',({id,value})=>{
                        this.data.some(item=>{
                            if(item.id === id){
                                item.goods_count = value;
                                return true;
                            }
                        })
                    })
                },
                deep: true
            }
        },
        components:{
            'Header':Header,
            'Footer':Footer,
            'Goods': Goods,
            'Counter': Counter
        },
        created() {
            axios({
                method: 'GET',
                url: 'https://www.escook.cn/api/cart'
            }).then(json=>{
                this.data=json.data.list;
            });
        }
    }
</script>

<style lang="less" scoped>
.app-container {
  padding-top: 45px;
  padding-bottom: 50px;
}
</style>
- 总结
- 在子组件中,要监听复选框状态变化的事件,拿到最新的勾选状态,只要复选框的勾选状态发生了改变,会自动触发change事件
<input type="checkbox" @change="stateChange" />
-
- 当监听到勾选状态发生改变之后,应该立即把最新的状态,通过自定义事件的形式,发送给父组件。其中,id是当前商品的id,value是当前商品的最新勾选状态
this.$emit('state-change',{id,value})

 浙公网安备 33010602011771号