
第04项目:淘淘商城(SpringMvc+Spring+Mybatis) 的学习实践总结【第三天】
淘淘商城(SpringMVC+Spring+Mybatis) 是传智播客在2015年9月份录制的,几年过去了。由于视频里课上老师敲的代码和项目笔记有些细节上存在出入,只有根据日志报错信息作出适当的调整变更才能跑通项目。为了方便广大自学Java同仁的共同进步,我将持续更新这个网络实战项目练习的内容,着重指出符合当下开发环境下的内容勘误修订。
https://pan.baidu.com/s/1bptYGAb#list/path=%2F&parentPath=%2Fsharelink389619878-229862621083040
第04项目:淘淘商城(SpringMVC+Spring+Mybatis) 的学习实践总结【第二天】
第04项目:淘淘商城(SpringMVC+Spring+Mybatis) 的学习实践总结【第三天】
03.第三天(实现商品添加)

//商品分类管理

@Service
public class ItemCatServiceImpl implements ItemCatService {

    @Autowired
    private TbItemCatMapper itemCatMapper;
    @Override
    public List<EUTreeNode> getItemCatList(long parentId) {
        //使用mybatis的逆向工程生成的mapper接口和XML文件
        //因为单表查询并且非主键字段,所以用example查询
        //1.创建查询条件
        TbItemCatExample example = new TbItemCatExample();
        Criteria criteria = example.createCriteria();
        criteria.andParentIdEqualTo(parentId);
        //2.根据条件查询
        List<TbItemCat> list = itemCatMapper.selectByExample(example);


        List<EUTreeNode> resultList = new ArrayList<>();
        //把列表转换成treeNodeist
        for (TbItemCat tbItemCat : list) {
            EUTreeNode node = new EUTreeNode();
            node.setId(tbItemCat.getId());
            node.setText(tbItemCat.getName());
            node.setState(tbItemCat.getIsParent()?"closed":"open");
            resultList.add(node);
        }
        //返回最终结果
        return resultList;
    }

}
/**
  * 商品分类管理controller
 *
 */
@Controller
@RequestMapping("/item/cat")
public class ItemCatController {

    @Autowired
    private ItemCatService itemCatService;

    @RequestMapping("/list")
    @ResponseBody
    //此行底下的private和public都可以,不影响功能实现
    public List<EUTreeNode> getItemCatList(@RequestParam(value="id",defaultValue = "0")Long parentId){
        List<EUTreeNode> list = itemCatService.getItemCatList(parentId);
        return list;
    }

}
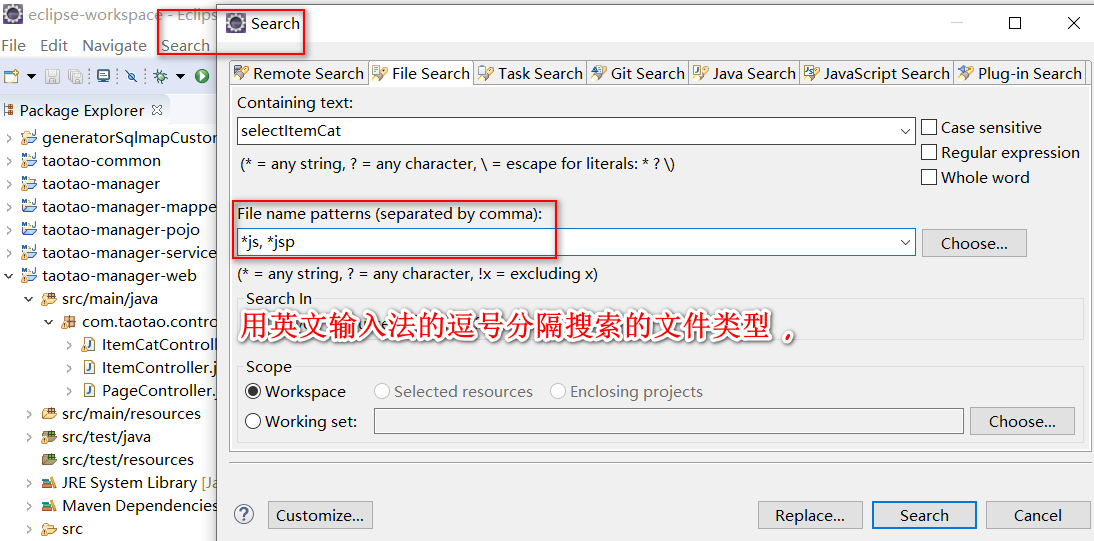
一、使用Eclipse的Search功能检索
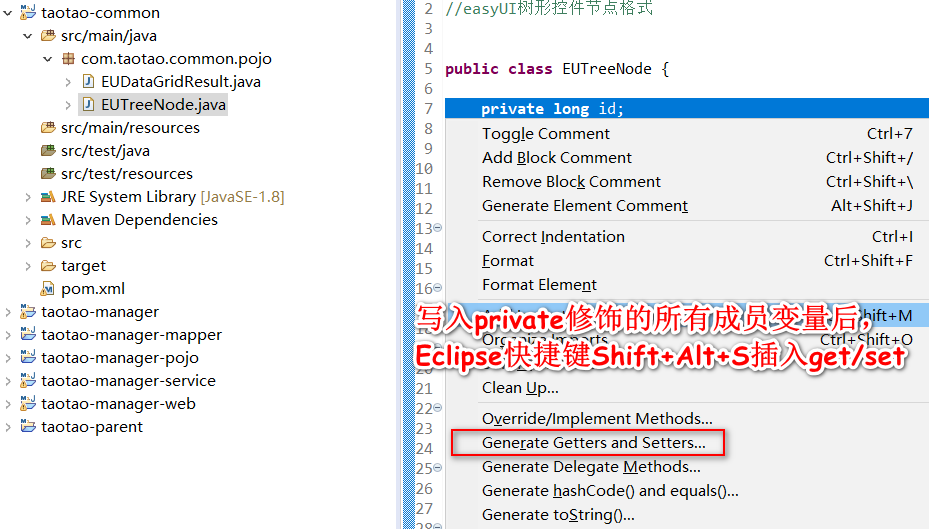
二、使用Eclipse的快捷键插入get/set方法
三、教学视频和淘淘商城-day03教案中代码的方法名称不一致性

四、图片上传服务器的搭建


Windows10操作系统下安装并使用VMware-workstation-full-15.5.0加载安装CentOS7后检查是否已安装GCC、PCRE、Zlib等实现nginx的运行环境
yum install gcc-c++安装gcc编译器
大部分Linux发行版的默认账户是普通用户,而更改系统文件或者执行某些命令,需要root身份才能进行,这就需要从当前用户切换到root用户,Linux中切换用户的命令是su -
nginx的http模块使用pcre来解析正则表达式
yum install -y pcre pcre-devel
zlib库提供了很多种压缩和解压缩的方式,nginx使用zlib对http包的内容进行gzip
yum install -y zlib zlib-devel
nginx不仅支持http协议,还支持https(即在ssl协议上传输http),所以需要在linux安装openssl库。
yum install -y openssl openssl-devel
五、Linux系统下的基本操作与Nginx的安装配置
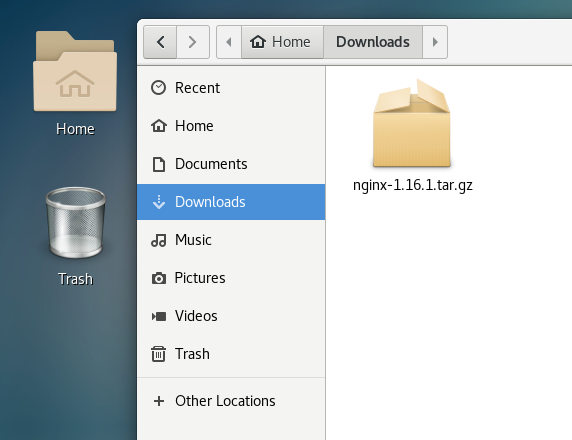
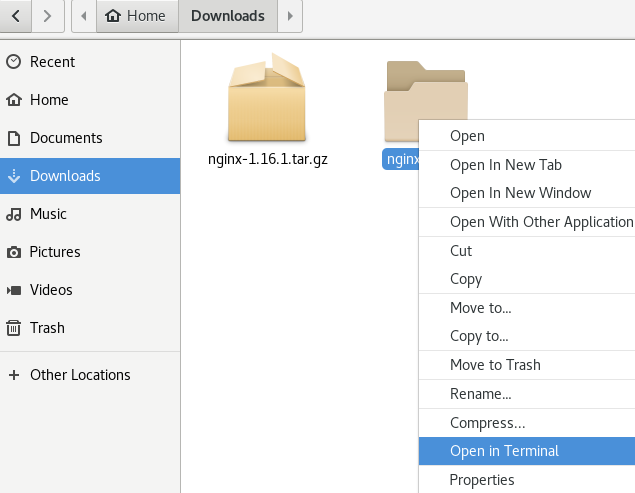
文件夹的新建可以用GUI实现,nginx-1.16.1.tar的解压可以命令行也可以用图形化界面操作完成。
tar -zxvf nginx-1.16.1.tar.gz
cd nginx-1.16.1
把nginx-1.16.1.tar.gz复制到Downloads目录下,解压该压缩文件到默认的当前目录,点击Extract执行。
注意:下边将临时文件目录指定为/var/temp/nginx,需要在/var下创建temp及nginx目录
cd /var
mkdir temp
cd /var/temp
mkdir nginx

参考技术博客: Linux系统下文件夹的新建与删除操作
选中nginx-1.16.1文件夹,右键单击在弹出菜单上选择open in Terminal
su -
cd /home/kangmianfeng/Downloads/nginx-1.16.1
在命令行里复制下面的nginx安装默认配置信息如下:
./configure \
--prefix=/usr/local/nginx \
--pid-path=/var/run/nginx/nginx.pid \
--lock-path=/var/lock/nginx.lock \
--error-log-path=/var/log/nginx/error.log \
--http-log-path=/var/log/nginx/access.log \
--with-http_gzip_static_module \
--http-client-body-temp-path=/var/temp/nginx/client \
--http-proxy-temp-path=/var/temp/nginx/proxy \
--http-fastcgi-temp-path=/var/temp/nginx/fastcgi \
--http-uwsgi-temp-path=/var/temp/nginx/uwsgi \
--http-scgi-temp-path=/var/temp/nginx/scgi
编译安装
make
make  install
安装成功查看安装目录 :
cd /usr/local/nginx
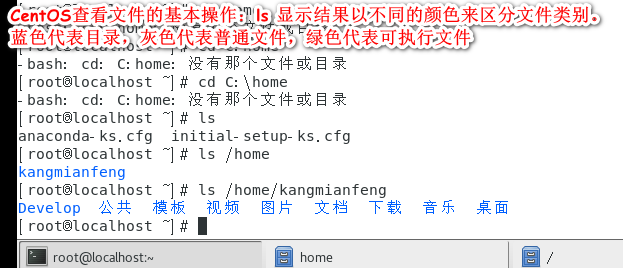
ls


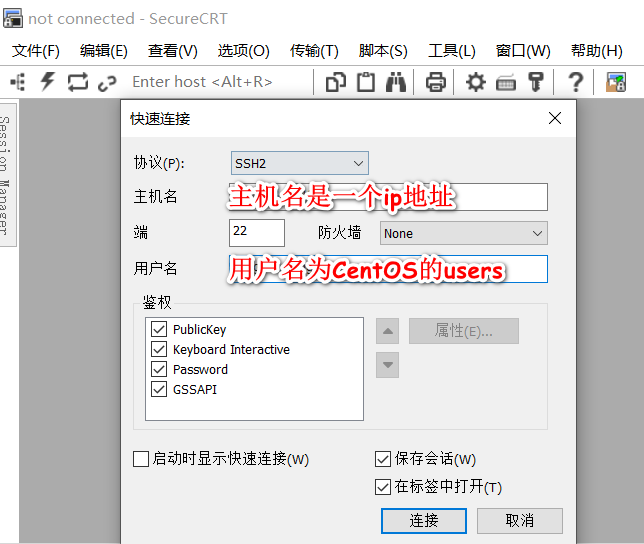
SecureCRT用来在Windows环境下远程登录Linux服务器的SSH连接配置
nginx安装成功,启动nginx,即可访问虚拟机上的nginx:
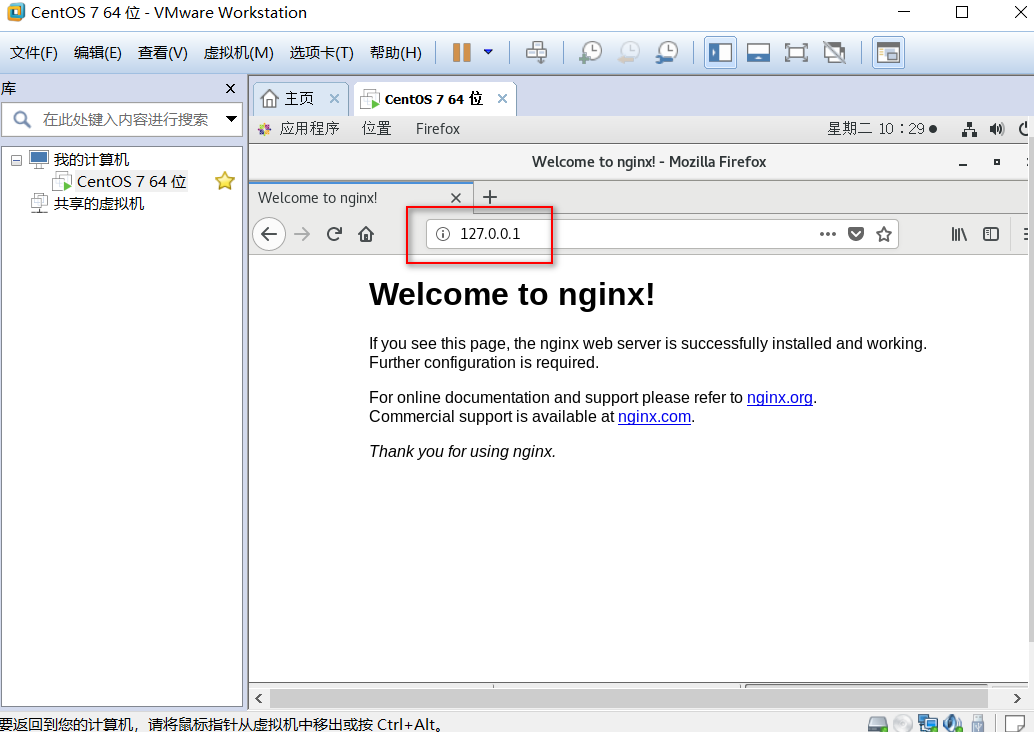
本教程中的nginx安装位置

cd /usr/local/nginx/sbin/
./nginx
VMware运行CentOS重启虚拟机后,启动Nginx报错"/var/run/nginx/nginx.pid" failed (2: No such file or directory)解决方法
注意:执行./nginx启动nginx,这里可以-c指定加载的nginx配置文件,如下:
./nginx -c /usr/local/nginx/conf/nginx.conf
#复制一份默认的配置文件重新命名为:taotao-nginx.conf
cp /usr/local/nginx/conf/nginx.conf /usr/local/nginx/conf/taotao-nginx.conf#在taotao-nginx.conf定义图片HTTP服务器的反向代理路由规则,修改文件需要root权限
#chmod 777使得所有用户可以读写和执行该文件
chmod777 /usr/local/nginx/conf/taotao-nginx.conf
location / { root /home/ftpuser/www; index index.html index.htm; }用命令进入你的站点根目录
cd /home/ftpuser/www
然后输入指令
chmod a+w .四种解决Nginx出现403 forbidden 报错的方法
在访问的根目录下要有index.html否则会报403错误
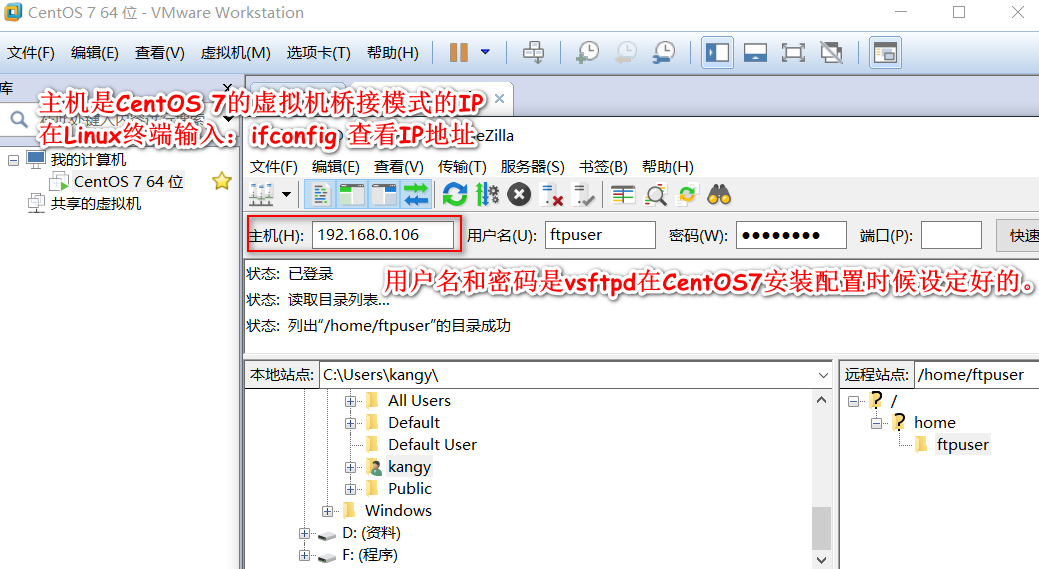
六、 vsftpd服务在CentOS 7中的安装、配置、使用
在VMware14虚拟机的CentOS 7系统中,安装与配置vsftpd【Linux安装ftp组件】
FileZilla Client 成功的连接到Linux主机的vsftpd服务如图所示:
七 、SELinux 全称是Security Enhanced Linux,关掉SELinux,并重启系统让其生效。
修改/etc/selinux/config配置文件,设置SELINUX=disabled
vim /etc/selinux/config
查看SELINUX状态的命令:
sestatus
八、 关闭CentOS 7的默认防火墙或者切换到iptables防火墙
先进行Linux防火墙设置
CentOS7默认使用的是firewall作为防火墙,这里改为iptables防火墙
1、关闭firewall:
systemctl stop firewalld.service #停止firewall
systemctl disable firewalld.service #禁止firewall开机启动
2、安装iptables防火墙
yum install iptables-services #安装
3、修改文件配置允许80端口
vi /etc/sysconfig/iptables #编辑防火墙配置文件
按i进入文本编辑 在原文档中找到
-A INPUT -m state –state NEW -m tcp -p tcp –dport 22 -j ACCEPT
在该行下面添加
-A INPUT -m state –state NEW -m tcp -p tcp –dport 80 -j ACCEPT
:wq! #保存退出
systemctl restart iptables.service #最后重启防火墙使配置生效
systemctl enable iptables.service #设置防火墙开机启动
systemctl restart network
systemctl stop NetworkManager
systemctl disable NetworkManager
systemctl start network.service
九 、FTPclient上传组件的使用
        <dependency>
            <groupId>commons-net</groupId>
            <artifactId>commons-net</artifactId>
        </dependency>
    @Test
    public void testFtpClient() throws Exception {

        //创建一个FtpClient对象
        FTPClient ftpClient = new FTPClient();
        //1.创建FTP连接。
        ftpClient.connect("192.168.179.128", 21);
        //2.登录FTP服务器,使用用户名和密码
        ftpClient.login("ftpuser", "taotaoftp");

        //读取本地文件
        File file = new File("F:\\aky.png");
        FileInputStream inputStream = new FileInputStream(file);

        //3.设置上传的路径
        ftpClient.changeWorkingDirectory("/home/ftpuser/www/images");
        //4.修改上传文件的格式、方法的形参是枚举enum
        ftpClient.setFileType(FTP.BINARY_FILE_TYPE);
        //5.执行上传文件
        //第一个参数:服务器端文件名
        //第二个参数:上传文件的inputStream
        ftpClient.storeFile("hello.png", inputStream);
        //关闭连接
        ftpClient.logout();

    }
    //测试FtpUtil工具类的使用
    @Test
    public void testFtpUtil() throws Exception {
        // 读取本地文件
        FileInputStream inputStream = new FileInputStream(new File("F:\\aky.png"));
        // 实用工具类
        FtpUtil.uploadFile("192.168.179.128", 21, "ftpuser", "taotaoftp", "/home/ftpuser/www/images", "/2019",
                "hello2.png", inputStream);

    }
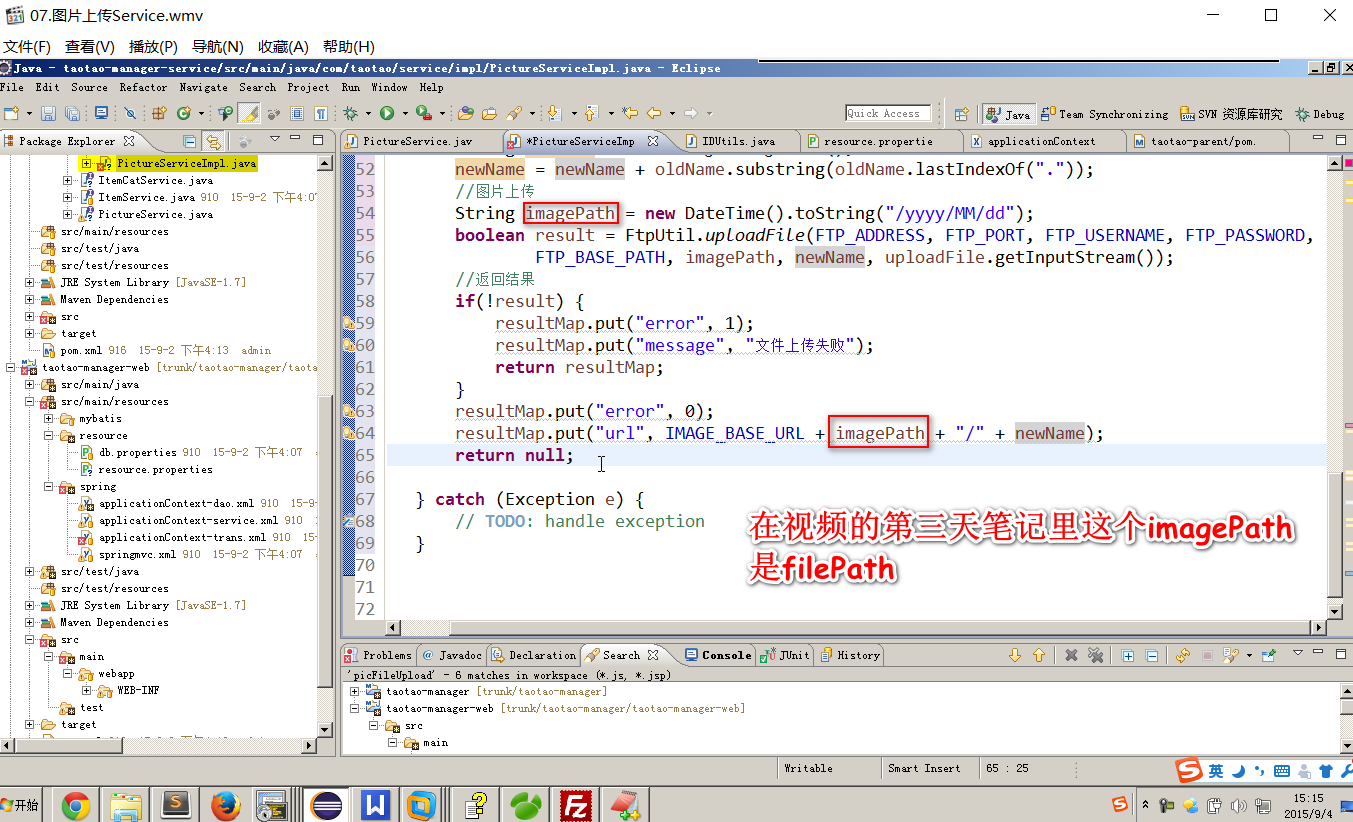
十、PictureServiceImpl 的视频和笔记代码变量名不一致的小细节
![]() public static PictureResultpackage com.taotao.common.pojo; /** * 上传图片的返回结果 */ public class PictureResult { private int error; private String url; private String message; private PictureResult(int error, String url, String message) { this.error = error; this.url = url; this.message = message; } //成功时调用的方法 public static PictureResult ok(String url) { return new PictureResult(0, url, null); } //失败时调用的方法 public static PictureResult error(String message) { return new PictureResult(1, null, message); } public int getError() { return error; } public void setError(int error) { this.error = error; } public String getUrl() { return url; } public void setUrl(String url) { this.url = url; } public String getMessage() { return message; } public void setMessage(String message) { this.message = message; } }
public static PictureResultpackage com.taotao.common.pojo; /** * 上传图片的返回结果 */ public class PictureResult { private int error; private String url; private String message; private PictureResult(int error, String url, String message) { this.error = error; this.url = url; this.message = message; } //成功时调用的方法 public static PictureResult ok(String url) { return new PictureResult(0, url, null); } //失败时调用的方法 public static PictureResult error(String message) { return new PictureResult(1, null, message); } public int getError() { return error; } public void setError(int error) { this.error = error; } public String getUrl() { return url; } public void setUrl(String url) { this.url = url; } public String getMessage() { return message; } public void setMessage(String message) { this.message = message; } }
import com.taotao.common.pojo.PictureResult;
import com.taotao.common.utils.FtpUtil;
import com.taotao.common.utils.IDUtils;
import com.taotao.service.PictureService;


@Service
public class PictureServiceImpl implements PictureService {
    //用@Value注解取出.properties配置文件中的值
    @Value("${FTP_ADDRESS}")
    private String FTP_ADDRESS;
    @Value("${FTP_PORT}")
    private Integer FTP_PORT;
    @Value("${FTP_USER_NAME}")
    private String FTP_USER_NAME;
    @Value("${FTP_PASSWORD}")
    private String FTP_PASSWORD;
    @Value("${FTP_BASE_PATH}")
    private String FTP_BASE_PATH;
    @Value("${IMAGE_BASE_URL}")
    private String IMAGE_BASE_URL;


    @Override
    public PictureResult uploadPicture(MultipartFile uploadFile) {

        //判断上传图片是否为空
        if (null == uploadFile || uploadFile.isEmpty()) {
            return PictureResult.error("上传图片为空");
        }

        //取文件扩展名
        String originalFilename = uploadFile.getOriginalFilename();
        String ext = originalFilename.substring(originalFilename.lastIndexOf("."));

            //生成新文件名可以是时间+随机数生成
            // 取原始文件名
            String oldName  = uploadFile.getOriginalFilename();
            // 生成新文件名
            String newName = IDUtils.genImageName();
            newName = newName + oldName.substring(oldName.lastIndexOf("."));
            // 图片上传到FTP服务器
            //文件在服务器的存放路径,应该使用日期分隔的目录结构
            DateTime dateTime = new DateTime();
            String imagePath = dateTime.toString("/yyyy/MM/dd");


            try {

            FtpUtil.uploadFile(FTP_ADDRESS, FTP_PORT, FTP_USER_NAME, FTP_PASSWORD, FTP_BASE_PATH, imagePath,newName, uploadFile.getInputStream());
            } catch (Exception e) {
                e.printStackTrace();
                return PictureResult.error("上传图片失败");

            }

            //返回结果,生成一个可以访问到图片的url返回
            return PictureResult.ok (IMAGE_BASE_URL+ imagePath +"/"+ newName);

    }


}
        <!-- 文件上传组件 -->
        <dependency>
            <groupId>commons-fileupload</groupId>
            <artifactId>commons-fileupload</artifactId>
        </dependency>
还需要在springmvc.xml配置多部件解析器:
![]() sprinmvc.xml<?xml version="1.0" encoding="UTF-8"?> <beans xmlns="http://www.springframework.org/schema/beans" xmlns:xsi="http://www.w3.org/2001/XMLSchema-instance" xmlns:p="http://www.springframework.org/schema/p" xmlns:context="http://www.springframework.org/schema/context" xmlns:mvc="http://www.springframework.org/schema/mvc" xsi:schemaLocation="http://www.springframework.org/schema/beans http://www.springframework.org/schema/beans/spring-beans.xsd http://www.springframework.org/schema/mvc http://www.springframework.org/schema/mvc/spring-mvc-4.0.xsd http://www.springframework.org/schema/context http://www.springframework.org/schema/context/spring-context.xsd"> <!-- 扫描controller的注解,别的不扫描 --> <context:component-scan base-package="com.taotao.controller" /> <!--开启对SpringMVC注解的支持:处理器映射器,处理器适配器 --> <mvc:annotation-driven /> <!-- 配置视图解析器 --> <bean id="viewResolver" class="org.springframework.web.servlet.view.InternalResourceViewResolver"> <property name="prefix" value="/WEB-INF/jsp/" /> <property name="suffix" value=".jsp" /> </bean> <!-- 不拦截释放静态资源的映射 --> <mvc:resources location="/WEB-INF/js/" mapping="/js/**" /> <mvc:resources location="/WEB-INF/css/" mapping="/css/**" /> <mvc:resources location="/WEB-INF/img/" mapping="/img/**" /> <mvc:resources location="/WEB-INF/plugins/" mapping="/plugins/**" /> <!-- 定义文件上传解析器 --> <bean id="multipartResolver" class="org.springframework.web.multipart.commons.CommonsMultipartResolver"> <!-- 设定默认编码 --> <property name="defaultEncoding" value="UTF-8"></property> <!-- 设定文件上传的最大值5MB,5*1024*1024 --> <property name="maxUploadSize" value="5242880"></property> </bean> </beans>
sprinmvc.xml<?xml version="1.0" encoding="UTF-8"?> <beans xmlns="http://www.springframework.org/schema/beans" xmlns:xsi="http://www.w3.org/2001/XMLSchema-instance" xmlns:p="http://www.springframework.org/schema/p" xmlns:context="http://www.springframework.org/schema/context" xmlns:mvc="http://www.springframework.org/schema/mvc" xsi:schemaLocation="http://www.springframework.org/schema/beans http://www.springframework.org/schema/beans/spring-beans.xsd http://www.springframework.org/schema/mvc http://www.springframework.org/schema/mvc/spring-mvc-4.0.xsd http://www.springframework.org/schema/context http://www.springframework.org/schema/context/spring-context.xsd"> <!-- 扫描controller的注解,别的不扫描 --> <context:component-scan base-package="com.taotao.controller" /> <!--开启对SpringMVC注解的支持:处理器映射器,处理器适配器 --> <mvc:annotation-driven /> <!-- 配置视图解析器 --> <bean id="viewResolver" class="org.springframework.web.servlet.view.InternalResourceViewResolver"> <property name="prefix" value="/WEB-INF/jsp/" /> <property name="suffix" value=".jsp" /> </bean> <!-- 不拦截释放静态资源的映射 --> <mvc:resources location="/WEB-INF/js/" mapping="/js/**" /> <mvc:resources location="/WEB-INF/css/" mapping="/css/**" /> <mvc:resources location="/WEB-INF/img/" mapping="/img/**" /> <mvc:resources location="/WEB-INF/plugins/" mapping="/plugins/**" /> <!-- 定义文件上传解析器 --> <bean id="multipartResolver" class="org.springframework.web.multipart.commons.CommonsMultipartResolver"> <!-- 设定默认编码 --> <property name="defaultEncoding" value="UTF-8"></property> <!-- 设定文件上传的最大值5MB,5*1024*1024 --> <property name="maxUploadSize" value="5242880"></property> </bean> </beans>
end


================================================
参考资料:
CentOS7 Failed to start LSB: Bring up/down解决方法
end

 浙公网安备 33010602011771号