https://www.cnblogs.com/zyly/p/9542164.html
目录
在前面我们已经陆续介绍了许多特征检测算子,我们可以根据图像局部的自相关函数求得Harris角点,后面又提到了两种十分优秀的特征点以及他们的描述方法SIFT特征和SURF特征。SURF特征是为了提高运算效率对SIFT特征的一种近似,虽然在有些实验环境中已经达到了实时,但是我们实践工程应用中,特征点的提取与匹配只是整个应用算法中的一部分,所以我们对于特征点的提取必须有更高的要求,从这一点来看前面介绍的的那些特征点方法都不可取。
一 FAST算法原理
为了解决这个问题,Edward Rosten和Tom Drummond在2006年发表的“Machine learning for high-speed corner detection”文章中提出了一种FAST特征,并在2010年对这篇论文作了小幅度的修改后重新发表。FAST的全称为Features From Accelerated Segment Test。
Rosten等人将FAST角点定义为:若某像素点与其周围领域内足够多的像素点处于不同的区域,则该像素点可能为角点。也就是某些属性与众不同,考虑灰度图像,即若该点的灰度值比其周围领域内足够多的像素点的灰度值大或者小,则该点可能为角点。
二 FAST算法步骤
- 从图片中选取一个像素PP,下面我们将判断它是不是一个特征点。我们首先把它的亮度值设为IpIp;
- 设定一个合适的阈值tt;
- 考虑以该像素点为中心的一个半径等于3像素的离散化的Bresenham圆,这个圆的边界上有16个像素;

4.现在,如果在这个大小为16个像素的圆上有nn个连续的像素点,他们的像素值要么都比Ip+tIp+t大,要么都比Ip−tIp−t小,那么他就是一个角点。nn的值可以设置为12或者9,实验证明选择9可能会有更好的效果。
上面的算法中,对于图像中的每一个点,我们都要去遍历其邻域圆上的16个点的像素,效率较低。我们下面提出了一种高效的测试(high-speed test)来快速排除一大部分非角点的像素。该方法仅仅检查在位置1,9,5和13四个位置的像素,首先检测位置1和位置9,如果它们都比阈值暗或比阈值亮,再检测位置5和位置13。如果pp是一个角点,那么上述四个像素点中至少有3个应该必须都大于Ip+tIp+t或者小于Ip−tIp−t,因为若是一个角点,超过四分之三圆的部分应该满足判断条件。如果不满足,那么pp不可能是一个角点。对于所有点做上面这一部分初步的检测后,符合条件的将成为候选的角点,我们再对候选的角点,做完整的测试,即检测圆上的所有点。
上面的算法效率实际上是很高的,但是有点一些缺点:
- 当我们设置n<12n<12时就不能使用快速算法来过滤非角点的点;
-
检测出来的角点不是最优的,这是因为它的效率取决于问题的排序与角点的分布;
-
对于角点分析的结果被丢弃了;
-
多个特征点容易挤在一起。
三 使用机器学习做一个角点分类器
- 首先选取你进行角点提取的应用场景下很多张的测试图片;
- 使用 FAST 算法找出每幅图像的特征点;
- 对每一个特征点,将其周围的 16 个像素存储构成一个向量。对于步骤二中得到的角点,把他存储在PP中;
- 对于图像上的每一个像素点,它周围邻域圆上位置为xx,x∈{1,2,...,16}x∈{1,2,...,16}的点表示为p→xp→x,可以用下面的判断公式将该点p→xp→x分为三类:
Sp→x=⎧⎩⎨⎪⎪d,Ip→x≤Ip−t(darker)s,Ip−t<Ip→x<Ip+t(similar)b,Ip+t≤Ip→x(brighter)Sp→x={d,Ip→x≤Ip−t(darker)s,Ip−t<Ip→x<Ip+t(similar)b,Ip+t≤Ip→x(brighter)
- 我们任意16个位置中的一个位置xx,可以把集合PP分为三个部分Pd,Ps,PbPd,Ps,Pb,其中PdPd的定义如下,PsPs和PbPb的定义与其类似:
Pb={p∈P:Sp→x=b}Pb={p∈P:Sp→x=b}换句话说,对于给定的位置xx,它都是可以把所有图像中的点分为三类,第一类PdPd包含了所有位置xx处的像素在阈值tt下暗于中心像素,PbPb包含了所有位置xx处的像素在阈值tt亮于中心元素;
- 定义一个新的布尔变量KpKp,如果pp是一个角点,那些KpKp为真,否则为假;
- 使用ID3算法(决策树分类器)来查询每一个子集;
- 递归计算所有的子集直至KpKp的熵为0;
- 被创建的决策树就用于于其他图片的FAST检测。
四 非极大值抑制
如何解决从邻近的位置选取了多个特征点的问题,我们可以使用Non-Maximal Suppression来解决。
- 为每一个检测到的特征点计算它的响应大小(score function)VV,这里VV定义为点pp和它周围16个像素点的绝对偏差之和;
- 考虑两个相邻的特征点,并比较它们的VV值;
- VV值较低的点会被删除。
五 OpenCV库FAST特征检测

# -*- coding: utf-8 -*-
"""
Created on Mon Aug 27 16:09:48 2018

@author: lenovo
"""

'''
FAST角点检测
'''
import cv2

'''1、加载图片'''
img1 = cv2.imread('./image/match1.jpg')
img1 = cv2.resize(img1,dsize=(600,400))
image1 = img1.copy()


'''2、提取特征点'''
#创建一个FAST对象,传入阈值t  可以处理RGB色彩空间图像
fast = cv2.FastFeatureDetector_create(threshold=50)
keypoints1 = fast.detect(image1,None)
#在图像上绘制关键点
image1 = cv2.drawKeypoints(image=image1,keypoints = keypoints1,outImage=image1,color=(255,0,255),flags=cv2.DRAW_MATCHES_FLAGS_DRAW_RICH_KEYPOINTS)

#输出默认参数
print("Threshold: ", fast.getThreshold())
print("nonmaxSuppression: ", fast.getNonmaxSuppression())
print("neighborhood: ", fast.getType())
print("Total Keypoints with nonmaxSuppression: ", len(keypoints1))

#显示图像
cv2.imshow('fast_keypoints1',image1)
cv2.waitKey(20)

#关闭非极大值抑制
fast.setNonmaxSuppression(0)
keypoints1 = fast.detect(image1,None)
print("Total Keypoints without nonmaxSuppression: ", len(keypoints1))
image1 = cv2.drawKeypoints(image=image1,keypoints = keypoints1,outImage=image1,color=(255,0,255),flags=cv2.DRAW_MATCHES_FLAGS_DRAW_RICH_KEYPOINTS)
cv2.imshow('fast_keypoints1 nms',image1)

cv2.waitKey(0)
cv2.destroyAllWindows()
关于FAST特征检测函数相关资料可以点击官方链接:https://docs.opencv.org/master/df/d74/classcv_1_1FastFeatureDetector.html#details
程序运行效果如下:

可以看到经过非极大值抑制之后,特征点从2092个降低到了1106个。如果你修改阈值t,你会发现tt越大,检测到的特征点越小。
如果你还记得我们之前介绍SIFT特征和SURF特征,我们忽略算法参数的影响,从总体上来看,你会发现FAST的特征点数量远远多于前着。这是受多方面元素影响,一方面是受算法本身影响,这两个算法是完全不同的;另一方面FAST特征对噪声比较敏感,从图片上我们也可以观察到,比如广场上许多的的噪声点。
除了上面我所说的这些,FAST算法还有以下需要改进的地方:
- 由于FAST算法依赖于一个阈值tt,因此算法还需要人为干涉;
- FAST算法不产生多尺度特征而且FAST特征点没有方向信息,这样就会失去旋转不变性;
后面我会介绍ORB算法,ORB将基于FAST关键点检测的技术和基于BRIFE描述符的技术相结合,ORB算法解决了上面我所讲述到的缺点,可以用来替代SIFT和SURF算法,与两者相比,ORB拥有更快的速度。
六 自己实现FAST特征检测
由于FAST算法比较简单,因此我们可以按照我们之前所讲述的步骤,自己去实现它,代码如下:
# -*- coding: utf-8 -*-
"""
Created on Mon Aug 27 20:22:51 2018

@author: lenovo
"""
import numpy as np
import cv2
from matplotlib import pyplot as plt

'''
自己实现FAST角点检测算法:不依赖OpenCV库
参考代码:https://github.com/tbliu/FAST
'''
def rgb2gray(image):
    '''
    转换图片空间RGB->gray

    args:
        image:输入RGB图片数据
    return:
        返回灰度图片
    '''
    rows,cols = image.shape[:2]
    grayscale = np.zeros((rows,cols),dtype=np.uint8)
    for row in range(0,rows):
        for col in range(0,cols):
            red,green,blue = image[row][col]
            gray = int(0.3*red+0.59*green+0.11*blue)
            grayscale[row][col] = gray
    return grayscale

def bgr2gray(image):
    '''
    转换图片空间BGR->gray

    args:
        image:输入BGR图片数据
    return:
        返回灰度图片
    '''
    rows,cols = image.shape[:2]
    grayscale = image.copy()for row in range(0,rows):
        for col in range(0,cols):
            blue,green,red = image[row][col]
            gray = int(0.3*red+0.59*green+0.11*blue)
            grayscale[row][col] = gray
    return grayscale

def medianBlur(image,ksize=3,):
    '''
    中值滤波,去除椒盐噪声

    args:
        image:输入图片数据,要求为灰度图片
        ksize:滤波窗口大小
    return:
        中值滤波之后的图片
    '''
    rows,cols = image.shape[:2]
    #输入校验
    half = ksize//2
    startSearchRow = half
    endSearchRow = rows-half-1
    startSearchCol = half
    endSearchCol = cols-half-1
    dst = np.zeros((rows,cols),dtype=np.uint8)
    #中值滤波
    for y in range(startSearchRow,endSearchRow):
        for x in range(startSearchCol,endSearchCol):
            window = []
            for i in range(y-half,y+half+1):
                for j in range(x-half,x+half+1):
                    window.append(image[i][j])
            #取中间值
            window = np.sort(window,axis=None)
            if len(window)%2 == 1:
                medianValue = window[len(window)//2]
            else:
                medianValue = int((window[len(window)//2]+window[len(window)//2+1])/2)
            dst[y][x] = medianValue
    return dst

def circle(row,col):
    '''
    对于图片上一像素点位置(row,col),获取其邻域圆上16个像素点坐标,圆由16个像素点组成

    args:
        row:行坐标 注意row要大于等于3
        col:列坐标 注意col要大于等于3
    '''
    if row < 3 or col < 3:
        return
    point1 = (row-3, col)
    point2 = (row-3, col+1)
    point3 = (row-2, col+2)
    point4 = (row-1, col+3)
    point5 = (row, col+3)
    point6 = (row+1, col+3)
    point7 = (row+2, col+2)
    point8 = (row+3, col+1)
    point9 = (row+3, col)
    point10 = (row+3, col-1)
    point11 = (row+2, col-2)
    point12 = (row+1, col-3)
    point13 = (row, col-3)
    point14 = (row-1, col-3)
    point15 = (row-2, col-2)
    point16 = (row-3, col-1)

    return [point1, point2,point3,point4,point5,point6,point7,point8,point9,point10,point11,point12, point13,point14,point15,point16]

def is_corner(image,row,col,threshold):
    '''
    检测图像位置(row,col)处像素点是不是角点
    如果圆上有12个连续的点满足阈值条件,那么它就是一个角点

    方法:
        如果位置1和9它的像素值比阈值暗或比阈值亮,则检测位置5和位置15
        如果这些像素符合标准,请检查像素5和13是否相符
        如果满足有3个位置满足阈值条件,则它是一个角点
        重复循环函数返回的每个点如果没有满足阈值,则不是一个角落

        注意:这里我们简化了论文章中的角点检测过程,会造成一些误差

    args:
        image:输入图片数据,要求为灰度图片
        row:行坐标 注意row要大于等于3
        col:列坐标 注意col要大于等于3
        threshold:阈值
    return :
        返回True或者False
    '''
    #校验
    rows,cols = image.shape[:2]
    if row < 3 or col < 3 :
        return False
    if row >= rows-3 or col >= cols-3:
        return False
    intensity = int(image[row][col])
    ROI = circle(row,col)
    #获取位置1,9,5,13的像素值
    row1, col1 = ROI[0]
    row9, col9 = ROI[8]
    row5, col5 = ROI[4]
    row13, col13 = ROI[12]
    intensity1 = int(image[row1][col1])
    intensity9 = int(image[row9][col9])
    intensity5 = int(image[row5][col5])
    intensity13 = int(image[row13][col13])
    #统计上面4个位置中满足  像素值  >  intensity + threshold点的个数
    countMore = 0
    #统计上面4个位置中满足 像素值  < intensity - threshold点的个数
    countLess = 0
    if intensity1 - intensity > threshold:
        countMore += 1
    elif intensity1 + threshold < intensity:
        countLess += 1
    if intensity9 - intensity > threshold:
        countMore += 1
    elif intensity9 + threshold < intensity:
        countLess += 1
    if intensity5 - intensity > threshold:
        countMore += 1
    elif intensity5 + threshold < intensity:
        countLess += 1
    if intensity13 - intensity > threshold:
        countMore += 1
    elif intensity13 + threshold < intensity:
        countLess += 1

    return countMore >= 3 or countLess>=3

def areAdjacent(point1, point2):
    """
    通过欧拉距离来确定两个点是否相邻,如果它们在彼此的四个像素内,则两个点相邻

    args:
        point1:像素点1的位置
        point2:像素点2的位置
     return :
        返回True或者False
    """
    row1, col1 = point1
    row2, col2 = point2
    xDist = row1 - row2
    yDist = col1 - col2
    return (xDist ** 2 + yDist ** 2) ** 0.5 <= 4

def calculateScore(image,point):
    """
    计算非极大值抑制的分数
    为每一个检测到的特征点计算它的响应大小,得分V定义为p和它周围16个像素点的绝对偏差之和
    考虑两个相邻的特征点,并比较它们的V,V值较小的点移除

    args:
        image:输入图片数据,要求为灰度图片
        point: 角点坐标
    """
    col, row  = point
    intensity = int(image[row][col])
    ROI = circle(row,col)
    values = []
    for p in ROI:
        values.append(int(image[p]))
    score = 0
    for value in values:
        score += abs(intensity - value)
    return score

def suppress(image, corners):
    '''
    Performs non-maximal suppression on the list of corners.
    For adjacent corners, discard the one with the smallest score.
    Otherwise do nothing

    Since we iterate through all the pixels in the image in order, any adjacent
    corner points should be next to each other in the list of all corners

    Non-maximal suppression throws away adjacent corners which are the same point in real life

    args:
        image: is a numpy array of intensity values. NOTE: Image must be grayscale
        corners : a list of (x,y) tuples   where x is the column index,and y is the row index
    '''
    i = 1
    #由于相邻的角点在corners列表中彼此相邻,所以我们写成下面形式
    while i < len(corners):
        currPoint = corners[i]
        prevPoint = corners[i - 1]
        #判断两个角点是否相邻
        if areAdjacent(prevPoint, currPoint):
            #计算非极大值抑制的分数
            currScore = calculateScore(image, currPoint)
            prevScore = calculateScore(image, prevPoint)
            #移除较小分数的点
            if (currScore > prevScore):
                del(corners[i - 1])
            else:
                del(corners[i])
        else:
            i += 1
            continue
    return


def detect(image, threshold=50,nonMaximalSuppress=True):
    '''
    corners = detect(image, threshold) performs the detection
    on the image and returns the corners as a list of (x,y) tuples
    where x is the column index, and y is the row index

    Nonmaximal suppression is implemented by default.


    args:
        image: is a numpy array of intensity values. NOTE: Image must be grayscale
        threshold:threshold is an int used to filter out non-corners.
    return:
        returns the corners as a list of (x,y) tuples   where x is the column index,
        and y is the row index
    '''
    corners = []
    rows,cols = image.shape[:2]
    #中值滤波
    image = medianBlur(image,3)
    cv2.imshow('medianBlur',image)
    cv2.waitKey(20)
    #开始搜寻角点
    for row in range(rows):
        for col in range(cols):
            if is_corner(image, row, col, threshold):
                corners.append((col, row))
    #非极大值抑制
    if nonMaximalSuppress:
        suppress(image, corners)
    return corners;

def test():
    image = cv2.imread('./image/match1.jpg')
    image = cv2.resize(image,dsize=(600,400))
    imgray = cv2.cvtColor(image, cv2.COLOR_BGR2GRAY)
    corners = detect(imgray)
    print('检测到的角点个数为:',len(corners))
    for point in corners:
        cv2.circle(image,point,1,(0,255,0),1)
    cv2.imshow('FAST',image)
    cv2.waitKey(0)
    cv2.destroyAllWindows()

if __name__=='__main__':
    test()
运行之后效果如下:
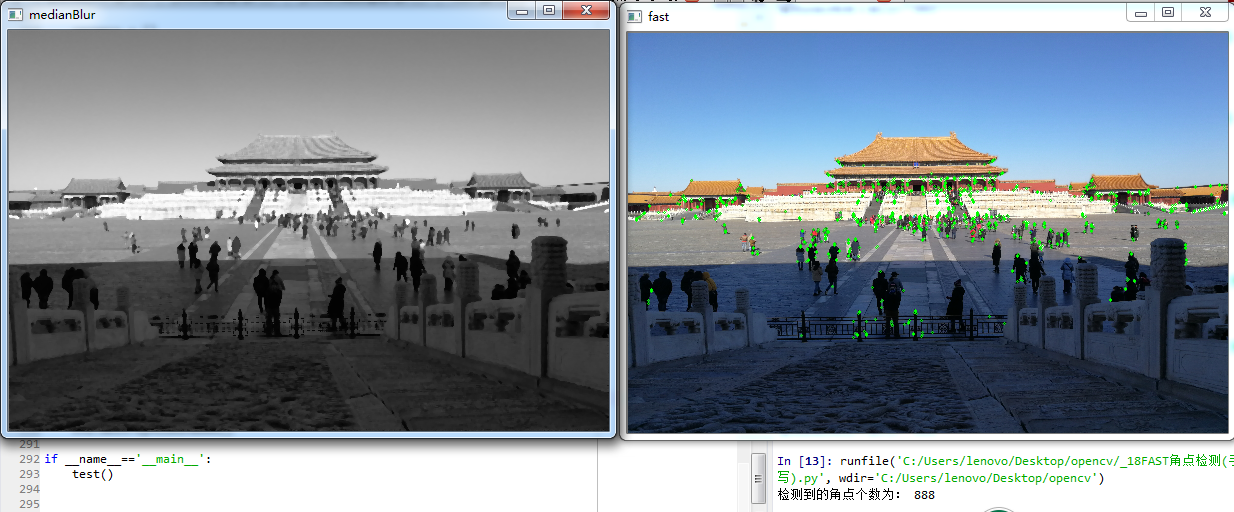
我们在FAST算法检测之前使用了中值滤波,为了去除噪声的影响,你也可以尝试使用高斯滤波或者均指滤波等滤波手段,这里就不在介绍,由于我们在实现滤波的时候并没有对图像边缘进行填充,因此在图片四周并不会模糊。
右图为检测到的角点,大概有888个像素点,这是使用了非极大值抑制之后的效果,与我们使用OpenCV库检测到的1106个近似相等.
参考文章:
[5]FAST Source code(python实现,推荐代码简短)

 浙公网安备 33010602011771号