ansible笔记
ansible笔记
针对 Windows 系统的服务器,可以使用 WRM(Windows Remote Management)实现无 Agent 模式管理。
Ansible 对被操作的服务器还是有一定要求的。例如,在调用一些模块的时候会提示客户机需要安装某个 Python 的扩展包。
对于 Windows 系统的服务器来说,安装 PowerShell 3.0 或以上版本才可以让 Ansible 正常地运转。当然,Ansible 在 Windows 上需要将 PowerShell 作为任务执行的解释器。
https://mp.weixin.qq.com/s/ZXqMQlaPr5kDHSWuA6FsHA
/etc/ansible/hosts 文件里定义的变量都必须加单引号,避免特殊字符转义
一个单引号是 ansible 中的一个特殊写法,用以避免特殊字符引发的bug,详情可参见文章《故障分析|ansible 使用密码的一坑》
ansible失败的地方
被控机器是Windows
1、被控机要开winrm端口
2、Windows的模块非常少
如果某个主机执行失败了,会生成retry文件,然后用--limit参数来重新执行即可
to retry, use: ansible --limit @xxx.retry
ansible解决的痛点:
一大堆运维脚本,而且服务器上脚本不是最新
预估停机执行时间
注意:
任务重复执行问题,幂等操作
安全:密码和密钥,ansible管理机权限
ansible没有回滚操作
ansible属于非登录shell
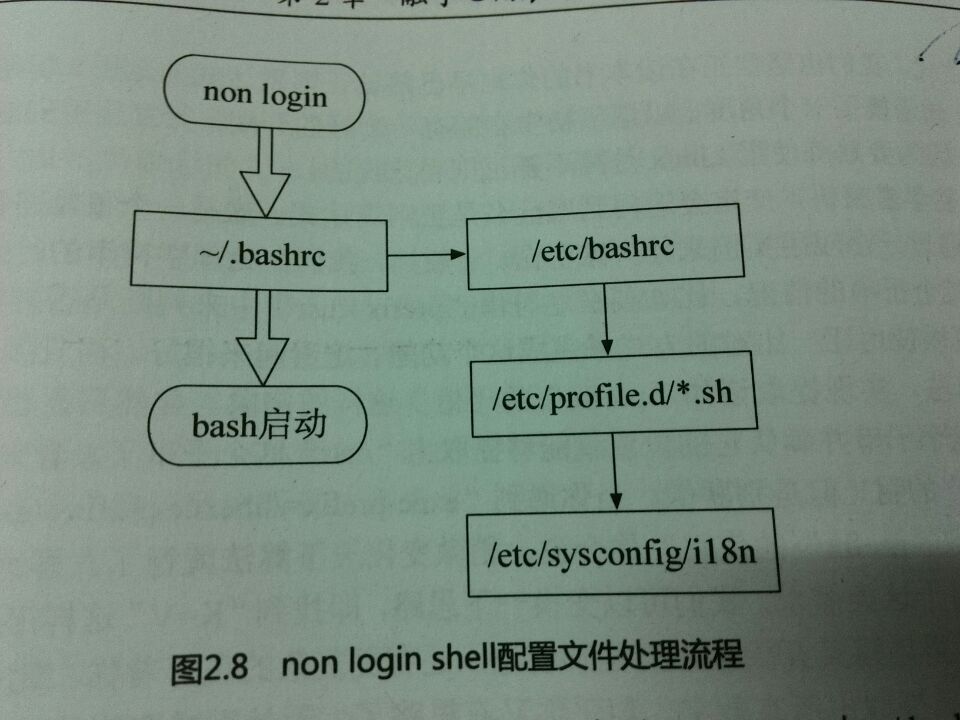
ansible执行过程大体过程如下图,其中暖色调的代表已经模块化
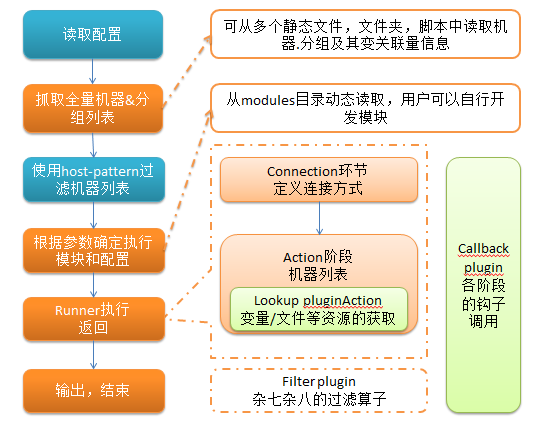

https://www.jianshu.com/p/575ced3a08fa
特点
无客户端
无服务器端
基于模块,用任意语言开发模块
yaml订制playbook
基于ssh工作
实现多级指挥
连接插件,连接被管理端
核心模块
自定义模块
插件完成模块功能补充
playbooks定义任务
主机清单

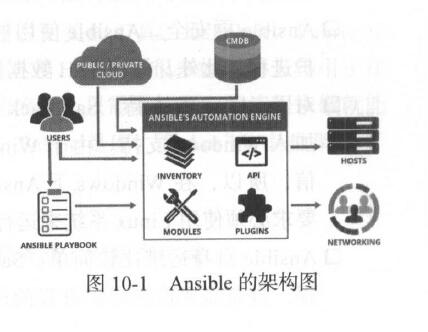
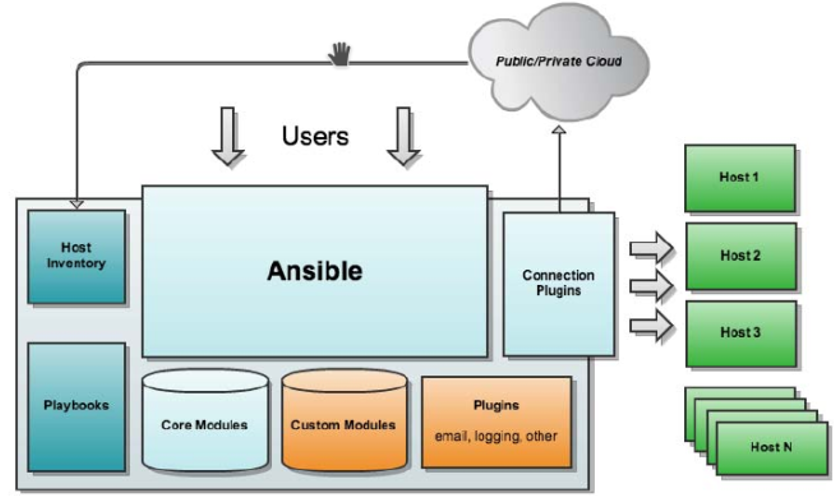
架构图
f

管理端支持local(连接管理机即自己连接自己的时候) 、ssh、zeromq 三种方式连接被管理端,默认使用基于ssh的连接---这部分对应基本架构图中的连接模块;
ansible安装
主控机
管理节点操作
yum install -y epel-release
yum install -y ansible
任务执行模式
ansible系统由控制主机对被管节点的操作方式有两种ad_hoc和playbook
ad_hoc单命令模式 可以对多台主机执行单个命令
ansible all -a "/bin/echo hello"
playbook模式
playbook通过多个tasks的集合完成一类功能如web的安装部署,数据库服务器的批量备份等
ansible提供了10个命令
ansible
ansible-doc
ansible-vault
ansible-pull
ansible-config
ansible-galaxy
ansible-playbook
ansible-connection
ansible-inventory
ansible-console
1、ansible
ansible命令管理主机
在官方文档中命令行的名字是:Ad-Hoc Commands
ansible是指令核心部分,其主要用于执行ad-hoc命令,即单条命令。默认后面需要跟主机和选项部分,默认不指定模块时,使用的是command模块。如:
[root@localhost ~]# ansible 127.0.0.1 -a 'date'
-m:后面接调用模块的名字
-a:后面接调用模块的参数
ansible all -m shell -a "sh /tmp/kel.sh >>/tmp/kel.log"
参数:
-a 'Arguments', --args='Arguments' 命令行参数
-m NAME, --module-name=NAME 执行模块的名字,默认使用 command 模块,所以如果是只执行单一命令可以不用 -m参数
-M MODULE_PATH, --module-path=MODULE_PATH 要执行的模块的路径,默认为/usr/share/ansible/
-i PATH, --inventory=PATH 指定主机文件、主机目录、可执行文件的路径,默认为/etc/ansible/hosts.
-u Username, --user=Username 执行用户,使用这个远程用户名而不是当前用户
-U --sud-user=SUDO_User sudo到哪个用户,默认为 root
-k --ask-pass 登录密码,提示输入SSH密码而不是基于密钥的验证
-K --ask-sudo-pass 提示密码使用sudo -s --sudo sudo运行
-s --snippet 指定模块显示playbook片段
-S --su 用 su 命令
-f --forks=NUM 并行任务数。NUM被指定为一个整数,默认是5。 #ansible testhosts -a "/sbin/reboot" -f 10 重启testhosts组的所有机器,每次重启10台
--private-key=PRIVATE_KEY_FILE 私钥路径,使用这个文件来验证连接
-vvv --verbose 查看详细的报错信息,类似/usr/local/mysql/bin/mysqlbinlog -vv
all 针对hosts 定义的所有主机执行
-o --one-line 压缩输出,摘要输出.尝试一切都在一行上输出。
-t Directory, --tree=Directory 执行过程中的日志保存到这个目录
-B 后台运行超时时间,ansible all -m ping -B 3600 -P 0
-T Seconds, --timeout=Seconds 时间,单位秒s
-P NUM, --poll=NUM 调查背景工作每隔数秒,调查后台程序时间。需要- b
-c Connection, --connection=Connection 连接类型使用。可能的选项是paramiko(SSH),SSH和地方。
--version ansible版本号
-C, --check 只是测试一下,不会真正去执行
-l SUBSET, --limit=SUBSET 进一步限制所选主机/组模式 --limit=192.168.0.15 只对这个ip执行或--limit=kvm 只对这个kvm组执行 ,除了kvm组不执行,其他组都执行ansible all -l kvm -m shell -a "sh /tmp/kel.sh >>/tmp/kel.log"
ansible --version
ansible 2.4.2.0
config file = /etc/ansible/ansible.cfg
configured module search path = [u'/root/.ansible/plugins/modules', u'/usr/share/ansible/plugins/modules']
ansible python module location = /usr/lib/python2.6/site-packages/ansible
executable location = /usr/bin/ansible
python version = 2.6.6 (r266:84292, Aug 18 2016, 15:13:37) [GCC 4.4.7 20120313 (Red Hat 4.4.7-17)]
查后台任务id
ansible all  -m ping  -B 3600 -P 0
ansible_job_id:"123"
xxx

#查看后台任务id为123的任务状态
ansible all  -m async_status -a "jid='123'"
2、ansible-doc
查看模块信息
-l:列出所有已安装的模块
-s :查看具体某模块的用法,如果是extra模块,必须cd到extra模块目录下面再执行,ansible-doc -s command
3、ansible-galaxy
ansible-galaxy 指令用于方便的从https://galaxy.ansible.com/ 站点下载官方收录的playbooks,我们可以形象的理解其类似于centos下的yum、python下的pip。
ansible-galaxy install aeriscloud.docker
这个安装了一个aeriscloud.docker组件,前面aeriscloud是galaxy上创建该模块的用户名,后面对应的是其模块。
初始化一个role的目录结构
ansible-galaxy init role_name
列出已安装的roles
ansible-galaxy list
查看已安装的roles信息
ansible-galaxy info bennojoy.mysql
卸载roles
ansible-galaxy remove bennojoy.mysql
安装一个role
参数-p 指定role下载的目录。
如果没有指定-p , 那么role 会被自动下载到环境变量ANSIBLE_ROLES_PATH 定义的目录下,
或者默认目录/etc/ansible/roles 下。
ansible-galaxy -p /tmp/roles install bennojoy.nginx
安装多个role
将所有依赖的role放在一个role.txt里面,-r参数指定role列表文件role.txt,类似pip install -r requirements.txt
ansible-galaxy -p /tmp/roles install  -r /tmp/role.txt
cat role.txt
bennojoy.nginx
bennojoy.mysql
bennojoy.mongodb

或者
ansible-galaxy -p /tmp/roles install -r requirements.yml
cat requirements.yml
# from galaxy
- src: yatesr.timezone

# from GitHub
- src: https://github.com/bennojoy/nginx

# from GitHub , overriding the name and specifying a  specific tag
- src: https://github.com/bennojoy/nginx
  version: master
  name: nginx role

# from a webserver , where the role is packaged in a tar.gz
- src: https://some.webserver.example.com/files/master.tar.gz
  name: http-role
4、ansible-playbook
该指令是使用最多的指令,其通过读取playbook 文件后,执行相应的动作
--tags=TAGS 只执行指定标签的任务 例子:ansible-playbook test.yml --tags=copy 只执行标签为copy的那个任务
--list-hosts 只打印有哪些主机会执行这个 playbook 文件,不是实际执行该 playbook 文件
--list-tasks 列出所有将被执行的任务
--syntax-check 对playbook执行语法检查,但不执行它
--skip-tags=SKIP_TAGS 只运行任务不匹配这些值的标签的playbook --skip-tags=copy_start
-e EXTRA_VARS, --extra-vars=EXTRA_VARS 额外的变量设置为键=值或YAML / JSON
--syntax-check 检查yaml文件的语法
--verbose 查看输出细节
--step 每执行一个任务后停止,等待用户确认
-f 用多少个线程执行playbook任务,比如用10个线程 ansible-playbook -f 10 ngxin.yml
ansible-playbook update.yml --extra-vars "hosts=vipers user=admin" 传递{{hosts}}、{{user}}变量,hosts可以是 ip或组名
检测语法错误
ansible-playbook -v --syntax-check init.yml
Using /etc/ansible/ansible.cfg as config file
ERROR! We were unable to read either as JSON nor YAML, these are the errors we got from each:
JSON: No JSON object could be decoded

Syntax Error while loading YAML.
did not find expected '-' indicator

The error appears to be in '/root/init.yml': line 12, column 9, but may
be elsewhere in the file depending on the exact syntax problem.

The offending line appears to be:

- name: install pkgs
yum:
^ here
5、ansible-pull
Ansible的另一种工作模式,pull模式,ansible默认使用push模式
支持直接从git下载playbook执行,需要遵循其规定的目录格式,用处不是特别大,可以不关注
6、ansible-vault
ansible-vault主要应用于配置文件中含有敏感信息,又不希望他能被人看到,vault可以帮你加密/解密这个配置文件,属高级用法。
主要对于playbooks里比如涉及到配置密码或其他变量时,可以通过该指令加密,这样我们通过cat看到的会是一个密码串类的文件,编辑的时候需要输入事先设定的密码才能打开。
这种playbook文件在执行时,需要加上 –ask-vault-pass参数,同样需要输入密码后才能正常执行。具体该部分可以参查官方博客。
[root@node1 ansible]# ansible-vault encrypt db_hosts
New Vault password:
Confirm New Vault password:
Encryption successful
[root@node1 ansible]# ansible -i db_hosts localhost -m ping
ERROR! Decryption failed
Decryption failed
[root@node1 ansible]# ansible -i db_hosts --ask-vault-pass localhost -m ping
Vault password:
localhost | SUCCESS => {
    "changed": false,
    "ping": "pong"
}

[root@node1 ansible]# cat db_hosts
$ANSIBLE_VAULT;1.1;AES256
61663966666265363465653064386666326234353433346163633838366532366236313032303636
6437313333333936396164663031633566613233343161650a333163333732616130343762636135
30303864663138643661393234336433313465623830333832663165393964353961323261373130
3135626236626435640a396338616563646532623966333337366365636665663563666432333539
61663632633130623733316232353836663366623136636432616332376266383263356264303765
6133616235363066356164653232326139643862653464623037
ansible核心模块
Ansible 对远程服务器的操作实际是通过模块完成的。其工作原理如下
1、将模块拷贝到远程服务器
2、执行模块定义的操作,完成对服务器的修改
3、在远程服务器中删除模块
所有模块官方文档:http://docs.ansible.com/ansible/latest/modules/list_of_all_modules.html
ping模块
ping一下你的远程主机,尝试ssh登录远程节点并检查python版本,如果连接成功,返回pong,不需要任何参数
调试和测试类模块
setup模块
获取远程机器的facts数据,也就是机器配置
参数
filter:只返回符合过滤规则的facts数据
# 显示所有机器的facts数据并存储在/tmp/facts目录下
# ansible all -m setup --tree /tmp/facts
# 只显示内存相关内容
# ansible all -m setup -a 'filter=ansible_*_mb'
# 只显示和facter有关的内容.
# ansible all -m setup -a 'filter=facter_*'
# 只显示网卡信息
# ansible all -m setup -a 'filter=ansible_eth[0-2]'
debug模块
参数
msg:定义打印的字符串
var:定义需要打印的变量
regester:定义注入变量
# Example that prints the loopback address and gateway for each host
- debug:
msg: "System {{ inventory_hostname }} has uuid {{ ansible_product_uuid }}"
- debug:
msg: "System {{ inventory_hostname }} has gateway {{ ansible_default_ipv4.gateway }}"
when: ansible_default_ipv4.gateway is defined
- shell: /usr/bin/uptime
register: result #将执行结果注入result变量
- debug:
var: result #打印result的内容
verbosity: 2
- name: Display all variables/facts known for a host
debug:
var: hostvars[inventory_hostname]
verbosity: 4
script模块
在远程节点上执行主控机上的脚步,其功能相当于scp + shell 的组合,脚本执行完成以后会在远程服务器上删除脚本文件
参数
chdir:在执行脚步之前先cd到这个目录
- script: /some/local/script.sh --some-arguments 1234

# Run a script that creates a file, but only if the file is not yet created
- script: /some/local/create_file.sh --some-arguments 1234
  args:
    creates: /the/created/file.txt

# Run a script that removes a file, but only if the file is not yet removed
- script: /some/local/remove_file.sh --some-arguments 1234
  args:
    removes: /the/removed/file.txt
copy模块
复制前会比较远程文件的checksum,如果相同则不复制,返回ok,如果不同才复制,返回changed
参数
mode:可以是数字形式也可以是符号形式,0644 ,01777,u+rwx , u=rw,g=r,o=r
owner:属主
group:属组
backup:默认no,先备份目标节点的源文件再复制,如果拷贝过程失败,则源文件还能使用,而不是对目标文件备份一份!
validate:默认none,验证复制后的文件,%s指代复制后的文件
dest:目标文件,必须是绝对路径
src:源文件,可以是绝对路径,也可以是相对路径,/tmp/表示拷贝文件夹里内容,/tmp表示把文件夹也拷贝过去
force:默认yes,当目标文件跟源文件不一样时会强制覆盖目标文件,如果一样,不会执行复制,别名thirsty,也就是thirsty等于force
follow:默认no,当拷贝的文件夹内有link存在的时候,那么拷贝过去的也会有link
- name: example copying file with owner and permissions
copy:
src: /srv/myfiles/foo.conf
dest: /etc/foo.conf
owner: foo
group: foo
mode: 0644

- name: The same example as above, but using a symbolic mode equivalent to 0644
copy:
src: /srv/myfiles/foo.conf
dest: /etc/foo.conf
owner: foo
group: foo
mode: u=rw,g=r,o=r

- name: Another symbolic mode example, adding some permissions and removing others
copy:
src: /srv/myfiles/foo.conf
dest: /etc/foo.conf
owner: foo
group: foo
mode: u+rw,g-wx,o-rwx

- name: Copy a new "ntp.conf file into place, backing up the original if it differs from the copied version
copy:
src: /mine/ntp.conf
dest: /etc/ntp.conf
owner: root
group: root
mode: 0644
backup: yes

- name: Copy a new "sudoers" file into place, after passing validation with visudo
copy:
src: /mine/sudoers
dest: /etc/sudoers
validate: /usr/sbin/visudo -cf %s

- name: Copy a "sudoers" file on the remote machine for editing
copy:
src: /etc/sudoers
dest: /etc/sudoers.edit
remote_src: yes
validate: /usr/sbin/visudo -cf %s

- name: Copy using the 'content' for inline data
copy:
content: '# This file was moved to /etc/other.conf'
dest: /etc/mine.conf'
template模块
在复制的同时根据实际情况修改部分内容,这时不能用copy模块,要用template模块
template模块使用的是python的jinja2模板引擎,这里不需要了解jinja2,只需要知道变量的表示法
{{}}就可以了
template模块同样具备copy模块的权限设置,文件备份,验证功能
参数
mode:可以是数字形式也可以是符号形式,0644 ,01777,u+rwx , u=rw,g=r,o=r
owner:属主
group:属组
backup:默认no,先备份目标节点的源文件再复制
validate:默认none,验证复制后的文件,%s指代复制后的文件
dest:目标文件
src:源文件
force:默认yes,当目标文件跟源文件不一样时会强制覆盖目标文件,如果一样,不会执行复制
follow:默认no,当拷贝的文件夹内有link存在的时候,那么拷贝过去的也会有link
roles/templates/server.xml中的template文件关键部分如下:
<?xml version="1.0" encoding="utf-8"?>
<code class="language-shell hljs handlebars">
<user username="{{ admin_username }}" password="{{ admin_password }}" roles="manager-gui"/>
</code>
当这个文件还没被template执行的时候,本地的admin_username及admin_password 都是变量状态。
当playbook执行完template的时候,远程的admin_username*及admin_password 会变成变量所对应的值。
么在执行这个Playbook前,对应的那个template文件(俗称模版),将在本地保持{{ admin_username }}及{{ admin_password }}的状态。在Ansible调用template模版执行的时候,这里将由Jinjia2从”tomcat-servers”读取对应的值,然后替换掉模版里的变量,
然后把这个替换变量值后的文件拷贝到远程节点。
file模块
用来设置远程主机上的文件,软链接symlinks,文件夹权限,也可以创建和删除文件夹,文件
参数
path:目标路径,别名dest,,name,也就是dest,,name等于path
recurse:递归设置文件属性,当state为directory时候
mode:可以是数字形式也可以是符号形式,0644 ,01777,u+rwx , u=rw,g=r,o=r
owner:属主
group:属组
src:源链接,只能应用于state=link 、 state=hard的情况
force:默认yes,当目标文件跟源文件不一样时会强制覆盖目标文件,如果一样,不会执行复制
follow:默认no,当拷贝的文件夹内有link存在的时候,那么拷贝过去的也会有link
state:默认file,file/link/directory/hard/touch/absent
file代表拷是文件;
link代表是个软链接;
directory代表文件夹;
hard代表硬链接;
touch代表生成一个空文件;
absent代表删除
#改变文件权限,数字权限必须以0开头
- file:
path: /etc/foo.conf
owner: foo
group: foo
mode: 0644
#创建软链接,这里的src和dest参数含义和copy模块不一样,file模块里所操作的文件都是远程节点上的文件
- file:
src: /file/to/link/to
dest: /path/to/symlink
owner: foo
group: foo
state: link


# 创建一个新文件 touch命令
- file:
path: /etc/foo.conf
state: touch
mode: "u=rw,g=r,o=r"

# touch the same file, but add/remove some permissions
- file:
path: /etc/foo.conf
state: touch
mode: "u+rw,g-wx,o-rwx"

# 创建一个文件夹
- file:
path: /etc/some_directory
state: directory
mode: 0755
user模块/group模块
user 模块请求的是useradd , userdel , usermod 三个命令
group 模块请求的是groupadd,groupdel, groupmod 三个命令
参数
group:主属组
groups:多个附加属组,用逗号分隔
home:家目录
createhome:默认yes,是否创建家目录
name:用户名或群组名,必须,别名user,也就是user等于name
password:密码,必须是加密过的密码,python -c "from passlib.hash import sha512_crypt; import getpass; print(sha512_crypt.using(rounds=5000).hash(getpass.getpass()))"
remove:把家目录也删除,前提state为absent,相当于userdel -r
shell:设置用户的登录shell
uid:设置uid
gid:设置gid
state:创建或删除用户/群组,取值包括present 和absent
generate_ssh_key:是否生成密钥
ssh_key_bits:sshkey的位数,最好设置为2048
ssh_key_file:默认.ssh/id_rsa,
ssh_key_type:默认rsa, 可选dsa,rsa
ssh_key_passphrase:sshkey的密码
expires :用户过期时间,过期时间为时间戳
- name: 添加用户johnd,设置uid为1040,组为admin
user:
name: johnd
comment: John Doe
uid: 1040
group: admin

- name: 添加用户james,设组为admins,developers
user:
name: james
shell: /bin/bash
groups: admins,developers
append: yes

- name: 删除用户johnd
user:
name: johnd
state: absent
remove: yes

- name: 创建密钥是 2048位 SSH key 的用户jsmith,保存位置在~jsmith/.ssh/id_rsa
user:
name: jsmith
generate_ssh_key: yes
ssh_key_bits: 2048
ssh_key_file: .ssh/id_rsa

- name: 创建用户james18,设置过期时间为2015/1/28 8:3:7
user:
name: james18
shell: /bin/zsh
groups: developers
expires: 1422403387


#创建群组
ansible test -m group -a "name=ansible state=present gid=l234" -become


#删除群组
ansible test -m group -a "name=ansible state=absent" -become
yum模块
管理yum包,fedora从版本22开始使用dnf代替yum,如果用fedora22推荐用dnf模块来进行安装包
参数
conf_file:yum的配置文件
disable_gpg_check:默认no, 只有state 为present 或 latest.才能指定disable_gpg_check
list:相当于yum list <package>
name:包名, 可以是'*' 表示yum -y update 更新所有包 或 rpm 文件的url路径或本地路径 ,同时 state=present ,别名pkg,也就是pkg等于name
state:用于描述安装包最终状态,present/latest/installed用于安装包,removed/absent用于remove安装包
update_cache:默认no,用于安装包前执行更新list,只会影响state参数为present/latest的时候
- name: 安装最新版本的Apache,如果已经安装了老版本,那么会更新到最新版本
yum:
name: httpd
state: latest

- name: 删除 Apache 包
yum:
name: httpd
state: absent

- name: 从testing repo 安装Apache
yum:
name: httpd
enablerepo: testing
state: present

- name: 安装指定版本的 Apache
yum:
name: httpd-2.2.29-1.4.amzn1
state: present

- name: 更新所有包
yum:
name: '*'
state: latest

- name: 更新所有包 除外 kernel & foo
yum:
name: '*'
state: latest
exclude: kernel*,foo*

- name: 从url中安装nginx rpm 包
yum:
name: http://nginx.org/packages/centos/6/noarch/RPMS/nginx-release-centos-6-0.el6.ngx.noarch.rpm
state: present

- name: 从本地文件中安装 nginx rpm 包
yum:
name: /usr/local/src/nginx-release-centos-6-0.el6.ngx.noarch.rpm
state: present

- name: 安装一组包 group install 'Development tools'
yum:
name: "@Development tools"
state: present

- name: 安装一组包 group install 'Gnome desktop'
yum:
name: "@^gnome-desktop-environment"
state: present

- name: yum list 出ansible相关的包并注入 register result ,之后用 debug 模块打印
yum:
list: ansible
register: result

- name: 使用多个仓库来安装包
yum:
name: sos
enablerepo: "epel,ol7_latest"

- name: 从多个禁用仓库安装包
yum:
name: sos
disablerepo: "epel,ol7_latest"
service模块
管理远程节点上的服务,比如httpd,sshd,nfs,crond等
参数
arguments:给命令行提供一些选项,别名: args,也就是args等于arguments
enabled:是否开机启动
name:必选项,服务名称
state:对当前服务执行启动,停止、重启、重新加载等操作(started,stopped,restarted,reloaded)
pattern:定义一个模式,如果通过status指令来查看服务的状态时,没有响应,就会通过ps指令在进程中根据该模式进行查找,如果匹配到,则认为该服务依然在运行
- name: 开启服务
service:
name: httpd
state: started

- name: 关服务
service:
name: httpd
state: stopped

- name: 重启服务
service:
name: httpd
state: restarted

- name: 重载服务
service:
name: httpd
state: reloaded

- name: 设置开机启动服务
service:
name: httpd
enabled: yes

- name: 启动foo服务,根据/usr/bin/foo
service:
name: foo
pattern: /usr/bin/foo
state: started

- name: 重启网络服务的eth0网卡
service:
name: network
state: restarted
args: eth0

ansible all -m service -a 'name=network state=restarted args=eth0'
firewalld模块
为某服务和端口添加firewalld规则,firewalld中有正在运行的规则和永久的规则,firewalld都支持
firewalld模块要求远程节点上的firewalld版本在0.2.11以上
参数
permanent:默认None,是否保存设置即使重启机器
interface,默认None,从zone里增删网卡
port:端口,形式端口/协议 ,端口范围 端口-端口/协议
rich_rule:复杂的firewalld规则
service:服务名,为服务添加firewall规则
source:ip来源
state:状态,enabled、disabled、present、absent
zone:work、drop、internal、external、trusted、home、dmz、public、block
#为https服务添加firewall规则
- firewalld:
service: https
permanent: true
state: enabled
#区域dmz
- firewalld:
zone: dmz
service: http
permanent: true
state: enabled

#为端口号8081/tcp,范围161-162/udp添加firewall规则
- firewalld:
port: 8081/tcp
permanent: true
state: disabled

- firewalld:
port: 161-162/udp
permanent: true
state: enabled

#其他复杂规则
- firewalld:
rich_rule: 'rule service name="ftp" audit limit value="1/m" accept'
permanent: true
state: enabled

- firewalld:
source: 192.0.2.0/24
zone: internal
state: enabled

- firewalld:
zone: trusted
interface: eth2
permanent: true
state: enabled

- firewalld:
masquerade: yes
state: enabled
permanent: true
zone: dmz

- firewalld:
zone: custom
state: present
permanent: true
shell模块/raw模块
在远程节点通过/bin/sh执行命令,如果一个操作可以通过模块yum,copy实现,那么建议不要用shell或command这样的通用命令模块
因为通用命令模块不会根据具体操作的特点进行状态status判断,所以当没有必要再重新执行的时候,他还是会重新执行一次
shell/raw 模块相当于使用SSH 直接执行Linux 命令,不会进入到Ansible 的模块子系统中,也可以执行远程机器的shell脚本,不过shell脚本需要绝对路径
command、shell、raw 和 script 这四个模块的作用和用法都类似,都用于远程执行命令或脚本:
command 模块:执行简单的远程 shell 命令,但不支持解析特殊符号 < > | ; & 等,比如需要重定向时不能使用 command 模块,而应该使用shell模块。但command 模块更安全,因为他不受用户环境的影响, 也很大的避免了潜在的 shell 注入风险
shell 模块:和command相同,但是支持解析特殊 shell 符号,但这样有潜在的 shell 注入风险
raw 模块:执行底层 shell 命令。command 和 shell 模块都是通过目标主机上的 python 代码启动 /bin/bash 来执行命令的,但目标主机上可能没有安装 python,这时只能使用 raw 模块在远程主机上直接启动
script 模块:在远程主机上执行脚本文件 ,和 raw 模块一样,不要求目标主机上已经装好 python
shell:在节点执行shell命令,支持特殊符号 $HOME、<、>、|、;、& ,不支持传入参数
参数
chdir:默认None,运行shell之前cd到某个目录
creates:默认None,创建一个文件,如果这个文件存在则不运行shell
removes:默认None,删除一个文件,如果这个文件不存在则不运行shell
executable:默认None,指定用哪种shell来执行命令,给出shell的绝对路径,比如/bin/bash
- name: 执行shell命令,把标准输出重定向到文件
shell: somescript.sh >> somelog.txt

- name: 改变工作目录在执行shell命令前
shell: somescript.sh >> somelog.txt
args:
chdir: somedir/


- name: somelog.txt不存在并改变工作目录
shell: somescript.sh >> somelog.txt
args:
chdir: somedir/
creates: somelog.txt

- name: bash处理重定向
shell: cat < /tmp/*txt
args:
executable: /bin/bash

- name: 使用模板变量 (always use quote filter to avoid injection)
shell: cat {{ myfile|quote }}


- name: Run expect to wait for a successful PXE boot via out-of-band CIMC
shell: |
set timeout 300
spawn ssh admin@{{ cimc_host }}

expect "password:"
send "{{ cimc_password }}\n"

expect "\n{{ cimc_name }}"
send "connect host\n"

expect "pxeboot.n12"
send "\n"

exit 0
args:
executable: /usr/bin/expect
delegate_to: localhost
command模块
在远程节点执行命令,不支持家目录,重定向,管道 $HOME、<、>、|、;、&
和shell模块类似,但有一个和shell模块不同,command模块多了一个传入参数的方式
参数
chdir:默认None,运行shell之前cd到某个目录
creates:默认None,创建一个文件,如果这个文件存在则不运行shell
removes:默认None,删除一个文件,如果这个文件不存在则不运行shell
- name: 返回执行结果到变量 registered var
command: cat /etc/motd
register: mymotd

- name: command模块多了一个传入参数的方式
command: /usr/bin/make_database.sh arg1 arg2 creates=/path/to/database


- name: This command will change the working directory to somedir/ and will only run when /path/to/database doesn't exist.
command: /usr/bin/make_database.sh arg1 arg2
args:
chdir: somedir/
creates: /path/to/database

- name: safely use templated variable to run command. Always use the quote filter to avoid injection issues.
command: cat {{ myfile|quote }}
register: myoutput
cron模块
管理cron.d 目录 crontab 文件
参数
cron_file:如果指定该选项,则用该文件替换远程主机上的cron.d目录下的用户任务计划,与user参数一起用
backup:默认no,对远程主机上的原任务计划内容修改之前做备份,万一出故障还原回来,而不是备份任务计划
job:要执行的任务,依赖于state=present 别名value ,也就是job等于value
user:默认root,操作哪个用户的crontab
disabled:禁用job,默认no,job状态必须是state=present
name:该任务的描述(必须项)
minute:分钟(0-59,*,*/2,……),不写默认为*
hour:小时(0-23,*,*/2,……),不写默认为*
day:日(1-31,*,*/2,……),不写默认为*,别名dom ,也就是day等于dom
month:月(1-12,*,*/2,……),不写默认为*
weekday:周(0-7,*,……),不写默认为*,别名dow,也就是weekday等于dow
special_time:指定什么时候执行,参数:reboot/yearly/annually/monthly/weekly/daily/hourly
state:状态,参数:present:创建任务 、absent:删除任务
# 5点和2点运行 一个ls命令"0 5,2 * * ls -alh > /dev/null"
- cron:
    name: "check dirs"
    minute: "0"
    hour: "5,2"
    job: "ls -alh > /dev/null"

# 移除名叫an old job的作业
- cron:
    name: "an old job"
    state: absent

# 创建一个作业 "@reboot /some/job.sh"
- cron:
    name: "a job for reboot"
    special_time: reboot
    job: "/some/job.sh"

# 建一个环境变量 "PATH=/opt/bin"
- cron:
    name: PATH
    env: yes
    value: /opt/bin

# Creates an entry like "APP_HOME=/srv/app" and insert it after PATH
# declaration
- cron:
    name: APP_HOME
    env: yes
    value: /srv/app
    insertafter: PATH

# 建一个cron文件存放在 /etc/cron.d
- cron:
    name: yum autoupdate
    weekday: 2
    minute: 0
    hour: 12
    user: root
    job: "YUMINTERACTIVE: 0 /usr/sbin/yum-autoupdate"
    cron_file: ansible_yum-autoupdate

# 删除一个cron文件 /etc/cron.d
- cron:
    name: "yum autoupdate"
    cron_file: ansible_yum-autoupdate
    state: absent

# 删除 "APP_HOME" 环境变量
- cron:
    name: APP_HOME
    env: yes
    state: absent
unarchive模块
unarchive模块用于解压文件,其作用类似于Linux 下的tar 命令。
默认情况下,unarchive的作用是将主控机的压缩包拷贝到远程服务器,然后进行解压。
远程机器需要已经安装gtar/unzip
参数:
remote_src: 默认no,表示在解压文件之前,先将控制节点上的文件复制到远程主机中,然后再进行解压,即使远程主机已经有这个压缩文件也不检查,yes表示解压远程主机上的文件,即使远程主机无这个文件
src: 必须,指定压缩文件的路径,该选项的取值取决于remote_src 的取值, 如果remote_src:取值为yes ,则src 指定的是远程服务器中压缩包的地址,如果remote_src取值为no, 则src 指向的是控制节点中的路径;
dest: 必须,该选项指定的是远程服务器上的绝对路径,表示压缩文件解压的路径
list_files:默认no ,如果该选项取值为yes ,也会解压文件,并且在ansible 的返回值中列出压缩包里的文件
exclude: 解压文件时排除exclude 选项指定的文件或目录列表;
keep_newer:默认False ,如果该选项取值为True ,那么,当目标地址中存在同名的文件,并且文件比压缩包中的文件更新时,不进行覆盖;
owner: 文件或目录解压以后的所有者
group:文件或目录解压以后所属的群组
mode: 文件或目录解压以后的权限
- name: Extract foo.tgz into /var/lib/foo
  unarchive:
    src: foo.tgz
    dest: /var/lib/foo

- name: Unarchive a file that is already on the remote machine
  unarchive:
    src: /tmp/foo.zip
    dest: /usr/local/bin
    remote_src: yes

- name: Unarchive a file that needs to be downloaded (added in 2.0)
  unarchive:
    src: https://example.com/example.zip
    dest: /usr/local/bin
    remote_src: yes
stat模块
stat 模块用于获取远程服务器上的文件信息,其作用类似于Linux 下的stat 命令。
stat模块可以获取atime 、ctime 、mtime 、checksum 、size 、uid 、gid 等信息
参数:
path: 指定文件或目录的路径
# Obtain the stats of /etc/foo.conf, and check that the file still belongs
# to 'root'. Fail otherwise.
- stat:
    path: /etc/foo.conf
  register: st
- fail:
    msg: "Whoops! file ownership has changed"
  when: st.stat.pw_name != 'root'

# Determine if a path exists and is a symlink. Note that if the path does
# not exist, and we test sym.stat.islnk, it will fail with an error. So
# therefore, we must test whether it is defined.
# Run this to understand the structure, the skipped ones do not pass the
# check performed by 'when'
- stat:
    path: /path/to/something
  register: sym

- debug:
    msg: "islnk isn't defined (path doesn't exist)"
  when: sym.stat.islnk is not defined

- debug:
    msg: "islnk is defined (path must exist)"
  when: sym.stat.islnk is defined

- debug:
    msg: "Path exists and is a symlink"
  when: sym.stat.islnk is defined and sym.stat.islnk

- debug:
    msg: "Path exists and isn't a symlink"
  when: sym.stat.islnk is defined and sym.stat.islnk == False


# Determine if a path exists and is a directory.  Note that we need to test
# both that p.stat.isdir actually exists, and also that it's set to true.
- stat:
    path: /path/to/something
  register: p
- debug:
    msg: "Path exists and is a directory"
  when: p.stat.isdir is defined and p.stat.isdir

# Don't do md5 checksum
- stat:
    path: /path/to/myhugefile
    get_md5: no

# Use sha256 to calculate checksum
- stat:
    path: /path/to/something
    checksum_algorithm: sha256
mount 模块
在远程服务器上挂载磁盘,当进行挂盘操作时,如果挂载点指定的路径不存在,将创建该路径
参数
state:可以取值为present, absent, mounted, unmounted , 其中, mounted 与unmounted 用来处理磁盘的挂载和卸载, 并且会正确配置fstab 文件, preset 与absent 只会设置fstab 文件, 不会去操作磁盘
fstype:指定文件系统类型, 当state 取值为present 或mounted 时,该选项为必填选项
src:挂载的设备
path: 挂载点的路径
# Before 2.3, option 'name' was used instead of 'path'
- name: Mount DVD read-only
  mount:
    path: /mnt/dvd
    src: /dev/sr0
    fstype: iso9660
    opts: ro,noauto
    state: present

- name: Mount up device by label
  mount:
    path: /srv/disk
    src: LABEL=SOME_LABEL
    fstype: ext4
    state: present

- name: Mount up device by UUID
  mount:
    path: /home
    src: UUID=b3e48f45-f933-4c8e-a700-22a159ec9077
    fstype: xfs
    opts: noatime
    state: present
synchronize模块
synchronize 模块是对rsync 命令的封装,以便对常见的rsync 任务进行处理
注意:主控机和远程主机都需要安装rsync,rsync daemon必须在主控机和远程主机都运行
synchronize模块不一定能完全代替rsync命令
参数
src : 需要同步到远程服务器的文件或目录
dest :远程服务器保存数据的路径
archive :默认yes ,相当于同时开启recursive 、links 、perms 、times 、owner 、group 、-D 等选项
compress :默认yes ,表示在文件同步过程中是否启用压缩
delete :默认no ,当取值为yes 时,表示删除dest 中存在而src 中不存在的文件
过滤: (.rsync-filter )files to the source directory,排除同步rsync-filter 文件里面指定的文件
- name: Synchronization of src on the control machine to dest on the remote hosts
  synchronize:
    src: some/relative/path
    dest: /some/absolute/path

- name: Synchronization using rsync protocol (push)
  synchronize:
    src: some/relative/path/
    dest: rsync://somehost.com/path/

- name: Synchronization using rsync protocol (pull)
  synchronize:
    mode: pull
    src: rsync://somehost.com/path/
    dest: /some/absolute/path/

- name:  Synchronization using rsync protocol on delegate host (push)
  synchronize:
    src: /some/absolute/path/
    dest: rsync://somehost.com/path/
  delegate_to: delegate.host

- name: Synchronization using rsync protocol on delegate host (pull)
  synchronize:
    mode: pull
    src: rsync://somehost.com/path/
    dest: /some/absolute/path/
  delegate_to: delegate.host

- name: Synchronization without any --archive options enabled
  synchronize:
    src: some/relative/path
    dest: /some/absolute/path
    archive: no

- name: Synchronization with --archive options enabled except for --recursive
  synchronize:
    src: some/relative/path
    dest: /some/absolute/path
    recursive: no

- name: Synchronization with --archive options enabled except for --times, with --checksum option enabled
  synchronize:
    src: some/relative/path
    dest: /some/absolute/path
    checksum: yes
    times: no

- name: Synchronization without --archive options enabled except use --links
  synchronize:
    src: some/relative/path
    dest: /some/absolute/path
    archive: no
    links: yes

- name: Synchronization of two paths both on the control machine
  synchronize:
    src: some/relative/path
    dest: /some/absolute/path
  delegate_to: localhost

- name: Synchronization of src on the inventory host to the dest on the localhost in pull mode
  synchronize:
    mode: pull
    src: some/relative/path
    dest: /some/absolute/path

- name: Synchronization of src on delegate host to dest on the current inventory host.
  synchronize:
    src: /first/absolute/path
    dest: /second/absolute/path
  delegate_to: delegate.host

- name: Synchronize two directories on one remote host.
  synchronize:
    src: /first/absolute/path
    dest: /second/absolute/path
  delegate_to: "{{ inventory_hostname }}"

- name: Synchronize and delete files in dest on the remote host that are not found in src of localhost.
  synchronize:
    src: some/relative/path
    dest: /some/absolute/path
    delete: yes
    recursive: yes

# This specific command is granted su privileges on the destination
- name: Synchronize using an alternate rsync command
  synchronize:
    src: some/relative/path
    dest: /some/absolute/path
    rsync_path: "su -c rsync"

# Example .rsync-filter file in the source directory
# - var       # exclude any path whose last part is 'var'
# - /var      # exclude any path starting with 'var' starting at the source directory
# + /var/conf # include /var/conf even though it was previously excluded

- name: Synchronize passing in extra rsync options
  synchronize:
    src: /tmp/helloworld
    dest: /var/www/helloworld
    rsync_opts:
      - "--no-motd"
      - "--exclude=.git"

# Hardlink files if they didn't change
- name: Use hardlinks when synchronizing filesystems
  synchronize:
    src: /tmp/path_a/foo.txt
    dest: /tmp/path_b/foo.txt
    link_dest: /tmp/path_a/
get_url模块
类似于wget和curl的功能,可以进行下载以及webapi交互等操作
支持HTTP, HTTPS, FTP
参数:
backup:默认no,创建一个包括时间戳信息的备份文件,这样你可以得到原始文件,如果你不正确地弄错了
checksum:
如果将校验和传递给此参数,则将在下载目标文件的摘要后计算摘要,以确保其完整性。格式:<algorithm>:<checksum>,例如:checksum =“sha256:D98291AC [...] B6DC7B97”如果你担心可移植性,只有sha1算法可用于所有平台和python版本。可以安装第三方hashlib库以访问其他算法。此外,如果将校验和传递给此参数,并且文件位于dest位置下,则将计算destination_checksum,如果校验和等于destination_checksum,则将跳过文件下载(除非force为true)
dest:目标文件,必须
force:默认no,当目标文件跟源文件不一样时会强制覆盖目标文件,如果一样,不会执行复制,别名thirsty,也就是thirsty等于force
mode:可以是数字形式也可以是符号形式,0644 ,01777,u+rwx , u=rw,g=r,o=r
owner:属主
group:属组
timeout:默认10秒,单位秒 超时请求
url:HTTP, HTTPS, FTP形式URL
url_username:用于HTTP基本认证的用户名。对于允许空密码的站点,可以在不使用url_password的情况下使用此参数。
url_password:用于HTTP基本认证的密码。如果未指定url_username参数,则不会使用url_password参数。
use_proxy:默认yes,如果no,它将不使用代理,即使在目标主机上的环境变量中定义了一个代理。
validate_certs:默认yes,如果no,SSL证书将不会验证。这只应在使用自签名证书的个人控制站点上使用。
tmp_dest:临时文件下载到的绝对路径。默认为TMPDIR,TEMP或TMP env变量或特定于平台的值
- name: 下载文件 foo.conf
  get_url:
    url: http://example.com/path/file.conf
    dest: /etc/foo.conf
    mode: 0440


- name: 下载并校验文件(sha256)
  get_url:
    url: http://example.com/path/file.conf
    dest: /etc/foo.conf
    checksum: sha256:b5bb9d8014a0f9b1d61e21e796d78dccdf1352f23cd32812f4850b878ae4944c

- name: D下载并校验文件 (md5)
  get_url:
    url: http://example.com/path/file.conf
    dest: /etc/foo.conf
    checksum: md5:66dffb5228a211e61d6d7ef4a86f5758

- name: 用ftp下载一个文件
  get_url:
    url: file:///tmp/afile.txt
    dest: /tmp/afilecopy.txt
fetch模块
从远程机器拷贝文件到控制机
参数
dest:必选项,必须是一个目录,假如目录是/backup/,文件名是/etc/profile,机器是192.168.3.6,那么保存的路径是/backup/192.168.3.6/etc/profile
flat:如果dest是/backup/而不是/backup,那么就会修改默认行为,那么保存的路径是/backup/profile
src :必选项,远程机器的文件位置,必须是一个文件,不能是目录,后续可能会支持目录
validate_checksum:默认yes,验证源文件和目标文件的校验和
# 存储文件在目标路径/tmp/fetched/192.168.3.6/tmp/somefile
- fetch:
    src: /tmp/somefile
    dest: /tmp/fetched

# 直接定义一个路径
- fetch:
    src: /tmp/somefile
    dest: /tmp/prefix-{{ inventory_hostname }}
    flat: yes

# 定义一个目标路径
- fetch:
    src: /tmp/uniquefile
    dest: /tmp/special/
    flat: yes

# 存储在针对playbook的相对路径
- fetch:
    src: /tmp/uniquefile
    dest: special/prefix-{{ inventory_hostname }}
    flat: yes
core模块和extra模块
在ansible文档上查看单个模块会显示是core模块还是extra模块
yum就是一个core模块,archive就是一个extra模块
core模块
不需要额外下载和配置,安装ansible后就可以直接使用
extra模块
需要进行下载和额外配置才能使用
额外的模块托管在Github上的,ansible-modules-extras <http://github.com/ansible/ansible-modules-extras>
使用方法
1、下载extra模块
cd /tmp/
git clone https://github.com/ansible/ansible-modules-extras.git
2、修改配置文件
/etc/ansible/ansible.cfg
#library = /tmp/ansible-modules-extras/
ansible配置文件 ansible.cfg
注意:修改了配置文件不需要重启ansible,因为ansible不是服务端,没有后台运行,修改了配置文件马上生效
ansible.cfg提供的是默认配置,在inventory文件里或playbook里没有定义的配置,ansible.cfg提供默认配置,例如sudo_user这个选项
module_set_locale 设置本地的环境变量
inventory = /etc/ansible/hosts 这个一个静态的ini格式的文件,指定主机文件、主机目录、可执行文件的路径,默认为/etc/ansible/hosts.
#library = /usr/share/my_modules/ Ansible默认搜寻extra模块的位置
remote_tmp = $HOME/.ansible/tmp Ansible 通过远程传输模块到远程主机,然后远程执行,执行后在清理现场,所以你看不到远程主机有python脚本或模块存在
pattern = * 如果没有提供“hosts”节点,这是playbook要通信的默认主机组.默认值是对所有主机通信
forks = 5 在与主机通信时的默认并行进程数 ,默认是5
poll_interval = 15 当具体的poll interval 没有定义时,多少时间回查一下这些任务的状态, 默认值是15秒
sudo_user = root sudo使用的默认用户 ,默认是root
#ask_sudo_pass = True 用来控制Ansible playbook 在执行sudo之前是否询问sudo密码.默认为False
#ask_pass = True 控制Ansible playbook 是否会自动默认弹出密码,默认为False,如果改为true,ansible命令就不需要用-k选项
transport = smart 通信机制.默认 值为’smart’。如果本地系统支持 ControlPersist技术的话,将会使用(基于OpenSSH)‘ssh’,如果不支持讲使用‘paramiko’.其他传输选项包括‘local’, ‘chroot’,’jail’等等
#remote_port = 22 远程SSH端口。 默认是22
module_lang = C 模块和系统之间通信的计算机语言,默认是C语言
gathering = implicit 控制默认facts收集(远程系统变量). 默认值为’implicit’, 每一次play,facts都会被收集
#roles_path = /etc/ansible/roles roles 路径指的是’roles/’下的目录,用于playbook搜索Ansible roles
#host_key_checking = False 检查主机密钥
sudo_exe = sudo 如果在其他远程主机上使用另一种方式执sudo操作.可以使用该参数进行更换
#what flags to pass to sudo 传递sudo之外的参数
#sudo_flags = -H
#SSH timeout SSH超时时间
timeout = 10
#remote_user = root 使用/usr/bin/ansible-playbook链接的默认用户名,如果不指定,会使用当前登录的用户名
#log_path = /var/log/ansible.log 日志文件存放路径
#module_name = command ansible命令执行默认的模块
#executable = /bin/sh 在sudo环境下产生一个shell交互接口. 用户只在/bin/bash的或者sudo限制的一些场景中需要修改
#jinja2_extensions = jinja2.ext.do,jinja2.ext.i18n 允许开启Jinja2拓展模块
#private_key_file = /root/.ssh/id_rsa 私钥文件存储位置
ansible_managed = Ansible managed: {file} modified on %Y-%m-%d %H:%M:%S by {uid} on {host} 这个设置可以告知用户,Ansible修改了一个文件,并且手动写入的内容可能已经被覆盖.
#display_skipped_hosts = True 显示任何跳过任务的状态 ,默认是显示
#error_on_undefined_vars = False 如果所引用的变量名称错误的话, 将会导致ansible在执行步骤上失败
#system_warnings = True 允许禁用系统运行ansible相关的潜在问题警告
#deprecation_warnings = True 允许在ansible-playbook输出结果中禁用“不建议使用”警告
#command_warnings = False 当shell和命令行模块被默认模块简化时,Ansible 将默认发出警告
#nocows = 1 默认ansible可以调用一些cowsay的特性 开启/禁用:0/1
#nocolor = 1 输出带上颜色区别, 开启/关闭:0/1
在线查看ansible.cfg文件
https://raw.githubusercontent.com/ansible/ansible/devel/examples/ansible.cfg
ansible配置文件解释列表
http://docs.ansible.com/ansible/latest/installation_guide/_config.html
http://docs.ansible.com/ansible/latest/installation_guide/intro_configuration.html
ansible会按照下面顺序查找配置文件
ANSIBLE_CONFIG (environment variable if set)
ansible.cfg (in the current directory)
~/.ansible.cfg (in the home directory)
/etc/ansible/ansible.cfg
inventory配置
指定inventory配置文件
1、在/etc/ansible/ansible.cfg中修改
inventory = /etc/ansible/hosts
2、命令行中传递inventory配置文件
利用参数-i传递主机清单配置文件
ansible-playbook -i /etc/ansible/hosts site.yml
静态inventory
一组相似的 hostname , 可简写如下,一般建议使用ip,而不使用主机名或域名,需要反解析:
[webservers]
www[01:50].example.com
数字的简写模式中,01:50 也可写为 1:50,意义相同.你还可以定义字母范围的简写模式:
[databases]
db-[a:f].example.com
inventory变量
主机变量
分配变量给主机很容易做到,这些变量定义后可在 playbooks 中使用:
[atlanta]
host1 http_port=80 maxRequestsPerChild=808 #maxRequestsPerChild 称为主机变量
host2 http_port=303 maxRequestsPerChild=909
组变量
也可以定义属于整个组的变量,这样就不用单独一台一台主机定义变量:
[atlanta]
host1
host2
[atlanta:vars]
ntp_server=ntp.atlanta.example.com
proxy=proxy.atlanta.example.com
[docker] #定义了一个组叫docker
172.16.1.11 #组下面的主机
172.16.1.12
#172.11.11.11 # ansible_ssh_pass='123456'

[docker:vars] #针对docker组使用inventroy内置变量定义了ssh登陆密码,中括号里写  [组名:vars]
ansible_ssh_pass='123456'

[kvm]
172.16.1.13
172.16.1.14

[docker:children] #组的继承,docker下面包含一个kvm组,kvm组里会继承docker组所有变量ansible_ssh_pass
kvm
按目录结构定义变量
通过/etc/ansible/ 定义文件表示变量
创建:/etc/ansible/host_vars/
创建:/etc/ansible/group_vars/
host_vars目录下文件名,要和/etc/ansible/hosts文件里的host名一致,并且是yaml格式文件
group_vars目录下文件名,要和/etc/ansible/hosts文件里的group名一致,并且是yaml格式文件
host_vars目录下目录名,ansible会读取目录下所有文件内容,并且是yaml格式文件
group_vars目录下目录名,ansible会读取目录下所有文件内容,并且是yaml格式文件
比如
主机变量
/etc/ansible/hosts
client_105 #主机名
/etc/ansible/host_vars/client_105.yml
---
client_105_key: 105
组变量
/etc/ansible/hosts
[kvm]
192.168.3.6
/etc/ansible/group_vars/kvm.yml
---
ntp_server: ntp.atlanta.example.com
目录下
/etc/ansible/host_vars/client_105/1.yml
/etc/ansible/host_vars/client_105/2.yml
/etc/ansible/host_vars/client_105/x.yml
/etc/ansible/group_vars/kvm/1.yml
/etc/ansible/group_vars/kvm/2.yml
/etc/ansible/group_vars/kvm/x.yml
Inventory行为参数(behavioral inventory parameters )
覆盖Ansible 默认配置时
ansible_ssh_host
将要连接的远程主机名.与你想要设定的主机的别名不同的话,可通过此变量设置.
ansible_ssh_port
ssh端口号.如果不是默认的端口号,通过此变量设置.
ansible_ssh_user
默认的 ssh 用户名
ansible_ssh_pass
ssh 密码(这种方式并不安全,我们强烈建议使用ansible命令行中 -k 参数 或 SSH 密钥)
ansible_sudo_pass
sudo 密码(这种方式并不安全,我们强烈建议使用 -K)
ansible_sudo_exe (new in version 1.8)
sudo 命令路径(适用于1.8及以上版本)
ansible_become
强制使用sudo提权
ansible_become_method
使用哪种提权方法,例如sudo
ansible_become_user
sudo用户,切换到哪个用户执行命令
ansible_become_pass
sudo用户密码
ansible_connection
与主机的连接类型.比如:local, ssh ,winrm, paramiko. Ansible 1.3 以前默认使用 paramiko.1.3 以后默认使用 'smart','smart' 方式会根据是否支持 ControlPersist, 来判断'ssh' 方式是否可行.从Ansible 1.3 版本开始, Ansible 默认使用Open SSH实现各服务器间通信
ansible_ssh_private_key_file
ssh 使用的私钥文件.适用于有多个密钥,而你不想使用 SSH 代理的情况.
ansible_shell_type
目标系统的shell类型.默认情况下,命令的执行使用 'bash' 语法,可设置为 'csh' 或 'fish'.
ansible_python_interpreter
目标主机的 python 路径.适用于的情况: 系统中有多个 Python, 或者命令路径不是"/usr/bin/python",比如 \*BSD, 或者 /usr/bin/python
不是 2.X 版本的 Python.我们不使用 "/usr/bin/env" 机制,因为这要求远程用户的路径设置正确,且要求 "python" 可执行程序名不可为 python以外的名字(实际有可能名为python26).
与 ansible_python_interpreter 的工作方式相同,可设定如 ruby 或 perl 的路径
多个inventory列表
配置支持多个inventory
首先需要修改ansible.cfg中inventory 的定义改成一个目录
inventory = /etc/ansible/inventory #/etc/ansible/inventory 是一个目录
然后我们在目录里面放入多个hosts文件
[root@ceshi2 ansible]# tree inventory
inventory
├── docker
└── kvm
cat docker
[docker]
172.16.1.11
172.16.1.12
#172.11.11.11 # ansible_ssh_pass='123456'
[docker:vars]
ansible_ssh_pass='123456'
cat kvm
[kvm]
172.16.1.13
172.16.1.14
ansible all -i /etc/ansible/inventory -a 'uptime' # -i可以指定主机文件或主机目录
动态inventory
动态inventory的意思是所有的变量可以从外部获取,也就是说我们可以从CMDB以及zabbix系统拉取所有的主机信息然后使用ansible进行管理。
引用inventory只需要把ansible.cfg文件中的inventory定义值改成一个执行脚本即可。
inventory = /etc/ansible/inventory.py #/etc/ansible/inventory.py 是一个py文件
#!/usr/bin/env python
# -*- coding:utf-8 -*-
# @Author : huazai
# @Time : 2017/11/27 14:11
# @File : inventory.py
# @Description :

import json
host1ip = ['192.168.1.15']
host2ip = ['192.168.1.110']
group = 'test11'    # 给一个组名
group2 = 'test22'
hostdata = {group:{"hosts":host1ip},group2:{"hosts":host2ip}}
print json.dumps(hostdata,indent=4)
ansible -i inventory.py test11 -a 'uptime' -k
SSH password:
192.168.1.15 | SUCCESS | rc=0 >>
07:25:27 up 3:56, 3 users, load average: 0.00, 0.00, 0.00
192.168.1.110 | SUCCESS | rc=0 >>
07:25:27 up 7 min, 3 users, load average: 0.00, 0.02, 0.00
按照Ansible 的约定,我们需要写一个动态脚本来获取服务器的列表。这个脚本必须支持 --list 选项和--host 选项。
--list 选项以json 的格式返回以组名为key ,服务器列表为value 的数据。
--host 返回一个字典,该字典中包含了这个服务器的详细信息。
python hosts.py --list
{
    "webservers":[
     "foo.example.com",
     "bar.example.com"
    ],
    "dbservers ": [
     "one.example.com",
     "two.example.com",
     "three.example.com"
    ]
}


python hosts.py  --host=foo.example.com
{
    "ansible_user":"lmx",
    "ansible_port":2099
}
表结构
mysql > show create table hosts\G
Create Table: CREATE TABLE 'hosts'(
`id`int(11) NOT NULL AUTO_INCREMENT,
`host` varchar(15) DEFAULT NULL ,
`groupname` varchar(15) DEFAULT NULL ,
`username` varchar(15) DEFAULT NULL ,
`port` int(11) DEFAULT  '22',
PRIMARY KEY ('id')
) ENGINE=InnoDB AUTO_INCREMENT=3 DEFAULT CHARSET=utf8mb4


id 是表的主键,
host 是服务器的ip 地址或主机名称
groupname 是Ansible 中的组名
username  SSH 连接的用户名
port SSH 连接的端口号
hosts.py
#!/usr/bin/env python
# -*- coding:utf-8 -*-
# @Author : huazai
# @Time : 2018/5/31 9:47
# @File : dd.py
# @Description :


from __future__ import  print_function
import argparse
import json
from collections import  defaultdict
from contextlib import  contextmanager

import pymysql


def to_json(in_dict):
    return json.dumps(in_dict,sort_keys=True,indent=2)


@contextmanager
def get_conn(**kwargs):
    conn=pymysql.connect(**kwargs)
    try:
        yield  conn   #关键是yield 和contextmanager
    finally:
        conn.close()


def parse_args():
    parse=argparse.ArgumentParser(description='openstack inventory module')
    group=parse.add_mutually_exclusive_group(required=True)
    group.add_argument('--list',action='store_true',help='list active servers')
    group.add_argument('--host',help='list details about the specific host')
    return parse.parse_args()


def list_all_hosts(conn):
    hosts=defaultdict(list)

    with conn as cur:   #上下文管理
        cur.execute('select * from hosts')
        rows=cur.fetchall()
        for row in rows:
            no,host,group,user,port = row
            hosts[group].append(host)
    return  hosts


def get_host_detail(conn,host):
    details = {}
    with conn as cur:
        cur.execute("select * from hosts where host='{0}'".format(host))
        rows = cur.fetchall()
        if rows:
            no,host,group,user,port=rows[0]
            details.update(ansible_user=user,ansible_port=port)

    return details


def main():
    parser=parse_args()
    with get_conn(host='127.0.0.1',user='abc',passwd='abc',db='test') as conn:
        if parser.list:
            hosts=list_all_hosts(conn)
            print(to_json(hosts))
        else:
            details = get_host_detail(conn,parser.host)
            print (to_json(details))

if __name__=='__main__':
    main()
ansible test -i hosts.py -m ping
主机分组切片
- command: /opt/application/migrate_db.py
  when: inventory_hostname == webservers[0]
playbook剧本
playbook选项
https://github.com/lorin/ansible-quickref
注意:
yaml文件里 等于号 等价于 冒号, mode=600 等价于 mode: 600
playbook剧本主要三部分
1、在什么机器以什么身份执行,hosts,users,sudo,sudo_user
2、执行的任务是什么,tasks
3、善后的任务有什么,handlers
YAML语法
1、文件开始符
---
2、数组list,横线后面有空格
- element1
- element2
- element3
3、字典 hash or dictionary,冒号后面有空格
key: value
4、复杂的字典
字典嵌套
languages:
ruby: Elite
python: Elite
dotnet: Lame
字典和数组的嵌套
- languages:
ruby: Elite
python: Elite
dotnet:
- lisp
- fortran
- erlang
5、注意
变量里有冒号:时要加引号
foo: "somebody i a colon here: so i did"
变量以为"{"开头时要加引号
foo: "{{ variable }}"
YAML 的语法规则如下
---:声明这是一个yaml文件,非必须
YAML 中的字段大小写敏感
YAML 与Python 一样,使用缩进表示层级关系
YAML 的缩进不允许使用Tab 键,只允许使用空格,且空格的数目不重要,只要相同层级的元素左侧对齐即可
"#"表示注释,从这个字符一直到行尾都会被解析器忽略
hosts:被控主机ip,或主机组,或all
remote_user:以某个用户身份执行
vars:变量
tasks:playbook核心,定义顺序执行的动作action,每个action调用一个ansible模块
action语法
name:每个action最好有name属性,这是供人类读的,写name是个好习惯,playbook执行时会显示对应的name
module:module_parameter=module_value
handers:playbook的event处理操作,有且仅有在action触发时才会执行,但多次触发只执行一次,并按照声明顺序执行
参数:传入到模块执行的参数,比如,copy模块需要src,dest,owner,group,mode等参数
YAML 支持三种格式的数据,分别是:
对象:键值对的集合,又称为映射,类似于Python 中的字典
数组: 一组按次序排列的值,又称为序列(sequence), 类似于Python 中的列表
纯量(scalars): 单个的、不可再分的值,如字符串、布尔值与数字
安装PyYAML模块
pip install PyYAML
#读取yaml文件
import yaml
with open('data.yaml') as f:
    print (yaml.load(f))
['Apple','Orange','Strawberry','Mango']
YAML 中可以使用多种方式指定布尔值。例如,下面的YAML 格式都是合法的:
create_key: yes
needs_agent:no
needs_agent:NO
knows_oop: True
likes_emacs: TRUE
uses_cvs: false
转换为Python 代码以后,对变量的取值进行了格式化
{'create_key': True ,
'know_oop': True,
'likes_emacs': True ,
'needs_agent': False,
'uses_cvs': False}
注意:当playbook使用vars.yml外部变量文件的时候,变量文件里面的yes、no要加单引号否则会当成布尔值
cat  vars.yml
---
redis_settings:
 appendonly: 'no' #no和yes需要使用加单引号的字符串,否则会当成布尔值
双引号引用字符串
如果字符串中包含特殊字符,需要使用双引号包含起来。
例如,下面的例子中,字符串包含冒号
冒号对于YAML 来说是一个特殊字符,因此,需要使用双引号包含起来。
foo: "somebody said I should put a colon here: so I did"
如果字符串的内容比较长,可以使用">"来折叠换行。也就是说,接下来缩进的内容都是这个字符串的一部分。
that: >
  Foo
  Bar
针对每一组主机的一个action组成一个play,一般一个playbook中只包含一个play
tasks中每个action都是对模块的调用,在每个action中
冒号前是模块的名字
冒号后是模块的参数
web.yml
- hosts: test \\主机组,在/etc/ansible/hosts定义
remote_user: root \\远端执行任务的用户
tasks: \\任务
-name: install httpd \\任务描述
command: yum -y install httpd \\调用ansible的command模块安装httpd
-name: provide httpd.conf \\任务描述
copy:src="/root/httpd.conf" dest="/etc/httpd/conf/httpd.conf" \\调用ansible的copy模块,httpd安装完成后将事先准备好的httpd.conf文件复制到/etc/httpd/conf目录下
tags: conf \\给此任务打标记,可单独执行标记的任务
notify: \\文件内容变更通知
- server restart \\通知到指定的任务
- name: server start \\任务描述
service: name=httpd state=started enabled=true \\调用ansible的service模块的属性定义安装完成httpd以后httpd服务的管理
handlers: \\定义接受关注的资源变化后执行的动作
- name: server restart \\任务描述
service: name=httpd state=restarted \\当关注的资源发生变化后调用service模块,采取的响应的动作
例子
heartbeat.yaml
    - hosts: hbhosts
    remote_user: root
    tasks:
        - name: ensure heartbeat latest version
          yum: name=heartbeat state=present
        - name: authkeys configure file
          copy: src=/root/hb_conf/authkeys dest=/etc/ha.d/authkeys
        - name: authkeys mode 600
          file: path=/etc/ha.d/authkeys mode=600
          notify:
            - restart heartbeat
        - name: ha.cf configure file
          copy: src=/root/hb_conf/ha.cf dest=/etc/ha.d/ha.cf
          notify:
            - restart heartbeat
    handlers:
        - name: restart heartbeat
            service: name=heartbeat state=restarted
或
例子
heartbeat.yaml
---
- hosts: hbhosts
  remote_user: root
  become: yes
  become_method: sudo
  tasks:
      - name: ensure heartbeat latest version
        yum: name=heartbeat state=present
      - name: authkeys configure file
        copy: src=/root/hb_conf/authkeys dest=/etc/ha.d/authkeys
      - name: authkeys mode 600
        file: path=/etc/ha.d/authkeys mode=600
        notify:
          - restart heartbeat
      - name: ha.cf configure file
        copy: src=/root/hb_conf/ha.cf dest=/etc/ha.d/ha.cf
        notify:
          - restart heartbeat
  handlers:
      - name: restart heartbeat
          service: name=heartbeat state=restarted
参数的写法
key=value
file: path=/etc/ha.d/authkeys mode=600 owner=root
或

多行
file: path=/etc/ha.d/authkeys
      mode=600  owner=root
或

yaml字典格式
file:
 path: /etc/ha.d/authkeys
 mode: 600
 owner: root
handler
每个编程语言都有event机制,handler就是playbook的event
handlers里面每个handler都是对模块的一次调用
只有在action的状态为changed时才会执行该action的handler
testhandler.yaml
    - hosts: lb
    remote_user: root
    vars:
        random_number: "{{ 1000 | random }}"
    tasks:
        - name: copy the /etc/hosts to /tmp/hosts.{{ 1000 | random }}
          copy: src=/etc/hosts dest=/tmp/hosts.{{ 1000 | random }}
          notify:   #因为文件名是随机数,源和目标永远都不一样,所以永远都会执行这个handler
            - call by /tmp/hosts.random_number
        - name: copy the /etc/hosts to /tmp/hosts
          copy: src=/etc/hosts dest=/tmp/hosts
          notify:
            - call by /tmp/hosts


    handlers:
        - name: call by /tmp/hosts
            debug: msg="call by /tmp/hosts"
        - name: call by /tmp/hosts.random_number
            debug: msg="call by /tmp/hosts.random_number"
notify里的名字跟handlers里的name一一对应
call by /tmp/hosts -》call by /tmp/hosts
call by /tmp/hosts.random_number -》 call by /tmp/hosts.random_number
handler按一定顺序执行,即使call by /tmp/hosts.random_number先触发,handler依然先执行call by /tmp/hosts
handler 只会在所有task 执行完后执行。并且,即便一个handler 被触发多次,它也只会执行一次。handler 并不是在被触发时立即执行,而是按照action中定义的顺序执行。
一般情况下, handler 都位于action的最后,即在所有任务执行完成以后再执行。
Ansible 官方文档提到handler 的唯一用途,就是重启服务与服务器
serial选项
串行执行,serial指定串行值
无论webservers 组中有多少服务器,无论--forks 选项取值为多少, 一次只更新一台服务器,更新完成以后再更新下一台服务器
- name: test play
  hosts: webservers
  serial: 1
local_action选项
使用local_action只在主控机执行操作
tasks:
- name: take out of load balancer pool
  local_action: command /usr/bin/take_out_of_pool    {{inventory_hostname}}
playbook变量
1、用户自定义变量,vars, vars_files ,vars_prompt,这些变量都可以用在jinja2文件里
2、来自远程主机收集到的facts变量
3、内置系统变量,template模块
4、把action结果传入变量,叫注册变量
5、在执行playbook时传入变量,叫额外变量
变量名约束
变量名称应为字母,数字和下划线。
变量应始终以字母开头。
变量名不应与python属性和方法名冲突。
变量作用域
global全局作用域: 设置在config, 环境变量, 和命令行中的变量
play: 作用于play和包含的structure, 变量, role中的default和vars
host: inventory, facts和register产生的变量, 只作用于某个host
变量优先级(从低到高)
role defaults
inventory vars
inventory group_vars
inventory host_vars
playbook group_vars
playbook host_vars
host facts
play vars
play vars_prompt
play vars_files
registered vars
set_facts
role and include vars
block vars (only for tasks in block)
task vars (only for the task)
extra vars (always win precedence)
用户自定义变量
vars关键字自定义变量,使用{{}}引用起来
cat a.yml
---
    - hosts: test
      gather_facts: False
      vars:
        var1: haha
        var2: your name is
      tasks:
        - debug: msg="{{var2}} {{var1}}"


cat b.yml
---
- hosts : test
  gather_facts: False
  vars_files:
    - /tmp/var_file1.yml   #建议用绝对路径
  tasks:
    - debug: msg="{{var1}}"


var_file1.yml 里的内容:
var1:  hello Han×××


cat b.yml
---
- hosts: client_105
  gather_facts: False
  vars_prompt:
    - name: 'client_105_key'
      prompt: 'Input key'  #交互时提示信息
      private: no          #输入数据是否显示
  tasks:
    - name: print 105_key
      debug: msg="{{ client_105_key }}"
facts变量
ansible通过setup模块收集主机信息,这些主机信息叫facts
每个playbook执行前都会默认执行setup模块,所以这些facts信息可以直接以变量形式使用
setup 模块收集到的信息,是 json 格式
说明:通常facts数据的顶级key为ansible_facts,在引用时应该将其包含在变量表达式中。
但自动收集的facts比较特殊,它以ansible_facts作为key,ansible每次收集后会自动将其注册为变量,
所以facts中的数据都可以直接通过变量引用,甚至连顶级key ansible_facts都要省略。
cat a.yml
---
    - hosts: test
      tasks:
        - debug: msg="{{ansible_all_ipv4_addresses}} {{ansible_os_family}}"
搜集facts信息会额外消耗时间,如果不需要facts信息,在playbook中通过关键字
gather_facts来控制是否收集
cat a.yml
---
    - hosts: test
      gather_facts: no
内置系统变量,template模块
在playbook中定义的变量,可以直接在template中使用,同时facts变量也可以直接在template中使用
当然也包含在inventory里面定义的host和group变量。只要是在playbook中可以访问的变量,都可以在template文件中使用。
下面使用template模块复制文件index.html.j2,并且替换index.html.j2中的变量
facts变量
{{ ansible_hostname }}
{{ ansible_default_ipv4.address }}
用户自定义的变量
{{ defined_name }}


index.html.j2文件
<html>
<title>Demo</title>
<body>
<div class="block" style="height: 99%;">
    <div class="centered">
        <h1>#46 Demo \{\{ defined_name \}\}</h1>
        <p>Served by \{\{ ansible_hostname \}\} (\{\{ ansible_default_ipv4.address \}\}).</p>
    </div>
</div>
</body>
</html>
a.yml
cat a.yml
---
- hosts : web
  vars:
      defined_name: "hello lin"
  tasks:
      - name: write the default index.html file
      template: src=/tmp/index2.html.j2  dest=/var/www/html/index.html
注册变量
register关键字,多个action之间传递变量,上一个action结果传递到下个action
cat a.yml
---
- hosts : test
  tasks:
    - shell : ls /tmp/
      register: result
      ignore_errors: True
    - debug: msg="{{result.stdout}}"

说明:
执行shell 模块后,返回信息是 json 格式的。再通过 register 注册到 result 变量。
然后,通过 debug 模块,输出 result 变量的stdout的值。
额外变量
第一种情况:hosts和user必须从命令行传入值,如果在命令行中不传入值则playbook报错
第二种情况:var1可以从命令行传入值,如果在命令行传入值则会覆盖playbook里面var1定义值(变量优先级)
第一种情况
cat a.yml
---
- hosts : "{{hosts}}"
  remote_user: "{{user}}"
  gather_facts: False
  tasks:

    - debug: msg="{{var1}}"

第二种情况
cat a.yml
---
- hosts : web
  gather_facts: False
  vars:
      var1: "AAA"
  tasks:

    - debug: msg="{{var1}}"
命令行传入变量值三种方式
普通方式传入
ansible-playbook a.yml -e 'hosts=web user=root'
json方式传入
ansible-playbook a.yml -e '{'hosts':'web','user':'root'}'
外部文件方式传入
ansible-playbook a.yml -e '@/tmp/vars.json'
playbook引用json格式变量
facts变量或者register返回的变量都是json格式
在playbook里面引用json格式变量,有三种方法
例子
注册变量返回的结果是json格式
- shell : ls /tmp/
  register: result
- debug: msg="{{result}}"
TASK [debug] **************************************************
ok: [192.168.188.109] => {
    "msg": {
        "changed": true,
        "cmd": "echo hello world",
        "delta": "0:00:00.001890",
        "end": "2018-01-18 17:12:00.178123",
        "failed": false,
        "rc": 0,
        "start": "2018-01-18 17:12:00.176233",
        "stderr": "",
        "stderr_lines": [],
        "stdout": "hello world",
        "stdout_lines": [
            "hello world"
        ]
    }
}
1、点号
- debug: msg="{{result.stdout}} "
2、中括号
- debug: msg="{{result['stdout']}} "
3、访问json里面的列表
- debug: msg="{{result['stdout_lines'][0]}} "
playbook逻辑控制语句
when:条件判断语句
loop:循环语句,vars插件和lookup插件提供,loop已经废弃,with_items
block:把几个action组成一个代码块,便于针对一组操作异常进行处理
注意:{{ item }}这个变量名是ansible内置的,不能变
when语句
远程主机是debian就立刻关机
tasks:
  - name: "shutdown debian systems"
    command: /sbin/shutdown  -t now
    when: ansible_os_family == "Debian"
判断真假
vars:
   epic: true
tasks:
   - shell: echo "HELLO"
   when: epic
   或
   when: not epic
判断变量是否已经定义了
tasks:
   - shell: echo "HELLO {{ foo }}"
   when: foo is defined

tasks:
   - shell: echo "not defined foo"
   when: foo is not  defined
使用and ,or进行判断
tasks:
   - shell: echo "HELLO {{ foo }}"
   when: foo is defined

tasks:
   - shell: echo "not defined foo"
   when: (foo is not  defined) or (ansible_distribution=="Debian")
loop语句
with_lines
with_fileglob
with_first_found
with_diet
with_flattened
with_indexed_items
with_nested
with_random_choice
with_sequence
with_together
with_subelements
with_file
列表循环
- name: add users
  user: name={{item}}  state=present  groups=wheel
  with_items:
    - testuser1
    - testuser2

vars:
  somelist: ['testuser1','testuser2']
tasks:
- name: add users
  user: name={{item}}  state=present  groups=wheel
  with_items: "{{somelist}}"
#如果列表里面的hash类型

- name: add users
  user: name={{ item.name }}  state=present  groups={{ item.groups }}
  with_items:
    - { name : 'testuser1',groups : 'wheel'}
    - { name : 'testuser2',groups : 'vsftp'}
#如果某个选项大于3就打印
vars:
  item: [1,2,3,4,5,6,7]
tasks:
- name: add users
  command: echo {{item}}
  with_items: item
  when: item > 3
嵌套循环
- name: give users access to multiple databases
  mysql_user: name={{ item[0] }} priv={{ item[1] }}.*:ALL append_privs=yes password=foo
  with_nested:
    - [ 'alice', 'bob' ]
    - [ 'clientdb','employeedb','providerd' ]
哈希循环
---
- hosts: all
  gather_facts: False
  vars:
   user:
    Bob_hou:
     name: Bob_Hou
     shell: bash
    Jmilk:
     name: Jmilk
     shell: zsh
  tasks:
  - name: debug loops
    debug: "msg=\"name -----> {{item.key }} value -----> {{item.value.name }} shell -----> {{ item.value.shell }}\""
    with_dict: "{{ user }}"
文件循环
---
- hosts: all
  gather_facts: False
  tasks:
  - name: debug loops
    debug: "msg=\"files -----> {{ item }}\""
    with_fileglob:
    - /root/playbook/*.yaml
条件判断循环,until\retries\delay
---
- hosts: all
  gather_facts: False
  tasks:
  - name: debug loops
    shell: cat /root/ansible
    register: host
    until: host.stdout.startswith("cat")
    retries: 5
    delay: 5
序列循环
类似于Python 中的range 函数。
在使用with_sequence 时,我们可以指定起点、终点和步长。
# create some test users
- user:
  name:"{{item}}"
  state: present
  groups: "events"
  with_sequence: start=0 end=32 format=testuser%02x
register循环,接受多个task的结果
这个是jinja2的语法:{% for i in ret.results %}
---
- hosts: all
  gather_facts: True
  tasks:
  - name: debug loops
    shell: "{{ item }}"
    with_items:
    - hostname
    - uname
    register: ret
  - name: display loops
    debug: "msg=\"{% for i in ret.results %} {{ i.stdout }} {% endfor %}\""
标签
标签tags执行部分action,tags可以和一个play(就是很多个task)或者一个task进行捆绑
ansible-playbook提供了“--skip-tags”和“--tags” 来指明是跳过特定的tags还是执行特定的tags。
always
tagged
untagged
all
- hosts: test-agent
  tasks:
    - command: echo test1
      tags:
         - test1
    - command: echo test2
      tags:
         - test2
    - command: echo test3
      tags:
         - test3
当执行 ansible-playbook test1.yml --tags="test1,test3" ,则只会执行 test1和test3的echo命令
当执行 ansible-playbook test1.yml --skip-tags="test2" ,同样只会执行 test1和test3的echo命令
- hosts: test-agent1
  tags:
     - play1
  tasks:
     - command: echo This is
     - command: echo agent1
- hosts: test-agent2
  tags:
     - play2
  tasks:
     - command: echo This is
     - command: echo agent2
- hosts: test-agent3
  tags:
     - play3
  tasks:
     - command: echo This is
     - command: echo agent3
当执行 ansible-playbook test2.yml --tags="play1,play3" ,则只会执行 play1和play3的tasks。
当执行 ansible-playbook test2.yml --skip-tags="play2" ,同样只会执行 test1和test3的tasks。
always标签
即使只执行某个标签,always标签也会被执行
tasks:
  - debug: msg="always print this debug message"
    tags:
     - always

  - yum: name{{item}} state=installed
    with_items:
      - httpd
    tags:
      - packages
ansible-playbook test_always.yml --tags="packages"
tasks:
  - yum: name{{item}} state=installed
    with_items:
      - httpd
    tags:
      - tagged
ansible-playbook test_always.yml --tags tagged
执行所有标记了标签的任务
tasks:
  - yum: name{{item}} state=installed
    with_items:
      - httpd
    tags:
      - tagged
ansible-playbook test_always.yml --tags untagged
执行所有没有标记标签的任务
tasks:
  - yum: name{{item}} state=installed
    with_items:
      - httpd
    tags:
      - tagged
ansible-playbook test_always.yml --tags all
不管有无标记标签都执行所有任务
include语句使用标签
- included: foo.yml
  tags: [web,foo]
role使用标签
roles:
  - { role: webserver,port: 5000 tags: ['web','foo']}
插件
插件是对ansible功能的补充,在ansible的配置文件中,每种类型的插件都有自己的配置变量
因此放置的目录并不相同
插件类型
#action_plugins = /usr/share/ansible/plugins/action
#cache_plugins = /usr/share/ansible/plugins/cache
#callback_plugins = /usr/share/ansible/plugins/callback
#connection_plugins = /usr/share/ansible/plugins/connection
#lookup_plugins = /usr/share/ansible/plugins/lookup
#inventory_plugins = /usr/share/ansible/plugins/inventory
#vars_plugins = /usr/share/ansible/plugins/vars
#filter_plugins = /usr/share/ansible/plugins/filter
#test_plugins = /usr/share/ansible/plugins/test
#terminal_plugins = /usr/share/ansible/plugins/terminal
#strategy_plugins = /usr/share/ansible/plugins/strategy
#inventory_plugins = /usr/share/ansible/plugins/inventory
#enable_plugins = host_list, virtualbox, yaml, constructed
action插件
和模块使用方法类似,只不过执行目标不是远程主机,而是在ansible的控制节点上
cache插件
为facts提供缓存,以避免多次执行playbook时搜集facts上有过多开销
callback插件
执行playbook后,提供额外行为,例如,将执行结果发送到email,或写入log中
官方提供的一些callback插件
https://github.com/ansible/ansible/tree/devel/lib/ansible/plugins/callback
connection插件
ansible为管理节点和远程节点之间提供了更多连接方法。默认的连接协议是基于paramiko的ssh协议
paramiko基本已经够用,如果有高级需求,则可以通过自定义插件来提供snmp,message bus等传输协议
filters插件
过滤器提供更多功能
lookup插件
lookup功能提供更多功能
strategy插件
为执行playbook提供更多执行策略,控制play在执行时的策略,默认策略是linear
即所有远程主机都执行完某一个任务之后,再执行下一个任务,ansible官方的strategy插件
提供了另外一个策略free,允许每个远程主机尽快地执行到play的结尾
从ansible2.0开始,支持free策略,允许执行较快的远程主机提前完成action部署,不用等其他远程主机一起执行action
- hosts: all
strategy: free
task:
...
shell插件
通过shell插件提供远程主机上更多类型的shell(csh,ksh,tcsh)
test插件
jinja2 test提供更多功能
vars插件
ansible将inventory/playbook命令行中的变量注入ansible中,通过vars插件
实现更多变量注入功能
如何使用callback 插件
timer:记录playbook执行时间
log plays:把执行结果记录在/var/log/ansible/hosts对应主机名文件里
1、下载 callback plugins 文件
使用callback插件,首先从官网提供的callback插件下载需要使用的插件对应的python文件
将下载的文件保存在 /usr/share/ansible/plugins/callback目录下
2、配置 ansible.cfg
配置放置 callback 插件的 Python 文件的位置
在ansible.cfg里启用插件
callback_plugins = /usr/share/ansible/plugins/callback
callback_whitelist = timer, log plays
3、playbook执行的时候自动会记录timer 和 log plays
lookup 插件
1、file:获取文件内容
---
- hosts: all
tasks:
- debug: msg="the value of foo.txt is {{ lookup('file', '/etc/foo.txt') }}"
2、password:生成密码字符串
如果文件已存在,则不会向其写入任何数据。 如果文件有内容,那些内容将作为密码读入。 空文件导致密码以空字符串返回。
---
- hosts: all
tasks:
# 使用只有ascii字母且长度为8的随机密码创建一个mysql用户:
    - mysql_user: name={{ client }}
                  password="{{ lookup('password', '/tmp/passwordfile chars=ascii_letters length=8') }}"
                  priv={{ client }}_{{ tier }}_{{ role }}.*:ALL
# 使用只有数字的随机密码创建一个mysql用户:
    - mysql_user: name={{ client }}
                  password="{{ lookup('password', '/tmp/passwordfile chars=digits') }}"
                  priv={{ client }}_{{ tier }}_{{ role }}.*:ALL
# 使用许多不同的字符集使用随机密码创建一个mysql用户:
    - mysql_user: name={{ client }}
                  password="{{ lookup('password', '/tmp/passwordfile chars=ascii_letters,digits,hexdigits,punctuation') }}"
                  priv={{ client }}_{{ tier }}_{{ role }}.*:ALL
3、env :读取环境变量
tasks:
- debug: msg="{{ lookup('env','HOME') }} is an environment variable"
4、pipe :读取Linux命令执行结果
tasks:
- debug: msg="{{ lookup('pipe','date') }} is the raw result of running this command"
5、csvfile :读取csv文件
- debug: msg="The atomic number of Lithium is {{ lookup('csvfile', 'Li file=/tmp/elements.csv delimiter=,') }}"
- debug: msg="The atomic mass of Lithium is {{ lookup('csvfile', 'Li file=/tmp/elements.csv delimiter=, col=2') }}"

参数    默认值    描述
file    ansible.csv    要加载的文件名称
col    1    要输出的列,索引从0开始
delimiter    TAB    文件的分隔符
default    empty string    如果key不在csv文件中,则为默认返回值
encoding    utf-8    使用的CSV文件的编码(字符集)(added in version 2.1)
6、ini :读取ini/properties文件
在section下查找以key1 = value1的格式来读取文件的内容。
ini 参数格式
lookup('ini', 'key [type=<properties|ini>] [section=section] [file=file.ini] [re=true] [default=<defaultvalue>]')
第一个值必须是ini文件里的key
字段 默认值 描述
type ini 文件类型。 可以是ini或properties (对于java)。
file ansible.ini 要加载的文件名称
section global 在哪里查找key
re False 开启正则匹配
default empty string 如果key不在文件中,则为默认返回值
users.ini
[production]
# My production information
user=robert
pass=somerandompassword

[integration]
# My integration information
user=gertrude
pass=anotherpassword

tasks:
- debug: msg="User in integration is {{ lookup('ini', 'user section=integration file=/tmp/users.ini') }}"
- debug: msg="User in production  is {{ lookup('ini', 'pass section=production  file=/tmp/users.ini') }}"
7、dig:dns查询
此模块依赖dnspython 库
- debug: msg="The IPv4 address for example.com. is {{ lookup('dig', 'example.com.')}}"
- debug: msg="The TXT record for example.org. is {{ lookup('dig', 'example.org.', 'qtype=TXT') }}"
- debug: msg="The TXT record for example.org. is {{ lookup('dig', 'example.org./TXT') }}"
其他
tasks:
- debug: msg="{{ lookup('pipe','date') }} is the raw result of running this command"
# redis_kv lookup requires the Python redis package
     - debug: msg="{{ lookup('redis_kv', 'redis://localhost:6379,somekey') }} is value in Redis for somekey"
# dnstxt lookup requires the Python dnspython package
     - debug: msg="{{ lookup('dnstxt', 'example.com') }} is a DNS TXT record for example.com"
- debug: msg="{{ lookup('template', './some_template.j2') }} is a value from evaluation of this template"
# loading a json file from a template as a string
     - debug: msg="{{ lookup('template', './some_json.json.j2', convert_data=False) }} is a value from evaluation of this template"
- debug: msg="{{ lookup('etcd', 'foo') }} is a value from a locally running etcd"
# shelvefile lookup retrieves a string value corresponding to a key inside a Python shelve file
     - debug: msg="{{ lookup('shelvefile', 'file=path_to_some_shelve_file.db key=key_to_retrieve') }}
过滤器插件
过滤器对普通变量的操作
default:为未定义的变量提供默认值
omit:与default一起使用,忽略变量的占位符,ansible会按照没有传这个参数的值来处理
{{ result.cmd|default(5) }}
result.cmd 如果没有定义的话,则其默认值为5
- name: touch files with an optional mode
  file: dest={{item.path}} state=touch mode={{item.mode|default(omit)}}
   with_items:
    - path: /tmp/foo
    - path: /tmp/bar
    - path: /tmp/baz
      mode: "0444"
对于列表中的前两个文件,默认mode将由系统的umask确定,因为mode=parameter 不会发送到文件模块,而最后的文件将接收mode=0444选项
default(omit)在没有定义mode时忽略mode变量
mandatory:强制定义变量,否则报错
如果变量未定义,则来自ansible和ansible.cfg的默认行为失败,但您可以将其关闭。
默认ansible.cfg中的error_on_undefined_vars=True
---
- hosts: localhost
  remote_user: root
  tasks:
    - debug: msg="{{ variable | mandatory }}"
int:将变量变为整型
vars:
  string_value: "6"
tasks:
  - name: "yes"
    debug: msg='YES'
      when:  string_value | int > 5
bool:判断变量是否为布尔类型
- debug: msg=test
  when: some_string_value | bool
ternary:类似于编程语言中的(A?B:C)
vars:
  name: "John"
tasks:
  - name: "true of false take different value"
    debug: msg="{{ ('name' == 'John') | ternary('Mr','Ms') }}"
过滤器对文件路径的操作
Linux
获取路径的文件名:{{ path | basename }}
获取路径中的目录:{{ path | dirname }}
扩展为实际的目录:{{ path | expanduser }}
获取软连接的真实路径:{{ path | realpath }}
获取文件名的名称和扩展名:{{ path | splitext }}
windows
获取路径的文件名:{{ path | win_basename }}
获取路径的目录名:{{ path | win_dirname }}
分割成多个部分:{{ path | win_splitdrive }}
分割成多个部分驱动器部分:{{ path | win_splitdrive | first }}
分割成多个部分文件名部分:{{ path | win_splitdrive | last }}
过滤器对字符串变量的操作
caplitalize:为字符串首字母大写
vars:
  string_value: "john"
tasks:
  - name: "cap"
    shell: echo {{ string_value | caplitalize }}
quote:为字符串增加双引号
vars:
  string_value: "John"
tasks:
  - name: "quote"
    shell: echo {{ string_value | quote }}
hash:获取字符串得hash值
tasks:
  - name: "hash"
    shell: echo {{ 'test1'|hash('sha1') }}
    shell: echo {{ 'test1'|hash('md5') }}
comment:注释
支持各种语言的注释
{{ "this is the comment" | comment }}
{{ "this is the comment" | comment('c') }}
{{ "this is the comment" | comment('cblock') }}
{{ "this is the comment" | comment('erlang') }}
{{ "this is the comment" | commen('xml')t }}
{{ "this is the comment" | comment('plain', prefix='#######\n#', postfix='#\n#######\n ###\n #') }}
regex_replace:用正则表示对字符串进行替换
# convert "ansible" to "able"
{{ 'ansible' | regex_replace('^a.*i(.*)$', 'a\\1') }}

# convert "foobar" to "bar"
{{ 'foobar' | regex_replace('^f.*o(.*)$', '\\1') }}

# convert "localhost:80" to "localhost, 80" using named groups
{{ 'localhost:80' | regex_replace('^(?P<host>.+):(?P<port>\\d+)$', '\\g<host>, \\g<port>') }}
ip:字符串ip地址转换
vars:
  myvar: "192.168.3.6"
  myvar6: "fe80:dcfd:1e54:728d:a99e"
  CIDR: "192.0.2.1/24'"
tasks:
  - name: "check ip"
    debug: msg={{ myvar | ipaddr }}
    debug: msg={{ myvar | ipv4 }}
    debug: msg={{ myvar6 | ipv6 }}
    debug: msg={{ CIDR |  ipaddr('address') }}
to_datetime:字符串转换为时间戳
tasks:
  - name: "datetime filter"
    debug: msg={{ "2016-06-06  20:00:12" | to_datetime }}
过滤器对json的操作
format:将变量值按照json/yaml输出
更改数据格式,其结果是字符串
{{  some_variable | to_json  }}
{{  some_variable | to_yaml  }}
对于人类可读的输出
{{  some_variable | to_nice_json  }}
{{  some_variable | to_nice_yaml  }}
合并两个json对象
tasks:
  - name: "combine"
    debug: msg={{ {'a':1,'b':2}| combine({'b':3}) }}
过滤器对数据结构的操作
数据结构:list、set
random:取随机数
从列表中随机获取元素
{{ ['a','b','c','d','e','f']|random }}
从0-59 的整数中随机获取一个数
{{ 59 |random}}
从0-100 中随机获取能被10 整除的数(可以理解为0 10 20 30 40 50 ...100 的随机数)
{{ 100 |random(step=10) }}
从0-100 中随机获取1 开始步长为10 的数(可以理解为1 11 21 31 41...91 的随机数)
{{ 100 |random(1, 10) }}
{{ 100 |random(start=1, step=10) }}
取最小的值
{{ [3, 4, 2] | min }}
取最大的值
{{ [3, 4, 2] | max }}
列表转换字符
{{ [3, 4, 2] | join(" ") }}
对列表唯一过滤
{{ [3, 4, 2] | unique }}
过滤器测试功能
测试字符串
when: ansible_os_family | match("Red[Hh]at" )
when: url | search("/users/.*/resources/.*")
版本比较
检查ansible_distribution_version版本是否大于或等于'12 .04',条件成立返回True。
{{ ansible_distribution_version | version_compare('12.04', '>=') }}

进行严格的版本检查
{{ sample_version_var | version_compare('1.0', operator='lt', strict=True) }}
测试list的包含关系
vars:
    a: [1,2,3,4,5]
    b: [2,3]
tasks:
    - debug: msg="A includes B"
      when: a|issuperset(b)

    - debug: msg="B is included in A"
      when: b|issubset(a)
测试文件路径
- debug: msg="path is a directory"
  when: mypath|is_dir
- debug: msg="path is a file"
  when: mypath|is_file
- debug: msg="path is a symlink"
  when: mypath|is_link
- debug: msg="path already exists"
  when: mypath|exists
- debug: msg="path is {{ (mypath|is_abs)|ternary('absolute','relative')}}"
- debug: msg="path is the same file as path2"
  when: mypath|samefile(path2)
- debug: msg="path is a mount"
  when: mypath|ismount
测试任务执行结果
tasks:
- shell: /usr/bin/foo
    register: result
    ignore_errors: True
- debug: msg="it failed"
    when: result|failed
  - debug: msg="it changed"
    when: result|changed
- debug: msg="it succeeded in Ansible >= 2.1"
    when: result|succeeded
- debug: msg="it succeeded"
    when: result|success
- debug: msg="it was skipped"
    when: result|skipped
变量可以通过过滤器修改。过滤器与变量用管道符号( | )分割,并且也可以用圆括号传递可选参数。
多个过滤器可以链式调用,前一个过滤器的输出会被作为 后一个过滤器的输入
vars:
  string_value: "steven"
tasks:
  - name: "quote"
    shell: echo {{ string_value | | caplitalize|quote |hash('md5') }}
jinja2 模版语法
读取json格式变量
下面2种方式效果是一样的,如果变量或属性不存在,会返回一个未定义值。
{{ foo.bar }}
{{ foo['bar'] }}
注释
要注释模板中一行,默认使用 {# ... #} 注释语法。
转义
简单的使用单引号进行转义
对于较大的段落,使用raw进行转义
{% raw %}
    <ul>
    {% for item in seq %}
        <li>{{ item }}</li>
    {% endfor %}
    </ul>
{% endraw %}
包含 > 、 < 、 & 或 " 字符的变量,必须要手动转义
{{ user.username|e }}
控制结构
控制结构指的是所有的那些可以控制程序流的东西 —— 条件(比如 if/elif/ekse )、 for 循环、以及宏和块之类的东西。控制结构在默认语法中以 {% .. %} 块的形式出现。
for语句
遍历序列
{% for user in users %}
  <li>{{ user.username|e }}</li>
{% endfor %}
在模板中如何遍历某一组内的所有主机?
{% for host in groups['db_servers'] %}
  {{ host }}
{% endfor %}


获取ip地址
{% for host in groups['db_servers'] %}
  {{ hostvars[host]['ansible_eth0']['ipv4']['address'] }}
{% endfor %}
获取组中第一个主机的ip地址
{{ hostvars[groups['webservers'][0]]['ansible_eth0']['ipv4']['address'] }}
迭代字典
{% for key, value in my_dict.iteritems() %}
    <dt>{{ key|e }}</dt>
    <dd>{{ value|e }}</dd>
{% endfor %}
循环 10 次迭代之后会终止处理,注:使用break, 需要开启轮询控制. 具体是在ansible.cfg的jinja2_extensions变量加上jinja2.ext.loopcontrols.
{% for user in users %}
    {%- if loop.index >= 10 %}{% break %}{% endif %}
{%- endfor %}

{% for user in users if loop.index <= 10 %}
    {{ loop.index }}
{%- endfor %}
在一个 for 循环块中你可以访问这些特殊的变量
loop.index 当前循环迭代的次数(从 1 开始)
loop.index0 当前循环迭代的次数(从 0 开始)
loop.revindex 到循环结束需要迭代的次数(从 1 开始)
loop.revindex0 到循环结束需要迭代的次数(从 0 开始)
loop.first 如果是第一次迭代,为 True 。
loop.last 如果是最后一次迭代,为 True 。
loop.length 序列中的项目数。
loop.cycle 在一串序列间期取值的辅助函数。
if 语句
Jinja 中的 if 语句类似 Python 中的 if 语句。
{% if kenny.sick %}
    Kenny is sick.
{% elif kenny.dead %}
    You killed Kenny!  You bastard!!!
{% else %}
    Kenny looks okay --- so far
{% endif %}
过滤器
过滤器段允许你在一块模板数据上应用常规 Jinja2 过滤器。只需要把代码用 filter 节包裹起来
{% filter upper %}
    This text becomes uppercase
{% endfilter %}
变量赋值
在代码块中,你也可以为变量赋值。在顶层的(块、宏、循环之外)赋值是可导出的,即 可以从别的模板中导入。
赋值使用 set 标签,并且可以为多个变量赋值
{% set navigation = [('index.html', 'Index'), ('about.html', 'About')] %}
{% set key, value = call_something() %}
表达式
{% ... %} 用于执行诸如 for 循环 或赋值的语句
{{ ... }} 把表达式的结果打印到模板上
if 表达式
一般的语法是
<do something> if <something is true> else <do something else>
例如
{{ '[%s]' % page.title if page.title is defined else 'undefined' }}
字面量
表达式最简单的形式就是字面量。字面量表示诸如字符串和数值的 Python 对象。
"Hello World" 双引号或单引号中间的一切都是字符串。无论何时你需要在模板中使用一个字 符串(比如函数调用、过滤器或只是包含或继承一个模板的参数),它们都是 有用的。
42/42.23 直接写下数值就可以创建整数和浮点数。如果有小数点,则为浮点数,否则为 整数。记住在 Python 里, 42 和 42.0 是不一样的。
['list','of','objects'] 一对中括号括起来的东西是一个列表。列表用于存储和迭代序列化的数据。
('tuple','of','values') 元组与列表类似,只是你不能修改元组。如果元组中只有一个项,你需要以逗号 结尾它。元组通常用于表示两个或更多元素的项。更多细节见上面的例子。
{dict':'of','key':'and','value':'pairs'} Python 中的字典是一种关联键和值的结构。键必须是唯一的,并且键必须只有一个 值。字典在模板中很少使用,罕用于诸如 xmlattr() 过滤器之类。
true/false true 永远是 true ,而 false 始终是 false,true 、 false 和 none 实际上是小写的,为了一致性(所有的 Jinja 标识符是小写的),你应该使用小写的版本
算术
Jinja 允许你用计算值。支持下面的 运算符
+ 把两个对象加到一起。通常对象是素质,但是如果两者是字符串或列表,你可以用这 种方式来衔接它们。无论如何这不是首选的连接字符串的方式!连接字符串见 ~ 运算符。 {{ 1 + 1 }} 等于 2 。
- 用第一个数减去第二个数。 {{ 3 - 2 }} 等于 1 。
/ 对两个数做除法。返回值会是一个浮点数。 {{ 1 / 2 }} 等于 {{ 0.5 }} 。
// 对两个数做除法,返回整数商。 {{ 20 // 7 }} 等于 2 。
% 计算整数除法的余数。 {{ 11 % 7 }} 等于 4 。
* 用右边的数乘左边的操作数。 {{ 2 * 2 }} 会返回 4 。也可以用于重 复一个字符串多次。 {{ ‘=’ * 80 }} 会打印 80 个等号的横条。
** 取左操作数的右操作数次幂。 {{ 2**3 }} 会返回 8 。
比较
== 比较两个对象是否相等。
!= 比较两个对象是否不等。
> 如果左边大于右边,返回 true 。
>= 如果左边大于等于右边,返回 true 。
< 如果左边小于右边,返回 true 。
<= 如果左边小于等于右边,返回 true 。
逻辑
对于 if 语句,在 for 过滤或 if 表达式中,它可以用于联合多个表达式
and 如果左操作数和右操作数同为真,返回 true 。
or 如果左操作数和右操作数有一个为真,返回 true 。
not 对一个表达式取反(见下)。
(expr) 表达式组。
is 和 in 运算符同样支持使用中缀记法: foo is not bar 和 foo not in bar 而不是 not foois bar 和 not foo in bar 。所有的 其它表达式需要前缀记法 not (foo and bar)
其它运算符
in 运行序列/映射包含检查。如果左操作数包含于右操作数,返回 true 。比如 {{ 1 in[1,2,3] }} 会返回 true 。
is 运行一个 测试 。
应用一个 过滤器 。
~ 把所有的操作数转换为字符串,并且连接它们。 {{ "Hello " ~ name ~ "!" }} 会返回(假设 name 值为 ''John' ) Hello John! 。
() 调用一个可调用量:{{ post.render() }} 。在圆括号中,你可以像在 python 中一样使用位置参数和关键字参数: {{ post.render(user, full=true) }} 。
. / [] 获取一个对象的属性。
role 和ansible galaxy
重用playbook
1、include语句
主要重用action,可以将多个action放在多个文件,避免playbook过于臃肿
include指令类似如下,可以像普通tasks命令一样在playbook中混合使用
tasks:
- include: /tmp/tasks/foo.yml
cat /tmp/tasks/foo.yml
---
# possibly saved as /tmp/tasks/foo.yml
  - name: placeholder foo
    command: /bin/foo
  - name: placeholder bar
    command: /bin/bar
在include中使用参数,parameterized include
tasks:
- include: wordpress.yml wp_user=timmy
- include: wordpress.yml wp_user=alice
- include: wordpress.yml wp_user=bob

或者
---
- hosts: lb
vars:
  wp_user: "timmy"
  remote_user: root
tasks:
- include: wordpress.yml
2、role
role类似于python的package,可以重用一组文件,形成完整功能
ansible会按照下面顺序查找roles_path
1、ANSIBLE_ROLES_PATH #环境变量
2、/etc/ansible/ansible.cfg : #roles_path = /etc/ansible/roles #如果没有设置环境变量就用配置文件里,可以设置多个路径,用逗号隔开
3、/etc/ansible/roles #如果没有设置环境变量也没有配置文件里设置roles_path 那么使用默认的路径
调整role和任务顺序
pre_tasks
post_tasks
如果在执行一个role时,需要在其前或其后依然要执行某些任务,我们可以使用pre_tasks及post_tasks来声明。
pre_tasks是在role之前执行,而post_tasks则在role之后执行
- name: deply webservers
 host: webservers
 vars_files:
   - secrets.yml

 pre_tasks:
   - name: update yum cache
     yum: update_cache=yes

 roles:
   - role: apache
     database_host: {{ hostvars.db.ansible_eth0.ipv4.address }}
     domains:
       - exampel.com
       - www.example.com

  post_tasks:
    - name: print something
      shell: echo "The roles have been updated!"
条件测试调用role
vim roles.yml
---
- hosts:web
  remote_user: root
  roles:
  - role: nginx
    when: "ansible_distribution_major_version == '7'"
完整的role目录结构
这里面任何一个文件都不是必须的,如果文件不存在,则跳过该文件的加载
调用:ansible-playbook -i hosts site.yml
主机清单设置group_vars目录,分类设置各类主机的变量
group_vars:
nginx
mysql
all
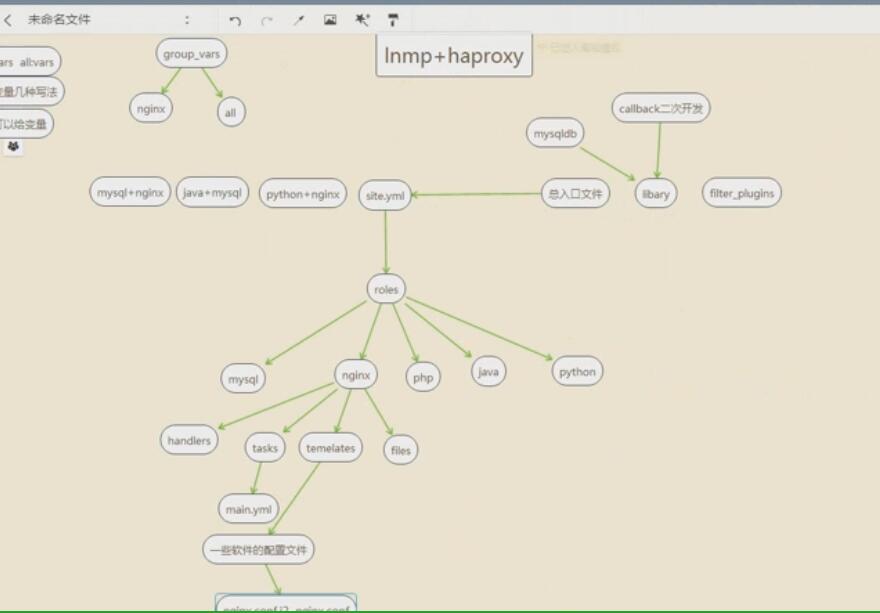
├── library #目录下存放callback二次开发,mysqldb,filter plugin等库文件
├── simple
│ ├── defaults #文件中的变量都会被加入play,这个是默认变量,优先级比vars低
│ │ └── main.yml
│ ├── files #copy、script模块使用这个目录下的文件
│ ├── handlers #文件中的handlers都会被加入play
│ │ └── main.yml
│ ├── meta #文件中的所有依赖的role都会被加入play
│ │ └── main.yml
│ ├── README.md
│ ├── tasks #文件中的任务都会被加入play,role的入口文件
│ │ └── main.yml
│ ├── templates #存放jinja2模版文件,例如nginx.conf.j2
│ ├── tests
│ │ ├── inventory
│ │ └── test.yml
│ └── vars #文件中的变量都会被加入play
│ └── main.yml
├── site.yml #总入口文件
├── group_vars
│ └── nginx #主机清单的nginx组的组变量
├── hosts #主机清单
role目录标准化

引用其他main.yml 文件
Ansible 提供了两个关键字, include和include_vars ,来分别引入role 中非main.yml 其他文件包含的tasks和vars
默认
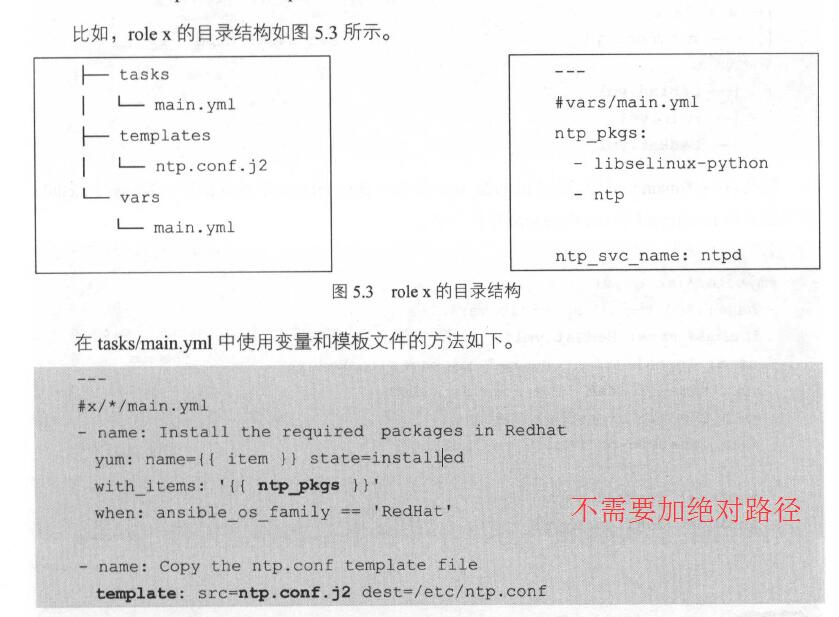
引入其他文件yaml文件

role的依赖
role 依赖关系的定义文件是x/meta/main.yml
如果role x 依赖role y ,那么在Playbook 中调用role x 之前会先调用role y。
当多个role 依赖同一个role 时, Ansible 会自动进行过滤,避免重复调用相同参数的role
第一种方法:dependencies
db 和Web 都依赖role common。如果在Playbook中调用db 和Web,
那么Ansible 会保证在 db 和Web 运行前,先运行 common ,并且只运行一次。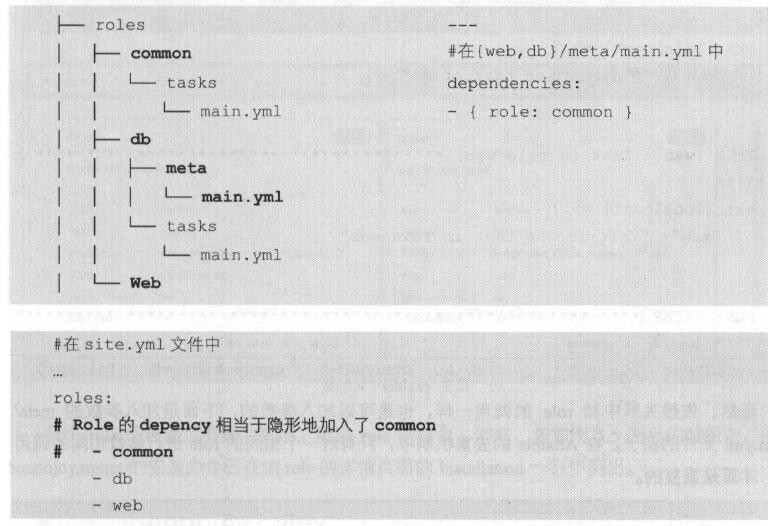
依赖关系中和role 的调用一样,也是可以加入参数的,下面是加入参数的meta/main.yml 文件的例子。
在Ansible 的去重机制中,只有对个相同的role 进行参数相同的调用时,才算是重复的。
---
dependencies :
- { role: common, name:"NAME IN DB"}
第二种方法:把引用的role放在最前面,先执行
site.yml
roles:
 - common  #先执行common role
 - db
 - web
ansible galaxy网站
访问https://galaxy.ansible.com/ ,通过BROWSE ROLES 找到你需要的role 。
windows相关的role
https://galaxy.ansible.com/mrlesmithjr/windows-iis/

windows远程管理
https://www.jianshu.com/p/4dcdf2a5cfe5
Windows Playbook示例
执行powershell脚本
- name: test script module
hosts: windows
tasks:
- name: run test script
script: files/test_script.ps1
获取ip地址信息
- name: test raw module
hosts: windows
tasks:
- name: run ipconfig
win_command: ipconfig
register: ipconfig
- debug: var=ipconfig
使用dos命令,移动文件
- name: another raw module example
hosts: windows
tasks:
- name: Move file on remote Windows Server from one location to another
win_command: CMD /C "MOVE /Y C:\teststuff\myfile.conf C:\builds\smtp.conf"
使用powershell命令,移动文件
- name: another raw module example demonstrating powershell one liner
hosts: windows
tasks:
- name: Move file on remote Windows Server from one location to another
win_command: Powershell.exe "Move-Item C:\teststuff\myfile.conf C:\builds\smtp.conf"
https://www.jianshu.com/p/4dcdf2a5cfe5
add_host
assert
async
debug
fail
fetch
group_by
include_vars
meta
pause
raw
script
set_fact
setup
slurp
template (also: win_template)
windows模块
http://docs.ansible.com/ansible/latest/modules/list_of_windows_modules.html
win_acl - Set file/directory/registry permissions for a system user or group
win_acl_inheritance - Change ACL inheritance
win_audit_policy_system - Used to make changes to the system wide Audit Policy.
win_audit_rule - Adds an audit rule to files, folders, or registry keys
win_certificate_store - Manages the certificate store
win_chocolatey - Manage packages using chocolatey
win_command - Executes a command on a remote Windows node
win_copy - Copies files to remote locations on windows hosts
win_defrag - Consolidate fragmented files on local volumes
win_disk_facts - Show the attached disks and disk information of the target host
win_disk_image - Manage ISO/VHD/VHDX mounts on Windows hosts
win_dns_client - Configures DNS lookup on Windows hosts
win_domain - Ensures the existence of a Windows domain.
win_domain_controller - Manage domain controller/member server state for a Windows host
win_domain_group - creates, modifies or removes domain groups
win_domain_membership - Manage domain/workgroup membership for a Windows host
win_domain_user - Manages Windows Active Directory user accounts
win_dotnet_ngen - Runs ngen to recompile DLLs after .NET updates
win_dsc - Invokes a PowerShell DSC configuration
win_environment - Modify environment variables on windows hosts
win_eventlog - Manage Windows event logs
win_eventlog_entry - Write entries to Windows event logs
win_feature - Installs and uninstalls Windows Features on Windows Server
win_file - Creates, touches or removes files or directories.
win_file_version - Get DLL or EXE file build version
win_find - Return a list of files based on specific criteria
win_firewall - Enable or disable the Windows Firewall
win_firewall_rule - Windows firewall automation
win_get_url - Fetches a file from a given URL
win_group - Add and remove local groups
win_group_membership - Manage Windows local group membership
win_hotfix - install and uninstalls Windows hotfixes
win_iis_virtualdirectory - Configures a virtual directory in IIS.
win_iis_webapplication - Configures IIS web applications
win_iis_webapppool - configures an IIS Web Application Pool
win_iis_webbinding - Configures a IIS Web site binding.
win_iis_website - Configures a IIS Web site.
win_lineinfile - Ensure a particular line is in a file, or replace an existing line using a back-referenced regular expression.
win_mapped_drive - maps a network drive for a user
win_msg - Sends a message to logged in users on Windows hosts.
win_msi - Installs and uninstalls Windows MSI files (D)
win_nssm - NSSM - the Non-Sucking Service Manager
win_owner - Set owner
win_package - Installs/uninstalls an installable package
win_pagefile - Query or change pagefile configuration
win_path - Manage Windows path environment variables
win_ping - A windows version of the classic ping module
win_power_plan - Changes the power plan of a Windows system
win_product_facts - Provides Windows product information (product id, product key)
win_psexec - Runs commands (remotely) as another (privileged) user
win_psmodule - Adds or removes a Powershell Module.
win_rabbitmq_plugin - Manage RabbitMQ plugins
win_reboot - Reboot a windows machine
win_reg_stat - returns information about a Windows registry key or property of a key
win_regedit - Add, change, or remove registry keys and values
win_region - Set the region and format settings
win_regmerge - Merges the contents of a registry file into the windows registry
win_robocopy - Synchronizes the contents of two directories using Robocopy
win_route - Add or remove a static route.
win_say - Text to speech module for Windows to speak messages and optionally play sounds
win_scheduled_task - Manage scheduled tasks
win_scheduled_task_stat - Returns information about a Windows Scheduled Task
win_security_policy - changes local security policy settings
win_service - Manage and query Windows services
win_share - Manage Windows shares
win_shell - Execute shell commands on target hosts.
win_shortcut - Manage shortcuts on Windows
win_stat - returns information about a Windows file
win_tempfile - Creates temporary files and directories.
win_template - Templates a file out to a remote server.
win_timezone - Sets Windows machine timezone
win_toast - Sends Toast windows notification to logged in users on Windows 10 or later hosts
win_unzip - Unzips compressed files and archives on the Windows node
win_updates - Download and install Windows updates
win_uri - Interacts with webservices
win_user - Manages local Windows user accounts
win_user_right - Manage Windows User Rights
win_wait_for - Waits for a condition before continuing
win_wakeonlan - Send a magic Wake-on-LAN (WoL) broadcast packet
win_webpicmd - Installs packages using Web Platform Installer command-line
win_whoami - Returns information about the current user and process
具体步骤
1、在管理机安装pywinrm
pip install pywinrm
2、在被控机执行winrm设置脚本
checkclientenv.bat
winrm set winrm/config/service/auth @{Basic="true"}
winrm set winrm/config/service @{AllowUnencrypted="true"}
checkclientenv.ps1

$RootDir = Split-Path -Parent $MyInvocation.MyCommand.Definition
$RootDir
""
sleep 1; Write-Host -ForegroundColor Yellow "正在检查当前数据库服务器的环境......"; sleep 2
""
Get-WmiObject -Class Win32_OperatingSystem | Select-Object -ExpandProperty Caption | Out-Null
$ComInfo =(gwmi -Class win32_operatingsystem).Caption
Write-Host "当前系统版本为:$($ComInfo)";
""
#获取当前系统的外网IP
$ExternalIP = ''
Try {$ExternalIP = Invoke-WebRequest http://myip.ipip.net| Select -ExpandProperty Content -ErrorAction SilentlyContinue}
catch [System.Net.WebException] { Write-Host -ForegroundColor Red  "当前主机无法访问外网!!"}
IF ($ExternalIP -ne '') { Write-Host -ForegroundColor Green  "当前主机外网IP为$($ExternalIP)" }
""
#获取当前系统的Powershell版本
$PSVersion = $PSVersionTable.PSVersion.Major
Write-Host -ForegroundColor Yellow "当前Powershell版本为$PSVersion"

##安装Powershell更新补丁
IF ($PSVersion -lt 5)
    {
     Write-Host -ForegroundColor Yellow "当前Powershell版本需要更新,正在打开Window update功能......";sleep 3
     set-Service -name wuauserv -StartupType Manual
     start-Service -name wuauserv
     Write-Host ""
    switch($ComInfo)
        {
        {$ComInfo.contains("2012") -and  $ComInfo.contains("R2")}                 {wusa.exe "$RootDir\PowerShell_v5\Win8.1AndW2K12R2-KB3134758-x64.msu"}
        {$ComInfo.contains("2012") -and  $ComInfo.notcontains("R2") }             {wusa.exe "$RootDir\PowerShell_v5\W2K12-KB3134759-x64"}
        {$ComInfo.contains("2008") -and  $ComInfo.contains("R2") }                {wusa.exe "$RootDir\PowerShell_v5\Win7AndW2K8R2-KB3134760-x64"}
        {$ComInfo.contains("Windows 8") -or $ComInfo.contains("Windows 8.1")}     {wusa.exe "$RootDir\Tools\PowerShell_v5\Win8.1-KB3134758-x86"}
        {$ComInfo.contains("Windows 7")}                                          {wusa.exe "$RootDir\PowerShell_v5\Win7-KB3134760-x86.msu"}
        Default { -ForegroundColor Red "当前系统无法自动更新Powershell V5版本,请手动更新后再重新运行脚本!等待5秒后脚本自动退出!";sleep 5;exit}
        }
    Write-Host "补丁安装完成后需要重启服务器!等待5秒后脚本自动退出!";sleep 5;exit
    }

""
#判断WinRm服务是否启动
$WinRMstatus  = Get-Service WinRM | Where-Object {$_.Status -eq "running"}

IF($WinRMstatus.count -eq 0)
    {
    Write-Host "正在开启WinRM服务......";Enable-PSRemoting –Force
    }


#判断WinRM服务是否开启监听端口
$WinRMport = winrm e winrm/config/listener

IF($WinRMport.count -eq 0)
    {
    Write-Host -NoNewline  "正在开启WinRM监听端口......";Enable-PSRemoting –Force;Write-Host -ForegroundColor Green "OK"
    }

Write-Host ""
Write-Host "测试本机的WinRM服务是否能正常连接......"
Try {Test-WsMan 127.0.0.1  -ErrorAction Stop | Out-Null}
Catch [System.InvalidOperationException]
{ Write-Host -ForegroundColor Red "WinRM服务连接异常,请检查相关配置,等待15秒后脚本自动退出!";sleep 15;exit}
Write-Host -ForegroundColor Green "本机的WinRM服务连接正常!"
""

##添加WinRM信任列表,在客户端添加,而不是服务端
$tr = Get-Item wsman:\localhost\client\trustedhosts | Select -Property value
IF($tr.value  -ne "*")
    {
    Write-Host "正在添加WinRM信任列表......"
    Set-Item wsman:\localhost\client\trustedhosts * -Force
    Restart-Service WinRM
    }
""
Write-Host "WinRM服务连接配置完成!";
""
Write-Host -ForegroundColor Yellow "请手动允许数据库服务器上的防火墙通过WinRM端口(允许外部网络,默认5895)和数据库镜像端口(允许内部网络,默认5022)通过!";sleep 5;
""
Write-Host "当前数据库服务器的环境完成!等待10秒后脚本自动退出!";sleep 10;exit
3、inventory 文件
[windows]
10.154.175.156

[linux]
192.168.3.9

[windows:vars]
ansible_user=Administrator
ansible_password=1qaz2wsx!@#123
ansible_port=5985   #winrm的端口
ansible_connection=winrm
ansible_winrm_server_cert_validation=ignore
4、Windows Playbook
获取ip地址信息
---
- hosts: windows
  tasks:
    - name: run ipconfig
      win_command: ipconfig
      register: result
    - name: print ipconfig
      debug: msg="{{ result }}"
5、执行playbook
ansible-playbook /tmp/site.yml
补充
对命令输出的信息进行utf-8编码,修改winrm模块的protocol.py
sed -i "s#tdout_buffer.append(stdout)#tdout_buffer.append(stdout.decode('gbk').encode('utf-8'))#g" /usr/lib/python2.6/site-packages/winrm/protocol.py
sed -i "s#stderr_buffer.append(stderr)#stderr_buffer.append(stderr.decode('gbk').encode('utf-8'))#g" /usr/lib/python2.6/site-packages/winrm/protocol.py
ansible的优化
1、开启SSH长连接
ansible是通过使用ssh和远程主机进行通信,所以对ssh有这很强的依赖。在OpenSSH 5.6以后支持Multiplexing这个特性,可以通过在ansible配置中设置以支持该特性。
ansible中控机上执行一次与远程主机的连接之后,这个连接会持久保持设定时间之久。可以通过netstat命令查看到ESTABLISHED状态的连接信息。
如下是配置参数,设置长连接保持时间为5天;control_path指定socket文件所保存的位置。
cat /etc/ansible/ansible.cfg
ssh_args = -o ControlMaster=auto -o ControlPersist=5d
control_path = /etc/ansible/ssh-socket/ #control_path需要预先创建给写权限
2、开启pipelining
默认情况下,ansible的执行流程是把生成好的本地python脚本push到远程服务器然后运行。如果开启了pipelining,整个流程少了一个push脚本到远程服务器的步骤,直接在SSH的会话中进行,可以提高整个执行效率。
cat /etc/ansible/ansible.cfg
pipelining = True
需要注意的是:如果开启pipelining,需要被控的远程服务器将/etc/sudoers中的”Defaults requiretty”注释掉,否则会出现类似如:you must have a tty to run sudo 的报错。
3、开启accelerate模式
accelerate模式类似于SSH的Multiplexing功能,都是使ansible控制服务器和远程服务器之间保持长连接。
accelerate模式是使用python程序在远程服务器上运行一个守护进程,ansible通过这个守护进程监听的端口进行通信。
使用accelerate模式,需要控制服务器和远程服务器都安装python-keyczar包
accelerate模式的开启方法很简单,只要在playbook中配置accelerate: true即可。
cat /etc/ansible/ansible.cfg
[accelerate]
accelerate_port = 5099
accelerate_timeout = 30
accelerate_connect_timeout = 5.0
4、对facts设置优化
playbook默认第一个task是Gathering Facts收集各主机的facts信息,以方便我们在paybook中直接引用facts里的信息。
如果既想用facts信息,有希望能提高playbook的效率的话,可以采用facts缓存来实现。
facts缓存支持多种方式:json文件方式,redis方式,memcache方式等。
facts存储不支持远端的redis/memcache,需要在ansible的控制服务器上安装redis/memcache;同时,还需要安装python的redis模块/memcache模块
1)json文件方式
cat /etc/ansible/ansible.cfg
gathering=smart
fact_caching_timeout=86400
fact_caching=jsonfile
fact_caching_connection=/path/to/ansible_fact_cache #这是一个目录,目录下会生成各个机器会以机器名为文件名
2)redis方式
cat /etc/ansible/ansible.cfg
gathering=smart
fact_caching_timeout=86400
fact_caching=redis
3)memcache方式
cat /etc/ansible/ansible.cfg
gathering=smart
fact_caching_timeout=86400
fact_caching=memcached
条件判断
= value == "字符串“,value == 数字
< value < 数字
> value > 数字
<= value <= 数字
>= value >= 数字
!= value != 数字
is defined value is defined(变量存在)
is not defined value is not defined(变量不存在)
in value is in value(变量为)
not in value is not in value(变量不为)
bool变量为true value(value的值为true)
bool变量false not value(value的值为false)
value in value2(value的值在value2列表中)
————————————————
版权声明:本文为CSDN博主「S_K15」的原创文章,遵循CC 4.0 BY-SA版权协议,转载请附上原文出处链接及本声明。
原文链接:https://blog.csdn.net/S_K15/article/details/121330876
处理失败任务
1、ignore_errors作用:当play遇到任务失败时会终止,ignore_errors: yes 将会忽略任务失败使下面的任务继续运行
2、force_handlers作用:当任务失败后play被终止也会调用触发器进程
3、changed_when作用:控制任务在何时报告它已进行更改,但不会更改任务本身的行为
4、failed_when作用:当符合条件时强制任务失败,但不会更改任务本身的行为
5、block
block:定义要运行的任务
rescue:定义当block句子中任务出现失败后运行rescue里的任务
always:定义block句子中任务是否出现失败都运行always的任务
f


 浙公网安备 33010602011771号