MySQL日志管理
MySQL日志管理
一、二进制日志
1.二进制日志的作用
'记录所有非查询语句(DDL,DML,DCL,DTL)除了DQL都记录
记录已提交的DML事务语句,并拆分为多个事件(event)来进行记录  rollback也会被记录
总之,二进制日志会记录所有对数据库发生修改的操作
1)如果我拥有数据库搭建开始所有的二进制日志,那么我可以把数据恢复到任意时刻
2)数据的备份恢复
3)数据的复制
2.默认路径:
[root@db01 /application/mysql-5.6.40/data]# ll
-rw-rw---- 1 mysql mysql     4714 Dec  9 15:24 mysql-bin.000001
-rw-rw---- 1 mysql mysql      120 Dec  9 15:24 mysql-bin.000002
-rw-rw---- 1 mysql mysql       38 Dec  9 15:24 mysql-bin.index
3.默认是否开启:关闭
# 修改配置文件
[root@db01 ~]# vim /etc/my.cnf
[mysqld]
log-bin=mysql-bin

# 查看启动状态
mysql> show variables like '%log_bin%';
+---------------------------------+------------------------------------------------+
| Variable_name                   | Value                                          |
+---------------------------------+------------------------------------------------+
| log_bin                         | ON                                             |
| log_bin_basename                | /application/mysql-5.6.40/data/mysql-bin       |
| log_bin_index                   | /application/mysql-5.6.40/data/mysql-bin.index |
| log_bin_trust_function_creators | OFF                                            |
| log_bin_use_v1_row_events       | OFF                                            |
| sql_log_bin                     | ON                                             |
+---------------------------------+------------------------------------------------+
MySQL binlog工作模式
1.statement(默认)语句模式,记录所有非DQL语句(mysql 5.6默认)
优点:通俗易懂,占用磁盘空间小
缺点:不严谨
mysql> show variables like 'binlog_format';
+---------------+-----------+
| Variable_name | Value     |
+---------------+-----------+
| binlog_format | STATEMENT |
+---------------+-----------+
mysql> create database binlog;
mysql> use binlog
mysql> create table binlog(id int);
mysql> insert into binlog values(1),(2),(3);
mysql> commit;

[root@db01 ~]# mysqlbinlog mysql-bin.000029
2.row 行级模式,记录所有非DQL语句,并且记录他们的变化过程 (MySQL5.7默认是行级模式)企业一般用
优点:严谨
缺点:不通俗易懂,占用磁盘空间大
[root@db01 ~]# vim /etc/my.cnf
[mysqld]
log-bin=mysql-bin
binlog_format=row

#查看日志的时候 是看不懂的  不是那种像豫剧模式直接显示出来执行语句的
#要这么看
[root@db01 ~]# mysqlbinlog --base64-output=decode-rows -vvv /application/mysql/data/mysql-bin.000001
3.mixed 混合模式,以上两种模式的混合 一般没有企业用
二进制日志实战操作
二进制日志的查看
#物理查看
[root@db01 data]# ll /application/mysql/data/
-rw-rw---- 1 mysql mysql      285 Mar  6  2017 mysql-bin.000001

#命令行查看
mysql> show binary logs;
+------------------+-----------+
| Log_name         | File_size |
+------------------+-----------+
| mysql-bin.000001 |      1638 |
| mysql-bin.000002 |       143 |
| mysql-bin.000003 |       143 |
| mysql-bin.000004 |       143 |
| mysql-bin.000005 |       143 |
| mysql-bin.000006 |       143 |
| mysql-bin.000007 |       143 |
| mysql-bin.000008 |       143 |
| mysql-bin.000009 |       143 |
| mysql-bin.000010 |       143 |
| mysql-bin.000011 |       143 |
| mysql-bin.000012 |       143 |
| mysql-bin.000013 |       143 |
| mysql-bin.000014 |       143 |
| mysql-bin.000015 |     90301 |
| mysql-bin.000016 |       507 |
| mysql-bin.000017 |       167 |
| mysql-bin.000018 |       167 |
| mysql-bin.000019 |       222 |
| mysql-bin.000020 |       634 |
| mysql-bin.000021 |    795994 |
| mysql-bin.000022 |     28834 |
| mysql-bin.000023 |       143 |
| mysql-bin.000024 |      2181 |
| mysql-bin.000025 |      1125 |
| mysql-bin.000026 |      3923 |
| mysql-bin.000027 |       143 |
| mysql-bin.000028 |       143 |
| mysql-bin.000029 |      1125 |
| mysql-bin.000030 |       864 |
+------------------+-----------+


mysql> show master status;
+------------------+----------+--------------+------------------+-------------------+
| File             | Position | Binlog_Do_DB | Binlog_Ignore_DB | Executed_Gtid_Set |
+------------------+----------+--------------+------------------+-------------------+
| mysql-bin.000030 |      864 |              |                  |                   |
+------------------+----------+--------------+------------------+-------------------+


#查看binlog事件
mysql> show binlog events in 'mysql-bin.000007';
事件介绍
1)在binlog中最小的记录单元为event 也就是说一条执行语句就是一个事件
2)一个事务会被拆分成多个事件(event)
事件(event)特性
1)每个event都有一个开始位置(start position)和结束位置(stop position)。
2)所谓的位置就是event对整个二进制的文件的相对位置。
3)对于一个二进制日志中,前120个position是文件格式信息预留空间。
4)MySQL第一个记录的事件,都是从120开始的。
row模式下二进制日志分析及数据恢复
1.把模式改为行级模式
这是在mysql5.6里 mysql5.7里想开启行级模式 必须加上一条server_id
[root@db01 ~]# vim /etc/my.cnf
[mysqld]
log-bin=mysql-bin
binlog_format=row
#添加完重启
2.模拟删库
# 刷新binlog日志
mysql> flush logs;

#清空binlog日志
mysql> reset master;

#查看binlog信息
mysql> show master status;
+------------------+----------+--------------+------------------+-------------------+
| File             | Position | Binlog_Do_DB | Binlog_Ignore_DB | Executed_Gtid_Set |
+------------------+----------+--------------+------------------+-------------------+
| mysql-bin.000001 |      120 |              |                  |                   |
+------------------+----------+--------------+------------------+-------------------+

#创建一个binlog1库
mysql> create database binlog1;
mysql> show master status;
+------------------+----------+--------------+------------------+-------------------+
| File             | Position | Binlog_Do_DB | Binlog_Ignore_DB | Executed_Gtid_Set |
+------------------+----------+--------------+------------------+-------------------+
| mysql-bin.000001 |      223 |              |                  |                   |
+------------------+----------+--------------+------------------+-------------------+

#使用binlog1库
mysql> use binlog1

#创建binglog_table表
mysql> create table binlog_table(id int);
mysql> show master status;
+------------------+----------+--------------+------------------+-------------------+
| File             | Position | Binlog_Do_DB | Binlog_Ignore_DB | Executed_Gtid_Set |
+------------------+----------+--------------+------------------+-------------------+
| mysql-bin.000001 |      336 |              |                  |                   |
+------------------+----------+--------------+------------------+-------------------+

#插入数据1
mysql> insert into binlog_table values(1),(2),(3);
mysql> show master status;
+------------------+----------+--------------+------------------+-------------------+
| File             | Position | Binlog_Do_DB | Binlog_Ignore_DB | Executed_Gtid_Set |
+------------------+----------+--------------+------------------+-------------------+
| mysql-bin.000001 |      336 |              |                  |                   |
+------------------+----------+--------------+------------------+-------------------+

#提交
mysql> commit;
mysql> show master status;
+------------------+----------+--------------+------------------+-------------------+
| File             | Position | Binlog_Do_DB | Binlog_Ignore_DB | Executed_Gtid_Set |
+------------------+----------+--------------+------------------+-------------------+
| mysql-bin.000001 |      550 |              |                  |                   |
+------------------+----------+--------------+------------------+-------------------+

#修改数据
mysql> update binlog_table set id=10 where id=1;

#提交
mysql> commit;
mysql> show master status;
+------------------+----------+--------------+------------------+-------------------+
| File             | Position | Binlog_Do_DB | Binlog_Ignore_DB | Executed_Gtid_Set |
+------------------+----------+--------------+------------------+-------------------+
| mysql-bin.000001 |      760 |              |                  |                   |
+------------------+----------+--------------+------------------+-------------------+

#删除数据
mysql> delete from binlog_table where id=3;

#提交
mysql> commit;
mysql> show master status;
+------------------+----------+--------------+------------------+-------------------+
| File             | Position | Binlog_Do_DB | Binlog_Ignore_DB | Executed_Gtid_Set |
+------------------+----------+--------------+------------------+-------------------+
| mysql-bin.000001 |      964 |              |                  |                   |
+------------------+----------+--------------+------------------+-------------------+

#查看数据
mysql> select * from binlog_table;
+------+
| id   |
+------+
|   10 |
|    2 |
+------+

#不小心删错了个表
mysql> drop table binlog_table;
mysql> show master status;
+------------------+----------+--------------+------------------+-------------------+
| File             | Position | Binlog_Do_DB | Binlog_Ignore_DB | Executed_Gtid_Set |
+------------------+----------+--------------+------------------+-------------------+
| mysql-bin.000001 |     1095 |              |                  |                   |
+------------------+----------+--------------+------------------+-------------------+

#气急败坏把库删了
mysql> drop database binlog1;
库没了 咋个办 ? -------> 解决方法:https://flights.ctrip.com/
3.使用binlog恢复数据
#之前数据的所有情况
+------+
| id   |
+------+
|    1 |
|    2 |
|    3 |
+------+

+------+
| id   |
+------+
|    10|
|    2 |
|    3 |
+------+

+------+
| id   |
+------+
|    10|
|    2 |
+------+
#查看当前有哪些binlog
mysql> show binary logs;
+------------------+-----------+
| Log_name         | File_size |
+------------------+-----------+
| mysql-bin.000001 |      1186 |
+------------------+-----------+

#行级模式查看 但是好像看不太懂
mysql> show binlog events in 'mysql-bin.000001';

#用这个看日志
[root@db01 ~]# mysqlbinlog --base64-output=decode-rows -vvv /application/mysql/data/mysql-bin.000001
#分析
update binlog.binlog_table
set
@1=22 --------->@1表示binlog_table中的第一列,集合表结构就是id=22
where
@1=2  --------->@1表示binlog_table中的第一列,集合表结构就是id=2

#找到想恢复到的数据情况的定位
起始:120
结束:760

#截取数据
[root@db01 ~]# mysqlbinlog --start-position=120 --stop-position=760 /application/mysql/data/mysql-bin.000001

#导出数据
[root@db01 ~]# mysqlbinlog --start-position=120 --stop-position=760 /application/mysql/data/mysql-bin.000001 >/tmp/binlog_table.sql

#临时关闭binlog
mysql> set sql_log_bin=0;
如果不加这条 你的binlog就会一直记录 包括你恢复的这一段 数据会很大 而且binlog里记录的都是重复数据

#执行sql文件
mysql> source /tmp/binlog_table.sql

#查看数据是否恢复
mysql> show databases;
+--------------------+
| Database           |
+--------------------+
| information_schema |
| binlog1            |
| db                 |
| linux50            |
| mysql              |
| oldboy             |
| performance_schema |
| test               |
| test2              |
| world              |
+--------------------+
mysql> use binlog1
mysql> sow tables;
mysql> show tables;
+-------------------+
| Tables_in_binlog1 |
+-------------------+
| binlog_table      |
+-------------------+
mysql> select * from binlog_table;
+------+
| id   |
+------+
|   10 |
|    2 |
|    3 |
+------+
使用binlog恢复指定库数据
两个库交互操作
#创建test1库
mysql> create database test1;

#查看binlog信息
mysql> show master status;
+------------------+----------+--------------+------------------+-------------------+
| File             | Position | Binlog_Do_DB | Binlog_Ignore_DB | Executed_Gtid_Set |
+------------------+----------+--------------+------------------+-------------------+
| mysql-bin.000001 |     2018 |              |                  |                   |
+------------------+----------+--------------+------------------+-------------------+

#创建test2库
mysql> create database test2;
mysql> show master status;
+------------------+----------+--------------+------------------+-------------------+
| File             | Position | Binlog_Do_DB | Binlog_Ignore_DB | Executed_Gtid_Set |
+------------------+----------+--------------+------------------+-------------------+
| mysql-bin.000001 |     2115 |              |                  |                   |
+------------------+----------+--------------+------------------+-------------------+

#切换到test1库
mysql> use test1

#创建tb1
mysql> create table tb1(id int);
mysql> show master status;
+------------------+----------+--------------+------------------+-------------------+
| File             | Position | Binlog_Do_DB | Binlog_Ignore_DB | Executed_Gtid_Set |
+------------------+----------+--------------+------------------+-------------------+
| mysql-bin.000001 |     2215 |              |                  |                   |
+------------------+----------+--------------+------------------+-------------------+

#插入数据到tb1
mysql> insert into test1.tb1 values(1),(2),(3);

#提交
mysql> commit;

#切换到test2
mysql> use test2

#创建tb2
mysql> create table tb2(id int);

#插入数据到tb2
mysql> insert into test2.tb2 values(1),(2);

#提交
mysql> commit;

#查看表test1
mysql> show tables from test1;
+-----------------+
| Tables_in_test1 |
+-----------------+
| tb1             |
+-----------------+
mysql> select * from test1.tb1;
+------+
| id   |
+------+
|    1 |
|    2 |
|    3 |
+------+

#查看表test2
mysql> show tables from test2;
+-----------------+
| Tables_in_test2 |
+-----------------+
| tb2             |
+-----------------+
mysql> select * from test2.tb2;
+------+
| id   |
+------+
|    1 |
|    2 |
+------+

#修改tb1数据
mysql> update test1.tb1 set id=10 where id=1;

#提交
mysql> commit;

#修改tb2数据
mysql> update test2.tb2 set id=20 where id=2;

#提交
mysql> commit;

#查看tb1数据
mysql> select * from test1.tb1;
+------+
| id   |
+------+
|   10 |
|    2 |
|    3 |
+------+

#查看tb2数据
mysql> select * from test2.tb2;
+------+
| id   |
+------+
|    1 |
|   20 |
+------+

mysql> show master status;
+------------------+----------+--------------+------------------+-------------------+
| File             | Position | Binlog_Do_DB | Binlog_Ignore_DB | Executed_Gtid_Set |
+------------------+----------+--------------+------------------+-------------------+
| mysql-bin.000001 |     3106 |              |                  |                   |
+------------------+----------+--------------+------------------+-------------------+
1 row in set (0.00 sec)


#不小心又删库了
mysql> drop database test1;
如何恢复?
#查看位置节点
mysql> show binary logs;
+------------------+-----------+
| Log_name         | File_size |
+------------------+-----------+
| mysql-bin.000001 |      3201 |
+------------------+-----------+
[root@db01 ~]# mysqlbinlog --base64-output=decode-rows -vvv /application/mysql/data/mysql-bin.000001

#截取位置点并导出数据
起始:1921
结束:3106
[root@db01 ~]# mysqlbinlog --start-position=1921 --stop-position=3106 /application/mysql/data/mysql-bin.000001 > /tmp/2.sql

`注意!像刚才那样截取  会把没有误删的test2也截取下来 恢复数据的时候 会有重复数据
`要在前面加上参数-d 指定数据库

#截取位置点并导出数据
[root@db01 ~]# mysqlbinlog -d test1 --start-position=1921 --stop-position=3106 /application/mysql/data/mysql-bin.000001 >/tmp/2.sql

#恢复数据
[root@db01 ~]# mysql -S /tmp/mysql.sock < /tmp/2.sql

#查看数据是否导入成功
[root@db01 ~]# mysql -S /tmp/mysql.sock
mysql> show databases;
+--------------------+
| Database           |
+--------------------+
| information_schema |
| binlog1            |
| db                 |
| linux50            |
| mysql              |
| oldboy             |
| performance_schema |
| test               |
| test1              |
| test2              |
| world              |
+--------------------+

mysql> use test1
mysql> show tables;
+-----------------+
| Tables_in_test1 |
+-----------------+
| tb1             |
+-----------------+

mysql> select * from tb1;
+------+
| id   |
+------+
|   10 |
|    2 |
|    3 |
+------+
binlog的刷新和删除
刷新binlog
1.MySQL重启会刷新binlog
[root@db01 data]# /etc/init.d/mysqld restart
2.执行,flush logs
mysql> flush logs
3.mysqladmin
[root@db01 data]# mysqladmin flush-log
4.binlog到1G会自动刷新
5.mysqldump -F
删除binlog
1.根据binlog的生存时间
#临时生效
SET GLOBAL expire_logs_days = 7;
#永久生效
[root@db01 data]# vim /etc/my.cnf
[mysqld]
expire_logs_days = 7
2.使用purge命令删除
PURGE BINARY LOGS BEFORE now() - INTERVAL 7 day;
3.根据binlog 名字删除 (一般用这个)
mysql> PURGE BINARY LOGS TO 'mysql-bin.000010';
10以后的都留着  就是删掉的是1-9
4.reset master(不要用啊 全删的)
主从关系中,主库执行此操作,主从环境必崩
binlog日志的GTID新特性
GTID 介绍
5.6 版本新加的特性,5.7中做了加强
5.6 中不开启,没有这个功能.
5.7 中的GTID,即使不开也会有自动生成
SET @@SESSION.GTID_NEXT= 'ANONYMOUS'
GTID(Global Transaction ID)
是对于一个已提交事务的编号,并且是一个全局唯一的编号。
它的官方定义如下:

GTID = source_id :transaction_id
7E11FA47-31CA-19E1-9E56-C43AA21293967:29

mysql> show master status;
基于GTID进行查看binlog
具备GTID后,截取查看某些事务日志:
--include-gtids
--exclude-gtids
mysqlbinlog --include-gtids='dff98809-55c3-11e9-a58b-000c2928f5dd:1-6' --exclude-gtids='dff98809-55c3-11e9-a58b-000c2928f5dd:4'  /data/binlog/mysql-bin.000004
GTID的幂等性
开启GTID后,MySQL恢复Binlog时,重复GTID的事务不会再执行了
就想恢复?怎么办?
--skip-gtids
mysqlbinlog --include-gtids='3ca79ab5-3e4d-11e9-a709-000c293b577e:4' /data/binlog/mysql-bin.000004 /data/binlog/mysql-bin.000004
set sql_log_bin=0;
source /tmp/binlog.sql
set sql_log_bin=1;
有GTID的恢复:
(1)截取
mysqlbinlog --skip-gtids --include-gtids='3ca79ab5-3e4d-11e9-a709-000c293b577e:7-12' mysql-bin.000004> /tmp/bin.sql
(2)恢复
set sql_log_bin=0;
source /tmp/bin.sql
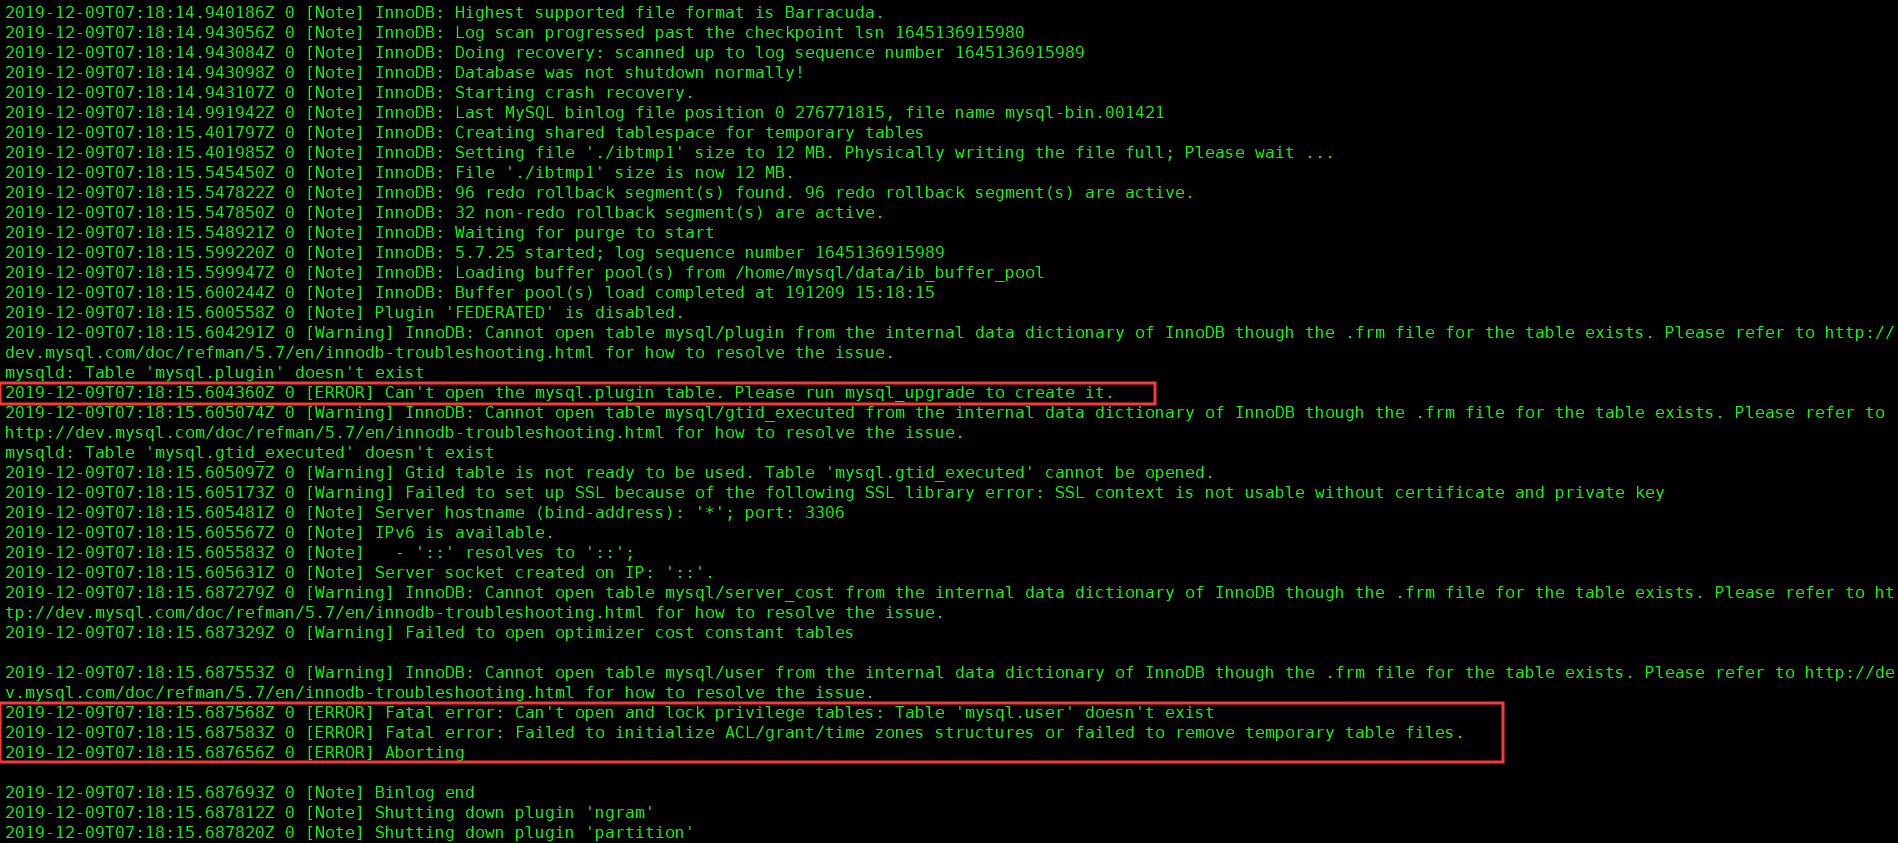
二、错误日志
1.作用
解决MySQL故障,排错
2.默认是否开启与路径
开启
路径/名字:$datadir/$hostname.err
#这个命令想查啥都行的
#查看方式
[root@db01 ~]# mysqladmin  variables |grep 'error'

| binlog_error_action                                    | IGNORE_ERROR
| log_error                                              | ./db01.err
| max_connect_errors                                     | 100
| max_error_count                                        | 64
| slave_skip_errors                                      | OFF

mysql> show variables like '%error%';
+---------------------+--------------+
| Variable_name       | Value        |
+---------------------+--------------+
| binlog_error_action | IGNORE_ERROR |
| error_count         | 0            |
| log_error           | ./db01.err   |
| max_connect_errors  | 100          |
| max_error_count     | 64           |
| slave_skip_errors   | OFF          |
+---------------------+--------------+
#编辑配置文件 开启
[root@db01 ~]# vim /etc/my.cnf
[mysqld]
log_error=/application/mysql/data/$hostname.err
这个报错 往往是没有初始化的原因
三、一般查询日志
1.作用
记录mysql所有执行成功的SQL语句信息,可以做审计用,但是我们很少开启。
2.默认是否开启与路径
默认是否开启:关闭
路径/名字:$datadir/$hostname.log
#查看方式
[root@db01 ~]# mysqladmin  variables |grep 'gen'
| collation_connection                                   | utf8_general_ci
| collation_database                                     | utf8_general_ci
| collation_server                                       | utf8_general_ci
| general_log                                            | OFF
| general_log_file                                       | /application/mysql-5.6.40/data/db01.log


mysql> show variables like '%gen%';
+------------------+-----------------------------------------+
| Variable_name    | Value                                   |
+------------------+-----------------------------------------+
| general_log      | OFF                                     |
| general_log_file | /application/mysql-5.6.40/data/db01.log |
+------------------+-----------------------------------------+
#编辑配置文件 开启
[root@db01 ~]# vim /etc/my.cnf
[mysqld]
general_log=on
general_log_file=/application/mysql/data/$hostnamel.log
#查看'审计'
[root@db01 /application/mysql/data]# cat db01.log
/application/mysql-5.6.40/bin/mysqld, Version: 5.6.40-log (Source distribution). started with:
Tcp port: 0  Unix socket: (null)
Time                 Id Command    Argument
191210  9:15:40	    1 Connect	root@localhost on
		    1 Query	select @@version_comment limit 1
191210  9:15:46	    1 Query	show databases
191210  9:15:51	    1 Query	SELECT DATABASE()
		    1 Init DB	test
		    1 Query	show databases
		    1 Query	show tables
		    1 Field List	jiaoyi
		    1 Field List	score
		    1 Field List	stu
		    1 Field List	student
		    1 Field List	student2
		    1 Field List	suo
		    1 Field List	suo_new
		    1 Field List	xiangqin
		    1 Field List	yinshi
191210  9:16:01	    1 Query	show tables
191210  9:16:08	    1 Query	select * from suo
191210  9:16:10	    1 Quit
四、慢查询日志
#手动查看

mysql> show processlist;
+----+------+-----------+------+---------+------+-------+------------------+
| Id | User | Host      | db   | Command | Time | State | Info             |
+----+------+-----------+------+---------+------+-------+------------------+
|  2 | root | localhost | NULL | Query   |    0 | init  | show processlist |
+----+------+-----------+------+---------+------+-------+------------------+

mysql> show full processlist;
+----+------+-----------+------+---------+------+-------+-----------------------+
| Id | User | Host      | db   | Command | Time | State | Info                  |
+----+------+-----------+------+---------+------+-------+-----------------------+
|  2 | root | localhost | NULL | Query   |    0 | init  | show full processlist |
+----+------+-----------+------+---------+------+-------+-----------------------+
1.作用
1)是将mysql服务器中影响数据库性能的相关SQL语句记录到日志文件
2)通过对这些特殊的SQL语句分析,改进以达到提高数据库性能的目的
2.默认是否开启与路径
默认是否开启:关闭
路径/名字:$datadir/$hostname-slow.log
[root@db01 ~]# mysqladmin variables |grep 'slow'
| log_slow_admin_statements                              | OFF
| log_slow_slave_statements                              | OFF
| slow_launch_time                                       | 2
| slow_query_log                                         | OFF
| slow_query_log_file                                    | /application/mysql-5.6.40/data/db01-slow.log
3.如何开启
[root@db01 ~]# vim /etc/my.cnf
[mysqld]
#指定是否开启慢查询日志
slow_query_log = 1
#指定慢日志文件存放位置(默认在data)
slow_query_log_file=/application/mysql/data/slow.log
#设定慢查询的阀值(默认10s)
long_query_time=0.05     时间根据你的数据大小来定
#不使用索引的慢查询日志是否记录到日志  记录就加
log_queries_not_using_indexes
#查询检查返回少于该参数指定行的SQL不被记录到慢查询日志
min_examined_row_limit=100(鸡肋) 我不加 知道这个参数就行
4.模拟慢查询
# 1.疯狂插入数据
[root@db01 ~]# mysql
mysql> use test
mysql> create table city select * from world.city;
mysql> insert into city select * from city;
mysql> insert into city select * from city;

# 2.另一个窗口查看
mysql> show processlist;
+----+------+-----------+------+---------+------+--------------+-------------------------------------+
| Id | User | Host      | db   | Command | Time | State        | Info                                |
+----+------+-----------+------+---------+------+--------------+-------------------------------------+
|  1 | root | localhost | test | Query   |    2 | Sending data | insert into city select * from city |
|  2 | root | localhost | NULL | Query   |    0 | init         | show processlist                    |
+----+------+-----------+------+---------+------+--------------+-------------------------------------+

# 3.太慢了 阻塞其他命令了
mysql> kill 1;  慢就杀了 不然阻塞其他的

# 4.回到第一个窗口查看
mysql> insert into city select * from city;
ERROR 2013 (HY000): Lost connection to MySQL server during query
5.查看慢查询日志
#查看慢查询日志  有点乱
[root@db01 ~]# cat /application/mysql/data/slow.log
/application/mysql-5.6.40/bin/mysqld, Version: 5.6.40-log (Source distribution). started with:
Tcp port: 0  Unix socket: (null)
Time                 Id Command    Argument
# Time: 191210  9:58:07
# User@Host: root[root] @ localhost []  Id:     1
# Query_time: 0.195234  Lock_time: 0.044663 Rows_sent: 0  Rows_examined: 4079
use test;
SET timestamp=1575943087;
create table city select * from world.city;
# Time: 191210  9:58:39
# User@Host: root[root] @ localhost []  Id:     1
# Query_time: 0.540788  Lock_time: 0.000305 Rows_sent: 0  Rows_examined: 8158
SET timestamp=1575943119;
insert into city select * from city;
# Time: 191210  9:59:48
# User@Host: root[root] @ localhost []  Id:     1
# Query_time: 0.090210  Lock_time: 0.000078 Rows_sent: 0  Rows_examined: 16316
SET timestamp=1575943188;
insert into city select * from city;
# Time: 191210 10:02:12
# User@Host: root[root] @ localhost []  Id:     1
# Query_time: 0.434296  Lock_time: 0.000077 Rows_sent: 0  Rows_examined: 32632
SET timestamp=1575943332;
insert into city select * from city;
......
6.使用mysqldumpslow命令来分析慢查询日志
#输出记录次数最多的10条SQL语句$PATH/mysqldumpslow -s c -t 10 /database/mysql/slow-log

参数说明:
-s:
是表示按照何种方式排序,c、t、l、r分别是按照记录次数、时间、查询时间、返回的记录数来排序,ac、at、al、ar,表示相应的倒叙;

-t:
是top n的意思,即为返回前面多少条的数据;

-g:
后边可以写一个正则匹配模式,大小写不敏感的;

#例:
# 次数
[root@db01 ~]# mysqldumpslow -s c -t 10 /application/mysql/data/slow.log

Reading mysql slow query log from /application/mysql/data/slow.log
Count: 8  Time=2.37s (18s)  Lock=0.00s (0s)  Rows=0.0 (0), root[root]@localhost
  insert into city select * from city

Count: 1  Time=0.15s (0s)  Lock=0.04s (0s)  Rows=0.0 (0), root[root]@localhost
  create table city select * from world.city

Died at /application/mysql/bin/mysqldumpslow line 161, <> chunk 9.

反正就是各种排序
7.下载第三方插件 查看慢查询数据
#去官网下rpm包 percona-toolkit-3.0.11-1.el6.x86_64 直接拖上去

[root@db01 ~]# yum  localinstall -y percona-toolkit-3.0.11-1.el6.x86_64.rpm
[root@db01 ~]# pt-query-digest /application/mysql/data/slow.log
# Attribute    pct   total     min     max     avg     95%  stddev  median
# ============ === ======= ======= ======= ======= ======= ======= =======
# Count         88       8
# Exec time     98     19s    90ms      9s      2s      9s      3s      1s
# Lock time      1   828us    68us   305us   103us   301us    75us    76us
# Rows sent      0       0       0       0       0       0       0       0
# Rows examine  99   1.84M   7.97k 870.27k 235.26k 830.38k 276.85k 184.53k
# Query size    86     280      35      35      35      35       0      35
# String:
# Databases    test
# Hosts        localhost
# Users        root
# Query_time distribution
#   1us
#  10us
# 100us
#   1ms
#  10ms  ################
# 100ms  ################################################################
#    1s  ################################################
#  10s+
大概就是这种看得懂又详细的
8.有能力的可以做成可视化界面:
Anemometer基于pt-query-digest将MySQL慢查询可视化
httpss://www.percona.com/downloads/percona-toolkit/LATEST/ 慢日志分析工具下载
httpss://github.com/box/Anemometer 可视化代码下载


 浙公网安备 33010602011771号