第二次作业
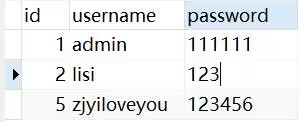
【实验内容】设计一个具有登陆界面可实现加、减、乘、除功能的计算器软件 说明:用java语法实现计算器的加减乘除功能,并连接数据库。
【开发工具】IntelliJ IDEA Community Edition 2021.3.3、MySQL、MySQL连接驱动:mysql-connector-java-5.1.32.jar、mybatis-3.5.5、javax.servlet-3.1.0、tomcat7
一.用户注册 登录流程图


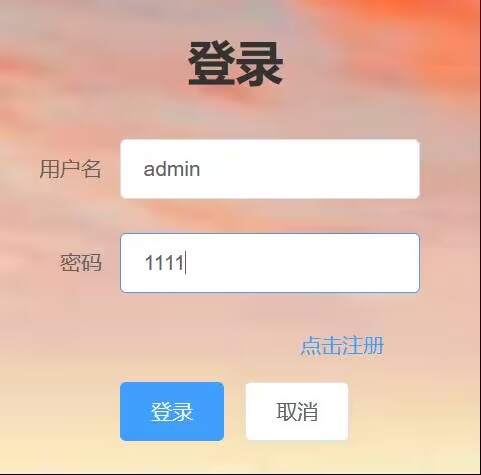
二.用户登录截图及代码


重要代码如下:
1.编写请求代码
methods: {
login() {
axios.post("/api/login",this.form).then((response)=>{
if(response.data==true) {
confirm('登录成功!');
window.location.href="home.html";
}
else alert('用户名或密码错误,请重试!');
})
},
- 编写登录界面定义变量
<!--登录界面-->
<h1 style="margin-left:125px;color: #333333">登录</h1>
<el-form ref="form" :model="form" label-width="80px" style="margin-top: 30px">
<el-form-item label="用户名">
<el-input v-model="form.username" style="width: 200px;"></el-input>
</el-form-item>
<el-form-item label="密码">
<el-input v-model="form.password" style="width: 200px;"></el-input>
</el-form-item>
<div style="margin-left: 200px;margin-bottom: 15px"><el-link type="primary" @click="register" >点击注册</el-link></div>
<el-form-item>
<el-button type="primary" @click="login">登录</el-button>
<el-button>取消</el-button>
</el-form-item>
</el-form>
定义变量
data() {
return {
form: {
username: '',
password: ''
},
- 编写注册界面定义变量
<!--注册界面-->
<h1 style="margin-left:100px;color: #333333">注册账号</h1>
<el-form ref="form" :model="form" label-width="80px" style="margin-top: 30px">
<el-form-item label="用户名">
<el-input v-model="form.username" style="width: 200px;"></el-input>
</el-form-item>
<el-form-item label="密码">
<el-input v-model="form.password" style="width: 200px;"></el-input>
</el-form-item>
<el-form-item>
<el-button type="primary" @click="onSubmit">注册</el-button>
<el-button href="register.html">取消</el-button>
</el-form-item>
</el-form>
接收数据的变量如下
data() {
return {
form: {
username: '',
password: ''
},
4.编写请求代码
onSubmit() {
axios.post("/api/register",this.form).then((response)=>{
if(response.data==false) alert("注册失败,用户名已存在!");
else {
confirm("注册成功,即将跳转登录界面")
window.location.href="login.html";
}
})
}
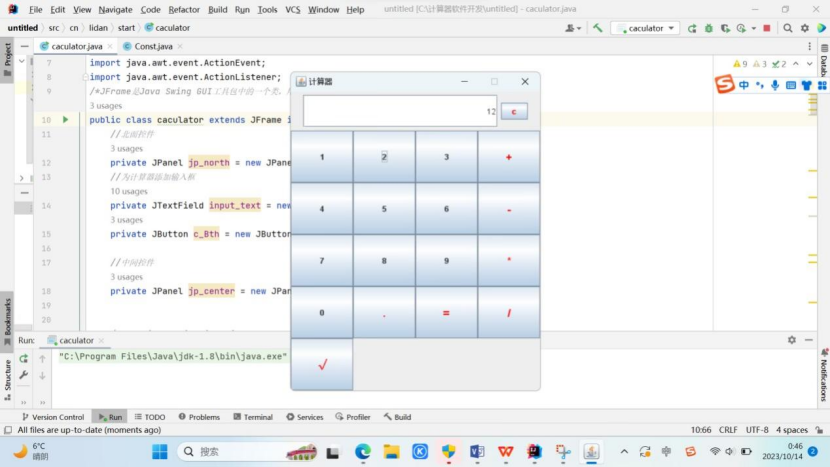
三.计算器运行结果及代码
(1)测试截屏如下
(2)重要代码如下:
说明:用java语法实现计算器的加减乘除功能,如下代码
package p;
import java.util.Scanner;
public class User {
public static String symbol(Scanner scanner){
System.out.println("请输入第一个数字");
float m = scanner.nextFloat();
System.out.println("请输入运算符");
String symbol=scanner.next();
System.out.println("请输入第二个数字");
float n = scanner.nextFloat();
if(symbol.equals("+")){
float num=JiaFa(m,n);
System.out.println(num);
}
else if(symbol.equals("-")){
float num=JianFa(m,n);
System.out.println(num);
}
else if(symbol.equals("*")){
float num=Cheng(m,n);
System.out.println(num);
}
else if(symbol.equals("/")){
float num=Chu(m,n);
System.out.println(num);
}
return symbol;
}
public static float JiaFa(float m,float n) {
float c = 0;
if (m> 10000 & n > 10000) {
System.out.println("数字过大,请重新输入");
}
return c=m+n;
}
public static float JianFa(float a,float b){
float c;
if(a> 10000 & b > 10000){
System.out.println("数字过大,请重新输入");
}
return c=a-b;
}
public static float Cheng(float a,float b){
float c;
if(a> 10000 & b > 10000){
System.out.println("数字过大,请重新输入");
}
return c=a*b;
}
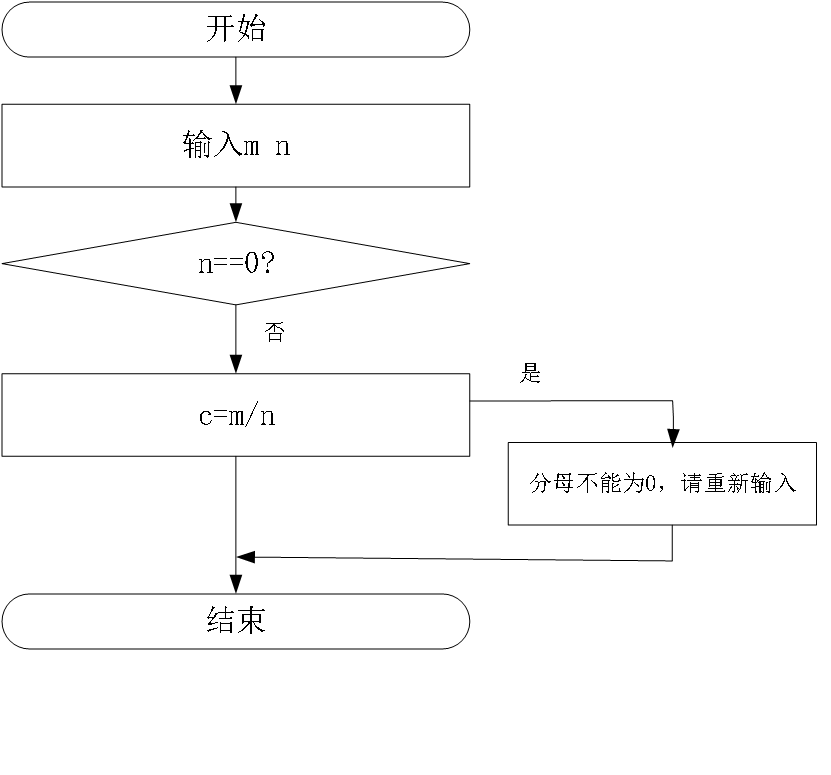
public static float Chu(float a,float b){
float c;
if(b==0){
System.out.println("分母不能为0,请重新输入");
}
return c=a/b;
}
public static void main(String[] args) {
Scanner scanner=new Scanner(System.in);
while(true){
symbol(scanner);
}
}
}
计算器软件的UI设计
本次计算器软件的界面设计是由swing设计,其设计代码如下:
package cn.lidan.start;
import can.lidan.util.Const;
import javax.swing.*;
import java.awt.*;
import java.awt.event.ActionEvent;
import java.awt.event.ActionListener;
/*JFrame是Java Swing GUI工具包中的一个类,用于创建窗口应用程序*/
public class caculator extends JFrame implements ActionListener {
//北面控件
private JPanel jp_north = new JPanel();
//为计算器添加输入框
private JTextField input_text = new JTextField();//创建输入框
private JButton c_Bth = new JButton("c");//创建一个按钮
//中间控件
private JPanel jp_center = new JPanel();//创建页面布局
/* public static final int FRAME_W=300;
public static final int FRAME_H=300;
public static final int SCREEN_W= Toolkit.getDefaultToolkit().getScreenSize().width;
public static final int SCREEN_H=Toolkit.getDefaultToolkit().getScreenSize().height;
public int frame_x=(SCREEN_W-FRAME_W)/2;
public int frame_y=(SCREEN_H-FRAME_H)/2;*/
public caculator() throws HeadlessException {
this.init();
this.addNorthComponet();
this.addCenterButton();
}
//进行初始化
public void init() {
this.setTitle(Const.TITLE);//设置名称
this.setSize(Const.FRAME_W, Const.FRAME_H);//给窗体设置大小
this.setLayout(new BorderLayout());
this.setResizable(false);//设置窗体大小不可修改
this.setLocation(Const.FRAME_x, Const.FRAME_y);
this.setDefaultCloseOperation(JFrame.EXIT_ON_CLOSE);//窗体关闭
}
//添加北面控件
public void addNorthComponet() {
this.input_text.setPreferredSize(new Dimension(300, 50));
jp_north.add(input_text);
this.c_Bth.setForeground(Color.RED);
jp_north.add(c_Bth);
c_Bth.addActionListener(new ActionListener() {
@Override
public void actionPerformed(ActionEvent e) {
input_text.setText("");
}
});
//添加输入框到窗体中
this.add(jp_north, BorderLayout.NORTH);
/*BorderLayout 将容器分为 EAST 、 SOUTH 、 WEST 、 NORTH 、 CENTER
五个区域,普通组件可以被放置在这 5 个区域的任意一个中 */
}
//添加中间按钮
public void addCenterButton() {
String bth_text = "123+456-789*0.=/√";
String regx = "[\\+\\-*/=.√]";
this.jp_center.setLayout(new GridLayout(5, 4));
for (int i = 0; i < 17; i++) {
String temp = bth_text.substring(i, i + 1);
JButton btn = new JButton();//创建数字按钮
btn.setText(temp);
if (temp.matches(regx)) {
//设置字体
btn.setFont(new Font("粗体", Font.BOLD, 17));
btn.setForeground(Color.RED);
}
/*if(temp.equals("+")||temp.equals("-")||temp.equals("*")
||temp.equals("/")||temp.equals(".")||temp.equals("="))
{
bth.setFont(new Font("粗体",Font.BOLD,16));
bth.setForeground(Color.RED);
}*/
btn.addActionListener(this);
jp_center.add(btn);
}
this.add(jp_center, BorderLayout.CENTER);
}
private String firstInput = null;
private String operator=null;
@Override
public void actionPerformed(ActionEvent e) {
String clickStr = e.getActionCommand();
if ("√.0123456789".indexOf(clickStr) != -1) {
this.input_text.setText(input_text.getText() + clickStr);
this.input_text.setHorizontalAlignment(JTextField.RIGHT);
//JOptionPane.showMessageDialog(this,clickStr);
} else if (clickStr.matches("[\\+\\-*/√]{1}")) {
operator = clickStr;
firstInput = this.input_text.getText();
this.input_text.setText("");
} else if (clickStr.equals("=")) {
Double a = Double.valueOf(firstInput);
Double b = Double.valueOf(this.input_text.getText());
Double result = null;
switch (operator) {
case "+":
result = a + b;
break;
case "-":
result = a - b;
break;
case "*":
result = a * b;
break;
case "/":
if (b != 0) {
result = a / b;
}
break;
}
this.input_text.setText(result.toString());
}
}
public static void main(String[] args) {
caculator Caculator = new caculator();
Caculator.setVisible(true);
}
}
package can.lidan.util;
import cn.lidan.start.caculator;
import java.awt.*;
public class Const {
public static final int FRAME_W=400;
public static final int FRAME_H=500;
public static final int SCREEN_W= Toolkit.getDefaultToolkit().getScreenSize().width;
public static final int SCREEN_H=Toolkit.getDefaultToolkit().getScreenSize().height;
public static final int FRAME_x=(SCREEN_W-FRAME_W)/2;
public static final int FRAME_y=(SCREEN_H-FRAME_H)/2;
public static final String TITLE="计算器";
}
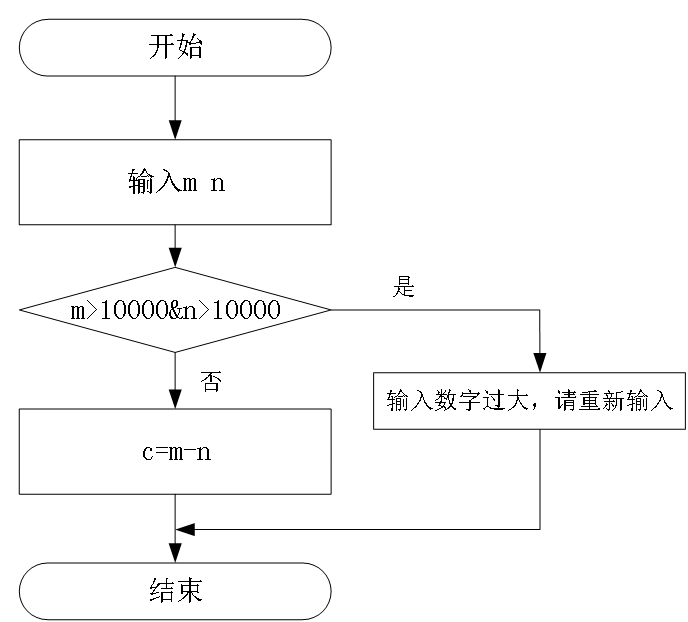
(3)使用Visio实现加减乘除的流程图如下


四.使用jdbc连接数据库
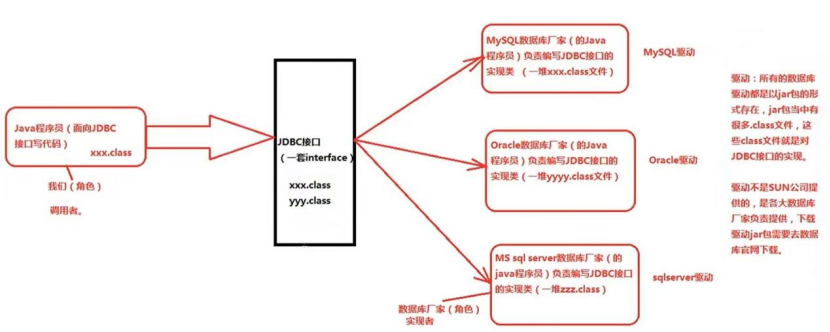
1、加载JDBC驱动程序:
(1)加载UXDB的驱动类
// 加载 UXDB的驱动
try{
Class.forName("com.uxsino.uxdb.Driver");
}catch (Exception e){
e.printStackTrace();
}
(2)加载MySQL的驱动类
try{
//加载MySql的驱动类
Class.forName("com.mysql.jdbc.Driver") ;
}catch(ClassNotFoundException e){
System.out.println("找不到驱动程序类 ,加载驱动失败!");
e.printStackTrace() ;
}
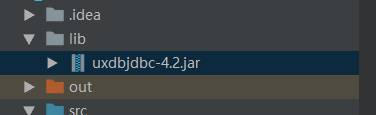
注意:不管加载什么数据库的驱动,可能都得提前导入驱动的jar包
2、提供JDBC连接需要的URL
(1)UXDB的连接URL
// UXDB的连接URL
String url = "jdbc:uxdb://192.71.1.31:5432/uxdb";
(2)MySQL的连接URL
String url = "jdbc:mysql://localhost:3306/mysql" ;
3、创建数据库的连接.
(1)连接UXDB数据库,用户名,密码
// 连接UXDB数据库
String url = "jdbc:uxdb://192.71.1.31:5432/uxdb";
try{
Connection conn =
DriverManager.getConnection(url,"uxdb","123456");
}catch(Exception e){
System.out.println("数据库连接失败!");
e.printStackTrace() ;
}
(2)连接MySQL数据库
String username = "root" ;
String password = "root" ;
try{
Connection conn =
DriverManager.getConnection(url , username , password ) ;
}catch(SQLException se){
System.out.println("数据库连接失败!");
se.printStackTrace() ;
}
4、创建一个Statement
5、执行SQL语句
Statement接口提供了三种执行SQL语句的方法:executeQuery 、executeUpdate 和 execute
(1)ResultSet executeQuery(String sqlString):执行查询数据库的SQL语句 ,返回一个结果集(ResultSet)对象。
(2)int executeUpdate(String sqlString):用于执行INSERT、UPDATE或DELETE语句以及SQL DDL语句,如:CREATE TABLE和DROP TABLE等
(3)execute(sqlString):用于执行返回多个结果集、多个更新计数或二者组合的语句。(这里不管什么数据库基本一致,大同小异)
(4)
(5)6、对数据库中查询的结果做处理
7、关闭JDBC对象
连接UXDB数据库整个完整的代码:
package com.song.jdbc;
import java.sql.*;
public class ConnTest {
public static void main(String[] args) {
Connection connection = getConn();
String sql = "select * from student";
PreparedStatement statement;
statement = null;
ResultSet resultSet;
resultSet = null;
try {
// statement = connection.createStatement();
// resultSet = statement.executeQuery(sql);
//4、创建一个Statement
PreparedStatement statement1 = connection.prepareStatement(sql);
//5、执行SQL语句
resultSet = statement1.executeQuery();
System.out.println("======");
//6、对数据库中 查询的结果做处理
while (resultSet.next()){
System.out.println("===22222====");
System.out.println(resultSet.getString(1));
System.out.println("\n");
}
}catch (Exception e){
e.printStackTrace();
}finally {
//7、关闭JDBC对象
if (resultSet != null){
try {
resultSet.close();
} catch (SQLException e) {
e.printStackTrace();
}
}
if (statement != null){
try {
statement.close();
} catch (SQLException e) {
e.printStackTrace();
}
}
if (connection != null){
try {
connection.close();
} catch (SQLException e) {
e.printStackTrace();
}
}
}
}
private static Connection getConn(){
Connection connection;
connection = null;
try{
//1、加载JDBC 驱动程序
Class.forName("com.uxsino.uxdb.Driver");
//2、提供JDBC连接需要的URL
String url = "jdbc:uxdb://192.71.1.31:5432/uxdb";
try {
//3、创建数据库的连接
return DriverManager.getConnection(url,"uxdb","123123");
}catch (Exception e){
e.printStackTrace();
}
}catch (Exception e){
e.printStackTrace();
}
return connection;
}
}
连接MySQL数据库整个完整的代码
package sqldemo;
import java.sql.Connection;
import java.sql.DriverManager;
import java.sql.ResultSet;
import java.sql.SQLException;
import java.sql.Statement;
public class main {
public static void main(String[] args) {
//声明Connection对象
Connection con;
//驱动程序名
String driver = "com.mysql.jdbc.Driver";
//URL指向要访问的数据库名mydata
String url = "jdbc:mysql://localhost:3306/sqltestdb";
//MySQL配置时的用户名
String user = "root";
//MySQL配置时的密码
String password = "123456";
//遍历查询结果集
try {
//加载驱动程序
Class.forName(driver);
//1.getConnection()方法,连接MySQL数据库!!
con = DriverManager.getConnection(url,user,password);
if(!con.isClosed())
System.out.println("Succeeded connecting to the Database!");
//2.创建statement类对象,用来执行SQL语句!!
Statement statement = con.createStatement();
//要执行的SQL语句
String sql = "select * from emp";
//3.ResultSet类,用来存放获取的结果集!!
ResultSet rs = statement.executeQuery(sql);
System.out.println("-----------------");
System.out.println("执行结果如下所示:");
System.out.println("-----------------");
System.out.println("姓名" + "\t" + "职称");
System.out.println("-----------------");
String job = null;
String id = null;
while(rs.next()){
//获取stuname这列数据
job = rs.getString("job");
//获取stuid这列数据
id = rs.getString("ename");
//输出结果
System.out.println(id + "\t" + job);
}
rs.close();
con.close();
} catch(ClassNotFoundException e) {
//数据库驱动类异常处理
System.out.println("Sorry,can`t find the Driver!");
e.printStackTrace();
} catch(SQLException e) {
//数据库连接失败异常处理
e.printStackTrace();
}catch (Exception e) {
// TODO: handle exception
e.printStackTrace();
}finally{
System.out.println("数据库数据成功获取!!");
}
}
}

 浙公网安备 33010602011771号