opencv-python图像处理1
一个很有趣的个人博客,不信你来撩 fangzengye.com
更改颜色空间
BGR ↔ Gray and BGR ↔ HSV.
>>> import cv2 as cv
>>> flags = [i for i in dir(cv) if i.startswith('COLOR_')]
>>> print( flags )
对象跟踪
步骤
1.获取视频的画面
2.将RGB变成HSV
3.设置跟踪对象的HSV值范围
import cv2 as cv
import numpy as np
cap = cv.VideoCapture(0)
while(1):
    # Take each frame
    _, frame = cap.read()
    # Convert BGR to HSV
    hsv = cv.cvtColor(frame, cv.COLOR_BGR2HSV)
    # define range of blue color in HSV
    lower_blue = np.array([110,50,50])
    upper_blue = np.array([130,255,255])
    # Threshold the HSV image to get only blue colors
    mask = cv.inRange(hsv, lower_blue, upper_blue)
    # Bitwise-AND mask and original image
    res = cv.bitwise_and(frame,frame, mask= mask)
    cv.imshow('frame',frame)
    cv.imshow('mask',mask)
    cv.imshow('res',res)
    k = cv.waitKey(5) & 0xFF
    if k == 27:
        break
cv.destroyAllWindows()
如何找到要跟踪对象的HSV值
>>> green = np.uint8([[[0,255,0 ]]])
>>> hsv_green = cv.cvtColor(green,cv.COLOR_BGR2HSV)
>>> print( hsv_green )
[[[ 60 255 255]]]
源地址
https://docs.opencv.org/3.4/df/d9d/tutorial_py_colorspaces.html
图像几何变换
Transformations
图像缩放
import numpy as np
import cv2 as cv
img = cv.imread('messi5.jpg')
res = cv.resize(img,None,fx=2, fy=2, interpolation = cv.INTER_CUBIC)
#OR
height, width = img.shape[:2]
res = cv.resize(img,(2*width, 2*height), interpolation = cv.INTER_CUBIC)
图像平移
import numpy as np
import cv2 as cv
img = cv.imread('messi5.jpg',0)
rows,cols = img.shape
M = np.float32([[1,0,100],[0,1,50]])
dst = cv.warpAffine(img,M,(cols,rows))
cv.imshow('img',dst)
cv.waitKey(0)
cv.destroyAllWindows()
图像旋转
img = cv.imread('messi5.jpg',0)
rows,cols = img.shape
# cols-1 and rows-1 are the coordinate limits.
M = cv.getRotationMatrix2D(((cols-1)/2.0,(rows-1)/2.0),90,1)
dst = cv.warpAffine(img,M,(cols,rows))
透视拉伸
img = cv.imread('sudoku.png')
rows,cols,ch = img.shape
pts1 = np.float32([[56,65],[368,52],[28,387],[389,390]])
pts2 = np.float32([[0,0],[300,0],[0,300],[300,300]])
M = cv.getPerspectiveTransform(pts1,pts2)
dst = cv.warpPerspective(img,M,(300,300))
plt.subplot(121),plt.imshow(img),plt.title('Input')
plt.subplot(122),plt.imshow(dst),plt.title('Output')
plt.show()
源地址
https://docs.opencv.org/3.4/da/d6e/tutorial_py_geometric_transformations.html
图像过滤
import cv2 as cv
import numpy as np
from matplotlib import pyplot as plt
img = cv.imread('gradient.png',0)
ret,thresh1 = cv.threshold(img,127,255,cv.THRESH_BINARY)
ret,thresh2 = cv.threshold(img,127,255,cv.THRESH_BINARY_INV)
ret,thresh3 = cv.threshold(img,127,255,cv.THRESH_TRUNC)
ret,thresh4 = cv.threshold(img,127,255,cv.THRESH_TOZERO)
ret,thresh5 = cv.threshold(img,127,255,cv.THRESH_TOZERO_INV)
titles = ['Original Image','BINARY','BINARY_INV','TRUNC','TOZERO','TOZERO_INV']
images = [img, thresh1, thresh2, thresh3, thresh4, thresh5]
for i in xrange(6):
    plt.subplot(2,3,i+1),plt.imshow(images[i],'gray')
    plt.title(titles[i])
    plt.xticks([]),plt.yticks([])
plt.show()
方法
cv.THRESH_BINARY
cv.THRESH_BINARY_INV
cv.THRESH_TRUNC
cv.THRESH_TOZERO
cv.THRESH_TOZERO_INV

自适应过滤
import cv2 as cv
import numpy as np
from matplotlib import pyplot as plt
img = cv.imread('sudoku.png',0)
img = cv.medianBlur(img,5)
ret,th1 = cv.threshold(img,127,255,cv.THRESH_BINARY)
th2 = cv.adaptiveThreshold(img,255,cv.ADAPTIVE_THRESH_MEAN_C,\
            cv.THRESH_BINARY,11,2)
th3 = cv.adaptiveThreshold(img,255,cv.ADAPTIVE_THRESH_GAUSSIAN_C,\
            cv.THRESH_BINARY,11,2)
titles = ['Original Image', 'Global Thresholding (v = 127)',
            'Adaptive Mean Thresholding', 'Adaptive Gaussian Thresholding']
images = [img, th1, th2, th3]
for i in xrange(4):
    plt.subplot(2,2,i+1),plt.imshow(images[i],'gray')
    plt.title(titles[i])
    plt.xticks([]),plt.yticks([])
plt.show()
方法
cv.ADAPTIVE_THRESH_MEAN_C: The threshold value is the mean of the neighbourhood area minus the constant C.
cv.ADAPTIVE_THRESH_GAUSSIAN_C: The threshold value is a gaussian-weighted sum of the neighbourhood values minus the constant
C.
源地址
https://docs.opencv.org/3.4/d7/d4d/tutorial_py_thresholding.html

模糊图像
2D Convolution ( Image Filtering )
cv.filter2D()
import numpy as np
import cv2 as cv
from matplotlib import pyplot as plt
img = cv.imread('opencv_logo.png')
kernel = np.ones((5,5),np.float32)/25
dst = cv.filter2D(img,-1,kernel)
plt.subplot(121),plt.imshow(img),plt.title('Original')
plt.xticks([]), plt.yticks([])
plt.subplot(122),plt.imshow(dst),plt.title('Averaging')
plt.xticks([]), plt.yticks([])
plt.show()
Image Blurring (Image Smoothing)
1. Averaging
cv.blur(img,(5,5))
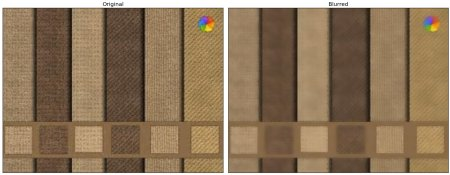
import cv2 as cv
import numpy as np
from matplotlib import pyplot as plt
img = cv.imread('opencv-logo-white.png')
blur = cv.blur(img,(5,5))
plt.subplot(121),plt.imshow(img),plt.title('Original')
plt.xticks([]), plt.yticks([])
plt.subplot(122),plt.imshow(blur),plt.title('Blurred')
plt.xticks([]), plt.yticks([])
plt.show()

2. Gaussian Blurring
blur = cv.GaussianBlur(img,(5,5),0)

3. Median Blurring
median = cv.medianBlur(img,5)

4. Bilateral Filtering
blur = cv.bilateralFilter(img,9,75,75)
源地址
https://docs.opencv.org/3.4/d4/d13/tutorial_py_filtering.html
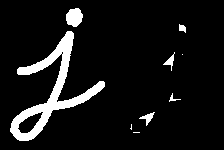
形态变换
1. 变细
cv.erode()
import cv2 as cv
import numpy as np
img = cv.imread('j.png',0)
kernel = np.ones((5,5),np.uint8)
erosion = cv.erode(img,kernel,iterations = 1)

2. 加粗
dilation = cv.dilate(img,kernel,iterations = 1)

3. 开放噪点
opening = cv.morphologyEx(img, cv.MORPH_OPEN, kernel)

封闭噪点
closing = cv.morphologyEx(img, cv.MORPH_CLOSE, kernel)

5. 形态梯度
gradient = cv.morphologyEx(img, cv.MORPH_GRADIENT, kernel)

顶 帽
tophat = cv.morphologyEx(img, cv.MORPH_TOPHAT, kernel)

黑帽
blackhat = cv.morphologyEx(img, cv.MORPH_BLACKHAT, kernel)
Structuring Element
** cv.getStructuringElement(). **
# Rectangular Kernel
>>> cv.getStructuringElement(cv.MORPH_RECT,(5,5))
array([[1, 1, 1, 1, 1],
       [1, 1, 1, 1, 1],
       [1, 1, 1, 1, 1],
       [1, 1, 1, 1, 1],
       [1, 1, 1, 1, 1]], dtype=uint8)
# Elliptical Kernel
>>> cv.getStructuringElement(cv.MORPH_ELLIPSE,(5,5))
array([[0, 0, 1, 0, 0],
       [1, 1, 1, 1, 1],
       [1, 1, 1, 1, 1],
       [1, 1, 1, 1, 1],
       [0, 0, 1, 0, 0]], dtype=uint8)
# Cross-shaped Kernel
>>> cv.getStructuringElement(cv.MORPH_CROSS,(5,5))
array([[0, 0, 1, 0, 0],
       [0, 0, 1, 0, 0],
       [1, 1, 1, 1, 1],
       [0, 0, 1, 0, 0],
       [0, 0, 1, 0, 0]], dtype=uint8)
源地址
https://docs.opencv.org/3.4/d9/d61/tutorial_py_morphological_ops.html

 浙公网安备 33010602011771号