Axios的基本使用
axios
axios引言
axios 是一个
异步请求技术
异步请求
基于XMLHttpRequest对象发起的请求都是异步请求
异步请求特点
请求之后页面不动,响应回来更新的是页面的局部,多个请求之间互不影响,并行执行
为什么不用ajax了?
ajax确实用来发送异步请求,但是有点过气了
因为现在流行的系统架构是前后端分离架构系统 ------>异步请求技术----------> vue 全家桶系列 前端技术端 vue淘汰了jquery
axios基本使用
在vue cli中使用axios的方法
1 安装
npm install axios --save-dev
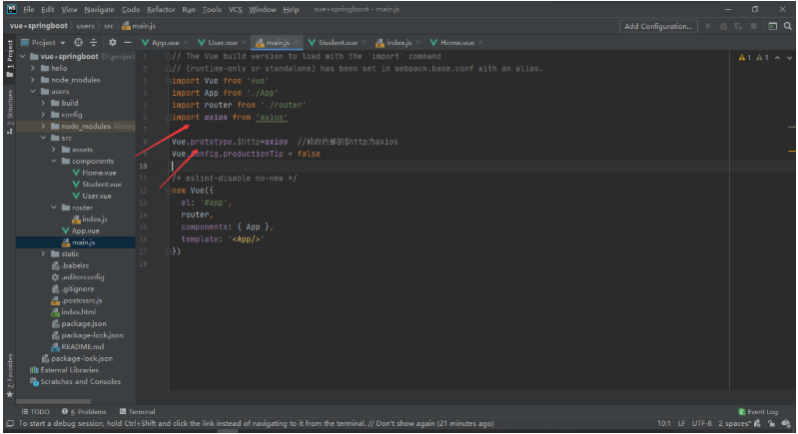
2 配置
在main.js中import axios from 'axios'
并且添加Vue.prototype.$http=axios  //修改内部的$http为axios
3 使用axios
配置环境
在vue cli中安装axios
# 1 安装
	npm install axios --save-dev
# 2 配置
	在main.js中import axios from 'axios'
	并且添加Vue.prototype.$http=axios  //修改内部的$http为axios
# 3 使用axios
	在需要发送异步请求的位置:this.$http.get("url").then((res)=>{})	this.$http.post("url").then((res)=>{})
在html中使用axios
<script src="https://unpkg.com/axios/dist/axios.min.js"></script>
axios的第一个应用
Example
GET方式请求测试
<!DOCTYPE html>
<html lang="en">
<head>
    <meta charset="UTF-8">
    <title>Title</title>
<!--引入axios相关依赖-->
    <script>         //get方式请求
        axios.get('http://localhost:8080/axios/findAll?username=zhangsan&password=123')//代表发送请求的url,传参直接放在url后面
            .then(function (response) {
                console.log(response.data);
            })//代表响应回来出发的回调函数
        .catch(function (err) {
            console.log(err);
        });
    </script>
</head>
<body>

</body>

</html>
post方式的请求
    <script>
        //post方式请求
        axios.post('http://localhost:8080/axios/save',{name: "longda",age: 23})//代表发送请求的url,传参对象放在后面
            .then(function (response) {
                console.log(response.data);
            })//代表响应回来出发的回调函数
        .catch(function (err) {
            console.log(err);
        });
    </script>
注意
##
	1 axios在发送post方式的请求时传递的参数如果为对象类型,axios会自动将对象**转化为json格式的字符串**使用 application/json的请求头向后端服务接口传递参数
##
	2 axios的post请求传递参数的两种方式:
#  第一种
	使用字符串进行参数传递:"name=zhangsan&age=23"
# 第二种
	后端接口直接使用@RequestBody注解形式接收参数
Axios的并发请求
并发请求:在同一时间发送多个不同的请求到后端服务,最后统一处理不同服务的响应结果
<script>
        //并发请求: 在同一时间发送多个
        function findAll() {
            return axios.get("http://localhost:8080/axios/findAll?username=xxx&passwod=123")
        }
        function save() {
            return axios.post("http://localhost:8080/axios/save",{name: "xxx",age: 23})
        }

        //并行发送
        axios.all([findAll(),save()]).then(
            axios.spread(function (result1,result2) {
                console.log(result1.data);
                console.log(result2.data);
            })//用来统一处理多个并发请求的执行结果
        );//处理并发请求
    </script>
总结
##
	1 针对与并发请求需要用到axios.all()函数来完成并发请求的处理
	2 正对于并发请求的结果汇总需要使用axios.spread()函数来统一汇总请求结果
Axios的Restful风格的API
# Axios的API总结
	axios.request(config)
    axios.get(url[, config])
    axios.delete(url[, config])
    axios.head(url[, config])
    axios.options(url[, config])
    axios.post(url[, data[, config]])
    axios.put(url[, data[, config]])
    axios.patch(url[, data[, config]])

#    注释:
	当使用以上别名方法时,url,method和data等属性不用在config重复声明。
Axios的高级使用 配置对象
1 配置对象
{
  // `url` 是请求的接口地址
  url: '/user',

  // `method` 是请求的方法
  method: 'get', // 默认值

  // 如果url不是绝对路径,那么会将baseURL和url拼接作为请求的接口地址
  // 用来区分不同环境,建议使用
  baseURL: 'https://some-domain.com/api/',

  // 用于请求之前对请求数据进行操作
  // 只用当请求方法为‘PUT’,‘POST’和‘PATCH’时可用
  // 最后一个函数需return出相应数据
  // 可以修改headers
  transformRequest: [function (data, headers) {
    // 可以对data做任何操作

    return data;
  }],

  // 用于对相应数据进行处理
  // 它会通过then或者catch
  transformResponse: [function (data) {
    // 可以对data做任何操作

    return data;
  }],

  // `headers` are custom headers to be sent
  headers: {'X-Requested-With': 'XMLHttpRequest'},

  // URL参数
  // 必须是一个纯对象或者 URL参数对象
  params: {
    ID: 12345
  },

  // 是一个可选的函数负责序列化`params`
  // (e.g.  https://www.npmjs.com/package/qs , http://api.jquery.com/jquery.param/)
  paramsSerializer: function(params) {
    return Qs.stringify(params, {arrayFormat: 'brackets'})
  },

  // 请求体数据
  // 只有当请求方法为'PUT', 'POST',和'PATCH'时可用
  // 当没有设置`transformRequest`时,必须是以下几种格式
  // - string, plain object, ArrayBuffer, ArrayBufferView, URLSearchParams
  // - Browser only: FormData, File, Blob
  // - Node only: Stream, Buffer
  data: {
    firstName: 'Fred'
  },

  // 请求超时时间(毫秒)
  timeout: 1000,

  // 是否携带cookie信息
  withCredentials: false, // default

  // 统一处理request让测试更加容易
  // 返回一个promise并提供一个可用的response
  // 其实我并不知道这个是干嘛的!!!!
  // (see lib/adapters/README.md).
  adapter: function (config) {
    /* ... */
  },

  // `auth` indicates that HTTP Basic auth should be used, and supplies credentials.
  // This will set an `Authorization` header, overwriting any existing
  // `Authorization` custom headers you have set using `headers`.
  auth: {
    username: 'janedoe',
    password: 's00pers3cret'
  },

  // 响应格式
  // 可选项 'arraybuffer', 'blob', 'document', 'json', 'text', 'stream'
  responseType: 'json', // 默认值是json

  // `xsrfCookieName` is the name of the cookie to use as a value for xsrf token
  xsrfCookieName: 'XSRF-TOKEN', // default

  // `xsrfHeaderName` is the name of the http header that carries the xsrf token value
  xsrfHeaderName: 'X-XSRF-TOKEN', // default

  // 处理上传进度事件
  onUploadProgress: function (progressEvent) {
    // Do whatever you want with the native progress event
  },

  // 处理下载进度事件
  onDownloadProgress: function (progressEvent) {
    // Do whatever you want with the native progress event
  },

  // 设置http响应内容的最大长度
  maxContentLength: 2000,

  // 定义可获得的http响应状态码
  // return true、设置为null或者undefined,promise将resolved,否则将rejected
  validateStatus: function (status) {
    return status >= 200 && status < 300; // default
  },

  // `maxRedirects` defines the maximum number of redirects to follow in node.js.
  // If set to 0, no redirects will be followed.
  // 最大重定向次数?没用过不清楚
  maxRedirects: 5, // default

  // `httpAgent` and `httpsAgent` define a custom agent to be used when performing http
  // and https requests, respectively, in node.js. This allows options to be added like
  // `keepAlive` that are not enabled by default.
  httpAgent: new http.Agent({ keepAlive: true }),
  httpsAgent: new https.Agent({ keepAlive: true }),

  // 'proxy' defines the hostname and port of the proxy server
  // Use `false` to disable proxies, ignoring environment variables.
  // `auth` indicates that HTTP Basic auth should be used to connect to the proxy, and
  // supplies credentials.
  // This will set an `Proxy-Authorization` header, overwriting any existing
  // `Proxy-Authorization` custom headers you have set using `headers`.
  // 代理
  proxy: {
    host: '127.0.0.1',
    port: 9000,
    auth: {
      username: 'mikeymike',
      password: 'rapunz3l'
    }
  },

  // `cancelToken` specifies a cancel token that can be used to cancel the request
  // (see Cancellation section below for details)
  // 用于取消请求?又是一个不知道怎么用的配置项
  cancelToken: new CancelToken(function (cancel) {
  })
}
使用配置对象形式发送请求
axios.create({
    method:'GET',
    url: '',
    baseURL: ''
})
var instance = axios.create({
    method: "GET",
     //公共的url放在一起
    baseURL:"http://localhost:8080",
    data:{	//作为请求体发送的数据,只适用于这些请求方法 'PUT','POST',和'PATCH'
        username:"xiaohei"
    }

});
	//访问不同的url(拼接在baseURL后面)
instance.get("/axios/findAll?username='zhangsan'")

 浙公网安备 33010602011771号