Docker Architecture、Docker Usage
目录
0. 引言 - 为什么要有Docker技术
1. Docker简介
2. Docker安装、部署、使用
3. Docker安全
4. Docker底层实现
5. Docker网络配置
6. Dockerfile详解
7. Docker Volume
0. 引言 - 为什么要有Docker技术
0x1: 虚拟机技术和LXC容器技术的差别
1. 虚拟机VM(Virtual Machine)技术
每个虚拟机都有自己独享的内核, 能运行完整的不作修改的操作系统

2. 容器技术LXC(Linux Container)技术
容器(container)是一种轻量级的虚拟化技术, 用于生成一个独立的标准运行环境而不需要多个内核实例,例如Docker就是一种典型的LXC容器技术的实现
0x2: LXC容器技术的优势
1. 快速部署(秒级),启动一个容器只需要派生一个进程并完成OS启动的用户态部分
而启动一个虚拟机需要执行额外的 BIOS 和内核代码

2. 容器几乎没有额外的 IO 性能开销
如果没有完善的硬件虚拟化支持,虚拟机会引入显著的 IO 性能开销

3. 容器的内存开销较小: 启动一个没有任何负载的容器仅需要几十 MB 的内存
而虚拟机由于包含完整的内核,内存开销要大得多。另外如果使用 Union FS 来构造容器的文件系统,能减少 page cache 带来的内存开销

4. 较小的磁盘空间占用: 构造容器的文件系统时,静态文件可以使用 bind-mount 或者Union FS 方式从宿主机加载,可以节省大量磁盘空间
0x3: LXC容器技术的优势
1. 资源隔离效果逊于虚拟机
对于虚拟机技术,由于有 Hypervisor 的存在,资源的隔离实现非常完整。
而容器技术还处于开发阶段,资源隔离的效果要逊于虚拟机

2. 内核的修改会影响所有的容器
虚拟机因为 Hypervisor 的存在,内核的更新只会影响一个应用

3. 缺少动态迁移的支持
目前 OpenVZ 的 CRIU 项目提供了初步的 checkpointing 和 restore支持,但完整的动态迁移仍需时日。虚拟机的动态迁移方案相对比较完整
1. Docker简介
Docker基于Go语言开发,代码托管在 Github上,并遵循Apache 2.0开源协议
Build, Ship and Run Any App, Anywhere
Docker - An open platform for distributed applications for developers and sysadmins.
Docker项目的目标是实现轻量级的操作系统虚拟化解决方案。Docker的基础是Linux容器(LXC)等技术
在LXC的基础上Docker进行了进一步的封装,让用户不需要去关心容器的管理,使得操作更为简便。用户操作Docker的容器就像操作一个快速轻量级的虚拟机一样简单
0x1: Docker的特性
1. Build
Develop an app using Docker containers with any language and any toolchain.

2. Ship
Ship the "Dockerized" app and dependencies anywhere - to QA, teammates, or the cloud - without breaking anything.

3. Run
Scale to 1000s of nodes, move between data centers and clouds, update with zero downtime and more.
0x2: Docker和Virtual Machines(VM)的区别
下面的图片比较了Docker和传统虚拟化方式的不同之处,可见容器是在操作系统层面上实现虚拟化,直接复用本地主机的操作系统,而传统方式则是在硬件层面实现
1. Virtual Machines

Each virtualized application includes
1. the application: which may be only 10s of MB
2. the necessary binaries and libraries
3. an entire guest operating system - which may weigh 10s of GB
2. Docker

The Docker Engine container
1. the application
2. its dependencies(Bins/Libs)
It runs as an isolated process in userspace on the host operating system, sharing the kernel with other containers. Thus, it enjoys the resource isolation and allocation benefits of VMs but is much more portable and efficient.

1. 一个Container通常包含应用及应用依赖项,Container用来隔离进程,这些进程主要运行在主机操作系统上的隔离区和用户空间。
这个是明显不同于传统的VMs

2. 传统的硬件虚拟化(例如VMWare、KVM、Xen、EC2)旨在创造一个完整虚拟机。每个虚拟化应用不仅包含应用的二进制文件,还需运行该应用程序所需的库、一个完整的Guest操作系统

3. 由于所有的容器共享同一个操作系统(以及二进制文件和库),所以,他们明显要比VM小的多,这样,就完全可以在一个物理主机上托管100个VMs(一般VM数量会受到严格限制)。此外,因为它们使用主机操作系统,重启一个VM并不意味着要重启操作系统,因此,容器更加轻便、高效

4. Docker中的容器效率会更高。因为一个传统的VM、应用、每个应用副本以及每个应用微小的变更都需要重新创建一个完整的VM
一个新的应用在主机上仅仅包含应用及其二进制文件/库,这样就无需创建一个新的客户机操作系统。

5. 如果想在主机上运行该应用的几个副本,你甚至无需复制共享的二进制文件,即使你对应用进行了变更,你也无需拷贝变更内容
0x3: Docker技术的核心竞争优势
1. Docker简单来说就是一个Container的管理工具。而Container就是一个更轻量级的虚拟机,但是这个虚拟机没有操作系统和设备(操作系统是共享的),container技术目前解决了软件行业的最大的几个问题
    1) 应用的共享
    2) 配置管理和维护(还有应用的隔离,效率等等)
    3) 不管是在物理机环境还是云环境和虚拟机相比,container不仅更轻量,而且配置简化了很多(不用考虑操作系统和设备的配置)
2. 写应用的人不用考虑操作系统的配置,应用都在container里面
3. Docker 容器几乎可以在任意的平台上运行,包括物理机、虚拟机、公有云、私有云、个人电脑、服务器等。 这种兼容性可以让用户把一个应用程序从一个平台直接迁移到另外一个。
4. Docker容器的运行不需要额外的hypervisor支持,它是内核级的虚拟化,因此可以实现更高的性能和效率。事实上,Linux的内核已经在很多方面(例如命名空间)对虚拟化进行了支持
0x4: Docker的架构

Docker架构下的三种运行方式
1. 作为守护进程,在Linux主机上管理LXC容器
    1) 使用namespaces来做权限的控制和隔离
    2) 使用cgroups来进行资源的配置
    3) 通过aufs来提高文件系统的资源利用率
    aufs是UnionFS的一种,它可以把对文件系统的改动当成一次commit一层层的叠加。这样的话多个容器之间就可以共享他们的文件系统层次。这样的话极大的节省了对存储的需求,并且也能加速容器的启动

2. 作为一个CLI,与守护进程的REST API进行对话(docker run ...)
3. 作为仓库的客户端,分享你所构建的内容(docker pull, docker commit)
0x5: Docker镜像
1. Docker镜像就是一个只读的模板
2. 一个镜像可以包含一个完整的ubuntu操作系统环境,里面仅安装了Apache或用户需要的其它应用程序
3. 镜像可以用来创建Docker容器
4. Docker提供了一个很简单的机制来创建镜像或者更新现有的镜像,用户甚至可以直接从其他人那里下载一个已经做好的镜像来直接使用
镜像的实现原理
Docker镜像是怎么实现增量的修改和维护的呢?每个镜像都由很多层次构成,Docker使用Union FS将这些不同的"层"结合到一个镜像中去 ,通常Union FS有两个用途
1. 一方面可以实现不借助LVM、RAID将多个disk挂到同一个目录下
2. 另一个更常用的就是将一个只读的分支和一个可写的分支联合在一起,Live CD 正是基于此方法可以允许在镜像不变的基础上允许用户在其上进行一些写操作。Docker在AUFS上构建的容器也是利用了类似的原理
0x6: Docker容器
1. Docker 利用容器来运行应用
2. 容器是从镜像创建的"运行实例"。它可以被启动、开始、停止、删除。每个容器都是相互隔离的(isolation)、保证安全的平台
3. 可以把容器看做是一个简易版的Linux环境(包括root用户权限、进程空间、用户空间和网络空间等)和运行在其中的应用程序
4. 镜像是只读的,容器在启动的时候创建一层可写层作为最上层
0x7: Docker仓库
1. 仓库是集中存放镜像文件的场所。有时候会把"仓库"和"仓库注册服务器"(Registry)混为一谈,并不严格区分。实际上,仓库注册服务器上往往存放着多个仓库,每个仓库中又包含了多个镜像,每个镜像有不同的标签(tag)
2. 仓库分为
    1) 公开仓库(Public): 最大的公开仓库是Docker Hub,存放了数量庞大的镜像供用户下载。国内的公开仓库包括Docker Pool等,可以提供大陆用户更稳定快速的访问
    2) 私有仓库(Private): 用户也可以在本地网络内创建一个私有仓库
当用户创建了自己的镜像之后就可以使用push命令将它上传到公有或者私有仓库,这样下次在另外一台机器上使用这个镜像时候,只需要从仓库上pull下来就可以了
3. Docker仓库的概念跟Git类似,"仓库注册服务器"可以理解为GitHub这样的托管服务
0x8: Docker源码学习
http://www.infoq.com/cn/articles/docker-source-code-analysis-part1
http://www.infoq.com/cn/articles/docker-source-code-analysis-part2
http://www.infoq.com/cn/articles/docker-source-code-analysis-part3
Relevant Link:
http://www.csdn.net/article/2014-06-20/2820325-cloud-Docker
http://www.infoq.com/cn/dockers/
http://yeasy.gitbooks.io/docker_practice/
https://docker.cn/p/
http://www.csdn.net/article/a/2014-06-18/15819053
https://www.docker.com/resources/usecases/
https://www.docker.com/
http://blog.csdn.net/u012601664/article/details/39547319
http://special.csdncms.csdn.net/BeDocker/
http://www.csdn.net/article/2014-02-01/2818306-Docker-Story
http://www.csdn.net/article/2014-06-20/2820325-cloud-Docker
http://www.csdn.net/article/2014-07-02/2820497-what's-docker
http://dockerpool.com/static/books/docker_practice/introduction/why.html
https://github.com/docker/docker
2. Docker安装、部署、使用
0x1: Docker Installation Based On Red Hat (64 bit)
https://docs.docker.com/installation/rhel/
https://fedoraproject.org/wiki/EPEL#How_can_I_use_these_extra_packages.3F
https://code.csdn.net/u010702509/docker_redhat
对于CentOS6,可以使用EPEL库安装Docker,命令如下
//1. 安装Docker支持
sudo yum install http://mirrors.yun-idc.com/epel/6/i386/epel-release-6-8.noarch.rpm
sudo yum install docker-io
//2. 登录Docker镜像仓库
docker login
//3. 下载最新镜像
sudo docker pull centos:latest
0x2: Docker Installation Based On ubntu 12.04 (64 bit)
1. 安装、升级内核
//Docker的运行需要Linux内核提供相应的支持
sudo apt-get update
sudo apt-get install linux-image-generic-lts-raring linux-headers-generic-lts-raring
sudo reboot

2. 第一次添加Docker的repository到你的本地秘钥库
sudo apt-key adv --keyserver keyserver.ubuntu.com --recv-keys 36A1D7869245C8950F966E92D8576A8BA88D21E9
sudo apt-get update
sudo apt-get install lxc-docker
//期间会遇到一个警告,说这个包不可靠,你只需要回复yes然后继续安装就可以了

3. 官方也提供了一个简单脚本帮助你安装,你可以用curl来获取这个脚本然后执行安装
curl -s https://get.docker.io/ubuntu/ | sudo sh

4. 下载安装ubuntu的镜像封装到一个沙箱中
sudo docker run -i -t ubuntu /bin/bash
0x3: Docker Installation Based On ubntu 13.04 (64 bit)
1. 确认是否安装了AUFS
sudo apt-get update
sudo apt-get install linux-image-extra-`uname -r`

2. 之后的步骤同ubntu 12.04 (64 bit)
Relevant Link:
https://code.csdn.net/u010702509/docker_ubntu
0x4: Install Docker on Ubuntu 14.04 LTS
apt-get update
apt-get -y install docker.io
0x5: Docker简单命令使用
1. 列出机器上的镜像(images)
docker images
我们可以根据REPOSITORY来判断这个镜像是来自哪个服务器,如果没有 / 则表示官方镜像,类似于username/repos_name表示Github的个人公共库,类似于regsistory.example.com:5000/repos_name则表示的是私服
2. 在docker index中搜索image(search)
docker search remnux
//搜索的范围是官方镜像和所有个人公共镜像。NAME列的 / 后面是仓库的名字

3. 从docker registry server 中下拉image或repository(pull)
docker pull centos
//默认拉取最新镜像: centos:latest

也可以明确指定具体的镜像
docker pull centos:centos6

也可以从某个人的公共仓库(包括自己是私人仓库)拉取
docker pull remnux/thug

如果你没有网络,或者从其他私服获取镜像,形如
docker pull dl.dockerpool.com:5000/mongo:latest
4. 推送一个image或repository到registry(push)
与上面的pull对应,可以推送到Docker Hub的Public、Private以及私服,但不能推送到Top Level Repository
docker push seanlook/mongo
docker push registry.tp-link.net:5000/mongo:2014-10-27
5. 使用image创建container并执行相应命令,然后停止
docker run命令首先会从特定的image创之上create一层可写的container,然后通过start命令来启动它。停止的container可以重新启动并保留原来的修改。run命令启动参数有很多
docker run --rm=true ubuntu echo "hello world"
hello word
//--rm=true参数,即完成操作后停止容器并从文件系统移除
当利用docker run来创建容器时,Docker在后台运行的标准操作包括
    1) 检查本地是否存在指定的镜像,不存在就从公有仓库下载
    2) 利用镜像创建并启动一个容器
    3) 分配一个文件系统,并在只读的镜像层外面挂载一层可读写层
    4) 从宿主主机配置的网桥接口中桥接一个虚拟接口到容器中去
    5) 从地址池配置一个ip地址给容器
    6) 执行用户指定的应用程序
    7) 执行完毕后容器被终止
6. 使用image创建container并进入交互模式, login shell是/bin/bash
docker run -i -t --name mytest centos:centos6 /bin/bash
bash-4.1#
//--name参数可以指定启动后的容器名字,如果不指定则docker会帮我们取一个名字
//-t 选项让Docker分配一个伪终端(pseudo-tty)并绑定到容器的标准输入上, -i 则让容器的标准输入保持打开
7. 运行出一个container放到后台运行
docker run -d ubuntu /bin/sh -c "while true; do echo hello world; sleep 2; done"
ae60c4b642058fefcc61ada85a610914bed9f5df0e2aa147100eab85cea785dc
//它将直接把启动的container挂起放在后台运行(saas),并且会输出一个CONTAINER ID,通过docker ps可以看到这个容器的信息,可在container外面查看它的输出docker logs ae60c4b64205,也可以通过docker attach ae60c4b64205连接到这个正在运行的终端
8. 映射host到container的端口和目录
映射主机到容器的端口是很有用的,比如在container中运行memcached,端口为11211,运行容器的host可以连接container的 internel_ip:11211 访问,如果有从其他主机访问memcached需求那就可以通过-p选项,形如-p <host_port:contain_port>,存在以下几种写法
-p 11211:11211 这个即是默认情况下,绑定主机所有网卡(0.0.0.0)的11211端口到容器的11211端口上
-p 127.0.0.1:11211:11211 只绑定localhost这个接口的11211端口
-p 127.0.0.1::5000
-p 127.0.0.1:80:8080
9. 终止容器
终止一个容器有2种方法
    1) 使用docker stop来终止一个运行中的容器
    2) 当Docker容器中指定的应用终结时,容器也自动终止
//终止状态的容器可以用docker ps -a命令看到,处于终止状态的容器,可以通过docker start命令来重新启动
在使用 -d 参数时,容器启动后会进入后台。 某些时候需要进入容器进行操作,可以使用docker rm来删除一个处于终止状态的容器,要注意的是,只有处于停止状态的容器才能删除
10. 查看日志文件来确认它是否正常工作
sudo docker attach -sig-proxy=false $CONTAINER_ID
11. 将在终止状态(stopped)的容器重新启动
可以利用docker start -a containerID命令,直接将一个已经终止的容器启动运行,容器的核心为所执行的应用程序,所需要的资源都是应用程序运行所必需的。除此之外,并没有其它的资源
12. 将一个container固化为一个新的image(commit)
当我们在制作自己的镜像的时候,会在container中安装一些工具、修改配置,如果不做commit保存起来,那么container停止以后再启动,这些更改就消失了。
docker commit <container> [repo:tag]
只能提交正在运行的container,即通过docker ps可以看见的容器
13. 默认情况下所有的命令都会经过一个受保护的Unix socket转发给docker进程,所以我们必须运行root或者通过sudo授权
sudo docker help
Relevant Link:
https://code.csdn.net/u010702509/docker_puppet
https://code.csdn.net/u010702509/docker_shareimage
https://code.csdn.net/u010702509/docker_buildimage
https://code.csdn.net/u010702509/docker_basic
https://code.csdn.net/u010702509/docker/file/Docker.md
http://www.liquidweb.com/kb/how-to-install-docker-on-ubuntu-14-04-lts/
https://docs.docker.com/engine/installation/linux/ubuntulinux/
https://code.csdn.net/u010702509/docker_helloword
https://segmentfault.com/a/1190000000751601
0x6: JAVA Tomcat Running Environment Installation
http://blog.csdn.net/junjun16818/article/details/34845613#comments
3. Docker安全
评估Docker的安全性时,主要考虑三个方面
1. 由内核的"名字空间(namespace)"和"控制组机制"提供的容器内在安全
2. Docker程序(特别是服务端)本身的抗攻击性
3. 内核安全性的加强机制对容器安全性的影响
0x1: 内核名字空间(namespace)
Docker容器和LXC容器很相似,所提供的安全特性也是类似的。当用docker run启动一个容器时,在后台Docker为容器创建了一个独立的名字空间和控制组集合
1. 名字空间提供了最基础也是最直接的隔离,在容器中运行的进程不会被运行在主机上的进程和其它容器发现和作用
    1) 父命名空间的进程"不能"被子命名空间看到
    2) 子命名空间的进程"可以"被父命名空间看到
    3) 同级之间的命名空间之间的进程"不可见"

1. 每个容器都有自己独有的网络栈,意味着它们不能访问其他容器的sockets或接口。但是,如果主机系统上做了相应的设置,容器可以像跟主机交互一样的和其他容器交互。当指定公共端口或使用links来连接2个容器时,容器就可以相互通信了(可以根据配置来限制通信的策略)
从网络架构的角度来看,所有的容器通过本地主机的网桥接口相互通信,就像物理机器通过物理交换机通信一样
Docker的名字空间是基于Linux内核的命名空间架构实现的,关于Linux内核命名空间的相关知识,请参阅另一篇文章
http://www.cnblogs.com/LittleHann/p/4026781.html
//搜索:2. Linux命名空间
0x2: 控制组
控制组是Linux容器机制的另外一个关键组件,负责实现资源的审计和限制
它提供了很多有用的特性;以及确保各个容器可以公平地分享主机的内存、CPU、磁盘 IO 等资源。更重要的是,控制组确保了当容器内的资源使用产生压力时不会连累主机系统
尽管控制组不负责隔离容器之间相互访问、处理数据和进程,它在防止拒绝服务(DDOS)攻击方面是必不可少的。尤其是在多用户的平台(比如公有或私有的PaaS)上,控制组十分重要。例如,当某些应用程序表现异常的时候,可以保证一致地正常运行和性能
0x3: 内核能力机制
能力机制(Capability)是Linux内核一个强大的特性,可以提供细粒度的权限访问控制。Linux内核自2.2版本起就支持能力机制,它将权限划分为更加细粒度的操作能力,既可以作用在进程上,也可以作用在文件上(DAC、MAC模型)
例如,一个Web服务进程只需要绑定一个低于1024的端口的权限,并不需要root权限。那么它只需要被授权net_bind_service能力即可
使用能力机制对加强 Docker 容器的安全有很多好处。通常,在服务器上会运行一堆需要特权权限的进程,包括有 ssh、cron、syslogd、硬件管理工具模块(例如负载模块)、网络配置工具等等。容器跟这些进程是不同的,因为几乎所有的特权进程都由容器以外的支持系统来进行管理
1. ssh: 访问被主机上ssh服务来管理
2. cron: 通常应该作为用户进程执行,权限交给使用它服务的应用来处理
3. 日志系统: 由Docker或第三方服务管理
4. 网络管理: 在主机上设置,除非特殊需求,容器不需要对网络进行配置
从上面的例子可以看出,大部分情况下,容器并不需要"真正的"root权限,容器只需要少数的能力即可。为了加强安全,容器可以禁用一些没必要的权限
1. 完全禁止任何mount操作
2. 禁止直接访问本地主机的套接字
3. 禁止访问一些文件系统的操作,比如创建新的设备、修改文件属性等
4. 禁止模块加载
默认情况下,Docker启动的容器被严格限制只允许使用内核的一部分能力,这样,就算攻击者在容器中取得了root权限,也不能获得本地主机的较高权限,能进行的破坏也有限
默认情况下,Docker采用白名单机制,禁用必需功能之外的其它权限。 当然,用户也可以根据自身需求来为Docker容器启用额外的权限
0x4: 系统原生提供的底层安全机制
除了"能力机制"之外,还可以利用一些现有的安全机制来增强使用Docker的安全性
1. LSM(Linux Security Module)
    1) TOMOYO
    2) AppArmor
    3) SELinux
2. 编译和运行时的安全检查
    1) GRSEC
    2) PAX
    3) 通过地址随机化(ASLR Address space layout randomization)避免恶意探测

3. 使用一些有增强安全特性的容器模板
    1) 带AppArmor的模板
    2) 带SELinux策略的模板

4. 用户可以自定义访问控制机制来定制安全策略
跟其它添加到Docker容器的第三方工具一样(比如网络拓扑和文件系统共享),有很多类似的机制,在不改变Docker内核情况下就可以加固现有的容器
Relevant Link:
http://dockerpool.com/static/books/docker_practice/security/README.html
4. Docker底层实现
Docker底层的核心技术包括
1. Linux上的名字空间(Namespaces)
2. 控制组(Control groups)
3. Union文件系统(Union file systems)
4. 容器格式(Container format)
我们知道,传统的虚拟机通过在宿主主机中运行hypervisor来模拟一整套完整的硬件环境提供给虚拟机的操作系统。虚拟机系统看到的环境是可限制的,也是彼此隔离的。这种直接的做法实现了对资源最完整的封装,但很多时候往往意味着系统资源的浪费。例如,以宿主机和虚拟机系统都为Linux系统为例,虚拟机中运行的应用其实可以利用宿主机系统中的运行环境
我们知道,在操作系统中,包括
1. 内核
2. 文件系统
3. 网络
4. PID
5. UID
6. IPC
7. 内存
8. 硬盘
9. CPU等等
所有的资源都是应用进程直接共享的。 要想实现虚拟化,需要实现对这些资源的虚拟隔离
随着Linux系统对于"名字空间(name space)"功能的完善实现,Linux内核已经可以实现上面的所有需求,让某些进程在彼此隔离的名字空间中运行。大家虽然都共用一个内核和某些运行时环境(例如一些系统命令和系统库),但是彼此却看不到,都以为系统中只有自己的存在。这种机制就是容器(Container),利用名字空间来做权限的隔离控制,利用cgroups来做资源分配
Docker采用了C/S架构,包括客户端和服务端。Docker daemon作为服务端接受来自客户的请求,并处理这些请求(创建、运行、分发容器)。客户端和服务端既可以运行在一个机器上,也可通过 socket或者RESTful API来进行通信

Docker daemon一般在宿主主机后台运行,等待接收来自客户端的消息。Docker客户端则为用户提供一系列可执行命令,用户用这些命令实现跟Docker daemon交互
0x1: 名字空间
名字空间是Linux内核一个强大的特性。每个容器都有自己单独的名字空间,运行在其中的应用都像是在独立的操作系统中运行一样。名字空间保证了容器之间彼此互不影响
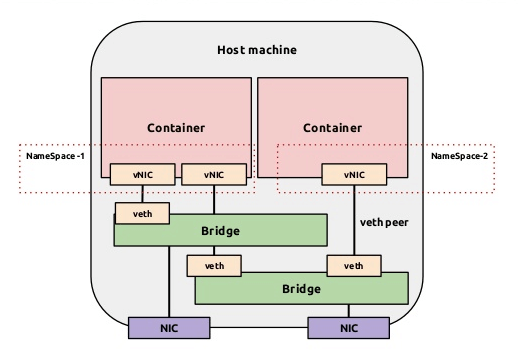
1. pid名字空间
不同用户的进程就是通过pid名字空间隔离开的,且不同名字空间中可以有相同pid。所有的LXC进程在Docker中的父进程为Docker进程,每个LXC进程具有不同的名字空间。同时由于允许嵌套,因此可以很方便的实现嵌套的Docker容器

2. net名字空间
有了pid名字空间,每个名字空间中的pid能够相互隔离,但是网络端口还是共享host的端口。网络隔离是通过net名字空间实现的,每个net名字空间有独立的网络设备、IP 地址、路由表、/proc/net目录。这样每个容器的网络就能隔离开来。Docker默认采用veth的方式,将容器中的虚拟网卡同host上的一个Docker网桥docker0连接在一起

3. ipc名字空间
容器中进程交互还是采用了Linux常见的进程间交互方法(interprocess communication - IPC),包括信号量、消息队列和共享内存等。然而同VM不同的是,容器的进程间交互实际上还是host上具有相同pid名字空间中的进程间交互,因此需要在IPC资源申请时加入名字空间信息,每个IPC资源有一个唯一的32位id

4. mnt名字空间
类似chroot,将一个进程放到一个特定的目录执行。mnt名字空间允许不同名字空间的进程看到的文件结构不同,这样每个名字空间中的进程所看到的文件目录就被隔离开了。同chroot不同,每个名字空间中的容器在/proc/mounts的信息只包含所在名字空间的mount point,即mnt名字空间是真正意义上的"chroot"

5. uts名字空间
UTS("UNIX Time-sharing System") 名字空间允许每个容器拥有独立的hostname和domain name,使其在网络上可以被视作一个独立的节点而非主机上的一个进程

6. user名字空间
每个容器可以有不同的用户和组id,也就是说可以在容器内用容器内部的用户执行程序而非主机上的用户
0x2: 控制组(cgroups)
Cgroups是control groups的缩写,是Linux内核提供的一种可以限制、记录、隔离进程组(process groups)所使用的物理资源(如:cpu、memory、IO等等)的机制。最初由google的工程师提出,后来被整合进Linux内核。Cgroups也是LXC为实现虚拟化所使用的资源管理手段,可以说没有cgroups就没有LXC
Cgroups最初的目标是为资源管理提供的一个统一的框架,既整合现有的cpuset等子系统,也为未来开发新的子系统提供接口。现在的cgroups适用于多种应用场景,从单个进程的资源控制,到实现操作系统层次的虚拟化(OS Level Virtualization)。Cgroups提供了一下功能
1. 限制进程组可以使用的资源数量(Resource limiting)
    1) memory子系统可以为进程组设定一个memory使用上限,一旦进程组使用的内存达到限额再申请内存,就会出发OOM(out of memory)
2. 进程组的优先级控制(Prioritization)
    1) 使用cpu子系统为某个进程组分配特定cpu share
3. 记录进程组使用的资源数量(Accounting)
    1) 使用cpuacct子系统记录某个进程组使用的cpu时间
4. 进程组隔离(Isolation)
    1) 使用ns子系统可以使不同的进程组使用不同的namespace,以达到隔离的目的,不同的进程组有各自的进程、网络、文件系统挂载空间
5. 进程组控制(Control)
    1) 使用freezer子系统可以将进程组挂起和恢复
Relevant Link:
https://access.redhat.com/documentation/en-US/Red_Hat_Enterprise_Linux/6/html/Resource_Management_Guide/ch01.html
http://www.cnblogs.com/lisperl/archive/2012/04/17/2453838.html
0x3: 联合文件系统(UnionFS)
联合文件系统(UnionFS)是一种分层、轻量级并且高性能的文件系统,它支持对文件系统的修改作为一次提交来一层层的叠加,同时可以将不同目录挂载到同一个虚拟文件系统下(unite several directories into a single virtual filesystem)
联合文件系统是Docker镜像的基础。镜像可以通过分层来进行继承,基于基础镜像(没有父镜像),可以制作各种具体的应用镜像,另外,不同Docker容器就可以共享一些基础的文件系统层,同时再加上自己独有的改动层,大大提高了存储的效率。
Docker中使用的AUFS(AnotherUnionFS)就是一种联合文件系统。AUFS支持为每一个成员目录(类似Git的分支)设定只读(readonly)、读写(readwrite)和写出(whiteout-able)权限, 同时 AUFS 里有一个类似分层的概念, 对只读权限的分支可以逻辑上进行增量地修改(不影响只读部分的)
Docker 目前支持的联合文件系统种类包括
1. AUFS
2. btrfs
3. vfs
4. DeviceMapper
Unionfs是一个堆栈式的联合文件系统,它可以把多个目录(也叫分支)内容合并在一起, 而目录的物理位置是分开的。Unionfs允许只读和可读写目录并存,就是说可同时删除和增加内容. Unionfs应用的地方很多
1. 在多个磁盘分区上合并不同文件系统的主目录
2. 把几张CD光盘合并成一个统一的光盘目录(归档)
3. 具有写时复制(copy-on-write)功能Unionfs可以把只读和可读写文件系统合并在一起,虚拟上允许只读文件系统的修改可以保存到可写文件系统当中
Linux上unionfs的实现依托了VFS设计的灵活性,从架构上看,它在VFS的下层,在具体文件系统(如ext3, ext4等)的上层。系统调用read()/write()落在VFS上,VFS找到待操作文件的inode(unionfs inode),经过unionfs的路由后找到真实文件的inode,执行操作。这是一个kernel hook的过程
Relevant Link:
http://www.kissthink.com/archive/9120.html
http://fengchj.com/?tag=%E8%81%94%E5%90%88%E6%96%87%E4%BB%B6%E7%B3%BB%E7%BB%9F
http://en.wikipedia.org/wiki/Union_mount
http://en.wikipedia.org/wiki/UnionFS
http://lwn.net/Articles/325369/
http://lwn.net/Articles/327738/
0x4: overlayfs
An overlay-filesystem tries to present a filesystem which is the result over overlaying one filesystem on top of the other.
This approach is 'hybrid' because the objects that appear in the filesystem do not all appear to belong to that filesystem. In many cases an object accessed in the union will be indistinguishable from accessing the corresponding object from the original filesystem. This is most obvious from the 'st_dev'(设备号) field returned by stat.
While directories will report an st_dev from the overlay-filesystem, all non-directory objects will report an st_dev from the lower or upper filesystem that is providing the object. Similarly st_ino will only be unique when combined with st_dev, and both of these can change over the lifetime of a non-directory object. Many applications and tools ignore these values and will not be affected.
overlayfs能将两个目录"合并"(借助了Linux内核提供的命名空间的基础数据结构、以及位于VFS和底层具体文件系统之间的UnionFS实现的逻辑上虚拟的合并),例如
1. dir1/目录
    ./fire
    ./water
2. dir2/目录
    ./apple
    ./banana
mount -t overlayfs overlayfs -olowerdir=/dir1,upperdi=/dir2 /test1/
合并以后,test1/目录里将会有
./fire
./water
./apple
./banana
其中/test1/fire、/dir1/fire其实是"同一个文件",用的是一台page cache
基于overlayfs实现"文件目录共享"
1. 准备一个base目录,将常用的可共用的系统文件放置进去,例如/etc、/bin、/lib、/usr等
2. 列出每个虚拟机容器需要独立使用的目录,例如/store1、/store2、/store3、/store4
3. 为每个虚拟机准备一个空目录,例如/container1、/container2、/container3、/container4
4. mount
    mount -t overlayfs overlayfs -olowerdir=/base,upperdir=/store1 /container1
    mount -t overlayfs overlayfs -olowerdir=/base,upperdir=/store2 /container2
    mount -t overlayfs overlayfs -olowerdir=/base,upperdir=/store3 /container3
    mount -t overlayfs overlayfs -olowerdir=/base,upperdir=/store4 /container4
5. 运维人员执行
    cd /container1/
    chroot
这样,每个虚拟机就在拥有自己"独立"的目录的前提下,并共享了系统的一些库文件
overlayfs从概念上有点类似视图的概念,对lowerdir的文件目录进行了一层抽象,对外提供了一层虚拟的视图
1. Upper and Lower
An overlay filesystem combines two filesystems
1. an 'upper' filesystem
The upper filesystem will normally be writable and if it is it must support the creation of trusted.* extended attributes, and must provide valid d_type in readdir responses, so NFS is not suitable.
A read-only overlay of two read-only filesystems may use any filesystem type.

2. a 'lower' filesystem
The lower filesystem can be any filesystem supported by Linux and does not need to be writable.  The lower filesystem can even be another overlayfs
When a name exists in both filesystems, the object in the 'upper' filesystem is visible while the object in the 'lower' filesystem is either hidden or, in the case of directories, merged with the 'upper' object.
2. Directories
Overlaying mainly involves directories. If a given name appears in both upper and lower filesystems and refers to a non-directory in either, then the lower object is hidden - the name refers only to the upper object.
Where both upper and lower objects are directories, a merged directory is formed.
At mount time, the two directories given as mount options "lowerdir" and "upperdir" are combined into a merged directory:
mount -t overlay overlay -olowerdir=/lower,upperdir=/upper,workdir=/work /merged
//The "workdir" needs to be an empty directory on the same filesystem as upperdir.
Then whenever a lookup is requested in such a merged directory, the lookup is performed in each actual directory and the combined result is cached in the dentry belonging to the overlay filesystem.
If both actual lookups find directories, both are stored and a merged directory is created, otherwise only one is stored: the upper if it exists, else the lower.
Only the lists of names from directories are merged. Other content such as metadata and extended attributes are reported for the upper directory only. These attributes of the lower directory are hidden.
3. whiteouts and opaque directories
In order to support rm and rmdir without changing the lower filesystem, an overlay filesystem needs to record in the upper filesystem that files have been removed. This is done using whiteouts and opaque directories (non-directories are always opaque).
1. A whiteout is created as a character device with 0/0 device number. When a whiteout is found in the upper level of a merged directory, any matching name in the lower level is ignored, and the whiteout itself is also hidden.
2. A directory is made opaque by setting the xattr "trusted.overlay.opaque" to "y".  Where the upper filesystem contains an opaque directory, any directory in the lower filesystem with the same name is ignored.
4. readdir
When a 'readdir' request is made on a merged directory, the upper and lower directories are each read and the name lists merged in the obvious way (upper is read first, then lower - entries that already exist are not re-added). This merged name list is cached in the 'struct file' and so remains as long as the file is kept open. If the
directory is opened and read by two processes at the same time, they will each have separate caches. A seekdir to the start of the directory (offset 0) followed by a readdir will cause the cache to be discarded and rebuilt.
This means that changes to the merged directory do not appear while a directory is being read. This is unlikely to be noticed by many programs.
seek offsets are assigned sequentially when the directories are read. Thus if
1. read part of a directory
2. remember an offset, and close the directory
3. re-open the directory some time later
4. seek to the remembered offset
there may be little correlation between the old and new locations in the list of filenames, particularly if anything has changed in the directory.
Readdir on directories that are not merged is simply handled by the underlying directory (upper or lower).
5. Non-directories
Objects that are not directories (files, symlinks, device-special files etc.) are presented either from the upper or lower filesystem as appropriate
1. When a file in the lower filesystem is accessed in a way the requires write-access, such as opening for write access, changing some metadata etc.
2. the file is first copied from the lower filesystem to the upper filesystem (copy_up)
//Note that creating a hard-link also requires copy_up, though of course creation of a symlink does not.
The copy_up may turn out to be unnecessary, for example if the file is opened for read-write but the data is not modified.
1. The copy_up process first makes sure that the containing directory exists in the upper filesystem - creating it and any parents as necessary.
2. It then creates the object with the same metadata (owner,mode, mtime, symlink-target etc.)
3. and then if the object is a file, the data is copied from the lower to the upper filesystem.
4. Finally any extended attributes are copied up.
5. Once the copy_up is complete, the overlay filesystem simply provides direct access to the newly created file in the upper filesystem
6. future operations on the file are barely noticed by the overlay filesystem (though an operation on the name of the file such as rename or unlink will of course be noticed and handled).
6. Multiple lower layers
Multiple lower layers can now be given using the the colon (":") as a separator character between the directory names. For example:
mount -t overlay overlay -olowerdir=/lower1:/lower2:/lower3 /merged
//As the example shows, "upperdir=" and "workdir=" may be omitted.  In that case the overlay will be read-only.
The specified lower directories will be stacked beginning from the rightmost one and going left. In the above example lower1 will be the top, lower2 the middle and lower3 the bottom layer
7. Non-standard behavior
The copy_up operation essentially creates a new, identical file and moves it over to the old name. The new file may be on a different filesystem, so both st_dev and st_ino of the file may change.
Any open files referring to this inode will access the old data and metadata. Similarly any file locks obtained before copy_up will not apply to the copied up file.
On a file opened with O_RDONLY fchmod(2), fchown(2), futimesat(2) and fsetxattr(2) will fail with EROFS.
If a file with multiple hard links is copied up, then this will "break" the link. Changes will not be propagated to other names referring to the same inode.
Symlinks in /proc/PID/ and /proc/PID/fd which point to a non-directory object in overlayfs will not contain valid absolute paths, only relative paths leading up to the filesystem's root. This will be fixed in the future.
Some operations are not atomic, for example a crash during copy_up or rename will leave the filesystem in an inconsistent state. This will be addressed in the future.
VFS的高度灵活性为overlayfs的实现提供了坚实的架构基础,既然对一个文件的操作是可以任意实现的,那就完全可以把文件A的read直接转为对另一个文件B的read
这就是overlayfs的根本,把对overlayfs文件系统系统里一个文件的操作,转为对lowerdir里对应文件的操作
static struct file *ovl_open(struct dentry *dentry, int flags, const struct cred *cred)
{
    int err;
    struct path realpath;
    enum ovl_path_type type;

    /*
    overlayfs在dentry的d_fsdata成员里放了文件对应的lowerdir和upperdir的信息,此处便可以找到该文件对应的lowerdirdir的文件
    */
    type = ovl_path_real(dentry, &realpath);
    if (ovl_open_need_copy_up(flags, type, realpath.dentry))
    {
        if (flags & O_TRUNC)
            err = ovl_copy_up_truncate(dentry, 0);
        else
            err = ovl_copy_up(dentry);
        if (err)
            return ERR_PTR(err);

        ovl_path_upper(dentry, &realpath);
     }
    /*
    将这个lowerdir对应的文件path传给vfs_open,这样,被真正open的就是lowerdir对应的"下层文件"了,之后的read/mmap都是调用该文件的file_operation
    */
    return vfs_open(&realpath, flags, cred);
}
而overlayfs提供的"虚拟共享目录"也是通过VFS层实现的
static int ovl_readdir(struct file *file, void *buf, filldir_t filler)
{
    struct ovl_dir_file *od = file->private_data;
    int res;

    if (!file->f_pos)
        ovl_dir_reset(file);
    if (od->is_real)
    {
        res = vfs_readdir(od->realfile, filler, buf);
        file->f_pos = od->realfile->f_pos;
        return res;
    }

    if (!od->is_cached)
    {
        struct path lowerpath;
        struct path upperpath;
        struct ovl_readdir_data rdd = { .list = &od->cache };

        ovl_path_lower(file->f_path.dentry, &lowerpath);
        ovl_path_upper(file->f_path.dentry, &upperpath);
        //将上下两层目录的内容都读出来,合并,放入rdd这个数据结构
        res = ovl_dir_read_merged(&upperpath, &lowerpath, &rdd);
        if (res)
            return res;
        od->cache_version = ovl_dentry_version_get(file->f_path.dentry);
        od->is_cached = true;
        /*
        将od->curser指向od-cache里对应偏移的dentry,这个dentry可以理解为类似该目录下面文件的dentry
        */
        ovl_seek_cursor(od, file->f_pos);
    }
    /*
    rdd数据结构里的list成员,实际上是指向od->cache的,所以移动od->cursor就是在沿着rdd->list找到所有dentry
    */
    while (od->cursor.next != &od->cache)
    {
        int over;
        loff_t off;
        struct ovl_cache_entry *p;

        p = list_entry(od->cursor.next, struct ovl_cache_entry, l_node);
        off = file->f_pos;
        file->f_pos++;
        list_move(&od->cursor, &p->l_node);

        if (p->is_whiteout)
            continue;
        over = filler(buf, p->name, p->len, off, p->ino, p->type);
        if (over)
            break;
     }
    //两层目录下的文件的文件名都读出来放到一起了
    return 0;
}
overlayfs的特性是将上下层目录合并为一个文件系统,"下层"目录是只读的,所以修改都是对"上层"的修改,在这个"新"的文件系统中
1. 新创建的文件实际是创建在"上层"目录的
2. 删除文件时
    1) 如果文件来自"下层"目录,则隐藏它(从虚拟机容器用户的角度来看就像删除了一样)
    2) 如果文件来自"上层"目录,则直接删除即可
3. 写一个文件时
    1) 如果文件来自"下层"目录,则拷贝其到上层目录,然后写这个"上层"的新文件
    2) 如果文件来自"上层"目录,则直接写即可

有VFS的高度灵活性,才有overlayfs的简洁实现
1. 上下合并
2. 同名覆盖
3. 写时拷贝
Relevant Link:
http://en.wikipedia.org/wiki/OverlayFS
https://git.kernel.org/cgit/linux/kernel/git/torvalds/linux.git/tree/Documentation/filesystems/overlayfs.txt
https://github.com/torvalds/linux/commit/e9be9d5e76e34872f0c37d72e25bc27fe9e2c54c
http://www.phoronix.com/scan.php?page=news_item&px=MTc5OTc
http://wenku.baidu.com/view/2c82473ca32d7375a41780ab.html
https://dev.openwrt.org/browser/trunk/target/linux/generic/patches-2.6.38/209-overlayfs.patch?rev=26213
http://issuu.com/byjgli/docs/overlayfs_procfs_____________/3
5. Docker网络配置
Dokcer 通过使用 Linux 桥接提供容器之间的通信,docker0 桥接接口的目的就是方便 Docker 管理。当 Docker daemon 启动时需要做以下操作
1. creates the docker0 bridge if not present: 如果 docker0 不存在则创建
2. searches for an IP address range which doesn’t overlap with an existing route: 搜索一个与当前路由不冲突的 ip 段
3. picks an IP in the selected range: 在确定的范围中选择 ip
4. assigns this IP to the docker0 bridge: 绑定 ip 到 docker0
0x1: Docker四种网络模式
docker run 创建 Docker 容器时,可以用 --net 选项指定容器的网络模式,Docker 有以下 4 种网络模式
1. host模式: 使用 --net=host 指定
2. container模式: 使用 --net=container:NAME_or_ID 指定
3. none模式: 使用 --net=none 指定
4. bridge模式:使用 --net=bridge 指定,默认设置
1. host模式
如果启动容器的时候使用 host 模式,那么这个容器将不会获得一个独立的 Network Namespace,而是和宿主机共用一个 Network Namespace。容器将不会虚拟出自己的网卡,配置自己的 IP 等,而是使用宿主机的 IP 和端口
例如,我们在 10.10.101.105/24 的机器上用 host 模式启动一个含有 web 应用的 Docker 容器,监听 tcp 80 端口。当我们在容器中执行任何类似 ifconfig 命令查看网络环境时,看到的都是宿主机上的信息。而外界访问容器中的应用,则直接使用 10.10.101.105:80 即可,不用任何 NAT 转换,就如直接跑在宿主机中一样。但是,容器的其他方面,如文件系统、进程列表等还是和宿主机隔离的
2. container模式
这个模式指定新创建的容器和已经存在的一个容器共享一个 Network Namespace,而不是和宿主机共享。新创建的容器不会创建自己的网卡,配置自己的 IP,而是和一个指定的容器共享 IP、端口范围等。同样,两个容器除了网络方面,其他的如文件系统、进程列表等还是隔离的。两个容器的进程可以通过 lo 网卡设备通信
3. none模式
这个模式和前两个不同。在这种模式下,Docker 容器拥有自己的 Network Namespace,但是,并不为 Docker容器进行任何网络配置。也就是说,这个 Docker 容器没有网卡、IP、路由等信息。需要我们自己为 Docker 容器添加网卡、配置 IP 等
4. bridge模式
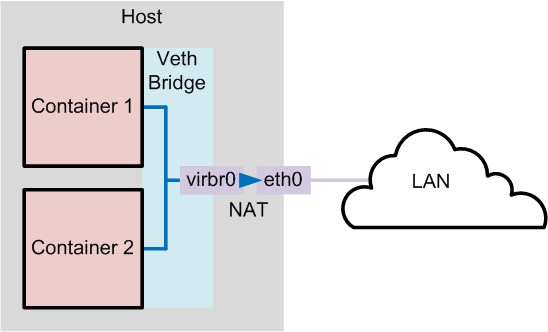
bridge 模式是 Docker 默认的网络设置,此模式会为每一个容器分配 Network Namespace、设置 IP 等,并将一个主机上的 Docker 容器连接到一个虚拟网桥上。当 Docker server 启动时,会在主机上创建一个名为 docker0 的虚拟网桥,此主机上启动的 Docker 容器会连接到这个虚拟网桥上。虚拟网桥的工作方式和物理交换机类似,这样主机上的所有容器就通过交换机连在了一个二层网络中
接下来就要为容器分配 IP 了,Docker 会从 RFC1918 所定义的私有 IP 网段中,选择一个和宿主机不同的IP地址和子网分配给 docker0,连接到 docker0 的容器就从这个子网中选择一个未占用的 IP 使用。如一般 Docker 会使用 172.17.0.0/16 这个网段,并将 172.17.42.1/16 分配给 docker0 网桥(在主机上使用 ifconfig 命令是可以看到 docker0 的,可以认为它是网桥的管理接口,在宿主机上作为一块虚拟网卡使用)
Relevant Link:
https://opskumu.gitbooks.io/docker/content/chapter6.html
http://dockone.io/article/402
http://www.oschina.net/translate/docker-network-configuration
6. Dockerfile详解
docker  build -t edwardsbean/centos6-jdk1.7  .
//当前目录下包含Dockerfile,使用命令build来创建新的image,并命名为edwardsbean/centos6-jdk1.7
0x1: Format
# Comment
FROM {YOUR Base Image from which you are building}
INSTRUCTION arguments
Docker runs the instructions in a Dockerfile in order. The first instruction must be `FROM` in order to specify the Base Image from which you are building.
1. FROM: 基于哪个镜像
2. RUN: 安装软件用
RUN echo 'we are running some # of cool things'

3. MAINTAINER: 镜像创建者
4. CMD: container启动时执行的命令,但是一个Dockerfile中只能有一条CMD命令,多条则只执行最后一条CMD.
CMD echo hello world
//CMD主要用于container时启动指定的服务,当docker run command的命令匹配到CMD command时,会替换CMD执行的命令

5. ENTRYPOINT: container启动时执行的命令,但是一个Dockerfile中只能有一条ENTRYPOINT命令,如果多条,则只执行最后一条
//ENTRYPOINT没有CMD的可替换特性

6. USER: 使用哪个用户跑container
ENTRYPOINT ["memcached"]
USER daemon

7. EXPOSE: container内部服务开启的端口。主机上要用还得在启动container时,做host-container的端口映射
docker run -d -p 127.0.0.1:33301:22 centos6-ssh
//container ssh服务的22端口被映射到主机的33301端口

8. ENV: 用来设置环境变量
ENV LANG en_US.UTF-8
ENV LC_ALL en_US.UTF-8

9. ADD: 将文件<src>拷贝到container的文件系统对应的路径<dest>
所有拷贝到container中的文件和文件夹权限为0755,uid和gid为0
如果文件是可识别的压缩格式,则docker会帮忙解压缩
如果要ADD本地文件,则本地文件必须在 docker build <PATH>,指定的<PATH>目录下
如果要ADD远程文件,则远程文件必须在 docker build <PATH>,指定的<PATH>目录下
/*
docker build github.com/creack/docker-firefox
docker-firefox目录下必须有Dockerfile和要ADD的文件
*/
注意:使用docker build - < somefile方式进行build,是不能直接将本地文件ADD到container中。只能ADD url file.
ADD只有在build镜像的时候运行一次,后面运行container的时候不会再重新加载了。

10. VOLUME: 将本地文件夹或者其他container的文件夹挂载到container中。
11. WORKDIR: 切换目录用,可以多次切换(相当于cd命令),对RUN,CMD,ENTRYPOINT生效
12. ONBUILD: ONBUILD 指定的命令在构建镜像时并不执行,而是在它的子镜像中执行
Relevant Link:
http://blog.csdn.net/wsscy2004/article/details/25878223
https://docs.docker.com/engine/reference/builder/
7. Docker Volume
Docker镜像是由多个文件系统(只读层)叠加而成。当我们启动一个容器的时候,Docker会加载只读镜像层并在其上(镜像栈顶部)添加一个读写层。如果运行中的容器修改了现有的一个已经存在的文件,那该文件将会从读写层下面的只读层复制到读写层,该文件的只读版本仍然存在,只是已经被读写层中该文件的副本所隐藏
当删除Docker容器,并通过该镜像重新启动时,之前的更改将会丢失。在Docker中,只读层及在顶部的读写层的组合被称为Union File System(联合文件系统),这就是为什么我们能在每次启动容器时都获得一个"纯净"的新镜像系统,在容器内部任意的修改都不会影响到其他容器以及宿主机的镜像
0x1: 数据卷
为了能够保存(持久化)数据以及共享容器间的数据,Docker提出了Volume的概念。简单来说,Volume就是目录或者文件,它可以绕过默认的联合文件系统,而以正常的文件或者目录的形式存在于宿主机上(即让容器和宿主机共享目录、文件)。数据卷是一种特殊的存在于一个或者多个docker内部的不同于Union File System的目录。数据卷提供多种有用的特性用来持久化和共享数据
1. 数据卷在docker初始化时创建。如果容器的镜像包含外挂的数据,外挂的数据将在卷初始化时被拷贝到新的本地卷
2. 数据卷可以被共享和在多个docker间复用
3. 可以对数据卷直接修改
4. 更新镜像时数据卷并不受影响
5. 即使镜像被删除,数据卷也仍然会持久化到本地
数据卷被设计用来持久化存储数据,独立于容器的生命周期。当你删除容器时,docker并不会自动删除数据卷,不使用的数据卷,也不会自动进行"垃圾回收"
0x1: 增加一个数据卷
我们可以通过两种方式来初始化Volume,这两种方式有些细小而又重要的差别。我们可以在运行时使用-v来声明Volume
docker run -it --name container-test -h CONTAINER -v /data debian /bin/bash
//上面的命令会将/data挂载到容器中,并绕过联合文件系统,我们可以在主机上直接操作该目录。任何在该镜像/data路径的文件将会被复制到Volume
//当使用-v参数时,镜像目录下的任何文件都不会被复制到Volume中(宿主机的Volume会复制到镜像目录,镜像不会复制到卷)
docker中的卷默认是读写权限,但你也可以设置为只读
sudo docker run --rm -it -v /root/Limon/samples:/home/malware/samples ubuntu bash
0x2: 数据共享
如果要授权一个容器访问另一个容器的Volume,我们可以使用-volumes-from参数来执行docker run
docker run -it -h NEWCONTAINER --volumes-from container-test debian /bin/bash
//值得注意的是不管container-test是否运行,它都会起作用。只要有容器连接Volume,它就不会被删除
0x3: 删除Volumes
如果你已经使用docker rm来删除你的容器,那可能有很多的孤立的Volume仍在占用着空间
Volume只有在下列情况下才能被删除
1. 该容器是用docker rm -v命令来删除的(-v是必不可少的)
2. docker run中使用了--rm参数
//即使用以上两种命令,也只能删除没有容器连接的Volume。连接到用户指定主机目录的Volume永远不会被docker删除
0x4: 使用共享卷的注意点
多个容器可以共享一个或者多个数据卷,但是同时写入的时候会发生冲突
数据卷在宿主里面是可以直接操作的。你可以使用普通的linux工具操作它们。但是建议你不要这样直接做,因为容器和应用并不知道你的操作,这可能会导致数据操作冲突
Relevant Link:
https://www.goodmemory.cc/docker%E5%AE%B9%E5%99%A8%E7%9A%84%E6%95%B0%E6%8D%AE%E7%AE%A1%E7%90%86/
http://dockone.io/article/128
Copyright (c) 2016 LittleHann All rights reserved

 浙公网安备 33010602011771号