【原创】JavaFx程序解决Jupyter Notebook导出PDF不显示中文
0.ATTENTION!!!
JavaFx里是通过Java调用控制台执行的的jupyter和xelatex指令,
这些个指令需要在本地安装Jupyter和MikTeX之后才能正常在电脑上运行
1.【问题背景】
1.1 最近写了一个大数据的小练习,感觉那个有点用,就想导出PDF去打印
然后问题来了:导出的PDF不显示中文!!!(可惜那一块多钱)。
网上教程差不多就是用juypter和xlatex命令进行转换,但是这样一个一个转感觉有点麻烦,
然后就想着写一个Java程序看看能不能自己选择文件进行PDF转换
然后探索的过程就开始了
1.2 一有问题当然是先问度娘了,找了一波后发现可以通过命令提示符(CMD)以命令的方式创建创建出pdf,这就很灵性了。
虽然直接在Jupyter Notebook里可以更简单地直接导出PDF,
但是对于希望在PDF里显示中文的同学来说,能够方便一点导出pdf文件的话,何乐而不为嘞
2.【基本过程】
2.1 我找的解决方案挺简单的,大概分三步:a): 一条命令通过source.ipynb文件生成source.tex文件
b): 用编辑器打开source.tex,在指定位置添加文本
c):一条命令通过source.tex文件生成一系列文件,这里面就包括了source.pdf
d):上面的处理方式都是通过Java实现,在控制台运行指令也是通过Java调用的(真好玩)
嘿嘿,听起来挺简单的,写着写着你会发现还真的挺简单的,还有一点瓜
3.【操作环境以及相关准备】
3.1 win10+IDEA+jdk8+anaconda+Jupyter Notebook+MikTeX+Pandoc+JavaFx(SceneBuilder)
3.2 要通过Jupyter Notebook转PDF的话要用MikTeX和Pandoc,MikTeX需要配置环境
3.3 MikTeX下载地址:https://miktex.org/download
Pandoc下载地址:https://github.com/jgm/pandoc/releases/tag/2.3.1
3.4 把MikTex添加到系统环境变量里

4.【Java控制台实现方式】
4.1 介绍:最初就是写了一个控制台程序,然后为了能够成功导出PDF就一直在堆代码,最后就是成功导出PDF
4.2 代码:因为一开始就是为了写功能而写代码,所以感觉把这个写死了,因为测试就是针对一个文件来写的,不过问题不大,
后面我又写了一个JavaFx的,相关注释我都写在里面了


  1 import java.io.*;
  2
  3 public class Main {
  4
  5     private static String path = "D:\\JupyterNotebook";
  6     private static File sourceFile = new File("D:\\JupyterNotebook\\pandas_test.tex");
  7
  8     public static void main(String[] args) throws IOException, InterruptedException {
  9         for (int i = 0; i < args.length; i++) {
 10             System.out.println(args[i]);
 11         }
 12         change2Tex();
 13         File bufferFile = createTexFile();  //获取创建的文件对象
 14         delay() ;                           //延时
 15         modifyTex(bufferFile);              //修该Tex文件
 16         change2PDF();                       //将Tex文件转化成PDF文件
 17     }
 18
 19
 20     /**
 21      * 延一个时,
 22      * java建文件比命令提示符快
 23      *
 24      * @throws InterruptedException
 25      */
 26     public static void delay() throws InterruptedException {
 27         for (int i = 0; i < 4; i++) {
 28             Thread.sleep(1000);
 29         }
 30     }
 31
 32     /**
 33      * 通过简单的命令
 34      * 将文件转化为tex文件
 35      * 执行cmd
 36      *
 37      * jupyter nbconvert --to latex yourNotebookName.ipynb
 38      * 将文件里   \documentclass[11pt]{article}后面加上下面这三行
 39      * \\usepackage{fontspec, xunicode, xltxtra}
 40      * \\setmainfont{Microsoft YaHei}
 41      * 将latex转化为pdf
 42      * xelatex yourNotebookName.tex
 43      */
 44     public static void change2Tex() throws IOException {
 45
 46         Runtime runtime = Runtime.getRuntime();
 47         String cmd = "cmd /k start  jupyter nbconvert --to latex " + path + "\\pandas_test.ipynb";  //cmd指令,cmd /k start + 指令,运行五玩了指令就关闭cmd
 48         System.out.println(cmd);
 49         System.out.println(path);
 50         runtime.exec(cmd);
 51     }
 52
 53     /**
 54      * 将tex文件转化成pdf文件
 55      *
 56      * @throws IOException
 57      */
 58     public static void change2PDF() throws IOException {
 59         Runtime runtime = Runtime.getRuntime();
 60         String cmd = "cmd /k start xelatex afterInsertText.tex";
 61         runtime.exec(cmd, null, new File(path));//注意这里:exec里有三个参数,这个方法可以指定在path文件夹打开cmd,然后运行cmd指令
 62     }
 63
 64     /**
 65      * 创建Tex文件
 66      *
 67      * @return
 68      * @throws IOException
 69      */
 70     public static File createTexFile() throws IOException {
 71
 72         File tempFile = new File("D:\\JupyterNotebook");        //判断这个文件夹在不在
 73         if (!tempFile.exists()) {
 74             tempFile.mkdir();
 75         }
 76
 77         File bufferTopTex = new File("D:\\JupyterNotebook", "afterInsertText.tex");     //判断这个文件在不在
 78         if (!bufferTopTex.exists()) {           //不在的话创建文件,
 79             bufferTopTex.createNewFile();
 80         }
 81         //在后面会把源.tex文件要修改的位置前面的数据写到下面这个文件(虽然下面是个对象,意思应该能懂)里面,
 82         // 然后接着在后面添加文本,最后把源tex剩下的数据写到这个文件里
 83         return bufferTopTex;
 84     }
 85
 86     /**
 87      * 文件读写,在文件后面添加需要添加的指令
 88      *
 89      * @throws IOException
 90      */
 91     public static void modifyTex(File file) throws IOException {
 92
 93         RandomAccessFile topTex = new RandomAccessFile(file, "rw");     //在本地创建的afterInsertText.tex文件
 94
 95         RandomAccessFile raf = new RandomAccessFile(sourceFile, "rw");  //获取源.tex文件
 96
 97         String line;
 98
 99         //在下面是对readLine()取到的数据进行转码,这是一个解决乱码的好方式
100         //注意在下面每用一次readLine(),那个指向行号的指针就会向下移动一次,和ResultSet里的rs.next()有点像
101         while ((line = new String(raf.readLine().getBytes("ISO-8859-1"), "utf-8")) != null) {
102             topTex.write(("\n" + line).getBytes());
103             if (line.equals("\\documentclass[11pt]{article}")) {
104                 topTex.write((" \n\\usepackage{fontspec, xunicode, xltxtra}").getBytes());
105                 topTex.write(("\n\\setmainfont{Microsoft YaHei}").getBytes());
106                 topTex.write(("\n\\usepackage{ctex} ").getBytes());
107                 break;
108             }
109         }
110
111         while (true) {
112             final String temp;
113             if ((temp = raf.readLine()) == null) {
114                 break;
115             } else {
116                 line = new String(temp.getBytes("ISO-8859-1"), "utf-8");
117                 topTex.write(("\n" + line).getBytes());
118             }
119         }
120     }
121 }
4.3 运行结果:emmmmmmm,这个运行完了就自己关掉了,不好截图,看看其他的吧

4.3.1 只有一个.ipynb文件:

然后运行一下程序:
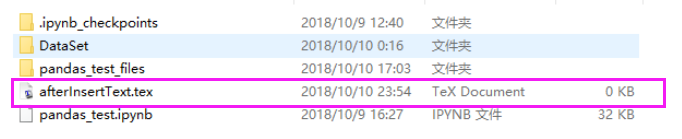
先是Java程序生成的afterInsertText.tex文件
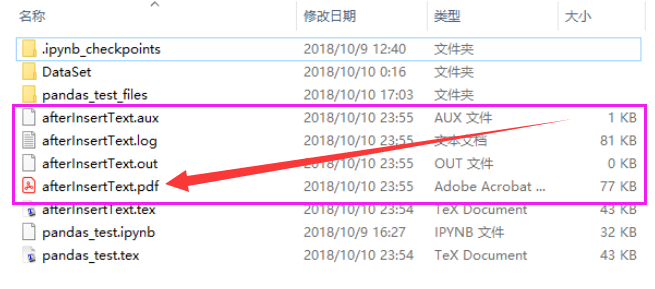
然后接着运行到结束就会生成这些文件,可以看到pdf自动生成了
最后看一眼有没有中文:
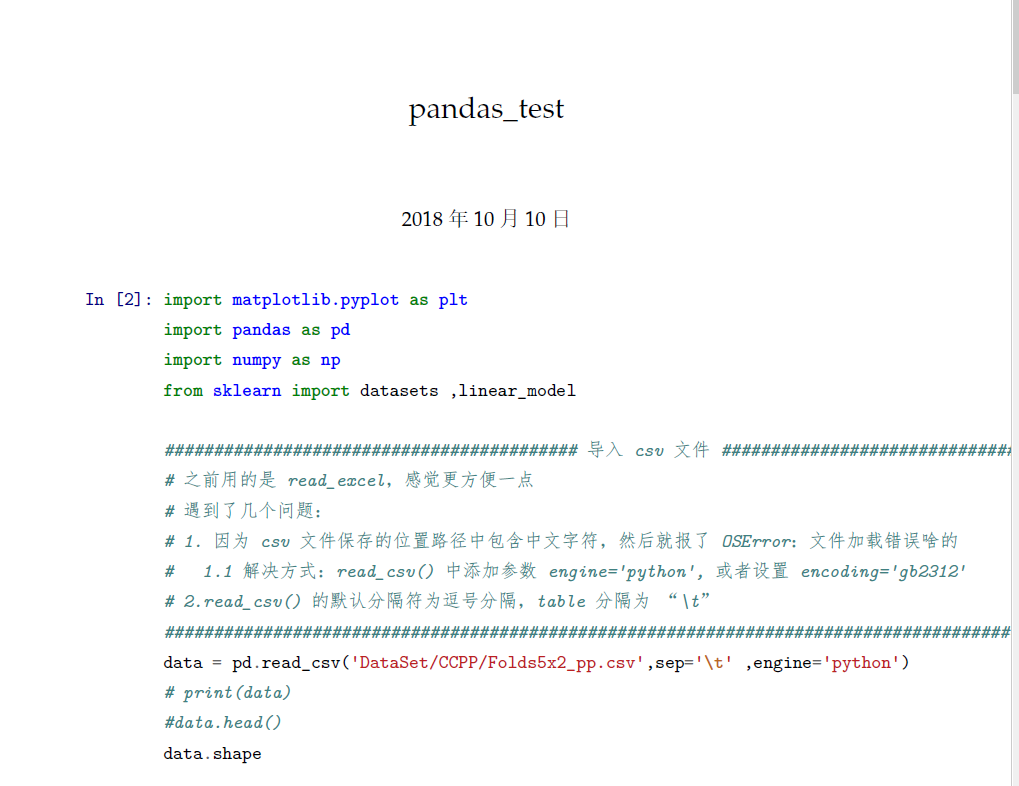
-----------------可以看出,上面的pdf是有中文的,成功-----------------
Tip_1:在这里给出要用到的cmd命令:
1.jupyter nbconvert --to latex yourNotebookName.ipynb
2.将文件里 \documentclass[11pt]{article}后面加上下面这三行
\usepackage{fontspec, xunicode, xltxtra}
\setmainfont{Microsoft YaHei}
\usepackage{ctex}
3.将latex转化为pdf: xelatex yourNotebookName.tex
Tip_2:
在Java里输出反斜杠要用两个,英文点号 ......要用 \\.
5.【JavaFx实现方式】
5.1 用的是IDEA开发的,所以开发JavaFx程序挺简单的,只要新建一个JavaFx程序就好了,然后就是下载Scenebuilder了,下载完了之后还要配置一下options.xml和other.xml
路径是这个:![]() other.xml也在这个路径下
other.xml也在这个路径下
配置:other.xml
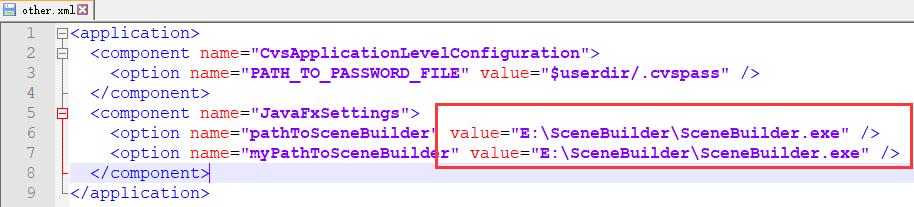
配置:options.xml,在45行里的value里面加上E:/SceneBuilder/SceneBuilder.exe;你的SceeBuilder程序的路径

重启IDEA,右键FXML文件可以看到有open in scenebuilder那个选项点击之后不会报错了
5.2 程序总体来说还行,但是打包成jar包之后就会出bug,点击Generate不会正常显示提示框,可是在IDEA里可以正常显示提示框,不知道为啥,所以就没处理这个bug,有兴趣的可以改一改咯
5.3 Java调用控制台执行的的jupyter和xelatex指令,这些个指令需要在本地安装Jupyter和MikTeX之后才能正常在电脑上运行
5.4 程序基本骨架

5.5 程序代码:
5.5.1 包含main方法的类
 1 package sample;
 2
 3 import javafx.application.Application;
 4 import javafx.fxml.FXMLLoader;
 5 import javafx.scene.Parent;
 6 import javafx.scene.Scene;
 7 import javafx.stage.Stage;
 8
 9 public class Main extends Application {
10
11     static Stage mainStage = null ;
12
13     public static Stage getMainStage(){
14         return mainStage;
15     }
16     @Override
17     public void start(Stage primaryStage) throws Exception{
18         mainStage = primaryStage;
19         Parent root = FXMLLoader.load(getClass().getResource("view/sample.fxml"));
20         primaryStage.setTitle("ChangeTex2PDF");
21         primaryStage.setScene(new Scene(root));
22         primaryStage.show();
23     }
24
25
26     public static void main(String[] args) {
27         launch(args);
28     }
29 }
5.5.2 主页中的控件的控制器
package sample.controller;

import javafx.fxml.FXML;
import javafx.scene.control.Label;
import javafx.stage.FileChooser;
import javafx.stage.Stage;
import sample.Main;
import sample.Service;

import java.io.File;
import java.io.IOException;

public class Controller {

    InputFileDialogController InputFileDialogController = new InputFileDialogController();

    private String srcFilePath;

    @FXML
    private Label filePath_Label;

    @FXML
    private void importFile() {
        //创建选择文件stage
        Stage chooseFileStage = new Stage();

        FileChooser fileChooser = new FileChooser();
        fileChooser.setTitle("选择文件");

        //文件过滤
        fileChooser.getExtensionFilters().addAll(
                new FileChooser.ExtensionFilter("ipynb file", "*.ipynb")
        );

        //以对话框的形式显示选择文件
        File file = fileChooser.showOpenDialog(chooseFileStage);
        if (file != null) {
            String absolutePath = file.getAbsolutePath();
            srcFilePath = absolutePath;
            filePath_Label.setText(absolutePath);
            System.out.println("劳资要读文件啦");
        }
    }

    @FXML
    /**
     * 生成按钮点击事件处理
     * srcFilePath:文件的绝对路径
     * fullName:名称+后缀
     * filePkgPath:目标文件的包路径,
     *      比如:C:\test\notebook\test.ipynb。
     *      这里filePkgPath就是C:\test\notebook
     * path_arr数组:对文件绝对路径的拆分,按反斜杠 \ 进行拆分,在java里用\\
     * fullName_arr数组:对fullName按英文句号进行拆分,在java里用"\\."表示
     * texFileName:构造一个tex文件名,给后面转化pdf时用
     *
     */
    public void generatePDF() throws IOException, InterruptedException {
        if (srcFilePath != null) {                                               //在选择了文件的情况下
            String[] path_arr = srcFilePath.split("\\\\");
            String fullName = path_arr[path_arr.length - 1];

            StringBuffer filePkgPath = getStringBuffer(path_arr);
            String[] fullName_arr = fullName.split("\\.");

            Service.change2Tex(filePkgPath.toString(), fullName_arr[0]);

            File bufferFile = Service.createTexFile(filePkgPath.toString());

            Service.delay();

            String texFileName = fullName_arr[0] + ".tex";
            texFileName = filePkgPath + "\\" + texFileName;
            Service.modifyTex(bufferFile, texFileName);
            Service.change2PDF(filePkgPath.toString());
        } else {
            InputFileDialogController.loadDialog().show();            //显示提示框,请先选择所需文件
            Main.getMainStage().close();
        }
    }

    /**
     * 获取目标文件的包路径
     *
     * @param path_arr
     * @return
     */
    private StringBuffer getStringBuffer(String[] path_arr) {
        StringBuffer filePkgPath = new StringBuffer();
        for (int i = 0; i < path_arr.length - 1; i++) {
            if (i < path_arr.length - 2) {                  //除开绝对路径后面的(文件名+后缀)那一项
                filePkgPath.append(path_arr[i]).append("\\");
            } else {
                filePkgPath.append(path_arr[i]);
            }
        }
        return filePkgPath;
    }

    /**
     * 退出软件
     *
     * @throws IOException
     */
    @FXML
    public void exit() throws IOException {
        Main.getMainStage().close();
    }
}
5.5.3 调用控制台,执行jupyter xlatex指令,以及对文件路径进行处理的方法
package sample;

import java.io.File;
import java.io.IOException;
import java.io.RandomAccessFile;

public class Service {
    /**
     * 延一个时,
     * 娘欸java建文件比命令提示符快
     *
     * @throws InterruptedException
     */
    public static void delay() throws InterruptedException {
        for (int i = 0; i < 4; i++) {
            Thread.sleep(1000);
        }
    }

    /**
     * 通过简单的命令
     * 将文件转化为tex文件
     * *   执行cmd
     * *   jupyter nbconvert --to latex yourNotebookName.ipynb
     *
     * 将文件里   \documentclass[11pt]{article}后面加上下面这两行
     * *       \\usepackage{fontspec, xunicode, xltxtra}
     * *       \\setmainfont{Microsoft YaHei}
     *
     * 将latex转化为pdf
     * *        xelatex yourNotebookName.tex
     */
    public static void change2Tex(String filePkgPath, String fileName) throws IOException {

        Runtime runtime = Runtime.getRuntime();
        String cmd = "cmd /k start  jupyter nbconvert --to latex " + filePkgPath + "\\" + fileName + ".ipynb";
        runtime.exec(cmd);
    }

    /*************************************这里可以改,改成用户自定义名称*************
     * 将tex文件转化成pdf文件
     *
     * @throws IOException
     */
    public static void change2PDF(String filePkgPath) throws IOException {
        Runtime runtime = Runtime.getRuntime();
        String cmd = "cmd /k start xelatex Result.tex";
        runtime.exec(cmd, null, new File(filePkgPath));
    }

    /**
     * 创建Tex文件
     *
     * @return  获取生成的tex文件
     * @throws IOException
     */
    public static File createTexFile(String filePkgPath) throws IOException {

        File tempFile = new File(filePkgPath);
        if (!tempFile.exists()) {
            tempFile.mkdir();
        }

        File bufferTopTex = new File(filePkgPath, "Result.tex");
        if (!bufferTopTex.exists()) {
            bufferTopTex.createNewFile();
        }

        return bufferTopTex;
    }

    /**
     * 文件读写,在文件后面添加需要添加的指令
     *
     * @throws IOException
     */
    public static void modifyTex(File file, String sourceFile) throws IOException {

        RandomAccessFile topTex = new RandomAccessFile(file, "rw");

        RandomAccessFile raf = new RandomAccessFile(sourceFile, "rw");

        String line;
        while ((line = new String(raf.readLine().getBytes("ISO-8859-1"), "utf-8")) != null) {
            topTex.write(("\n" + line).getBytes());
            if (line.equals("\\documentclass[11pt]{article}")) {
                topTex.write((" \n\\usepackage{fontspec, xunicode, xltxtra}").getBytes());
                topTex.write(("\n\\setmainfont{Microsoft YaHei}").getBytes());
                topTex.write(("\n\\usepackage{ctex} ").getBytes());
                break;
            }
        }

        //接着插入后半部分
        while (true) {
            final String temp;
            if ((temp = raf.readLine()) == null) {
                break;
            } else {
                line = new String(temp.getBytes("ISO-8859-1"), "utf-8");
                topTex.write(("\n" + line).getBytes());
            }
        }
    }

    //判断是否成功生成,成功生成对应文件弹出成功框

}
5.5.4 控制弹出框动作的控制器
package sample.controller;

import javafx.fxml.FXML;
import javafx.fxml.FXMLLoader;
import javafx.scene.Scene;
import javafx.stage.Stage;
import sample.Main;


import java.io.IOException;

public class InputFileDialogController {

    static Stage stage = new Stage();

    public Stage loadDialog() throws IOException {
        Scene dialogScene = new Scene(FXMLLoader.load(getClass().getResource("../view/inputFileDialog.fxml")));
        stage.setScene(dialogScene);
        return stage;
    }

    @FXML
    public void closeDialog(){
        stage.close();
        Main.getMainStage().show();
    }
}
5.5.5 主页的视图
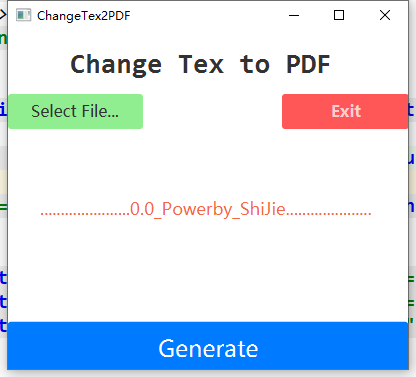
 1 <?xml version="1.0" encoding="UTF-8"?>
 2
 3 <?import javafx.scene.control.Button?>
 4 <?import javafx.scene.control.Label?>
 5 <?import javafx.scene.layout.AnchorPane?>
 6 <?import javafx.scene.layout.ColumnConstraints?>
 7 <?import javafx.scene.layout.GridPane?>
 8 <?import javafx.scene.layout.HBox?>
 9 <?import javafx.scene.layout.RowConstraints?>
10 <?import javafx.scene.text.Font?>
11
12 <AnchorPane maxHeight="354.0" maxWidth="400.0" minHeight="295.0" minWidth="400.0" prefHeight="338.0" prefWidth="400.0" xmlns="http://javafx.com/javafx/8.0.171" xmlns:fx="http://javafx.com/fxml/1" fx:controller="sample.controller.Controller">
13    <children>
14       <GridPane prefHeight="343.0" prefWidth="400.0" style="-fx-background-color: white;" stylesheets="@giveMeCss.css">
15         <columnConstraints>
16           <ColumnConstraints hgrow="SOMETIMES" minWidth="10.0" prefWidth="100.0" />
17         </columnConstraints>
18         <rowConstraints>
19           <RowConstraints maxHeight="164.0" minHeight="10.0" prefHeight="59.0" vgrow="SOMETIMES" />
20           <RowConstraints maxHeight="241.0" minHeight="10.0" prefHeight="224.0" vgrow="SOMETIMES" />
21           <RowConstraints maxHeight="52.0" minHeight="10.0" prefHeight="52.0" vgrow="SOMETIMES" />
22         </rowConstraints>
23          <children>
24             <AnchorPane maxHeight="50.0" minHeight="50.0" minWidth="0.0" prefHeight="50.0" prefWidth="398.0">
25                <children>
26                   <Label layoutX="62.0" prefHeight="51.0" prefWidth="277.0" stylesheets="@giveMeCss.css" text="Change Tex to PDF">
27                      <font>
28                         <Font name="Consolas Bold" size="28.0" />
29                      </font>
30                   </Label>
31                </children>
32             </AnchorPane>
33             <Button mnemonicParsing="false" onMouseClicked="#generatePDF" prefHeight="61.0" prefWidth="400.0" style="-fx-background-color: #007bff;" stylesheets="@giveMeCss.css" text="Generate" textFill="WHITE" GridPane.rowIndex="2">
34                <font>
35                   <Font size="23.0" />
36                </font>
37             </Button>
38             <Label fx:id="filePath_Label" alignment="CENTER" contentDisplay="CENTER" prefHeight="34.0" prefWidth="381.0" text="   ......................0.0_Powerby_ShiJie....................." textFill="#f56744" GridPane.rowIndex="1">
39                <font>
40                   <Font size="17.0" />
41                </font>
42             </Label>
43             <HBox prefHeight="178.0" prefWidth="400.0" GridPane.rowIndex="1">
44                <children>
45                   <Button cache="true" mnemonicParsing="false" onMouseClicked="#importFile" prefHeight="34.0" prefWidth="137.0" style="-fx-background-color: lightgreen;" stylesheets="@giveMeCss.css" text="Select File...">
46                      <font>
47                         <Font size="16.0" />
48                      </font>
49                   </Button>
50                   <Button mnemonicParsing="false" opacity="0.0" prefHeight="35.0" prefWidth="141.0" text="Button" />
51                   <Button mnemonicParsing="false" onMouseClicked="#exit" prefHeight="34.0" prefWidth="129.0" style="-fx-background-color: #ff5757;" stylesheets="@giveMeCss.css" text="Exit" textFill="#ffffffbd">
52                      <font>
53                         <Font name="System Bold" size="16.0" />
54                      </font>
55                   </Button>
56                </children>
57             </HBox>
58          </children>
59       </GridPane>
60    </children>
61 </AnchorPane>
5.5.6 弹出框的视图
 1 <?xml version="1.0" encoding="UTF-8"?>
 2
 3 <?import javafx.scene.control.Button?>
 4 <?import javafx.scene.control.Label?>
 5 <?import javafx.scene.layout.AnchorPane?>
 6 <?import javafx.scene.text.Font?>
 7
 8 <AnchorPane prefHeight="238.0" prefWidth="411.0" xmlns="http://javafx.com/javafx/8.0.171" xmlns:fx="http://javafx.com/fxml/1" fx:controller="sample.controller.InputFileDialogController">
 9    <children>
10       <Label alignment="CENTER" layoutY="-6.0" prefHeight="53.0" prefWidth="411.0" style="-fx-background-color: #ff4d4d;" stylesheets="@giveMeCss.css" text="Warning" textFill="#e9ff4f">
11          <font>
12             <Font name="System Bold" size="21.0" />
13          </font></Label>
14       <Label layoutX="84.0" layoutY="72.0" prefHeight="95.0" prefWidth="267.0" text="Please select a file first ;)">
15          <font>
16             <Font size="20.0" />
17          </font></Label>
18       <Button layoutX="161.0" layoutY="195.0" mnemonicParsing="false" onMouseClicked="#closeDialog" prefHeight="43.0" prefWidth="90.0" style="-fx-background-color: #007bff;" stylesheets="@giveMeCss.css" text="OK" textFill="#c4f2ff">
19          <font>
20             <Font size="16.0" />
21          </font></Button>
22    </children>
23 </AnchorPane>
5.6 Tips:
5.6.1 如果你直接导入这个项目的话,那么你在SceneBuilder里需要选定controller,以及绑定控件触发事件和控件id


5.7 最后再上一波运行结果哇
5.7.1首页
5.7.2 没有选择文件点击Generate之后:在开发环境里点击会弹出Warning,但是导出jar包之后就报错了0.0

5.7.3 选择.ipynb文件,然后程序就开始了
5.7.4 还有一些细节可以做,比如说程序运行的进度条呀,自定义导出pdf的名称呀啥的
可能我的解决方式有点瓜,但是这只是我一时兴起,于是就写了这么个东西,觉得挺好玩的
代码已经放到我的Github上了,欢迎大家来看看呀:https://github.com/Shijie1210/ChangeTex2PDF_CN.git
本文来自博客园,作者:你啊347,转载请注明原文链接:https://www.cnblogs.com/LinKinSJ/p/9769903.html

 浙公网安备 33010602011771号