
一个简单的UVM项目的学习记录(五)——整体完善
一、monitor
在之前的代码中,已经成功实现了激励部分并通过了测试。换句话说,agent中的sequencer和driver已经完成,还剩下唯一一个组件:monitor。
monitor需要监控并收集总线上的数据,将其打包后发送给需要的组件。既然需要发送,自然就要用到TLM端口,因此需要创建对应的变量;需要统计获得的transaction数目,因此需要创建一个int型变量;由于有i_agt和o_agt之分,因此需要一个变量来控制monitor中的监测行为,因为输入端和输出端部分所需要的数据并不完全相同。
点击查看代码
`ifndef AMP_MONITOR_SV
`define AMP_MONITOR_SV

class amp_monitor extends uvm_monitor;
    `uvm_component_utils(amp_monitor)

    int mon_item_num;
    bit mon_input = 0;	// defualt: monitor belongs to output agent

    amp_seq_item t;

    virtual amp_interface vif = null;

    uvm_analysis_port #(amp_seq_item) ap;

    extern function 	 new(string name = "amp_monitor", uvm_component parent = null);
    extern function void build_phase(uvm_phase phase);
    extern task 		 main_phase(uvm_phase phase);
    extern function void report_phase(uvm_phase phase);

    extern protected task collect_item(amp_seq_item t);
endclass : amp_monitor

function amp_monitor::new(string name = "amp_monitor", uvm_component parent = null);
	super.new(name, parent);

	`uvm_info(get_type_name(), "created", UVM_LOW)
endfunction : new

function void amp_monitor::build_phase(uvm_phase phase);
	super.build_phase(phase);

	ap = new("ap", this);
	mon_item_num = 0;
endfunction : build_phase

task amp_monitor::main_phase(uvm_phase phase);
	super.main_phase(phase);

	forever begin
		@vif.ck_mon;
		t = amp_seq_item::type_id::create("t");
		this.collect_item(t);
		`uvm_info(get_type_name(), {"collect item t:\n", t.sprint()}, UVM_FULL)

		if(mon_input && t.ttype == amp_seq_item::SET_BASE_NUMBER) begin
			mon_item_num += 1;
			ap.write(t);
			`uvm_info(get_type_name(), {"i_mon catch t:\n", t.sprint()}, UVM_FULL)
		end
		else if(t.rd_valid) begin
			mon_item_num += 1;
			ap.write(t);
			`uvm_info(get_type_name(), {"o_mon catch t:\n", t.sprint()}, UVM_FULL)
		end
	end
endtask : main_phase

function void amp_monitor::report_phase(uvm_phase phase);
	super.report_phase(phase);

	`uvm_info(get_type_name(), $sformatf("mon_item_num: %0d", mon_item_num), UVM_LOW)
endfunction : report_phase

task amp_monitor::collect_item(amp_seq_item t);
	if(mon_input) begin	// i_agt
		// set scaler
		if(vif.ck_mon.wr_en_i && vif.ck_mon.set_scaler_i) begin
			t.ttype 		= amp_seq_item::SET_SCALER;
			t.no			= 0;
			t.base_number	= 0;
			t.scaler		= vif.ck_mon.wr_data_i;
			t.rd_scaler		= vif.ck_mon.scaler_o;
		end
		// set base number
		else if(vif.ck_mon.wr_en_i && !vif.ck_mon.set_scaler_i) begin
			t.ttype 		= amp_seq_item::SET_BASE_NUMBER;
			t.no			= vif.ck_mon.wr_data_i[15:8];
			t.base_number	= vif.ck_mon.wr_data_i[7:0];
			t.rd_scaler		= vif.ck_mon.scaler_o;
		end
		// idle
		else begin
			t.ttype			= amp_seq_item::IDLE;
		end
	end
	else begin // o_agt
		t.rd_valid	= vif.ck_mon.rd_val_o;
		t.no		= vif.ck_mon.rd_data_o[31:24];
		t.rd_data	= vif.ck_mon.rd_data_o[23:0];
	end
endtask : collect_item

`endif // AMP_MONITOR_SV
当然,由于新增了一个控制变量,因此amp_agent.sv中的代码也需要做出对应的修改,主要是根据is_active的值对mon_input的值进行修改:
点击查看代码
if(is_active == UVM_ACTIVE) begin
    sqr = amp_sequencer::type_id::create("sqr", this);
    drv = amp_driver::type_id::create("drv", this);
    drv.vif = vif;
    mon.mon_input = 1;
end
monitor内部的代码编写也常常和端口以及时序有关。因此对每一个DUT,充分了解其工作时序和端口情况是验证工作顺利展开的前提之一。
二、reference model
在这里,先不做过多处理,因为调用DPI接口是一个相对来说不熟悉的过程,因此main_phase()中使用从输入端处的monitor获取的transaction,直接计算出放大后的结果,再将transaction转发给scoreboard。
点击查看代码
`ifndef AMP_ENV_REFM_SV
`define AMP_ENV_REFM_SV

class amp_env_refm extends uvm_component;
    `uvm_component_utils(amp_env_refm)

    uvm_blocking_get_port #(amp_seq_item)	gp;
    uvm_analysis_port #(amp_seq_item)		ap;

    amp_seq_item t;
    amp_seq_item scb_t;

    int res;

    extern function      new(string name = "amp_env_refm", uvm_component parent = null);
    extern function void build_phase(uvm_phase phase);
    extern task          main_phase(uvm_phase phase);
endclass : amp_env_refm

function amp_env_refm::new(string name = "amp_env_refm", uvm_component parent = null);
	super.new(name, parent);

	`uvm_info(get_type_name(), "created", UVM_LOW)
endfunction : new

function void amp_env_refm::build_phase(uvm_phase phase);
	super.build_phase(phase);

	gp = new("gp", this);
	ap = new("ap", this);
endfunction : build_phase

task amp_env_refm::main_phase(uvm_phase phase);
	super.main_phase(phase);

	while(1) begin
		t = new("t");
		scb_t = new("scb_t");

		gp.get(t);
		scb_t.copy(t);

		res = t.base_number*t.rd_scaler;

		scb_t.rd_data = res;
		ap.write(scb_t);
	end
endtask : main_phase

`endif // AMP_ENV_REFM_SV
三、scoreboard
计分板(scoreboard)的功能也比较单一:分别拿到从reference model和从DUT输出的数据,进行比较。数据都从FIFO中获取。
点击查看代码
`ifndef AMP_ENV_SCB_SV
`define AMP_ENV_SCB_SV

class amp_env_scb extends uvm_scoreboard;
    `uvm_component_utils(amp_env_scb);

    uvm_blocking_get_port #(amp_seq_item) exp_gp;
    uvm_blocking_get_port #(amp_seq_item) act_gp;

    amp_seq_item exp_t, act_t;

    int success_num, failure_num;

    extern function      new(string name = "amp_env_scb", uvm_component parent = null);
    extern function void build_phase(uvm_phase phase);
    extern task          main_phase(uvm_phase phase);
    extern function void report_phase(uvm_phase phase);
endclass : amp_env_scb

function amp_env_scb::new(string name = "amp_env_scb", uvm_component parent = null);
	super.new(name, parent);

	`uvm_info(get_type_name(), "created", UVM_LOW)
endfunction : new

function void amp_env_scb::build_phase(uvm_phase phase);
	super.build_phase(phase);

	exp_gp = new("exp_gp", this);
	act_gp = new("act_gp", this);

	success_num = 0;
	failure_num = 0;
endfunction : build_phase

task amp_env_scb::main_phase(uvm_phase phase);
	super.main_phase(phase);

	while(1) begin
		exp_gp.get(exp_t);
		act_gp.get(act_t);
		if(exp_t.no != act_t.no)
			`uvm_info(get_type_name(), $sformatf("no is different, exp_t.no: %0d, act_t.no: %0d", exp_t.no, act_t.no), UVM_LOW)
		else begin
			if(exp_t.rd_data == act_t.rd_data)
				success_num += 1;
			else begin
				failure_num += 1;
				`uvm_info(get_type_name(), $sformatf("exp_t: scaler: %0d, base_number: %0d, exp_res: %0d", exp_t.rd_scaler, exp_t.base_number, exp_t.rd_data), UVM_LOW)
				`uvm_info(get_type_name(), $sformatf("act_t: scaler: %0d, base_number: %0d, act_res: %0d", act_t.rd_scaler, act_t.base_number, act_t.rd_data), UVM_LOW)
				`uvm_error("SCORE ERROR", "actual rd_data is not equal with expect rd_data")
			end
		end
	end
endtask : main_phase

function void amp_env_scb::report_phase(uvm_phase phase);
	super.report_phase(phase);

	`uvm_info(get_type_name(), $sformatf("success_num: %0d", success_num), UVM_LOW)
	`uvm_info(get_type_name(), $sformatf("failure_num: %0d", failure_num), UVM_LOW)
endfunction : report_phase

`endif // AMP_ENV_SCB_SV
当然,在最后的report_phase()中,会输出比较结果,可以使用该结果与monitor中report_phase()的输出结果进行比对,实现简单的debug。
四、FIFO的创建和连接
从验证结构和上述的代码中,已经默认使用到了FIFO,不然不会定义那么多TLM端口。
作为与env内部组件之间的通信的一部分,FIFO自然需要在env下进行创建和连接。根据验证结构,env中需要三个FIFO。在amp_env.sv中新增三个uvm_tlm_analysis_fifo型成员变量,例化后在connect_phase()中完成连接。
点击查看代码
`ifndef AMP_ENV_SV
`define AMP_ENV_SV

class amp_env extends uvm_env;
    `uvm_component_utils(amp_env)

    amp_agent_config agt_cfg;

    amp_env_refm    refm;
    amp_env_scb     scb;
    amp_agent       i_agt;
    amp_agent       o_agt;


    uvm_tlm_analysis_fifo #(amp_seq_item) iagt_refm_fifo;
    uvm_tlm_analysis_fifo #(amp_seq_item) oagt_scb_fifo;
    uvm_tlm_analysis_fifo #(amp_seq_item) refm_scb_fifo;

    extern function      new(string name = "amp_env", uvm_component parent = null);
    extern function void build_phase(uvm_phase phase);
    extern function void connect_phase(uvm_phase phase);
    extern function void report_phase(uvm_phase phase);
endclass : amp_env

function amp_env::new(string name = "amp_env", uvm_component parent = null);
    super.new(name, parent);

    `uvm_info(get_type_name(), "created", UVM_LOW)
endfunction : new

function void amp_env::build_phase(uvm_phase phase);
    super.build_phase(phase);

    if(!uvm_config_db #(amp_agent_config)::get(this, "", "agt_cfg", agt_cfg))
        `uvm_error("NO CONFIG", $sformatf("No config for: %s. Check tests", get_full_name()))

    refm  = amp_env_refm::type_id::create("refm", this);
    scb   = amp_env_scb::type_id::create("scb", this);
    i_agt = amp_agent::type_id::create("i_agt", this);
    i_agt.is_active = agt_cfg.i_agt_is_active;
    o_agt = amp_agent::type_id::create("o_agt", this);
    o_agt.is_active = agt_cfg.o_agt_is_active;

    iagt_refm_fifo = new("iagt_refm_fifo", this);
	oagt_scb_fifo = new("oagt_scb_fifo", this);
	refm_scb_fifo = new("refm_scb_fifo", this);
endfunction : build_phase

function void amp_env::connect_phase(uvm_phase phase);
	super.connect_phase(phase);

	i_agt.mon.ap.connect(iagt_refm_fifo.analysis_export);
	refm.gp.connect(iagt_refm_fifo.blocking_get_export);

	o_agt.mon.ap.connect(oagt_scb_fifo.analysis_export);
	scb.act_gp.connect(oagt_scb_fifo.blocking_get_export);

	refm.ap.connect(refm_scb_fifo.analysis_export);
	scb.exp_gp.connect(refm_scb_fifo.blocking_get_export);
endfunction : connect_phase

function void amp_env::report_phase(uvm_phase phase);
	super.report_phase(phase);

	if(i_agt.mon.mon_item_num == o_agt.mon.mon_item_num)
		`uvm_info(get_type_name(), "mon_item_num check ok", UVM_LOW)
	else
		`uvm_error("ENV ERROR", "mon_item_num check error")
endfunction : report_phase

`endif // AMP_ENV_SV
FIFO的连接其实就是“看人下菜碟”:根据自己的需要选择FIFO上对应的端口即可。这一点无论是对FIFO,还是对之前组件中用到的TLM来说都是一样的。
在env中,使用到了report_phase(),该phase在这里的主要作用是比对i_agt和o_agt各自处理的transaction数目。一般来说,这两者应当相等。如果不相等,则可能出现了逻辑错误等问题。
在env中进行比较是因为这两个值分别在不同的monitor中。作为上层组件的env,自然能很方便地获取到不同agent中的信息;而在agent的不同例化:i_agt和o_agt中,两者都不能互相获取到对方的transaction处理数目。因此这一比较工作需要在env中完成。
五、运行
由于在reference model中已经计算了结果,因此最终的比较结果应该以“success”占了绝大多数。
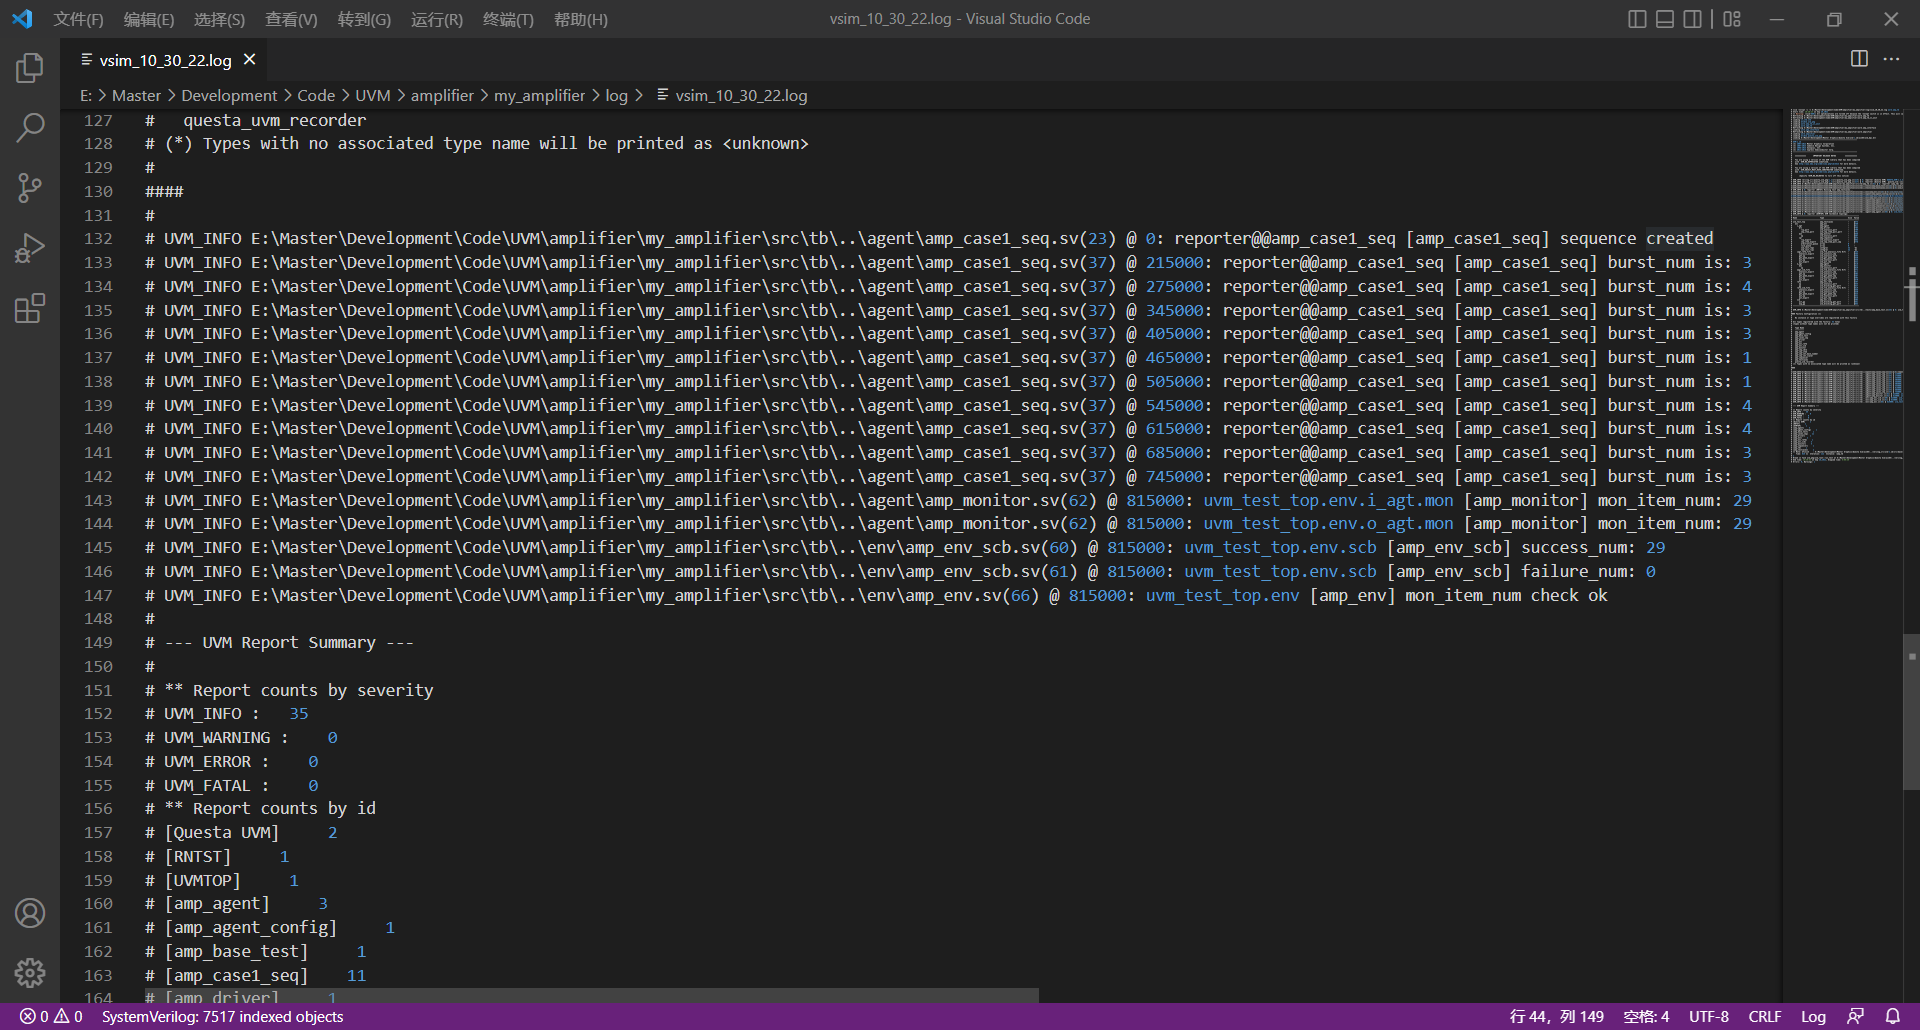
可以看到,此次仿真中,i_agt中的monitor捕获到了29个有效transaction,o_agt中的monitor同样捕获到了29个有效transaction。事实上,这里计算burst_num的累计和,也能发现其结果等于29(3+4+3+3+1+1+4+4+3+3)。
经过scoreboard比对后发现两者transaction的计算结果相同,可以认为整个仿真环境搭建成功。
至此,整个验证平台搭建完成,之后会在Linux上进行优化。
本文来自博客园,作者:TooyamaYuuouji,转载请注明原文链接:https://www.cnblogs.com/Lexington-CV2/articles/16651117.html

 浙公网安备 33010602011771号