
一个简单的UVM项目的学习记录(二)——搭建验证框架
一、创建接口
在agent文件夹下创建一个名为amp_interface.sv的文件。amp字段代表着这个DUT的名字。interface主要是用来连接DUT和各个组件。在刚开始时,只需要定义好与DUT端口相匹配的变量即可。
标准的接口定义,其输入变量只有时钟信号和复位信号,而内部变量无需再有时钟信号和复位信号。
点击查看代码
`ifndef AMP_INTERFACE_SV
`define AMP_INTERFACE_SV

interface amp_interface(input bit clk_i, bit rstn_i);
    logic        wr_en_i;
    logic        set_scaler_i;
    logic [15:0] wr_data_i;

    logic        rd_val_o;
    logic [31:0] rd_data_o;
    logic [15:0] scaler_o;
endinterface : amp_interface

`endif // AMP_INTERFACE_SV
二、激励文件的编写
个人而言,我喜欢从下到上编写代码。在整个验证环境中,最小的部分应该就是transaction了,因此从transaction开始。当然,这里只是简单的编写,后期还会对其进行完善。
2.1 transaction
在agent文件夹中创建一个名为amp_seq_item.sv的文件,该文件用来控制激励所需的具体数据和控制要求。
在一开始的时候,可以不用急着编写transaction内部的各种变量和约束。先搭好框架,再回来完成激励的编写也不迟。在搭建框架的阶段,尽量不要把事情弄得过于复杂。
点击查看代码
`ifndef AMP_SEQ_ITEM_SV
`define AMP_SEQ_ITEM_SV

class amp_seq_item extends uvm_sequence_item;
    `uvm_object_utils(amp_seq_item)

    extern function new(string name = "amp_seq_item");
endclass : amp_seq_item

function amp_seq_item::new(string name = "amp_seq_item");
    super.new(name);

    `uvm_info(get_type_name(), "created", UVM_HIGH)
endfunction : new

`endif // AMP_SEQ_ITEM_SV
2.2 sequence
在agent文件夹中创建一个名为amp_seq.sv的文件,该文件用来完成激励生成和场景控制。
由于sequence之间允许存在嵌套关系,因此有时为了构建更加丰富的激励场景,会将这个文件先命名为amp_base_seq.sv,然后其他sequence继承于该base_sequence来产生激励。这里我则不使用base字段。
sequence和transaction一样,一开始也不需要详细编写,搭好框架即可。
点击查看代码
`ifndef AMP_SEQ_SV
`define AMP_SEQ_SV

class amp_seq extends uvm_sequence #(amp_seq_item);
    `uvm_object_utils(amp_seq)

    extern function new(string name = "amp_seq");
endclass : amp_seq

function amp_seq::new(string name = "amp_seq");
    super.new(name);

    `uvm_info(get_type_name(), "created", UVM_HIGH)
endfunction : new

`endif // AMP_SEQ_SV
2.3 sequencer
在《UVM实战卷I》中,将sequencer比喻成枪,sequence比喻成弹匣,transaction比喻成一个个的子弹。子弹和弹匣用完是可以扔的,但枪不行,因此sequencer是激励“三兄弟”里面唯一的一个组件(component)。
在agent文件夹中创建一个名为amp_sequencer.sv的文件,该文件用于创建sequencer。一般来说,sequencer不需要写过多代码,现在写好的sequencer在之后不会有任何改动。
点击查看代码
`ifndef AMP_SEQUENCER_SV
`define AMP_SEQUENCER_SV

class amp_sequencer extends uvm_sequencer #(amp_seq_item);
    `uvm_component_utils(amp_sequencer)

    extern function new(string name = "amp_sequencer", uvm_component parent = null);
endclass : amp_sequencer

function amp_sequencer::new(string name = "amp_sequencer", uvm_component parent = null);
    super.new(name, parent);

    `uvm_info(get_type_name(), "created", UVM_LOW)
endfunction : new

`endif // AMP_SEQUENCER_SV
三、agent及其内部组件
3.1 driver
与sequencer连接最紧密的组件,就是driver了。同样的,在agent文件夹中创建一个名为amp_driver.sv的文件,该文件用于创建driver。
driver需要用到接口变量。从验证结构可以知道,driver是一个在agent内部的组件,因此这个接口变量可以由agent向driver传递。因此在driver中定义了一个接口变量。
点击查看代码
`ifndef AMP_DRIVER_SV
`define AMP_DRIVER_SV

class amp_driver extends uvm_driver #(amp_seq_item);
    virtual amp_interface vif = null;

    `uvm_component_utils(amp_driver)

    extern function new(string name = "amp_driver", uvm_component parent = null);
endclass : amp_driver

function amp_driver::new(string name = "amp_driver", uvm_component parent = null);
    super.new(name, parent);

    `uvm_info(get_type_name(), "created", UVM_LOW)
endfunction : new

`endif // AMP_DRIVER_SV
3.2 monitor
在agent文件夹中创建一个名为amp_monitor.sv的文件,该文件用于创建monitor。
monitor与driver有些类似,由于需要监视总线上的信号,因此其也需要获得接口,采取的获取方式同样是由agent进行变量传递。
点击查看代码
`ifndef AMP_MONITOR_SV
`define AMP_MONITOR_SV

class amp_monitor extends uvm_monitor;
    virtual amp_interface vif = null;

    `uvm_component_utils(amp_monitor)

    extern function new(string name = "amp_monitor", uvm_component parent = null);
endclass : amp_monitor

function amp_monitor::new(string name = "amp_monitor", uvm_component parent = null);
    super.new(name, parent);

    `uvm_info(get_type_name(), "created", UVM_LOW)
endfunction : new

`endif // AMP_MONITOR_SV
3.3 agent
在agent文件夹中创建一个名为amp_agent.sv的文件,该文件用于创建agent。
根据验证结构,DUT的输入和输入都需要agent,但是这两个agent内部的组件却是不一样的。DUT输入部分的agent不妨称之为i_agt,其内部拥有sequencer、driver和monitor这三个组件,而输出部分的agent——o_agt,则只需要一个monitor监测interface上的信号即可,并不需要其他组件。因此,需要一个变量来控制agent的例化过程。
为了实现这一功能,UVM的agent自带一个成员变量is_active,该成员变量的类型是uvm_active_passive_enum。通过对这个变量进行判断,就能够改变agent例化时的行为。
当然,为了测试的灵活性,这个变量肯定需要想办法从更高层次的组件甚至是tb文件中获取。获取方式一般是直接使用config_db机制或是在上层组件中使用config_db机制辅以变量传递。
3.3.1 agent的配置文件
在agent文件夹中创建一个名为amp_agent_config.sv的文件,该文件用于对agent进行配置。
配置文件一般来说是一个对象(object),UVM并未对其创建一个特殊的父类,因此需要直接继承自uvm_object。就像接口一样,配置文件的实例通过config_db机制进行传递。通常配置文件中都只需要放置一些变量,因此其内容非常简单。
点击查看代码
`ifndef AMP_AGENT_CONFIG_SV
`define AMP_AGENT_CONFIG_SV

class amp_agent_config extends uvm_object;
    uvm_active_passive_enum i_agt_is_active = UVM_PASSIVE;
    uvm_active_passive_enum o_agt_is_active = UVM_PASSIVE;

    `uvm_object_utils(amp_agent_config)

    extern function new(string name = "amp_agent_config");
endclass : amp_agent_config

function amp_agent_config::new(string name = "amp_agent_config");
    super.new(name);

    `uvm_info(get_type_name(), "created", UVM_LOW)
endfunction : new

`endif // AMP_AGENT_CONFIG_SV
3.3.2 agent本身
虽然配置文件和agent在同一个文件夹下,但正常情况下agent不能直接使用配置文件中的变量。在这里,我采用在上层组件(一般是env)中利用config_db的get()函数获取agent的配置文件,然后再进行变量传递的方式来完成对agent行为的控制。
这里使用到了config_db机制。一般说来,get()函数的使用方式都比较固定,因此可以在build_phase()直接编写相应的代码来获取接口变量。
需要注意的是,一定要记得在上层组件中传入该接口变量。可以先在手边的备忘录上记上一笔,免得忘记。
点击查看代码
`ifndef AMP_AGENT_SV
`define AMP_AGENT_SV

class amp_agent extends uvm_agent;
    virtual amp_interface vif;

    amp_sequencer   sqr;
    amp_driver      drv;
    amp_monitor     mon;

    `uvm_component_utils(amp_agent)

    extern function      new(string name = "amp_agent", uvm_component parent = null);
    extern function void build_phase(uvm_phase phase);
endclass : amp_agent

function amp_agent::new(string name = "amp_agent", uvm_component parent = null);
    super.new(name, parent);

    `uvm_info(get_type_name(), "created", UVM_LOW)
endfunction : new

function void amp_agent::build_phase(uvm_phase phase);
    super.build_phase(phase);

    if(!uvm_config_db #(virtual amp_interface)::get(this, "", "vif", vif))
        `uvm_error("NO VIF", {"virtual interface must be set for: ", get_full_name()})

    mon = amp_monitor::type_id::create("mon", this);
    mon.vif = vif;

    if(is_active == UVM_ACTIVE) begin
        sqr = amp_sequencer::type_id::create("sqr", this);
        drv = amp_driver::type_id::create("drv", this);
        drv.vif = vif;
    end
endfunction : build_phase

`endif // AMP_AGENT_SV
四、env及其内部组件
env,即environment的缩写,是容纳与agent同级别的组件、并进行组件间连接的场所。由于已经编写好了agent,因此这里从其他组件开始。
4.1 refm
在env文件夹中创建一个名为amp_env_refm.sv的文件,该文件用于模仿DUT的行为。refm字段是reference model的缩写,其使用i_agt产生的激励,利用由高级语言(C、C++等)写成参考模型,产生输出并将其传给scoreboard。
UVM出于通用性的考虑,并没有为refm设计一个父类,而是直接继承于uvm_component。不考虑组件间的通信,也不考虑如何调用参考模型的输出,先创建一个refm的空壳待用。
点击查看代码
`ifndef AMP_ENV_REFM_SV
`define AMP_ENV_REFM_SV

class amp_env_refm extends uvm_component;
    `uvm_component_utils(amp_env_refm)

    extern function new(string name = "amp_env_refm", uvm_component parent = null);
endclass : amp_env_refm

function amp_env_refm::new(string name = "amp_env_refm", uvm_component parent = null);
    super.new(name, parent);

    `uvm_info(get_type_name(), "created", UVM_LOW)
endfunction : new

`endif // AMP_ENV_REFM_SV
4.2 scb
在env文件夹中创建一个名为amp_env_scb.sv的文件,该文件用于比对在相同激励下,DUT的输出和参考模型的输出。scb字段是scoreboard的缩写。
在amp_env_refm.sv文件中,我们并未添加由高级语言写成的参考模型,自然在该文件中,也不需要考虑信号的处理,有一个构造函数即可。
点击查看代码
`ifndef AMP_ENV_SCB_SV
`define AMP_ENV_SCB_SV

class amp_env_scb extends uvm_scoreboard;
    `uvm_component_utils(amp_env_scb)

    extern function new(string name = "amp_env_scb", uvm_component parent = null);
endclass : amp_env_scb

function amp_env_scb::new(string name = "amp_env_scb", uvm_component parent = null);
    super.new(name, parent);

    `uvm_info(get_type_name(), "created", UVM_LOW)
endfunction : new

`endif // AMP_ENV_SCB_SV
4.3 env
在env文件夹中创建一个名为amp_env.sv的文件,该文件用于创建env,并例化reference model、scoreboard和agent,建立起它们之间的连接,以及完成配置方面的工作。
正如在agent的部分所说的那样,agent所需的配置变量agt_cfg将在env中获取然后传递给agent,而agt_cfg的创建将在tests文件夹下的文件中完成。
点击查看代码
`ifndef AMP_ENV_SV
`define AMP_ENV_SV

class amp_env extends uvm_env;
    amp_agent_config agt_cfg;

    amp_env_refm    refm;
    amp_env_scb     scb;
    amp_agent       i_agt;
    amp_agent       o_agt;

    `uvm_component_utils(amp_env)

    extern function      new(string name = "amp_env", uvm_component parent = null);
    extern function void build_phase(uvm_phase phase);
endclass : amp_env

function amp_env::new(string name = "amp_env", uvm_component parent = null);
    super.new(name, parent);

    `uvm_info(get_type_name(), "created", UVM_LOW)
endfunction : new

function void amp_env::build_phase(uvm_phase phase);
    super.build_phase(phase);

    if(!uvm_config_db #(amp_agent_config)::get(this, "", "agt_cfg", agt_cfg))
        `uvm_error("NO CONFIG", $sformatf("No config for: %s. Check tests", get_full_name()))

    refm  = amp_env_refm::type_id::create("refm", this);
    scb   = amp_env_scb::type_id::create("scb", this);
    i_agt = amp_agent::type_id::create("i_agt", this);
    i_agt.is_active = agt_cfg.i_agt_is_active;
    o_agt = amp_agent::type_id::create("o_agt", this);
    o_agt.is_active = agt_cfg.o_agt_is_active;
endfunction : build_phase

`endif // AMP_ENV_SV
五、tests
5.1 base_test
在tests文件夹中创建一个名为amp_base_test.sv的文件,该文件用于创建一个基本的测试用例。
这里的基本,意思是之后所有的测试用例,都应当继承于这个基类,而非uvm_test。因此这个基类应当只具有最基本的功能,包括例化env,设置通用的config,打印信息等。
在base_test中,我用到了end_of_elaboration_phase(),该phase在connect_phase()之后运行。使用这个phase调用系统函数,打印出当前的冗余度和UVM结构树。
点击查看代码
`ifndef AMP_BASE_TEST_SV
`define AMP_BASE_TEST_SV

class amp_base_test extends uvm_test;
    amp_env          env;
    amp_agent_config agt_cfg;

    `uvm_component_utils(amp_base_test)

    extern function      new(string name = "amp_base_test", uvm_component parent);
    extern function void build_phase(uvm_phase phase);
    extern function void end_of_elaboration_phase(uvm_phase phase);
endclass : amp_base_test

function amp_base_test::new(string name = "amp_base_test", uvm_component parent);
    super.new(name, parent);

    `uvm_info(get_type_name(), "created", UVM_LOW)
endfunction : new

function void amp_base_test::build_phase(uvm_phase phase);
    super.build_phase(phase);

    env = amp_env::type_id::create("env", this);
    agt_cfg = amp_agent_config::type_id::create("agt_cfg");
    agt_cfg.i_agt_is_active = UVM_ACTIVE;

    uvm_config_db #(amp_agent_config)::set(this, "env", "agt_cfg", agt_cfg);
endfunction : build_phase

function void amp_base_test::end_of_elaboration_phase(uvm_phase phase);
    super.end_of_elaboration_phase(phase);

    uvm_top.print_topology();
    `uvm_info(get_type_name(), $sformatf("Verbosity level is set to: %d", get_report_verbosity_level()), UVM_LOW)
    factory.print();
endfunction : end_of_elaboration_phase

`endif // AMP_BASE_TEST_SV
5.2 testcase
测试用例继承于base_test。这里我们还不知道需要几个测试用例,暂时先写一个空的testcase。
在tests文件夹中创建一个名为amp_testcase1.sv的文件,该文件用于创建一个"1号"测试用例。
点击查看代码
`ifndef AMP_TESTCASE1_SV
`define AMP_TESTCASE1_SV

class amp_testcase1 extends amp_base_test;
    `uvm_component_utils(amp_testcase1)

    extern function new(string name = "amp_testcase1", uvm_component parent = null);
endclass : amp_testcase1

function amp_testcase1::new(string name = "amp_testcase1", uvm_component parent = null);
    super.new(name, parent);

    `uvm_info(get_type_name(), "created", UVM_LOW)
endfunction : new

`endif // AMP_TESTCASE1_SV
六、tb
6.1 索引文件
在tb文件夹中创建一个名为amp_pkg.svh的文件,该文件用于索引并包含所有的sv文件,以及决定编译顺序。
如果没有这个索引文件,tb文件将无法找到其他sv文件的位置,自然会报错。
这个索引文件,最需要注意的地方就是文件的包含顺序,需要按照包含顺序从上到下依次导入,否则编译的时候就会报错。
点击查看代码
`include "../agent/amp_interface.sv"
`include "../agent/amp_seq_item.sv"
`include "../agent/amp_seq.sv"
`include "../agent/amp_sequencer.sv"
`include "../agent/amp_agent_config.sv"
`include "../agent/amp_driver.sv"
`include "../agent/amp_monitor.sv"
`include "../agent/amp_agent.sv"

`include "../env/amp_env_refm.sv"
`include "../env/amp_env_scb.sv"
`include "../env/amp_env.sv"

`include "../tests/amp_base_test.sv"
`include "../tests/amp_testcase1.sv"
6.2 tb文件
tb是testbench的缩写,是整个验证中的顶层文件。tb文件的编写没啥可说的,和之前的那个测试用tb相比,只是多了索引文件的引入和接口变量的传递。
在tb文件夹中创建一个名为amp_tb.sv的文件。根据接口文件的定义,tb文件中只需要实现时钟信号和复位信号的时序即可。将clk和rst_n传递给接口变量,并利用接口连接DUT,最后使用config_db将接口文件传递分别传递给两个agent。最后加上UVM的入口,run_test(),tb文件就编写好了。
点击查看代码
`timescale 1ns/1ps

import uvm_pkg::*;

`include "uvm_macros.svh"
`include "amp_pkg.svh"

parameter T = 10;

module amp_tb;
    bit clk, rst_n;

    amp_interface itf(clk, rst_n);

    amplifier dut(
        .clk_i          (clk)               ,
        .rstn_i         (rst_n)             ,
        .wr_en_i        (itf.wr_en_i)       ,
        .set_scaler_i   (itf.set_scaler_i)  ,
        .wr_data_i      (itf.wr_data_i)     ,
        .rd_val_o       (itf.rd_val_o)      ,
        .rd_data_o      (itf.rd_data_o)     ,
        .scaler_o       (itf.scaler_o)
    );

    initial begin
        rst_n <= 1'b0;
        #(10*T);
        rst_n <= 1'b1;
    end

    initial begin
        clk <= 1'b0;
        forever begin
            #(T/2) clk <= ~clk;
        end
    end

    initial begin
        uvm_config_db #(virtual amp_interface)::set(null, "uvm_test_top.env.i_agt", "vif", itf);
        uvm_config_db #(virtual amp_interface)::set(null, "uvm_test_top.env.o_agt", "vif", itf);
    end

    initial begin
        run_test("amp_base_test");
    end
endmodule : amp_tb
七、运行
将所有的框架搭建起来后,在Questa Sim中导入文件,并编译amp_tb.sv文件,发现没报错,仿真并运行。
在命令行窗口可以看到许多输出,其中最显眼的就是这个UVM结构树了:
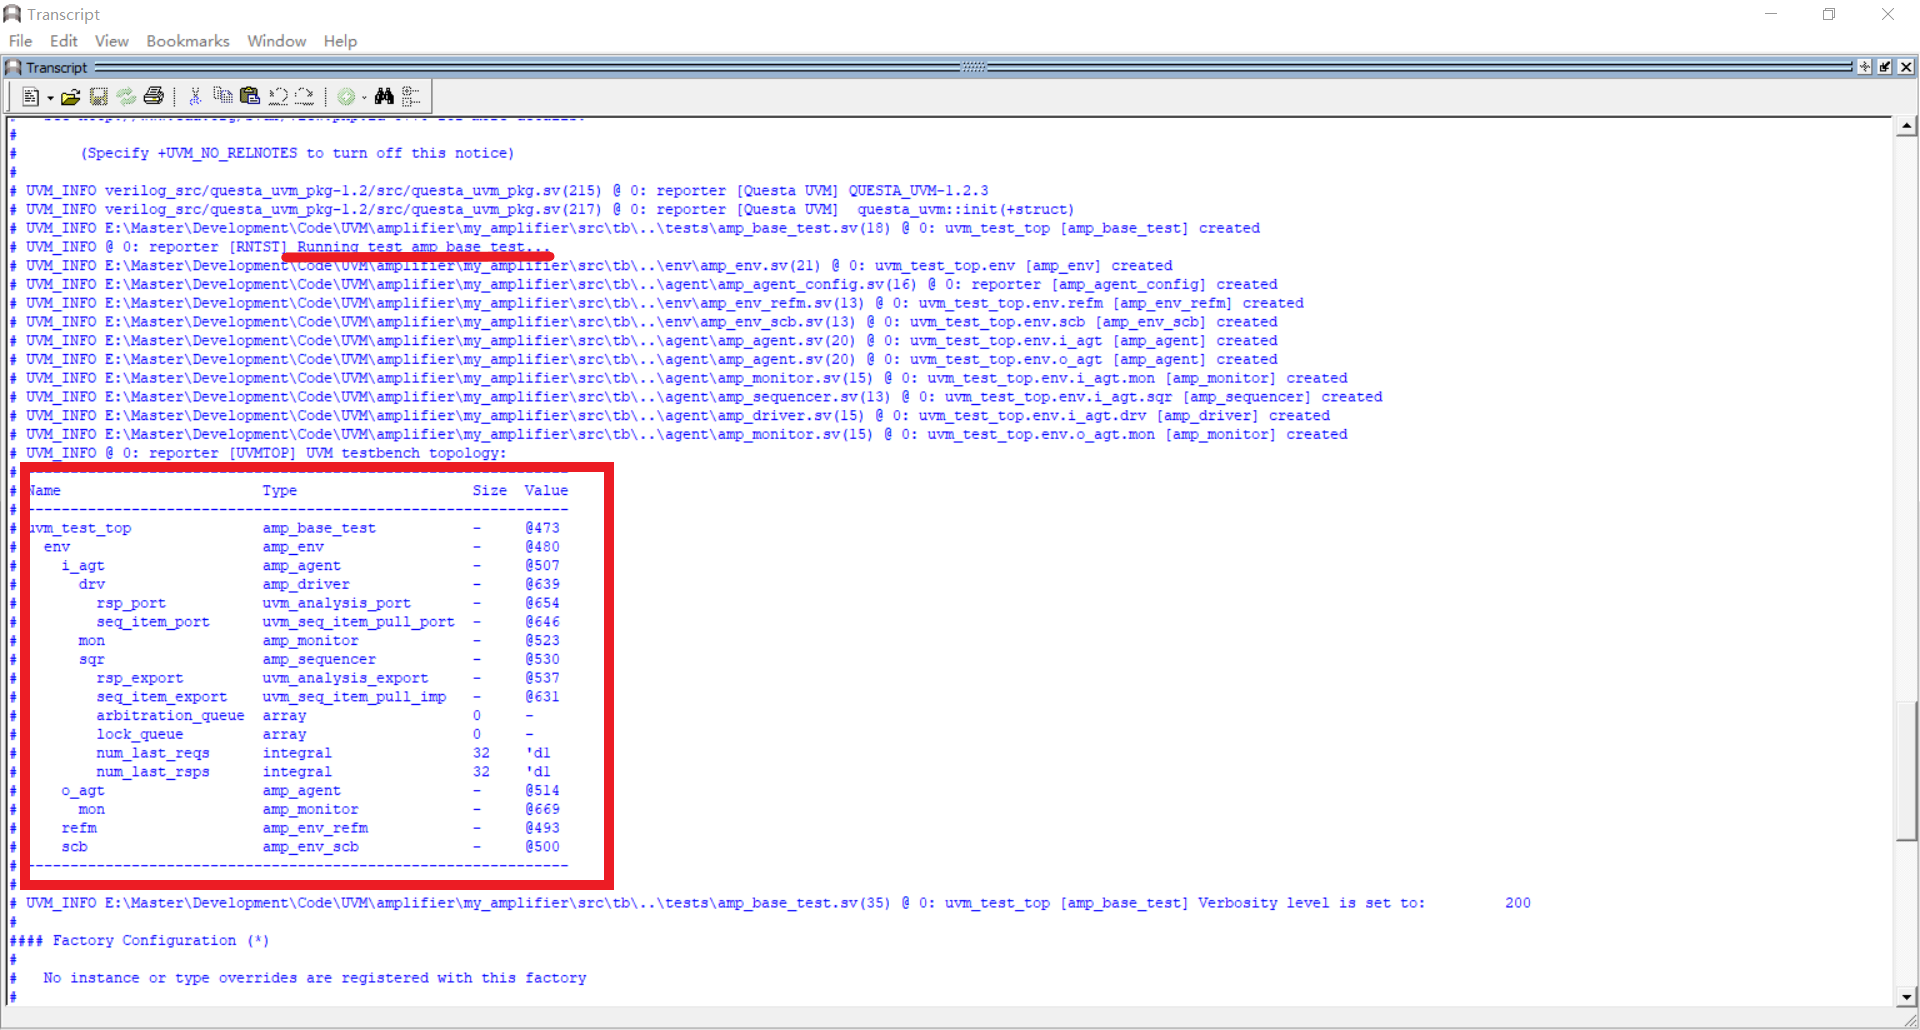
可以发现,该结构树和验证结构基本相同。
上图中,从画横线的地方可以知道,此时执行的测试用例确确实实是base_test。
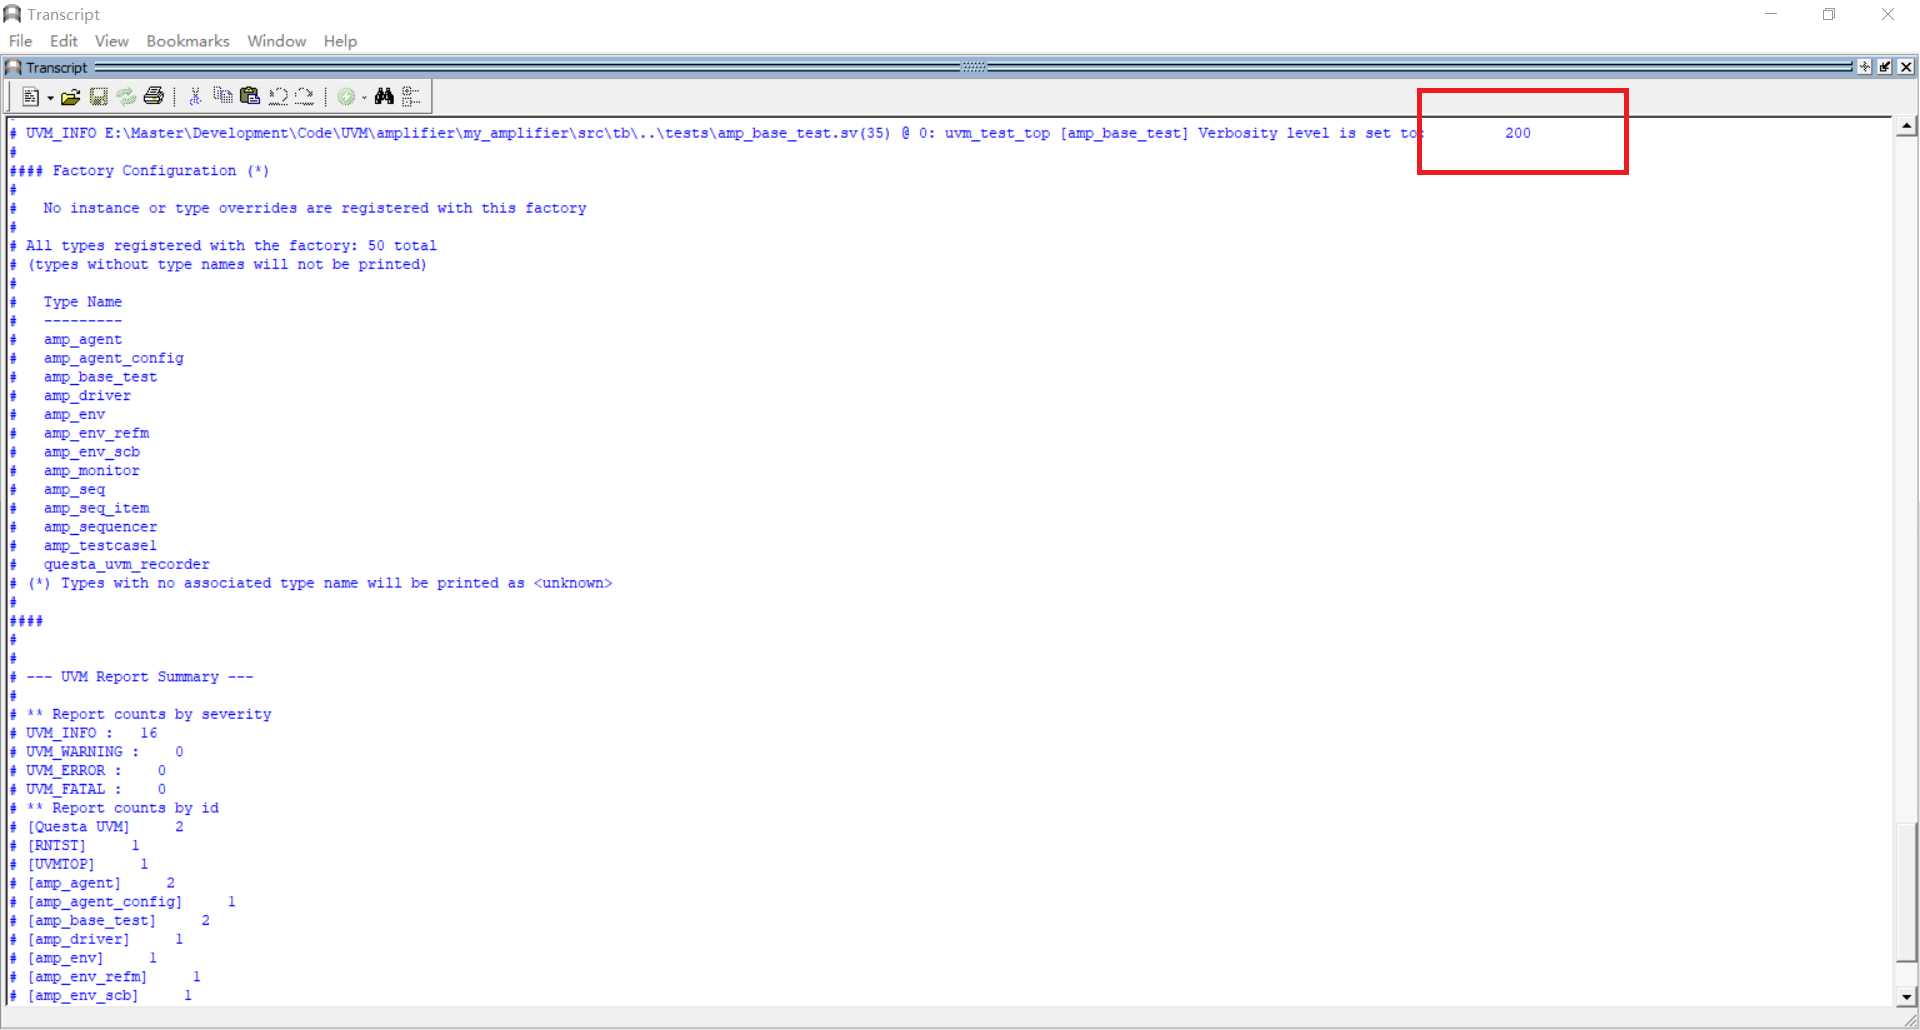
下面这张图则展示了在该测试用例中,设定的打印信息冗余度。此时的冗余度为200。按照UVM的冗余度级别,200对应着UVM_MEDIUM,因此高于200的冗余度级别——UVM_HIGH、UVM_FULL、UVM_DEBUG所对应的信息都不会被打印出来,这一点可以在amp_seq.sv等文件以及打印信息中得到验证。
本文来自博客园,作者:TooyamaYuuouji,转载请注明原文链接:https://www.cnblogs.com/Lexington-CV2/articles/16614045.html

 浙公网安备 33010602011771号