

十分钟学会什么是async和await
早上无意中看到了async和await关键字,花了十几分钟看了一下msdn,大概明白了是什么一个东西,和大家分享一下。
await关键字的中文是期待的意思。在我们编程中想表达“我待会期待这里会有一个值,但我不是现在就要,我先去做其他事情,你完成的时候告诉我”。其实异步模式非常符合现实中场景,现实生活中还真的很少东西是同步的。等车的时候没事干可以拿手机出来玩一下,首发下邮件,而不是直愣愣的干在那里等着车过来。
话说回来,在C# 5中借助await可以更好的辅助我们进行异步编程模式的开发,通过改变执行流程,使得异步执行看起来更像同步执行。
我直接拿msdn里的代码和图来举例吧。

    public partial class MainWindow : Window
    {
        private async void StartButton_Click(object sender, RoutedEventArgs e)
        {
            int contentLength = await AccessTheWebAsync();

            resultsTextBox.Text +=
                String.Format("\r\nLength of the downloaded string: {0}.\r\n", contentLength);
        }

        async Task<int> AccessTheWebAsync()
        {

            HttpClient client = new HttpClient();

            Task<string> getStringTask = client.GetStringAsync("http://msdn.microsoft.com");

            DoIndependentWork();

            string urlContents = await getStringTask;
            return urlContents.Length;
        }


        void DoIndependentWork()
        {
            resultsTextBox.Text += "Working . . . . . . .\r\n";
        }
    }
可以从图中看出,和正常的执行流程是不一样的,我们甚至还会回到“看似已经执行完的方法中”,接着await下面执行

但其实这也不难理解,如果你用过yield return的话。可以看做执行到await的时候方法就可以返回了,等await后面的动作执行完以后我们再回来继续执行下面的步骤。
但天有不测风云,壮士有可能一去不复返,改一下StartButton_Click代码,看下面的这个情况
1         private async void StartButton_Click(object sender, RoutedEventArgs e)
2         {
3             int contentLength = AccessTheWebAsync().Result;
4
5             resultsTextBox.Text +=
6                 String.Format("\r\nLength of the downloaded string: {0}.\r\n", contentLength);
7         }
我们调用了task的Result,这个属性内部会调用await的方法,也就是会阻塞线程,也就是说线程执行到第3行的时候,就会被阻塞了(阻塞线程是罪大恶极的事情,要牢记在心)。一直等待AccessTheWebAsync()方法完成。
但是AccessTheWebAsync()能完成吗?答案是不能!因为AccessTheWebAsync方法需要依赖这个已经被阻塞的线程回去完成。好吧,一个互相等待的死锁出现了。
你妈妈喊你回家吃饭,快点来接着执行await下面的代码

我靠,我被Result定住了,没办法回去了。

。。。。。。。。
不指定SynchronizationContext
要解决这个问题,就要知道为什么会产生这种情况。
要产生这种情况需要满足两个条件,
1.我指定了要接下来执行下面代码的SynchronizationContext
2.SynchronizationContext里面包含的所有线程被阻塞
SynchronizationContext是什么东西呢?简单来说就是.NET提供的一个类,能让任务在指定的线程里面运行。详细的话看我的这篇多线程之旅七——GUI线程模型,消息的投递(post)与处理(IOS开发前传)
一些SynchronizationContext只封装了单独的一个线程,比如UI thead, 还有一些封装的是一组线程,比如说线程池,可以挑选任意一个线程池的线程来完成指定的任务。
所以说为啥这里悲剧了?因为UI thread所在的SynchronizationContexts只有它这么一个独苗,一旦它被阻塞,就没辙了。
所以解决这种问题的方式有这些,一个就是在await 指定的时候,选择”哥不care你那个线程回来执行,反正来线程啊!“
 1         async Task<int> AccessTheWebAsync()
 2         {
 3
 4             HttpClient client = new HttpClient();
 5
 6             Task<string> getStringTask = client.GetStringAsync("http://msdn.microsoft.com");
 7
 8             DoIndependentWork();
 9
10             string urlContents = await getStringTask.ConfigureAwait(false)
;
11             return urlContents.Length;
12         }
第10行新加的.ConfigureAwait(false) 表达的就是这个意思,也就是我不在乎你接下来执行的线程是什么线程,来自哪个SynchronizationContext。默认是true,也就是我指定就要原来的那个SynchronizationContext,其他的宁可死也不要。
第二种方式就是让它原来的SynchronizationContext本身就封装了多个线程,这样即使阻塞了一个线程,也可以调用其他线程来完成任务。
int contentLength = Task.run(AccessTheWebAsync()).Result;
觉得这样写会改变了原来的调用的话,也可以把这层封装在AccessTheWebAsync方法里,这样外部调用的方式可以保持不变。
        async Task<int> AccessTheWebAsync()
        {

            return Task.Run(async ()=> {HttpClient client = new HttpClient();

            Task<string> getStringTask = client.GetStringAsync("http://msdn.microsoft.com");

                DoIndependentWork();

                string urlContents = await getStringTask;
                return urlContents.Length;
            })

        }
好吧,如果你十分钟没看懂的话,那咱们来看看好玩的yield return,再回来看看这个await。
为什么yield return返回的是IEnumerable<T>类型?就是因为IEnumerable表达的意思是“我只关心你当前的和下一个,我不管你总共有多少”,就和数学归纳法一样,有第一个(n=1),有下一个(n+1),就能推断出所有情况。所以当我们foreach遍历一个IEnumerable类型的时候,无论是在foreach之前就计算好所有元素,还是调用一次MoveNext时才计算并返回一个,都符合这个意思。如果我们的输入序列和输出序列都是用yield return来实现的,那么就相当于构造了一条延迟执行的pipeline。恩,没错,和Linq的实现一样的道理。
C#编译器是通过一个状态机来实现的,每次调用MoveNext方法return 出去之前,都修改当前的状态,使得下次进入的时候是从其他状态进入。
    class Foo
    {
        public IEnumerable<string> AnIterator()
        {
            yield return "1";
            yield return "2";
            yield return "3";
        }
    }

    class Program
    {
        static void Main()
        {
            var collection = new Foo();
            foreach (var s in collection.AnIterator())
            {
                Console.WriteLine(s);
            }
        }
    }
通过reflactor查看编译器帮我们做的事情,我们每写一个yield return就对应产生一个分支的case
        private bool MoveNext()
        {
            switch (this.<>1__state)
            {
                case 0:
                    this.<>1__state = -1;
                    this.<>2__current = "1";
                    this.<>1__state = 1; //修改当前状态为1
                    return true;

                case 1:
                    this.<>1__state = -1;
                    this.<>2__current = "2";
                    this.<>1__state = 2; //修改当前状态为2
                    return true;

                case 2:
                    this.<>1__state = -1;
                    this.<>2__current = "3";
                    this.<>1__state = 3; //修改当前状态为3
                    return true;

                case 3:
                    this.<>1__state = -1;
                    break;
            }
            return false;
        }
其实Jeffrey Richter以前就借助过yield return实现的状态机来简化异步编程,使得它看起来像同步编程。
下面的代码yield return 1看起来是不是很像是await?
private static IEnumerator<Int32> PipeServerAsyncEnumerator(AsyncEnumerator ae) {
   // Each server object performs asynchronous operations on this pipe
   using (var pipe = new NamedPipeServerStream(
      "Echo", PipeDirection.InOut, -1, PipeTransmissionMode.Message,
      PipeOptions.Asynchronous | PipeOptions.WriteThrough)) {
      // Asynchronously accept a client connection
      pipe.BeginWaitForConnection(ae.End(), null);
      yield return 1;

      // A client connected, let's accept another client
      var aeNewClient = new AsyncEnumerator();
      aeNewClient.BeginExecute(PipeServerAsyncEnumerator(aeNewClient),
         aeNewClient.EndExecute);
      // Accept the client connection
      pipe.EndWaitForConnection(ae.DequeueAsyncResult());
      // Asynchronously read a request from the client
      Byte[] data = new Byte[1000];

    pipe.BeginRead(data, 0, data.Length, ae.End(), null);
       yield return 1;

               // The client sent us a request, process it.
       Int32 bytesRead = pipe.EndRead(ae.DequeueAsyncResult());
               // My sample server just changes all the characters to uppercase
               // But, you can replace this code with any compute-bound operation
       data = Encoding.UTF8.GetBytes(
                  Encoding.UTF8.GetString(data, 0, bytesRead).ToUpper().ToCharArray());
               // Asynchronously send the response back to the client
       pipe.BeginWrite(data, 0, data.Length, ae.End(), null);


       yield return 1;
               // The response was sent to the client, close our side of the connection
       pipe.EndWrite(ae.DequeueAsyncResult());
       } // Close happens in a finally block now!
}
终于,Jeffrey Richter在C#5里面终于用关键字await更好的实现了他的想法(他去年来上海宣讲的时候说await是他创建的)
有兴趣的话可以看看await创建的状态机长啥样干了什么
 View Code
// This is the state machine method itself void IAsyncStateMachine.MoveNext() { String result = null; // Task's result value // Compilerinserted try block ensures the state machine’s task completes try { // Assume we're logically leaving the 'try' block // If 1st time in state machine method, // execute start of original method Boolean executeFinally = true; if (m_state == 1) { m_local = m_argument; } // Try block that we had in our original code try { TaskAwaiter<Type1> awaiterType1; TaskAwaiter<Type2> awaiterType2; switch (m_state) { case 1: // Start execution of code in 'try' // Call Method1Async and get its awaiter awaiterType1 = Method1Async().GetAwaiter(); if (!awaiterType1.IsCompleted) { m_state = 0; // 'Method1Async' is completing // asynchronously m_awaiterType1 = awaiterType1; // Save the awaiter for when we come back // Tell awaiter to call MoveNext when operation completes m_builder.AwaitUnsafeOnCompleted(ref awaiterType1, ref this); // The line above invokes awaiterType1's OnCompleted which approximately // calls ContinueWith(t => MoveNext()) on the Task being awaited. // When the Task completes, the ContinueWith task calls MoveNext executeFinally = false; // We're not logically leaving the 'try' // block return; // Thread returns to caller } // 'Method1Async' completed synchronously break; case 0: // 'Method1Async' completed asynchronously awaiterType1 = m_awaiterType1; // Restore mostrecent awaiter break; case 1: // 'Method2Async' completed asynchronously awaiterType2 = m_awaiterType2; // Restore mostrecent awaiter goto ForLoopEpilog; } // After the first await, we capture the result & start the 'for' loop m_resultType1 = awaiterType1.GetResult(); // Get awaiter's result ForLoopPrologue: m_x = 0; // 'for' loop initialization goto ForLoopBody; // Skip to 'for' loop body ForLoopEpilog: m_resultType2 = awaiterType2.GetResult(); m_x++; // Increment x after each loop iteration // Fall into the 'for' loop’s body ForLoopBody: if (m_x < 3) { // 'for' loop test // Call Method2Async and get its awaiter awaiterType2 = Method2Async().GetAwaiter(); if (!awaiterType2.IsCompleted) { m_state = 1; // 'Method2Async' is completing asynchronously m_awaiterType2 = awaiterType2; // Save the awaiter for when we come back // Tell awaiter to call MoveNext when operation completes m_builder.AwaitUnsafeOnCompleted(ref awaiterType2, ref this); executeFinally = false; // We're not logically leaving the 'try' block return; // Thread returns to caller } // 'Method2Async' completed synchronously goto ForLoopEpilog; // Completed synchronously, loop around } } catch (Exception) { Console.WriteLine("Catch"); } finally { // Whenever a thread physically leaves a 'try', the 'finally' executes // We only want to execute this code when the thread logically leaves the 'try' if (executeFinally) { Console.WriteLine("Finally"); } } result = "Done"; // What we ultimately want to return from the async function } catch (Exception exception) { // Unhandled exception: complete state machine's Task with exception m_builder.SetException(exception); return; } // No exception: complete state machine's Task with result m_builder.SetResult(result); } }
恩,实现有点复杂,现在先可以不用了解,不过注释也已经写得挺明白了。
好吧,我承认十分钟学会有点标题党,但是看到这里,我想大家基本都有了个印象吧,目的达到了。
计算机是怎么样工作的?
2013-05-13 22:08 by 人若无名, 81 阅读, 0 评论, 收藏, 编辑
实验环境:Ubuntu12.04
下面我们通过 example.c 代码分别生成.cpp .s .o 和ELF可执行文件,并加载运行来分析 程序 example在CPU上执行的整个过程,并由此分析单任务计算机和多任务计算机的工作原理:
 example.c

 2 int g(int x)
 3 {
 4     return x + 3;
 5 }
 6
 7 int f(int x)
 8 {
 9     return g(x);
10 }
11 int main()
12 {
13     return f(8) + 1;16 }
一:
为了在系统上运行example.c 程序,每条C语句都必须转化为低级机器语言指令,然后这些指令按照一种称为可执行目标程序的格式打好包,并以二进制磁盘文件的形式存放起来。
在Linux系统上,从源文件到目标文件的转化是由编译器驱动程序完成的:
>gcc - o example example.cd
在这里,GCC编译器,读取源程序文件example.c 并把它翻译成一个可执行目标文件 example。
这个翻译过程分为四个阶段:
1:预处理阶段
预处理器根据以字符#开头的命令,修改原始的C程序,比如这里的example.c中的#include<stdio.h>,告诉预处理器,读取系统文件stdio.h的内容,并把它直接插入到程序文本中,结果就得到另外一个C程序。
这里可以通过命令:gcc –E –o example.cpp example.c 来查看预处理之后的程序example.cpp,打开example.cpp文件后,你会发现在原来的程序上面多了stdio.h中的内容。
2:编译阶段
编译器将文本文件example.cpp 翻译成文本文件 example.s,它包含了对应的汇编程序:
可以根据第一阶段预处理后的 example.cpp 来生成汇编程序 命令:> gcc –x cpp-output –S –o example.s example.cpp
也可以直接通过原程序生成:> gcc –S –o example.s example.c
3:汇编阶段
汇编器(as)将example.s翻译成机器语言指令,把这些指令打包成可重定位目标程序的格式,并将结果保存在目标文件example.o中,它是个二进制文件,字节编码是机器语言指令。
这阶段可以通过 第二阶段生成的example.s 来生成:>gcc –x assembler –c example.s -o example.o
也可以直接通过原程序生成: > gcc –c example.c -o example.o
> as –o example.o example.s
4:链接阶段
在example程序中,最后调用了printf函数,它是标准C库中的一个函数。printf函数存在于一个名为printf.o的单独预编译好了的目标文件中,而这个文件必须以某种方式合并到example.o程序中,链接器就是负责这些工作的。结果就得到了example文件,是一个可执行目标文件,可以被加载进内存执行。
生成可执行目标程序:可以接着第三阶段生成: >gcc -o example example.o
也可以从原程序生成: >gcc -o example example.c
此刻,example.c源程序已经被编译系统翻译成了可执行目标文件example,并存放在磁盘上,要想在linux系统上运行,我们将example文件名输入到外壳(shell)应用程序中:
> ./example
初始,shell执行它的指令,等待我们输入命令,当我们输入 ./example 后,shell 应用程序将字符读入寄存器,再存放到存储器中,然后shell执行一系列指令来加载可执行的example文件,将example目标文件中的代码和数据从磁盘复制到内存,然后处理器从main程序中的机器语言指令开始顺序执行。
二:
下面再从汇编代码的角度来具体分析程序执行过程:
 1 080483b4 <g>:
 2  80483b4:    55                       push   %ebp
 3  80483b5:    89 e5                    mov    %esp,%ebp
 4  80483b7:    8b 45 08                 mov    0x8(%ebp),%eax
 5  80483ba:    83 c0 03                 add    $0x3,%eax
 6  80483bd:    5d                       pop    %ebp
 7  80483be:    c3                       ret
 8
 9 080483bf <f>:
10  80483bf:    55                       push   %ebp
11  80483c0:    89 e5                    mov    %esp,%ebp
12  80483c2:    83 ec 04                 sub    $0x4,%esp
13  80483c5:    8b 45 08                 mov    0x8(%ebp),%eax
14  80483c8:    89 04 24                 mov    %eax,(%esp)
15  80483cb:    e8 e4 ff ff ff           call   80483b4 <g>
16  80483d0:    c9                       leave
17  80483d1:    c3                       ret
18
19 080483d2 <main>:
20  80483d2:    55                       push   %ebp
21  80483d3:    89 e5                    mov    %esp,%ebp
22  80483d5:    83 ec 04                 sub    $0x4,%esp
23  80483d8:    c7 04 24 08 00 00 00     movl   $0x8,(%esp)
24  80483df:    e8 db ff ff ff           call   80483bf <f>
25  80483e4:    83 c0 01                 add    $0x1,%eax
26  80483e7:    c9                       leave
分析之前,先介绍3个寄存器,及3个特殊指令所执行的动作:
1:esp:栈指针,总是指向栈顶 ebp:栈基址指针,指向栈底 eip:总是指向下一条要执行指令的地址
2:call 指令:执行call 指令时:会把当前eip的值压栈保存,并使得eip等于被调用函数的起始地址。
3:leave指令:执行leave指令,等于下面两条指令:
movl %ebp , %esp //使栈顶指针指向栈基指针
pop %ebp //使得栈基指针恢复为前一次保存的ebp的值
4:ret指令:等于 pop %ebp 即恢复ebp的值。
三:
下面分析指令从main函数开始执行过程中,函数栈的变换:
假设系统刚开始为该进程分配的栈状况如图1:

图 1
从main函数中第一条指令开始运行,知道运行到g函数中的add $0x3,%eax指令后,栈的状态如图2所示:
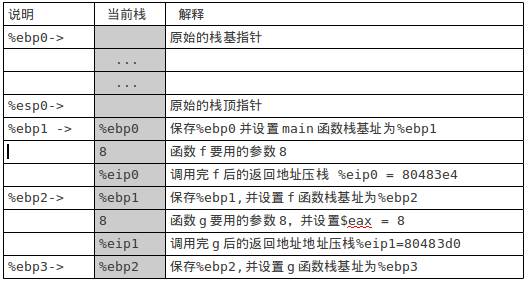
                            图2


把 x+3的计算结果11存放到%eax 中,下面进行函数返回操作:
pop  %ebp
ret
执行完上面两条指令后的栈如图3:
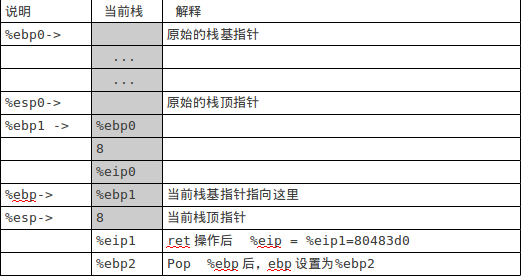
图3
当前eip= 80483d0,即跳转到f函数中的leave指令处开始执行:
leave
ret

执行完上面两条指令后,栈如图4:
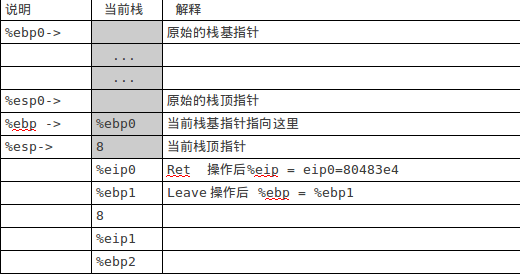
图4
当前eip=80483e4即回到了main函数中,下面执行
f(8)+1对应的操作: add $0x1,%eax
最后计算结果保存在eax中,等于12

执行leave操作后,栈如图5下:
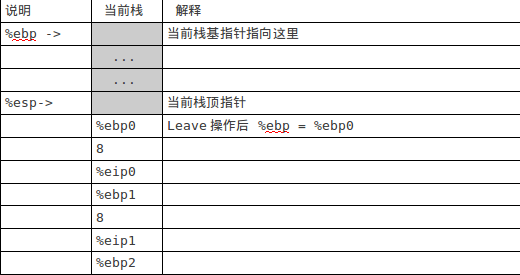
图5
从图5中可以看出,最后栈恢复之前的状态,跟图1中的原始栈一样。
下面我们根据example汇编代码的执行流程来分析单任务计算机和多任务计算机是怎么工作的:
如果把main函数 f函数 g函数看成是3个不同的任务,那么从上面的汇编代码分析可以发现 对于单任务,计算机是按顺序从起始地址一条指令接着一条指令执行的,但是这里实现了main,f,g 多任务的执行,那是通过什么机制来实现的呢?
通过上面的分析,我们不难发现是通过修改堆栈,保存任务流程断点信息(上下文:例如栈基址%ebp,和原下一条将要执行指令的地址%eip),并在将来某个时间恢复该上下文(通过pop,ret,leave操作恢复%ebp %eip的值),然后继续该任务流程”的方式,就是多任务的核心机制。
从上面的汇编代码分析中也可以看出每个任务都设有一个私有堆栈,用于保存任务流被折断(任务切换)时的堆栈内容,方便返回之前的任务继续执行。
由此可见,单任务的执行就是简单的从上到下按控制流执行。
多任务的执行是通过修改堆栈来改变任务的控制流方向实现多任务的并发执行。

 浙公网安备 33010602011771号