个人技术博客
目录:
技术概述
- 我在我的团队中负责部分安卓界面的开发,学习了Android界面设计。对于界面的设计不是非常熟悉,一些控件的实现设置不知道怎样完成,后面在查阅了相应的资料和团队成员的指导下,完成了自己负责的界面。
技术详述
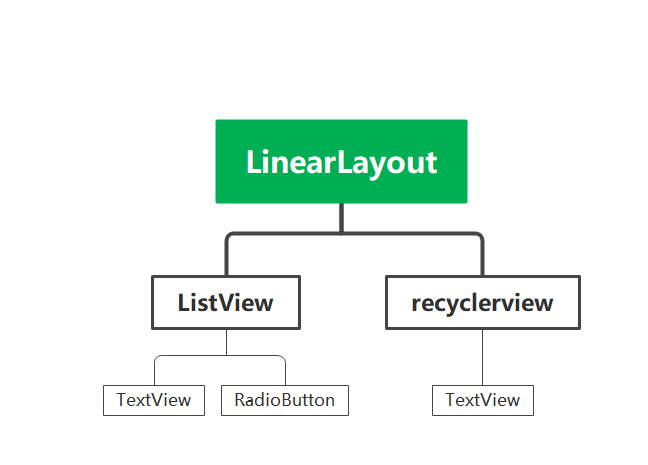
- 界面的设计部分,比较关键的就是两个线性布局,里面一个是ListView、一个是recyclerview,ListView中的为TextView和RadioButton按钮,recyclerview中的为TextView类型。
流程图:针对自己实现的界面
具体代码:
因为界面中要求地址和标签选择框都为圆角框,通过在drawable中添加shape_corner的自定义模板。
<LinearLayout
        android:id="@+id/address_edit"
        android:layout_width="match_parent"
        android:layout_height="120dp"
        android:background="@drawable/shape_corner"
shape_corner:设定Radius的值
<?xml version="1.0" encoding="utf-8"?>
<shape xmlns:android="http://schemas.android.com/apk/res/android">
    <!--背景颜色-->
    <solid android:color="#fff" />
    <!--分别设置左上,右上,左下,右下-->
    <corners
        android:topLeftRadius="10dp"
        android:topRightRadius="10dp"
        android:bottomLeftRadius="10dp"
        android:bottomRightRadius="10dp" />
    <stroke android:width="1dp" android:color="#cccccc" />
</shape>
地址选择界面的设计
<?xml version="1.0" encoding="utf-8"?>
<LinearLayout
    xmlns:android="http://schemas.android.com/apk/res/android" android:layout_width="match_parent"
    android:layout_height="match_parent"
    android:orientation="vertical">

    <TextView
        android:id="@+id/address_tv"
        android:layout_width="match_parent"
        android:layout_height="wrap_content"
        android:text="幸福小区自提点"></TextView>

    <RadioButton
        android:id="@+id/mine_phone_num"
        android:layout_width="wrap_content"
        android:layout_height="wrap_content"
        android:text="15512345678"
        android:focusable="false"></RadioButton>

</LinearLayout>
标签选择界面的设计
<?xml version="1.0" encoding="utf-8"?>
<androidx.constraintlayout.widget.ConstraintLayout
    xmlns:android="http://schemas.android.com/apk/res/android" android:layout_width="match_parent"
    android:layout_height="match_parent">

    <CheckBox
        android:id="@+id/cb_tag_choose"
        android:layout_width="match_parent"
        android:layout_height="match_parent"/>

</androidx.constraintlayout.widget.ConstraintLayout>
问题&解决
对于网络链接部分,不是非常了解,在团队成员的帮助下,解决了这个问题。
创建Retrofit实例
String account = SpUtil.getInstance().getString("account","");
        String token = SpUtil.getInstance().getString("token","");
        Retrofit retrofit = new Retrofit.Builder()
                .baseUrl(Constant.URL_BASE)
                .addConverterFactory(GsonConverterFactory.create())
                .build();
        UserServices userServices = retrofit.create(UserServices.class);
        Call<UserTagResponse> call = userServices.getUserTags(token, account);
        call.enqueue(new Callback<UserTagResponse>() {
            @Override
            public void onResponse(Call<UserTagResponse> call, Response<UserTagResponse> response) {
                if (response.isSuccessful()){
                    getActivity().runOnUiThread(() -> {
                        if (response.body().getTags() != null){
                            tagList.addAll(response.body().getTags());
                        }
                        adapter.notifyDataSetChanged();
                    });
                }
            }
            @Override
            public void onFailure(Call<UserTagResponse> call, Throwable t) {
                Log.d("MineFragment",t.getMessage());
            }
        });
总结
- 对于界面的设计感觉不是很熟练,做出来的界面并不是很好看,对于Android的理解还十分有限。极限编程中学了部分的vue,但在团队项目中没有实践。还有许多东西需要学习,

 浙公网安备 33010602011771号