事物自定义标签
前言
对于Spring中事务的分析,首先从配置文件中入手,在配置文件中有这样的一个配置:<tx:annotation-driven/>。可以说此处是配置事务的开关,如果没有此处配置,那么Spring中将不存在事务的功能。那么我们就从这个配置文件开始分析。
根据之前的分析,我们可以推断,在自定义代码中的解析过程中一定是做了一些辅助操作,于是我们先从自定义标签入手分析。
全局搜索代码关键字annotation-drive,最终锁定类TxNamespaceHandler,在TxNamespaceHandler中的init方法中:
public void init() {
        registerBeanDefinitionParser("advice", new TxAdviceBeanDefinitionParser());
        registerBeanDefinitionParser("annotation-driven", new AnnotationDrivenBeanDefinitionParser());
        registerBeanDefinitionParser("jta-transaction-manager", new JtaTransactionManagerBeanDefinitionParser());
    }
根据自定义标签的使用规则以及上面的代码,可以知道,在遇到<tx:annotation-driven为开头的配置后,Spring都会使用AnnotationDrivenBeanDefinitionParser类的parse方法进行解析。
public BeanDefinition parse(Element element, ParserContext parserContext) {
        Object source = parserContext.extractSource(element);

        // Register component for the surrounding <task:annotation-driven> element.
        CompositeComponentDefinition compDefinition = new CompositeComponentDefinition(element.getTagName(), source);
        parserContext.pushContainingComponent(compDefinition);

        // Nest the concrete post-processor bean in the surrounding component.
        BeanDefinitionRegistry registry = parserContext.getRegistry();

        String mode = element.getAttribute("mode");
        if ("aspectj".equals(mode)) {
            // mode="aspectj"
            registerAsyncExecutionAspect(element, parserContext);
        }
        else {
            // mode="proxy"
            if (registry.containsBeanDefinition(TaskManagementConfigUtils.ASYNC_ANNOTATION_PROCESSOR_BEAN_NAME)) {
                parserContext.getReaderContext().error(
                        "Only one AsyncAnnotationBeanPostProcessor may exist within the context.", source);
            }
            else {
                BeanDefinitionBuilder builder = BeanDefinitionBuilder.genericBeanDefinition(
                        "org.springframework.scheduling.annotation.AsyncAnnotationBeanPostProcessor");
                builder.getRawBeanDefinition().setSource(source);
                String executor = element.getAttribute("executor");
                if (StringUtils.hasText(executor)) {
                    builder.addPropertyReference("executor", executor);
                }
                String exceptionHandler = element.getAttribute("exception-handler");
                if (StringUtils.hasText(exceptionHandler)) {
                    builder.addPropertyReference("exceptionHandler", exceptionHandler);
                }
                if (Boolean.valueOf(element.getAttribute(AopNamespaceUtils.PROXY_TARGET_CLASS_ATTRIBUTE))) {
                    builder.addPropertyValue("proxyTargetClass", true);
                }
                registerPostProcessor(parserContext, builder, TaskManagementConfigUtils.ASYNC_ANNOTATION_PROCESSOR_BEAN_NAME);
            }
        }

        if (registry.containsBeanDefinition(TaskManagementConfigUtils.SCHEDULED_ANNOTATION_PROCESSOR_BEAN_NAME)) {
            parserContext.getReaderContext().error(
                    "Only one ScheduledAnnotationBeanPostProcessor may exist within the context.", source);
        }
        else {
            BeanDefinitionBuilder builder = BeanDefinitionBuilder.genericBeanDefinition(
                    "org.springframework.scheduling.annotation.ScheduledAnnotationBeanPostProcessor");
            builder.getRawBeanDefinition().setSource(source);
            String scheduler = element.getAttribute("scheduler");
            if (StringUtils.hasText(scheduler)) {
                builder.addPropertyReference("scheduler", scheduler);
            }
            registerPostProcessor(parserContext, builder, TaskManagementConfigUtils.SCHEDULED_ANNOTATION_PROCESSOR_BEAN_NAME);
        }

        // Finally register the composite component.
        parserContext.popAndRegisterContainingComponent();

        return null;
    }
在上述的代码中,存在对于mode属性的判断,根据代码,如果我们需要使用AspectJ的方式进行事务切入(Spring中的事务是以AOP为基础的),那么可以使用这样的配置:
<tx:annotation-driven transaction-manager="transactionManager" mode="aspectj"/>
注册InfrastructureAdvisorAutoProxyCreator
我们以默认配置为例子进行分析,进入AopAutoProxyConfigurer类的configureAutoProxyCreator:
public static void configureAutoProxyCreator(Element element, ParserContext parserContext) {
            AopNamespaceUtils.registerAutoProxyCreatorIfNecessary(parserContext, element);

            String txAdvisorBeanName = TransactionManagementConfigUtils.TRANSACTION_ADVISOR_BEAN_NAME;
            if (!parserContext.getRegistry().containsBeanDefinition(txAdvisorBeanName)) {
                Object eleSource = parserContext.extractSource(element);

                //创建TransactionAttributeSource的bean
                RootBeanDefinition sourceDef = new RootBeanDefinition(
                        "org.springframework.transaction.annotation.AnnotationTransactionAttributeSource");
                sourceDef.setSource(eleSource);
                sourceDef.setRole(BeanDefinition.ROLE_INFRASTRUCTURE);
                //注册bean,并使用Spring中的定义规则生成beanName
                String sourceName = parserContext.getReaderContext().registerWithGeneratedName(sourceDef);

                // 创建TransactionInterceptor的bean
                RootBeanDefinition interceptorDef = new RootBeanDefinition(TransactionInterceptor.class);
                interceptorDef.setSource(eleSource);
                interceptorDef.setRole(BeanDefinition.ROLE_INFRASTRUCTURE);
                registerTransactionManager(element, interceptorDef);
                interceptorDef.getPropertyValues().add("transactionAttributeSource", new RuntimeBeanReference(sourceName));
                String interceptorName = parserContext.getReaderContext().registerWithGeneratedName(interceptorDef);

                // 创建TransactionAttributeSourceAdvisor的bean
                RootBeanDefinition advisorDef = new RootBeanDefinition(BeanFactoryTransactionAttributeSourceAdvisor.class);
                advisorDef.setSource(eleSource);
                advisorDef.setRole(BeanDefinition.ROLE_INFRASTRUCTURE);
                advisorDef.getPropertyValues().add("transactionAttributeSource", new RuntimeBeanReference(sourceName));
                //将sourceName的bean注入advisorDef的adviceBeanName属性中
                advisorDef.getPropertyValues().add("adviceBeanName", interceptorName);
                //如果配置了order属性,则加入到bean中
                if (element.hasAttribute("order")) {
                    advisorDef.getPropertyValues().add("order", element.getAttribute("order"));
                }
                parserContext.getRegistry().registerBeanDefinition(txAdvisorBeanName, advisorDef);
                //创建CompositeComponentDefinition
                CompositeComponentDefinition compositeDef = new CompositeComponentDefinition(element.getTagName(), eleSource);
                compositeDef.addNestedComponent(new BeanComponentDefinition(sourceDef, sourceName));
                compositeDef.addNestedComponent(new BeanComponentDefinition(interceptorDef, interceptorName));
                compositeDef.addNestedComponent(new BeanComponentDefinition(advisorDef, txAdvisorBeanName));
                parserContext.registerComponent(compositeDef);
            }
        }
上面的代码注册了代理类以及三个bean,这三个bean支撑了整个事务功能,那么这三个bean是怎么组织起来的呢?
首先,其中的两个bean注册到了一个名为advisorDef的bean中,advisorDef使用BeanFactoryTransactionAttributeSourceAdvisor作为其属性。也就是说BeanFactoryTransactionAttributeSourceAdvisor代表着当前bean,具体代码如下:
advisorDef.getPropertyValues().add("adviceBeanName",interceptorName);
那么如此组装的目的是什么呢?接着来分析代码,上面函数的第一句代码是configureAutoProxyCreator中的第一句代码很重要:
AopNamespaceUtils.registerAutoProxyCreatorIfNecessary(parserContext, element);
进入这个函数:
public static void registerAutoProxyCreatorIfNecessary(
            ParserContext parserContext, Element sourceElement) {

        BeanDefinition beanDefinition = AopConfigUtils.registerAutoProxyCreatorIfNecessary(
                parserContext.getRegistry(), parserContext.extractSource(sourceElement));
        useClassProxyingIfNecessary(parserContext.getRegistry(), sourceElement);
        registerComponentIfNecessary(beanDefinition, parserContext);
    }
private static void registerComponentIfNecessary(@Nullable BeanDefinition beanDefinition, ParserContext parserContext) {
        if (beanDefinition != null) {
            parserContext.registerComponent(
                    new BeanComponentDefinition(beanDefinition, AopConfigUtils.AUTO_PROXY_CREATOR_BEAN_NAME));
        }
    }
对于解析来的代码流程AOP中已经有所分析,上面的两个函数主要目的是注册了InfrastructureAdvisorAutoProxyCreator类型的bean,那么注册这个类的目的是什么呢?查看这个类的层次:
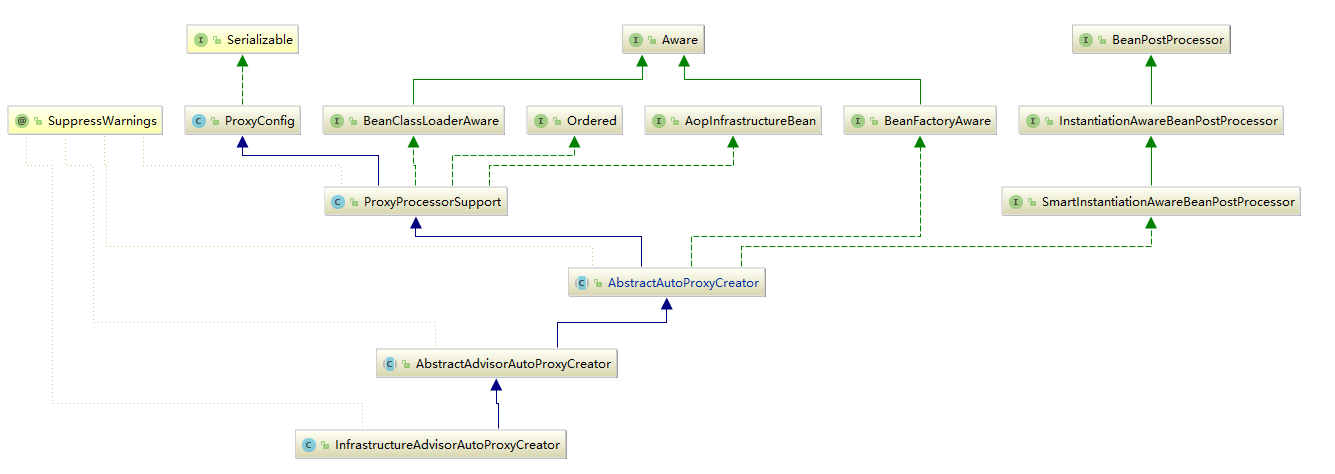
从上图中可看出,InfrastructureAdvisorAutoProxyCreator间接实现了SmartInstantiationAwareBeanPostProcessor,而SmartInstantiationAwareBeanPostProcessor又继承自InstantiationAwareBeanPostProcessor,也就是说在Spring中,所有bean实例化时Spring都会保证调用其PostProcessAfterInitialization方法,其实现是在父类AbstractAutoProxyCreator类中实现。
在实例化bean的时候,会调用wrapIfnecessary方法,这个方法是确定是否需要封装,检测以及封装的工作都委托给了wrapIfnecessary函数进行。
protected Object wrapIfNecessary(Object bean, String beanName, Object cacheKey) {
        if (StringUtils.hasLength(beanName) && this.targetSourcedBeans.contains(beanName)) {
            return bean;
        }
        if (Boolean.FALSE.equals(this.advisedBeans.get(cacheKey))) {
            return bean;
        }
        //给定的bean类是否代表一个基础设施类,不应代理,或者配置了指定bean不需要自动代理
        if (isInfrastructureClass(bean.getClass()) || shouldSkip(bean.getClass(), beanName)) {
            this.advisedBeans.put(cacheKey, Boolean.FALSE);
            return bean;
        }

        Object[] specificInterceptors = getAdvicesAndAdvisorsForBean(bean.getClass(), beanName, null);
        if (specificInterceptors != DO_NOT_PROXY) {
            this.advisedBeans.put(cacheKey, Boolean.TRUE);
            Object proxy = createProxy(
                    bean.getClass(), beanName, specificInterceptors, new SingletonTargetSource(bean));
            this.proxyTypes.put(cacheKey, proxy.getClass());
            return proxy;
        }

        this.advisedBeans.put(cacheKey, Boolean.FALSE);
        return bean;
    }
wrapIfnecessary函数功能实现起来很复杂,但是逻辑上理解起来还是相对简单的,在wrapIfnecessary函数中主要的工作如下:
(1)找出指定bean对应的增强器;
(2)根据找出的增强器创建代理;
听起来上述代码的逻辑很简单,对于创建代理的部分,之前的文章中也已经提到过,但是对于增强器的获取,Spring又是怎么做的呢?
获取对应class/method的增强器
获取指定bean对应的增强器,其中包括两个关键字:增强器和对应。也就是说在getAdvicesAndAdvisorsForBean函数中,不但要找出增强器,而且还需要判断增强器是否满足要求。
protected Object[] getAdvicesAndAdvisorsForBean(
            Class<?> beanClass, String beanName, @Nullable TargetSource targetSource) {

        List<Advisor> advisors = findEligibleAdvisors(beanClass, beanName);
        if (advisors.isEmpty()) {
            return DO_NOT_PROXY;
        }
        return advisors.toArray();
    }
protected List<Advisor> findEligibleAdvisors(Class<?> beanClass, String beanName) {
        List<Advisor> candidateAdvisors = findCandidateAdvisors();
        List<Advisor> eligibleAdvisors = findAdvisorsThatCanApply(candidateAdvisors, beanClass, beanName);
        extendAdvisors(eligibleAdvisors);
        if (!eligibleAdvisors.isEmpty()) {
            eligibleAdvisors = sortAdvisors(eligibleAdvisors);
        }
        return eligibleAdvisors;
    }
其实看了那么多的源码,我们也渐渐的体会到了Spring中代码的优秀,即使是一个很复杂的逻辑,在Spring中也会被拆分成若干个小的逻辑,然后在每个函数中实现,使得每个函数的逻辑简单到我们能快速的理解。同样,在上面的函数中,Spring又将任务进行了拆分,分成了获取所有增强器与增强器是否匹配这两个功能点。
1.寻找候选增强器
在findCandidateAdvisors函数中完成的就是获取增强器的功能。
protected List<Advisor> findCandidateAdvisors() {
        Assert.state(this.advisorRetrievalHelper != null, "No BeanFactoryAdvisorRetrievalHelper available");
        return this.advisorRetrievalHelper.findAdvisorBeans();
    }
public List<Advisor> findAdvisorBeans() {
        // Determine list of advisor bean names, if not cached already.
        String[] advisorNames = this.cachedAdvisorBeanNames;
        if (advisorNames == null) {
            // Do not initialize FactoryBeans here: We need to leave all regular beans
            // uninitialized to let the auto-proxy creator apply to them!
            advisorNames = BeanFactoryUtils.beanNamesForTypeIncludingAncestors(
                    this.beanFactory, Advisor.class, true, false);
            this.cachedAdvisorBeanNames = advisorNames;
        }
        if (advisorNames.length == 0) {
            return new ArrayList<>();
        }

        List<Advisor> advisors = new ArrayList<>();
        for (String name : advisorNames) {
            if (isEligibleBean(name)) {
                if (this.beanFactory.isCurrentlyInCreation(name)) {
                    if (logger.isTraceEnabled()) {
                        logger.trace("Skipping currently created advisor '" + name + "'");
                    }
                }
                else {
                    try {
                        advisors.add(this.beanFactory.getBean(name, Advisor.class));
                    }
                    catch (BeanCreationException ex) {
                        Throwable rootCause = ex.getMostSpecificCause();
                        if (rootCause instanceof BeanCurrentlyInCreationException) {
                            BeanCreationException bce = (BeanCreationException) rootCause;
                            String bceBeanName = bce.getBeanName();
                            if (bceBeanName != null && this.beanFactory.isCurrentlyInCreation(bceBeanName)) {
                                if (logger.isTraceEnabled()) {
                                    logger.trace("Skipping advisor '" + name +
                                            "' with dependency on currently created bean: " + ex.getMessage());
                                }
                                // Ignore: indicates a reference back to the bean we're trying to advise.
                                // We want to find advisors other than the currently created bean itself.
                                continue;
                            }
                        }
                        throw ex;
                    }
                }
            }
        }
        return advisors;
    }
对于上面的函数,首先是通过BeanFactoryUtils类提供的工具方法获取所有对应Advisor.class的类,获取办法无非是使用ListableBeanFactory中提供的方法:
String[] getBeanNamesForType(Class<?> type,boolean includeNonSingletons,boolean allowEagerInit);
而当我们知道增强器在容器中的beanName时,获取增强器已经不是问题了,在BeanFactory中提供了这样的方法,可以帮助我们快速的定位对应的bean实例。
<T> T getBean(String name,Class<T> requiredType) throws BeansException;
我们在前言中说在自定义标签时曾经注册了一个类型为BeanFactoryTransactionAttributeSourceAdvisor的bean,而在此bean中我们又注入了另外两个bean,那么此时这个bean就会被开始使用了。因为BeanFactoryTransactionAttributeSourceAdvisor同样实现了Advisor接口,那么在获取所有增强器时自然也会将此bean提取出来,并随着其他增强器一起在后续的步骤中被织入代理。
2.候选增强器中寻找匹配项
当找出对应的增强器后,接下来的任务就是看这些增强器是否与对应的class匹配,当然不只是class,class内部的方法如果匹配也可以通过验证。
protected List<Advisor> findAdvisorsThatCanApply(
            List<Advisor> candidateAdvisors, Class<?> beanClass, String beanName) {

        ProxyCreationContext.setCurrentProxiedBeanName(beanName);
        try {
            return AopUtils.findAdvisorsThatCanApply(candidateAdvisors, beanClass);
        }
        finally {
            ProxyCreationContext.setCurrentProxiedBeanName(null);
        }
    }
public static List<Advisor> findAdvisorsThatCanApply(List<Advisor> candidateAdvisors, Class<?> clazz) {
        if (candidateAdvisors.isEmpty()) {
            return candidateAdvisors;
        }
        List<Advisor> eligibleAdvisors = new ArrayList<>();
        //首先处理引介增强
        for (Advisor candidate : candidateAdvisors) {
            if (candidate instanceof IntroductionAdvisor && canApply(candidate, clazz)) {
                eligibleAdvisors.add(candidate);
            }
        }
        boolean hasIntroductions = !eligibleAdvisors.isEmpty();
        for (Advisor candidate : candidateAdvisors) {
            //引介增强已经处理
            if (candidate instanceof IntroductionAdvisor) {
                // already processed
                continue;
            }
            //对于普通的bean处理
            if (canApply(candidate, clazz, hasIntroductions)) {
                eligibleAdvisors.add(candidate);
            }
        }
        return eligibleAdvisors;
    }
public static boolean canApply(Advisor advisor, Class<?> targetClass, boolean hasIntroductions) {
        if (advisor instanceof IntroductionAdvisor) {
            return ((IntroductionAdvisor) advisor).getClassFilter().matches(targetClass);
        }
        else if (advisor instanceof PointcutAdvisor) {
            PointcutAdvisor pca = (PointcutAdvisor) advisor;
            return canApply(pca.getPointcut(), targetClass, hasIntroductions);
        }
        else {
            // It doesn't have a pointcut so we assume it applies.
            return true;
        }
    }
当前我们分析的是对于bean是否适用于此增强方法,那么当前的advisor就是之前查找出来的BeanFactoryTransactionAttributeSourceAdvisor的bean实例,通过上面的类图又可以知道:BeanFactoryTransactionAttributeSourceAdvisor间接实现了PointcutAdvisor。因此,在canApply函数中的第二个if判断时就会通过判断,会将BeanFactoryTransactionAttributeSourceAdvisor中的getPoint方法返回值作为参数继续调用canApply方法,而getPoint方法返回的是TransactionAttributeSourcePointcut类型的实例。对于TransactionAttributeSource这个属性实在解析自定义标签时注入进去的。
ublic static boolean canApply(Pointcut pc, Class<?> targetClass, boolean hasIntroductions) {
        Assert.notNull(pc, "Pointcut must not be null");
        if (!pc.getClassFilter().matches(targetClass)) {
            return false;
        }
        //此时的pc表示TransactionAttributeSourcePointcut,pc.getMethodMatcher();返回的正是自身(this)
        MethodMatcher methodMatcher = pc.getMethodMatcher();
        if (methodMatcher == MethodMatcher.TRUE) {
            // No need to iterate the methods if we're matching any method anyway...
            return true;
        }

        IntroductionAwareMethodMatcher introductionAwareMethodMatcher = null;
        if (methodMatcher instanceof IntroductionAwareMethodMatcher) {
            introductionAwareMethodMatcher = (IntroductionAwareMethodMatcher) methodMatcher;
        }

        Set<Class<?>> classes = new LinkedHashSet<>();
        if (!Proxy.isProxyClass(targetClass)) {
            classes.add(ClassUtils.getUserClass(targetClass));
        }
        classes.addAll(ClassUtils.getAllInterfacesForClassAsSet(targetClass));

        for (Class<?> clazz : classes) {
            Method[] methods = ReflectionUtils.getAllDeclaredMethods(clazz);
            for (Method method : methods) {
                if (introductionAwareMethodMatcher != null ?
                        introductionAwareMethodMatcher.matches(method, targetClass, hasIntroductions) :
                        methodMatcher.matches(method, targetClass)) {
                    return true;
                }
            }
        }

        return false;
    }
通过上面的函数大致可以理清大体脉络,首先获取对应类的所有接口并连同类本身一起遍历,遍历过程中又对类中的方法进行再次遍历,一旦匹配成功便认为这个类适用于当前增强器。
对于事务的配置不仅仅局限于在函数上配置,我们都知道,在类和接口上配置可以延续到类中的每个函数,那么针对每个函数进行检测,在类本身上配置的事务属性岂不是检测不到了吗?带着这个疑问,我们继续探求matcher方法:
做匹配的时候methodMatcher.matches(method,targetClass)会使用TransactionAttributeSourcePointcut类的matchs方法:
public boolean matches(Method method, Class<?> targetClass) {
        if (TransactionalProxy.class.isAssignableFrom(targetClass) ||
                PlatformTransactionManager.class.isAssignableFrom(targetClass) ||
                PersistenceExceptionTranslator.class.isAssignableFrom(targetClass)) {
            return false;
        }
        //自定义标签解析时注入
        TransactionAttributeSource tas = getTransactionAttributeSource();
        return (tas == null || tas.getTransactionAttribute(method, targetClass) != null);
    }
此时的tas表示AnnotationTransactionAttributeSource类型,而AnnotationTransactionAttributeSource类型的getTransactionAttribute方法如下:
public TransactionAttribute getTransactionAttribute(Method method, @Nullable Class<?> targetClass) {
        if (method.getDeclaringClass() == Object.class) {
            return null;
        }

        //首先,看看是否有缓存的值。
        Object cacheKey = getCacheKey(method, targetClass);
        TransactionAttribute cached = this.attributeCache.get(cacheKey);
        if (cached != null) {
            if (cached == NULL_TRANSACTION_ATTRIBUTE) {
                return null;
            }
            else {
                return cached;
            }
        }
        else {
            TransactionAttribute txAttr = computeTransactionAttribute(method, targetClass);
            // 把它放到缓存里。
            if (txAttr == null) {
                this.attributeCache.put(cacheKey, NULL_TRANSACTION_ATTRIBUTE);
            }
            else {
                String methodIdentification = ClassUtils.getQualifiedMethodName(method, targetClass);
                if (txAttr instanceof DefaultTransactionAttribute) {
                    ((DefaultTransactionAttribute) txAttr).setDescriptor(methodIdentification);
                }
                if (logger.isTraceEnabled()) {
                    logger.trace("Adding transactional method '" + methodIdentification + "' with attribute: " + txAttr);
                }
                this.attributeCache.put(cacheKey, txAttr);
            }
            return txAttr;
        }
    }
很遗憾,在getTransactionAttribute方法中并没有找到我们需要的代码,尝试从缓存中加载,如果对应信息没有被缓存的话,工作又委托给了computeTransactionAttribute方法,在computeTransactionAttribute方哈中终于看到了事务标签的提取过程。
3.提取事务标签
protected TransactionAttribute computeTransactionAttribute(Method method, @Nullable Class<?> targetClass) {
        // 不允许根据需要使用非公共方法。
        if (allowPublicMethodsOnly() && !Modifier.isPublic(method.getModifiers())) {
            return null;
        }

        // 方法可能在接口上,但我们需要来自目标类的属性
        ////如果目标类为空,则方法将保持不变。
        Method specificMethod = AopUtils.getMostSpecificMethod(method, targetClass);

        // 查看方法中是否存在事务声明
        TransactionAttribute txAttr = findTransactionAttribute(specificMethod);
        if (txAttr != null) {
            return txAttr;
        }

        //查看方法所在类是否存在事务声明
        txAttr = findTransactionAttribute(specificMethod.getDeclaringClass());
        if (txAttr != null && ClassUtils.isUserLevelMethod(method)) {
            return txAttr;
        }
        //如果存在接口,则到接口中去寻找
        if (specificMethod != method) {
            txAttr = findTransactionAttribute(method);
            if (txAttr != null) {
                return txAttr;
            }
            // 到接口的类中去寻找
            txAttr = findTransactionAttribute(method.getDeclaringClass());
            if (txAttr != null && ClassUtils.isUserLevelMethod(method)) {
                return txAttr;
            }
        }

        return null;
    }
对于事务属性的获取规则是这样的:如果方法中存在事务属性,则使用方法中的属性,否则使用方法上的类的属性,如果方法所在类的属性上还是没有搜寻到对应的事务属性,那么再搜寻接口中的方法,再没有的话,最后尝试搜寻接口的类上面的声明。对于函数computeTransactionAttribute中的逻辑与我们所认识的规则并不差别,但是上面的函数中并没有去做真正的搜寻事务属性的逻辑,而是搭建了执行框架,将搜寻的任务委托给了findTransactionAttribute方法。
protected TransactionAttribute findTransactionAttribute(Method method) {
        return determineTransactionAttribute(method);
    }
protected TransactionAttribute determineTransactionAttribute(AnnotatedElement element) {
        for (TransactionAnnotationParser annotationParser : this.annotationParsers) {
            TransactionAttribute attr = annotationParser.parseTransactionAnnotation(element);
            if (attr != null) {
                return attr;
            }
        }
        return null;
    }
this.annotationParsers是在当前类AnnotationTransactionAttributeSource初始化的时候初始化的,其中的值加入了SpringTransactionAnnotationParser,也就是当进行属性获取的时候其实是使用SpringTransactionAnnotationParser类中parseTransactionAnnotation方法进行解析的。
public TransactionAttribute parseTransactionAnnotation(AnnotatedElement element) {
        AnnotationAttributes attributes = AnnotatedElementUtils.findMergedAnnotationAttributes(
                element, Transactional.class, false, false);
        if (attributes != null) {
            return parseTransactionAnnotation(attributes);
        }
        else {
            return null;
        }
    }
至此,我们终于看到了获取注解的代码。首先会判断当前类是否含有Transactional注解,这是事务属性的基础,当然如果有的话会继续调用parseTransactionAnnotation方法解析详细的属性。
protected TransactionAttribute parseTransactionAnnotation(AnnotationAttributes attributes) {
        RuleBasedTransactionAttribute rbta = new RuleBasedTransactionAttribute();
        //解析propagation
        Propagation propagation = attributes.getEnum("propagation");
        rbta.setPropagationBehavior(propagation.value());
        //解析isolation
        Isolation isolation = attributes.getEnum("isolation");
        rbta.setIsolationLevel(isolation.value());
        //解析timeout
        rbta.setTimeout(attributes.getNumber("timeout").intValue());
        //解析readOnly
        rbta.setReadOnly(attributes.getBoolean("readOnly"));
        //解析value
        rbta.setQualifier(attributes.getString("value"));
        //解析rollbackFor
        List<RollbackRuleAttribute> rollbackRules = new ArrayList<>();
        for (Class<?> rbRule : attributes.getClassArray("rollbackFor")) {
            rollbackRules.add(new RollbackRuleAttribute(rbRule));
        }
        //解析rollbackForClassName
        for (String rbRule : attributes.getStringArray("rollbackForClassName")) {
            rollbackRules.add(new RollbackRuleAttribute(rbRule));
        }
        //解析noRollbackFor
        for (Class<?> rbRule : attributes.getClassArray("noRollbackFor")) {
            rollbackRules.add(new NoRollbackRuleAttribute(rbRule));
        }
        //解析noRollbackForClassName
        for (String rbRule : attributes.getStringArray("noRollbackForClassName")) {
            rollbackRules.add(new NoRollbackRuleAttribute(rbRule));
        }
        rbta.setRollbackRules(rollbackRules);

        return rbta;
    }
上面的方法实现了对对应类或者方法的事务属性解析,你会在这个类中看到你常用的或者不常用的属性。
至此,已经完成了对事务标签的解析。
回顾一下:我们现在的任务是找出对应的事务属性,现在如果我们已经在一个bean中找到了事务属性,所以,它是与事务增强器匹配的,也就是它会被事务功能修饰。至此,事务功能的初始化工作便结束了,当判断某个bean适用于事务增强时,也就是适用于增强器BeanFactoryTransactionAttributeSourceAdvisor,没错,还是这个类,所以说,在自定义标签解析时,注入的类成为了整个事务功能的基础。BeanFactoryTransactionAttributeSourceAdvisor作为Advisor的实现类,自然要遵从Advisor的处理方式,当代理被调用时会调用这个类的增强方法,也就是bean的Advise,又因为在解析事务定义标签时我们把TransactionInterceptor类型的bean注入到了BeanFactoryTransactionAttributeSourceAdvisor中,所以,在调用事务增强器增强的代理类时会首先执行TransactionInterceptor进行增强,同时,也就是在TransactionInterceptor类中的invoke方法中完成了整个事务的逻辑。
参考:《Spring源码深度解析》 郝佳 编著:


 浙公网安备 33010602011771号