Vue 前端验证码 - canvas Rem布局自适应 - 跨域问题
⭐前言
在vue项目中,登录界面必不可少。简单项目里,验证码通常由数字字母构成。一般有两种产生方式:前端,后端。后端生成,前端直接调用接口,将返回的url放入a标签即可。而前端生成,则大多用canvas画布实现,如何让验证码随屏幕大小变化,还能保持原样不失真,这就是我们要实现的功能。当然,在创建vue项目时,我们必须得克服跨域问题。No ' Access-Control-Allow-Origin'的解决方案,在文章最后。若有错误和建议,请积极指正!
⭐canvas 生成验证码 (vue)
按照需求,一步步实现验证码生成。(源码贴在后面)
下面,进入正题。
组件需要什么?
首先,我们自己注册一个组件 Identify.vue ,用来实现验证码的生成。
第一步, 我们要明确,这个组件需要什么?
显然,我们需要一个画布,在画布上进行绘制,生成验证码就好。
自然而然,<canvas></canvas>就布局上去了。
<template>
  <div class="canvas">
    <canvas id="canvas" class="yanzheng1"></canvas>
  </div>
</template>
再者,我们需定义组件属性
props: {
    identifyCode: { // 默认注册码
      type: String,
      default: '1234'
    },
    fontSizeMin: { // 字体最小值
      type: Number,
      default: 130
    },
    fontSizeMax: { // 字体最大值
      type: Number,
      default: 140
    }
}
组件的实现
接下来,我们可以进行绘制验证码。内容包括如下:
1、随机数(验证码内容:一般为数字字母组合)
2、随机颜色 (rgb实现)
3、干扰线
4、干扰点
随机数
randomNum (min, max) {
    return Math.floor(Math.random() * (max - min) + min)
},
随机色
randomColor (min, max) {
    const r = this.randomNum(min, max)
    const g = this.randomNum(min, max)
    const b = this.randomNum(min, max)
    return 'rgb(' + r + ',' + g + ',' + b + ')'
},
干扰线
drawLine (ctx) {
    const canvas = document.getElementById('canvas')
    for (let j = 0; j < 4; j++) {
    ctx.strokeStyle = this.randomColor(100, 200)
    ctx.beginPath()
    ctx.moveTo(this.randomNum(0, canvas.width), this.randomNum(0, canvas.height))
    ctx.lineTo(this.randomNum(0, canvas.width), this.randomNum(0, canvas.height))
    // lineWidth 控制线的粗细
    ctx.lineWidth = 3
    ctx.stroke()
    }
},
干扰点
drawDot (ctx) {
    const canvas = document.getElementById('canvas')
    for (let k = 0; k < 30; k++) {
        ctx.fillStyle = this.randomColor(0, 255)
        ctx.beginPath()
        // 可以改变 3 来实现改变干扰点的大小
        ctx.arc(this.randomNum(0, canvas.width), this.randomNum(0, canvas.height), 3, 0, 2 * Math.PI)
        ctx.fill()
    }
}
绘制验证码
drawPic () {
    const canvas = document.getElementById('canvas')
    const ctx = canvas.getContext('2d')
    ctx.textBaseline = 'bottom'
    // console.log(canvas.width)
    // 绘制背景(颜色)
    ctx.fillStyle = '#e6ecfd'
    ctx.fillRect(0, 0, canvas.width, canvas.height)
    // 绘制文字
    for (let i = 0; i < this.identifyCode.length; i++) {
        this.drawText(ctx, this.identifyCode[i], i)
    }
    this.drawLine(ctx)
    this.drawDot(ctx)
},
drawText (ctx, txt, i) {
    const canvas = document.getElementById('canvas')
    ctx.fillStyle = this.randomColor(50, 160) // 随机生成字体颜色
    ctx.font = this.randomNum(this.fontSizeMin, this.fontSizeMax) + 'px SimHei' // 随机生成字体大小
    // x,y控制生成字体在画布上分布的位置。如下的0.5/1,可根据实际情况进行增减。
    const x = (i + 0.5 ) * (canvas.width / (this.identifyCode.length + 1))
    const y = this.randomNum(this.fontSizeMax, canvas.height - 5)
    var deg = this.randomNum(-30, 30)
    // 修改坐标原点和旋转角度
    ctx.translate(x, y)
    ctx.rotate(deg * Math.PI / 180)
    ctx.fillText(txt, 0, 0)
    // 恢复坐标原点和旋转角度
    ctx.rotate(-deg * Math.PI / 180)
    ctx.translate(-x, -y)
},
注意:
const canvas = document.getElementById('canvas')
// canvas.width是为了获取到画布的宽度,实现适配。高度亦是如此。
组件源码
原理搞懂,直接上手。新建一个vue文件。
Identify.vue
代码如下:
<template>
  <div class="canvas">
    <canvas id="canvas" class="yanzheng1"></canvas>
  </div>
</template>

<script>
export default {
  name: 'Identify',
  props: {
    identifyCode: { // 默认注册码
      type: String,
      default: '1234'
    },
    fontSizeMin: { // 字体最小值
      type: Number,
      default: 130
    },
    fontSizeMax: { // 字体最大值
      type: Number,
      default: 140
    }
  },
  methods: {
    // 生成一个随机数
    randomNum (min, max) {
      return Math.floor(Math.random() * (max - min) + min)
    },

    // 生成一个随机的颜色
    randomColor (min, max) {
      const r = this.randomNum(min, max)
      const g = this.randomNum(min, max)
      const b = this.randomNum(min, max)
      return 'rgb(' + r + ',' + g + ',' + b + ')'
    },

    drawPic () {
      const canvas = document.getElementById('canvas')
      const ctx = canvas.getContext('2d')
      ctx.textBaseline = 'bottom'
      // console.log(canvas.width)
      // 绘制背景
      ctx.fillStyle = '#e6ecfd'
      ctx.fillRect(0, 0, canvas.width, canvas.height)
      // 绘制文字
      for (let i = 0; i < this.identifyCode.length; i++) {
        this.drawText(ctx, this.identifyCode[i], i)
      }
      this.drawLine(ctx)
      this.drawDot(ctx)
    },
    drawText (ctx, txt, i) {
      const canvas = document.getElementById('canvas')
      ctx.fillStyle = this.randomColor(50, 160) // 随机生成字体颜色
      ctx.font = this.randomNum(this.fontSizeMin, this.fontSizeMax) + 'px SimHei' // 随机生成字体大小
      const x = (i + 0.5 ) * (canvas.width / (this.identifyCode.length + 1))
      const y = this.randomNum(this.fontSizeMax, canvas.height - 5)
      var deg = this.randomNum(-30, 30)
      // 修改坐标原点和旋转角度
      ctx.translate(x, y)
      ctx.rotate(deg * Math.PI / 180)
      ctx.fillText(txt, 0, 0)
      // 恢复坐标原点和旋转角度
      ctx.rotate(-deg * Math.PI / 180)
      ctx.translate(-x, -y)
    },

    drawLine (ctx) {
      // 绘制干扰线
      const canvas = document.getElementById('canvas')
      for (let j = 0; j < 4; j++) {
        ctx.strokeStyle = this.randomColor(100, 200)
        ctx.beginPath()
        ctx.moveTo(this.randomNum(0, canvas.width), this.randomNum(0, canvas.height))
        ctx.lineTo(this.randomNum(0, canvas.width), this.randomNum(0, canvas.height))
        ctx.lineWidth = 3
        ctx.stroke()
      }
    },

    drawDot (ctx) {
      // 绘制干扰点
      const canvas = document.getElementById('canvas')
      for (let k = 0; k < 30; k++) {
        ctx.fillStyle = this.randomColor(0, 255)
        ctx.beginPath()
        ctx.arc(this.randomNum(0, canvas.width), this.randomNum(0, canvas.height), 3, 0, 2 * Math.PI)
        ctx.fill()
      }
    }
  },
  watch: {
    identifyCode () {
      this.drawPic()
    }
  },
  mounted () {
    this.drawPic()
  }
}
</script>

<style scoped>
  .yanzheng1{
    width: 100px;
    height: 34px;
  }
</style>
之后,在要引入的页面,引用。
引用验证码.vue
这里用的是 element UI elementUI官网
<el-form-item prop="code">
    <el-input @keyup.enter.native="checkCode"  type="text" v-model="code" placeholder=" - - - -">
        <template slot="suffix">
            <div class="yanzheng"  @click="refreshCode">
                <!--        Identify就是注册组件-->
                <Identify class="yanzheng1"  :identifyCode="identifyCode"></Identify>
            </div>
        </template>
    </el-input>
</el-form-item>

<!--  @keyup.enter.native 实现输入完,按回车执行checkCode函数,或者按钮实现-->
<script>
  import Identify from '../components/Identify.vue'
  export default {
      components: {
          Identify
      },
      data () {
          return {
              identifyCodes: '1234567890abcdefjhijk1234567890linopqrsduvwxyz', // 验证码组成元素
              identifyCode: '', // 验证码生成结果
              code:'', // 验证码输入内容
          }
      },
      mounted () {
          // 初始化验证码
          this.identifyCode = ''
          this.makeCode(this.identifyCodes, 4)
      },
      methods:{
           // 重置验证码
          refreshCode () {
            this.identifyCode = ''
            this.makeCode(this.identifyCodes, 4)
          },
          makeCode (o, l) {
              // o代表随机数元素集合,l代表验证码位数(现在为4位验证码)
            for (let i = 0; i < l; i++) {
              this.identifyCode += this.identifyCodes[this.randomNum(0, this.identifyCodes.length)]
            }
          },
          randomNum (min, max) {
            return Math.floor(Math.random() * (max - min) + min)
          },
          checkCode(){
              if (this.code.toLowerCase() !== this.identifyCode.toLowerCase()) {
                  this.$message.error('请填写正确验证码')
                  this.refreshCode()
              }
              else {
                  this.$message.success('验证成功!')
                  // 执行功能函数
              }
          }
      }
  }
</script>

<style scoped>
    .yanzheng{
        width: 100px;
        height: 34px;
        text-align: center;
        margin: 5px 30px;
        border: 2px solid #009199;
    }
    .yanzheng1{
        width: 100px;
        height: 34px;
    }
</style>
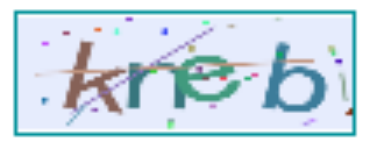
css样式,可自行调整。实现效果如下:

⭐vue自适应,可采用rem布局
安装postcss-px2rem以及px2rem-loader
npm install postcss-px2rem px2rem-loader --save
创建 rem.js 文件
可在src目录下创建utils文件夹,放入其中(/src/utils/rem.js)
// rem等比适配配置文件
// 基准大小
const baseSize = 16
// 设置 rem 函数
function setRem () {
    if (document.documentElement.clientWidth < 768) {
        // 当前页面宽度相对于750宽的缩放比例。
        document.documentElement.style.fontSize = baseSize *(document.documentElement.clientWidth/ 750 - 0.36)  + 'px'
    }
    else {
    	// 当前页面宽度相对于1920宽的缩放比例。
        const scale = document.documentElement.clientWidth / 1920
        // 设置页面根节点字体大小
        document.documentElement.style.fontSize = baseSize * Math.min(scale, 1.7) + 'px'
    }
}
// 初始化
setRem()
// 改变窗口大小时重新设置 rem
window.onresize = function () {
    setRem()
}
在main.js中引入
import '../src/util/rem'
最后,在 vue.config.js 中配置插件
// 引入等比适配插件
const px2rem = require('postcss-px2rem')

// 配置基本大小
const postcss = px2rem({
  // 基准大小 baseSize,需要和rem.js中相同
  remUnit: 16
})

// 使用等比适配插件
module.exports = {
  lintOnSave: true,
  css: {
    loaderOptions: {
      postcss: {
        plugins: [
          postcss
        ]
      }
    }
  }
}
不要忘记重启!!重启方可生效!
⭐vue跨域问题,No ' Access-Control-Allow-Origin'
在开始vue项目构建之前的必经之路,就是避免跨域问题。
直接上手:
vue.config.js配置
创建好vue工程后,找到 vue.config.js 文件,双击点击进入项目即可(与src目录同级)
若没有该配置文件,则新建 vue.config.js 文件,与src目录同级。
module.exports = {
  devServer: {
    host: '127.0.0.1', // 本地
    open: true,
    port: 8082, // 本地开放端口
    overlay: true,
    headers: {
      'Access-Control-Allow-Origin': '*'
    },
    hotOnly: false,
    disableHostCheck: true,
    proxy: {
      '/api': {
        target: 'https://xxx.xxx.xxx.xxx:8181', // 目标服务器,api请求地址(https和http要区分)
        ws: true,
        changeOrigin: true,
        pathRewrite: {
          '^/api': '/'
        }
      }
    }
  }
}
一般情况下,都会安装 axios运行依赖 , 官网
npm install axios
main.js配置
在 main.js 中配置如下:
// 引入axios
import axios from 'axios'
Vue.prototype.$axios = axios
Vue.prototype.$http = axios

// 利用'/api'为基准地址,实现跨域。
axios.defaults.baseURL='/api'

Vue.config.productionTip = false
接口调用举例
/test/all/ 为接口请求
async getTestList () {
    const { data: res } = await this.$http.get('/test/all/')
    if (res.status !== 200) {
        return this.$message.error(res.msg)
    }
    this.$message.success('成功!')
},
如下,出现api,即成功!
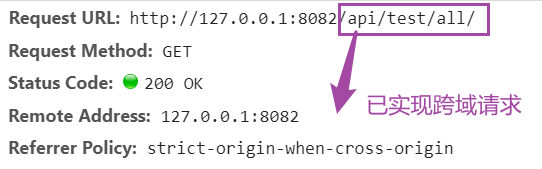
注意!!配置完记得重启!!否则不生效!!
关于以上链接引用【侵权删】

 浙公网安备 33010602011771号