银河麒麟系统最小安装
银河麒麟系统最小安装
一、系统准备
- 准备系统镜像
- Kylin-Server-V10-SP3-General-Release-2303-X86_64
二、安装系统
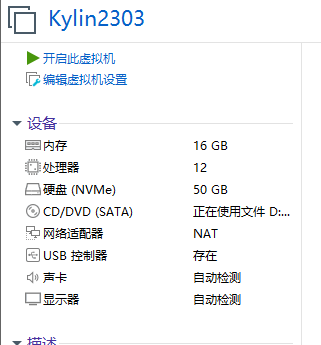
1.配置虚拟机环境
- 配置好虚拟机环境并绑定系统镜像Kylin2303
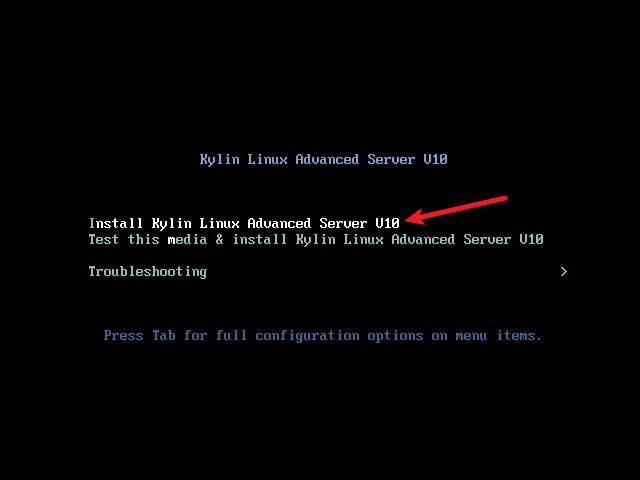
2.选择安装选项
- 启动虚拟机后,在安装界面选择第一项 “Install Kylin Linux Advanced Server U10” 直接安装。
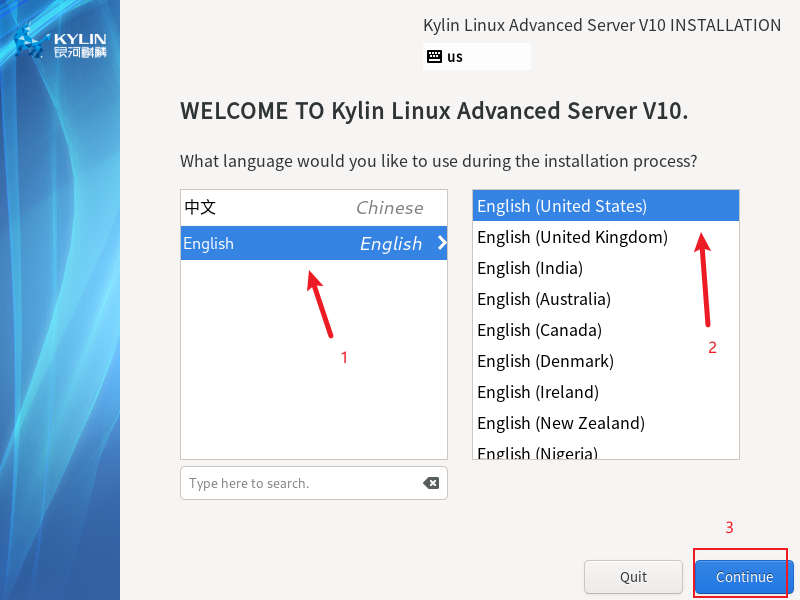
3.选择安装语言
- 选择英语(如 “English (United States)”)作为安装过程中的语言。
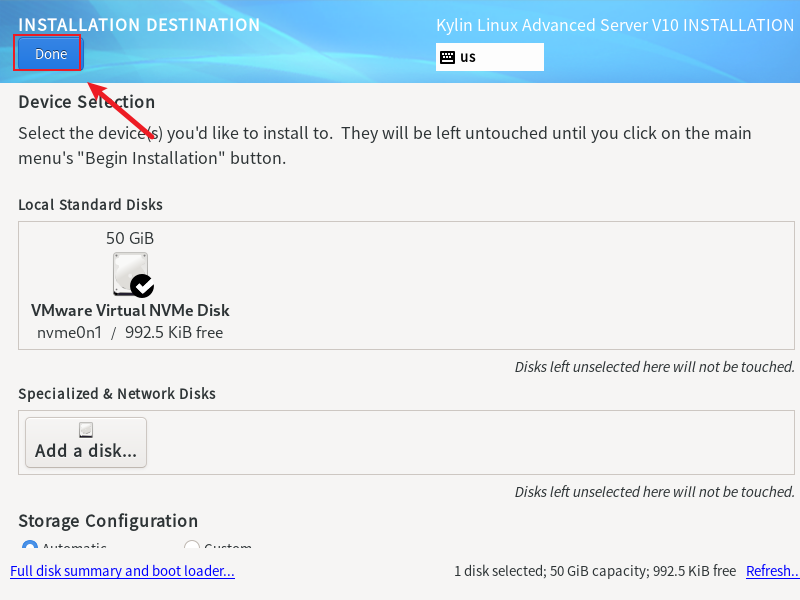
4.磁盘分区
- 磁盘分区选择默认设置。选择要安装系统的磁盘,本次示例中为 50GiB 的 “VMware Virtual NVMe Disk nvme0n1”,未选择的磁盘不会被改动。
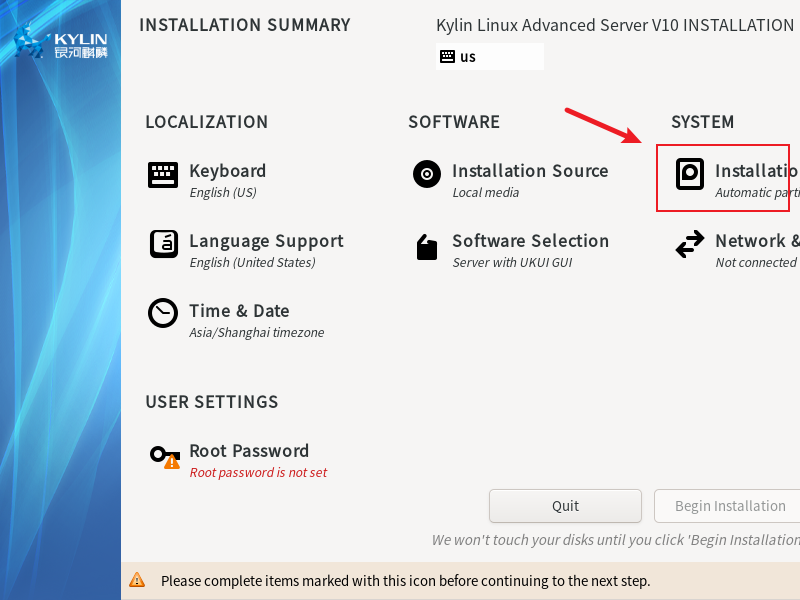
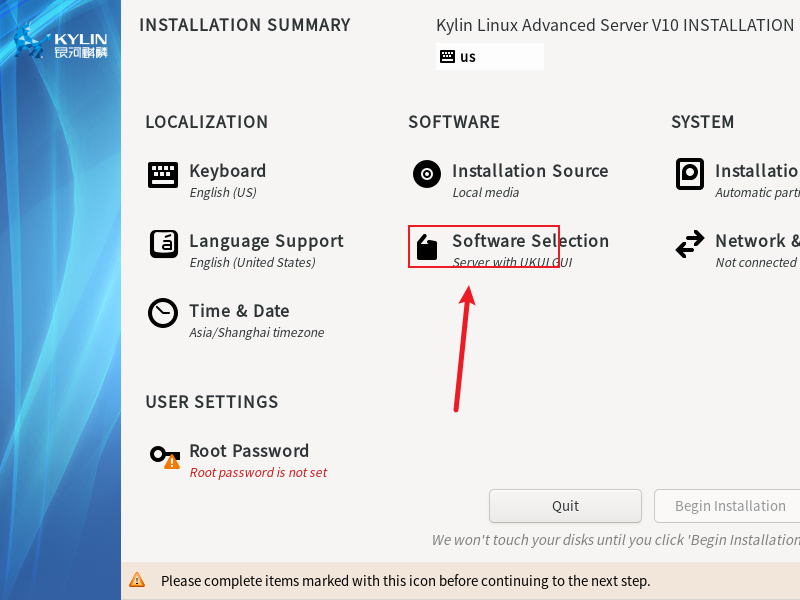
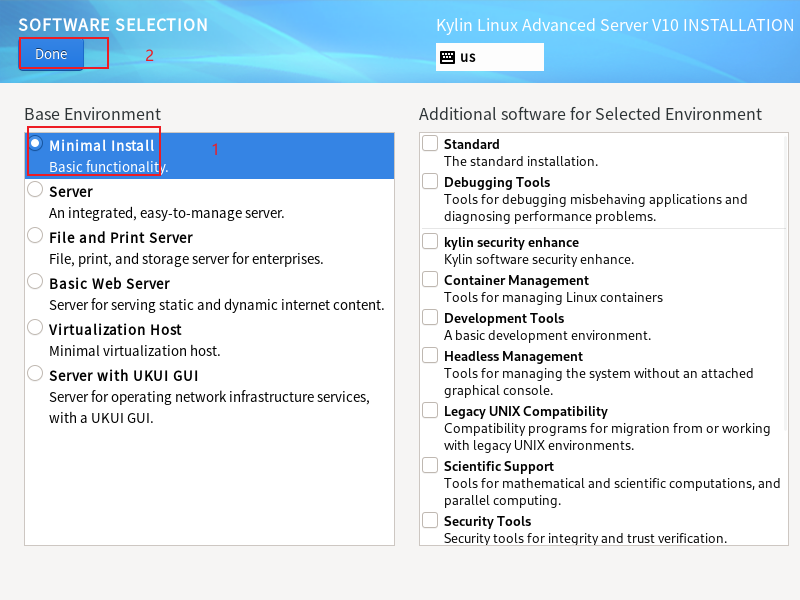
5.选择系统镜像安装类型
- 在软件选择中,选择最小安装 “Minimal Install”,仅安装基本功能。
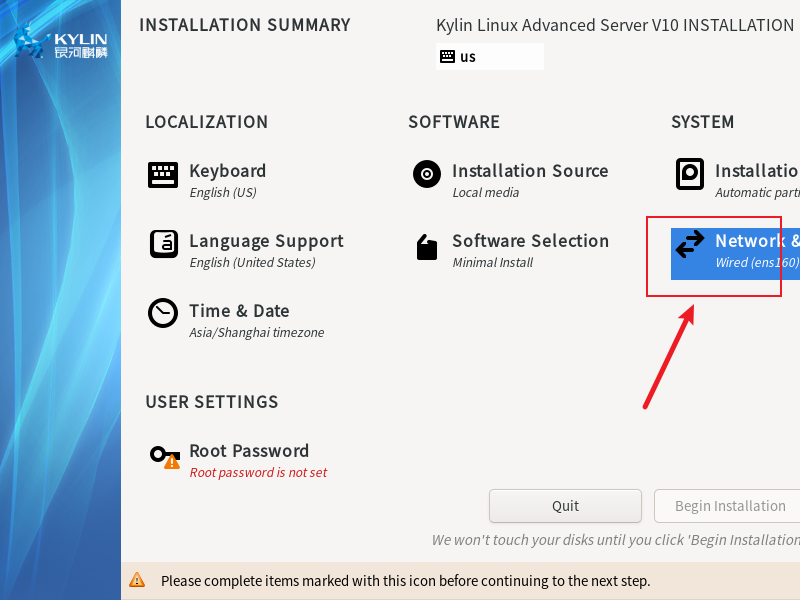
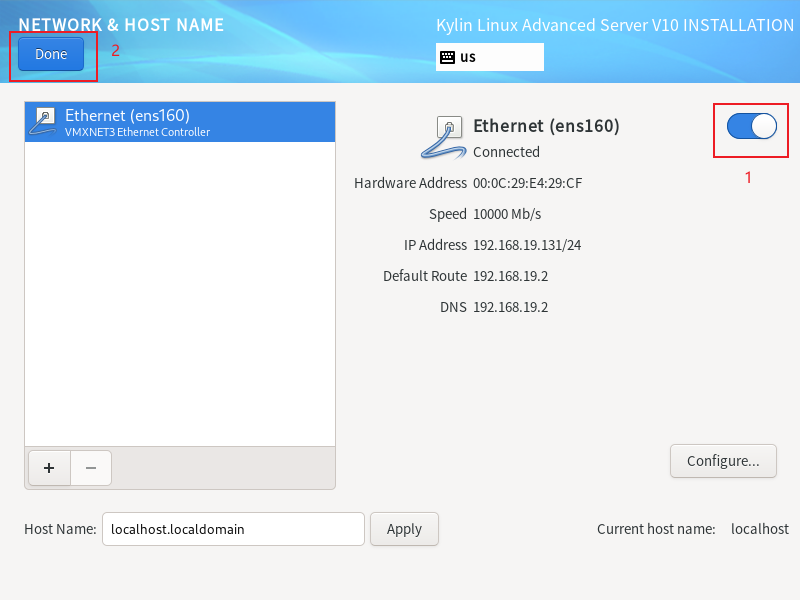
6网络配置
- 网络配置选择自动获取。配置完成后,查看网络连接状态,确保网络已连接,
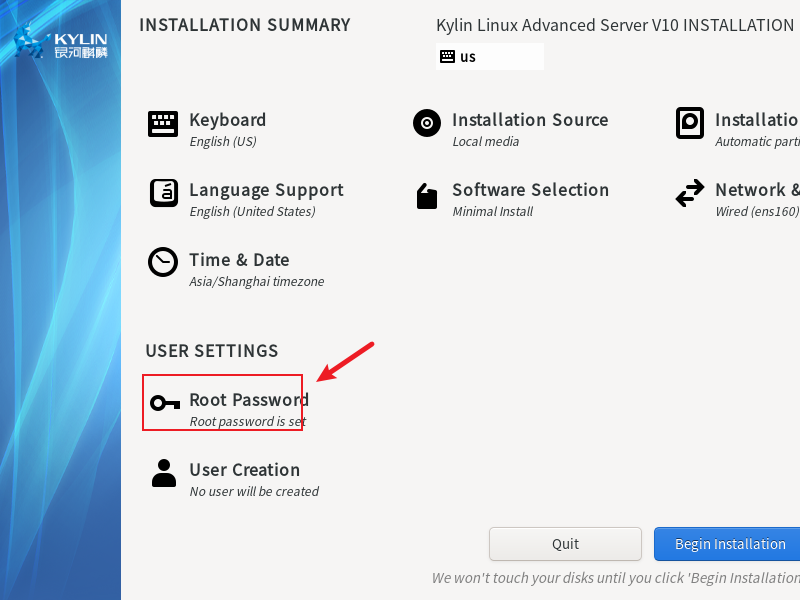
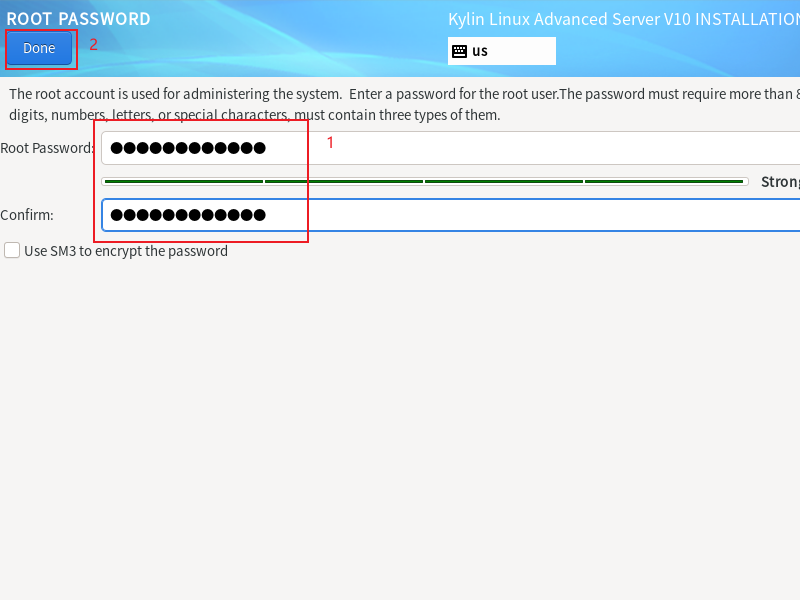
7.创建 root 账户密码
- 为 root 用户设置密码,密码要求至少包含数字、字母、特殊字符中的三种类型。
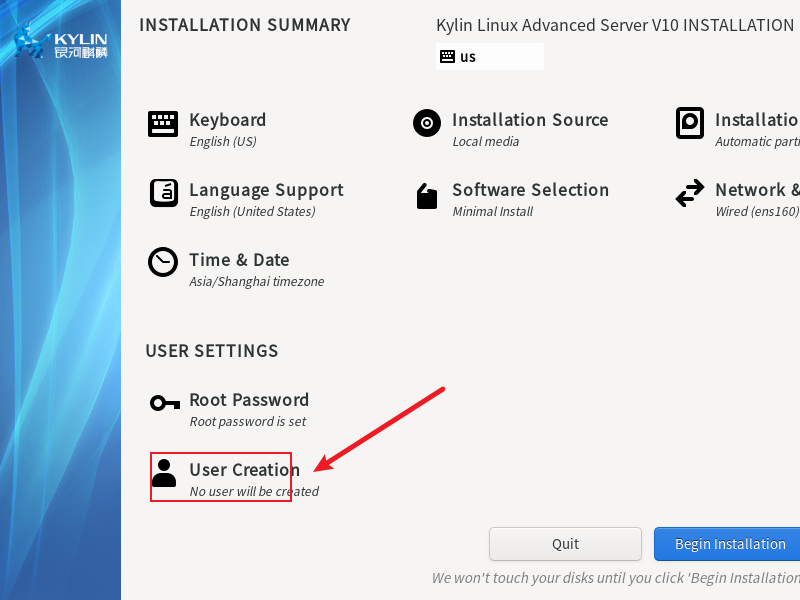
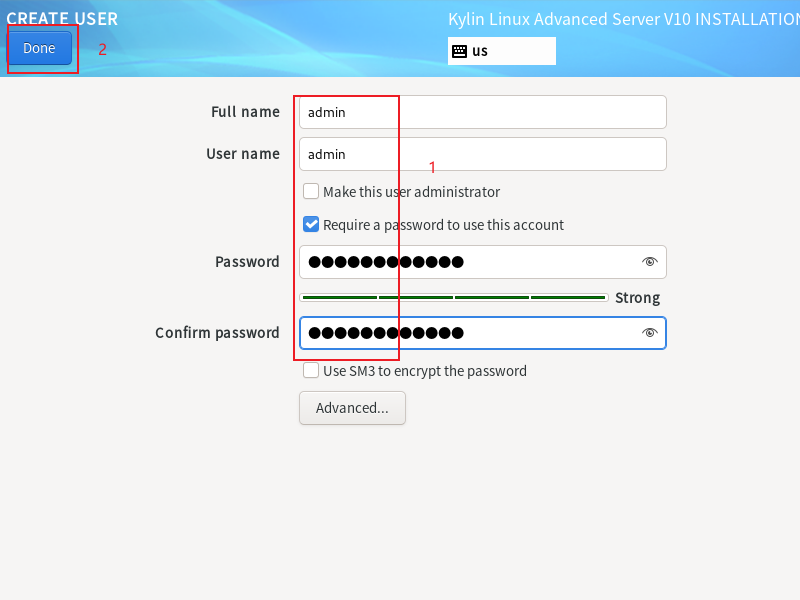
8.创建普通账户
- 创建一个普通账户,如账户名为 “admin”,设置好密码,并可选择将该用户设置为管理员。
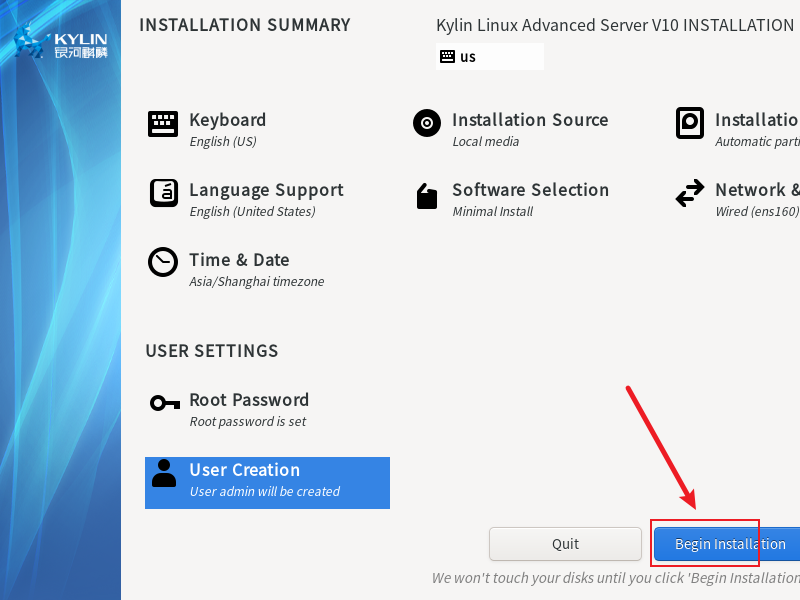
9.开始安装系统
- 确认各项设置无误后,点击 “Begin Installation” 开始安装系统,安装过程中需等待安装 441 个安装包。

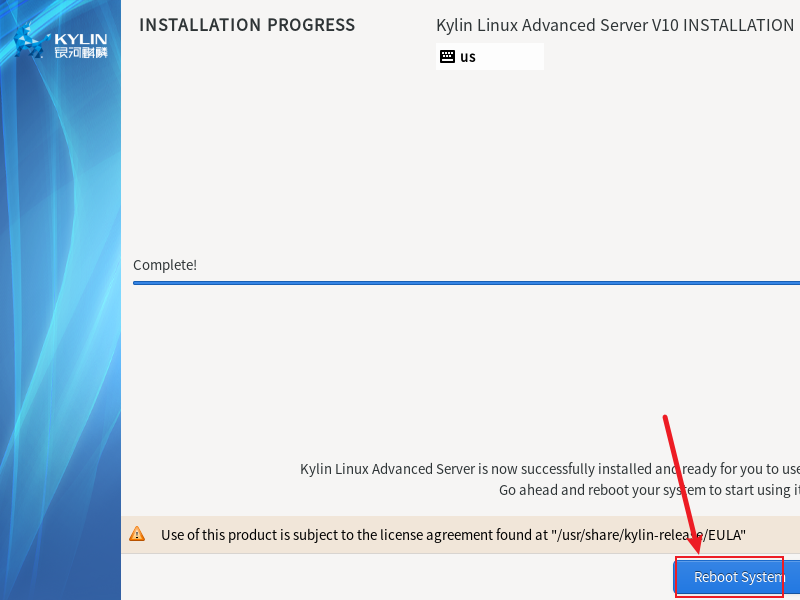
10.安装完成后重启系统
- 安装完成后,选择 “Reboot System” 重启系统。
三、重启完成后配置
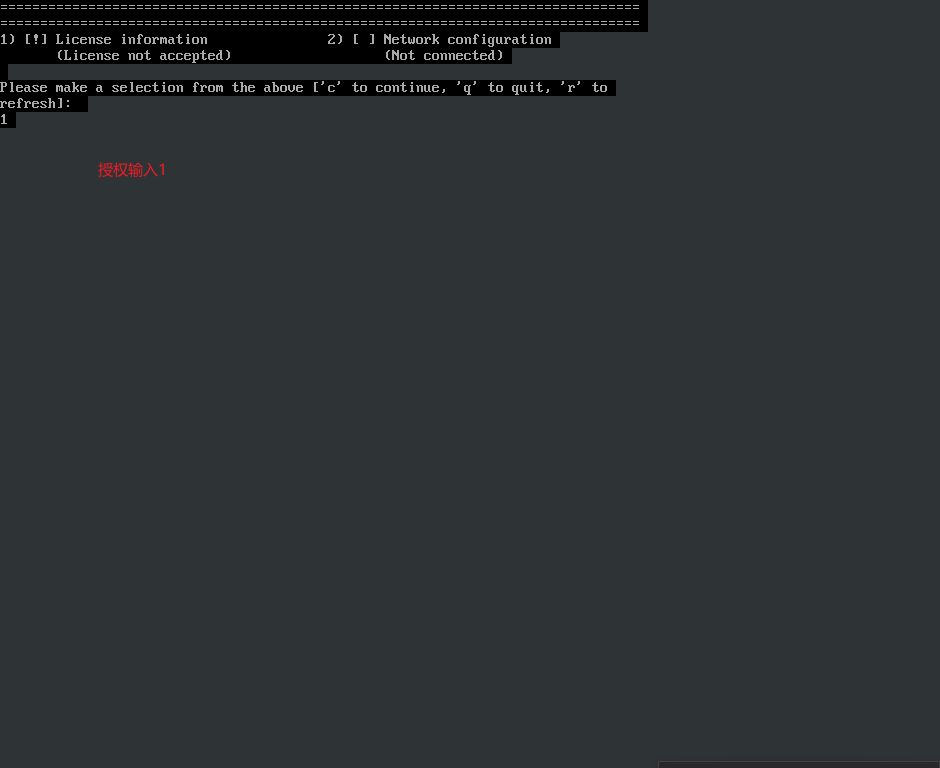
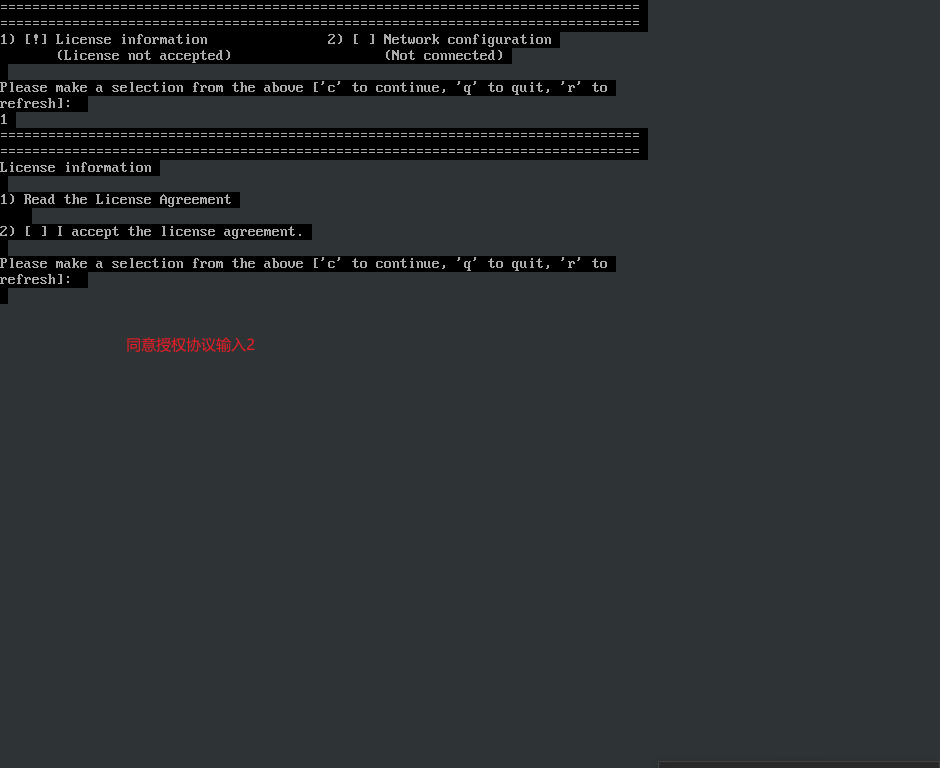
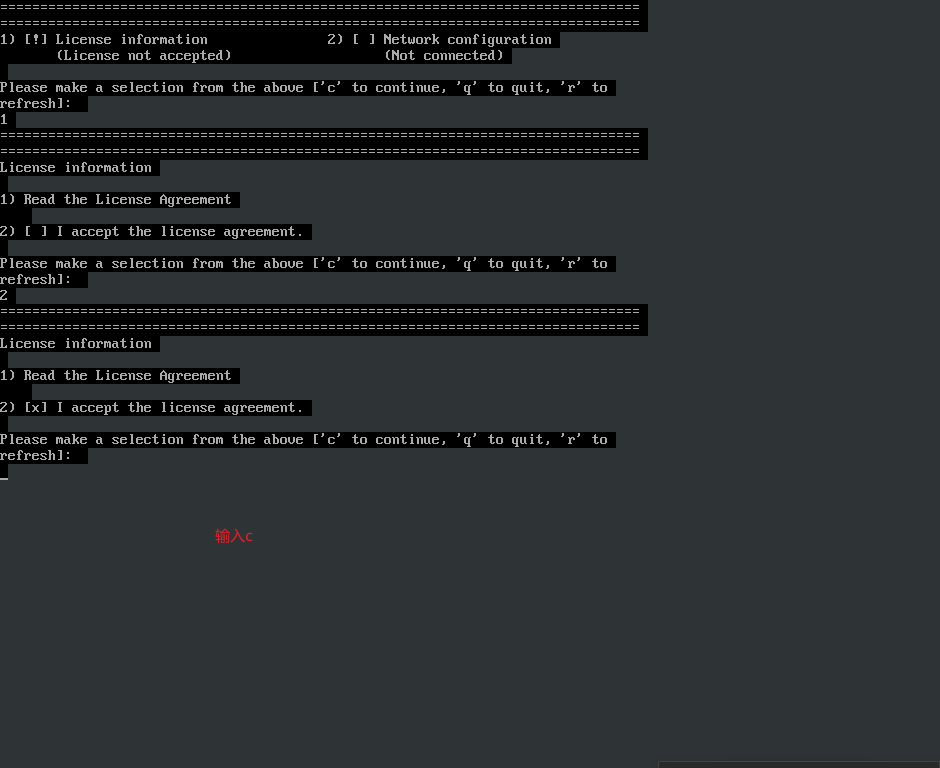
1.授权配置
- 重启完成后,在配置界面,先处理授权信息。阅读授权协议并选择接受协议(输入相应选项,如 “2” 选择接受,再输入 “c” 继续)。

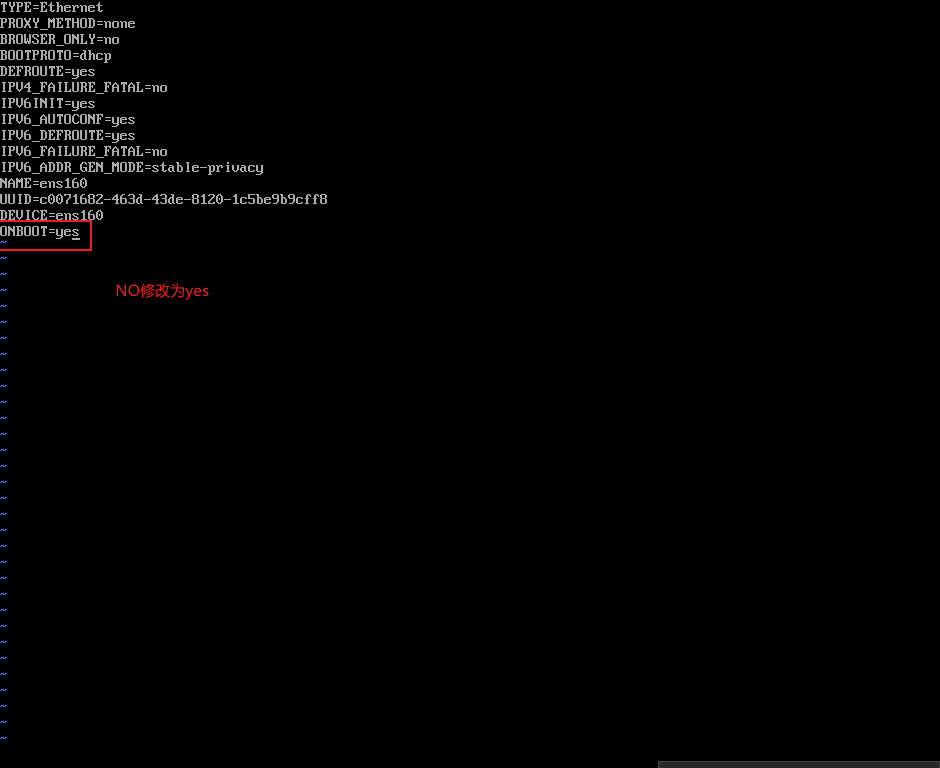
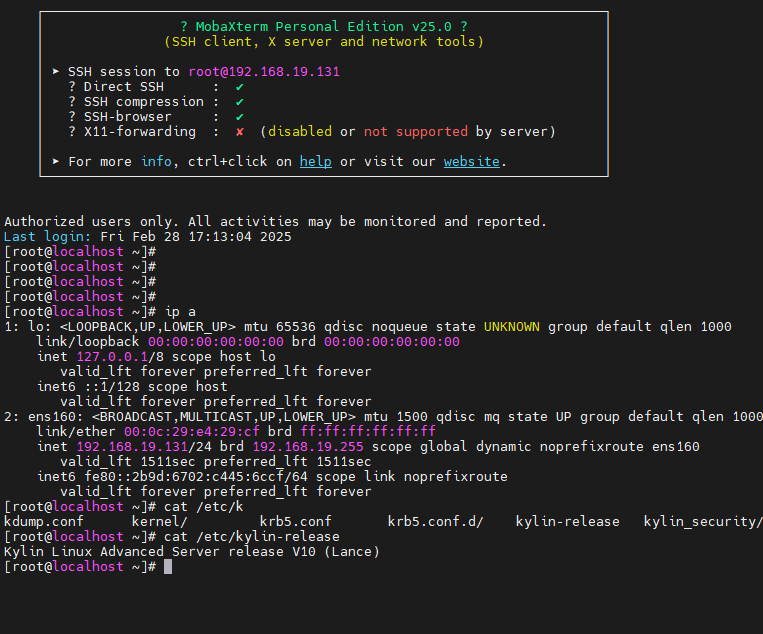
2.登录与网卡配置
- 使用 root 用户登录系统,查看网卡名称。修改网卡配置文件 “/etc/sysconfig/network-scripts/ifcfg-ens160”,将 “ONBOOT” 的值从 “NO” 修改为 “yes” 。

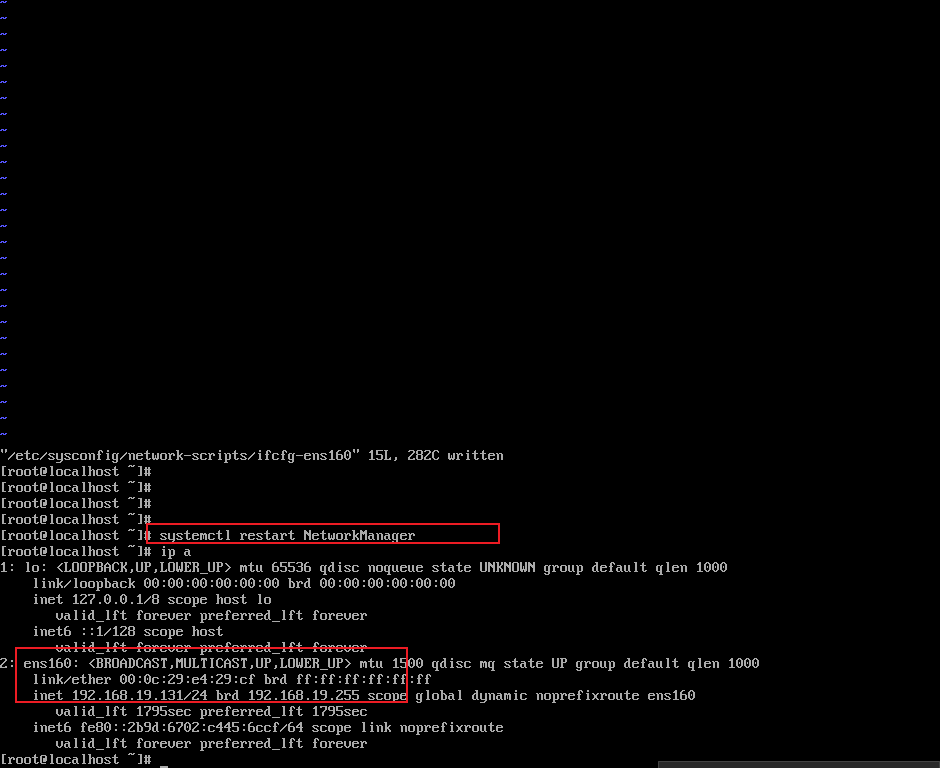
3.重启网卡与查询 IP
- 重启网卡配置后,查询网卡的 IP 地址,确保网络配置生效。
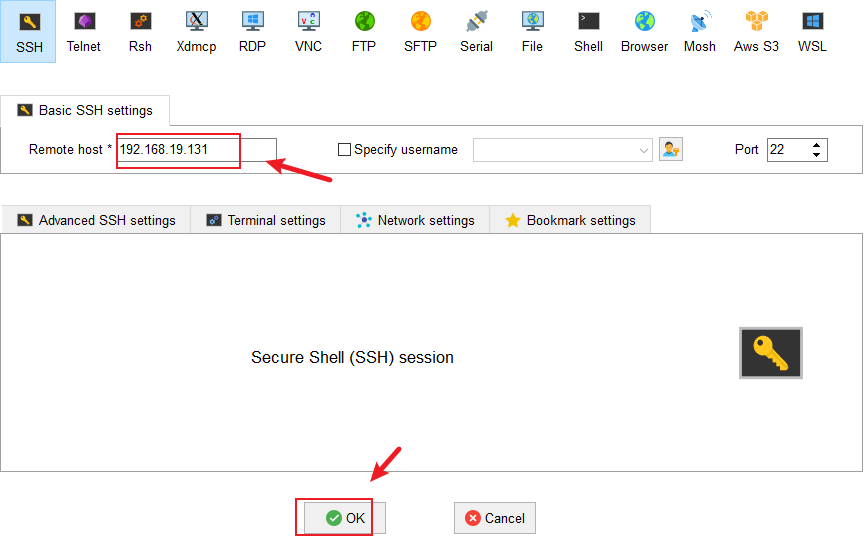
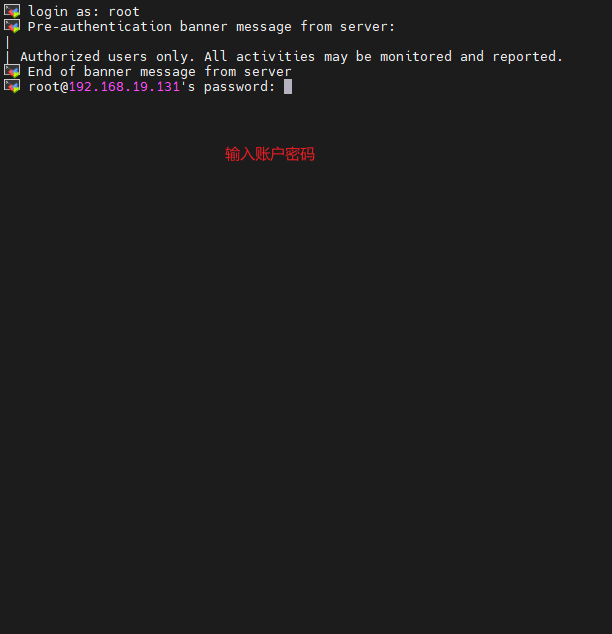
4.通过 ssh 终端登录系统
- 使用 SSH 终端登录系统,输入远程主机 IP 地址(192.168.19.131)、端口(22),选择 root 用户登录并输入密码 。
四、麒麟系统基础配置
1.配置生产环境内核参数及 Kylin 源
- 配置 Kylin 源,修改 “/etc/yum.repos.d/kylin_x86_64.repo” 文件,设置好相应的仓库地址、gpgcheck、gpgkey 及 enabled 等参数 。
[root@localhost ~]# cat /etc/yum.repos.d/kylin_x86_64.repo
###Kylin Linux Advanced Server 10 - os repo###

[ks10-adv-os]
name = Kylin Linux Advanced Server 10 - Os
baseurl = https://update.cs2c.com.cn/NS/V10/V10SP3/os/adv/lic/base/$basearch/
gpgcheck = 1
gpgkey=file:///etc/pki/rpm-gpg/RPM-GPG-KEY-kylin
enabled = 1

[ks10-adv-updates]
name = Kylin Linux Advanced Server 10 - Updates
baseurl = https://update.cs2c.com.cn/NS/V10/V10SP3/os/adv/lic/updates/$basearch/
gpgcheck = 1
gpgkey=file:///etc/pki/rpm-gpg/RPM-GPG-KEY-kylin
enabled = 1

[ks10-adv-addons]
name = Kylin Linux Advanced Server 10 - Addons
baseurl = https://update.cs2c.com.cn/NS/V10/V10SP3/os/adv/lic/addons/$basearch/
gpgcheck = 1
gpgkey=file:///etc/pki/rpm-gpg/RPM-GPG-KEY-kylin
enabled = 0
[root@localhost ~]#

#清理YUM缓存
yum clean all
#重建仓库缓存
yum makecache
#当前启用仓库
yum repolist
2.安装最小化的依赖包
- 安装常用的工具和依赖包
yum install  vim iotop bc gcc gcc-c++ glibc glibc-devel pcre pcre-devel openssl \
openssl-devel zip unzip zlib-devel  net-tools lrzsz tree ntpdate telnet lsof tcpdump \
wget libevent libevent-devel bc  systemd-devel bash-completion traceroute  bridge-utils  -y
3.关闭防火墙及相关配置(可选)
- 关闭防火墙并设置开机不启动,使用 “systemctl stop firewalld” 和 “systemctl disable firewalld” 命令 。
systemctl stop firewalld
systemctl disable  firewalld

开放端口(四种场景)
(1) 对所有IP开放端口(开放 8080 端口示例)
bash
sudo firewall-cmd --zone=public --add-port=8080/tcp --permanent
(2) 对特定IP开放端口(允许 192.168.1.100 访问 3306 端口)
bash
sudo firewall-cmd --zone=public --add-rich-rule='
 rule family="ipv4"
 source address="192.168.1.100"
 port protocol="tcp" port="3306" accept' --permanent
(3) 对IP段开放端口(允许 192.168.1.0/24 网段访问 80 端口)
bash
sudo firewall-cmd --zone=public --add-rich-rule='
 rule family="ipv4"
 source address="192.168.1.0/24"
 port protocol="tcp" port="80" accept' --permanent
(4) 开放服务(如HTTP/HTTPS)
bash
sudo firewall-cmd --add-service=http --permanent
sudo firewall-cmd --add-service=https --permanent


移除规则
bash
# 移除端口规则
sudo firewall-cmd --remove-port=8080/tcp --permanent

# 移除IP规则
sudo firewall-cmd --remove-rich-rule='
 rule family="ipv4"
 source address="192.168.1.100"
 port protocol="tcp" port="3306" accept' --permanent
重载防火墙使规则生效
bash
sudo firewall-cmd --reload
验证规则
bash
# 查看所有开放端口
sudo firewall-cmd --list-ports

# 查看详细规则(含IP限制)
sudo firewall-cmd --list-all

# 检查特定IP规则
sudo firewall-cmd --list-rich-rules
保存规则(可选)
bash
sudo firewall-cmd --runtime-to-permanent
4.关闭selinux配置文件(可选)
- 关闭 selinux 配置文件,修改 “/etc/sysconfig/selinux” 文件,将 “SELINUX” 的值设置为 “disabled” 。
[root@openstack network-scripts]# cat /etc/sysconfig/selinux

# This file controls the state of SELinux on the system.
# SELINUX= can take one of these three values:
#     enforcing - SELinux security policy is enforced.
 #     permissive - SELinux prints warnings instead of enforcing.
#     disabled - No SELinux policy is loaded.
SELINUX=disabled
# SELINUXTYPE= can take one of three values:
#     targeted - Targeted processes are protected,
#     minimum - Modification of targeted policy. Only selected processes are protected.
#     mls - Multi Level Security protection.
SELINUXTYPE=targeted
5.配置内核参数优化(可选)
- 修改 “/etc/sysctl.conf” 文件,对内核参数进行优化,如网络参数、内存参数、TCP 参数等 。
[root@openstack network-scripts]# cat /etc/sysctl.conf
# Controls source route verification
net.ipv4.conf.default.rp_filter = 1
net.ipv4.ip_nonlocal_bind = 1
net.ipv4.ip_forward = 1

# Do not accept source routing
net.ipv4.conf.default.accept_source_route = 0

# Controls the System Request debugging functionality of the kernel
kernel.sysrq = 0

# Controls whether core dumps will append the PID to the core filename.
# Useful for debugging multi-threaded applications.
kernel.core_uses_pid = 1

# Controls the use of TCP syncookies
net.ipv4.tcp_syncookies = 1

# Disable netfilter on bridges.
net.bridge.bridge-nf-call-ip6tables = 0
net.bridge.bridge-nf-call-iptables = 0
net.bridge.bridge-nf-call-arptables = 0

# Controls the default maxmimum size of a mesage queue
kernel.msgmnb = 65536

# # Controls the maximum size of a message, in bytes
kernel.msgmax = 65536

# Controls the maximum shared segment size, in bytes
kernel.shmmax = 68719476736

# # Controls the maximum number of shared memory segments, in pages
kernel.shmall = 4294967296


# TCP kernel paramater
net.ipv4.tcp_mem = 786432 1048576 1572864
net.ipv4.tcp_rmem = 4096        87380   4194304
net.ipv4.tcp_wmem = 4096        16384   4194304
net.ipv4.tcp_window_scaling = 1
net.ipv4.tcp_sack = 1

# socket buffer
net.core.wmem_default = 8388608
net.core.rmem_default = 8388608
net.core.rmem_max = 16777216
net.core.wmem_max = 16777216
net.core.netdev_max_backlog = 262144
net.core.somaxconn = 20480
net.core.optmem_max = 81920


# TCP conn
net.ipv4.tcp_max_syn_backlog = 262144
net.ipv4.tcp_syn_retries = 3
net.ipv4.tcp_retries1 = 3
net.ipv4.tcp_retries2 = 15

# tcp conn reuse
net.ipv4.tcp_tw_reuse = 1
net.ipv4.tcp_tw_recycle = 1
net.ipv4.tcp_fin_timeout = 1


net.ipv4.tcp_max_tw_buckets = 20000
net.ipv4.tcp_max_orphans = 3276800
net.ipv4.tcp_timestamps = 1 #?
net.ipv4.tcp_synack_retries = 1
net.ipv4.tcp_syncookies = 1

# keepalive conn
net.ipv4.tcp_keepalive_time = 300
net.ipv4.tcp_keepalive_intvl = 30
net.ipv4.tcp_keepalive_probes = 3
net.ipv4.ip_local_port_range = 10001    65000

# swap
vm.overcommit_memory = 0
vm.swappiness = 10

#net.ipv4.conf.eth1.rp_filter = 0
#net.ipv4.conf.lo.arp_ignore = 1
#net.ipv4.conf.lo.arp_announce = 2
#net.ipv4.conf.all.arp_ignore = 1
#net.ipv4.conf.all.arp_announce = 2
6.配置文件大小限制
- 修改 “/etc/security/limits.conf” 文件,配置文件大小、进程数、文件描述符等的限制 。
[root@openstack network-scripts]# cat /etc/security/limits.conf
#上面省略,以下是重要部分
*                soft    core          unlimited
*                hard    core          unlimited
*                soft    nproc         1000000
*                hard    nproc         1000000
*                soft    nofile        1000000
*                hard    nofile        1000000
*                soft    memlock       32000
*                hard    memlock       32000
*                soft    msgqueue      8192000
*                hard    msgqueue      8192000
五、配置安装docker
1.配置 CentOS 镜像源。
- 由于 kylin 官方源缺少依赖,所以使用以下命令配置 CentOS 镜像源:
curl -o /etc/yum.repos.d/CentOS-Base.repo https://mirrors.aliyun.com/repo/Centos-8.repo
2.添加 docker 镜像源
yum-config-manager --add-repo https://mirrors.aliyun.com/docker-ce/linux/centos/docker-ce.repo
3.替换 docker 镜像源
sed -i 's+download.docker.com+mirrors.aliyun.com/docker-ce+' /etc/yum.repos.d/docker-ce.repo
注意:修改 centos 和 docker repo文件中的 $releasever 为 centos_version ,原因是在麒麟服务器操作系统V10中 $releasever 被修改为了 10,而我们需要使用 centos 8 的镜像源,如果不替换,仓库的每一个地址都是404。
4.新建 centos_version 文件并追加内容“8”:
echo 8 > /etc/yum/vars/centos_version
5.替换 docker-ce.repo 镜像源地址的$releaseserver 为 $centos_version
sed -i 's/$releasever/$centos_version/g' /etc/yum.repos.d/docker-ce.repo
6.替换 CentOS-Base.repo 镜像源地址的$releaseserver 为 $centos_version
sed -i 's/$releasever/$centos_version/g' /etc/yum.repos.d/CentOS-Base.repo
7.清理本地缓存
dnf clean all
8.创建缓存
yum makecache
9.查看 docker-ce 版本列表
yum list docker-ce --showduplicates | sort -r
10.卸载旧的 Docker
- 若系统中存在旧的 Docker,使用以下命令卸载:
yum remove -y docker \
    docker-client \
    docker-client-latest \
    docker-common \
    docker-latest \
    docker-latest-logrotate \
    docker-logrotate \
    docker-engine \
    docker-selinux
11.安装 docker-ce
yum install docker-ce docker-ce-cli containerd.io -y
12.更换 docker 镜像源
vim /etc/docker/daemon.json
{
  "registry-mirrors": [
   "https://a5hnw7pp.mirror.aliyuncs.com",
   "https://hub.xdark.top",
   "https://hub.littlediary.cn",
   "https://dockerpull.org",
   "https://docker.1panelproxy.com",
   "https://2m11665s.mirror.aliyuncs.com",
   "https://registry.docker-cn.com",
   "https://dockerhub.azk8s.cn",
   "https://docker.mirrors.ustc.edu.cn",
   "http://hub-mirror.c.163.com",
   "https://k8s.gcr.io",
   "https://github-releases.githubusercontent.com",
   "https://vsxcs7sq.mirror.aliyuncs.com",
   "https://ustc-edu-cn.mirror.aliyuncs.com"]
}

export PATH=$PATH:/path/to/docker_directory
source ~/.bashrc

 systemctl daemon-reload
 systemctl start docker
 systemctl enable docker
 systemctl restart docker
六、二进制安装docker
1.下载 Docker 安装包
- 从以下链接下载 Docker及Docker compose安装包:
https://download.docker.com/linux/static/stable/
https://github.com/docker/compose/
2.创建docker用户及用户组
groupadd docker
usermod -aG docker $USER             # 将当前用户加入 docker 组
useradd -m -g docker -s /sbin/bash docker    #创建 docker 用户,主组设为现有 docker 组
或
useradd -s /sbin/nologin docker             #创建一个名为 docker 的系统用户,并禁止该用户登录系统
3.上传及创建目录
mkdir -p /opt/software/docker && cd /opt/software/docker/
tar -xzvf docker-27.5.1.tgz
4.修改文件及文件夹属性
chown -R docker.docker docker
cp -a docker/* /usr/bin/
5.测试 Docker
- 此步骤很重要,第一次执行需要手动执行确认权限:
docker -v
dockerd
6.编辑 docker 的系统服务文件
cat >> /lib/systemd/system/docker.service << EOF
[Unit]
Description=Docker Application Container Engine
Documentation=https://docs.docker.com
After=network-online.target firewalld.service
Wants=network-online.target

[Service]
Type=notify
ExecStart=/usr/bin/dockerd
ExecReload=/bin/kill -s HUP
LimitNOFILE=infinity
LimitNPROC=infinity
LimitCORE=infinity
TimeoutStartSec=0
Delegate=yes
KillMode=process
Restart=on-failure
StartLimitBurst=3
StartLimitInterval=60s

[Install]
WantedBy=multi-user.target
EOF
7.为 docker.service 添加执行权限
chmod +x /lib/systemd/system/docker.service
8.创建 docker 配置
mkdir -p /etc/docker

cat >> /etc/docker/daemon.json <<EOF
{
  "exec-opts": ["native.cgroupdriver=systemd"],
  "registry-mirrors": [
    "https://docker.fxxk.dedyn.io",
    "https://docker-mirror.aigc2d.com"
  ],
  "max-concurrent-downloads": 10,
  "log-driver": "json-file",
  "log-level": "warn",
  "log-opts": {
    "max-size": "10m",
    "max-file": "3"
    },
  "data-root": "/var/lib/docker"
}
EOF
9.启动 Docker
systemctl daemon-reload
systemctl start docker
systemctl enable docker
systemctl status docker
docker -v
10.上传及安装docker-compose
mv docker-compose-linux-x86_64 /usr/bin/docker-compose
chmod +x /usr/bin/docker-compose
docker-compose -v

 浙公网安备 33010602011771号