实现微信公众号扫描登录||Retrofit2 对接微信接口
https://developers.weixin.qq.com/doc/offiaccount/Account_Management/Generating_a_Parametric_QR_Code.html
1/通过ticket换取二维码
请求:https://mp.weixin.qq.com/cgi-bin/showqrcode?ticket=TICKET TICKET记得进行UrlEncode
返回:http 返回码是200,是一张图片,可以直接展示或者下载。
2/获取ticket
请求: POST URL: https://api.weixin.qq.com/cgi-bin/qrcode/create?access_token=TOKEN
参数:
{"expire_seconds": 604800, "action_name": "QR_STR_SCENE", "action_info": {"scene": {"scene_str": "test"}}}
返回:
{"ticket":"gQH47joAAAAAAAAAASxodHRwOi8vd2VpeGluLnFxLmNvbS9xL2taZ2Z3TVRtNzJXV1Brb3ZhYmJJAAIEZ23sUwMEmm
3sUw==","expire_seconds":60,"url":"http://weixin.qq.com/q/kZgfwMTm72WWPkovabbI"}
3/获取access_token
https://developers.weixin.qq.com/doc/offiaccount/Basic_Information/Get_access_token.html
公众号和小程序均可以使用AppID和AppSecret调用本接口来获取access_token。AppID和AppSecret可在“微信公众平台-设置与开发--基本配置
https://mp.weixin.qq.com/debug/cgi-bin/sandboxinfo?action=showinfo&t=sandbox/index
请求:https请求方式: GET https://api.weixin.qq.com/cgi-bin/token?grant_type=client_credential&appid=APPID&secret=APPSECRET
返回:{"access_token":"ACCESS_TOKEN","expires_in":7200}
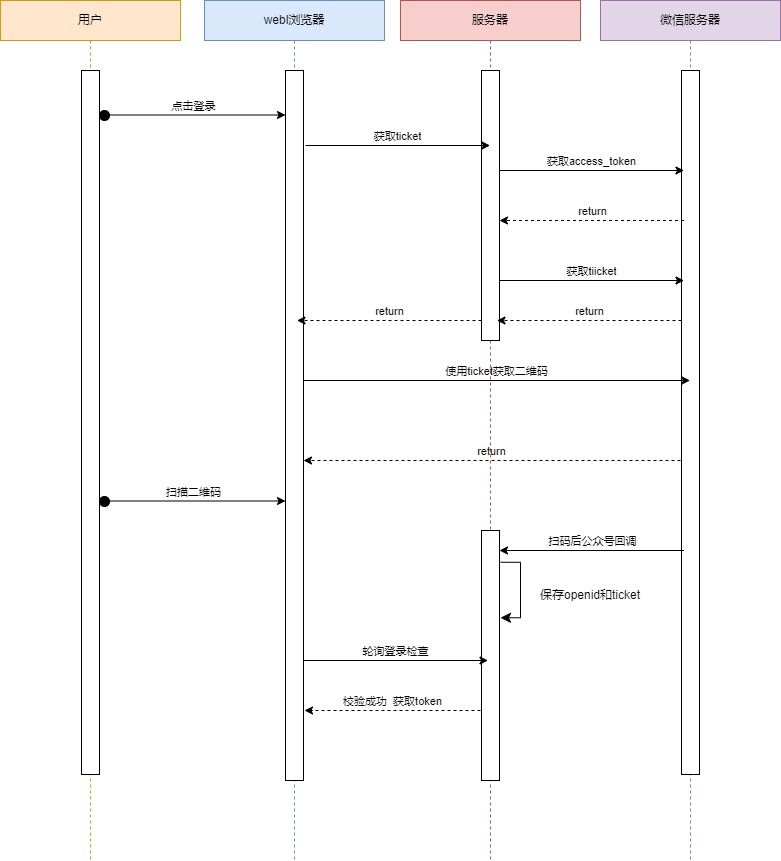
流程图:
Retrofit2 对接微信获取 access_token 的接口为例
1.添加依赖
<dependency>
   <groupId>com.squareup.retrofit2</groupId>
   <artifactId>retrofit</artifactId>
   <version>2.9.0</version>
</dependency>
<dependency>
   <groupId>com.squareup.retrofit2</groupId>
   <artifactId>converter-jackson</artifactId>
   <version>2.9.0</version>
</dependency>
2.定义数据模型:创建一个 Java 类来映射返回的 JSON 数据。
@Data
public class WexinTokenRes {
   private String access_token;
   private int expires_in;
   private String errcode;
   private String errmsg;
}
3.定义 API 接口:使用 Retrofit2 定义一个接口来描述请求。
//使用 API 服务:在其他 Spring 组件(如 Service 类)中,直接注入 IWeixinApiService 并调用接口方法,无需手动处理 HTTP 请求。
public interface IWeixinApiService {

   @GET("cgi-bin/token")
   Call<WexinTokenRes> getAccessToken(//获取access_token
           @Query("grant_type") String grantType,
           @Query("appid") String appid,
           @Query("secret") String secret
   );

   @POST("cgi-bin/qrcode/create")//获取ticket凭证
   Call<WeixinQrCodeRes> createQrCode(
           @Query("access_token") String accessToken,
           @Body WeixinQrCodeReq weixinQrCodeReq
   );

   @POST("cgi-bin/message/template/send")//发送模板消息
   Call<Void> sendMessage(@Query("access_token") String accessToken, @Body WeixinTemplateMessageVO weixinTemplateMessageVO);

}
4.接口实现
@Slf4j
@Configuration
public class Retrofit2Config {
   private static final String BASE_URL = "https://api.weixin.qq.com/";

   //配置 Retrofit 客户端:retrofit() 方法创建并配置 Retrofit,设置基础 URL 和 JSON 转换器。
   @Bean
   public Retrofit retrofit(){
       return new Retrofit.Builder()
               .baseUrl(BASE_URL)
               .addConverterFactory(JacksonConverterFactory.create())
               .build();
   }
   //生成 API 接口实现:weixinApiService() 方法利用 Retrofit 实例生成 IWeixinApiService 的代理对象。
   @Bean
   public IWeixinApiService weixinApiService(Retrofit retrofit){
       return retrofit.create(IWeixinApiService.class);
   }
}

5.使用示例:在其他类中调用getAccessToken方法获取微信 access_token。
@Service
public class WeixinLoginServiceImpl implements ILoginService {

   @Value("${weixin.config.app-id}")
   private String appid;
   @Value("${weixin.config.app-secret}")
   private String appSecret;
   @Value("${weixin.config.template_id}")
   private String template_id;


   @Resource
   private IWeixinApiService weixinApiService;
   @Resource
   private Cache<String, String>  weixinAccessToken;
   @Resource
   private Cache<String, String> openidToken;

   @Override
   public String createQrCodeTicket() throws Exception {
       //1.获取accessToken
       String accessToken = weixinAccessToken.getIfPresent(appid);
       if(accessToken == null){
           Call<WeixinTokenRes> call =  weixinApiService.getAccessToken("client_credential",appid,appSecret);
           WeixinTokenRes weixinTokenRes = call.execute().body();
           assert weixinTokenRes != null;
           accessToken  = weixinTokenRes.getAccess_token();
           weixinAccessToken.put(appid,accessToken);
       }

       //2.生成ticket
       WeixinQrCodeReq weixinQrCodeReq = WeixinQrCodeReq.builder()
               .expire_seconds(2592000)
               .action_name(WeixinQrCodeReq.ActionNameTypeVO.QR_SCENE.getCode())
               .action_info(WeixinQrCodeReq.ActionInfo.builder()
                       .scene(WeixinQrCodeReq.ActionInfo.Scene.builder()
                               .scene_id(100601)
                               .build())
                       .build())
               .build();
       Call<WeixinQrCodeRes> call =  weixinApiService.createQrCode(accessToken,weixinQrCodeReq);
       WeixinQrCodeRes weixinQrCodeRes = call.execute().body();
       assert null != weixinQrCodeRes;
       return weixinQrCodeRes.getTicket();
   }

@Override
   public String checkLogin(String ticket) {
       return openidToken.getIfPresent(ticket);
   }

   @Override
   public void saveLoginState(String ticket, String openid) throws IOException {
       openidToken.put(ticket, openid);
       // 1. 获取 accessToken
       String accessToken = weixinAccessToken.getIfPresent(appid);//发送模板消息
       if (null == accessToken) {
           Call<WeixinTokenRes> call = weixinApiService.getAccessToken("client_credential", appid, appSecret);
           WeixinTokenRes weixinTokenRes = call.execute().body();
           assert weixinTokenRes != null;
           accessToken = weixinTokenRes.getAccess_token();
           weixinAccessToken.put(appid, accessToken);
       }
       //2.发送模板消息
       Map<String, Map<String, String>> data = new HashMap<>();
       WeixinTemplateMessageVO.put(data, WeixinTemplateMessageVO.TemplateKey.USER, openid);

       WeixinTemplateMessageVO templateMessageDTO = new WeixinTemplateMessageVO(openid, template_id);
       templateMessageDTO.setTouser(openid);
       templateMessageDTO.setUrl("");
       templateMessageDTO.setData(data);
       Call<Void> call = weixinApiService.sendMessage(accessToken, templateMessageDTO);
       call.execute();
   }
}

 浙公网安备 33010602011771号