没有废话,直接上干货,理论部分大家可以看其它资料。
这里是部分关键代码,如果需要全部可运行的代码,请给本人留言。
在后继,还将给出搭建高可用Eureka架构的方式。
1 Eureka的框架图
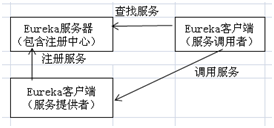
在Eureka的服务器里,包含着记录当前所有服务列表的注册中心,而服务提供者和调用者所在的机器均被称为“Eureka客户端”。
服务提供者会和服务器进行如下的交互:第一,注册本身能提供的服务,第二,定时发送心跳,以此证明本服务处于生效状态。而服务调用者一般会从服务器查找服务,并根据找到的结果从服务提供者这端调用服务。
2.1搭建Eureka服务器
这里我们将在EurekaBasicDemo-Server项目里编写Eureka服务器的代码。
第一步,当我们创建完Maven类型的项目后,需要在pom.xml里编写该项目所需要的依赖包,关键代码如下。
1    <dependencyManagement>
2         <dependencies>
3             <dependency>
4                 <groupId>org.springframework.cloud</groupId>
5    <artifactId>spring-cloud-dependencies</artifactId>
6                 <version>Brixton.SR5</version>
7                 <type>pom</type>
8                 <scope>import</scope>
9             </dependency>
10         </dependencies>
11      </dependencyManagement>
12      <dependencies>
13        <dependency>
14            <groupId>org.springframework.cloud</groupId>
15    <artifactId>spring-cloud-starter-eureka-server</artifactId>
16        </dependency>
17    </project>
从第1到第11行,我们引入了版本号是Brixton.SR5的Spring Cloud包,这个包里包含着Eureka的支持包,在第13到16行的代码里,引入了Eureka Server端的支持包,引入后,我们才能在项目的java文件里使用Eureka的特性。
第二步,在application.yml里,需要配置Eureka服务端的信息,代码如下。
1    server:
2      port: 8888
3    eureka:
4      instance:
5        hostname: localhost
6      client:
7        register-with-eureka: false
8        fetch-registry: false
9        serviceUrl:
10          defaultZone: http://localhost:8888/eureka/
从第2和第5行里,我们指定了Eureka服务端使用的主机地址和端口号,这里分别是localhost和8888,也就是说让服务端运行在本地8888号端口,在第10行里,我们指定了服务端所在的url地址。
由于这已经是服务器端,所以我们通过第7行的代码,指定无需向Eureka注册中心注册自己,同理,服务器端的职责是维护服务列表而不是调用服务,所以通过第8行的代码指定本端无需检索服务。
第三步,在RegisterCenterApp.java里编写Eureka启动代码。
1    省略必要的package和import代码
2    @EnableEurekaServer //指定本项目是Eureka服务端
3    @SpringBootApplication
4    public class RegisterCenterApp
5    {
6        public static void main( String[] args )
7        {SpringApplication.run(RegisterCenterApp.class, args);}
8    }
在第6行的main函数里,我们还是通过run方法启动Eureka服务。
运行App.java启动Eureka服务器端后,在浏览器里输入localhost:8888后,可以看到如下图所示的Eureka服务器端的信息面板,其中Instances currently registered with Eureka目前是空的,说明尚未有服务注册到本服务器的注册中心。

2.2 编写作为服务提供者的Eureka客户端
这里我们将在EurekaBasicDemo-ServerProvider项目里编写Eureka客户端的代码,在这个项目里,我们将提供一个SayHello的服务。
第一步,创建完Maven类型的项目后,我们需要在pom.xml里写入本项目的依赖包,关键代码如下。本项目所用到的依赖包之前都用过,所以这里就不展开讲了。
1    <dependencyManagement>
2         <dependencies>
3             <dependency>
4                 <groupId>org.springframework.cloud</groupId>              <artifactId>spring-cloud-dependencies</artifactId>
5                 <version>Brixton.SR5</version>
6                 <type>pom</type>
7                 <scope>import</scope>
8             </dependency>
9         </dependencies>
10      </dependencyManagement>
11      <dependencies>
12        <dependency>
13                <groupId>org.springframework.boot</groupId>
14                <artifactId>spring-boot-starter-web</artifactId>
15                <version>1.5.4.RELEASE</version>
16        </dependency>
17        <dependency>
18            <groupId>org.springframework.cloud</groupId>
19            <artifactId>spring-cloud-starter-eureka</artifactId>
20        </dependency>
21      </dependencies>
第二步,在application.yml里编写针对服务提供者的配置信息,代码如下。
1    server:
2      port: 1111
3    spring:
4      application:
5        name: sayHello
6    eureka:
7      client:
8        serviceUrl:
9          defaultZone: http://localhost:8888/eureka/
从第2行里,我们能看到本服务将启用1111号端口,在第5行,我们指定了本服务的名字,叫sayHello,在第9行,我们把本服务注册到了Eureka服务端,也就是注册中心里。
第三步,在Controller.java里,编写控制器部分的代码,在其中实现对外的服务。
1    //省略必要的package和import代码
2    @RestController //说明这是个控制器
3    public class Controller {
4        @Autowired //描述Eureka客户端信息的类
5        private DiscoveryClient client;
6        @RequestMapping(value = "/hello/{username}", method = RequestMethod.GET    )
7        public String hello(@PathVariable("username") String username) {
8            ServiceInstance instance = client.getLocalServiceInstance();
9             //输出服务相关的信息
10            System.out.println("host is:" + instance.getHost());
11            System.out.println("port is:" + instance.getPort());
12            System.out.println("ServiceID is:" + instance.getServiceId() );
13            //返回字符串
14            return "hello " + username;
15        }
16    }
我们通过第6和第7行的代码,指定了能触发hello方法的url格式,在这个方法里,我们首先通过第10到12行的代码,输出了主机名、端口号和ServiceID等信息,并在第14行里,返回了一个字符串。
第四步,编写Spring Boot的启动类ServiceProviderApp.java,代码如下。
1    //省略必要的package和import代码
2    @SpringBootApplication
3    @EnableEurekaClient
4    public class ServiceProviderApp {
5        public static void main( String[] args )
6        {SpringApplication.run(ServiceProviderApp.class, args);}
7    }
由于这是处于Eureka的客户端,所以加入第3行所示的注解,在main函数里,我们依然是通过run方法启动Spring Boot服务。
2.3 编写服务调用者的代码
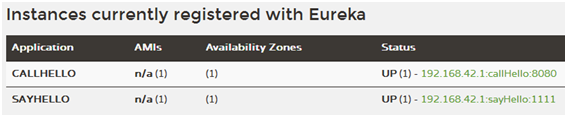
启动Eureka服务器端的RegisterApp.java和服务提供者端的ServiceProviderApp.java,在浏览器里输入http://localhost:8888/后,在Eureka的信息面板里能看到SayHello服务,如下图所示。

如果这时我们在浏览器里输入http://localhost:1111/hello/Mike,能直接调用服务,同时能看浏览器里看到“hello Mike”的输出。不过在大多数的场景里,我们一般是在程序里调用服务,而不是简单地通过浏览器调用,在下面的EurekaBasicDemo-ServiceCaller项目里,我们将演示在Eureka客户端调用服务的步骤。
第一步。在这个Maven项目里,我们编写如下的pom.xml配置,关键代码如下。
1    <dependencyManagement>
2         <dependencies>
3             <dependency>
4                 <groupId>org.springframework.cloud</groupId>
                      <artifactId>spring-cloud-dependencies</artifactId>
5                 <version>Brixton.SR5</version>
6                 <type>pom</type>
7                 <scope>import</scope>
8             </dependency>
9         </dependencies>
10      </dependencyManagement>
11      <dependencies>
12        <dependency>
13            <groupId>org.springframework.boot</groupId>
14            <artifactId>spring-boot-starter-web</artifactId>
15            <version>1.5.4.RELEASE</version>
16        </dependency>
17        <dependency>
18            <groupId>org.springframework.cloud</groupId>
19            <artifactId>spring-cloud-starter-eureka</artifactId>
20        </dependency>
21        <dependency>
22           <groupId>org.springframework.cloud</groupId>
23           <artifactId>spring-cloud-starter-ribbon</artifactId>
24        </dependency>
25      </dependencies>
请大家注意,从第21到24行,我们需要引入 ribbon的依赖包,通过它我们可以实现负载均衡。而其它的依赖包我们之前都已经见过,所以就不再解释了。
第二步,在application.yml里,我们编写针对本项目的配置信息,代码如下。
1    spring:
2      application:
3        name: callHello
4    server:
5      port: 8080
6    eureka:
7      client:
8        serviceUrl:
9          defaultZone: http://localhost:8888/eureka/
在第3行里,我们指定了本服务的名字叫callHello,在第5行里我们指定了本服务是运行在8080端口,在第9行里,我们把本服务注册到Eureka服务器上。
第三步,编写提供服务的控制器类,在其中调用服务提供者的提供的服务,代码如下。
1    //省略必要的package和import代码
2    @RestController
3    @Configuration
4    public class Controller {
5        @Bean
6        @LoadBalanced
7        public RestTemplate getRestTemplate()
8        { return new RestTemplate();   }
9
10        @RequestMapping(value = "/hello", method = RequestMethod.GET    )
11        public String hello() {
12            RestTemplate template = getRestTemplate();
13            String retVal = template.getForEntity("http://sayHello/hello/Eureka", String.class).getBody();
14            return "In Caller, " + retVal;
15        }
16    }
在第7行的getRestTemplate方法上,我们启动了@LoadBalanced(负载均衡)的注解。关于负载均衡的细节将在后面章节里详细描述,这里我们引入@LoadBalanced注解的原因是,RestTemplate类型的对象本身不具备调用远程服务的能力,也就是说,如果我们去掉这个注解,程序未必能跑通。只有当我们引入该注解,该方法所返回的对象才能具备调用远程服务的能力。
在提供服务的第11行的hello方法里,我们是通过第13行的代码,用RestTemplate类型对象的getForEntity方法,调用服务提供者sayHello提供的hello方法。
这里我们是通过http://sayHello/hello/Eureka这个url去发现对应的服务,在这个url里,只包含了服务名sayHello,并没有包含服务所在的主机名和端口号,换句话说,该url其实是通过注册中心定位到sayHello服务的物理位置的。
至于这个url和该服务物理位置的绑定关系,是在Eureka内部实现的,这也是Eureka可以被称作“服务发现框架”的原因。
第四步,在ServiceCallerApp.java方法里,我们编写启动本服务的代码,这我们已经很熟悉了,所以就不再讲述了。
1    //省略必要的package和import代码
2    @EnableDiscoveryClient
3    @SpringBootApplication
4    public class ServiceCallerApp
5    {
6        public static void main( String[] args )
7        {SpringApplication.run(ServiceCallerApp.class, args); }
8    }
2.4 通过服务调用者调用服务
当我们依次启动Eureka服务器(也就是注册中心)、服务提供者和服务调用者的Spring Boot启动程序后,在浏览器里输入http://localhost:8888/后,能在信息面板里看到有两个服务,分别是服务提供者SayHello和服务调用者CallHello,如下图所示。
由于服务调用者运行在8080端口上,所以如果我们在浏览器里输入http://localhost:8080/hello,能看到在浏览器里输出“In Caller, hello Eureka”,这就说明它确实已经调用了服务提供者SayHello里的hello方法。
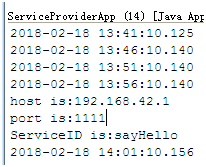
此外,我们还能在服务提供者所在的控制台里看到host、port和ServiceID的输出,如下图所示,这能进一步验证了服务提供者里控制器类里的hello方法被服务调用者调到。

 浙公网安备 33010602011771号