

Python基础-week05 Python常用模块的使用
一.模块介绍
模块,用一砣代码实现了某个功能的代码集合。
类似于函数式编程和面向过程编程,函数式编程则完成一个功能,其他代码用来调用即可,提供了代码的重用性和代码间的耦合。而对于一个复杂的功能来,可能需要多个函数才能完成(函数又可以在不同的.py文件中),n个 .py 文件组成的代码集合就称为模块。
1.定义
模块:用来从逻辑上组织python代码(变量,函数,类,逻辑),本质就是.py结尾的python文件名,用途就是实现一个功能。
例如:文件名为test.py,对应的模块就是test
2.导入方法
import module_name1
import module_name2,module_name3 #导入多个模块
from moudule_name import * #导入module_name中的所有函数和变量,可能会跟本地的函数重名。
from module_name import logger() as logger2 #与本地的logger()函数重名,进行重命名!
from和import的区别?
from调用函数可以直接使用,不用加模块名.xx 来调用。
import 调用需要用模块名.xxx来调用。
3.import本质(路径搜索和搜索路径)
导入模块的本质就是把python文件解释一遍:import moudule_alex
(相当于module_alex=all_code 把所有的代码)
import module_name --->module_name.py ---->module_name.py的路径----》sys.path
from test import m1 相当于m1='code'就可以直接使用和读取m1的值!
4.导入优化
#优化前!
import module_test
#导入优化后为,相当于把module_test的sayhello()函数拿到当前的文件中,不需要一遍遍的查找解释!
from module_test import sayhello
#也可以加上 as 起个别名防止跟当前文件中的函数名冲突!
5.模块的分类
a:标准库:sys,os 等
time和datetime
strftime('格式',struct_time)---->'格式化的字符串'
strptime('格式化的字符串','格式')--->struct_time(时间元祖)
b:开源模块(第三方模块)
yum install gcc等这类开源模块,也可以wget 下载源码包手动安装。
c.自定义模块
自己定义的python模块,提供给其他的py文件使用。
更详细的模块说明请参考武老师:http://www.cnblogs.com/wupeiqi/articles/4963027.html
6.模块的表现形式
1 使用python编写的.py文件
2 已被编译为共享库或DLL的C或C++扩展
3 把一系列模块组织到一起的文件夹(注:文件夹下有一个__init__.py文件,该文件夹称之为包)
4 使用C编写并链接到python解释器的内置模块
二.time & datetime 模块
1.time & datetime 方法实例


 1 import time
 2
 3
 4 #1.时间戳,通过gmtime转换成元祖
 5 x=time.time() #这个取出来的时间为分界点的时间,如果是中国要+8小时东八区,locatime可以直接取时间。
 6 gmt=time.gmtime(x) #x不写默认为localtime本地时间
 7 print (gmt.tm_year,'年',gmt.tm_mon,'月',gmt.tm_mday,'日')
 8
 9
10
11
12 #2.格式化的时间字符串,gmt是将秒转换成元祖的格式。
13 #元祖转换成字符串
14 strtime=time.strftime("%Y-%m-%d %H:%M:%S",gmt)
15 strtime2=time.strftime("%Y-%m-%d %H:%M:%S",time.localtime())
16 print (strtime)
17 print (strtime2)
18
19 #字符串转换成元祖,与strftime正好相反,格式可以随意排版,但是要与%H等参数对应。
20 print(time.strptime("2018-03-28 02:14:15","%Y-%m-%d %H:%M:%S"))
21 print(time.strptime("02:14:15 2018-03-12","%H:%M:%S %Y-%m-%d"))
22 sruct_time1=time.strptime("02:14:15 2018-03-12","%H:%M:%S %Y-%m-%d")
23
24 #将元祖转换成字符串,如果不传参默认当前时间
25 print (time.asctime(sruct_time1))
26 print (time.asctime())
27 #(Wed Mar 28 17:48:04 2018)
28
29 #,如果不传参默认当前时间
30 print (time.ctime())
31 #(Wed Mar 28 17:48:04 2018)
32
33
34 #3.元祖,共九个元素
35 print(time.localtime()) #相当于 x=time.time() gmt=time.gmtime(x)
36
37 #将秒转换成元祖,并取出其中指定的天
38 lt=time.localtime(123213123)
39 print ("in 1973 year's %d day!" %lt.tm_yday )
40
41 #将元祖转换成秒
42 print(time.mktime(lt))
 1 #Author:http://www.cnblogs.com/Jame-mei
 2 import datetime
 3 #1.取当前时间
 4 print (datetime.datetime.now())
 5
 6 #2.当前时间+3天
 7 print (datetime.datetime.now()+datetime.timedelta(3))
 8
 9 #3.当前时间 -3天
10 print (datetime.datetime.now()+datetime.timedelta(-3))
11
12 #4.当前时间 +3小时
13 print (datetime.datetime.now()+datetime.timedelta(hours=3))
14
15 #4.当前时间 -30分钟
16 print (datetime.datetime.now()+datetime.timedelta(minutes=-30))
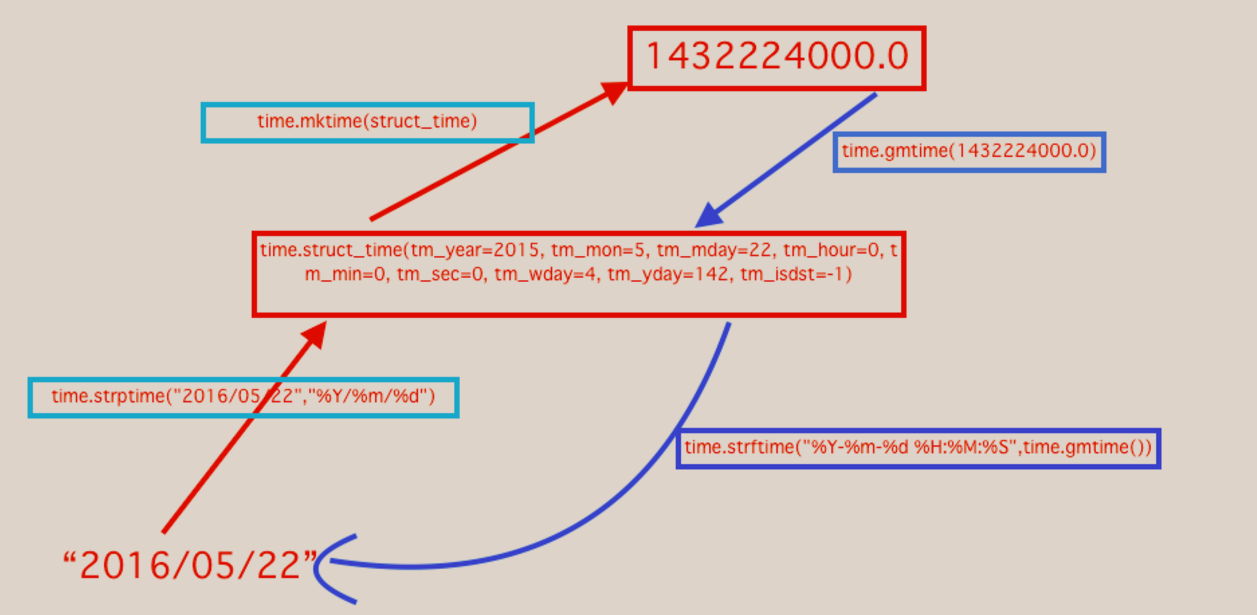
2.time & datetime图,练习完实例后多思考以下图


三.random模块
1.random常用方法实例
 1 #Author:http://www.cnblogs.com/Jame-mei
 2 import random
 3
 4 '''random的实际应用:'''
 5
 6 #1.随机整数,randint 包括5
 7 print (random.randint(1,5))
 8
 9 #2.随机选取0-100的偶数,不包括101
10 print (random.randrange(0,101,2))
11
12 #3.随机浮点数1个,uniform范围不包括2;random(),默认1以内的
13 print (random.random())
14 print(random.uniform(1,2))
15
16 #4.随机字符串
17 print (random.choice('abcd'))
18 #从多个字符串中选取 多个字符串
19 print (random.sample(['abc','jame','tomcat'],2))
20
21
22 #5.洗牌
23 item=[1,2,3,4,5]
24 print ('before:',item)
25 random.shuffle(item)
26 print ('after:',item)
2.random的随机数应用
 1 #Author:http://www.cnblogs.com/Jame-mei
 2 import random
 3 import string
 4
 5 #打印4位数字(字母+数字随意)的验证码
 6 checkcode=''
 7 for i in range(5):
 8     current=random.randrange(0,5)
 9     #字母
10     if current==i:
11         tmp=chr(random.randint(65,90)) #chr将数字转换成ASCII码对应的字母!!
12     #数字
13     else:
14         tmp=random.randint(0,9)
15
16     checkcode+=str(tmp)
17
18 print (checkcode)
四.os模块(系统常用)
1.os模块常用方法练习
  1 #Author:http://www.cnblogs.com/Jame-mei
  2 import  os
  3 import time
  4
  5 #1.getcwd(),获取该脚本的目录
  6 #os.chdir("E:\pythonwork\s14\os")
  7 print (os.getcwd())
  8
  9 #2.chdir,相当于cd,再os.getcwd()来获取当前的目录才能看出效果
 10 os.chdir("E:\pythonwork\s14")
 11 print (os.getcwd())
 12
 13 #3.curdir
 14 print (os.curdir)
 15
 16 #4.pardir 获取当前目录父目录的字符串名:..
 17 print (os.pardir)
 18
 19 #5.mkdirs,可生成多个递归目录,在当前目录下新建了os/test1/test2目录
 20 #os.makedirs('os/test1/test2')
 21
 22 #6.removedir,要求目录不为空的情况下
 23 #os.removedirs(r"E:\pythonwork\s14\day05\os\os_test")
 24
 25 #7.创建和删除目录
 26 #os.mkdir(r"E:\pythonwork\s14\day05\os\test_os2")
 27 #生成单级目录;相当于shell中mkdir dirname
 28
 29 #os.rmdir(r"E:\pythonwork\s14\day05\os\test_os2")
 30 #删除单级空目录,若目录不为空则无法删除,报错;相当于shell中rmdir dirname
 31
 32
 33 #8.listdir 列出指定目录下的所有文件和子目录,包括隐藏文件,并以列表方式打印
 34 print(os.listdir('E:\pythonwork\s14\os'))
 35
 36
 37 #9.删除一个文件
 38 #os.remove(r'E:\pythonwork\s14\day05\os\remove_test.py')
 39
 40 #10.rename('oldname','newname') 重命名文件或者目录,其中windows里面的路径要加r,或者\来进行转义!
 41 #os.rename(r'E:\pythonwork\s14\day05\os\rename_test.py',r'E:\pythonwork\s14\day05\os\rename_test2.py')
 42
 43
 44
 45 #11.stat(path/filename) 获取文件、目录信息
 46 print (os.stat(r'E:\pythonwork\s14\day05\os\test1.py'))
 47
 48 #12.sep 输出操作系统特定的路径分隔符,可以进行跨平台,换个linux就变了/了
 49 print (os.sep)
 50 #.linsep 输出当前平安体使用的行终止符
 51 print (os.linesep)
 52 #.pathsep 输出用于分割文件路径的字符串
 53 print(os.pathsep)
 54
 55
 56 #13.name 输出字符串指示当前使用平台
 57 print (os.name)
 58
 59 #14.system()运行shell命令,直接显示
 60 print (os.system("ls -l"))
 61
 62 #15.environ 获取系统环境变量
 63 print (os.environ)
 64
 65 #16.os.path大类!
 66
 67 #os.path.abspath() 返回path规范化的绝对路径,
 68 print (os.path.abspath('test1.py'))
 69
 70 #os.path.split(path) 将path分割成目录和文件名二元组返回
 71 print (os.path.split('E:\pythonwork\s14\day05\os\test1.py'))
 72 #output:('E:\\pythonwork\\s14\\day05', 'os\test1.py') 这样一个元祖。
 73
 74
 75 #返回path的目录。其实就是os.path.split(path)的第一个元素
 76 print (os.path.dirname('E:\pythonwork\s14\day05\os\test1.py'))
 77
 78
 79 # os.path.basename(path)  返回path最后的文件名。如何path以/或\结尾,那么就会返回空值。即os.path.split(path)的第二个元素
 80 print (os.path.basename('E:\pythonwork\s14\day05\os\test1.py'))
 81
 82 # os.path.exists(path)  如果path存在,返回True;如果path不存在,返回False
 83 print (os.path.exists(r'E:\pythonwork\s14\day05\os\test1.py'))
 84
 85 # os.path.isabs(path)  如果path是绝对路径,返回True
 86 print (os.path.exists(r'E:\pythonwork\s14\day05\os\test1.py'))
 87
 88 # os.path.isfile(path)  如果path是一个存在的文件,返回True。否则返回False
 89 print (os.path.isfile(r'E:\pythonwork\s14\day05\os\test1.py'))
 90
 91 # os.path.isdir(path)  如果path是一个存在的目录,则返回True。否则返回False
 92 print (os.path.isdir(r'E:\pythonwork\s14\day05\os'))
 93
 94 # os.path.join(path1[, path2[, ...]])  将多个路径组合后返回,第一个绝对路径之前的参数将被忽略
 95 print (os.path.join(r'E:\pythonwork\s14',r'day05',r'os',r'test1.py'))
 96 #output:E:\pythonwork\s14\day05\os\test1.py
 97
 98 # os.path.getatime(path)  返回path所指向的文件或者目录的最后存取时间
 99 filetime=os.path.getatime(r"E:\pythonwork\s14\day05\os\rename_test2.py") #返回的秒数
100 print (time.strftime("%Y-%m-%d %H:%M:%S",time.localtime(filetime))) #先转换成元祖,再转换成指定格式的时间。
101
102 # os.path.getmtime(path)  返回path所指向的文件或者目录的最后修改时间
103 motime=os.path.getmtime(r"E:\pythonwork\s14\day05\os\rename_test2.py")
104 print (time.strftime("%Y-%m-%d %H:%M:%S",time.localtime(motime)))
2.更多参考官方文档
https://docs.python.org/2/library/os.html?highlight=os#module-os
五.sys模块(系统常用)
1.sys模块常用方法练习
 1 #1.argv  命令行参数List,第一个元素是程序本身路径
 2 print (sys.argv)
 3 #output:['E:/pythonwork/s14/day05/sys/sys_test1.py']
 4
 5
 6 #2.exit(n)
 7 #sys.exit(0)
 8
 9 #3.version
10 print (sys.version)
11 #output: 3.6.3 (v3.6.3:2c5fed8, Oct  3 2017, 18:11:49) [MSC v.1900 64 bit (AMD64)]
12
13 #4.maxint,python3已经找不到该方法了
14
15 #5.path
16 print (sys.path)
17
18 #6.sys.platform,输出的是win32的操作系统的信息
19 print (sys.platform)
20
21 #7.stdout,标准输出
22 sys.stdout.write('please:')
23 val = sys.stdin.readline()[:-1]
24 print (val)
2.更多参考官方文档
https://docs.python.org/2/library/sys.html?highlight=sys#module-sys
六.shutil模块
高级的 文件、文件夹、压缩包 处理模块。
1.拷贝(src为源文件,dst为目标文件)
shutil.copy(src, dst)
拷贝文件和权限
shutil.copy2(src, dst)
拷贝文件和状态信息
shutil.copyfile(src, dst)
拷贝文件
shutil.copyfileobj(fsrc, fdst[, length])
将文件内容拷贝到另一个文件中,可以部分内容
1 f1=open("本节笔记",encoding='utf-8')
2 f2=open("笔记2",'w',encoding='utf-8')
3 #shutil.copyfileobj(f1,f2)
shutil.copymode(src, dst)
仅拷贝权限。内容、组、用户均不变
shutil.copystat(src, dst)
拷贝状态的信息,包括:mode bits, atime, mtime, flags
shutil.ignore_patterns(*patterns)
shutil.copytree(src, dst, symlinks=False, ignore=None)
递归的去拷贝文件(常用)
1 递归的去拷贝文件,这个常用!
2 #shutil.copytree(r"E:/pythonwork/s14/day05/shutil",r"E:/pythonwork/s14/day05/shutil/newshutil")
2.删除
shutil.rmtree(path[, ignore_errors[, onerror]])
递归的去删除文件(常用)
1 #递归的去删除文件
2 #shutil.rmtree(r"E:/pythonwork/s14/day05/shutil/newshutil")
3.移动
shutil.move(src, dst)
递归的去移动文件
4.压缩和解压
shutil.make_archive(base_name, format,...)
创建压缩包并返回文件路径,例如:zip、tar
- base_name: 压缩包的文件名,也可以是压缩包的路径。只是文件名时,则保存至当前目录,否则保存至指定路径,
如:www =>保存至当前路径
如:/Users/wupeiqi/www =>保存至/Users/wupeiqi/ - format: 压缩包种类,“zip”, “tar”, “bztar”,“gztar”
- root_dir: 要压缩的文件夹路径(默认当前目录)
- owner: 用户,默认当前用户
- group: 组,默认当前组
- logger: 用于记录日志,通常是logging.Logger对象
实例:shutil.make_archive():
1 #创建压缩包并返回文件路径,例如:zip、tar,会把shutil目录下的所有压缩备份到当前目录的backup_py.zip,最好压缩到其他地方避免死循环。
2 ret = shutil.make_archive(r"D:\pytest\backup_py", 'zip', root_dir='E:/pythonwork/s14/day05/shutil')
4.1.zipfile 压缩解压
 1 #Author:http://www.cnblogs.com/Jame-mei
 2 import zipfile
 3
 4 # 压缩
 5 z = zipfile.ZipFile('ziptest.zip', 'w')
 6 z.write('test1.py') #将要压缩的文件写入!!
 7 z.write('本节笔记')
 8 z.close()
 9
10 # 解压
11 z = zipfile.ZipFile('ziptest.zip', 'r')
12 z.extractall(path="ziptest") #将ziptest.zip解压到当前文件夹下,娶一个名字叫ziptest
13 z.close()
4.2.tarfile压缩解压
 1 #Author:http://www.cnblogs.com/Jame-mei
 2 import tarfile
 3
 4 #1.压缩
 5 tf=tarfile.open('tarfile.tar','w')
 6 tf.add(r'E:/pythonwork/s14/day05/shutil/ziptest.zip','ziptest.zip')
 7 tf.close()
 8
 9
10 #2.解压
11 zf=tarfile.open('tarfile.tar','r')
12 zf.extractall(r"E:/pythonwork/s14/day05/shutil/tarfile") #解压成这个目录下,名字叫tarfile的文件夹!
13 zf.close()
七.json & pickle(文件保存及网络传输常用)
用于序列化的两个模块
- json,用于字符串 和 python数据类型间进行转换,解决了不通语言之间的通信例如java/php等。
- pickle,用于python特有的类型 和 python的数据类型间进行转换,解决了python语言内部的通信。
Json模块提供了四个功能:dumps、dump、loads、load
pickle模块提供了四个功能:dumps、dump、loads、load
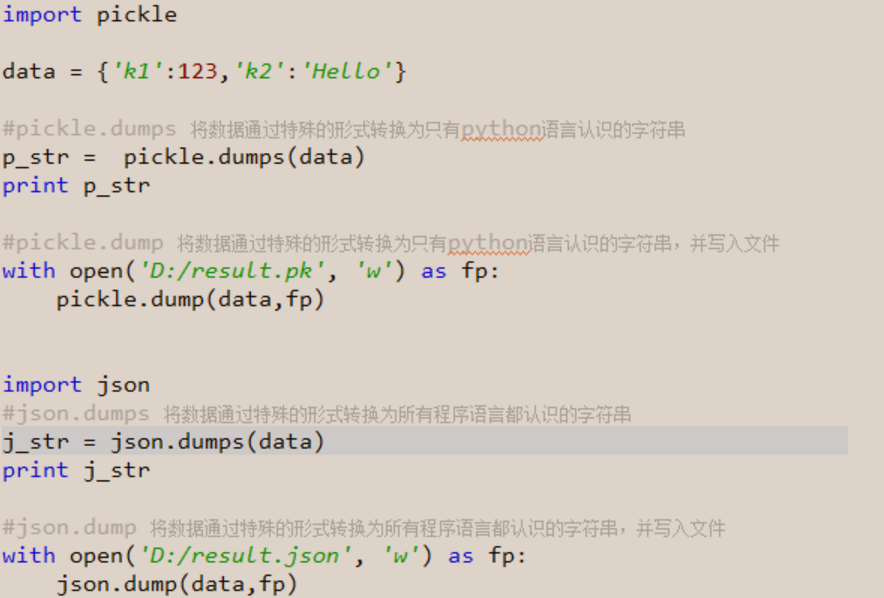
更多详情见:python基础-week04的json&pickle章节内容!
八.shelve
shelve模块是一个简单的k,v将内存数据通过文件持久化的模块,可以持久化任何pickle可支持的python数据格式。
shelve存入读取实例:
 1 #Author:http://www.cnblogs.com/Jame-mei
 2 import shelve
 3 import datetime
 4
 5 d = shelve.open('shelve_test')  # 打开一个文件
 6 t=datetime.datetime.now()
 7
 8 # class Test(object):
 9 #     def __init__(self, n):
10 #         self.n = n
11
12 info={'age':24,'job':'it'}
13 name = ["alex", "rain", "test"]
14
15 #1.写入
16 d["names"] = name  # 持久化列表
17 d["dicts"] =info  # 持久化字典
18 d['tz']=t         #持久化时间类型
19
20
21 #2.读出来
22 print(d.get('names'))
23 print(d.get('dicts'))
24 print (d.get('tz'))
九.xml处理(1-2)
1.xml简介和格式
xml是实现不同语言或程序之间进行数据交换的协议,跟json差不多,但json使用起来更简单,不过,古时候,在json还没诞生的黑暗年代,大家只能选择用xml呀,至今很多传统公司如金融行业的很多系统的接口还主要是xml。
xml的格式如下,就是通过<>节点来区别数据结构的:
 1 <?xml version="1.0"?>
 2 <data>
 3     <country name="Liechtenstein">
 4         <rank updated="yes">2</rank>
 5         <year>2008</year>
 6         <gdppc>141100</gdppc>
 7         <neighbor name="Austria" direction="E"/>
 8         <neighbor name="Switzerland" direction="W"/>
 9     </country>
10     <country name="Singapore">
11         <rank updated="yes">5</rank>
12         <year>2011</year>
13         <gdppc>59900</gdppc>
14         <neighbor name="Malaysia" direction="N"/>
15     </country>
16     <country name="Panama">
17         <rank updated="yes">69</rank>
18         <year>2011</year>
19         <gdppc>13600</gdppc>
20         <neighbor name="Costa Rica" direction="W"/>
21         <neighbor name="Colombia" direction="E"/>
22     </country>
23 </data>
xml协议在各个语言里的都 是支持的,在python中可以用以下模块操作xml :
1.遍历xml的内容和子节点标签
 1 #Author:http://www.cnblogs.com/Jame-mei
 2 import xml.etree.ElementTree as xeet
 3
 4 tree=xeet.parse('test_xml.xml')
 5 root=tree.getroot()
 6
 7 print (root)
 8 print (root.tag,root.text)
 9
10
11
12
13 #1.遍历xml文件 ,tag标签,attrib属性,text标签的值
14 for child in root:
15     print (child.tag,child.attrib)
16     for i in child:
17         print (i.tag,i.attrib,i.text)
18     print("=============================================================>>>")
19
20
21
22 #2.只遍历 rank子节点标签的属性和内容
23 #只遍历year 节点
24 for node in root.iter('rank'):
25     print(node.tag,node.text,node.attrib)
2.删除、修改xml
 1 #Author:http://www.cnblogs.com/Jame-mei
 2
 3 import xml.etree.ElementTree as xee
 4
 5
 6 tree=xee.parse("test_xml.xml")
 7 root=tree.getroot()
 8
 9 1.批量修改 rank标签中的值
10 for node in root.iter('rank'):
11      new_rank=int(node.text)+10
12      node.text=str(new_rank)
13      node.set('update','yes')
14
15 tree.write('test_xml.xml')
16
17
18
19
20 #2.删除
21 for country in root.findall('country'):
22     rank=int(country.find('rank').text)
23     if rank>50:
24         root.remove(country)
25
26 tree.write('output.xml') #将删除后的文本保存到output.xml中,这样可以保证源文件不会误操作无法恢复的情况。
3.自己创建生成一个xml文件
 1 #Author:http://www.cnblogs.com/Jame-mei
 2 import xml.etree.ElementTree as ET
 3
 4 new_xml = ET.Element("namelist")
 5
 6 name = ET.SubElement(new_xml, "name", attrib={"enrolled": "yes"})
 7 age = ET.SubElement(name, "age", attrib={"checked": "no"})
 8 age.text = '33'
 9 sex = ET.SubElement(name, "sex")
10 sex.text="男"
11
12
13 name2 = ET.SubElement(new_xml, "name", attrib={"enrolled": "no"})
14 age = ET.SubElement(name2, "age")
15 age.text = '19'
16
17 et = ET.ElementTree(new_xml)  # 生成文档对象
18 et.write("test.xml", encoding="utf-8", xml_declaration=True)
19
20 ET.dump(new_xml)  # 打印生成的格式
21
22
23
24
25
26
27
28
29
30
31 输出:
32
33 <?xml version='1.0' encoding='utf-8'?>
34 <namelist>
35     <name enrolled="yes">
36         <age checked="no">33</age>
37         <sex>男</sex>
38     </name>
39     <name enrolled="no">
40         <age>19</age>
41     </name>
42 </namelist>
十.yaml处理
Python也可以很容易的处理ymal文档格式,只不过需要安装一个模块,参考文档:http://pyyaml.org/wiki/PyYAMLDocumentation
开源的Ansible,Saltstack的配置文件都是用yaml写的。
十一.configparser
用于生成和修改常见配置文档,当前模块的名称在 python 3.x 版本中变更为 configparser。
来看一个好多软件的常见文档格式如下:
[DEFAULT]
ServerAliveInterval = 45 Compression = yes CompressionLevel = 9 ForwardX11 = yes [bitbucket.org] User = hg [topsecret.server.com] Port = 50022 ForwardX11 = no
 1 #Author http://www.cnblogs.com/Jame-mei
 2 import configparser  #python2.x ConfigParser 大写
 3
 4 config = configparser.ConfigParser()
 5
 6 config["DEFAULT"] = {'ServerAliveInterval': '45',
 7                      'Compression': 'yes',
 8                      'CompressionLevel': '9'}
 9 config['DEFAULT']['ForwardX11'] = 'yes'
10
11
12 config['bitbucket.org'] = {}
13 config['bitbucket.org']['User'] = 'hg'
14
15 config['topsecret.server.com'] = {}
16 topsecret = config['topsecret.server.com']
17 topsecret['Host Port'] = '50022'  # mutates the parser
18 topsecret['ForwardX11'] = 'no'    #same here
19
20
21
22 #最后写入!
23 with open('example.ini', 'w') as configfile:
24     config.write(configfile)
25
26
27 ================================================================================
28 输出如下:
29 [DEFAULT]
30 serveraliveinterval = 45
31 compression = yes
32 compressionlevel = 9
33 forwardx11 = yes
34
35 [bitbucket.org]
36 user = hg
37
38 [topsecret.server.com]
39 host port = 50022
40 forwardx11 = no
#2.读出
 1 [DEFAULT]
 2 serveraliveinterval = 45
 3 compression = yes
 4 compressionlevel = 9
 5 forwardx11 = yes
 6
 7 [bitbucket.org]
 8 user = hg
 9
10 [topsecret.server.com]
11 host port = 50022
12 forwardx11 = no
 1 #Author http://www.cnblogs.com/Jame-mei
 2 import configparser
 3
 4 config=configparser.ConfigParser()
 5
 6
 7 config.read('example.ini')
 8 print(config.sections())  #打印出除了默认标签,以外的标签!!
 9 print(config.defaults())
10 '''
11 输出:
12 ['bitbucket.org', 'topsecret.server.com']
13 OrderedDict([('serveraliveinterval', '45'), ('compression', 'yes'), ('compressionlevel', '9'), ('forwardx11', 'yes')])
14 '''
15
16 print (config['bitbucket.org']['User'])
17 print (config['DEFAULT']['Compression'])
18 '''
19 输出:
20 hg
21 yes
22
23 '''
24
25 topsecret = config['topsecret.server.com']
26 print (topsecret['ForwardX11'])
27 print (topsecret['host port'])
28 '''
29 输出:
30 no
31 50022
32 '''
33
34 print ('遍历configparaser-default默认标签的属性名==============================>>>>>>>>>>>>>>>>>>>>>>')
35 for key in config['DEFAULT']:
36     print(key)
37 '''
38 输出:
39 serveraliveinterval
40 compression
41 compressionlevel
42 forwardx11
43 '''
44
45
46 print('遍历configparaser----bitbucket.org标签的属性名+default默认属性名==============================>>>>>>>>>>>>>>>>>>>>>>')
47 for key in config['bitbucket.org']:
48     print (key)
49 '''
50 遍历:
51 user
52 serveraliveinterval
53 compression
54 compressionlevel
55 forwardx11
56 '''
57
58
59 print('遍历configparaser----topsecret.server.com标签的属性名+default默认属性名==============================>>>>>>>>>>>>>>>>>>>>>>')
60 for key in config['topsecret.server.com']:
61     print (key)
62 '''
63 输出:
64 host port
65 forwardx11
66 serveraliveinterval
67 compression
68 compressionlevel
69
70 '''
71
72
73 #总结,遍历default就是只遍历default默认属性的名
74 # 遍历其他标签的属性名,也会遍历出default的属性名!
#3.configparser增删改查语法
 1 [section1]
 2 k1 = v1
 3 k2:v2
 4
 5 [section2]
 6 k1 = v1
 7
 8 import ConfigParser
 9
10 config = ConfigParser.ConfigParser()
11 config.read('i.cfg')
12
13 # ########## 读 ##########
14 #secs = config.sections()
15 #print secs
16 #options = config.options('group2')
17 #print options
18
19 #item_list = config.items('group2')
20 #print item_list
21
22 #val = config.get('group1','key')
23 #val = config.getint('group1','key')
24
25 # ########## 改写 ##########
26 #sec = config.remove_section('group1')
27 #config.write(open('i.cfg', "w"))
28
29 #sec = config.has_section('wupeiqi')
30 #sec = config.add_section('wupeiqi')
31 #config.write(open('i.cfg', "w"))
32
33
34 #config.set('group2','k1',11111)
35 #config.write(open('i.cfg', "w"))
36
37 #config.remove_option('group2','age')
38 #config.write(open('i.cfg', "w"))
十二.hashlib(加密常用)
用于加密相关的操作,3.x里代替了md5模块和sha模块,主要提供 SHA1, SHA224, SHA256, SHA384, SHA512 ,MD5 算法:
 1 import hashlib
 2
 3 m = hashlib.md5()
 4 m.update(b"Hello")
 5 m.update(b"It's me")
 6 print(m.digest())
 7 m.update(b"It's been a long time since last time we ...")
 8
 9 print(m.digest()) #2进制格式hash
10 print(len(m.hexdigest())) #16进制格式hash
11 '''
12 def digest(self, *args, **kwargs): # real signature unknown
13     """ Return the digest value as a string of binary data. """
14     pass
15
16 def hexdigest(self, *args, **kwargs): # real signature unknown
17     """ Return the digest value as a string of hexadecimal digits. """
18     pass
19
20 '''
21 import hashlib
22
23 # ######## md5 ########
24
25 hash = hashlib.md5()
26 hash.update('admin')
27 print(hash.hexdigest())
28
29 # ######## sha1 ########
30
31 hash = hashlib.sha1()
32 hash.update('admin')
33 print(hash.hexdigest())
34
35 # ######## sha256 ########
36
37 hash = hashlib.sha256()
38 hash.update('admin')
39 print(hash.hexdigest())
40
41
42 # ######## sha384 ########
43
44 hash = hashlib.sha384()
45 hash.update('admin')
46 print(hash.hexdigest())
47
48 # ######## sha512 ########
49
50 hash = hashlib.sha512()
51 hash.update('admin')
52 print(hash.hexdigest())
还不够吊?python 还有一个 hmac 模块,它内部对我们创建 key 和 内容 再进行处理然后再加密散列消息鉴别码,简称HMAC,是一种基于消息鉴别码MAC(Message Authentication Code)的鉴别机制。使用HMAC时,消息通讯的双方,通过验证消息中加入的鉴别密钥K来鉴别消息的真伪;
一般用于网络通信中消息加密,前提是双方先要约定好key,就像接头暗号一样,然后消息发送把用key把消息加密,接收方用key + 消息明文再加密,拿加密后的值 跟 发送者的相对比是否相等,这样就能验证消息的真实性,及发送者的合法性了。
1 #Author http://www.cnblogs.com/Jame-mei
2 import hmac
3
4 h=hmac.new('天王盖地虎'.encode(encoding='utf-8'),'小鸡炖蘑菇'.encode(encoding='utf-8'))
5
6 print (h.digest())
7 print (h.hexdigest())
更多关于md5,sha1,sha256等介绍的文章看这里https://www.tbs-certificates.co.uk/FAQ/en/sha256.html
十三.subprocess
import  subprocess

'''
sh-3.2# ls /Users/egon/Desktop |grep txt$
mysql.txt
tt.txt
事物.txt
'''

res1=subprocess.Popen('ls /Users/jieli/Desktop',shell=True,stdout=subprocess.PIPE)
res=subprocess.Popen('grep txt$',shell=True,stdin=res1.stdout,
                 stdout=subprocess.PIPE)

print(res.stdout.read().decode('utf-8'))


#等同于上面,但是上面的优势在于,一个数据流可以和另外一个数据流交互,可以通过爬虫得到结果然后交给grep
res1=subprocess.Popen('ls /Users/jieli/Desktop |grep txt$',shell=True,stdout=subprocess.PIPE)
print(res1.stdout.read().decode('utf-8'))


#windows下:
# dir | findstr 'test*'
# dir | findstr 'txt$'
import subprocess
res1=subprocess.Popen(r'dir C:\Users\Administrator\PycharmProjects\test\函数备课',shell=True,stdout=subprocess.PIPE)
res=subprocess.Popen('findstr test*',shell=True,stdin=res1.stdout,
                 stdout=subprocess.PIPE)

print(res.stdout.read().decode('gbk')) #subprocess使用当前系统默认编码,得到结果为bytes类型,在windows下需要用gbk解码
十四.logging模块(常用)
很多程序都有记录日志的需求,并且日志中包含的信息即有正常的程序访问日志,还可能有错误、警告等信息输出,python的logging模块提供了标准的日志接口,你可以通过它存储各种格式的日志,logging的日志可以分为 debug(), info(), warning(), error() and critical() 5个级别,下面我们看一下怎么用。
最简单用法:
|
1
2
3
4
5
6
7
8
|
import logginglogging.warning("user [alex] attempted wrong password more than 3 times")logging.critical("server is down")#输出WARNING:root:user [alex] attempted wrong password more than 3 timesCRITICAL:root:server is down |
待续....
十五.re正则(对于爬虫重要)
常用正则表达式:
 1 '.'     默认匹配除\n之外的任意一个字符,若指定flag DOTALL,则匹配任意字符,包括换行
 2 '^'     匹配字符开头,若指定flags MULTILINE,这种也可以匹配上(r"^a","\nabc\neee",flags=re.MULTILINE)
 3 '$'     匹配字符结尾,或e.search("foo$","bfoo\nsdfsf",flags=re.MULTILINE).group()也可以
 4 '*'     匹配*号前的字符0次或多次,re.findall("ab*","cabb3abcbbac")  结果为['abb', 'ab', 'a']
 5 '+'     匹配前一个字符1次或多次,re.findall("ab+","ab+cd+abb+bba") 结果['ab', 'abb']
 6 '?'     匹配前一个字符1次或0次
 7 '{m}'   匹配前一个字符m次
 8 '{n,m}' 匹配前一个字符n到m次,re.findall("ab{1,3}","abb abc abbcbbb") 结果'abb', 'ab', 'abb']
 9 '|'     匹配|左或|右的字符,re.search("abc|ABC","ABCBabcCD").group() 结果'ABC'
10 '(...)' 分组匹配,re.search("(abc){2}a(123|456)c", "abcabca456c").group() 结果 abcabca456c
11
12
13 '\A'    只从字符开头匹配,re.search("\Aabc","alexabc") 是匹配不到的
14 '\Z'    匹配字符结尾,同$
15 '\d'    匹配数字0-9
16 '\D'    匹配非数字
17 '\w'    匹配[A-Za-z0-9]
18 '\W'    匹配非[A-Za-z0-9]
19 's'     匹配空白字符、\t、\n、\r , re.search("\s+","ab\tc1\n3").group() 结果 '\t'
20
21 '(?P<name>...)' 分组匹配 re.search("(?P<province>[0-9]{4})(?P<city>[0-9]{2})(?P<birthday>[0-9]{4})","371481199306143242").groupdict("city") 结果{'province': '3714', 'city': '81', 'birthday': '1993'}
 1 #Author http://www.cnblogs.com/Jame-mei
 2 import re
 3
 4 #match  .+以任意多个字符开头,\d数字结尾
 5 res1=re.match("^.+\d", "cai123yuanhua")
 6 print (res1.group())
 7 #cai123
 8
 9 #rearch {3}每次只匹配最多3个数字
10 res2=re.search("[0-9]{3}","aa123x2a34567aa")
11 print (res2.group())
12 #123
13
14 re4=re.search("ABC|abc","abcABCCD").group()
15 print (re4)
16 #'abc',先匹配ABC没有,又开始匹配abc
17
18 res6=re.search("(abc){2}","alexabcabcabcbad")
19 print (res6.group())
20 #abcabc
21
22 res7=re.search("(abc){2}a(123|456)c", "abcabca456c").group()
23 print ('res7:',res7)
24 #res7: abcabca456c
25
26 res8=re.search(".*\D","alexabcabcabcbad.,&").group()
27 print (res8)
28 #alexabcabcabcbad.,& ,匹配非数字的所有
29
30 res9=re.search("\D+","alexabcabcabcbad.,&").group()
31 print (res9)
32 #alexabcabcabcbad.,&
33
34
35 res10=re.search("\w+","AaBbCc13579&?!").group()
36 print (res10)
37 #AaBbCc13579
38
39 res11=re.search("(?P<province>[0-9]{3})(?P<city>[0-9]{3})(?P<birthday>[0-9]{8})","371481199306143242").groupdict()
40 print (res11)
41 #{'province': '371', 'city': '481', 'birthday': '19930614'}
42
43
44 #findall {1,3} 最多每次最多只能匹配到3个数字
45 print(re.findall("[0-9]{1,3}","aa1x2a34545aa"))
46 #output
47 #['1', '2', '345', '45']
48
49
50 res5=re.findall("ABC|abc","abABCCabcD")
51 print (res5)
52 #['ABC', 'abc']
53
54
55
56 #re.slip
57 s1=re.split("[0-9]","abc1de2f9gh10")
58 #['abc', 'de', 'f', 'gh', '', '']
59
60
61 #rs.sub
62 sb1=re.sub("[0-9]+","-","abc12de3f45GH")
63 print (sb1)
64 #abc-de-f-GH
65
66 sb2=re.sub("[0-9]+","-","abc12de3f45GH",count=2)
67 print (sb2)
68 #'abc-de-f45GH'
69
70
71 '''
72 match
73
74 search
75 findall
76 split
77 sub
78 这四种最常用,可以查看练习其中的方法。
79 '''
最常用的匹配语法:
|
1
2
3
4
5
|
re.match 从头开始匹配re.search 匹配包含re.findall 把所有匹配到的字符放到以列表中的元素返回re.splitall 以匹配到的字符当做列表分隔符re.sub 匹配字符并替换 |
反斜杠的困扰:
与大多数编程语言相同,正则表达式里使用"\"作为转义字符,这就可能造成反斜杠困扰。
假如你需要匹配文本中的字符"\",那么使用编程语言表示的正则表达式里将需要4个反斜杠"\\\\":前两个和后两个分别用于在编程语言里转义成反斜杠,转换成两个反斜杠后再在正则表达式里转义成一个反斜杠。
Python里的原生字符串很好地解决了这个问题,这个例子中的正则表达式可以使用r"\\"表示。同样,匹配一个数字的"\\d"可以写成r"\d"。有了原生字符串,你再也不用担心是不是漏写了反斜杠,写出来的表达式也更直观。
仅需轻轻知道的几个匹配模式:
|
1
2
3
|
re.I(re.IGNORECASE): 忽略大小写(括号内是完整写法,下同)M(MULTILINE): 多行模式,改变'^'和'$'的行为(参见上图)S(DOTALL): 点任意匹配模式,改变'.'的行为 |
实例练习1:
 1 #Author http://www.cnblogs.com/Jame-mei
 2 import re
 3
 4 #1.re.I
 5 f1=re.search("[a-z]+","abcA",flags=re.I).group()
 6 print (f1)
 7 #输出abcA,re.I可以忽略大小写输出。
 8
 9
10 #2.re.M
11 m1=re.search(r"^a","\nabc\ncba")
12 #无法匹配,为空
13 m2=re.search(r"^abc","\nabc\ncba",flags=re.M).group()
14 print (m2)
15 #输出 abc,忽略换行符,匹配
16
17
18 #3.re.S
19 s1=re.search(r".+","\nabc\ncba",flags=re.S).group()
20 print (s1)
21 #输出abc cba,忽略了换行符!
实例练习2:
  1 import re
  2
  3 # print(re.findall('egon','helloegon123 -_egon*()'))
  4 #                                           egon
  5 # ['egon','egon']
  6
  7 # print(re.findall('\w','hello123 -_*()'))
  8 #                                 \w
  9 # print(re.findall('\W','hello123 -_*()'))
 10 #                                   \W
 11 # print(re.findall('\s','h  \tell\nlo'))
 12 # print(re.findall('\S','h  \tell\nlo'))
 13
 14 # print(re.findall('\d','hello123  456'))
 15 # print(re.findall('\D','hello*12-3 = 456'))
 16
 17 # print(re.findall('\s','h  \tell\nlo'))
 18 # print(re.findall('\t','h  \tell\nlo'))
 19 # print(re.findall('\n','h  \tell\nlo'))
 20
 21 # print(re.findall('egon','egon say hello egon egon is hahahah'))
 22 # print(re.findall('^egon','egon say hello egon egon is hahahah'))
 23 # print(re.findall('^egon',' egon say hello egon egon is hahahah'))
 24 # print(re.findall('alex$','hello alex aaa bb alex '))
 25 #                                            alex$
 26
 27 # . :代表匹配除了换行符以外的任意单个字符
 28 # print(re.findall('a.c','a-c a*c a1c a\nc aaaaac a c'))
 29 #                                           a.c
 30 # print(re.findall('a.c','a-c a*c a1c a\nc aaaaac a c',re.DOTALL))
 31 # ['a-c','a*c','a1c','aac','a c']
 32
 33 # []: 代表匹配我们自己指定范围的任意一个字符,
 34 # print(re.findall('\d[-+*/]\d','1+3 a1!3sdf 2*3 1/4 2-3 aadsf hello'))
 35 # print(re.findall('a[0-9]c','a1c a2c a11c abc a*c a9c'))
 36 # print(re.findall('a[0-9][0-9]c','a1c a2c a11c abc a*c a9c'))
 37 # print(re.findall('a[a-z]c','a1c aAc a2c acc aec a11c abc a*c a9c'))
 38 # print(re.findall('a[A-Z]c','a1c aAc a2c acc aec a11c abc a*c a9c'))
 39 # print(re.findall('a[A-Za-z]c','a1c aAc a2c acc aec a11c abc a*c a9c'))
 40
 41 # 重复匹配
 42 # ? : 代表左边那一个字符出现0次或者1次
 43 # print(re.findall('ab?','b ab abb abbbb bbbbbba'))
 44 #                                            ab?
 45 # ['ab','ab','ab','a']
 46 # print(re.findall('ab{0,1}','b ab abb abbbb bbbbbba'))
 47
 48
 49 # * :代表左边那一个字符出现0次或者无穷次,如果没有可以凑合,但如果>1个,有多少就必须拿多少
 50 # print(re.findall('ab*','b ab abb abbbb bbbbbba'))
 51 #                                            ab*
 52 # ['ab','abb','abbbb','a']
 53 # print(re.findall('ab{0,}','b ab abb abbbb bbbbbba'))
 54
 55
 56 # + :代表左边那一个字符出现1次或者无穷次,至少要有一个,但如果有>1个,有多少就必须拿多少
 57 # print(re.findall('ab+','b ab abb abbbb bbbbbba'))
 58 #                                           ab+
 59 # ['ab','abb','abbbb',]
 60 # print(re.findall('ab{1,}','b ab abb abbbb bbbbbba'))
 61
 62
 63 # {n,m}:代表左边那一个字符出现n次到m次,至少要有n个,但如果有>n个,就拿<=m个
 64 # print(re.findall('ab{2,5}','b ab abbbbbbbbbbb abb abbbb bbbbbba'))
 65 #                                                      ab{2,5}
 66 # ['abbbbb','abb','abbbb',]
 67
 68
 69 # .* : 匹配0个或无穷个任意字符,默认是贪婪匹配
 70 # print(re.findall('a.*c','helloac a123lllc4a567+-1c egon')) #找离a最远的那个c
 71 #                                                 a.*c
 72
 73 # .*? : 匹配0个或无穷个任意字符,非贪婪匹配
 74 # print(re.findall('a.*?c','helloac a123lllc4a567+-1c egon')) #找离a最远的那个c
 75 #                                          a.*?c
 76 # ['ac','a123lllc','a567+-1c']
 77
 78
 79 # print(re.findall('href="(.*?)"','<div class="div1"><a href="https://www.baidu.com">点我啊</a></div><div class="div1"><a href="https://www.python.org">点我啊</a></div>'))
 80 #                                                                                                                     href=".*"
 81
 82 # print(re.findall('href="(.*?)"','<div class="div1"><a href="https://www.baidu.com">点我啊</a></div><div class="div1"><a href="https://www.python.org">点我啊</a></div>'))
 83
 84
 85
 86 # print(re.findall('compan(ies|y)','Too many companies have gone bankrupt, and the next one is my company'))
 87 #                                                                                               compan(ies|y)
 88 # print(re.findall('compan(?:ies|y)','Too many companies have gone bankrupt, and the next one is my company'))
 89
 90 # print(re.findall('a[^0-9]c','a1c abc aAc a-c a*c'))
 91
 92
 93 # print(re.findall('a\\\\c','a\c a1c aac')) #a\\c
 94 # print(re.findall(r'a\\c','a\c a1c aac')) #a\\c
 95
 96
 97 # print(re.findall(r'egon','egon is egon hhaha egon'))
 98
 99 # 从左往右匹配,匹配成功一个就结束,返回一个对象,不成功最后返回None
100 # print(re.search(r'egon','egxxxon is egon hhaha egon'))
101 # print(re.search(r'xxx','egon is egon hhaha egon'))
102
103 # print(re.search(r'egon','egxxxon is egon hhaha egon').group())
104
105 # obj=re.search('(href)="(.*?)"','<div class="div1"><a href="https://www.baidu.com">点我啊</a></div><div class="div1"><a href="https://www.python.org">点我啊</a></div>')
106 # print(obj.group())
107 # print(obj.group(1))
108 # print(obj.group(2))
109
110
111 # print(re.search(r'xxxx','egxxxon is egon hhaha egon').group())
112
113
114 # print(re.search(r'^egon','egon egxxxon is egon hhaha egon'))
115 # print(re.match(r'egon','egon egxxxon is egon hhaha egon').group())
116
117
118 # msg='root:x:0:0::/root:/bin/bash'
119 # print(re.split('[:/]',msg))
120
121 # print(re.sub('alex','sb','alex hello alex is sb alex'))
122 # print(re.sub('^alex','sb','alex hello alex is sb alex'))
123 # print(re.sub('alex$','sb','alex hello alex is sb alex'))
124
125 obj=re.compile('href="(.*?)"')
126
127 msg1='<div class="div1"><a href="https://www.baidu.com">点我啊</a></div><div class="div1"><a href="https://www.python.org">点我啊</a></div>'
128 # print(re.findall('href="(.*?)"',msg1))
129 print(obj.findall(msg1))
130
131 msg2='<div class="div1"><a href="https://www.sina.com.cn">点我啊</a></div><div class="div1"><a href="https://www.tmall.com">点我啊</a></div>'
132 # print(re.search('href="(.*?)"',msg2).group(1))
133 print(obj.search(msg2).group(1))
实例练习3:
# =================================匹配模式=================================
#一对一的匹配
# 'hello'.replace(old,new)
# 'hello'.find('pattern')

#正则匹配
import re
#\w与\W
print(re.findall('\w','hello egon 123')) #['h', 'e', 'l', 'l', 'o', 'e', 'g', 'o', 'n', '1', '2', '3']
print(re.findall('\W','hello egon 123')) #[' ', ' ']

#\s与\S
print(re.findall('\s','hello  egon  123')) #[' ', ' ', ' ', ' ']
print(re.findall('\S','hello  egon  123')) #['h', 'e', 'l', 'l', 'o', 'e', 'g', 'o', 'n', '1', '2', '3']

#\n \t都是空,都可以被\s匹配
print(re.findall('\s','hello \n egon \t 123')) #[' ', '\n', ' ', ' ', '\t', ' ']

#\n与\t
print(re.findall(r'\n','hello egon \n123')) #['\n']
print(re.findall(r'\t','hello egon\t123')) #['\n']

#\d与\D
print(re.findall('\d','hello egon 123')) #['1', '2', '3']
print(re.findall('\D','hello egon 123')) #['h', 'e', 'l', 'l', 'o', ' ', 'e', 'g', 'o', 'n', ' ']

#\A与\Z
print(re.findall('\Ahe','hello egon 123')) #['he'],\A==>^
print(re.findall('123\Z','hello egon 123')) #['he'],\Z==>$

#^与$
print(re.findall('^h','hello egon 123')) #['h']
print(re.findall('3$','hello egon 123')) #['3']

# 重复匹配:| . | * | ? | .* | .*? | + | {n,m} |
#.
print(re.findall('a.b','a1b')) #['a1b']
print(re.findall('a.b','a1b a*b a b aaab')) #['a1b', 'a*b', 'a b', 'aab']
print(re.findall('a.b','a\nb')) #[]
print(re.findall('a.b','a\nb',re.S)) #['a\nb']
print(re.findall('a.b','a\nb',re.DOTALL)) #['a\nb']同上一条意思一样

#*
print(re.findall('ab*','bbbbbbb')) #[]
print(re.findall('ab*','a')) #['a']
print(re.findall('ab*','abbbb')) #['abbbb']

#?
print(re.findall('ab?','a')) #['a']
print(re.findall('ab?','abbb')) #['ab']
#匹配所有包含小数在内的数字
print(re.findall('\d+\.?\d*',"asdfasdf123as1.13dfa12adsf1asdf3")) #['123', '1.13', '12', '1', '3']

#.*默认为贪婪匹配
print(re.findall('a.*b','a1b22222222b')) #['a1b22222222b']

#.*?为非贪婪匹配:推荐使用
print(re.findall('a.*?b','a1b22222222b')) #['a1b']

#+
print(re.findall('ab+','a')) #[]
print(re.findall('ab+','abbb')) #['abbb']

#{n,m}
print(re.findall('ab{2}','abbb')) #['abb']
print(re.findall('ab{2,4}','abbb')) #['abb']
print(re.findall('ab{1,}','abbb')) #'ab{1,}' ===> 'ab+'
print(re.findall('ab{0,}','abbb')) #'ab{0,}' ===> 'ab*'

#[]
print(re.findall('a[1*-]b','a1b a*b a-b')) #[]内的都为普通字符了,且如果-没有被转意的话,应该放到[]的开头或结尾
print(re.findall('a[^1*-]b','a1b a*b a-b a=b')) #[]内的^代表的意思是取反,所以结果为['a=b']
print(re.findall('a[0-9]b','a1b a*b a-b a=b')) #[]内的^代表的意思是取反,所以结果为['a=b']
print(re.findall('a[a-z]b','a1b a*b a-b a=b aeb')) #[]内的^代表的意思是取反,所以结果为['a=b']
print(re.findall('a[a-zA-Z]b','a1b a*b a-b a=b aeb aEb')) #[]内的^代表的意思是取反,所以结果为['a=b']

#\# print(re.findall('a\\c','a\c')) #对于正则来说a\\c确实可以匹配到a\c,但是在python解释器读取a\\c时,会发生转义,然后交给re去执行,所以抛出异常
print(re.findall(r'a\\c','a\c')) #r代表告诉解释器使用rawstring,即原生字符串,把我们正则内的所有符号都当普通字符处理,不要转义
print(re.findall('a\\\\c','a\c')) #同上面的意思一样,和上面的结果一样都是['a\\c']

#():分组
print(re.findall('ab+','ababab123')) #['ab', 'ab', 'ab']
print(re.findall('(ab)+123','ababab123')) #['ab'],匹配到末尾的ab123中的ab
print(re.findall('(?:ab)+123','ababab123')) #findall的结果不是匹配的全部内容,而是组内的内容,?:可以让结果为匹配的全部内容
print(re.findall('href="(.*?)"','<a href="http://www.baidu.com">点击</a>'))#['http://www.baidu.com']
print(re.findall('href="(?:.*?)"','<a href="http://www.baidu.com">点击</a>'))#['href="http://www.baidu.com"']

#|
print(re.findall('compan(?:y|ies)','Too many companies have gone bankrupt, and the next one is my company'))
re其他方法介绍:
# ===========================re模块提供的方法介绍===========================
import re
#1
print(re.findall('e','alex make love') )   #['e', 'e', 'e'],返回所有满足匹配条件的结果,放在列表里
#2
print(re.search('e','alex make love').group()) #e,只到找到第一个匹配然后返回一个包含匹配信息的对象,该对象可以通过调用group()方法得到匹配的字符串,如果字符串没有匹配,则返回None。

#3
print(re.match('e','alex make love'))    #None,同search,不过在字符串开始处进行匹配,完全可以用search+^代替match

#4
print(re.split('[ab]','abcd'))     #['', '', 'cd'],先按'a'分割得到''和'bcd',再对''和'bcd'分别按'b'分割

#5
print('===>',re.sub('a','A','alex make love')) #===> Alex mAke love,不指定n,默认替换所有
print('===>',re.sub('a','A','alex make love',1)) #===> Alex make love
print('===>',re.sub('a','A','alex make love',2)) #===> Alex mAke love
print('===>',re.sub('^(\w+)(.*?\s)(\w+)(.*?\s)(\w+)(.*?)$',r'\5\2\3\4\1','alex make love')) #===> love make alex

print('===>',re.subn('a','A','alex make love')) #===> ('Alex mAke love', 2),结果带有总共替换的个数


#6
obj=re.compile('\d{2}')

print(obj.search('abc123eeee').group()) #12
print(obj.findall('abc123eeee')) #['12'],重用了obj
补充1:
import re
print(re.findall("<(?P<tag_name>\w+)>\w+</(?P=tag_name)>","<h1>hello</h1>")) #['h1']
print(re.search("<(?P<tag_name>\w+)>\w+</(?P=tag_name)>","<h1>hello</h1>").group()) #<h1>hello</h1>
print(re.search("<(?P<tag_name>\w+)>\w+</(?P=tag_name)>","<h1>hello</h1>").groupdict()) #<h1>hello</h1>

print(re.search(r"<(\w+)>\w+</(\w+)>","<h1>hello</h1>").group())
print(re.search(r"<(\w+)>\w+</\1>","<h1>hello</h1>").group())

补充一
补充2:
import re

print(re.findall(r'-?\d+\.?\d*',"1-12*(60+(-40.35/5)-(-4*3))")) #找出所有数字['1', '-12', '60', '-40.35', '5', '-4', '3']


#使用|,先匹配的先生效,|左边是匹配小数,而findall最终结果是查看分组,所有即使匹配成功小数也不会存入结果
#而不是小数时,就去匹配(-?\d+),匹配到的自然就是,非小数的数,在此处即整数
print(re.findall(r"-?\d+\.\d*|(-?\d+)","1-2*(60+(-40.35/5)-(-4*3))")) #找出所有整数['1', '-2', '60', '', '5', '-4', '3']

补充二
本周作业:
开发一个简单的python计算器
- 实现加减乘除及拓号优先级解析
- 用户输入 1 - 2 * ( (60-30 +(-40/5) * (9-2*5/3 + 7 /3*99/4*2998 +10 * 568/14 )) - (-4*3)/ (16-3*2) )等类似公式后,必须自己解析里面的(),+,-,*,/符号和公式(不能调用eval等类似功能偷懒实现),运算后得出结果,结果必须与真实的计算器所得出的结果一致
作业源码地址:https://gitee.com/meijinmeng/calculator.git

 浙公网安备 33010602011771号