鸿蒙@Link双向绑定和@Provide、Consume跨层传递、@Observed&@ObjectLink更改多层结构的数据
@Link 双向同步
使用 @Link 可以实现父组件和子组件的双向同步
使用步骤:
1.将父组件的状态属性传递给子组件
2.子组件通过@Link修饰即可
基本数据类型和复杂数据类型都是可以的哈
@Link双向绑定
@Component
struct Child {
  // 使用Link修饰的,说明这个是双向的。
  // 子组件的修改会同步到父组件中去
  @Link sonValue:string
  build() {
    Column(){
      Text('我是子组件')
      Text('子组件的数据是:'+this.sonValue)
      Button('子组件修改数据').onClick(()=>{
        this.sonValue = '完美世界'
      })
    }.backgroundColor("#cdc").width('100%')
  }
}

@Entry
@Component
struct Index {
  @State contValue:string = '仙逆'
  build() {
    Column(){
      Row(){
        Button('修改数据').onClick(()=>{
        })
      }
      Row(){
        Text('父组件的数据:')
        Text(this.contValue)
      }.backgroundColor('#cac').width('100%').height(50).margin({bottom:30})

      Child({
        sonValue: this.contValue
      })
    }
  }
}

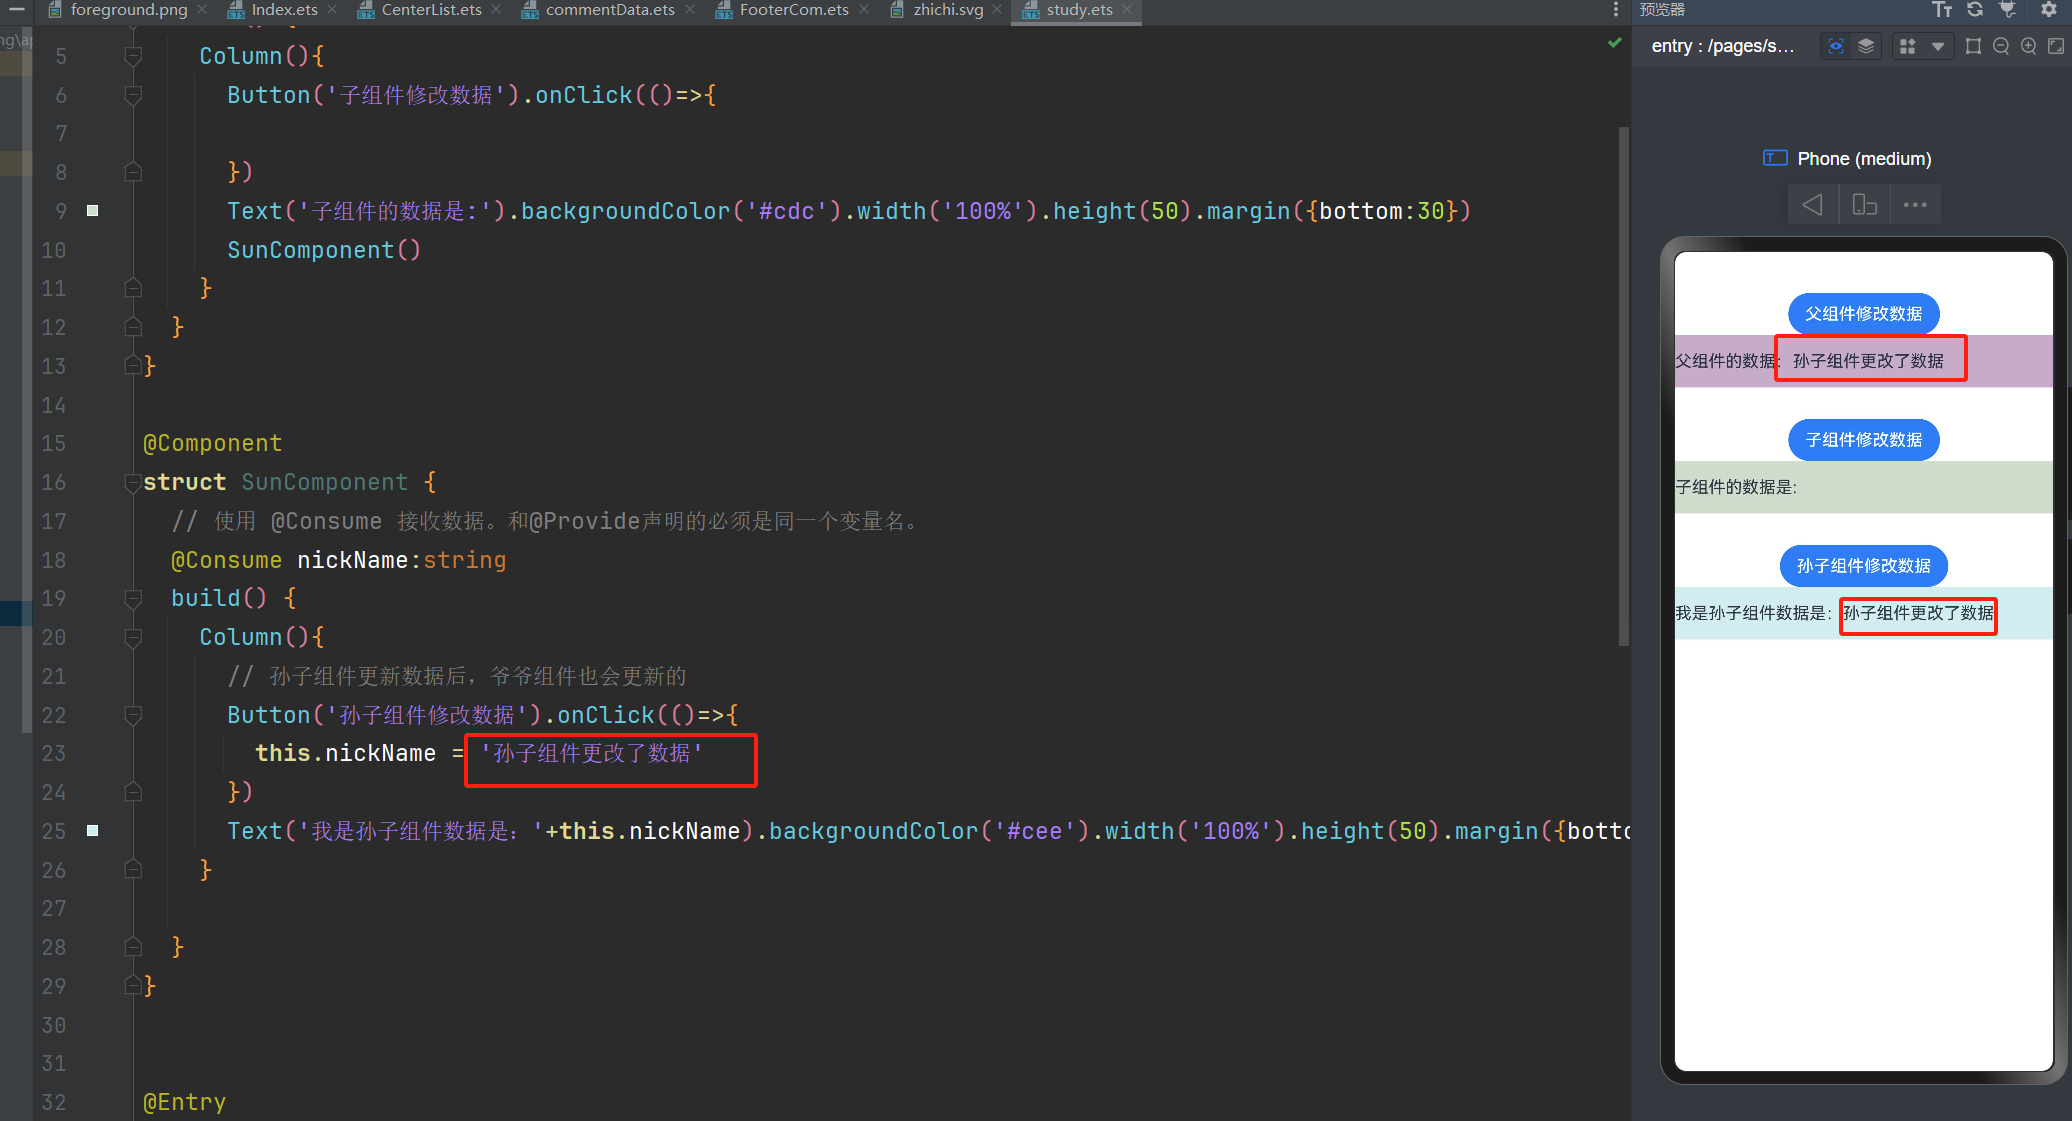
@Provide和@Consume的简单介绍
父组件使用@Provide修饰声明的变量。
中间无论有多少层级,孙子组件都可以通过@Consume来获取到。
中间层不需要对数据做任何的处理。
父组件更改的数据孙子组件会接收并且会更新界面。
同理孙子组件更改数据爷爷组件也会接收并且更新界面。
也就是说: @Provide和@Consume是双向的,数据变化后界面会自动更新视图
需要注意的是:使用@Provide和@Consume生命的变量名必须是一样的
使用办法
1.将父组件的状态属性使用 @Provide 修饰,变量名称必须和@Consume保持一致
2.子组件通过 @Consume 修饰,变量名称必须和@Provide保持一致
基本数据类型和复杂数据类型都是可以的哈
@Provide和@Consume传递数据并且双向更改
@Component
struct SonComponent {
  // 这个子组件不需要对数据做任何的处理
  build() {
    Column(){
      Button('子组件修改数据').onClick(()=>{

      })
      Text('子组件的数据是:').backgroundColor('#cdc').width('100%').height(50).margin({bottom:30})
      SunComponent()
    }
  }
}

@Component
struct SunComponent {
  // 使用 @Consume 接收数据。和@Provide声明的必须是同一个变量名。
  @Consume nickName:string
  build() {
    Column(){
      // 孙子组件更新数据后,爷爷组件也会更新的
      Button('孙子组件修改数据').onClick(()=>{
        this.nickName = '孙子组件更改了数据'
      })
      Text('我是孙子组件数据是:'+this.nickName).backgroundColor('#cee').width('100%').height(50).margin({bottom:30})
    }

  }
}


@Entry
@Component
struct Index {
  // 顶级组件使用
  @State contValue:string = '仙逆'
  @Provide nickName:string='我的div丢了怎么办?'
  build() {
    Column(){
      Row(){
        Button('父组件修改数据').onClick(()=>{
          this.nickName = '我的昵称哈哈哈'
        })
      }
      Row(){
        Text('父组件的数据:')
        Text(this.nickName)
      }.backgroundColor('#cac').width('100%').height(50).margin({bottom:30})

      SonComponent()
    }
  }
}

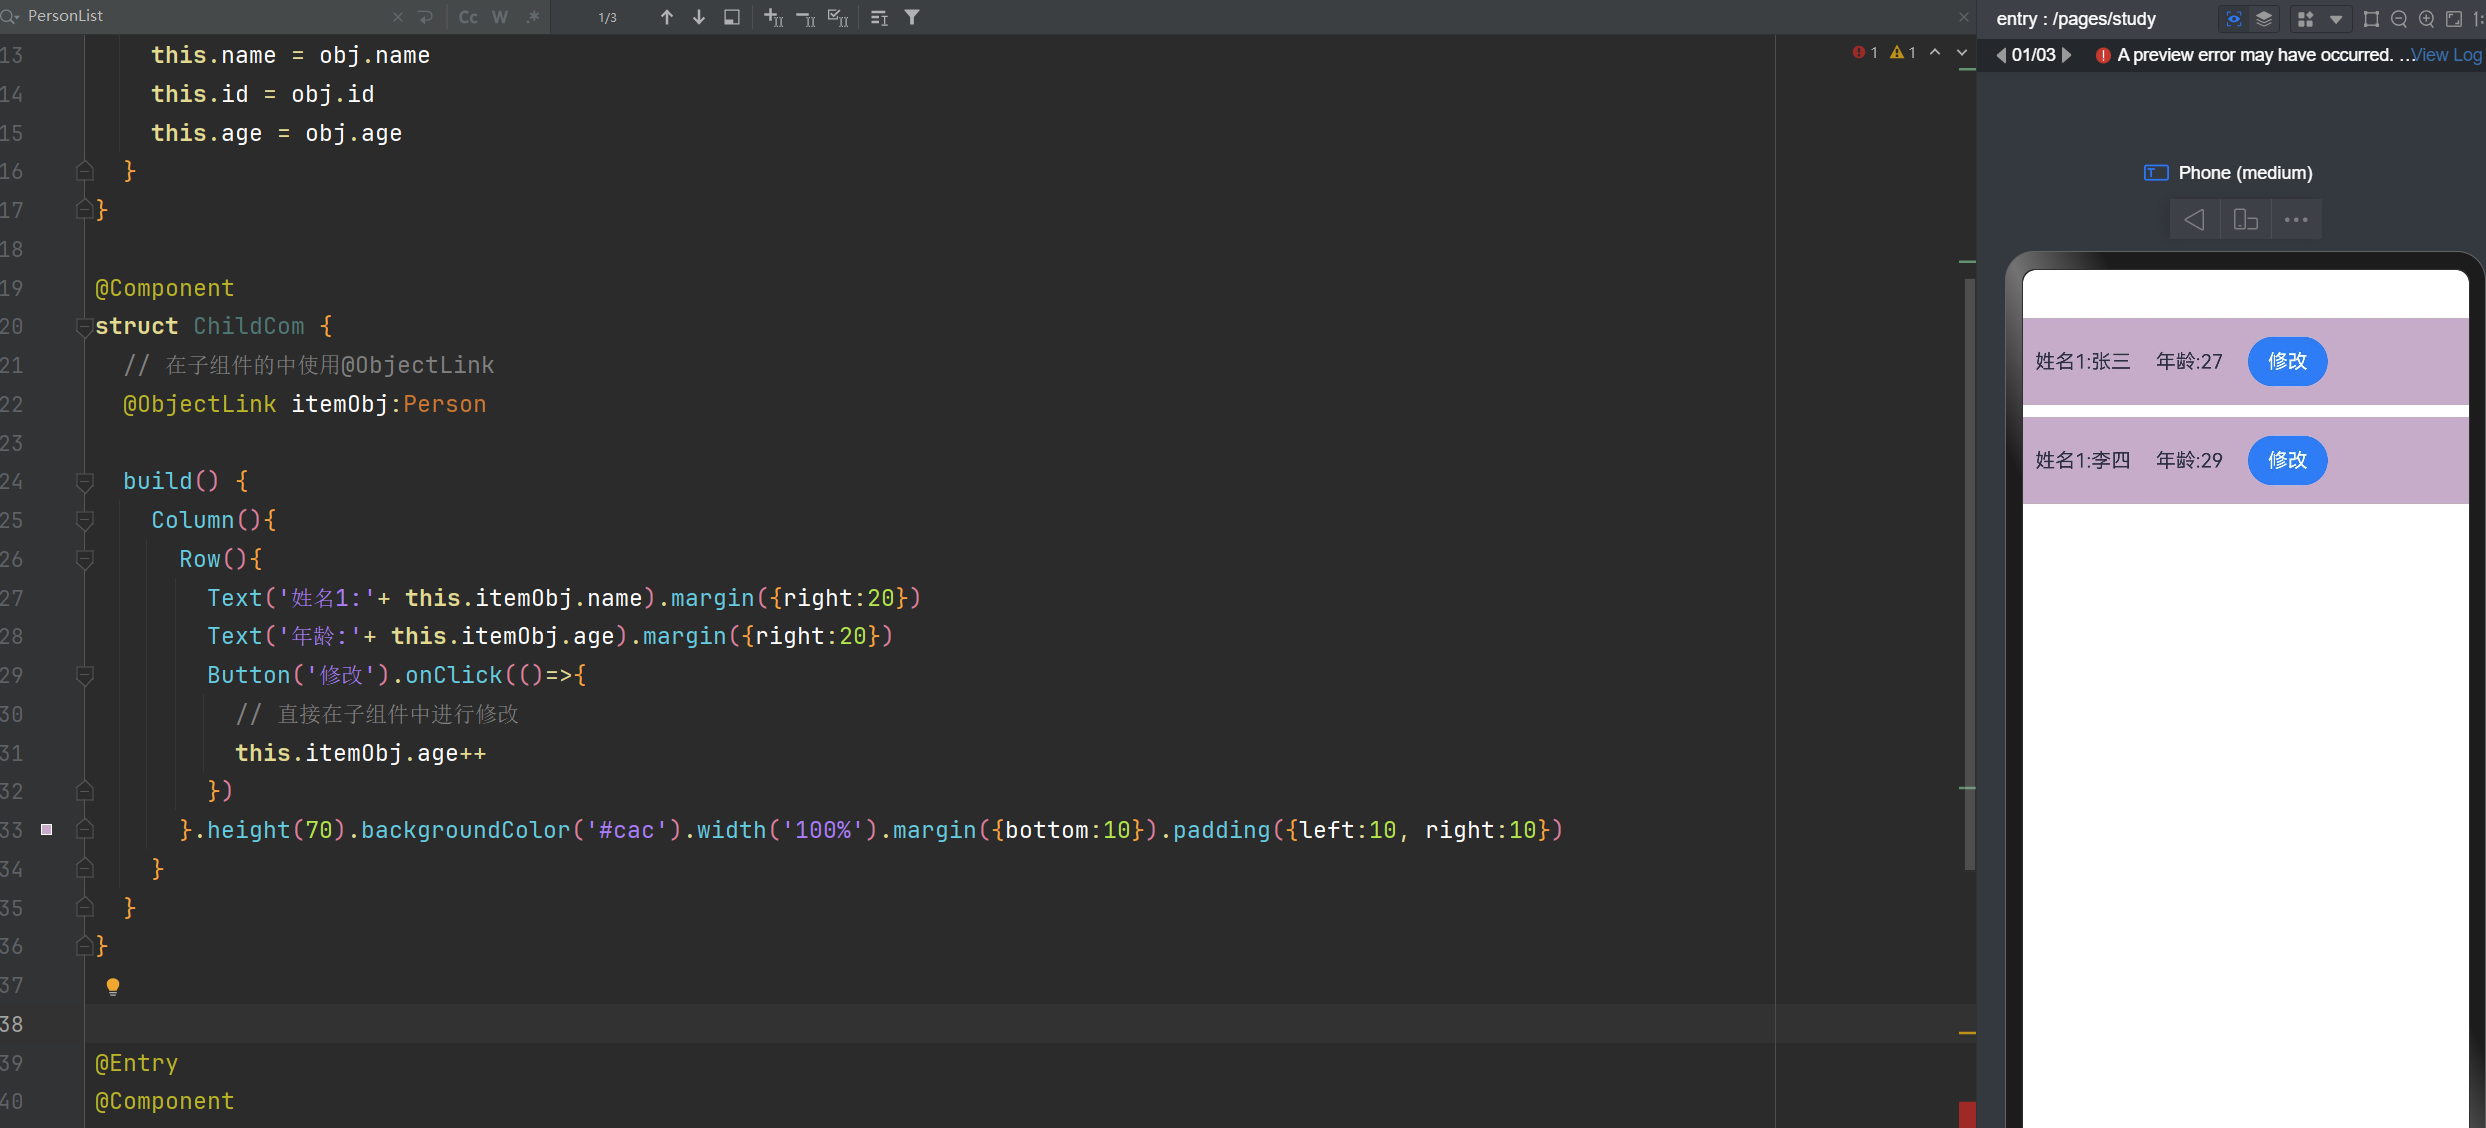
@Observed 、 @ObjectLink 嵌套对象数组属性变化
说明:装饰器仅能观察到第一层的变化。对于多层嵌套的情况,比如对象数组等。
第2层属性的变化是无法观察到的,这个时候,我们的主角就出现了。
@Observed/@ObjectLink装饰器
作用:用于在涉及嵌套对象或数组的场景中进行双向数据同步
需要注意:@ObjectLink修饰符不能用在 Entry 修饰的组件中使用
@Observed 修饰的必须是使用类进行实例化的
使用步骤
1,使用@Observed去修饰类声明的数据
2,在子组件中使用@ObjectLink去修饰要更改的数据
interface PersonList{
  name:string
  id:string
  age:number
}
// 将数据用类的方式进行实例化,而不能用接口的方式进行。因为:@Observed修饰时必须是使用类进行初始
@Observed
class Person{
  name:string
  id:string
  age:number
  constructor(obj:PersonList) {
    this.name = obj.name
    this.id = obj.id
    this.age = obj.age
  }
}

@Component
struct ChildCom {
  // 在子组件的中使用@ObjectLink
  @ObjectLink itemObj:Person
  // 等会父组件会重写这个方法
  editorHandler = ()=>{}
  build() {
    Column(){
      Row(){
        Text('姓名1:'+ this.itemObj.name).margin({right:20})
        Text('年龄:'+ this.itemObj.age).margin({right:20})
        Button('修改').onClick(()=>{
          this.editorHandler()
        })
      }.height(70).backgroundColor('#cac').width('100%').margin({bottom:10}).padding({left:10, right:10})
    }
  }
}


@Entry
@Component
struct Index {
  @State PersonArray:PersonList[]=[
    new Person({
      name:'张三',
      id:'user01',
      age:19
    }),
    new Person({
      name:'李四',
      id:'user02',
      age:22
    })
  ]
  build() {
    Column(){
      ForEach(this.PersonArray,(item:Person,index:number)=>{
        ChildCom({
          itemObj: item,
          // 我们现在就可以更改第层的属性了,父组件进行更改
          editorHandler:()=>{
            item.age++
          }
        })
      })
    }
  }
}

刚刚我们讲了,是通过父组件中的方法来进行更改的。
其实你也可以通过子组件来更新。但是我们一般不这样进行更改。
下面我们来看下,直接在子组件中进行修改。
...其他省略...
@Component
struct ChildCom {
  // 在子组件的中使用@ObjectLink
  @ObjectLink itemObj:Person
  build() {
    Column(){
      Row(){
        Text('姓名1:'+ this.itemObj.name).margin({right:20})
        Text('年龄:'+ this.itemObj.age).margin({right:20})
        Button('修改').onClick(()=>{
          // 直接在子组件中进行修改
          this.itemObj.age++
        })
      }.height(70).backgroundColor('#cac').width('100%').margin({bottom:10}).padding({left:10, right:10})
    }
  }
}
...其他省略...
@Observed&@ObjectLink更新的逻辑
属性更新的逻辑:当我们使用@0bserved装饰过的数据,属性改变时,
就会监听到遍历依赖它的 @0bjectLink 包装类,通知数据更新。
请看下面这个例子
... 其他代码不变
@Entry
@Component
struct Index {
  build() {
    Column() {
      // 属性更新的逻辑:当我们使用@0bserved装饰过的数据,属性改变时,
      // 就会监听到遍历依赖它的 @0bjectLink 包装类,通知数据更新。
      Text('这个值不会更新:'+ this.PersonArray[0].age)
      ForEach(this.PersonArray,(item:Person,index:number)=>{
        ChildCom({
          itemObj: item,
          // 我们现在就可以更改第层的属性了,父组件进行更改
          editorHandler:()=>{
            item.age++
          }
        })
      })
    }
  }
}
... 其他代码不变
点击第一个按钮后,文本框中的数据会变化嘛

有的小伙伴会说:会做更改,有的小伙伴可能会说:不会更改。
下面我们就是看到真相的时刻

文本框中的数据不会更改,为什么呢?
因为:当我们使用@0bserved装饰过的数据,属性改变时,
就会监听到遍历依赖它的 @0bjectLink 包装类,通知数据更新。
文本框中的 this.PersonArray[0].age 没有使用@0bjectLink包装。
因此不会进行界面的跟新
如果我们想要this.PersonArray[0].age更新的话,就需要使用@0bjectLink包装
更新文本框中的 this.PersonArray[0].age
我们把 this.PersonArray[0].age 的数据值单独抽离成为一个组件。
原因是:@ObjectLink修饰符不能用在 Entry 修饰的组件中使用
interface PersonList{
  name:string
  id:string
  age:number
}
// 将数据用类的方式进行实例化,而不能用接口的方式进行。因为:@Observed修饰时必须是使用类进行初始
@Observed
class Person{
  name:string
  id:string
  age:number
  constructor(obj:PersonList) {
    this.name = obj.name
    this.id = obj.id
    this.age = obj.age
  }
}

@Component
struct ChildCom {
  // 在子组件的中使用@ObjectLink
  @ObjectLink itemObj:Person
  // 等会父组件会重写这个方法
  editorHandler = ()=>{}
  build() {
    Column(){
      Row(){
        Text('姓名1:'+ this.itemObj.name).margin({right:20})
        Text('年龄:'+ this.itemObj.age).margin({right:20})
        Button('修改').onClick(()=>{
          this.editorHandler()
        })
      }.height(70).backgroundColor('#cac').width('100%').margin({bottom:10}).padding({left:10, right:10})
    }
  }
}


@Component
struct SonText {
  @ObjectLink infoAge:Person
  build() {
    Text('这个值不会更新:'+ this.infoAge.age)
  }
}

@Entry
@Component
struct Index {
  @State PersonArray:PersonList[]=[
    new Person({
      name:'张三',
      id:'user01',
      age:19
    }),
    new Person({
      name:'李四',
      id:'user02',
      age:22
    })
  ]
  build() {
    Column() {
      // 属性更新的逻辑:当我们使用@0bserved装饰过的数据,属性改变时,
      // 就会监听到遍历依赖它的 @0bjectLink 包装类,通知数据更新。
      // 但是下面的 this.PersonArray[0].ag 没有使用@0bjectLink进行包装,所以不会更新
      // Text('这个值不会更新:'+ this.PersonArray[0].age)
      // 我们把它变成组件,在组件中就可以使用 @0bjectLink
      SonText({
        infoAge: this.PersonArray[0]
      })
      ForEach(this.PersonArray,(item:Person,index:number)=>{
        ChildCom({
          itemObj: item,
          // 我们现在就可以更改第层的属性了,父组件进行更改
          editorHandler:()=>{
            item.age++
          }
        })
      })
    }
  }
}

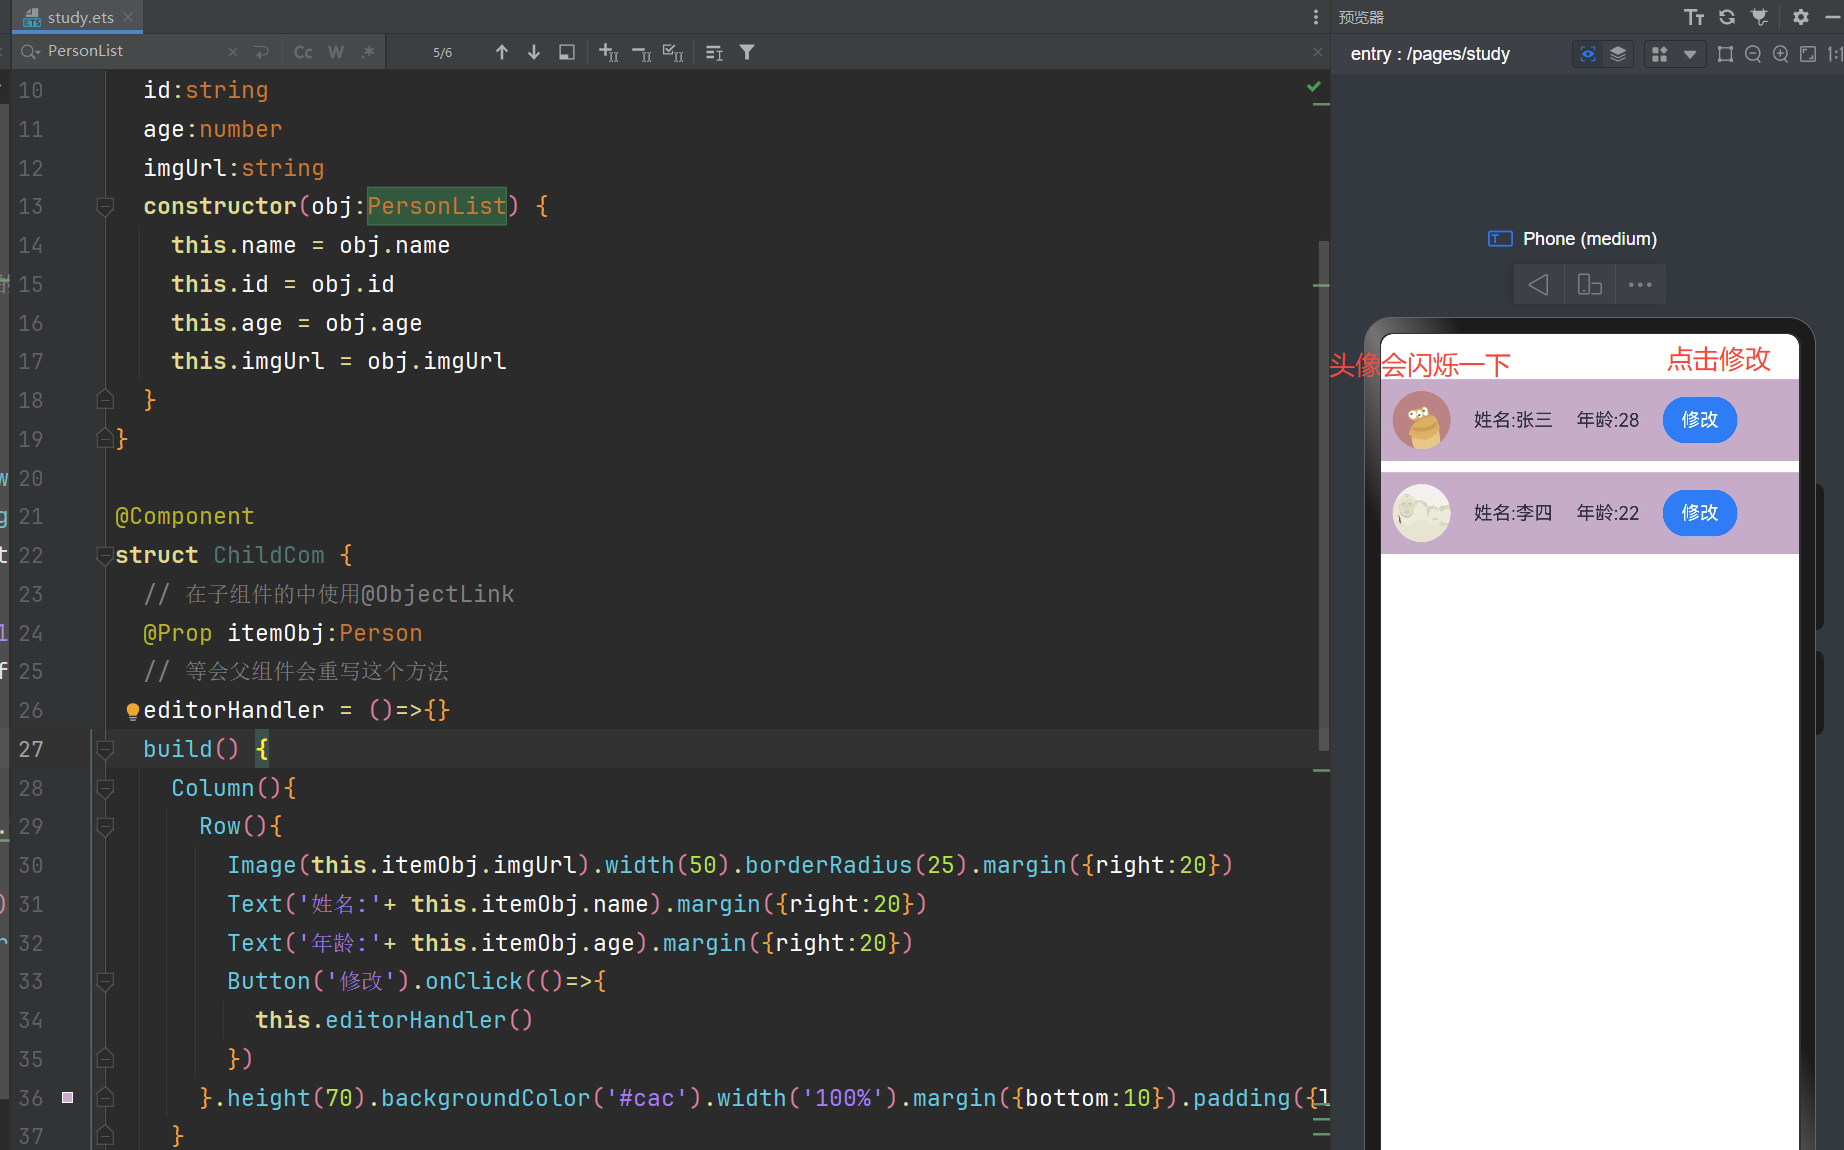
装饰器更改第二层的数据会造成整项重新跟新(图片闪烁一下)
前面我们说了:
装饰器仅能观察到第一层的变化。对于多层嵌套的情况,比如对象数组等。
第2层属性的变化是无法观察到的。
因此我们会是下面的办法
let newItemObj:PersonList = this.PersonArray[index]
newItemObj.age+=1
// Array.splice(从第几项开始删除,删除几个,替换的项1,替换的项2,...)
this.PersonArray.splice(index,1,newItemObj)
但是这样更新年龄的时候,头像会闪动一下。因为跟新了整项。
使用Observed&、ObjectLink装饰的话就可以做到精确跟新。不会闪烁。
@Prop更新整项造成图像闪烁问题
interface PersonList{
  name:string
  id:string
  age:number,
  imgUrl:string
}

class Person{
  name:string
  id:string
  age:number
  imgUrl:string
  constructor(obj:PersonList) {
    this.name = obj.name
    this.id = obj.id
    this.age = obj.age
    this.imgUrl = obj.imgUrl
  }
}

@Component
struct ChildCom {
  // 在子组件的中使用@ObjectLink
  @Prop itemObj:Person
  // 等会父组件会重写这个方法
  editorHandler = ()=>{}
  build() {
    Column(){
      Row(){
        Image(this.itemObj.imgUrl).width(50).borderRadius(25).margin({right:20})
        Text('姓名:'+ this.itemObj.name).margin({right:20})
        Text('年龄:'+ this.itemObj.age).margin({right:20})
        Button('修改').onClick(()=>{
          this.editorHandler()
        })
      }.height(70).backgroundColor('#cac').width('100%').margin({bottom:10}).padding({left:10, right:10})
    }
  }
}


@Entry
@Component
struct Index {
  @State PersonArray:PersonList[]=[
    new Person({
      name:'张三',
      id:'user01',
      age:19,
      imgUrl:'https://p3-passport.byteacctimg.com/img/mosaic-legacy/3795/3047680722~130x130.awebp'
    }),
    new Person({
      name:'李四',
      id:'user02',
      age:22,
      imgUrl:'https://p9-passport.byteacctimg.com/img/user-avatar/98fd632fb172e17c564e253895d192bf~130x130.awebp'
    })
  ]
  build() {
    Column() {

      ForEach(this.PersonArray,(item:Person,index:number)=>{
        ChildCom({
          itemObj: item,
          // 我们现在就可以更改第层的属性了,父组件进行更改
          editorHandler:() => {
            // this.PersonArray[index]的类型不是Person类型,是PersonList类型。
            // 从这里我们可以看出来。==> @State PersonArray:PersonList[]=[{},{}]
            let newItemObj:PersonList = this.PersonArray[index]
            newItemObj.age+=1
            //  Array.splice(从第几项开始删除,删除几个,替换的项1,替换的项2,...)
            this.PersonArray.splice(index,1,newItemObj)
          }
        })
      })
    }
  }
}
最后的总结
@Link可以实现数据的双向绑定。
@Provide、Consume跨层传递。中间层对数据不需要做任何的处理。
@Observed&、ObjectLink更改多层结构的数据,同时会跟新界面,不会造成图像闪烁。
@Prop更新第二层的数据会造成整项跟新,图像闪烁问题。
遇见问题,这是你成长的机会,如果你能够解决,这就是收获。
出处:https://www.cnblogs.com/IwishIcould/
想问问题,打赏了卑微的博主,求求你备注一下的扣扣或者微信;这样我好联系你;(っ•̀ω•́)っ✎⁾⁾!
如果觉得这篇文章对你有小小的帮助的话,记得在右下角点个“推荐”哦,或者关注博主,在此感谢!
万水千山总是情,打赏5毛买辣条行不行,所以如果你心情还比较高兴,也是可以扫码打赏博主(っ•̀ω•́)っ✎⁾⁾!
想问问题,打赏了卑微的博主,求求你备注一下的扣扣或者微信;这样我好联系你;(っ•̀ω•́)っ✎⁾⁾!


如果文中有什么错误,欢迎指出。以免更多的人被误导。

 浙公网安备 33010602011771号