鸿蒙@State和List列表组件和列表渲染
@State 状态详解
注意:不是所有的状态变量更改都会引起界面的刷新。
只有可以被框架观察到的修改才会引起界面刷新。
boolean、string、number类型时,可以观察到数值的变化
class或者Object时,只能观察自身的赋值的变化或者说第一层属性赋值的变化。
即Object.keys(observedObject) 返回的属性。
无法观察到第2层属性的变化
interface addressType {
  details: string;
}

interface  Person {
  userName:string
  address: addressType
}
@Entry
@Component
struct Index {
  @State Person:Person = {
    userName: '张三',
     address:{
       details:'地球中的某一个地方'
     }
  }
  build() {
    Column(){
      Text('地址是:'+this.Person.address.details).fontColor(Color.Pink)
      Button('更改它的值').margin({ top:10}).onClick(()=>{
        // 这种更改会失败,因为观察不到第2层属性的赋值变化。不会跟新
        // this.Person.address.details = '在xxx省xx市阳光小区'

        // 正确做法,这样就可以观察到第1层属性赋值的变化.ui正常更新
        this.Person.address = {
          details: '在xxx省xx市阳光小区'
        }
      })
    }
  }
}

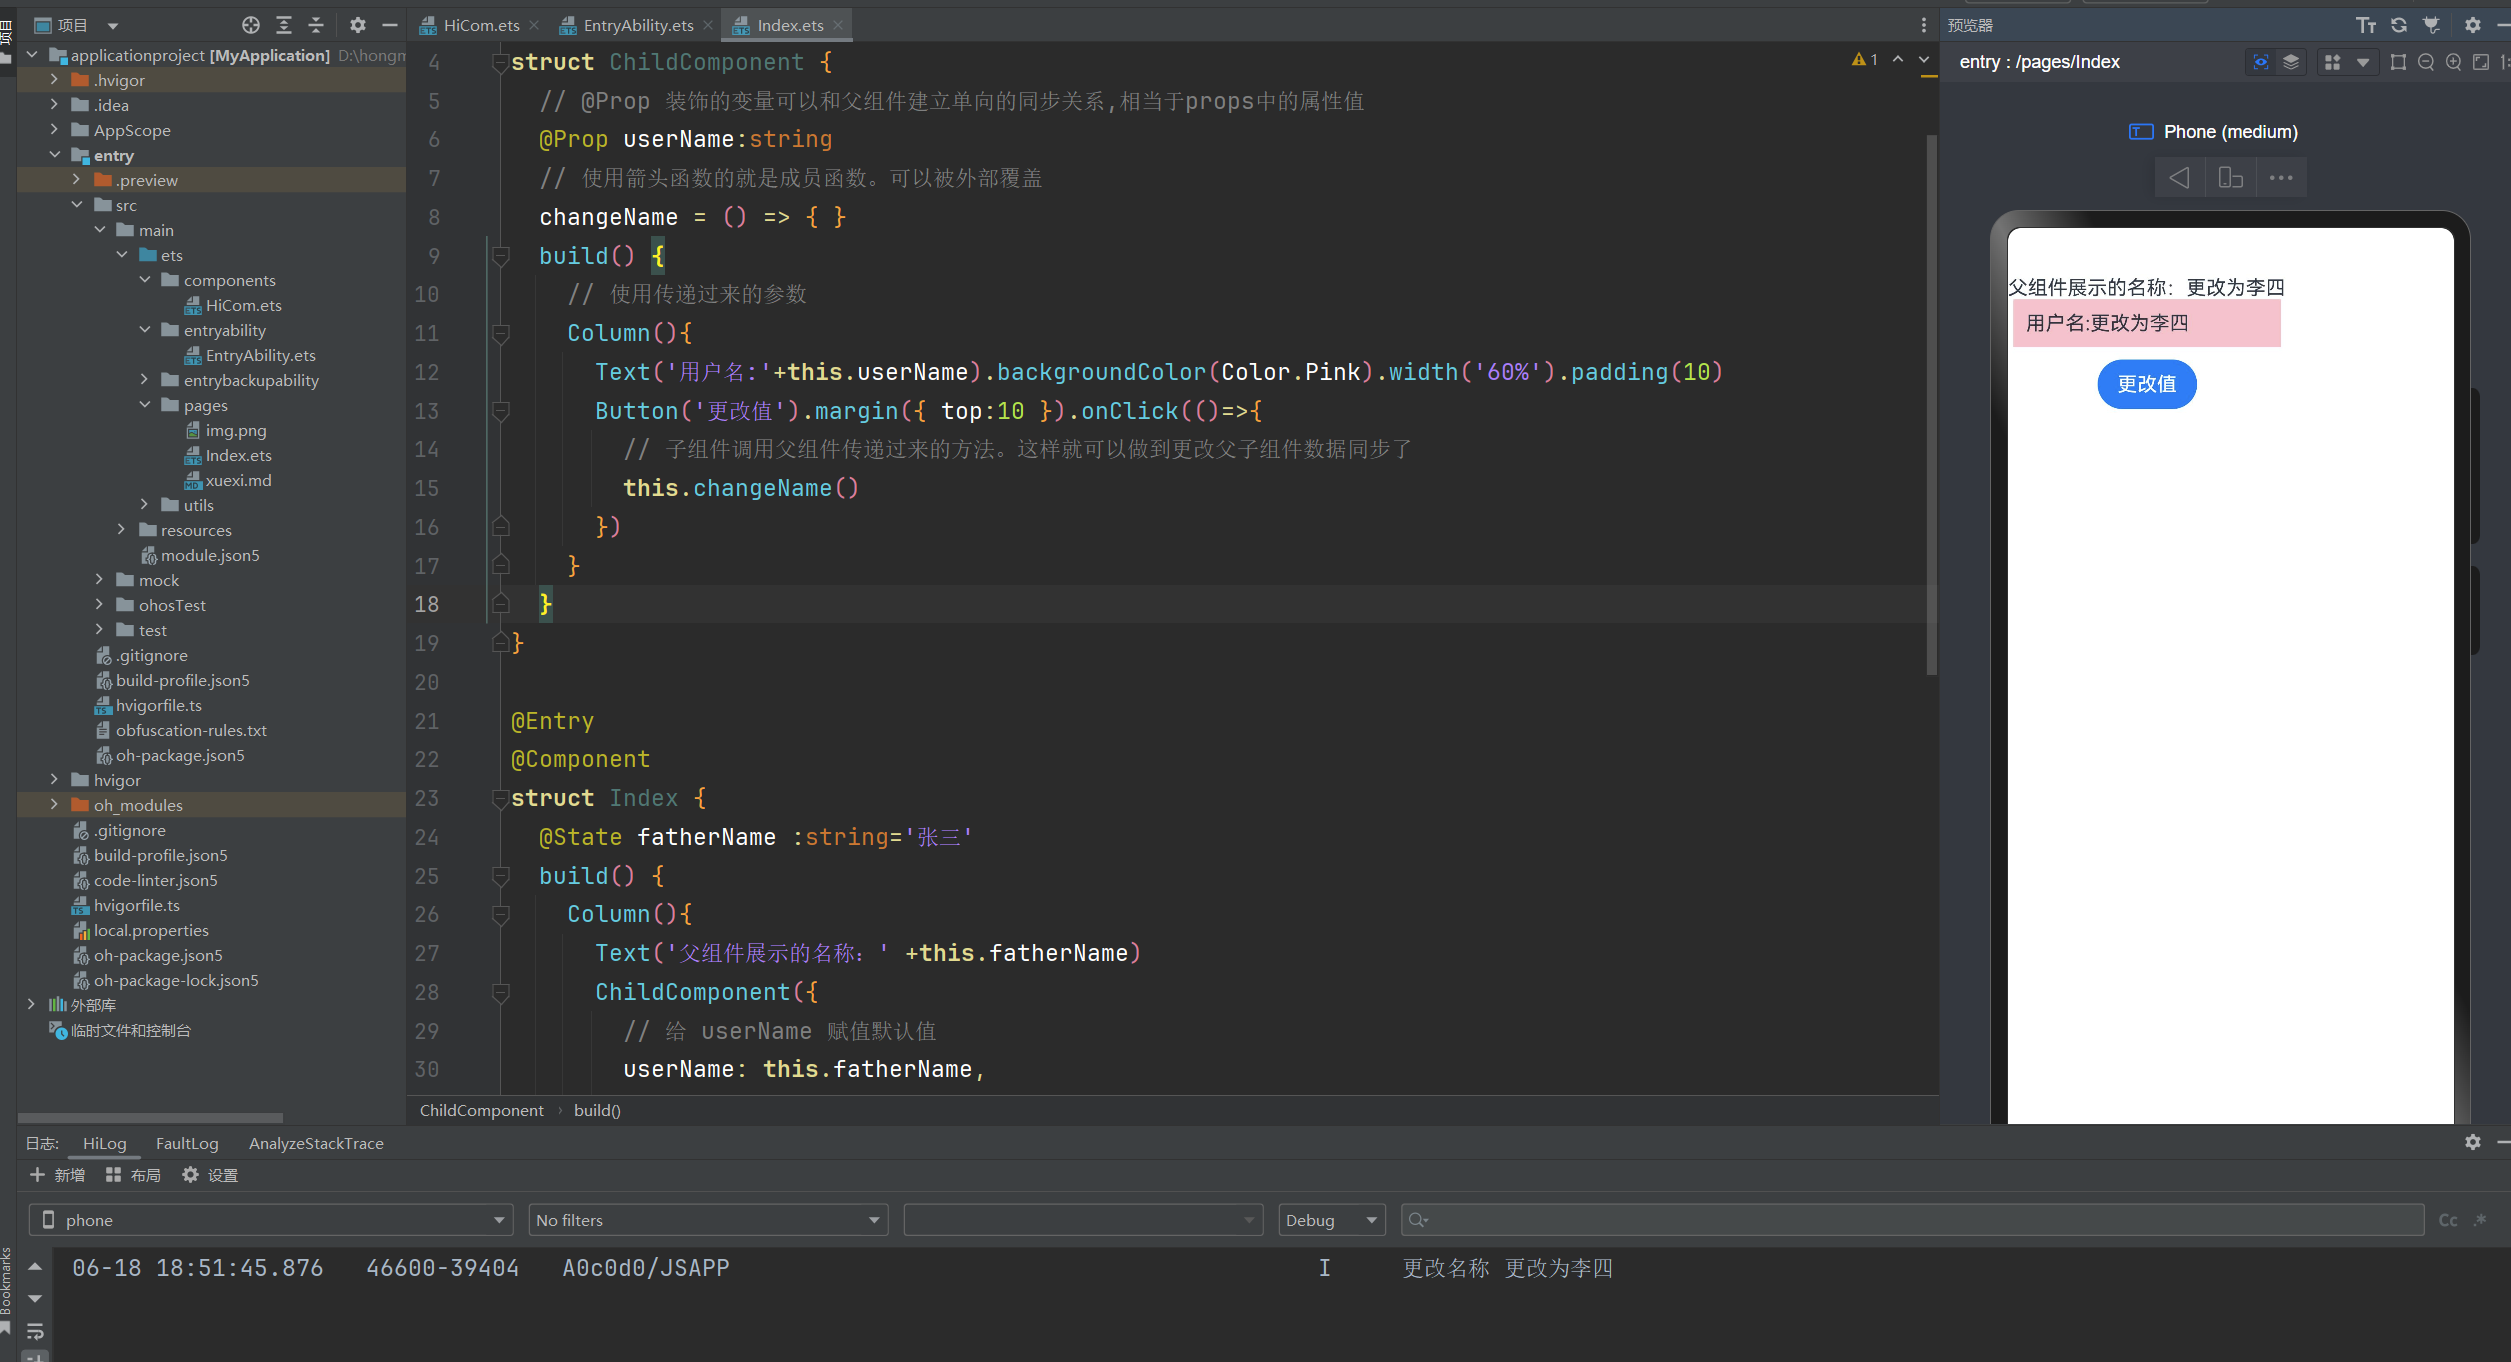
@Prop-父子单向
@Prop 装饰的变量可以和父组件建立单向的同步关系
@Prop 装饰的变量是可变的,但是变化后不会同步回其父组件
父组件通过方法来更改传递给子组件的数据,子组件的ui界面会自动跟新
@Prop父组件单向更改数据
@Component
struct ChildComponent {
  // @Prop 装饰的变量可以和父组件建立单向的同步关系,相当于props中的属性值
  @Prop userName:string
  // 使用箭头函数的就是成员函数。可以被外部覆盖
  changeName = () => {

  }
  build() {
    // 使用传递过来的参数
    Text('用户名:'+this.userName).backgroundColor(Color.Pink).width('60%').padding(10)
  }
}

@Entry
@Component
struct Index {
  @State fatherName :string='张三'
  build() {
    Column(){
      ChildComponent({
        // 给 userName 赋值默认值
        userName: this.fatherName
      })
      Button('更改值').margin({ top:10 }).onClick(()=>{
        this.fatherName ='更改为李四'
      })
    }
  }
}
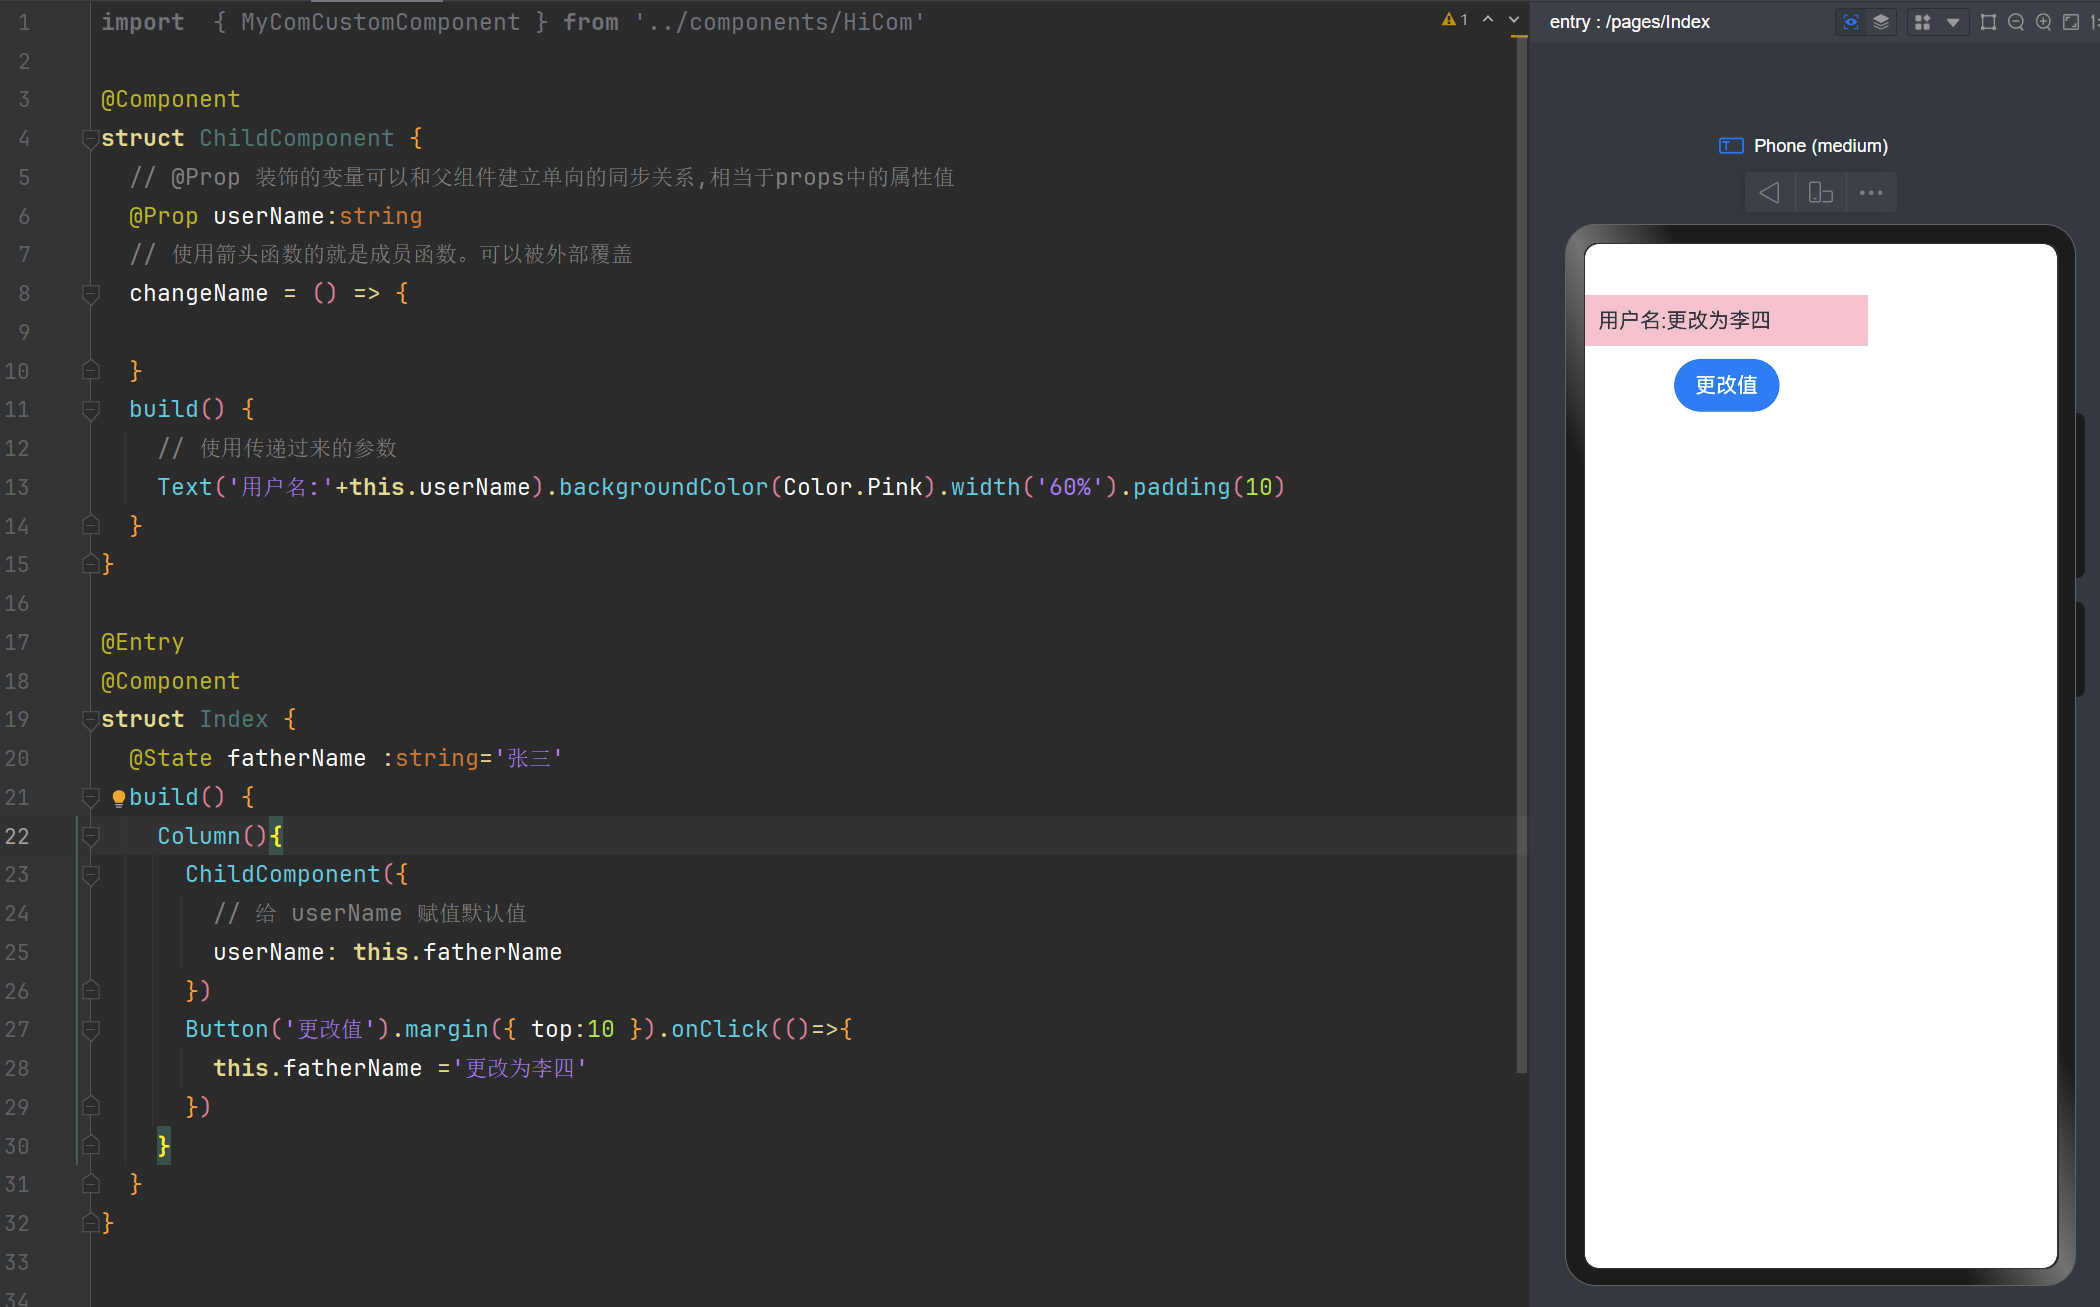
@Prop-子组件调用父组件的方法
import  { MyComCustomComponent } from '../components/HiCom'

@Component
struct ChildComponent {
  // @Prop 装饰的变量可以和父组件建立单向的同步关系,相当于props中的属性值
  @Prop userName:string
  // 使用箭头函数的就是成员函数。可以被外部覆盖
  changeName = () => { }
  build() {
    // 使用传递过来的参数
    Column(){
      Text('用户名:'+this.userName).backgroundColor(Color.Pink).width('60%').padding(10)
      Button('更改值').margin({ top:10 }).onClick(()=>{
        // 子组件调用父组件传递过来的方法。这样就可以做到更改父子组件数据同步了
        this.changeName()
      })
    }
  }
}

@Entry
@Component
struct Index {
  @State fatherName :string='张三'
  build() {
    Column(){
      Text('父组件展示的名称:' +this.fatherName)
      ChildComponent({
        // 给 userName 赋值默认值
        userName: this.fatherName,
        // 子组件调用这个方法的时候,就会更改父组件中的数据,同时数据传递给子组件,达到修改子组件中的数据
        // 需要注意:这里必须要使用箭头函数,this的指向问题
        // 使用箭头函数,指向上一级作用域中的this,也就是这个组件中的this
        changeName:()=>{
          this.fatherName ='更改为李四'
          console.log('更改名称', this.fatherName)
        }
      })
    }
  }
}
顶部-中间-底部布局
@Entry
@Component
struct Index {
  build() {
    Column(){
      // 顶部部分
      Row(){

      }.width('100%').height(50).backgroundColor('#ccc')

      // 中间部分
      Column(){

      }.width('100%')
      .layoutWeight(1) // 让容器的高度自适应
      .backgroundColor('#cac')

      //  底部部分
      Row(){

      }.width('100%').height(50).backgroundColor('#aa1')

    }.width('100%').height('100%')
  }
}

1,撑满整个屏幕
Column(){}.width('100%').height('100%')
2,自适应布局:设置 layoutWeight属性的元素,将会与兄弟元素按照权重进行分配主轴剩余的空间。
或者说:自适应布局会先把固定空间排列好,剩下的空间会按照权重来进行分配
语法是:组件.layoutWeight(数字)
现在我们把顶部抽离成为一个组件
// @Extend  对某个具体的组件进行抽取
@Extend(Button)
function ButtonFn(isSelect:boolean){
  .width(46)
  .height(30)
  .fontSize(12)
  .padding({left:4, right:4})
  .backgroundColor(isSelect ? '#fff' : '#f7f8fa')
  .fontColor(isSelect ? '#2f2e33' : '#8e9298')
  .border({width:1, color:isSelect ? '#e4e5e6' : '#f7f8fa'})
}

// 使用@Component说明这个是一个组件
@Component
struct  HeaderCom{
  @State selectActive:boolean = true
  build() {
    Row(){
      Text('评论76').fontSize(22).fontWeight(400)
      Row(){
        Button('最新',{ stateEffect:false }).ButtonFn(this.selectActive).onClick(()=>{
          this.selectActive = true
        })
        Button('最热',{ stateEffect:false }).ButtonFn(!this.selectActive).onClick(()=>{
          this.selectActive = false
        })
      }.backgroundColor('#f7f8fa')
       .borderRadius(20)
    }.width('100%').height(50)
     .justifyContent(FlexAlign.SpaceBetween)
     .padding({left:10, right:10, top:6, bottom:6})

  }
}
// 使用默认导出导出这个组件
export default  HeaderCom
import  HeaderCom from '../components/HeaderCom'

@Entry
@Component
struct Index {
  build() {
    Column(){
     // 顶部部分
     HeaderCom().backgroundColor('#fff')

    // 中间部分
    Column(){

    }.width('100%')
    .layoutWeight(1) // 让容器的高度自适应
    .backgroundColor('#fff')

    //  底部部分
    Row(){

    }.width('100%').height(50).backgroundColor('#aa1')

    }.width('100%').height('100%').backgroundColor(Color.Red)
  }
}

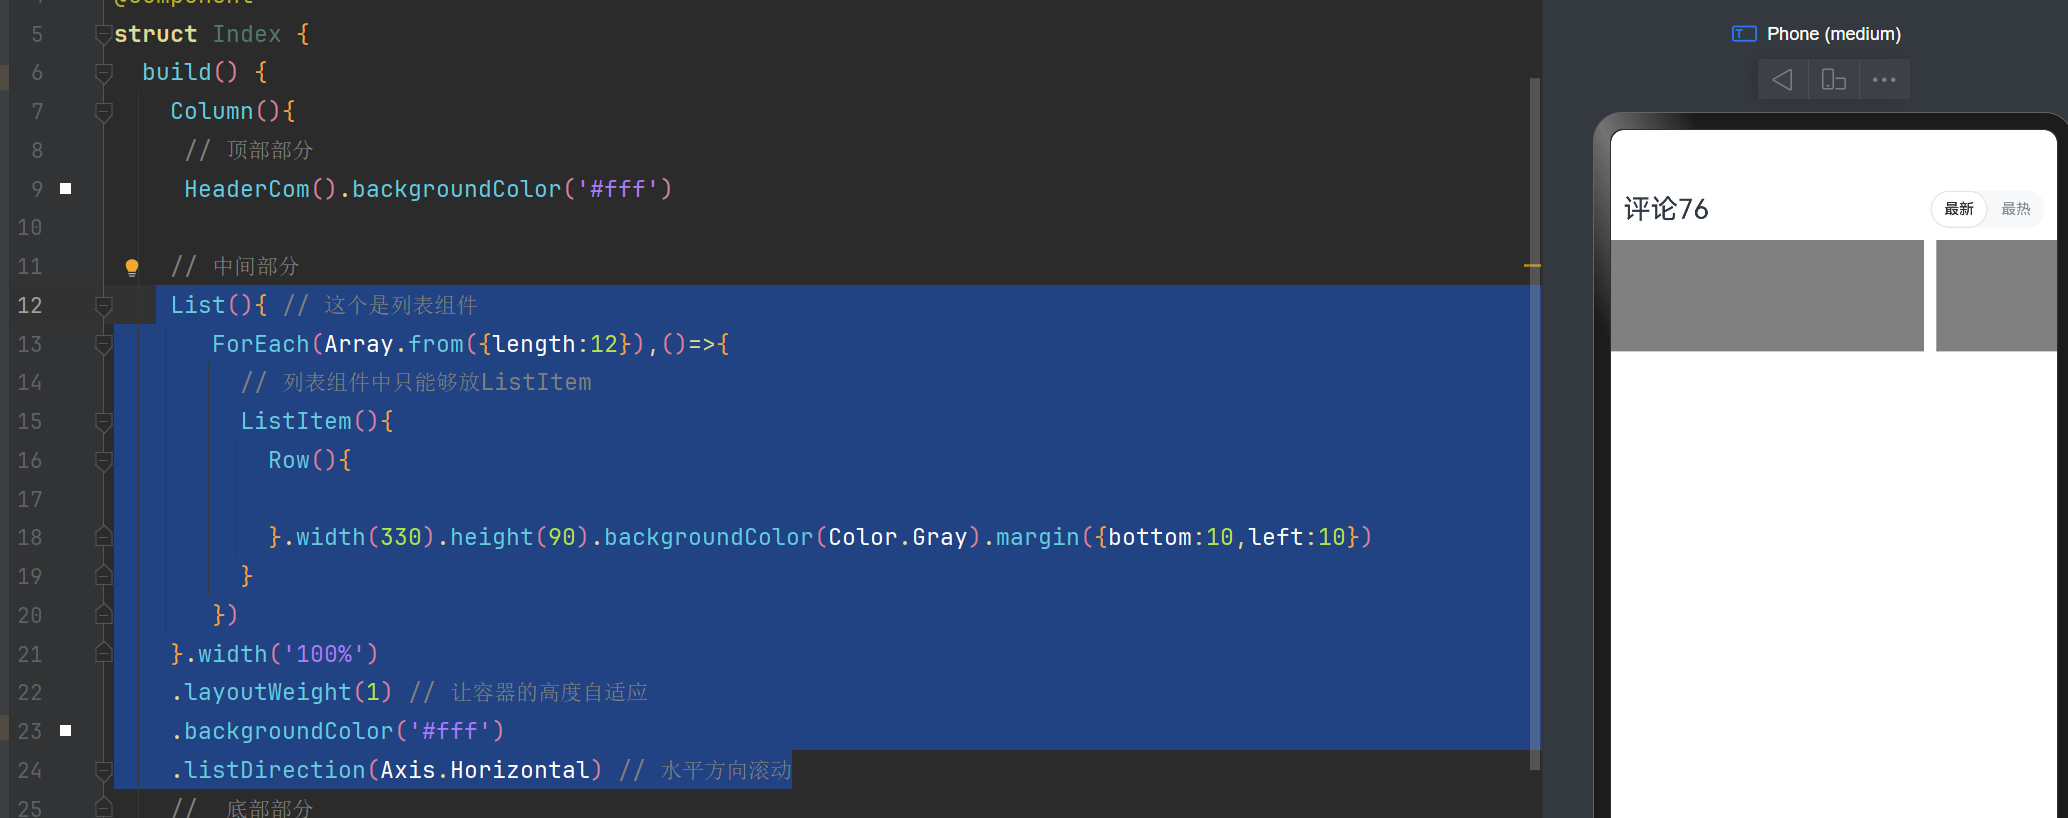
List 列表组件
列表是一种容器,当列表项达到一定数量,超过List容器组件大小时,自动滚动
List 组件下只能够放ListItem组件。这个是规定
常见的属性
1,主轴方向(垂直) listDirection(Axis.Horizontal)
2,交叉轴布局 lanes(列数,间距)
3,列对齐方式 alignListItem(ListItemAlign.Center)
4,滚动条状态 scrollBar(BarState.Auto)
  BarState.Auto 滑动的时候展示滚动条,不滑动的时候就不展示。 Off不展示滚动条。 On一直展示滚动条
5,分割线样式 divider({ ... })
主轴方向:listDirection(Axis.Horizontal)水平
 List(){ // 这个是列表组件
       ForEach(Array.from({length:12}),()=>{
         // 列表组件中只能够放ListItem
         ListItem(){
           Row(){

           }.width(330).height(90).backgroundColor(Color.Gray).margin({bottom:10,left:10})
         }
       })
    }.width('100%')
    .layoutWeight(1) // 让容器的高度自适应
    .backgroundColor('#fff')
    .listDirection(Axis.Horizontal) // 水平方向滚动
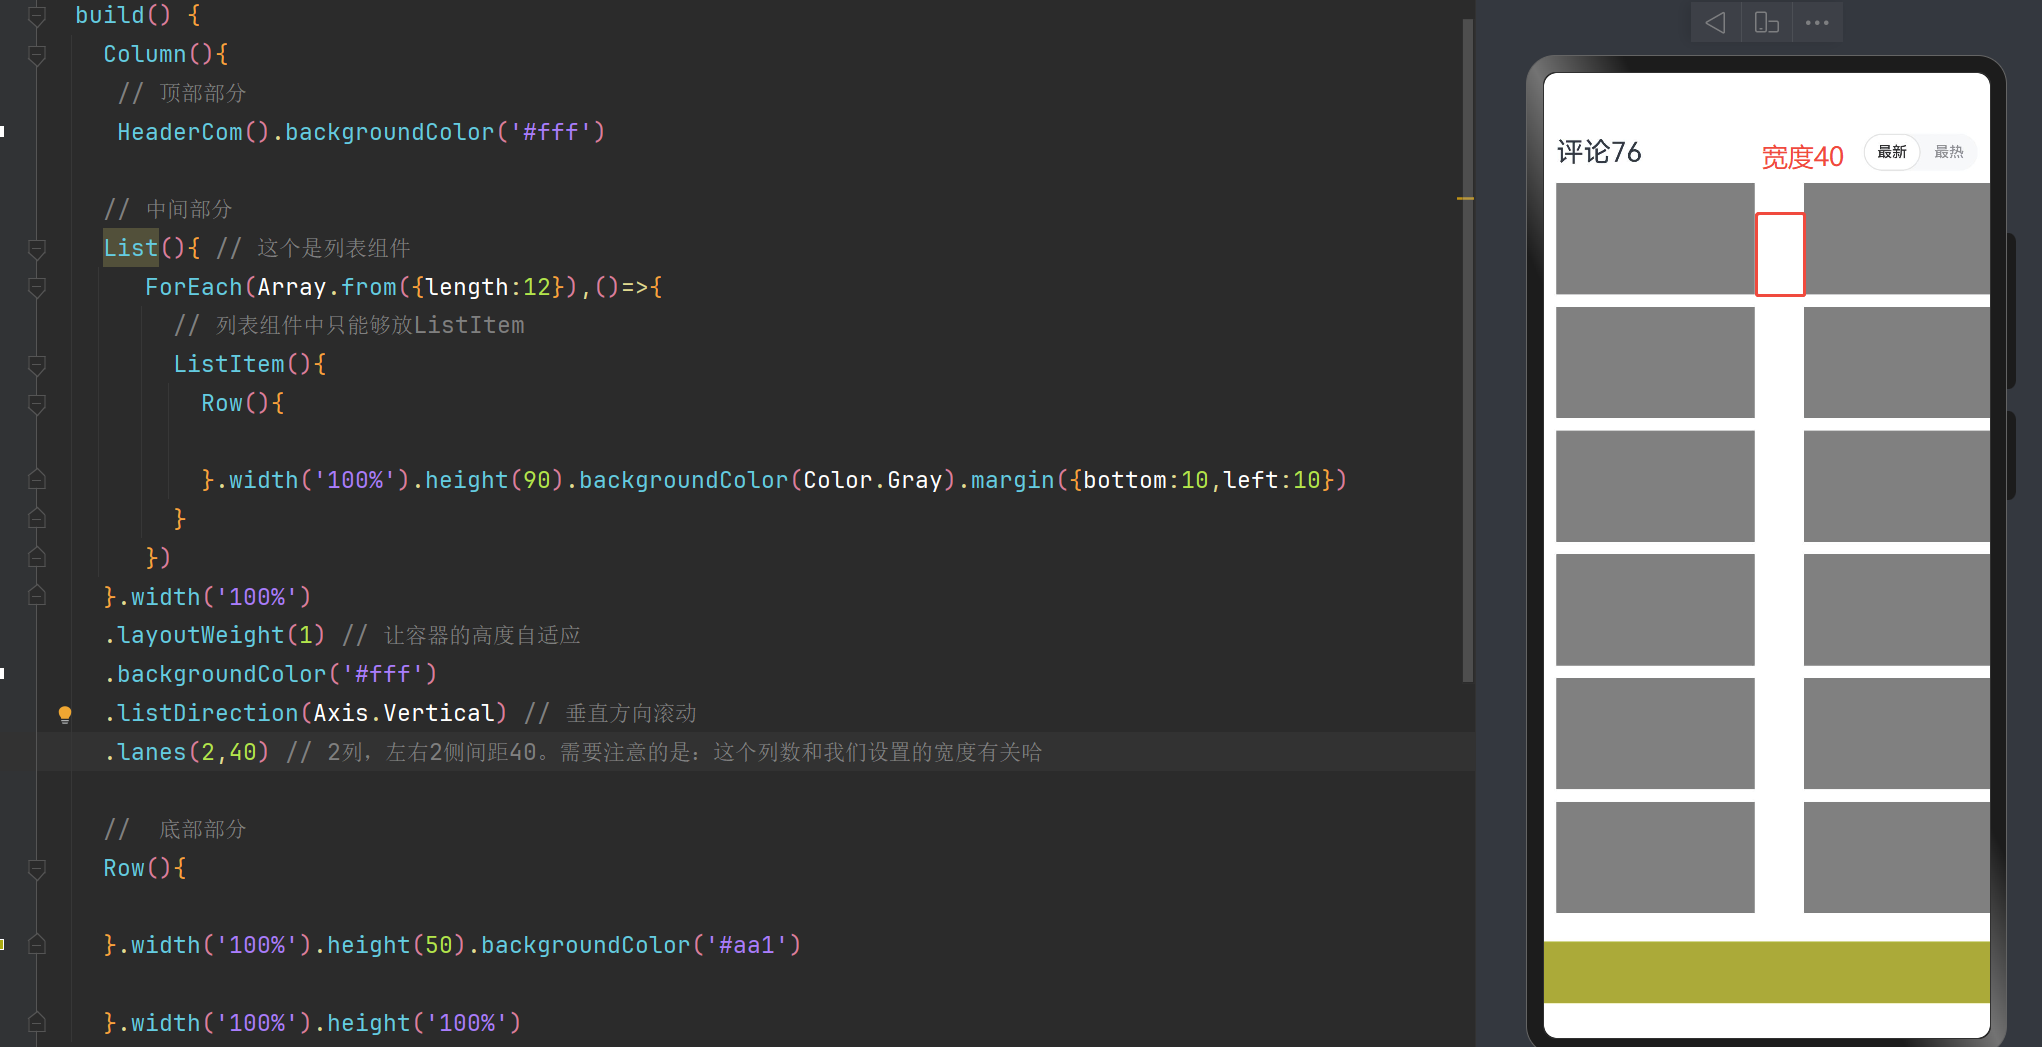
交叉轴布局 lanes(列数,间距)
 List(){ // 这个是列表组件
       ForEach(Array.from({length:12}),()=>{
         // 列表组件中只能够放ListItem
         ListItem(){
           Row(){

           }.width('100%').height(90).backgroundColor(Color.Gray).margin({bottom:10,left:10})
         }
       })
    }.width('100%')
    .layoutWeight(1) // 让容器的高度自适应
    .backgroundColor('#fff')
    .listDirection(Axis.Vertical) // 垂直方向滚动
    .lanes(2,40) // 2列,左右2侧间距40。需要注意的是:这个列数和我们设置的宽度有关哈
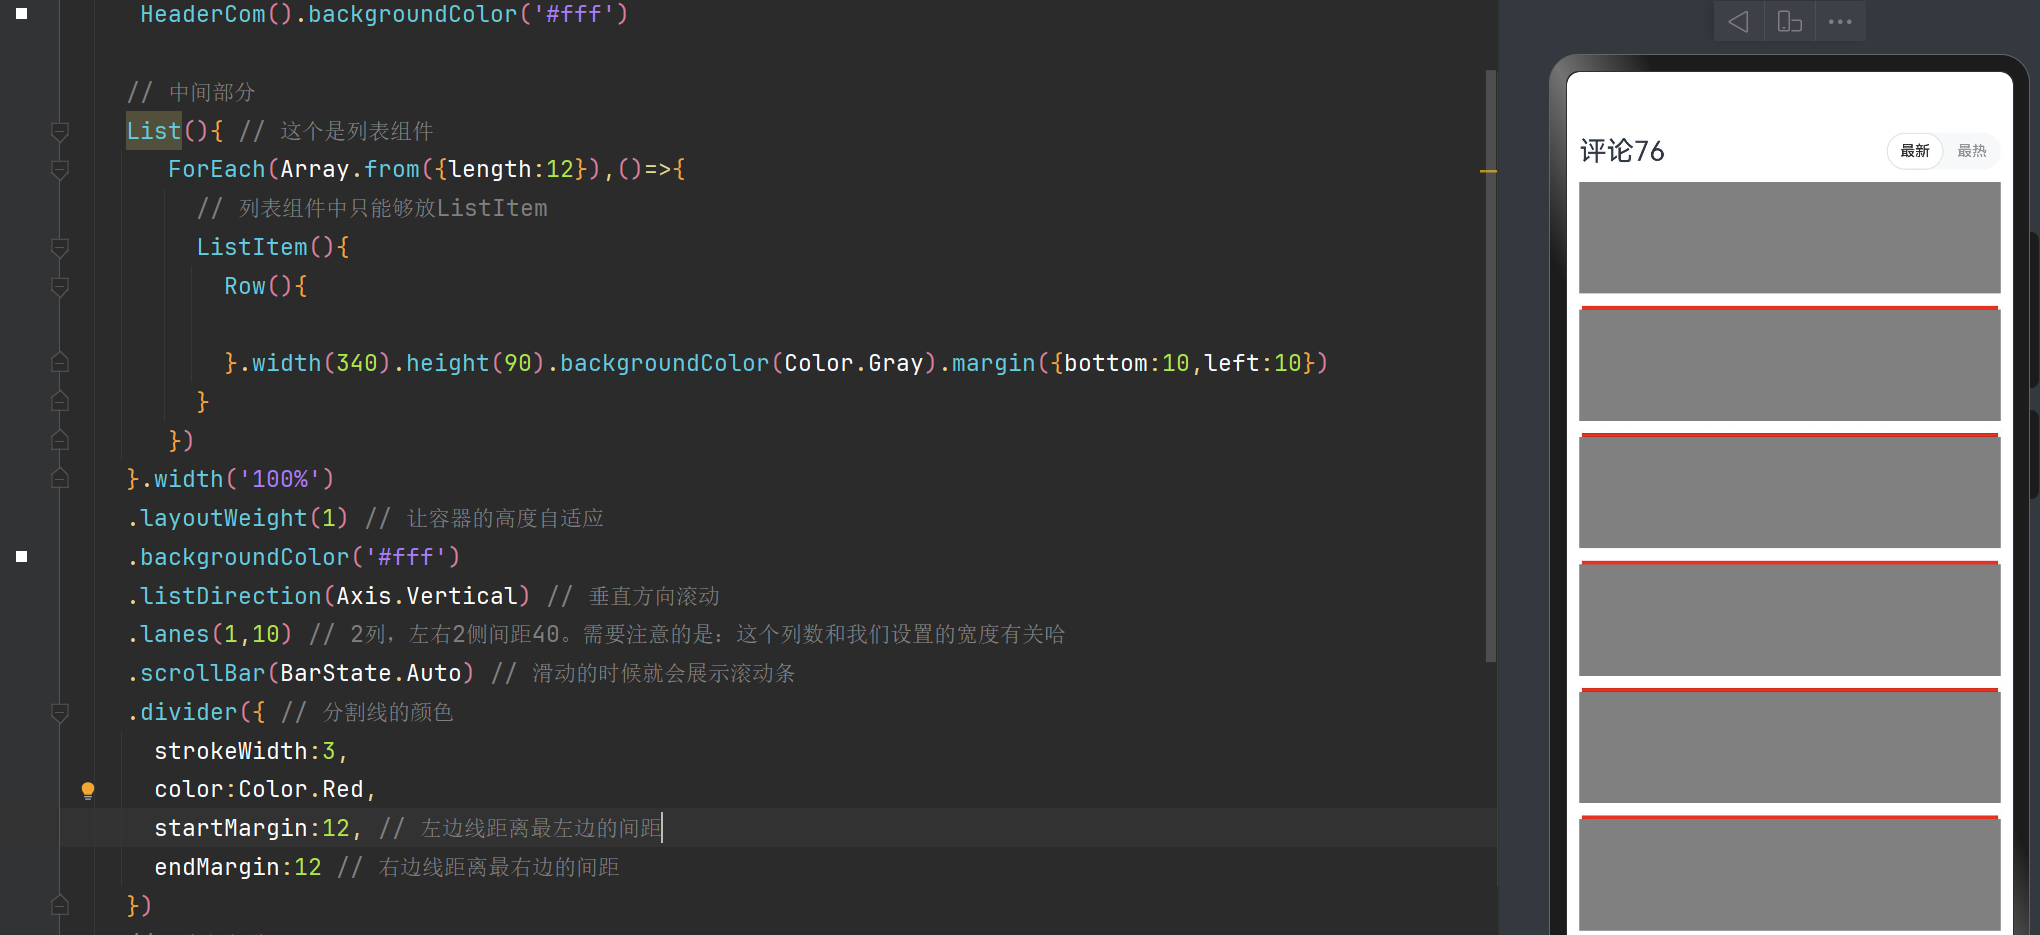
分割线的颜色divider
 // 中间部分
    List(){ // 这个是列表组件
       ForEach(Array.from({length:12}),()=>{
         // 列表组件中只能够放ListItem
         ListItem(){
           Row(){

           }.width(340).height(90).backgroundColor(Color.Gray).margin({bottom:10,left:10})
         }
       })
    }.width('100%')
    .layoutWeight(1) // 让容器的高度自适应
    .backgroundColor('#fff')
    .listDirection(Axis.Vertical) // 垂直方向滚动
    .lanes(1,10) // 2列,左右2侧间距40。需要注意的是:这个列数和我们设置的宽度有关哈
    .scrollBar(BarState.Auto) // 滑动的时候就会展示滚动条
    .divider({ // 分割线的颜色
      strokeWidth:3,
      color:Color.Red,
      startMargin:12, // 左边线距离最左边的间距
      endMargin:12 // 右边线距离最右边的间距
    })
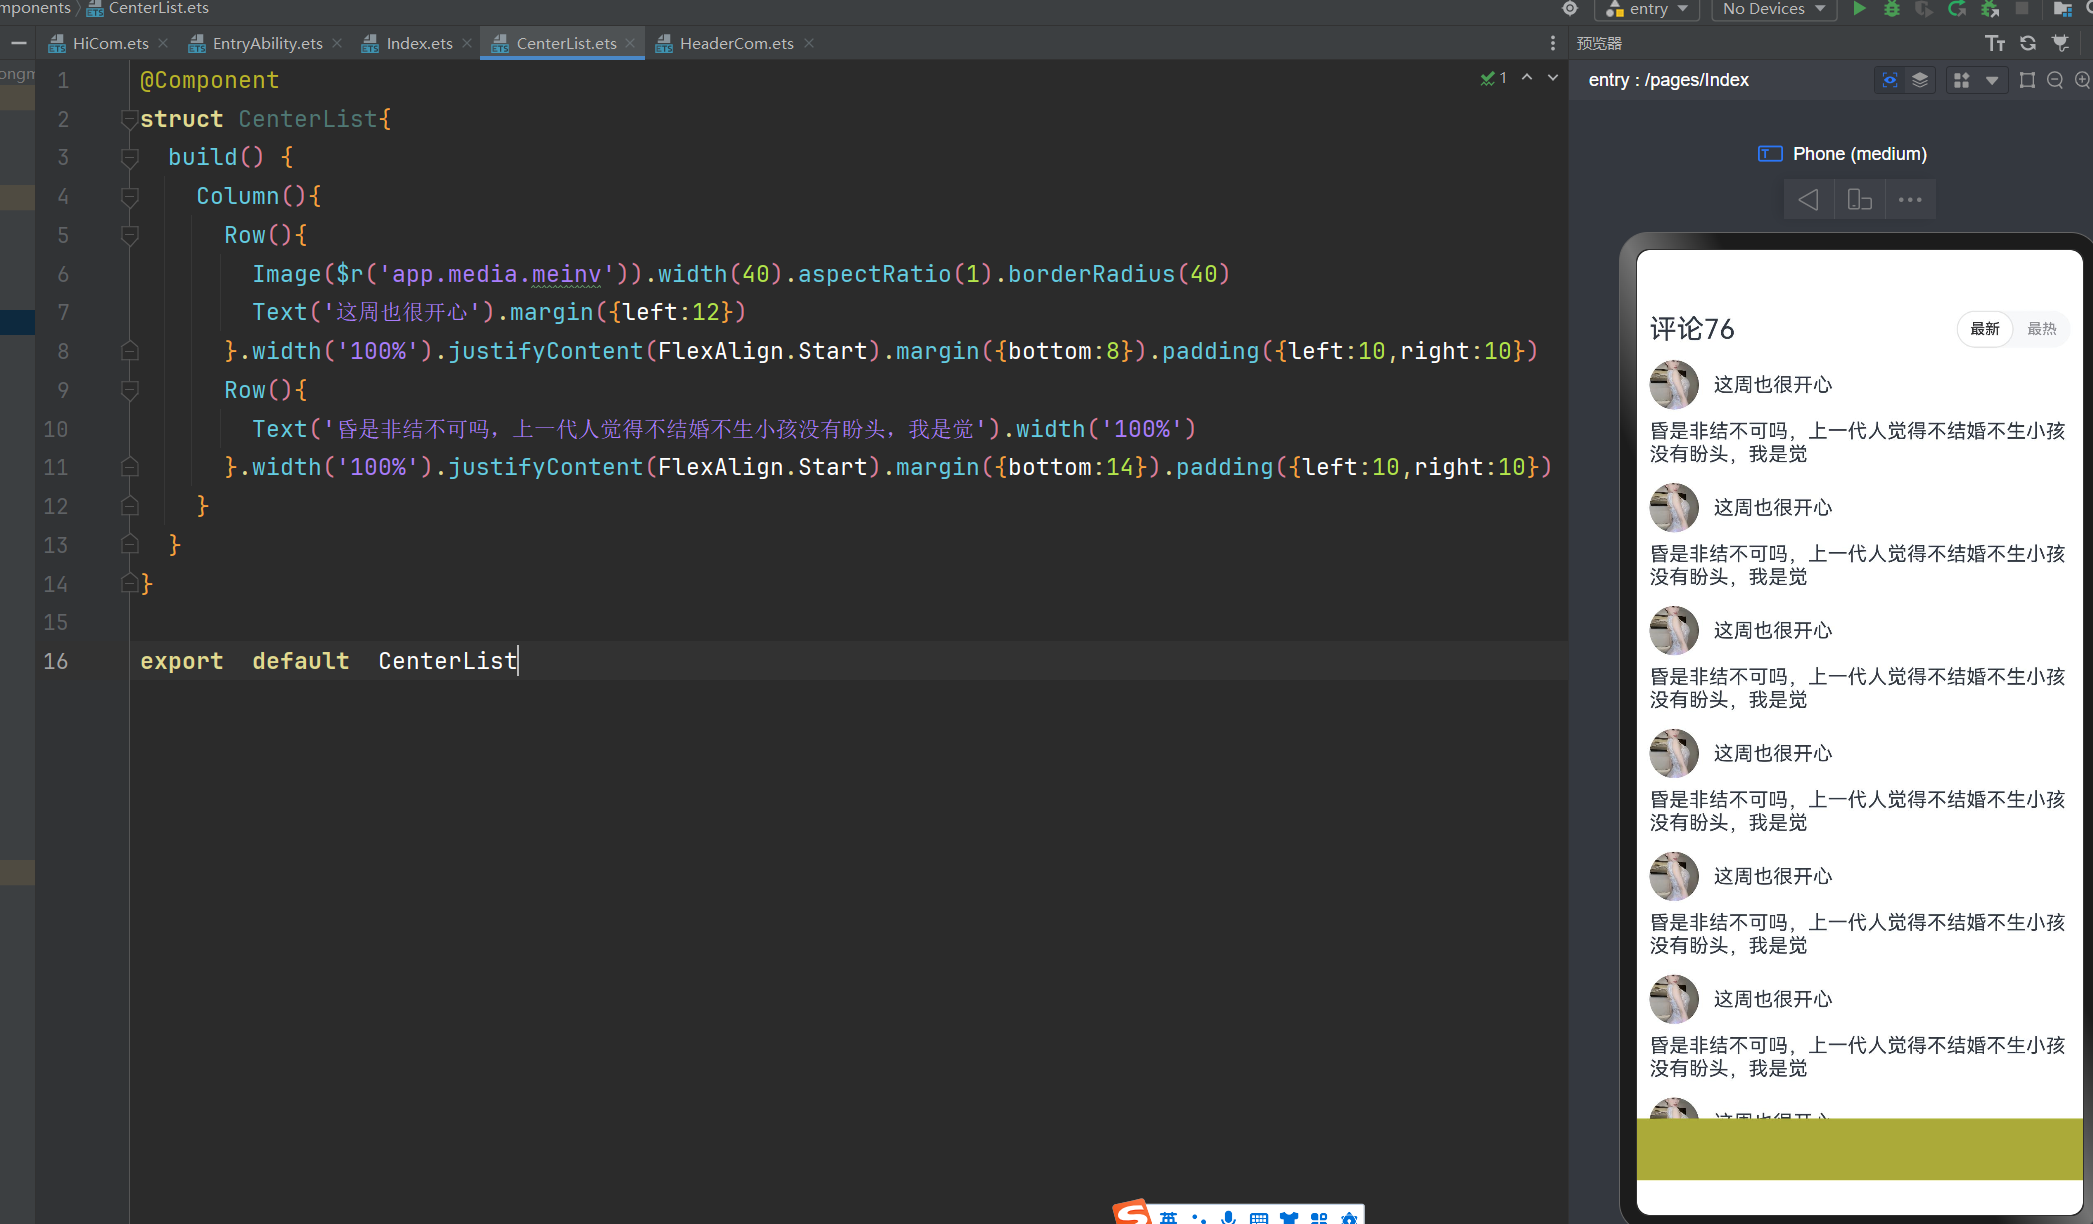
如何让Column下的2个Row组件水平居左
@Component
struct CenterList{
  build() {
    Column(){
      Row(){
        Image($r('app.media.meinv')).width(40).aspectRatio(1).borderRadius(40)
        Text('这周也很开心').margin({left:12})
      }
      Row(){
        Text('昏是非结不可吗,上一代人觉得不结婚不生小孩没有盼头,我是觉').width('100%')
      }
    }
  }
}

export  default  CenterList

使用 width('100%').justifyContent(FlexAlign.Start)来处理
@Component
struct CenterList{
  build() {
    Column(){
      Row(){
        Image($r('app.media.meinv')).width(40).aspectRatio(1).borderRadius(40)
        Text('这周也很开心').margin({left:12})
      }.width('100%').justifyContent(FlexAlign.Start).margin({bottom:8}).padding({left:10,right:10})
      Row(){
        Text('昏是非结不可吗,上一代人觉得不结婚不生小孩没有盼头,我是觉').width('100%')
      }.width('100%').justifyContent(FlexAlign.Start).margin({bottom:14}).padding({left:10,right:10})
    }
  }
}

export  default  CenterList
还可以使用alignItems(HorizontalAlign.Start)水平左对齐
@Component
struct CenterList{
  build() {
    Column(){
      Row(){
        Image($r('app.media.meinv')).width(40).aspectRatio(1).borderRadius(40)
        Text('这周也很开心').margin({left:12})
      }.margin({bottom:8}).padding({left:10,right:10})
      Row(){
        Text('昏是非结不可吗,上一代人觉得不结婚不生小孩没有盼头,我是觉').width('100%')
      }.margin({bottom:14}).padding({left:10,right:10})
    }.alignItems(HorizontalAlign.Start) // 水平左对齐
  }
}

export  default  CenterList
列表展示
@Component
struct CenterList{
  build() {
    Column(){
      Row(){
        Image($r('app.media.meinv')).width(40).aspectRatio(1).borderRadius(40)
        Text('这周也很开心').margin({left:12})
      }.margin({bottom:8}).padding({left:10,right:10})
      Row(){
        Text('昏是非结不可吗,上一代人觉得不结婚不生小孩没有盼头,我是觉').width('100%')
      }.margin({bottom:14}).padding({left:10,right:10})
      Row(){
        Text('4小时前')
        Row(){
          Image($r('app.media.xiaoxi')).width(26).margin({right:4})
          Image($r('app.media.zhichi')).width(26)
        }
      }
      // 2端对齐哈的前提需要设置宽度为100%
      .width('100%').justifyContent(FlexAlign.SpaceBetween)
      .padding({left:10,right:10})

    }.alignItems(HorizontalAlign.Start) // 水平左对齐
  }
}

export  default  CenterList

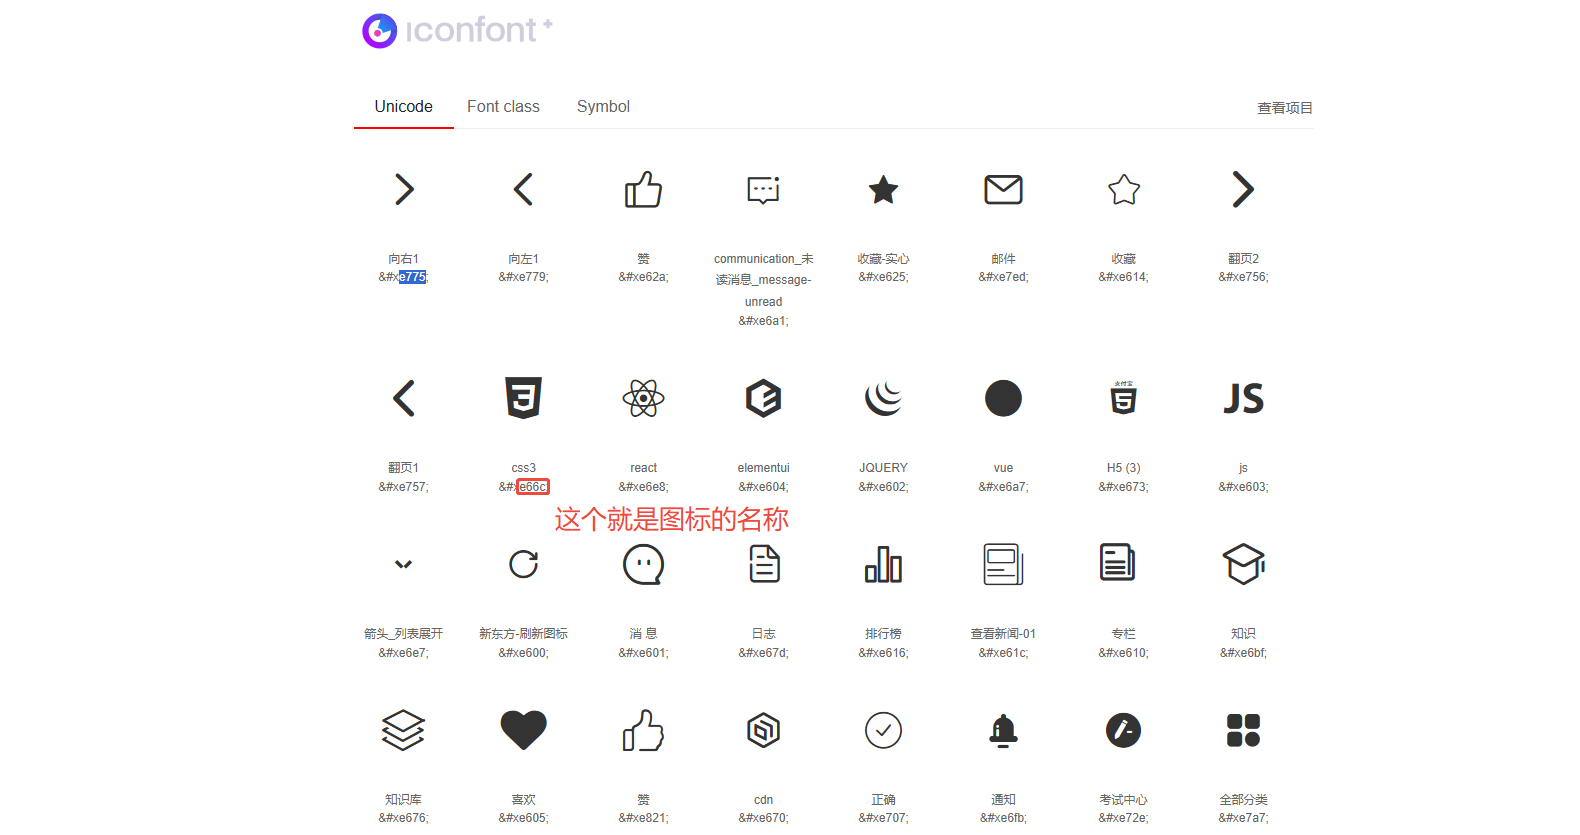
使用字体图标
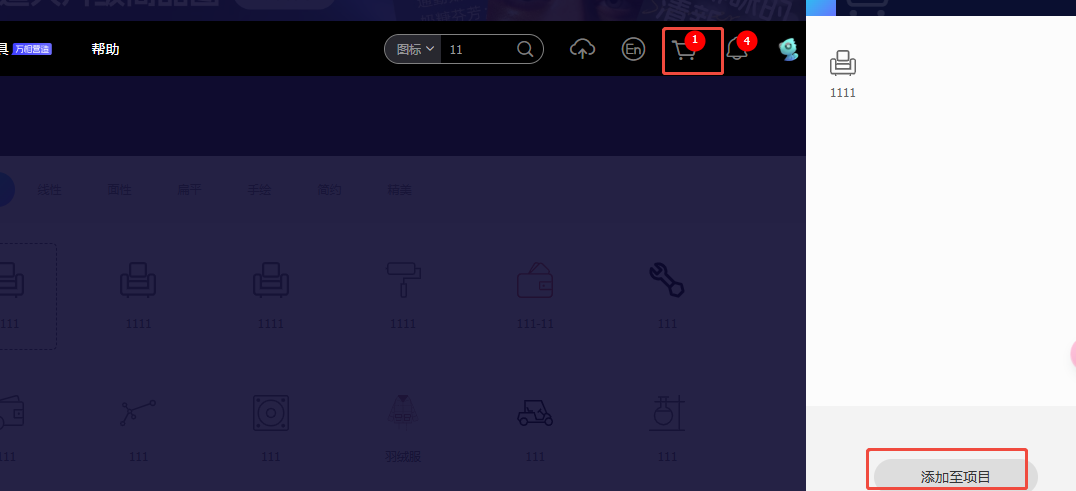
阿里的字体图标库:https://www.iconfont.cn/manage/index
选择合适的字体图标,然后加入库

然后添加到项目
选择font css,下载到本地
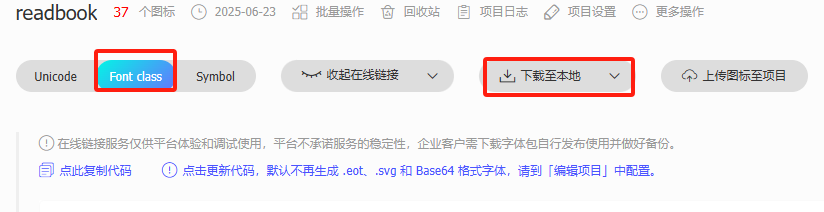
复制下载下来的这个文件 iconfont.css
把这个文件放置在main/ets文件夹下

引入字体图标这个库
import font from '@ohos.font'
在构建页面的时候使用
@Entry
@Component
struct Index {
// 在加载Index页面的时候就进行注册
aboutToAppear(): void { // 生命周期函数,组件在加载的时候就会自动去调用这个方法
// 1,注册字体
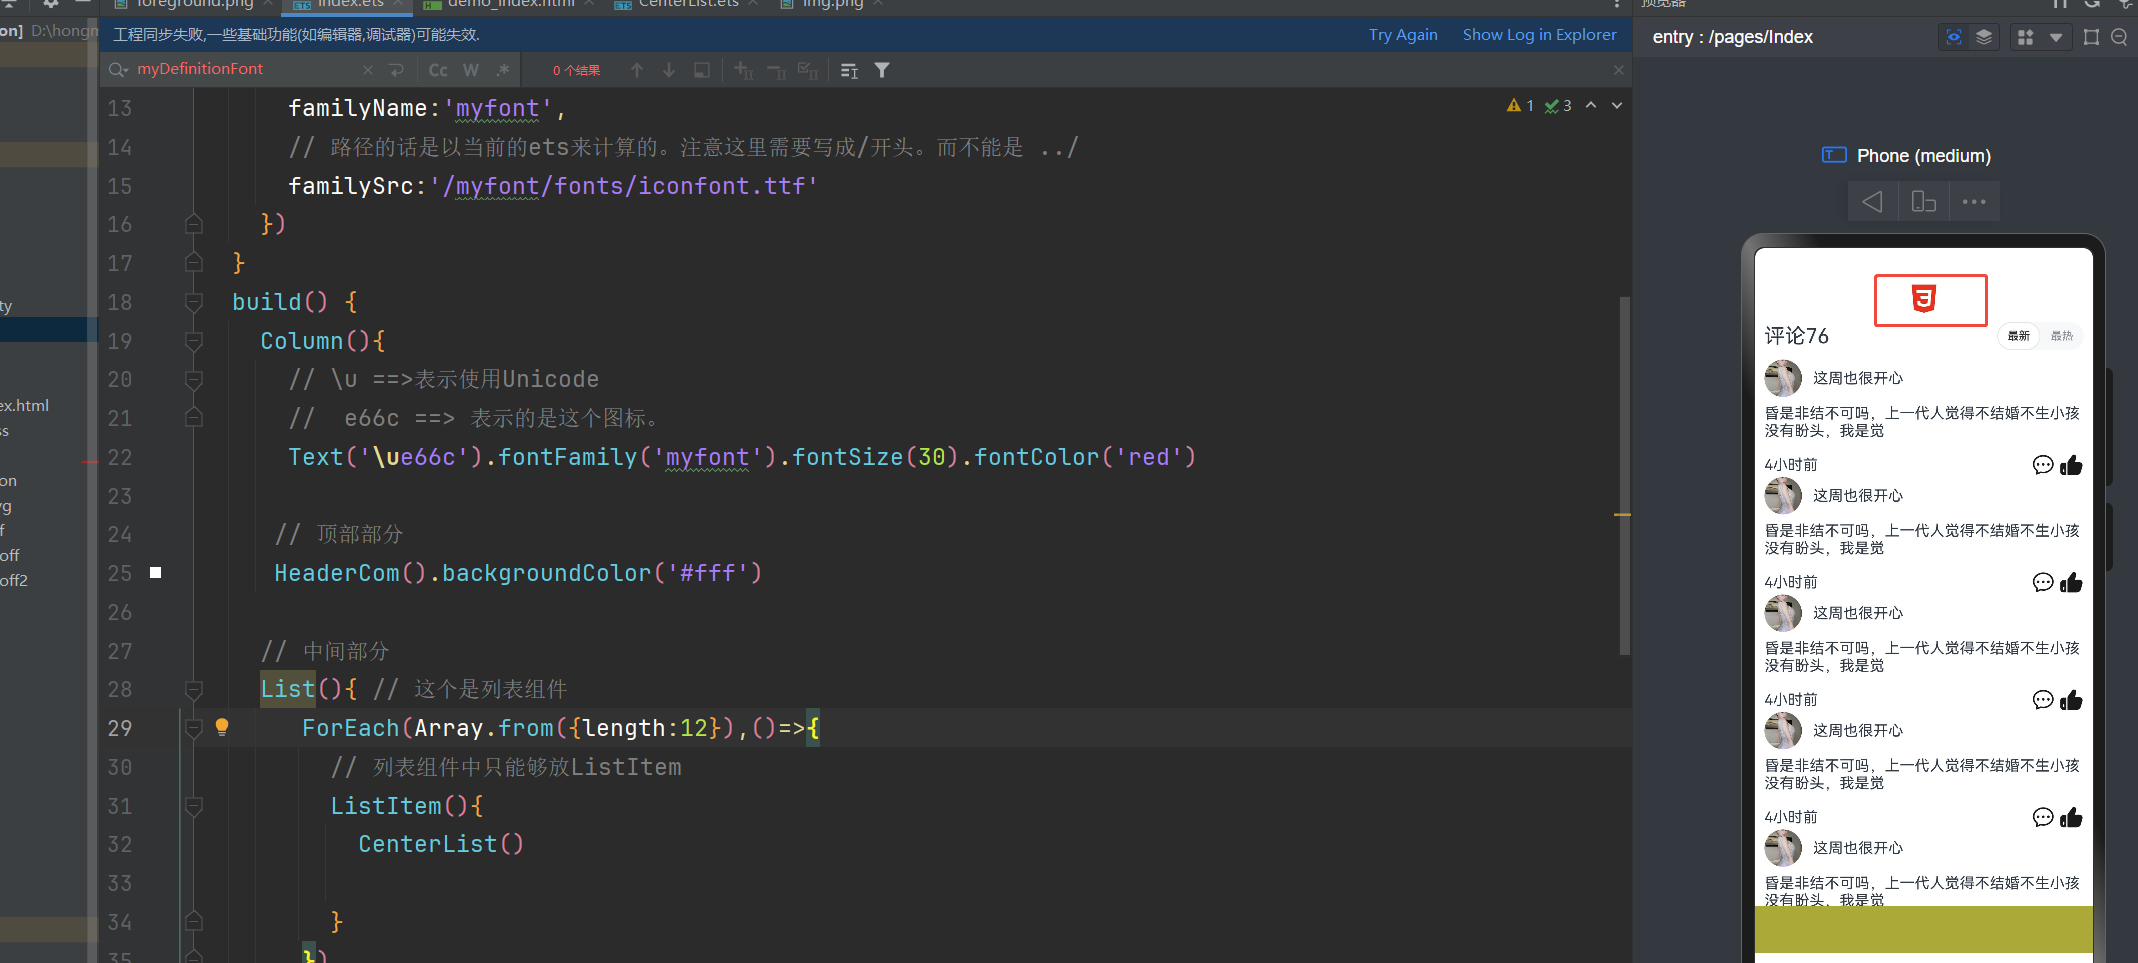
font.registerFont({
familyName:'myfont',
// 路径的话是以当前的ets来计算的。注意这里需要写成/开头。而不能是 ../
familySrc:'/myfont/fonts/iconfont.ttf'
})
}
build() {
Column(){
// \u ==>表示使用Unicode
// e66c ==> 表示的是这个图标。
Text('\ue66c').fontFamily('myfont').fontSize(30).fontColor('red')
}
}
}
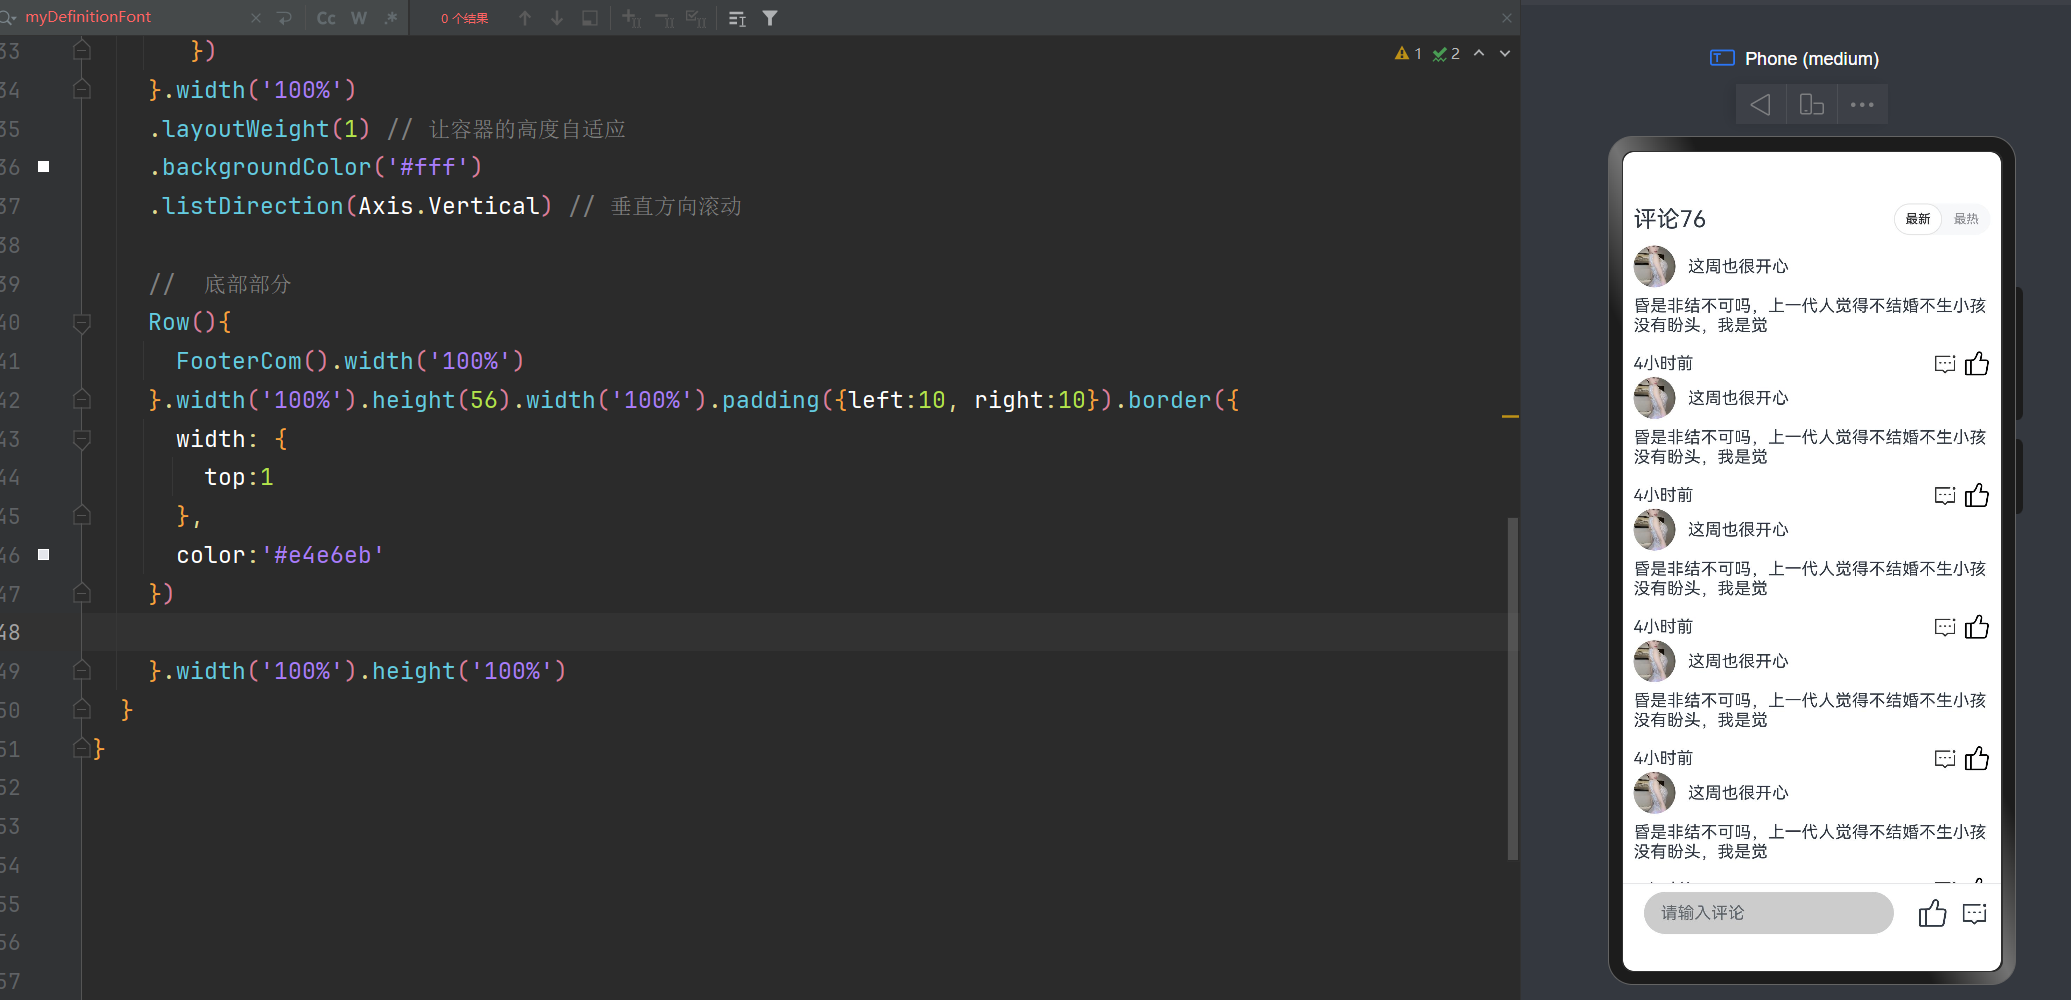
尾部的评论
@Component
struct FooterCom {
  build() {
    Column(){
      Row(){
        TextInput({
          placeholder:'请输入评论'
        }).backgroundColor('#ccc').width('70%').margin({left:10}) // Color.Transparent 无色
        Row(){
          Text('\ue62a').fontFamily('myfont').fontSize(30)
          Text('\ue6a1').fontFamily('myfont').fontSize(30).margin({left:10})
        }
      }.width('100%').justifyContent(FlexAlign.SpaceBetween)
    }
  }
}

export default  FooterCom
 //  使用组件
  Row(){
    FooterCom().width('100%')
  }.width('100%').height(56).width('100%').padding({left:10, right:10}).border({
    width: {
      top:1
    },
    color:'#e4e6eb'
  })
导出数据
export  class commentData{
  name:string
  constructor(name:string) {
    this.name = name
  }
}
export  const crateListData = ():commentData[] =>{
  let result:commentData[] = new Array;
   result = [
    new commentData('张三')
  ]
  return result
}
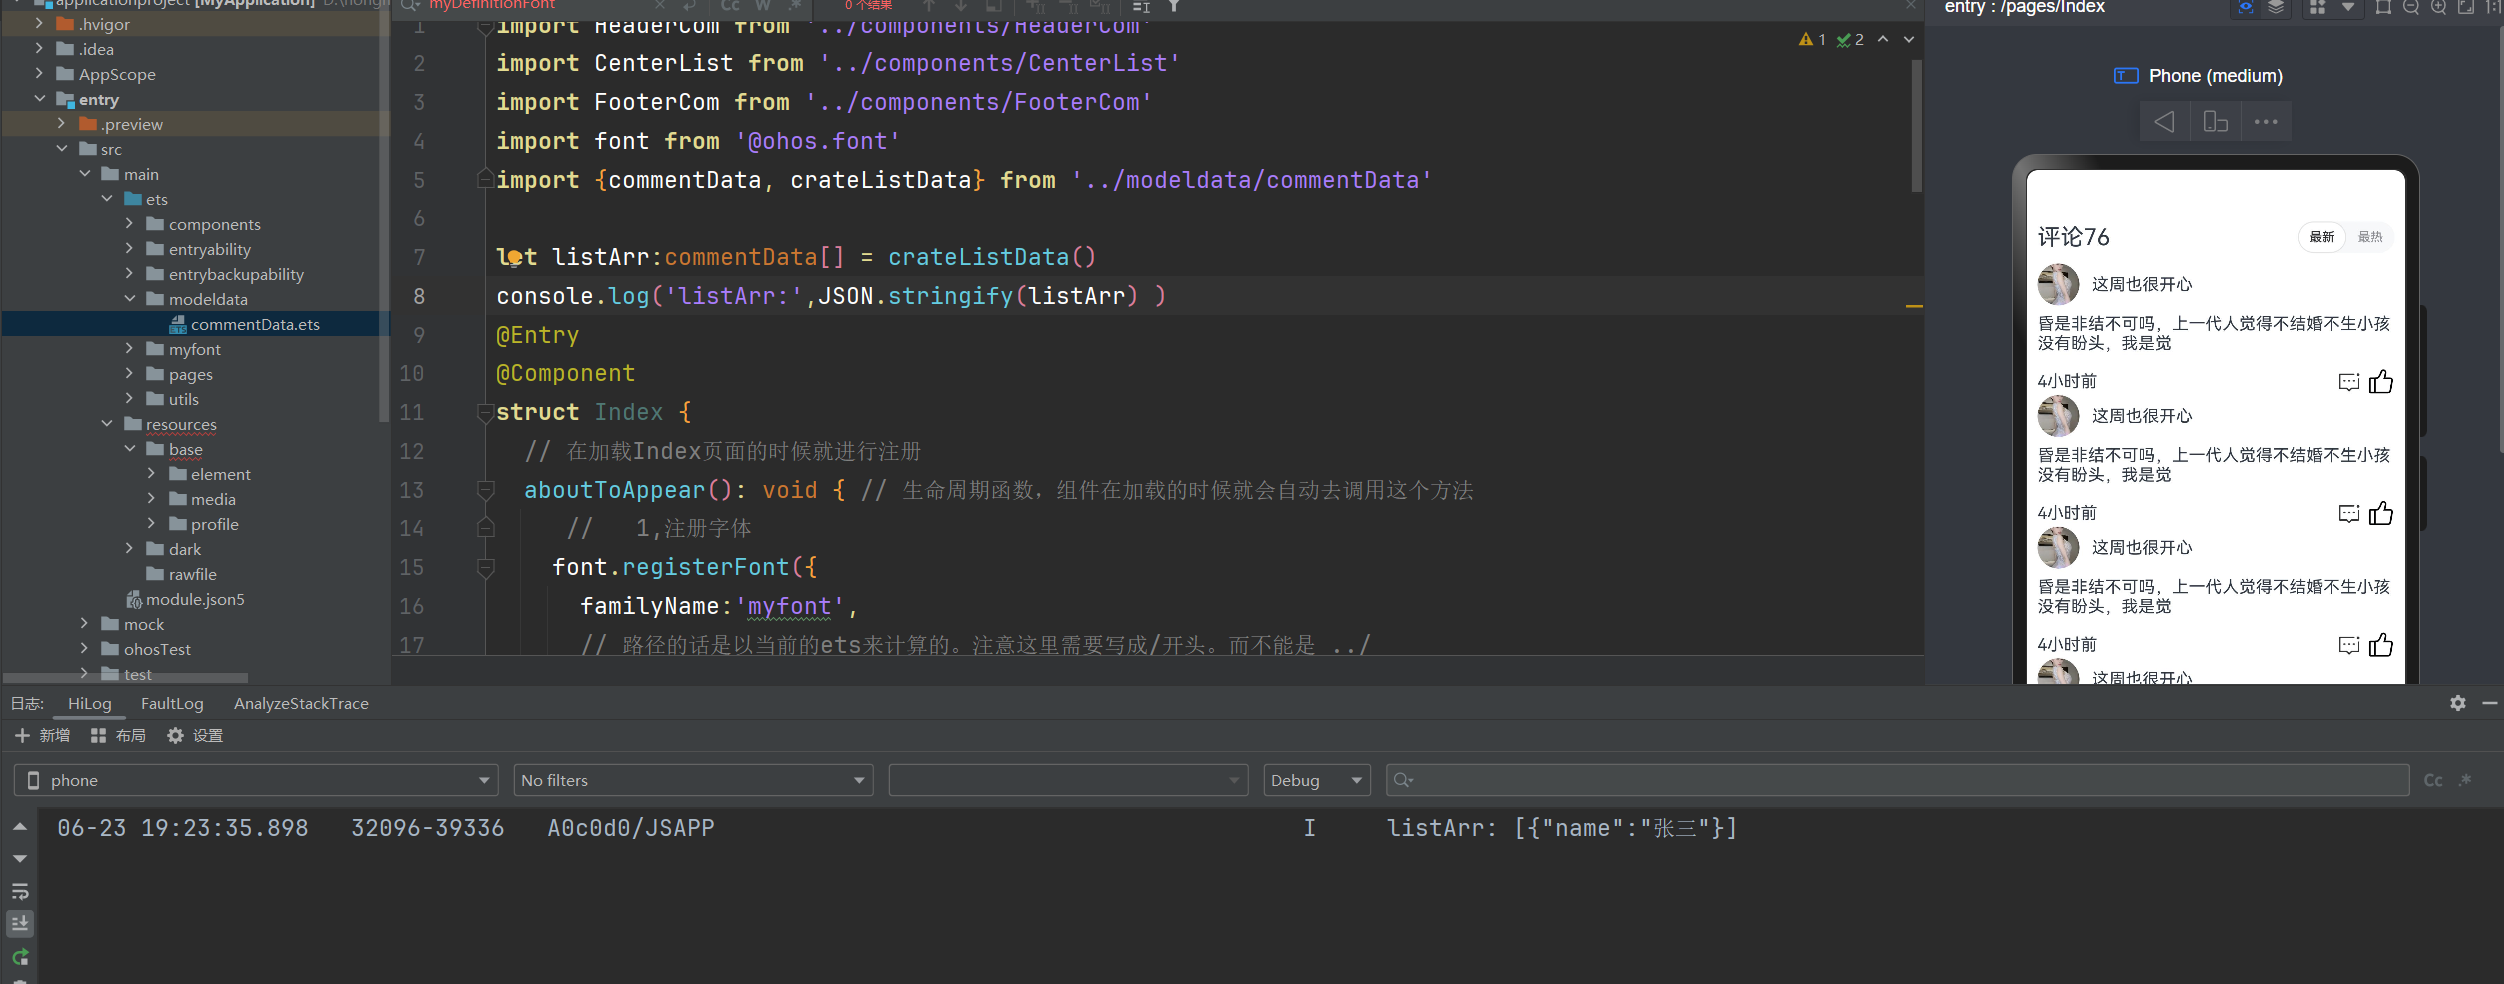
import {commentData, crateListData} from '../modeldata/commentData'
let listArr:commentData[] = crateListData()
console.log('listArr:',JSON.stringify(listArr) )
现在我们动态渲染一下数据
我们把数据稍微给改造一下哈
src/main/ets/modeldata/commentData.ets
export  class commentData{
  nickName:string
  userImgUrl:string
  cont:string
  constructor(nickName:string, userImgUrl:string, cont:string) {
    this.nickName = nickName
    this.userImgUrl = userImgUrl
    this.cont = cont
  }
}
export  const crateListData = ():commentData[] =>{
  let result:commentData[] = new Array;
   result = [
       new commentData('用户2345','https://p3-passport.byteacctimg.com/img/mosaic-legacy/3795/3047680722~130x130.awebp', '兄弟萌,到我啦,相亲帖。'),
       new commentData('起个什么名好呢','https://p9-passport.byteacctimg.com/img/user-avatar/98fd632fb172e17c564e253895d192bf~130x130.awebp', '兄弟萌,到我啦,相亲帖。'),
       new commentData('这是好事啊','https://p26-passport.byteacctimg.com/img/user-avatar/73fe06ddee6175af519e4e52763b1b95~130x130.awebp', '兄弟萌,到我啦,相亲帖。'),
     new commentData('一条爱吃屎的狗','https://p9-passport.byteacctimg.com/img/user-avatar/77982a236f0482ac6c1461f5f459daa5~130x130.awebp', '兄弟萌,到我啦,相亲帖。'),
     new commentData('Zssss修勾','https://p3-passport.byteacctimg.com/img/user-avatar/38583dcfd549fbfc5b4917788a108447~130x130.awebp', '兄弟萌,到我啦,相亲帖。'),
     new commentData('树上掉下来的虫','https://p3-passport.byteacctimg.com/img/mosaic-legacy/3795/3047680722~130x130.awebp', '兄弟萌,到我啦,相亲帖。'),
     new commentData('哎呦呵','https://p3-passport.byteacctimg.com/img/mosaic-legacy/3795/3047680722~130x130.awebp', '兄弟萌,到我啦,相亲帖。'),
     new commentData('Mask007','https://p3-passport.byteacctimg.com/img/mosaic-legacy/3795/3047680722~130x130.awebp', '兄弟萌,到我啦,相亲帖。'),
     new commentData('卧梅又闻花','https://p3-passport.byteacctimg.com/img/mosaic-legacy/3795/3047680722~130x130.awebp', '兄弟萌,到我啦,相亲帖。'),

  ]
  return result
}
import {commentData, crateListData} from '../modeldata/commentData'
struct Index {
// 声明一个响应式数据,等会需要使用到
@State commentListData:commentData[] = crateListData()
}
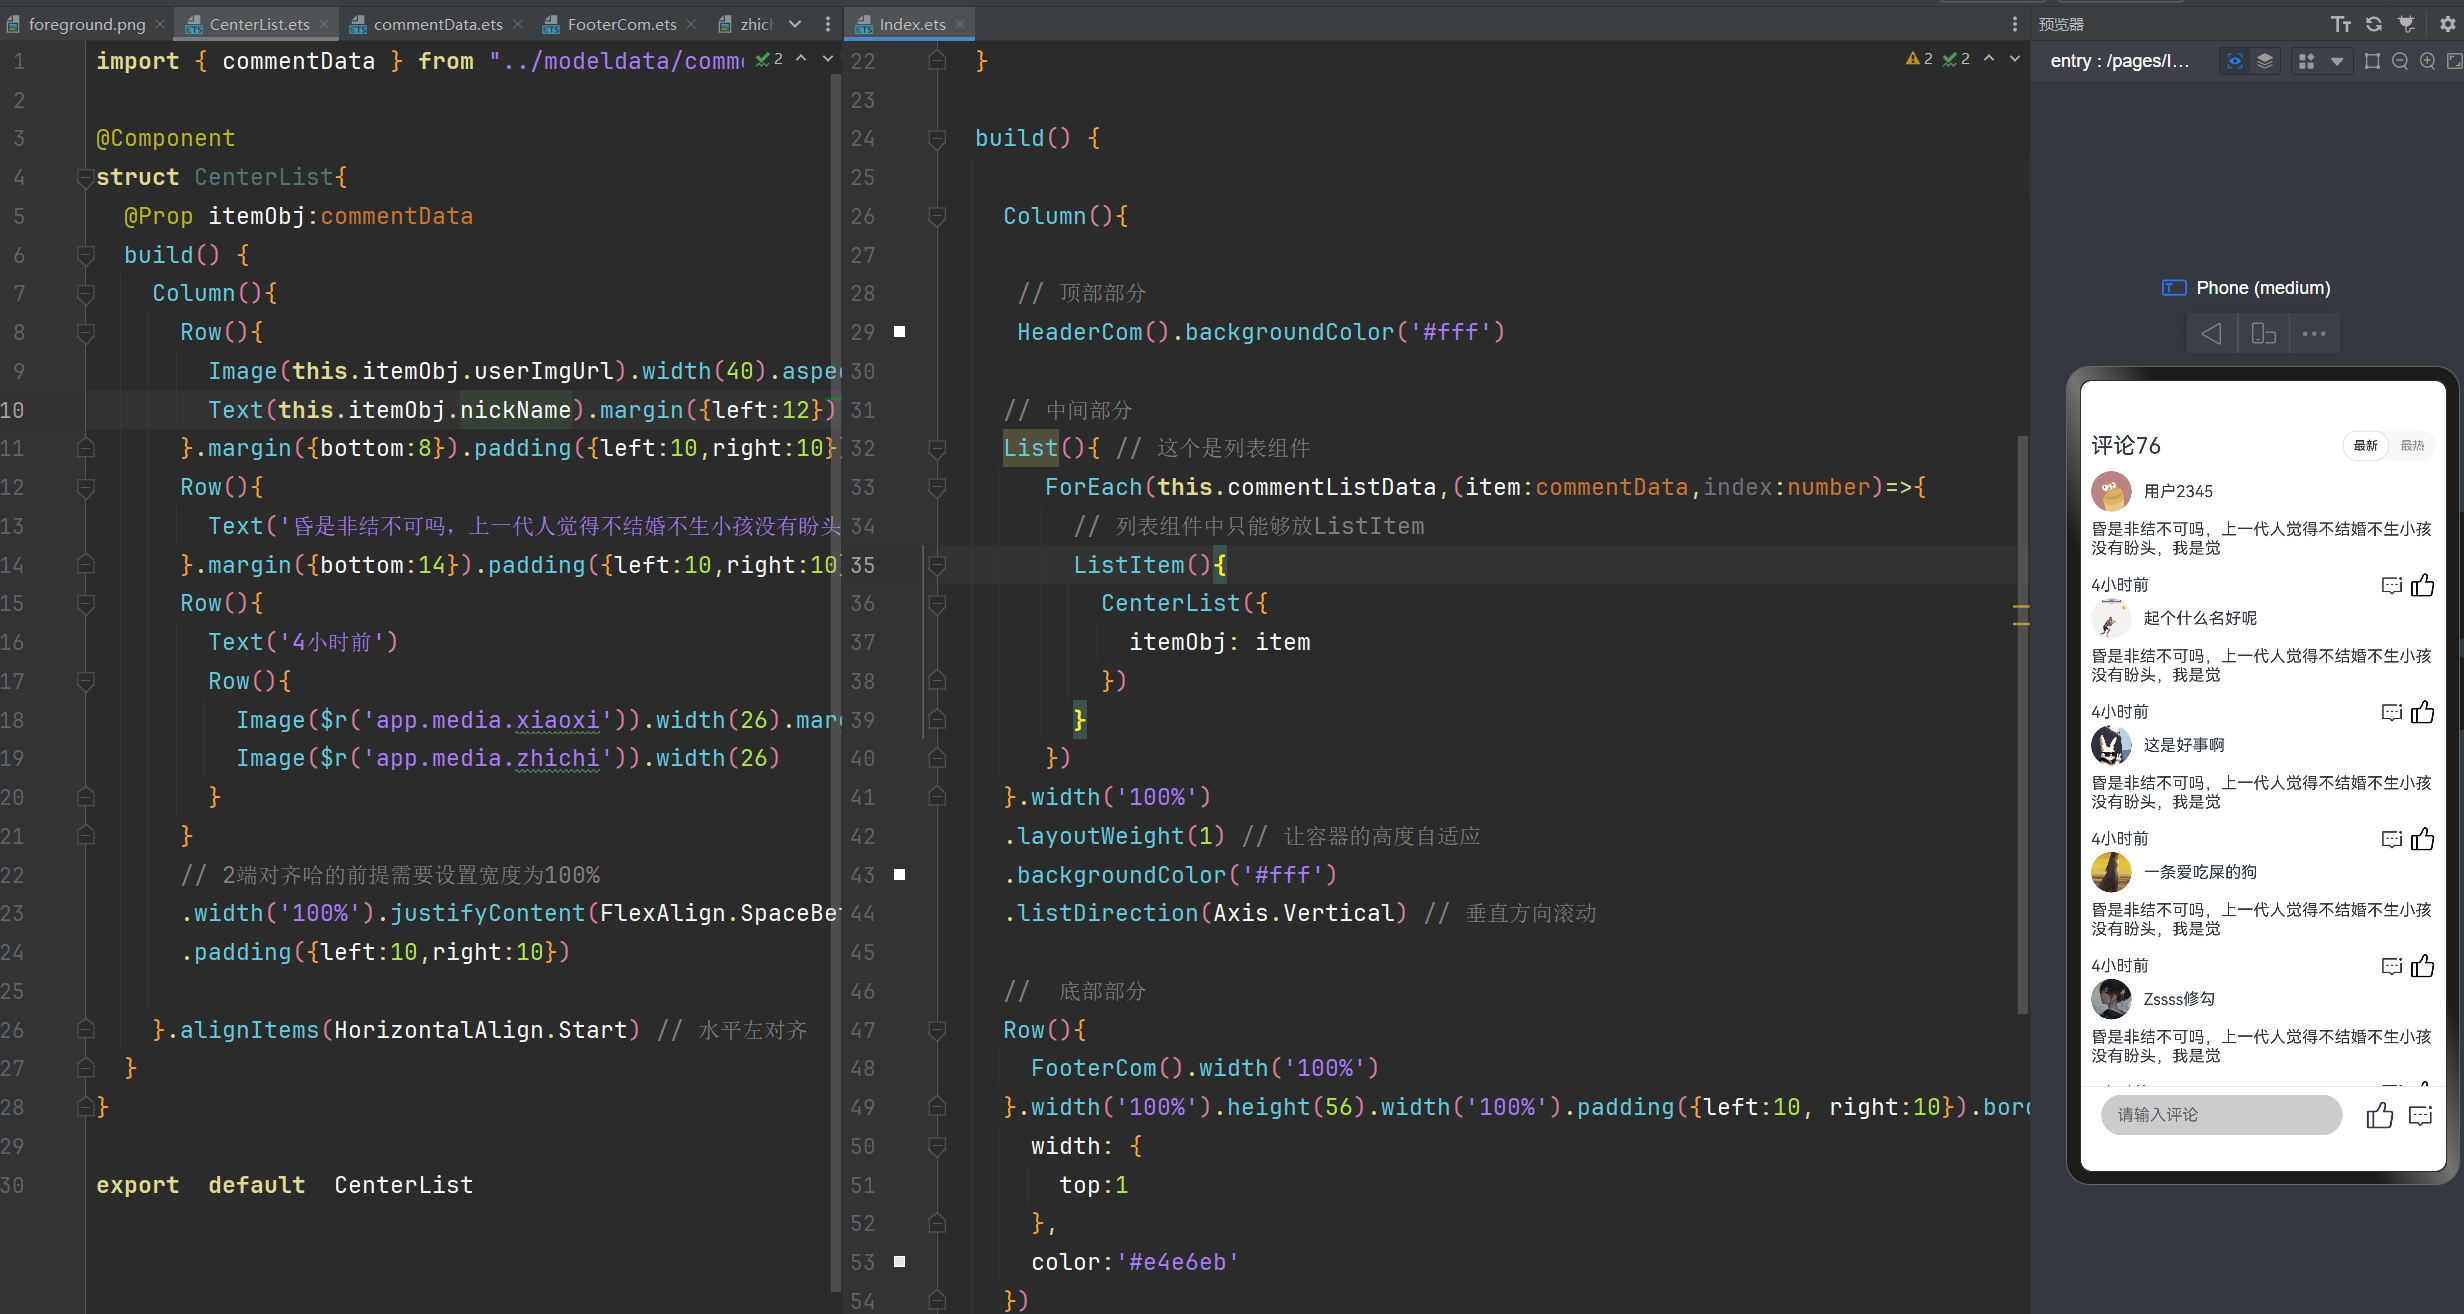
// 中间部分
List(){ // 这个是列表组件
ForEach(this.commentListData,(item:commentData,index:number)=>{
// 列表组件中只能够放ListItem
ListItem(){
CenterList({
itemObj: item // 现在我们把数据传递给这个组件
})
}
})
}.width('100%')
.layoutWeight(1) // 让容器的高度自适应
.backgroundColor('#fff')
.listDirection(Axis.Vertical) // 垂直方向滚动
import { commentData } from "../modeldata/commentData"

@Component
struct CenterList{
  @Prop itemObj:commentData
  build() {
    Column(){
      Row(){
        Image(this.itemObj.userImgUrl).width(40).aspectRatio(1).borderRadius(40)
        Text(this.itemObj.nickName).margin({left:12})
      }.margin({bottom:8}).padding({left:10,right:10})
      Row(){
        Text('昏是非结不可吗,上一代人觉得不结婚不生小孩没有盼头,我是觉').width('100%')
      }.margin({bottom:14}).padding({left:10,right:10})
      Row(){
        Text('4小时前')
        Row(){
          Image($r('app.media.xiaoxi')).width(26).margin({right:4})
          Image($r('app.media.zhichi')).width(26)
        }
      }
      // 2端对齐哈的前提需要设置宽度为100%
      .width('100%').justifyContent(FlexAlign.SpaceBetween)
      .padding({left:10,right:10})

    }.alignItems(HorizontalAlign.Start) // 水平左对齐
  }
}

export  default  CenterList
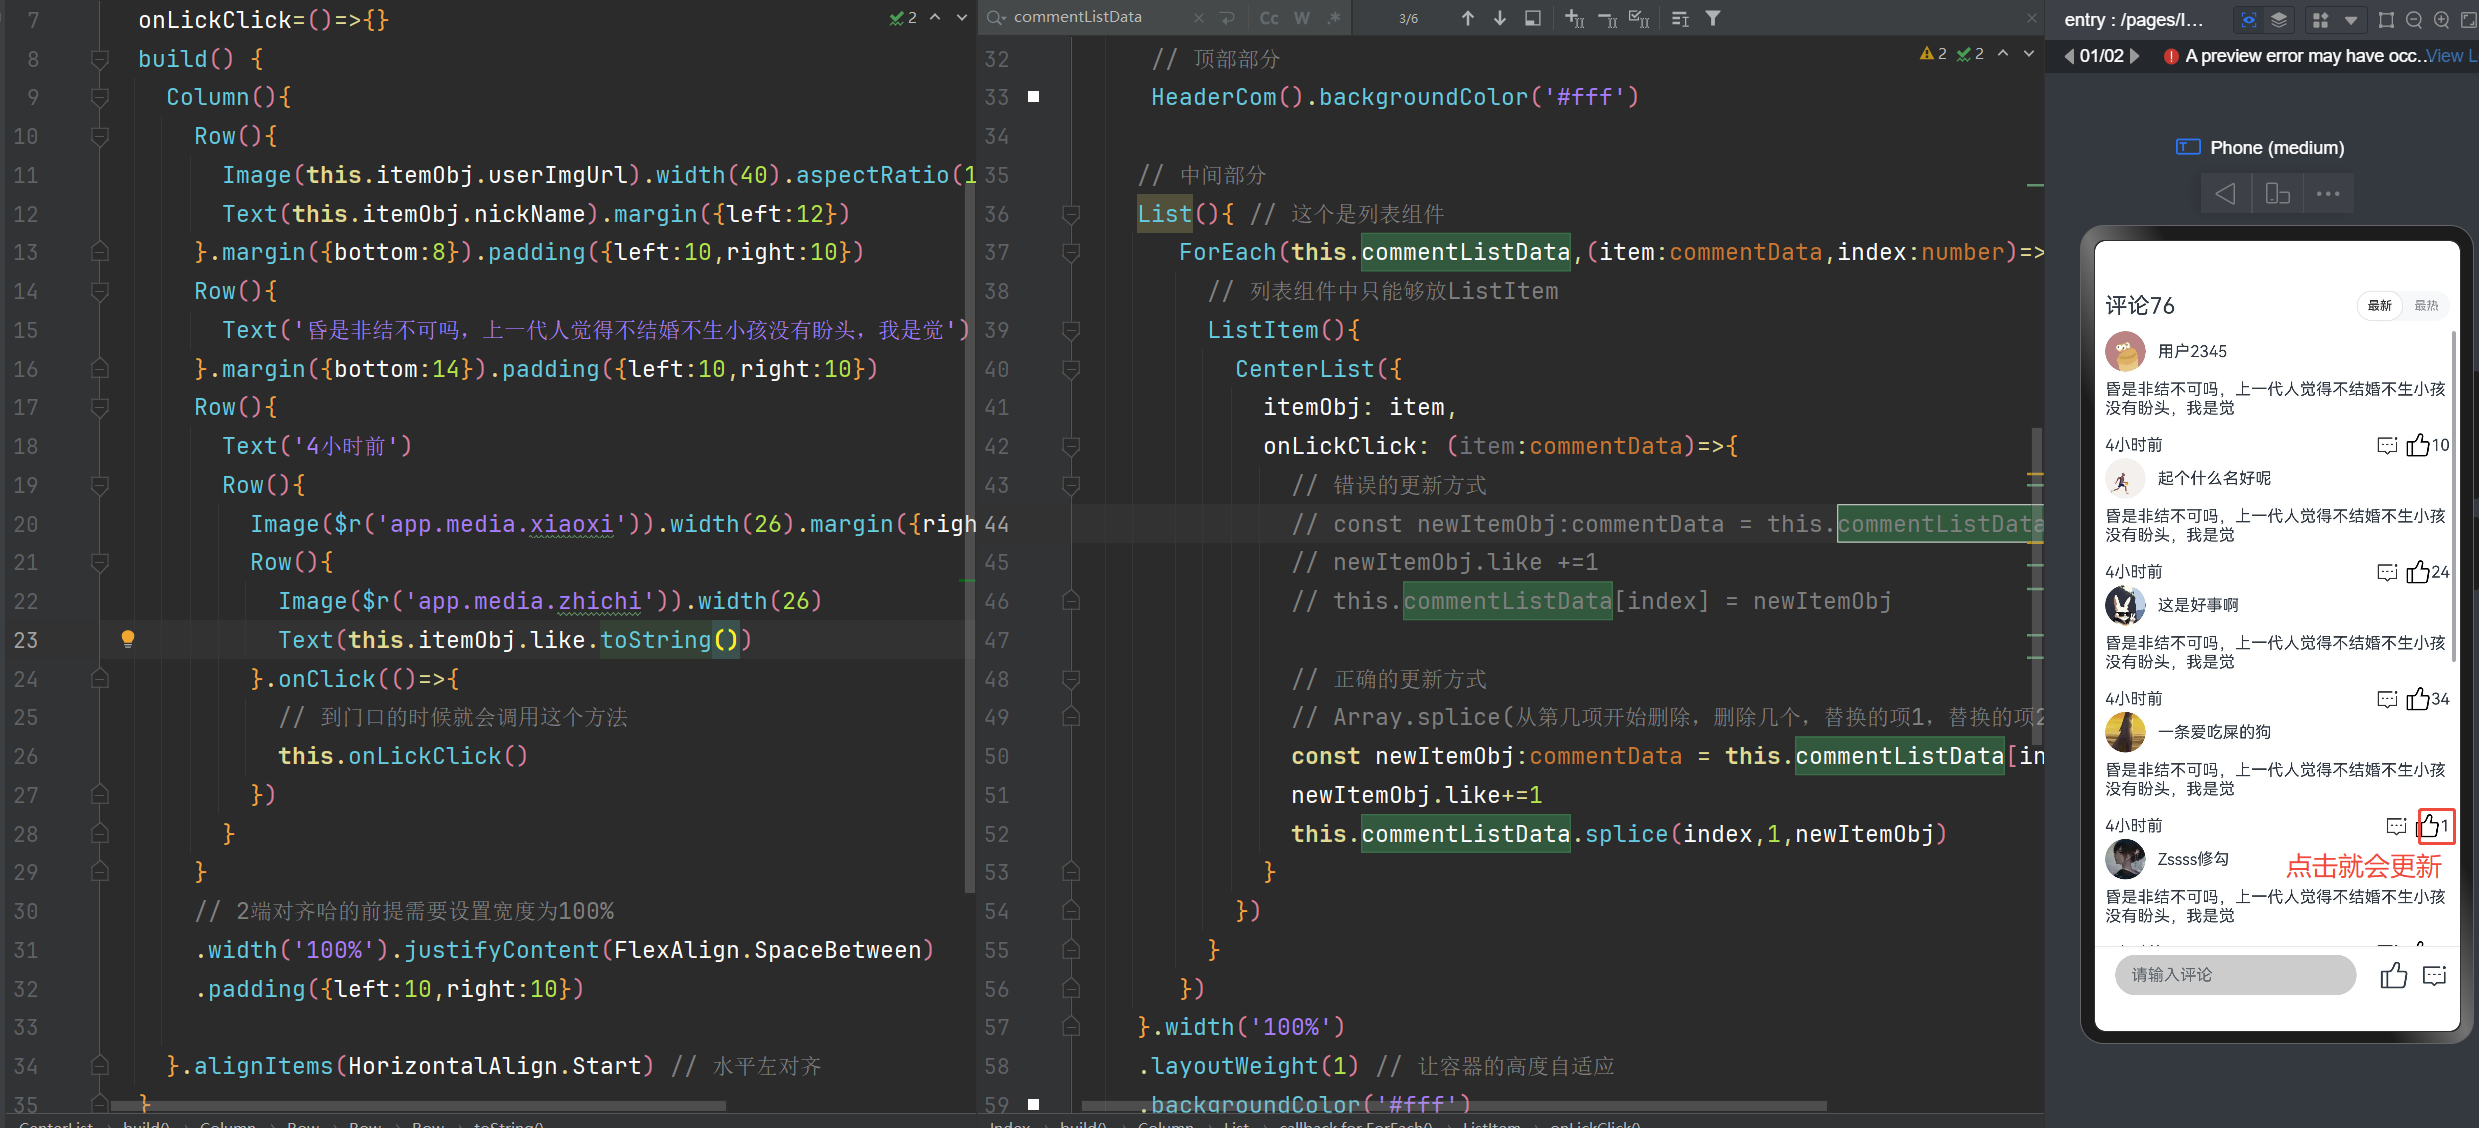
实现点赞功能
import { commentData } from "../modeldata/commentData"

@Component
struct CenterList{
  @Prop itemObj:commentData
  // 定义的点击喜欢的方法,这个方法将会被父组件的的方法给重写
  onLickClick=()=>{}
  build() {
    Column(){
      Row(){
        Image(this.itemObj.userImgUrl).width(40).aspectRatio(1).borderRadius(40)
        Text(this.itemObj.nickName).margin({left:12})
      }.margin({bottom:8}).padding({left:10,right:10})
      Row(){
        Text('昏是非结不可吗,上一代人觉得不结婚不生小孩没有盼头,我是觉').width('100%')
      }.margin({bottom:14}).padding({left:10,right:10})
      Row(){
        Text('4小时前')
        Row(){
          Image($r('app.media.xiaoxi')).width(26).margin({right:4})
          Row(){
            Image($r('app.media.zhichi')).width(26)
            Text(this.itemObj.like.toString())
          }.onClick(()=>{
            // 到门口的时候就会调用这个方法
            this.onLickClick()
          })
        }
      }
      // 2端对齐哈的前提需要设置宽度为100%
      .width('100%').justifyContent(FlexAlign.SpaceBetween)
      .padding({left:10,right:10})

    }.alignItems(HorizontalAlign.Start) // 水平左对齐
  }
}

export  default  CenterList
import HeaderCom from '../components/HeaderCom'
import CenterList from '../components/CenterList'
import FooterCom from '../components/FooterCom'
import font from '@ohos.font'
import {commentData, crateListData} from '../modeldata/commentData'

@Entry
@Component
struct Index {
  // 声明一个响应式数据
  @State commentListData:commentData[] = crateListData()
  // fatherClick(){
  //   AlertDialog.show({
  //     message:'121'
  //   })
  // }
  // 在加载Index页面的时候就进行注册
  aboutToAppear(): void { // 生命周期函数,组件在加载的时候就会自动去调用这个方法
     //   1,注册字体
    font.registerFont({
      familyName:'myfont',
      // 路径的话是以当前的ets来计算的。注意这里需要写成/开头。而不能是 ../
      familySrc:'/myfont/fonts/iconfont.ttf'
    })

  }

  build() {

    Column(){

     // 顶部部分
     HeaderCom().backgroundColor('#fff')

    // 中间部分
    List(){ // 这个是列表组件
       ForEach(this.commentListData,(item:commentData,index:number)=>{
         // 列表组件中只能够放ListItem
         ListItem(){
           CenterList({
             itemObj: item,
             onLickClick: (item:commentData)=>{
               // 错误的更新方式
               // const newItemObj:commentData = this.commentListData[index]
               // newItemObj.like +=1
               // this.commentListData[index] = newItemObj

               // 正确的更新方式
               // Array.splice(从第几项开始删除,删除几个,替换的项1,替换的项2,...)
               const newItemObj:commentData = this.commentListData[index]
               newItemObj.like+=1
               this.commentListData.splice(index,1,newItemObj)
             }
           })
         }
       })
    }.width('100%')
    .layoutWeight(1) // 让容器的高度自适应
    .backgroundColor('#fff')
    .listDirection(Axis.Vertical) // 垂直方向滚动

    //  底部部分
    Row(){
      FooterCom().width('100%')
    }.width('100%').height(56).width('100%').padding({left:10, right:10}).border({
      width: {
        top:1
      },
      color:'#e4e6eb'
    })

    }.width('100%').height('100%')
  }
}
@State绑定的数据默认是单向
@Component
struct FooterCom {
  @State inputValue:string ='1'
  build() {
    Column(){
      Row(){
        TextInput({
          placeholder:'请输入评论',
          text:this.inputValue
        }).backgroundColor('#ccc').width('70%').margin({left:10})
          .onSubmit(()=>{
            AlertDialog.show({
              message: this.inputValue
            })
          })
        // Color.Transparent 无色
        Row(){
          Text('\ue62a').fontFamily('myfont').fontSize(30)
          Text('\ue6a1').fontFamily('myfont').fontSize(30).margin({left:10})
        }
      }.width('100%').justifyContent(FlexAlign.SpaceBetween)
    }
  }
}

export default  FooterCom

怎么把它变成双向的值呢?
我们需要在text:后面新增2个$$就可以了。
TextInput({
   placeholder:'请输入评论',
   text:$$this.inputValue
})
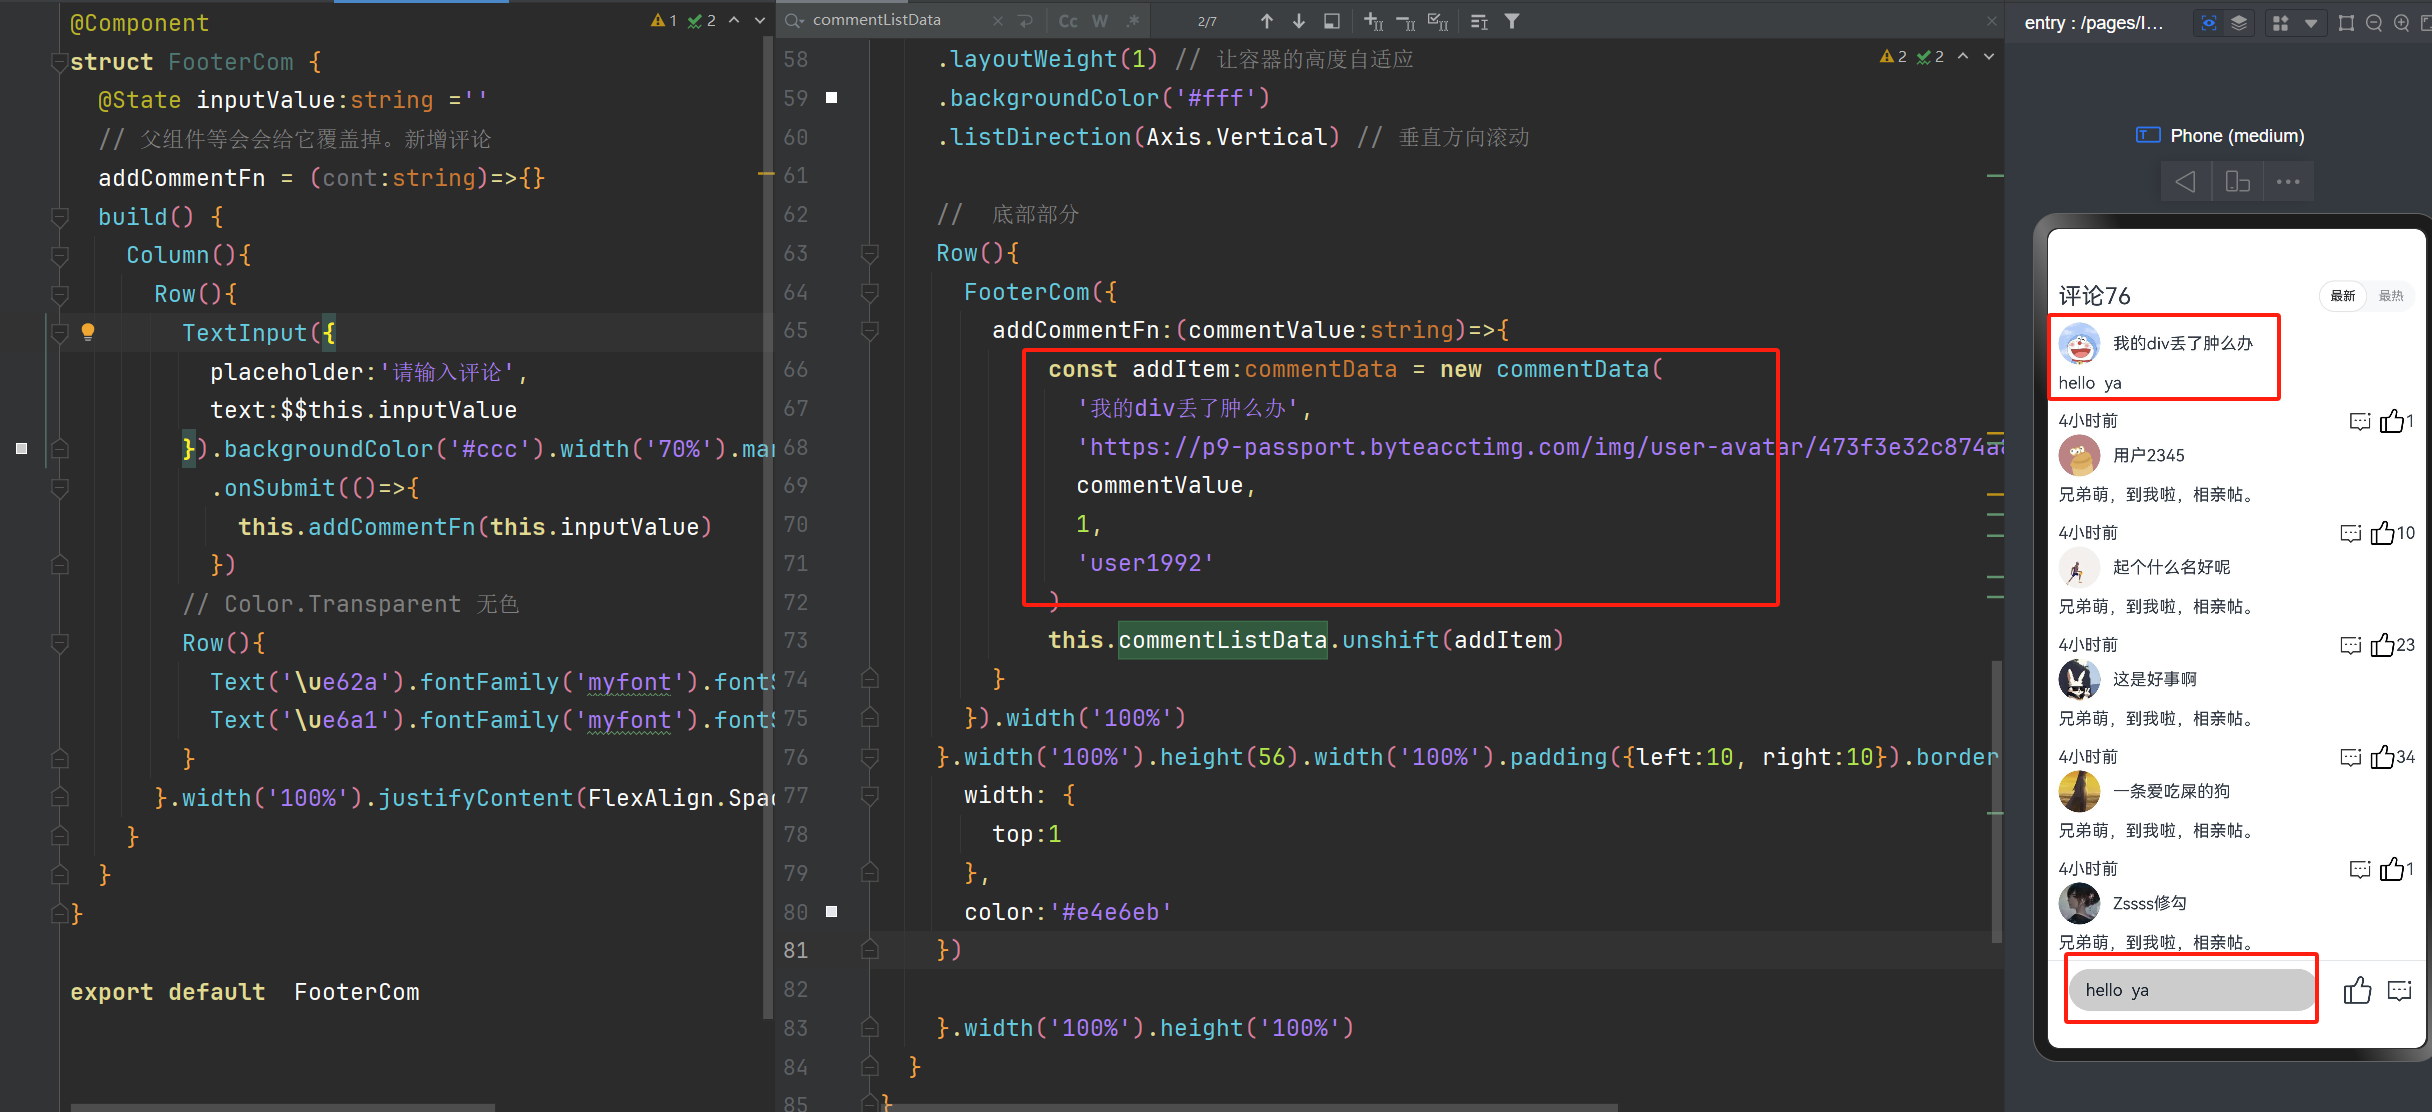
实现评论功能
@Component
struct FooterCom {
  @State inputValue:string =''
  // 父组件等会会给它覆盖掉。新增评论
  addCommentFn = (cont:string)=>{}
  build() {
    Column(){
      Row(){
        TextInput({
          placeholder:'请输入评论',
          text:$$this.inputValue
        }).backgroundColor('#ccc').width('70%').margin({left:10})
          .onSubmit(()=>{
            this.addCommentFn(this.inputValue)
          })
        // Color.Transparent 无色
        Row(){
          Text('\ue62a').fontFamily('myfont').fontSize(30)
          Text('\ue6a1').fontFamily('myfont').fontSize(30).margin({left:10})
        }
      }.width('100%').justifyContent(FlexAlign.SpaceBetween)
    }
  }
}

export default  FooterCom
   //  底部部分
    Row(){
      FooterCom({
        addCommentFn:(commentValue:string)=>{
            const addItem:commentData = new commentData(
              '我的div丢了肿么办',
              'https://p9-passport.byteacctimg.com/img/user-avatar/473f3e32c874a82e2cf6f844ba77e362~130x130.awebp',
              commentValue,
              1,
              'user1992'
            )
            this.commentListData.unshift(addItem)
        }
      }).width('100%')
    }.width('100%').height(56).width('100%').padding({left:10, right:10}).border({
      width: {
        top:1
      },
      color:'#e4e6eb'
    })
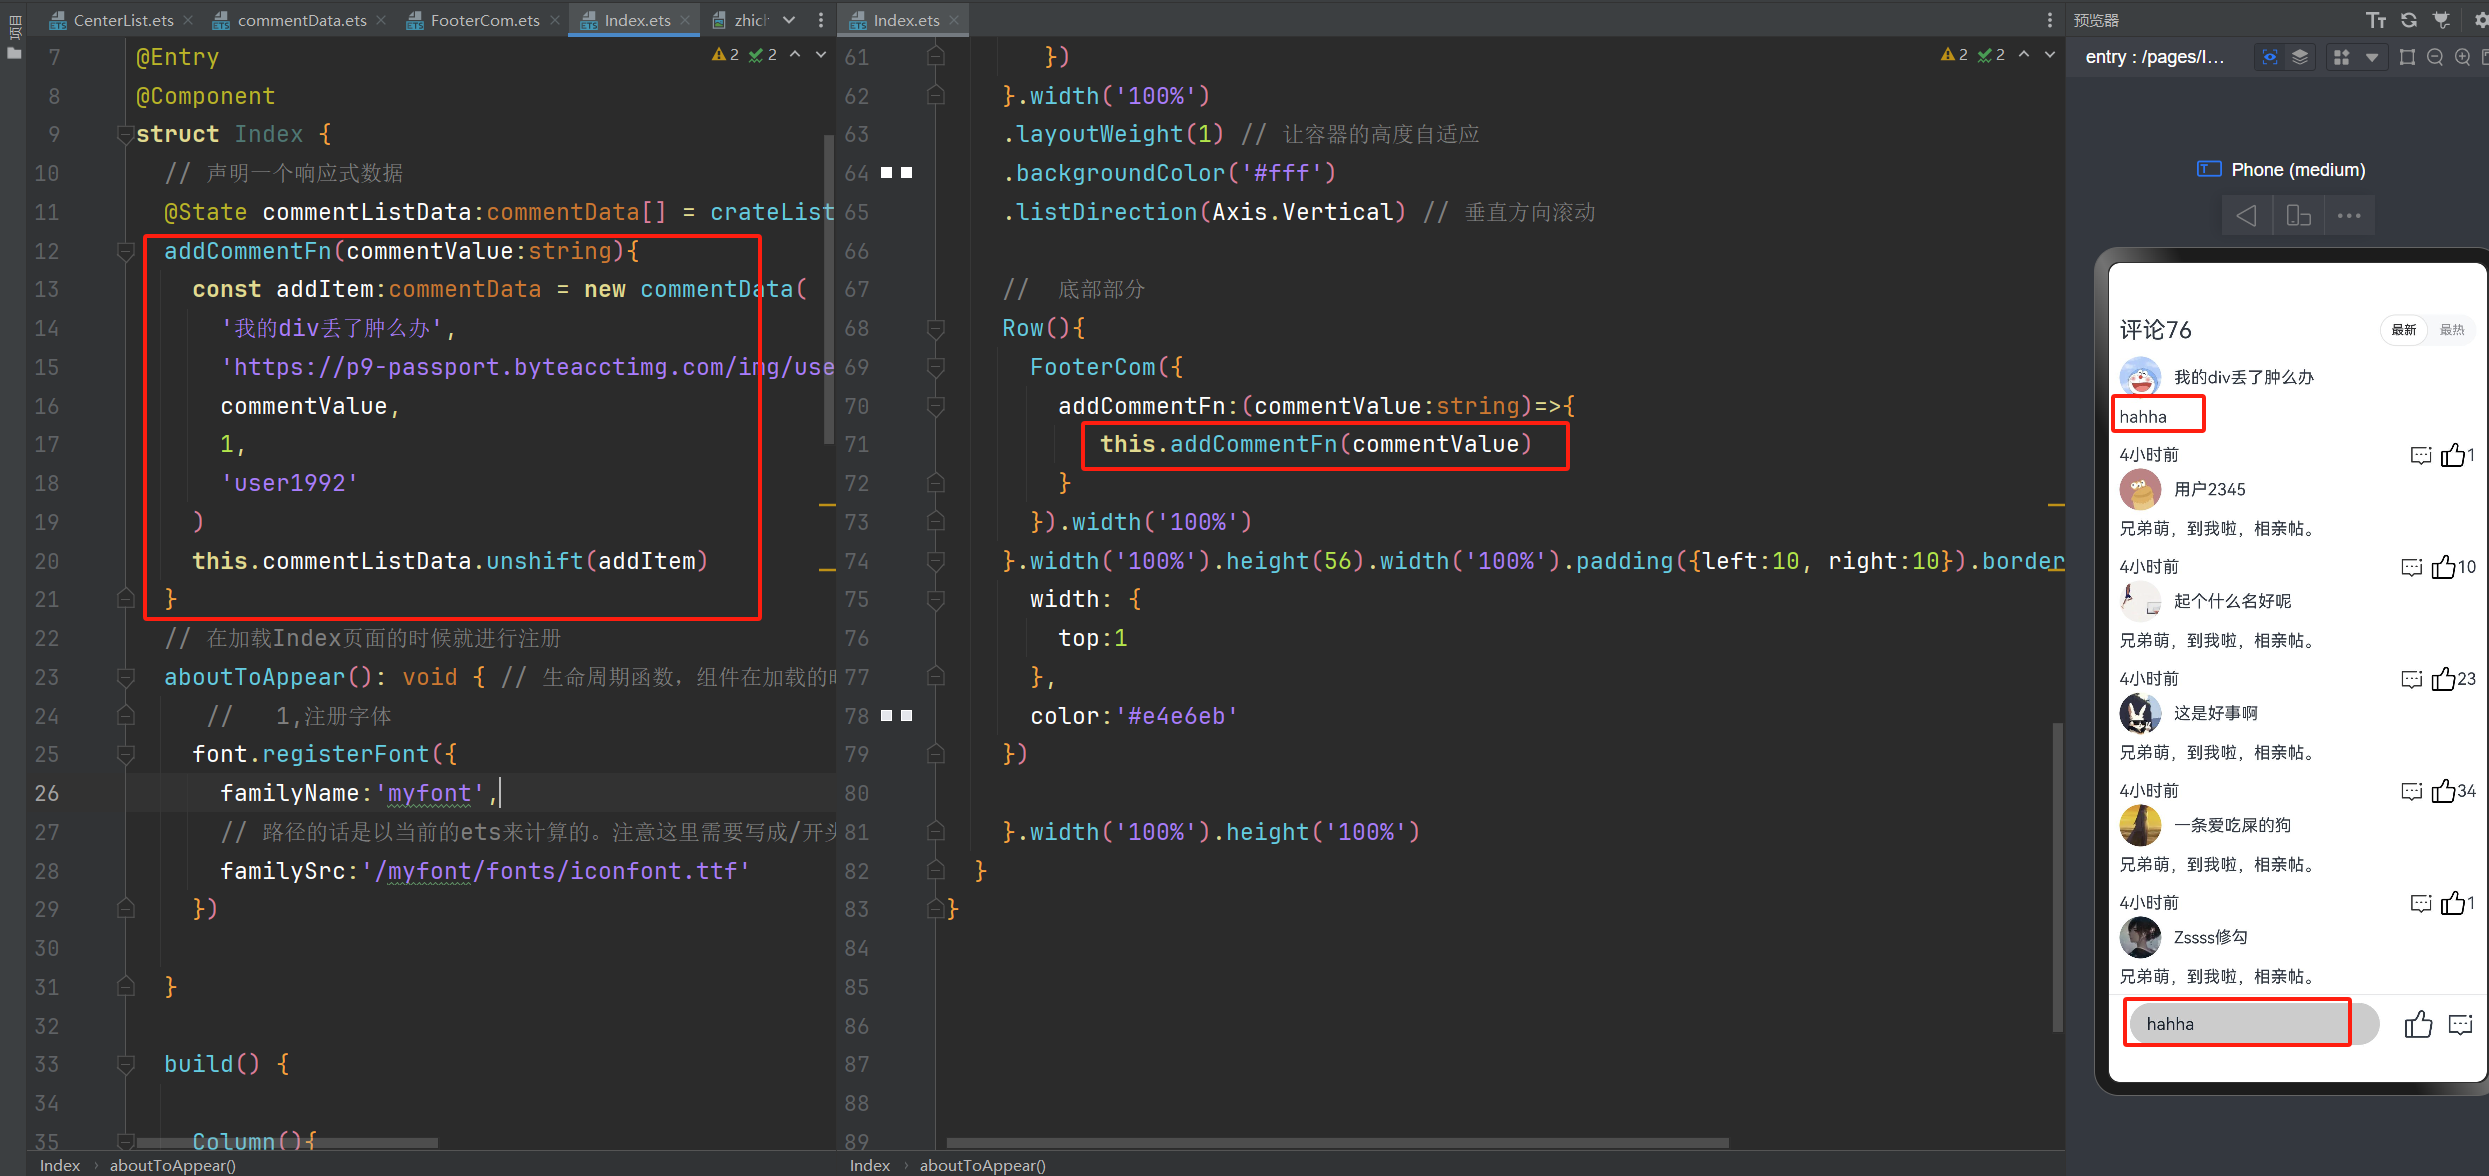
把评论方法抽离出去
addCommentFn(commentValue:string){
    const addItem:commentData = new commentData(
      '我的div丢了肿么办',
      'https://p9-passport.byteacctimg.com/img/user-avatar/473f3e32c874a82e2cf6f844ba77e362~130x130.awebp',
      commentValue,
      1,
      'user1992'
    )
    this.commentListData.unshift(addItem)
  }

addCommentFn:(commentValue:string)=>{
    this.addCommentFn(commentValue)
}
遇见问题,这是你成长的机会,如果你能够解决,这就是收获。
出处:https://www.cnblogs.com/IwishIcould/
想问问题,打赏了卑微的博主,求求你备注一下的扣扣或者微信;这样我好联系你;(っ•̀ω•́)っ✎⁾⁾!
如果觉得这篇文章对你有小小的帮助的话,记得在右下角点个“推荐”哦,或者关注博主,在此感谢!
万水千山总是情,打赏5毛买辣条行不行,所以如果你心情还比较高兴,也是可以扫码打赏博主(っ•̀ω•́)っ✎⁾⁾!
想问问题,打赏了卑微的博主,求求你备注一下的扣扣或者微信;这样我好联系你;(っ•̀ω•́)っ✎⁾⁾!


如果文中有什么错误,欢迎指出。以免更多的人被误导。

 浙公网安备 33010602011771号