


1、用shell脚本批量建立Linux用户
实现要求:创建用户student1到student50,指定组为student组!而且每个用户需要设定一个不同的密码!
#!/bin/bash
for i in `seq 1 10`
do
    useradd -G student student$i;
    echo student$i | passwd student$i --stdin;
done
注意: `seq 1 10`不是‘’哦
实现要求:创建用户,设置相同密码
#!/bin/bash
password="123456"
for USER in user1 user2 user3
do
     useradd -m $USER
     echo -e "${password}\n${password}" | passwd $USER
done
【说明:
     echo -n 不换行输出:
$echo -n "123"
$echo "456"
最终输出 123456
而不是
123
456
    echo -e 处理特殊字符:
        \n 换行且光标移至行首 】
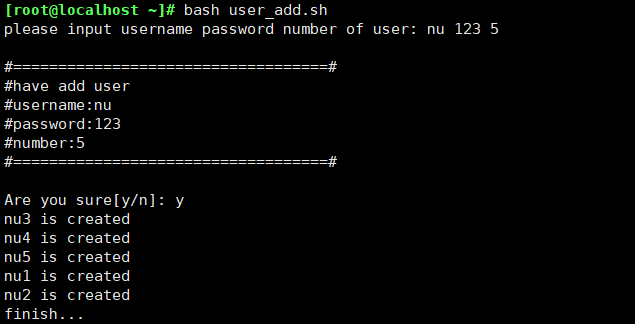
2、批量创建用户(用户交互版)
#!/bin/bash
#################################
#user_add
#v1.0  huangjiaping  2020-06-11
################################
read -p "please input username password number of user: " username pass num
echo "
#===================================#
#have add user
#username:$username
#password:$pass
#number:$num
#===================================#
"
read -p "Are you sure[y/n]: " action

if [ "$action" = "y" ];then
    for i in `seq 1 $num`#注意:seq支持参数,而{1..$num}这种是错误,{}不支持参数的。
    do
        {
        user=$username$i
        useradd $user
        echo $password|passwd $user --stdin &>/dev/null
        echo "$user is created"
        }&
    done
    wait
    echo "finish..."
else
    echo "退出"
    exit
fi
实现效果:
3、实现批量创建用户(文件版)
#!/bin/bash
if [ $# -eq 0 ];then #判断是否有参数
    echo "usage:`basename $0` file"
    exit 1
fi
if [ ! -f $1 ];then #判断参数是否是文件
    echo "error file"
    exit 2
fi
i=/root/user_file.txt
#for处理文件默认是按回车分隔,而不会以空格或tab键
#所以要重新定义分隔符
#IFS内部字段分隔符
#IFS=$'\n'
IFS=$'\n'
for line in `cat $i`
do
    if [ ${#line} -eq 0 ];then #跳过用户文件内容中的空行
        continue
    fi
    user=`echo $line|awk '{print $1}'`
    pass=`echo $line|awk '{print $2}'`
    id $user &>/dev/null
    if [ $? -eq 0 ];then
        echo "user $user already exists"
    else
        useradd $user
        echo $pass | passwd $user --stdin
        echo "$user is created"
    fi
done
用户文件:user_file.txt
[root@localhost ~]# cat user_file.txt
          #这里是空格,注意要跳过
pp 123
实现效果:
[root@localhost ~]# bash -xv file_user_add.sh user_file.txt
#!/bin/bash
if [ $# -eq 0 ];then
    echo "usage:`basename $0` file"
    exit 1
fi
+ '[' 1 -eq 0 ']'
if [ ! -f $1 ];then
    echo "error file"
    exit 2
fi
+ '[' '!' -f user_file.txt ']'
i=/root/user_file.txt
+ i=/root/user_file.txt
IFS=$'\n'
+ IFS='
'
for line in `cat $i`
do
    if [ ${#line} -eq 0 ];then
        continue
    fi
    user=`echo $line|awk '{print $1}'`
    pass=`echo $line|awk '{print $2}'`
    id $user &>/dev/null
    if [ $? -eq 0 ];then
        echo "user $user already exists"
    else
        useradd $user
        echo $pass | passwd $user --stdin
        echo "$user is created"
    fi
done
cat $i
++ cat /root/user_file.txt
+ for line in '`cat $i`'
+ '[' 6 -eq 0 ']'
echo $line|awk '{print $1}'
++ awk '{print $1}'
++ echo 'pp 123'注意:line获取的数值
+ user=pp
echo $line|awk '{print $2}'
++ awk '{print $2}'
++ echo 'pp 123'
+ pass=123
+ id pp
+ '[' 1 -eq 0 ']'
+ useradd pp
+ echo 123
+ passwd pp --stdin
更改用户 pp 的密码 。
passwd:所有的身份验证令牌已经成功更新。
+ echo 'pp is created'
pp is created
4、批量修改root用户密码
#!/bin/bash
###############################
#user pass is check
#v1.0 huangjiaping 2020-06-12
###############################
read -p "Please input your new passwd: " pass

for ip in $(cat ip.txt)
do
    {
        if [ ${#ip} -eq 0 ];then
            continue
        fi
        ping -c1 $ip &>/dev/null
        if [ $? -eq 0 ];then
            ssh $ip "echo $pass | passwd --stdin root"
            if [ $? -eq 0 ];then
                etho "$ip" >>ok_`date +%F`.txt
            else
                echo "$ip" >>fail_`date +%F`.txt
            fi
        else
            echo "$ip" >>fail_`date +%F`.txt

        fi
    }&

done
实现效果:

4、实现一个系统工具箱
#!/bin/bash
################################
#system manage
#v1.0,huangjiaping
###############################
while :
do
        menu(){
                cat  <<-EOF
                +....................................+
                +       h. help                      +
                +       f. disk partition            +
                +       d. filesystem mount          +
                +       m. memory                    +
                +       u. systemd load              +
                +       q. exit                      +
                +....................................+
                EOF
        }
        read -p "please input [h for help: ]" action
        case "$action" in
        h)
                clear
                menu
                ;;
        f)
                fdisk -l
                ;;
        d)
                df -Th
                ;;
        u)
                uptime
                ;;
        q)
                break
                ;;
        "")
                ;;
        *)
                echo "error"
                ;;
        esac
done
echo "你退出了"
效果:

5、简单实现自动化安装apache
#!/bin/bash
##########################
#install apache
#v1.0 huangjiaping 2020-6-10
##########################
gateway=10.0.0.2

ping -c1 baidu.com &>/dev/null
if [ $? -eq 0 ];then
        yum -y install httpd &>/dev/null
        systemctl restart httpd
        systemctl enable httpd
        sed -ri '/^SELINUX=/cSELINUX=disabled' /etc/selinux/config
        setenforce 0
        curl http://127.0.0.1 &>/dev/null
        if [ $? -eq 0 ];then
                echo "Apache is installed"
        else
                echo "Apache is error"
        fi
elif ping -c1 $gateway &>/dev/null;then
        echo "gateway is ok,check dns... "
else
        echo "check ip address"

fi
实现效果:

6、简单实现自动化多系统配置yum源
#!/bin/bash
os_station=`cat /etc/redhat-release | awk '{print$4}' | awk -F"." '{print $1"."$2}'`
yum_server=10.0.0.101
[ -d /etc/yum.repos.d ] || mkdir /etc/yum.repos.d/bak
[ -d /etc/yum.repos.d/bak ] || mv /etc/yum.repos.d/* /etc/yum.repos.d/bak
if [ "$os_station" = "7.4" ];then
        cat > /etc/yum.repos.d/centos7u3.repo <<-EOF
        [centos7]
        name=centos7
        baseurl=file://$yum_server/centos7u3
        enabled=1
        gpgcheck=0
        EOF
        echo "7.3 yum configure..."
elif [ "$os_station" = "6.3" ];then
        cat > /etc/yum.repos.d/centos7u3.repo <<-EOF
        [centos7]
        name=centos7
        baseurl=file://$yum.server/centos7u3
        enabled=1
        gpgcheck=0
        EOF
else
        echo "Error"
fi
实现效果:

7、实现批量ip嗅探
#!/bin/bash
for i in {2..200}
do
    {
    ip=10.0.0.$i
    ping -c1 $ip &>/dev/null
    touch ip.txt
    if [ $? -eq 0 ];then
        echo "$ip is ok">>ip.txt
    else
        echo "$ip is no">>ip.txt
    fi
    }&
done
wait
echo "finish..."
实现效果:


 浙公网安备 33010602011771号