cesium入门示例-探测效果
动画实现方式通过多个canvas实现,参考的https://www.yueyanshaosun.cn/ysCesium/views/5_geometricObj2_entityCanvas.html
探测效果实现步骤:
1、创建Cylinder圆锥体;
2、设置材质的贴图为动态属性,实现动态探测,但方向不变;
3、动态修改圆锥体长度length、位置position、朝向orientation,让圆锥体沿着顶点动起来;
4、去掉底部的纹理贴图,修改了cesium的源码实现。
第4步请教cesiumlab群,圆锥体是包含底面的,没有参数可以修改,只能动源码了,涉及的类包括:Core/CylinderGeometry.js、DataSources/CylinderGraphics,js、DataSources/CylinderGeometryUpdater.js
实现代码如下:
html部分:
1 <div id="cesiumContainer"></div>
2 <canvas id="canvas-a" width="400px" height="400px"></canvas>
3 <canvas id="canvas-b" width="400px" height="400px"></canvas>
4 <canvas id="canvas-c" width="400px" height="400px"></canvas>
三个canvas也可以通过js代码创建。
js部分:
  1 Cesium.Ion.defaultAccessToken = ‘your token';
  2 var viewer = new Cesium.Viewer('cesiumContainer');
  3 viewer._cesiumWidget._creditContainer.style.display = "none";
  4 viewer.scene.debugShowFramesPerSecond = true;
  5
  6 //通过3个画布交替切换实现探测纹理动态
  7 var changenum = 0;
  8 var curCanvas = 'a';
  9
 10 function readyCanvas(convasid, radius) {
 11     var canvas = document.getElementById(convasid);
 12     let cwidth = 400;
 13     let cheight = 400;
 14     var ctx = canvas.getContext("2d");
 15     ctx.clearRect(0, 0, cwidth, cheight);
 16     ctx.fillStyle = 'rgba(255, 255, 255, 0)';
 17     ctx.fillRect(0, 0, cwidth, cheight);
 18
 19     for (let ii = 0; radius <= 200; ii++) {
 20         ctx.lineWidth = 5;
 21         //开始一个新的绘制路径
 22         ctx.beginPath();
 23         //设置弧线的颜色
 24         var trans = 1.0 - (radius / 255);
 25         ctx.strokeStyle = "rgba(255, 0, 255, " + trans + ")";
 26         var circle = {
 27             x: 200, //圆心的x轴坐标值
 28             y: 200, //圆心的y轴坐标值
 29             r: radius //圆的半径
 30         };
 31         //以canvas中的坐标点(200,200)为圆心,绘制一个半径为50px的圆形
 32         ctx.arc(circle.x, circle.y, circle.r, 0, Math.PI * 2, true);
 33         //按照指定的路径绘制弧线
 34         ctx.stroke();
 35         radius += 20;
 36     }
 37 }
 38 readyCanvas("canvas-a", 5);
 39 readyCanvas("canvas-b", 10);
 40 readyCanvas("canvas-c", 15);
 41
 42 function drawCanvasImage(time, result) {
 43     changenum++;
 44     var canvas = document.getElementById("canvas-" + curCanvas);
 45     if (changenum >= 20) {
 46         changenum = 0;
 47         if (curCanvas === 'a')
 48             curCanvas = 'b';
 49         else if (curCanvas === 'b')
 50             curCanvas = 'c';
 51         else
 52             curCanvas = 'a';
 53     }
 54     return canvas;
 55 }
 56 //初始位置
 57 var lon = -118.760842;
 58 var lat = 38.132073;
 59 var planePosition = Cesium.Cartesian3.fromDegrees(lon, lat, 3000.0)
 60 //改变圆锥体位置,循环画矩形
 61 function changePosition() {
 62     if (lon > -118.755842 && lat < 38.138073) {
 63         lat += 0.00001;
 64     } else if (lat > 38.138073 && lon > -118.760842) {
 65         lon -= 0.00001;
 66     } else if (lon <= -118.760842 && lat > 38.132074) {
 67         lat -= 0.00001
 68     } else {
 69         lon += 0.00001;
 70     }
 71
 72     planePosition = Cesium.Cartesian3.fromDegrees(lon, lat, 3000.0)
 73     return planePosition
 74 }
 75 //根据圆锥中心点位置动态计算朝向、圆锥体长度
 76 var geoD = new Cesium.EllipsoidGeodesic();
 77 //顶点经纬度
 78 var startPt = Cesium.Cartographic.fromDegrees(-118.760842, 38.132073, 0);
 79
 80 function changeOrientation() {
 81     //计算经度方向的夹角
 82     var endX = Cesium.Cartographic.fromDegrees(lon, 38.132073, 0);
 83     geoD.setEndPoints(startPt, endX);
 84     var innerS = geoD.surfaceDistance;
 85     var angleX = Math.atan(innerS / halfLen);
 86
 87     //计算圆锥体长度
 88     var end = Cesium.Cartographic.fromDegrees(lon, lat, 0);
 89     geoD.setEndPoints(startPt, end);
 90     innerS = geoD.surfaceDistance;
 91     length = Math.sqrt(innerS * innerS + halfLen * halfLen);
 92
 93     //计算纬度方向的夹角
 94     var endY = Cesium.Cartographic.fromDegrees(-118.760842, lat, 0);
 95     geoD.setEndPoints(startPt, endY);
 96     innerS = geoD.surfaceDistance;
 97     var angleY = Math.asin(innerS / length);
 98
 99     //计算朝向
100     var hpr = new Cesium.HeadingPitchRoll(0.0, angleX, angleY);
101     var orientation = Cesium.Transforms.headingPitchRollQuaternion(planePosition, hpr);
102
103     return orientation
104 }
105 var halfLen = 1000.0
106 var length = 1000.0;
107
108 function changeLength() {
109     return 2 * length;
110 }
111 //创建圆锥实体
112 var cylinder = viewer.entities.add({
113     name: 'Red cone',
114     position: new Cesium.CallbackProperty(changePosition, false),
115     orientation: new Cesium.CallbackProperty(changeOrientation, false),
116     cylinder: {
117         length: new Cesium.CallbackProperty(changeLength, false),
118         topRadius: 0.0,
119         bottomRadius: 300.0,
120         //topSurface: false,    //新增参数,控制顶部是否渲染
121         bottomSurface: false,    //新增参数,控制底部是否渲染
122         material: new Cesium.ImageMaterialProperty({
123             image: new Cesium.CallbackProperty(drawCanvasImage, false),
124             transparent: true
125         })
126     }
127 });
128
129 //定位到圆锥体
130 var initialPosition = Cesium.Cartesian3.fromDegrees(-118.760842, 38.089073, 8000); //相机视角三要素:朝向(左右偏移),倾斜(上下偏移),翻滚角度(相机视锥体中轴线旋转角度)
131 var initialOrientation = new Cesium.HeadingPitchRoll.fromDegrees(1.27879878293835, -51.34390550872461, 0.0716951918898415);
132 viewer.scene.camera.setView({
133     destination: initialPosition,
134     orientation: initialOrientation,
135     endTransform: Cesium.Matrix4.IDENTITY
136 });
创建圆锥体时,将121、124行注释,显示效果如下:
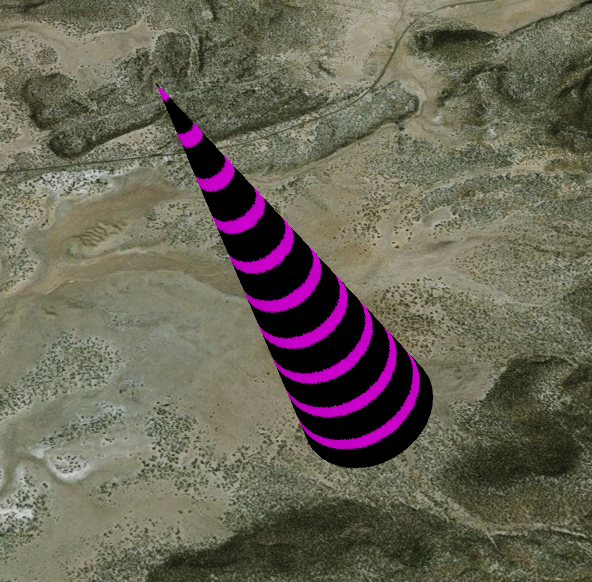
若设置为透明的,即启用124行,效果如下:
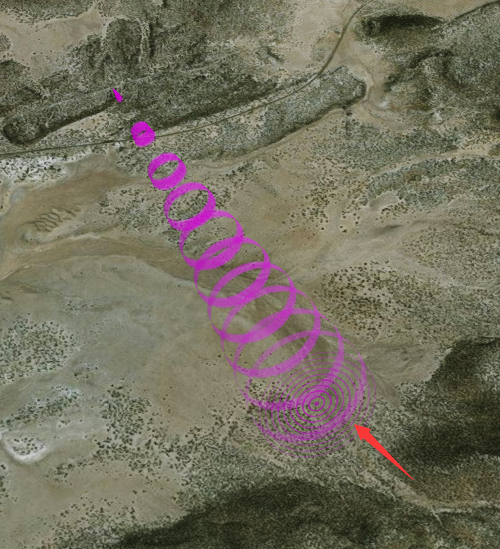
注意箭头标示的地方,圆锥底部也被渲染纹理,修改源码增加了两个参数topSurface、bottomSurface用于支持关闭底部的渲染,最后结果如下:


 浙公网安备 33010602011771号