java调用python脚本 并传参(根据配置文件获取python文件地址)
方式一:
Java代码
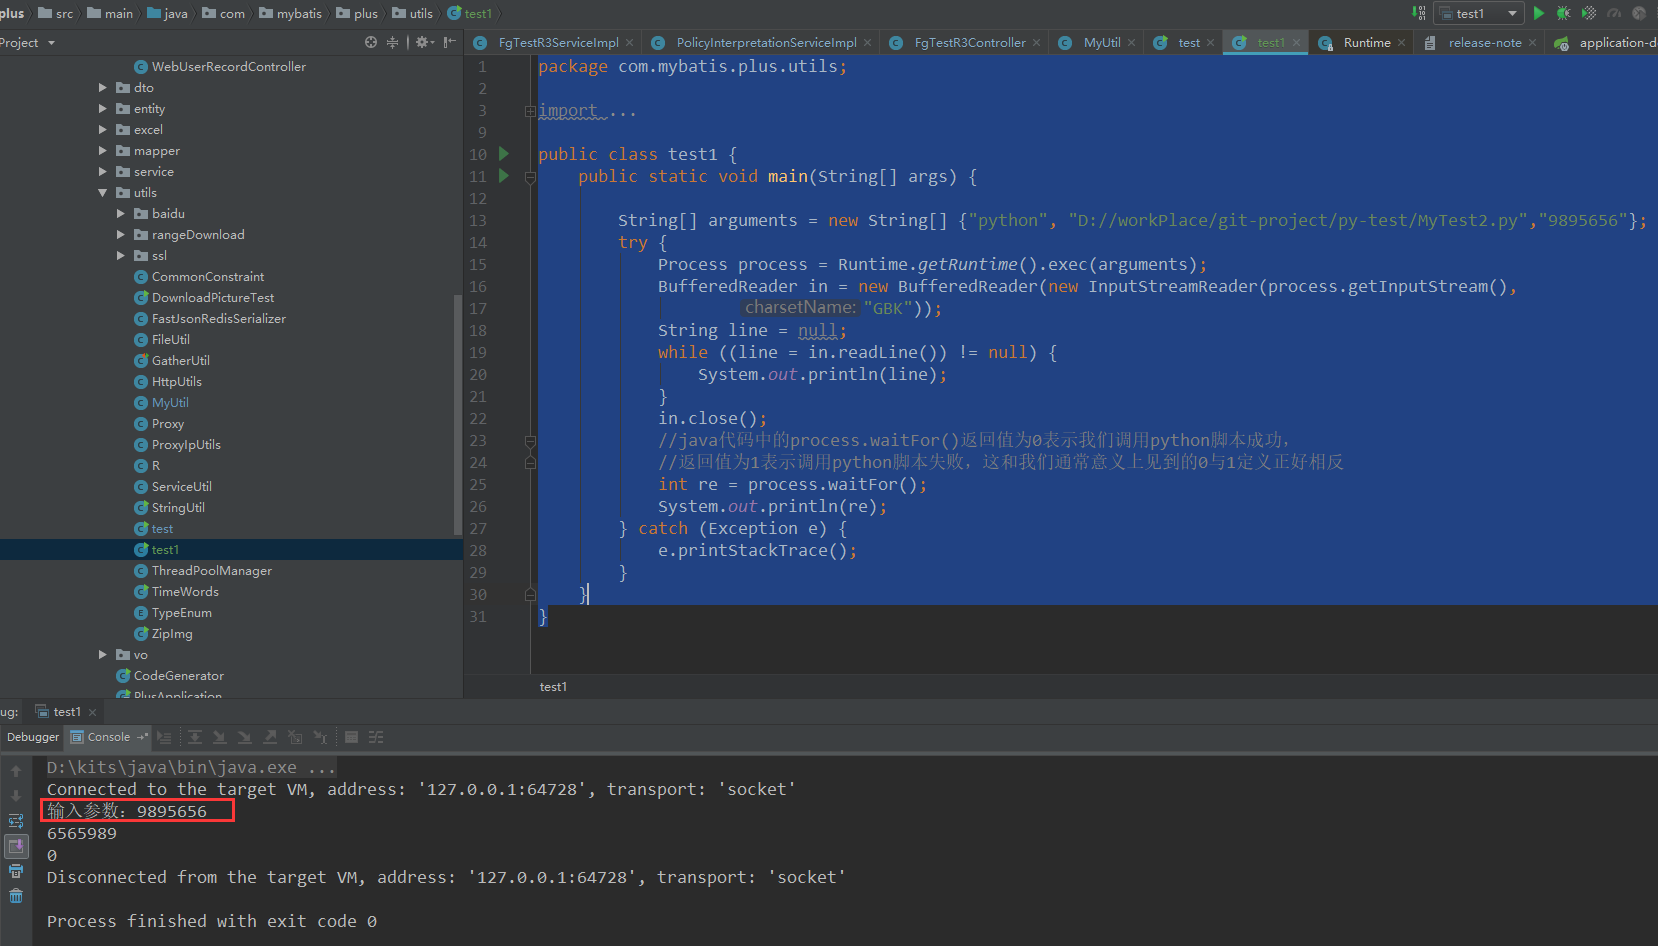
package com.mybatis.plus.utils;
import cn.hutool.core.lang.Console;
import java.io.BufferedReader;
import java.io.InputStreamReader;
import java.util.ArrayList;
import java.util.List;

public class test1 {
    public static void main(String[] args) {

        String[] arguments = new String[] {"python", "D://test.py","9895656"};
        try {
            Process process = Runtime.getRuntime().exec(arguments);
            BufferedReader in = new BufferedReader(new InputStreamReader(process.getInputStream(),
                    "GBK"));
            String line = null;
            while ((line = in.readLine()) != null) {
                System.out.println(line);
            }
            in.close();
            //java代码中的process.waitFor()返回值为0表示我们调用python脚本成功,
            //返回值为1表示调用python脚本失败,这和我们通常意义上见到的0与1定义正好相反
            int re = process.waitFor();
            System.out.println(re);
        } catch (Exception e) {
            e.printStackTrace();
        }
    }
}
Python
from enum import Enum
import sys

class Solution:
    def reverse(self, x: int) -> int:
        if x==0:
            return 0
        strList = []
        isPositive = True
        if x < 0:
            isPositive = False
        value = abs(x)
        temp = value
        while (temp/10.0>0.09):
            i = temp%10
            strList.append(str(i))
            temp = temp//10
        join = "".join(strList)
        result = int(join)
        if result>2147483647:
            result=0
        if isPositive == False:
            result = -result
        return result

if __name__ == "__main__":
    so = Solution()
    print("输入参数:"+sys.argv[1])
    print(so.reverse(int(sys.argv[1])))
读取配置文件中的数据
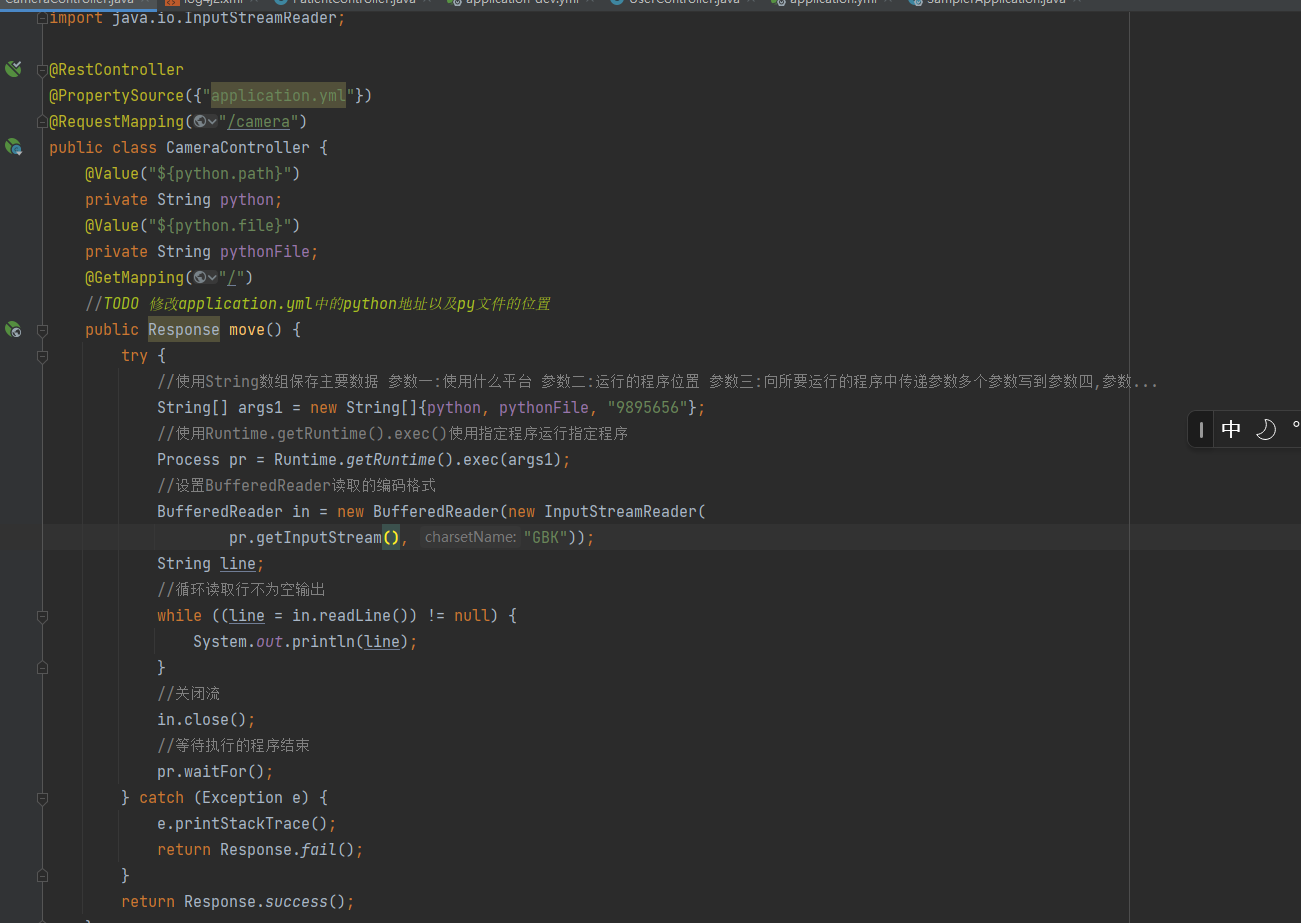
Java代码
import com.mysql.cj.log.Log;
import org.springframework.beans.factory.annotation.Value;
import org.springframework.context.annotation.PropertySource;
import org.springframework.web.bind.annotation.GetMapping;
import org.springframework.web.bind.annotation.RequestMapping;
import org.springframework.web.bind.annotation.RestController;

import java.io.BufferedReader;
import java.io.IOException;
import java.io.InputStreamReader;

@RestController
@PropertySource({"application.yml"})
@RequestMapping("/camera")
public class CameraController {
    @Value("${python.path}")
    private String python;
    @Value("${python.file}")
    private String pythonFile;
    @GetMapping("/")
    //TODO 修改application.yml中的python地址以及py文件的位置
    public Response move() {
        try {
            //使用String数组保存主要数据 参数一:使用什么平台 参数二:运行的程序位置 参数三:向所要运行的程序中传递参数多个参数写到参数四,参数...
            String[] args1 = new String[]{python, pythonFile, "9895656"};
            //使用Runtime.getRuntime().exec()使用指定程序运行指定程序
            Process pr = Runtime.getRuntime().exec(args1);
            //设置BufferedReader读取的编码格式
            BufferedReader in = new BufferedReader(new InputStreamReader(
                    pr.getInputStream(), "GBK"));
            String line;
            //循环读取行不为空输出
            while ((line = in.readLine()) != null) {
                System.out.println(line);
            }
            //关闭流
            in.close();
            pr.waitFor();
        } catch (Exception e) {
            e.printStackTrace();
            return Response.fail();
        }
        return Response.success();
    }


}
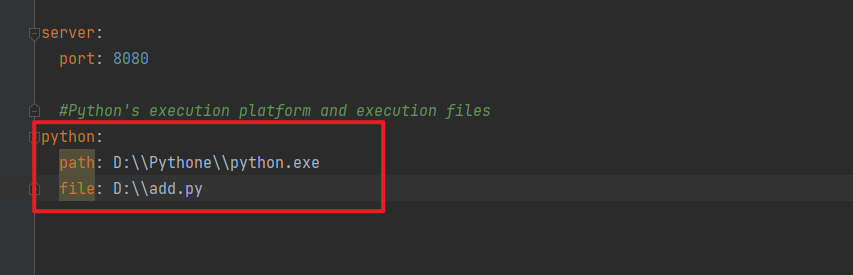
application.yml配置文件
方式二:
此方法需要引入依赖
 <dependency>
       <groupId>org.python</groupId>
       <artifactId>jython-standalone</artifactId>
       <version>2.7.0</version>
 </dependency>
import org.junit.jupiter.api.Test;
import org.python.core.PyFunction;
import org.python.core.PyInteger;
import org.python.core.PyObject;
import org.python.util.PythonInterpreter;

import java.io.BufferedReader;
import java.io.IOException;
import java.io.InputStreamReader;

class SamplerApplicationTests {
    @Test
    public void test() throws IOException {
        PythonInterpreter interpreter = new PythonInterpreter();
        interpreter.execfile("D:\\add1.py");

        // 第一个参数为期望获得的函数(变量)的名字,第二个参数为期望返回的对象类型
        PyFunction pyFunction = interpreter.get("add", PyFunction.class);
        int a = 5, b = 10;
        //调用函数,如果函数需要参数,在Java中必须先将参数转化为对应的“Python类型”
        PyObject pyobj = pyFunction.__call__(new PyInteger(a), new PyInteger(b));
        System.out.println("the anwser is: " + pyobj);
    }

}
python代码
def add(a,b):
    return a + b

 浙公网安备 33010602011771号