Swagger
1.简介
RestFul API文档在线自动生成工具 => API文档与API定义同步更新
直接运行,可以在线测试API接口
2.在项目使用Swagger需要springfox
- swagger2
- ui
3.SpringBoot集成Swagger2
在pom.xml中导入依赖
<!-- https://mvnrepository.com/artifact/io.springfox/springfox-swagger2 -->
<dependency>
    <groupId>io.springfox</groupId>
    <artifactId>springfox-swagger2</artifactId>
    <version>2.9.2</version>
</dependency>
<!-- https://mvnrepository.com/artifact/io.springfox/springfox-swagger-ui -->
<dependency>
    <groupId>io.springfox</groupId>
    <artifactId>springfox-swagger-ui</artifactId>
    <version>2.9.2</version>
</dependency>
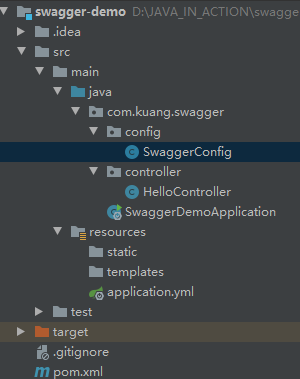
4.编写一个Hello工程
package com.kuang.swagger.controller;

import org.springframework.web.bind.annotation.RequestMapping;
import org.springframework.web.bind.annotation.RestController;

@RestController
public class HelloController {

    @RequestMapping("/hello")
    public String hello() {
        return "hello";
    }
}
5.集成swagger ==》config
config/SwaggerConfig.java
package com.kuang.swagger.config;

import springfox.documentation.swagger2.annotations.EnableSwagger2;

import org.springframework.context.annotation.Configuration;

@Configuration
@EnableSwagger2  // 开启swagger2
public class SwaggerConfig {

}
6.启动运行
http://localhost:8088/swagger-ui.html
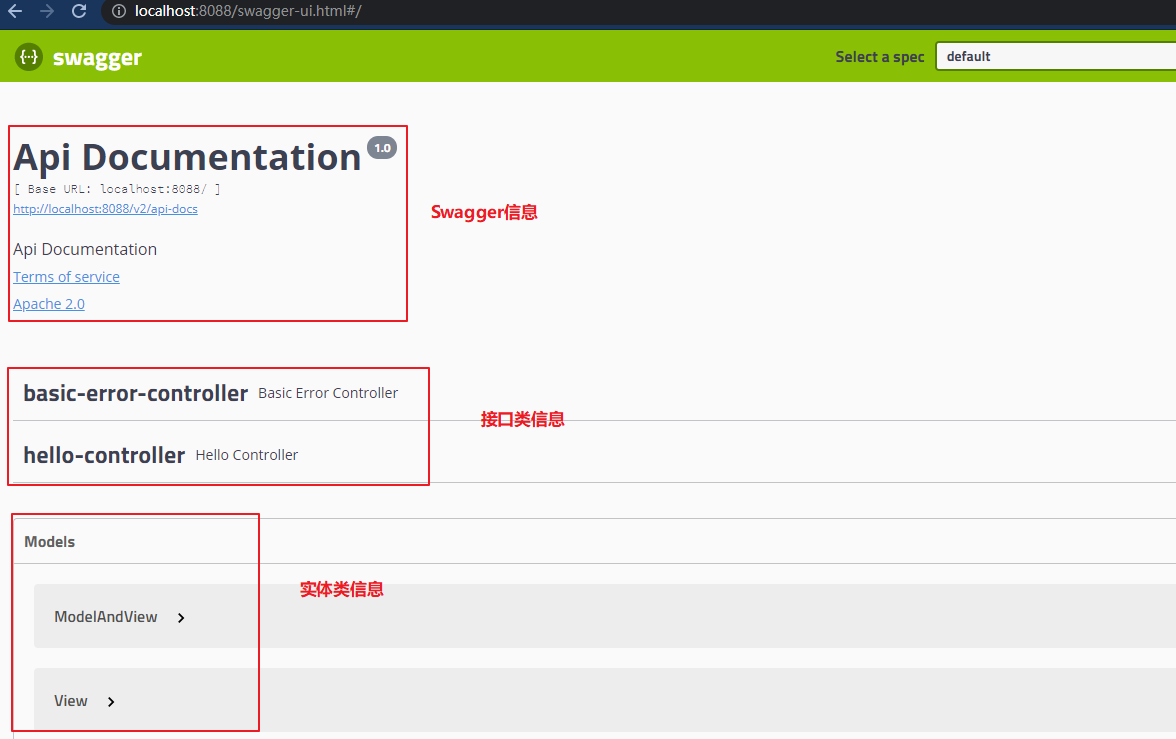
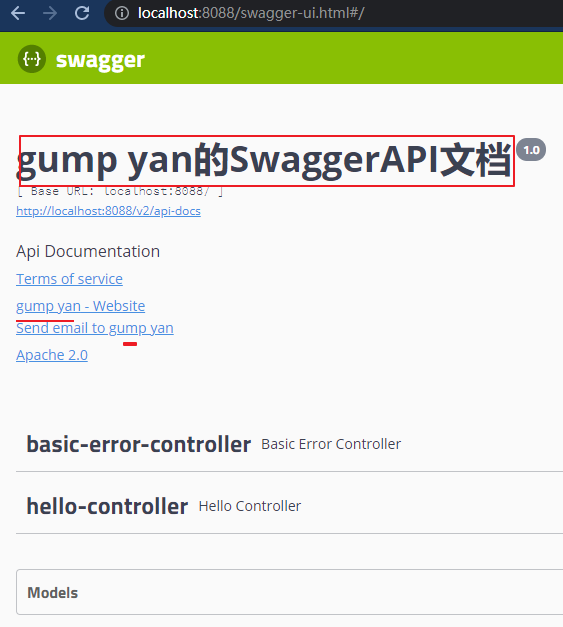
7.配置Swagger信息,即更改默认信息
在SwaggerConfig.java中配置
/*
 * Copyright (c) Huawei Technologies Co., Ltd. 2021-2021. All rights reserved.
 */

package com.kuang.swagger.config;

import springfox.documentation.service.ApiInfo;
import springfox.documentation.service.Contact;
import springfox.documentation.spi.DocumentationType;
import springfox.documentation.spring.web.plugins.Docket;
import springfox.documentation.swagger2.annotations.EnableSwagger2;

import org.springframework.context.annotation.Bean;
import org.springframework.context.annotation.Configuration;

import java.util.ArrayList;

@Configuration
@EnableSwagger2  // 开启swagger2
public class SwaggerConfig {

    // 配置了swagger的Docket的bean实例
    @Bean
    public Docket docket() {
        return new Docket(DocumentationType.SWAGGER_2).apiInfo(apiInfo());
    }

    // 配置swagger信息=apiInfo
    private ApiInfo apiInfo() {
        // 作者信息
        Contact contact =  new Contact("gump yan", "https://www.cnblogs.com/GumpYan/", "5758878@qq.com");
        return new ApiInfo(
            "gump yan的SwaggerAPI文档",
            "Api Documentation",
            "1.0",
            "https://www.cnblogs.com/GumpYan/",
            contact,
            "Apache 2.0",
            "http://www.apache.org/licenses/LICENSE-2.0",
            new ArrayList());
    }
}
8.配置扫描接口
    // 配置了swagger的Docket的bean实例
    @Bean
    public Docket docket() {
        return new Docket(DocumentationType.SWAGGER_2)
            .apiInfo(apiInfo())
            .select()
            // RequestHandlerSelectors 配置要扫描接口的方式
            // basePackage():指定要扫描的包
            // any():扫描全部
            // none():不扫描
            // withClassAnnotation:扫描类上的注解
            .apis(RequestHandlerSelectors.basePackage("com.kuang.swagger.controller"))
            // paths() 过滤什么路径
            .paths(PathSelectors.ant("/kuang/**"))
            .build();
    }
主要为了扫描接口

这样配之后,之前的base-error-controller就不在了,就是指定包路径和请求路径
9.配置swagger启动
关闭swagger,用enable(false);enable(true)是开启,代码上线时候,正式发布的时候,注意关闭swagger


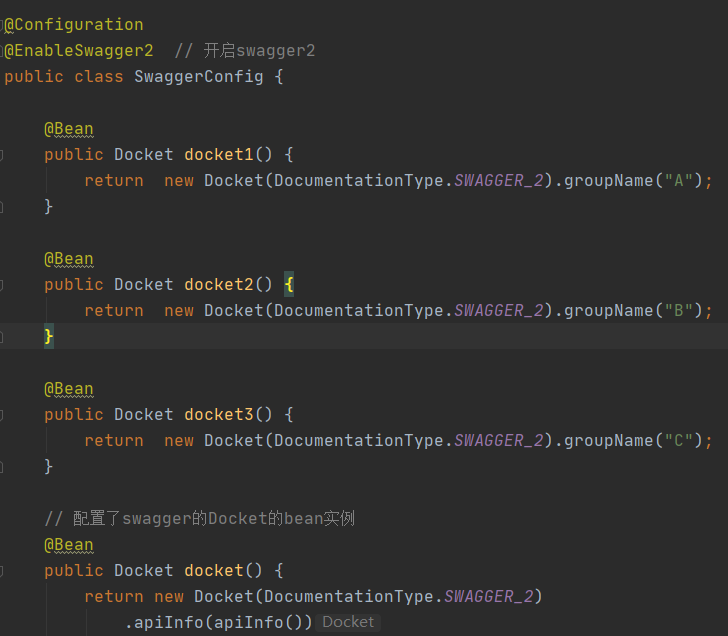
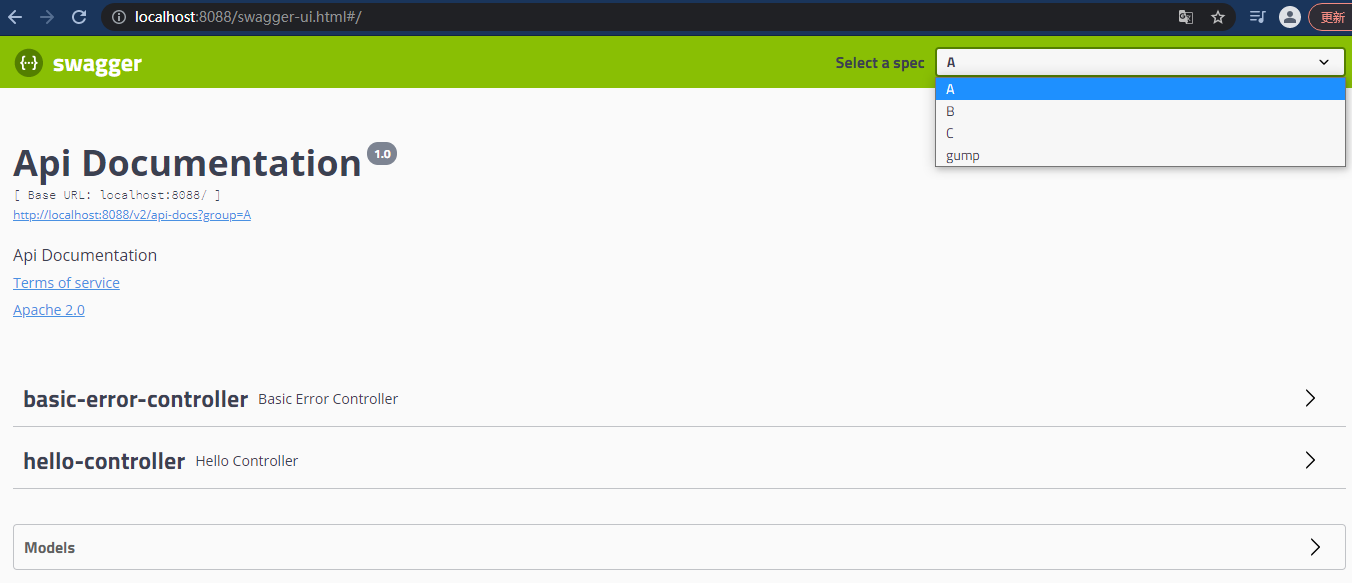
10.配置API分组
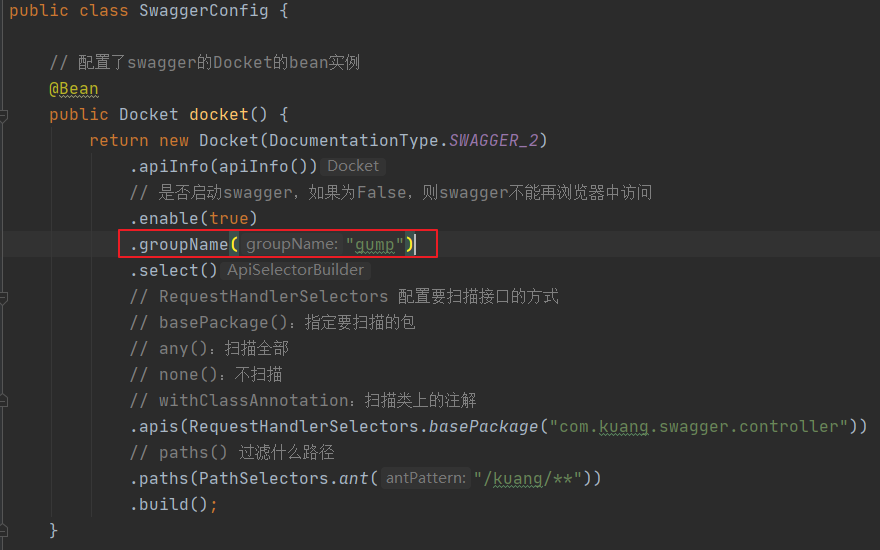

如何配置多个分组:多个Docket实例即可
package com.kuang.swagger.config;

import springfox.documentation.builders.PathSelectors;
import springfox.documentation.builders.RequestHandlerSelectors;
import springfox.documentation.service.ApiInfo;
import springfox.documentation.service.Contact;
import springfox.documentation.spi.DocumentationType;
import springfox.documentation.spring.web.plugins.Docket;
import springfox.documentation.swagger2.annotations.EnableSwagger2;

import org.springframework.context.annotation.Bean;
import org.springframework.context.annotation.Configuration;

import java.util.ArrayList;

@Configuration
@EnableSwagger2  // 开启swagger2
public class SwaggerConfig {

    @Bean
    public Docket docket1() {
        return  new Docket(DocumentationType.SWAGGER_2).groupName("A");
    }

    @Bean
    public Docket docket2() {
        return  new Docket(DocumentationType.SWAGGER_2).groupName("B");
    }

    @Bean
    public Docket docket3() {
        return  new Docket(DocumentationType.SWAGGER_2).groupName("C");
    }

    // 配置了swagger的Docket的bean实例
    @Bean
    public Docket docket() {
        return new Docket(DocumentationType.SWAGGER_2)
            .apiInfo(apiInfo())
            // 是否启动swagger,如果为False,则swagger不能再浏览器中访问
            .enable(true)
            .groupName("gump")
            .select()
            // RequestHandlerSelectors 配置要扫描接口的方式
            // basePackage():指定要扫描的包
            // any():扫描全部
            // none():不扫描
            // withClassAnnotation:扫描类上的注解
            .apis(RequestHandlerSelectors.basePackage("com.kuang.swagger.controller"))
            // paths() 过滤什么路径
            .paths(PathSelectors.ant("/kuang/**"))
            .build();
    }

    // 配置swagger信息=apiInfo
    private ApiInfo apiInfo() {
        // 作者信息
        Contact contact =  new Contact("gump yan", "https://www.cnblogs.com/GumpYan/", "5758878@qq.com");
        return new ApiInfo(
            "gump yan的SwaggerAPI文档",
            "Api Documentation",
            "1.0",
            "https://www.cnblogs.com/GumpYan/",
            contact,
            "Apache 2.0",
            "http://www.apache.org/licenses/LICENSE-2.0",
            new ArrayList());
    }
}
11.接口注释
创建一个实体类User,加上swagger的注释
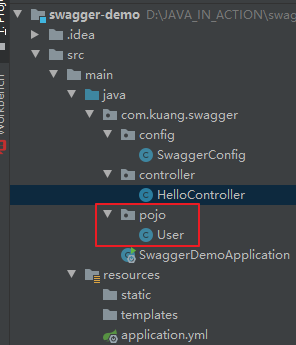
package com.kuang.swagger.pojo;

import io.swagger.annotations.ApiModel;
import io.swagger.annotations.ApiModelProperty;

@ApiModel("用户实体类")
public class User {
    @ApiModelProperty("用户名")
    public String username;
    @ApiModelProperty("密码")
    public String password;
}
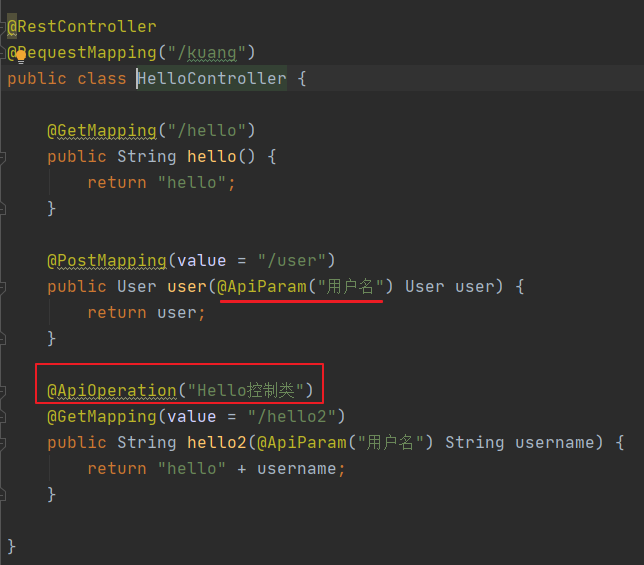

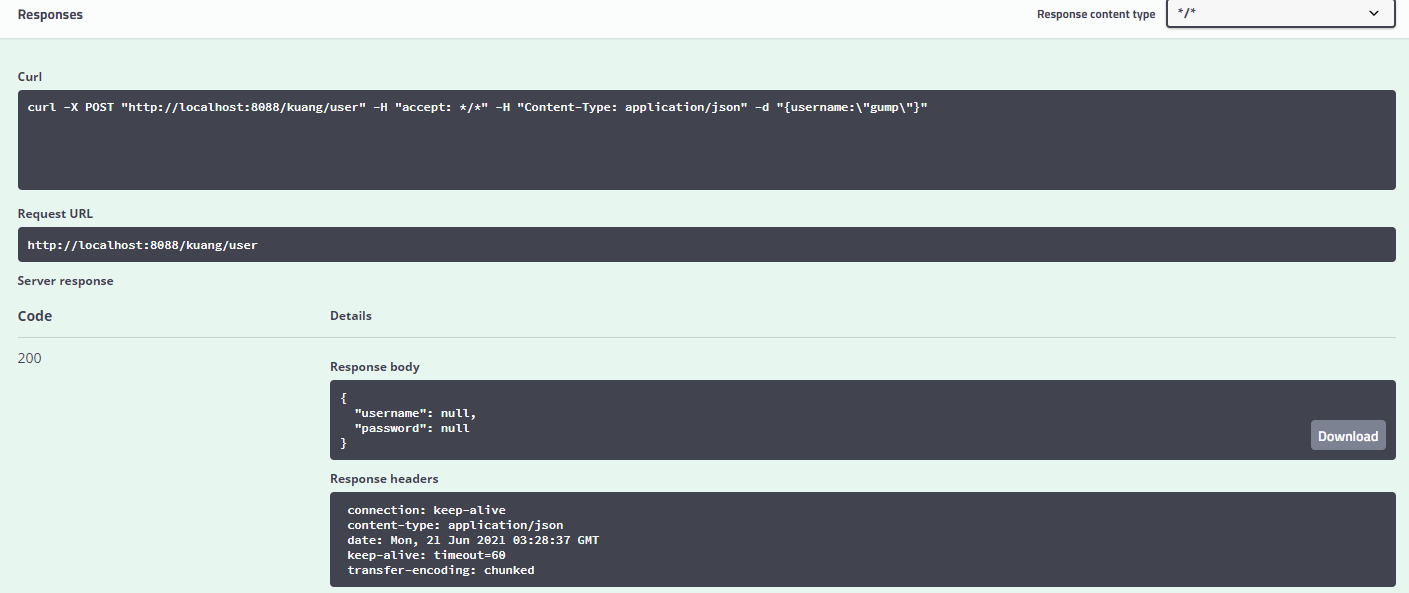
不仅可以看到注释,也可以在这里面做测试,这就是swagger的另一个好处,可以做postman的事情


 浙公网安备 33010602011771号