

React学习笔记
4-3:props,state,render
1.数据驱动渲染的框架
2.当组件的props或state改变的时候render会重新执行
4-4:react中的虚拟dom
1.流程:
旧的流程
①state数据
②JSX模板
③数据 + 模板 结合,生成真实DOM,来显示
④state发生改变
⑤数据+模板结合,生成真实DOM,替换原始DOM
改良流程:
①state数据
②JSX模板
③数据 + 模板 结合,生成真实DOM,来显示
④state发生改变
⑤数据 + 模板结合,生成真实DOM,并不直接替换原始DOM
⑥新的DOM和原始DOM对比,找差异
⑦找出input框发生变化
⑧只用新的DOM中的input元素,替换掉老的DOM中的input元素
虚拟DOM流程:
①state数据
②JSX模板
③数据 + 模板 结合,生成虚拟DOM,来显示
<div id="abc"><span>hellow world</span></div>
④用虚拟DOM结构生成真实DOM(虚拟DOM就是一个JS对象,用它来描述真实DOM)(消耗性能)
['div',{id:'abc'},['span',{},'helloworld']]
⑤state发生变化
⑥数据+模板生成新的虚拟DOM (极大提升性能)
['div',{id:'abc'},['span',{},'byebye']]
⑦比较原始虚拟DOM和新的虚拟DOM区别,找到区别的span中内容
⑧直接操作DOM,改变span内容
4-5深入了解虚拟DOM
1.JSX-->createElement-->虚拟DOM(JS对象)-->真实DOM
代码对比:
render(){
return <div><span>item</span> </div>
//效果等同于
return React.createElement('div',{},React.createElement('span',{},'item'))
}
2.虚拟DOM优点
①性能提升了
②使得跨端应用得以实现
4-6虚拟DOM中的Diff算法
setState是异步函数,为提高比对性能。
比对虚拟dom,同层比对,从上往下,根节点不同往下子节点都修改掉。
keys的重要性,提高比对性能。不建议key值是index值,因为比对的性能是基于key值跟上次一样,所以建议用item做key。
4-7react中的ref的使用
直接获取操作dom
<ul ref={(ul)=>{this.ul = ul }}>
</ul>
s使用
fn(){
this.setState(prevState)=》({
list:[...prevState.list,prevState.inpuValue],
inputValue:'
}),()=>{ //因为setState是异步的,等执行完
console.log(this.ul.querySelectorAll('div').length);
}
}
4-8react的生命周期函数
定义:生命周期函数指在某一个时刻组件会自动调用执行函数
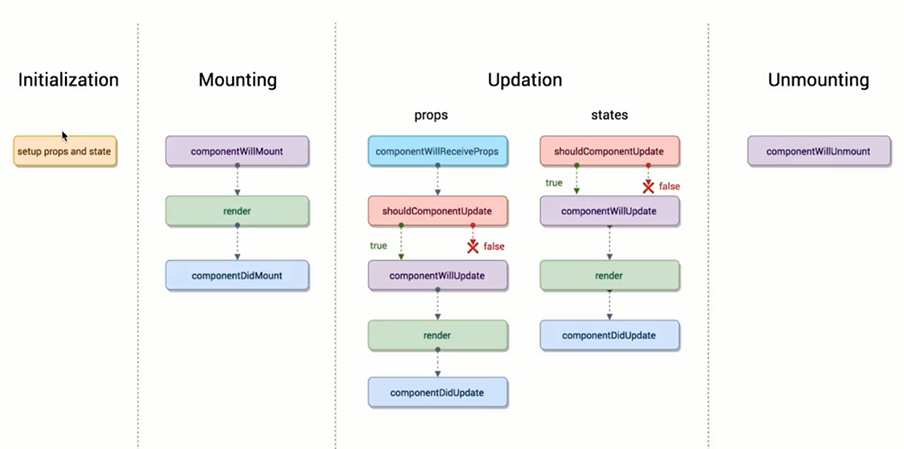
-------------Mounting-------------
` componentWillMount:在组件即将被挂载到页面的时刻自动执行。
` render:页面渲染。
` componentDidMount:组件在挂载到页面后,自动执行。
--------------Updation--------------
· componentWillReciveProps:一个组件要从父组件接受参数,只要父组件的render函数被重新执行了,子组件的这个生命周期函数就会被执行(如果这个组件第一次存在于父组件中,不会执行,如果这个组件之前已经存在于父组件中,才执行)。
` shouldComponentUpdate:组件被更新之前,自动执行。
` componentWillUpdate:组件被更新之前,自动执行,但是他在shouldComponentUpdate之后被执行,如果shouldComponentUpdate返回true才执行,返回false不执行。
` componentDidUpdate:组件更新完成后,被执行。
----------------Unmounting--------------
· componentWillUnmount:当这个组件即将被页面中剔除的时候,执行。
4-9react生命周期函数的使用场景
` shouldComponentUpdate做优化,在子组件中使用,因为父组件render更新后,子组件也会更新,所以需要优化。
shouldComponentUpdate(nextProps,nextStates){
if(nextProps.val !== this.prop.val){
return true;
}else{
return false;
}
}
` 按惯例在componentDidMount()中请求数据
componentDidMount(){
axios.get()
.then(()=>{})
.catch(()=>{})
}
4-10使用Charles实现本地数据mock
4-11React中实现css过渡动画
this.state = {
show:true
}
<Fragment>
<div className={this.state.show ? 'show' : 'hide'}>helloe</div>
<button onClick={this.handleToggle}>Toggle</button>
</Fragment>
handleToggle(){
this.setState{
show:this.state.show ? false : true
}
}
css文件
.show{
opacity:1;
transition: all 1s ease-in;
}
.hide{
opacity:0;
transition: all 1s ease-in;
}
4-12React中使用css动画效果
.hide{
animation:hide-item 2s ease-in forwards;
}
@keyframes hide-item {
0%{
opacity:1;
color:red;
}
50%{
opacity:0.5;
color:green;
}
100%{
opacity:0;
color:blue;
}
}
4-13使用react-transition-group实现动画
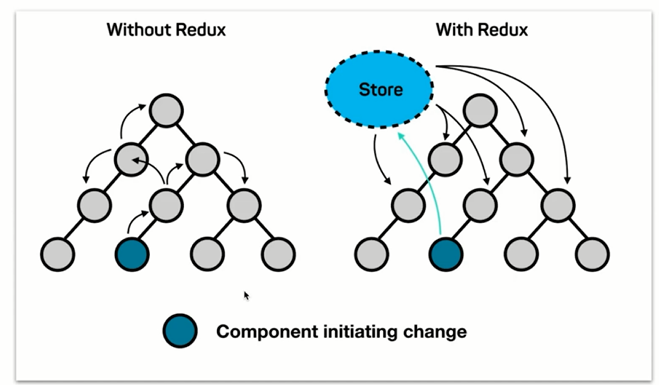
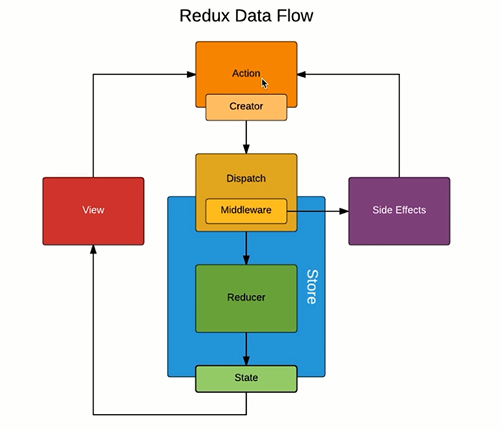
5-1Redux概念简述
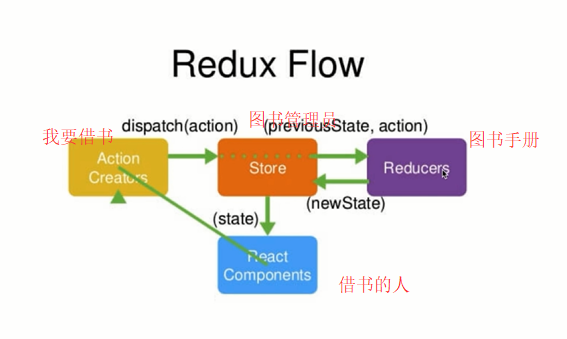
5-2Redux的工作流程
5-3使用Antd实现todolist页面布局
5-4创建redux中的store
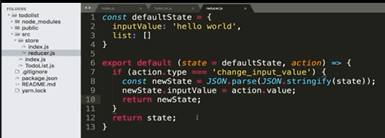
1.创建reducer.js
const defaultState = {
inputValue:'123',
list:[1,2]
}
export default (state = defaultState,action) => {
return state;
}
2.把reduce放入store;创建index.js
import { createStore } form 'redux';
import reducer from './reducer';
const store = createStore(reducer);
export default store;
3.在component中使用store
import store from './store';
constructor(props){
super(props);
this.state = store.getState(); //可以取用this.state.inputValue和this.state.list;
}
}
5-5Action和Reducer的编写
1.在compoent里面
<input onChange={this.handleChange} >
</input>
constructor(props){
super(props);
this.state = store.getState(); //可以取用this.state.inputValue和this.state.list;
this.handleChange= this.handleChange.bind(this);
store.subscribe(this.handleStoreChange);//进行store订阅
}
}
handleBtnClick(e) {
const action = {
type:'change_value',
value:e.target.vaue
}
store.dispatch(action);
}
handleStoreChange() {
this.setState (store.getState());
}
2.在store把action放入reducer进行处理
3.在reducer中处理
const defaultState = {
inputValue:'123',
list:[1,2]
}
export default (state = defaultState,action) => {
if(action.type === "change_value"){
const newState = JSON.parse(JSON.stringify(state));//深拷贝一个对象
newState.inputValue = action.value;
return newState;
}
//这里摘一下添加操作的代码
/*
if(action.type === "add_item"){
const newState = JSON.parse(JSON.stringify(state));//深拷贝一个对象
newState.list.push(newState.inputValue);
newState.inputValue = ' ';
return newState;
}
*/
return state;
}
5-6使用Redux完成TodoList删除功能
5-7ActionTypes的拆分
1.在store文件夹下的actionTypes.js里面定义
export const CHANGE_VALUE = 'change_value';
export const ADD_ITEM = 'add_item';
2.在组件中使用
import { CHANGE_VALUE ,ADD_ITEM } from './store/actionTypes';
handleBtnClick(e) {
const action = {
type:CHANGE_VALUE ,
value:e.target.vaue
}
store.dispatch(action);
}
3.在store文件夹的reducer.js
import { CHANGE_VALUE ,ADD_ITEM } from './store/actionTypes';
export default (state = defaultState,action) => {
if(action.type === CHANGE_VALUE ){
const newState = JSON.parse(JSON.stringify(state));//深拷贝一个对象
newState.inputValue = action.value;
return newState;
}
return state;
}
5-8使用actionCreator统一创建action
1.在store文件夹下创建actionCreatores.js
import { CHANGE_VALUE ,ADD_ITEM } from './store/actionTypes';
export const getInputChangeAction = (value) => ({
type:CHANGE_VALUE ,
value
});
2.在组件文件中
import { getInputChangeAction } from './store/actionCreatores';
handleBtnClick(e) {
const action =getInputChangeAction(:e.target.vaue);
store.dispatch(action);
}
5-9Redux知识点复习补充
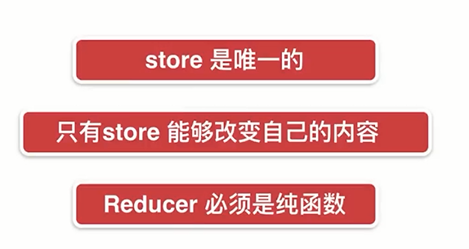
· 纯函数:给固定的输入,就一定会有固定的输出,而且不会有任何副作用
核心API

6-1UI组件与容器组件拆分
·UI组件:页面渲染
·容器组件:逻辑处理
onClick = this.handleItemDelete.bind(this,index)拆分后在UI组件
onClick = {() =》 {this.props.handleItemDelete(index)}};
而且需要在逻辑组件的construtors绑定,this.handleItemDelete.bind(this),在render函数中<UI handleItemDelete=this.handleItemDelete />进行传递
6-2无状态组件
·当一个组件只有render函数的时候,可以把它定义成无状态的组件
const TodoListUI = (props) => {
return (
<div>
...
</div>
)
}
export default TodoListUI;
优点:性能好,因为普通组件是class类型,里面包含了生命周期等,但无状态组件就是单纯的函数
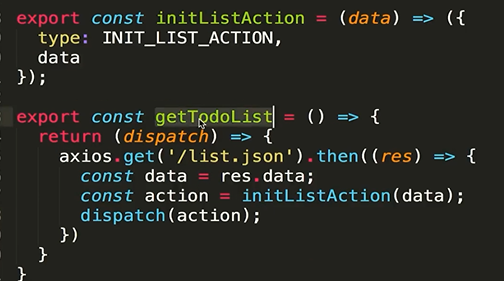
6-3Redux中发生异步请求获取数据
componentDidMount(){
axios.get('/list.json').then((res) => {
const data = res.data;
const action = initListAction(data);
store.dispatch(action);
})
}
在actionCreators.js
export const initListAction = () => ({
type: INIT_LIST_ACTION,
data
})
在actionTypes.js
export INIT_LIST_ACTION = 'init_list_action';
在reducers.js
if(action.type === INIT_LIST_ACTION ){
const newState = JSON.parse(JSON.stringify(state));
newState.list = action.data;
return newState;
}
6-4使用Redux-thunk中间件进行ajax请求发送
1.安装redux-thunk并在store文件夹下的index.js进行配置

2.在actionCreators.js创建方法
3.在组件使用

6-5什么是redux的中间件
·中间件就是对store的dispatch做了一个升级,之前dispatch只能接收一个对象传递给store,加了redux-thunk后,dispatch可以分别参数传过来是对象还是函数,如果是函数就先执行函数,再store.dispatch()
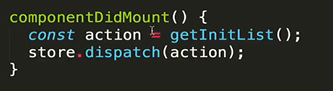
6-6~6-7Redux-saga中间件使用入门
1.在store文件夹的index.js文件中引入redux-saga并使用
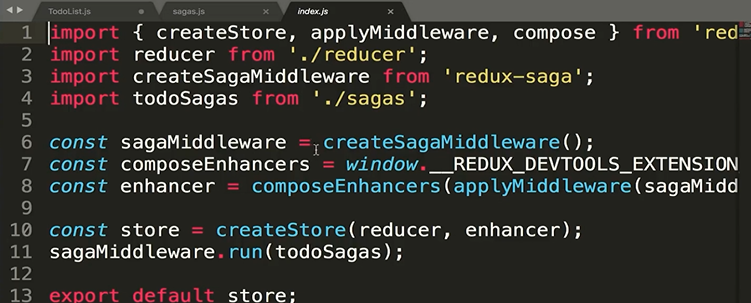
2.创建一个sagas.js
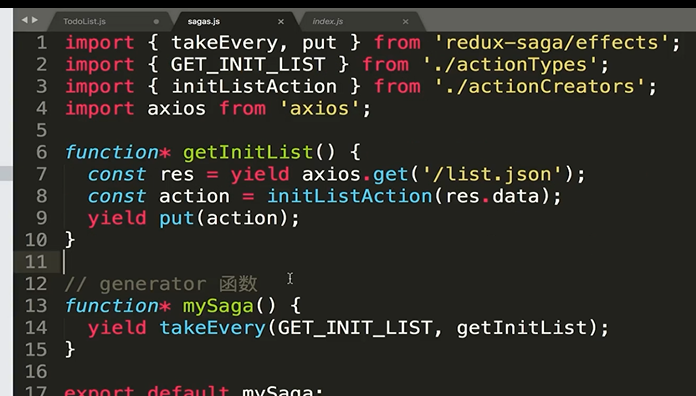
改进代码
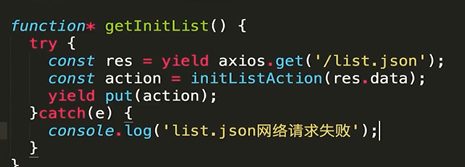
3.调用actionCreators.js里面的initListAction()方法,然后reducer.js里接收到派发(不用修改代码)
4.在组件里发生action
6-8如何使用React-redux
1.在store文件夹创建index.js
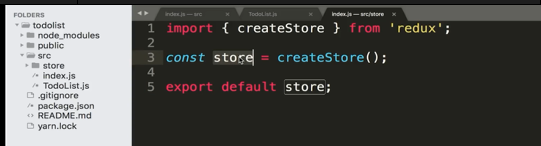
2.创建并在index.js使用全局store

3.在组件里派发
import connect from 'react-redux'
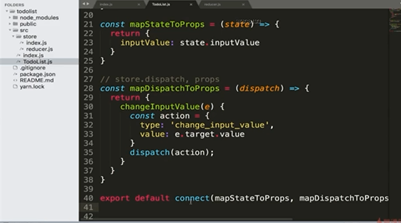
//使用connect(mapStateToProps,mapDispatchToProps)(TodoList);
4.在store文件夹的reducer.js

 浙公网安备 33010602011771号