
Spring依赖注入三种方式详解
在讲解Spring依赖注入之前的准备工作:
- 下载包含Spring的工具jar包的压缩包
- 解压缩下载下来的Spring压缩包文件
- 解压缩之后我们会看到libs文件夹下有许多jar包,而我们只需要其中的commons-logging-1.0.4.jar,spring-beans-4.2.1.RELEASE.jar,spring-context-4.2.1.RELEASE.jar,spring-context-support-4.2.1.RELEASE.jar,spring-core-4.2.1.RELEASE.jar,spring-expression-4.2.1.RELEASE.jar
- 在Eclipse建立一个Dynamic Web Project
- 将上述必要的几个jar包导入WEB-INF文件夹下lib文件夹中
- 在src下建立下面提到的包和类
准备工作做完之后我们就开始依赖注入之旅了:
- 很多人都有迷惑,到底什么是依赖注入,什么是控制反转,其实所说的依赖注入(DI)和控制反转(IOC)是同一概念,他们是不分家的。
- 通俗来讲就是,当某个角色(调用者)需要另一个角色(被调用者)的协助时,在Java中,通常需要调用者去创建被调用者的实例,即new一个被调用者的对象,而在Spring中,创建被调用者的工作不由调用者完成,因此称控制反转;而创建被调用者的实例由Spring容器来完成,然后注入到调用者,因此也称依赖注入。
- Spring采用配置文件或Annotation(注解)来管理Bean的实现类、依赖关系,Spring容器则根据配置文件,利用反射来创建实例,并为之注入依赖关系。
- 打个比方吧,在古代生产力及低的社会,人们自给自足,去打猎要自己生产工具Arrow(箭)来捕获自己的猎物,完全是自己动手制造(new)一个箭(对象)。到后来随着社会的发展,有了制造箭工具的工厂,人们无需自己制造箭,而是去工厂告诉他们你需要什么,然后工厂就会给你相应的工具。再后来,你无须到工厂,坐在家里就可以,要什么发出个指令,箭就会出现,这里人和箭都是有Spring来管理的,二者依赖关系由Spring提供。
好了,废话不多说了,下面即将进入我们的正题,依赖注入的三种方式(setter注入、构造注入、接口注入):
先建立三种方式都会用到的类和接口
接口:Arrow(箭)、Person(人)
实现类:ArrowImpl、PersonImpl
测试类:MainTest
- setter注入
Arrow接口:
package iocdi;

public interface Arrow {
	public String getArrow();
}
Person接口:
package iocdi;

public interface Person {
	public void hunt();
}
ArrowImpl类:
package iocdi;

public class ArrowImpl implements Arrow {

	@Override
	public String getArrow() {
		return "an arrow";
	}

}
PersonImpl类:
package iocdi;

public class PersonImpl implements Person {

	private Arrow arrow;

	@Override
	public void hunt() {
		System.out.println("I get " + arrow.getArrow() + " to hunt.");
	}

	//set注入一支箭
	public void setArrow(Arrow arrow) {
		this.arrow = arrow;
	}

}
MainTest类:
package iocdi;
import org.springframework.context.ApplicationContext;
import org.springframework.context.support.ClassPathXmlApplicationContext;
/**
* @author ForeverLover
*/
public class MainTest {
public static void main(String[] args) {
ApplicationContext ac = new ClassPathXmlApplicationContext("ApplicationContext.xml");
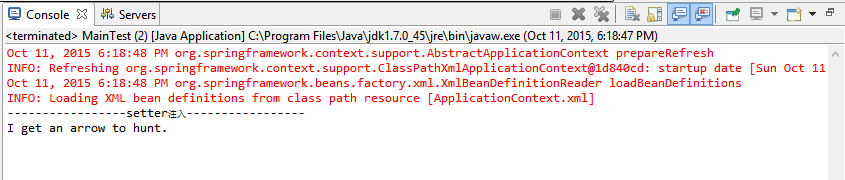
System.out.println("-----------------setter注入-----------------");
Person p = ac.getBean("PersonImpl",PersonImpl.class);
p.hunt();
}
}
看到测试类会有疑问,ApplicationContext.xml从哪儿冒出来的,这里要说的就是Spring容器帮助我们去创建实例对象bean,在进程启动时,Spring容器会自动加载此配置文件,解析通过配置文件配置的bean并创建对应类的实例,被调用者使用指定方式注入到调用者中,从而控制反转和依赖注入。ApplicationContext.xml配置文件内容如下:
<?xml version="1.0" encoding="UTF-8"?>
<beans xmlns="http://www.springframework.org/schema/beans"
	xmlns:xsi="http://www.w3.org/2001/XMLSchema-instance"
	xmlns:tx="http://www.springframework.org/schema/tx"
	xmlns:aop="http://www.springframework.org/schema/aop"
	xsi:schemaLocation="
	http://www.springframework.org/schema/beans
	http://www.springframework.org/schema/beans/spring-beans-3.0.xsd
	http://www.springframework.org/schema/tx
	http://www.springframework.org/schema/tx/spring-tx-3.0.xsd
	http://www.springframework.org/schema/aop
	http://www.springframework.org/schema/aop/spring-aop-3.0.xsd">

	<bean id="ArrowImpl" class="iocdi.ArrowImpl"/>

	<bean id="PersonImpl" class="iocdi.PersonImpl">
		<!-- setter注入 -->
		<property name="arrow" ref="ArrowImpl"/>
	</bean>

</beans>
所有工作都完成了,然后从测试类MainTest的main方法执行一下,从控制台可以看到结果,是OK的:
- 构造注入
setter注入讲完了,现在我们来聊聊构造注入了,所谓构造注入就是在实例化对象的时候就把参数传给这个对象,我们知道对于JavaBean都必须有构造器,最少有一个无参构造器,到这我们可以继续下面的构造注入,与setter注入不同之处在于,PersonImpl获得ArrowImpl实例的方法,接口Arrow和Person不变,ArrowImpl类也不变,我们修改一下PersonImpl类和ApplicationContext.xml文件:
修改后的PersonImpl类:
package iocdi;

public class PersonImpl implements Person {

	private Arrow arrow;

	public PersonImpl() {}

	public PersonImpl(Arrow arrow) {
		this.arrow = arrow;
	}

	@Override
	public void hunt() {
		System.out.println("I get " + arrow.getArrow() + " to hunt.");
	}

}
修改后的ApplicationContext.xml文件:
<?xml version="1.0" encoding="UTF-8"?>
<beans xmlns="http://www.springframework.org/schema/beans"
	xmlns:xsi="http://www.w3.org/2001/XMLSchema-instance"
	xmlns:tx="http://www.springframework.org/schema/tx"
	xmlns:aop="http://www.springframework.org/schema/aop"
	xsi:schemaLocation="
	http://www.springframework.org/schema/beans
	http://www.springframework.org/schema/beans/spring-beans-3.0.xsd
	http://www.springframework.org/schema/tx
	http://www.springframework.org/schema/tx/spring-tx-3.0.xsd
	http://www.springframework.org/schema/aop
	http://www.springframework.org/schema/aop/spring-aop-3.0.xsd">

	<bean id="ArrowImpl" class="iocdi.ArrowImpl"/>

	<bean id="PersonImpl" class="iocdi.PersonImpl">
		<!-- 构造注入 -->
		<constructor-arg ref="ArrowImpl"/>
	</bean>

</beans>
然后再次运行一下MainTest测试类,看结果,仍然可行:
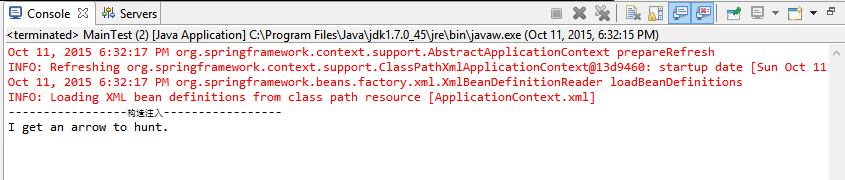
- 接口注入
不同于setter注入和构造注入,接口注入无需在xml文件里配置bean,而利用Java反射创建实现接口类的实例。
让我们来修改一下MainTest测试类和PersonImpl类:
修改的PersonImpl类:
package iocdi;

public class PersonImpl implements Person {

	private Arrow arrow;

	@Override
	public void hunt() {
		try {
			Object obj = Class.forName("iocdi.ArrowImpl").newInstance();
			arrow = (Arrow) obj;
			System.out.println("I get " + arrow.getArrow() + " to hunt.");
		} catch (InstantiationException e) {
			e.printStackTrace();
		} catch (IllegalAccessException e) {
			e.printStackTrace();
		} catch (ClassNotFoundException e) {
			e.printStackTrace();
		}
	}

}
修改的MainTest类:
package iocdi;


/**
 * @author ForeverLover
 */
public class MainTest {
	public static void main(String[] args) {
		try {
			Object obj = Class.forName("iocdi.PersonImpl").newInstance();
			Person p = (Person) obj;
			System.out.println("-----------------接口注入-----------------");
			p.hunt();
		} catch (InstantiationException e) {
			e.printStackTrace();
		} catch (IllegalAccessException e) {
			e.printStackTrace();
		} catch (ClassNotFoundException e) {
			e.printStackTrace();
		}
	}
}
运行一下测试类,从控制台得出结果:

- Lookup注入
说到这顺便说一下Lookup方法注入吧,对于Lookup注入需要一下几个类:
Arrow类
Person抽象类
MainTest测试类
创建Arrow类:
package iocdi;

import java.util.Random;

public class Arrow {

	private String arrow;
	private String[] arrows = {"aaaaArrow", "bbbbArrow", "ccccArrow","ddddArrow","eeeeArrow",
			"ffffArrow","ggggArrow","hhhhArrow","iiiiArrow"};

	public Arrow() {
		this.arrow = arrows[new Random().nextInt(9)];
	}

	public void getArrow() {
		System.out.println("I get a " + arrow);
	}

}
创建Person类:
package iocdi;

public abstract class Person {

	public abstract Arrow createArrow();

	public Arrow getArrow() {
		return new Arrow();
	}

}
创建MainTest类:
package iocdi;

import org.springframework.context.ApplicationContext;
import org.springframework.context.support.ClassPathXmlApplicationContext;


/**
 * @author ForeverLover
 */
public class MainTest {
	public static void main(String[] args) {
		ApplicationContext ac = new ClassPathXmlApplicationContext("ApplicationContext.xml");
		Person p = ac.getBean("Person", Person.class);
		Arrow arrow1 = p.getArrow();
		Arrow arrow2 = p.getArrow();
		System.out.println(arrow1.equals(arrow2));
		System.out.println("------------I am a dividing line------------");
		Arrow arrow3 = p.createArrow();
		Arrow arrow4 = p.createArrow();
		System.out.println(arrow3.equals(arrow4));
	}
}
修改ApplicationContext.xml配置文件:
<?xml version="1.0" encoding="UTF-8"?>
<beans xmlns="http://www.springframework.org/schema/beans"
	xmlns:xsi="http://www.w3.org/2001/XMLSchema-instance"
	xmlns:tx="http://www.springframework.org/schema/tx"
	xmlns:aop="http://www.springframework.org/schema/aop"
	xsi:schemaLocation="
	http://www.springframework.org/schema/beans
	http://www.springframework.org/schema/beans/spring-beans-3.0.xsd
	http://www.springframework.org/schema/tx
	http://www.springframework.org/schema/tx/spring-tx-3.0.xsd
	http://www.springframework.org/schema/aop
	http://www.springframework.org/schema/aop/spring-aop-3.0.xsd">

	<bean id="Arrow" class="iocdi.Arrow"/>

    <bean id="Person" class="iocdi.Person">
        <lookup-method name="createArrow" bean="Arrow" />
    </bean>

</beans>
最后测试一下,控制台查看一下:
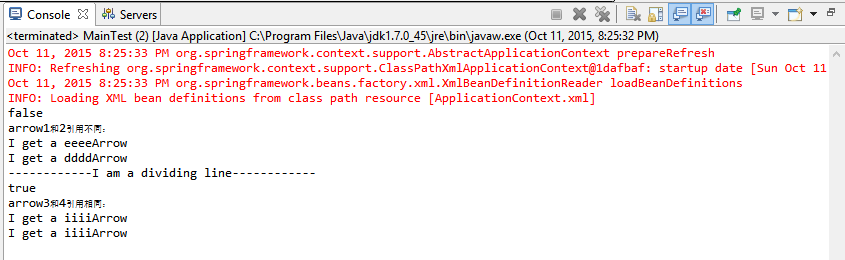
先说一下,分隔线前面之所以会输出false是因为创建的两个对象的引用不同,虽然这里打印出来是eeeeArrow和ddddArrow结果确实不同,因为是随机的,即便有可能结果相同,两个对象的引用也不相同。但是分隔线下面无论如何创建的两个对象的引用相同。大家也可能会疑惑,为什么在配置文件里配置的抽象类也可以实例化对象,并且抽象类中的抽象方法createArrow()并没具体实现却可以创建Arrow实例,这里就跟Spring容器有关,其具体实现了abstarct类,如果createArrow()不是抽象方法,那abstract实现类也会覆盖这个方法。

 浙公网安备 33010602011771号