CompletableFuture
为什么需要使用 CompletableFuture
在一些存在依赖关系的任务场景(task1 —> task2 —> task3),这些独立的任务可以通过线程池的方式执行,但是这样会存在以下几个问题:
- 由于任务之间存在依赖关系,因此有的线程在执行的过程中可能会阻塞,如果设置的线程池设置的不合理甚至会引发死锁,并且这样的方式对于 CPU 资源的使用也会比较低
- 通过主动阻塞自身等待前序任务的执行结果的代码会很臃肿,而如果通过回调的方式来解决依赖关系,那么在依赖链路较长的情况下可能会引发 回调地狱的问题
因此需要尝试一种能够支持任务编排的方式来执行这些具备依赖关系的任务。目前主流的方式有 CompletableFuture、RxJava 和 Reactor,后两者支持的特性更多,更强大,但是学习成本也很大,因此使用 CompletableFuture 为一般的任务编排选项
基本使用[1]
假设现在存在如下的任务依赖(将运行任务封装为 CompletableFuture):
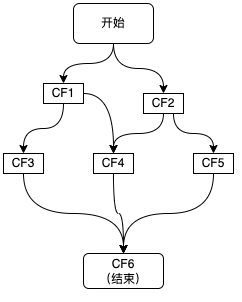
零依赖
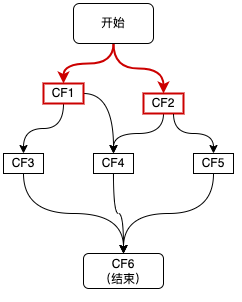
如上图红色链路所示,对于没有前置依赖的任务,可以通过如下的方式来创建 CompletableFuture:
// 创建自定义的线程池替换默认的 Executor
Executor executor = Executors.newFixedThreadPool(16);

// 1. 由于这里需要获取到返回结果,因此使用 supplyAsync
CompletableFuture<String> cf1 = CompletableFuture.supplyAsync(() -> "result1", executor);
// 2. 使用 completedFuture 直接创建一个已完成的 CompletableFuture
CompletableFuture<String> cf2 = CompletableFuture.completedFuture("result2");
// 3、先初始化一个未完成的CompletableFuture,然后通过complete()、completeExceptionally(),完成该CompletableFuture
CompletableFuture<String> cf = new CompletableFuture<>();
cf.complete("success");
第三种方式的一个经典使用场景,用于将回调方法转换为 CompletableFuture,然后再依赖 CompletableFuture 的编排能力进行编排,示例如下:
@Test
public void completableFutureTest() throws IOException {
    AsynchronousFileChannel fileChannel = AsynchronousFileChannel.open(Paths.get("C:\\github\\Test-Repo\\Crawl.py"));
    CompletableFuture<ByteBuffer> readFuture = toCompletableFuture(fileChannel)
            .whenComplete((attachment, throwable) -> {
                attachment.flip();
                logger.info("completableFutureTest: {}", new String(
                        attachment.array(),
                        attachment.position(),
                        attachment.limit(),
                        StandardCharsets.UTF_8
                ));
            });
    readFuture.join(); // 防止程序未执行完成后退出
}

public static CompletableFuture<ByteBuffer> toCompletableFuture(final AsynchronousFileChannel callback) {
    //新建一个未完成的CompletableFuture
    CompletableFuture<ByteBuffer> resultFuture = new CompletableFuture<>();
    //监听回调的完成,并且与CompletableFuture同步状态
    ByteBuffer byteBuffer = ByteBuffer.allocate(10 * 1024 * 10);
    callback.read(byteBuffer, 0, byteBuffer, new CompletionHandler<Integer, ByteBuffer>() {
        @Override
        public void completed(Integer result, ByteBuffer attachment) {
            resultFuture.complete(attachment);
        }

        @Override
        public void failed(Throwable exc, ByteBuffer attachment) {
            resultFuture.completeExceptionally(exc);
        }
    });
    logger.info("toCompletableFuture finished.......");
    return resultFuture;
}
一元依赖
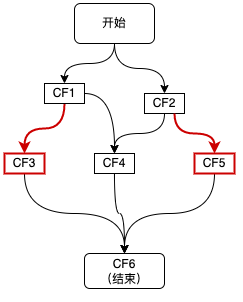
如上图红色链路所示,CF3、CF5 分别依赖于 CF1、CF2,对于这种单个依赖的 CompletableFuture 可以通过 thenApply、thenAccept 和 thenCompose 等方法来实现,代码示例如下:
CompletableFuture<String> cf3 = cf1.thenApply(result1 -> {
  //result1为CF1的结果
  // ......
  return "result3";
});
CompletableFuture<String> cf5 = cf2.thenApply(result2 -> {
  //result2为CF2的结果
  // ......
  return "result5";
});
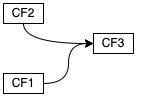
二元依赖
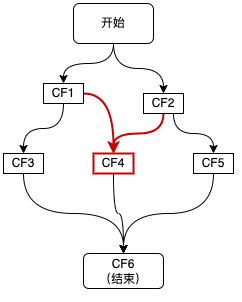
如上图红色链路所示,CF4 同时依赖于 CF1 和 Cf2,这种依赖关系可以通过 thenCombine 等回调方法来实现,代码如下:
CompletableFuture<String> cf4 = cf1.thenCombine(cf2, (result1, result2) -> {
  //result1 和 result2 分别为 cf1 和 cf2 的结果
  return "result4";
});
多元依赖
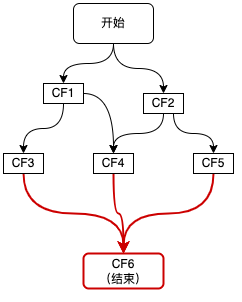
如上图红色链路所示,CF6 依赖 CF3、CF4 和 CF5,这种多元依赖可以通过 allOf 或 anyOf 来实现,区别在于 allOf 会等待所有的依赖完成后再执行,而 anyOf 则只需任意一个完成即可。对应的代码如下:
CompletableFuture<Void> allOfFuture = CompletableFuture.allOf(cf3, cf4, cf5);
allOfFuture.thenApply(any -> {
    // 这里的join并不会阻塞,因为传给thenApply的函数是在 CF3、CF4、CF5全部完成时,才会执行 。
    String result3 = cf3.join();
    String result4 = cf4.join();
    String result5 = cf5.join();
    // 根据 result3、result4、result5 组装最终 result;
    return  result3 + "_" + result4 + "_" + result5 + "_result6";
});
实现原理
CompletableFuture 的类结构如下:
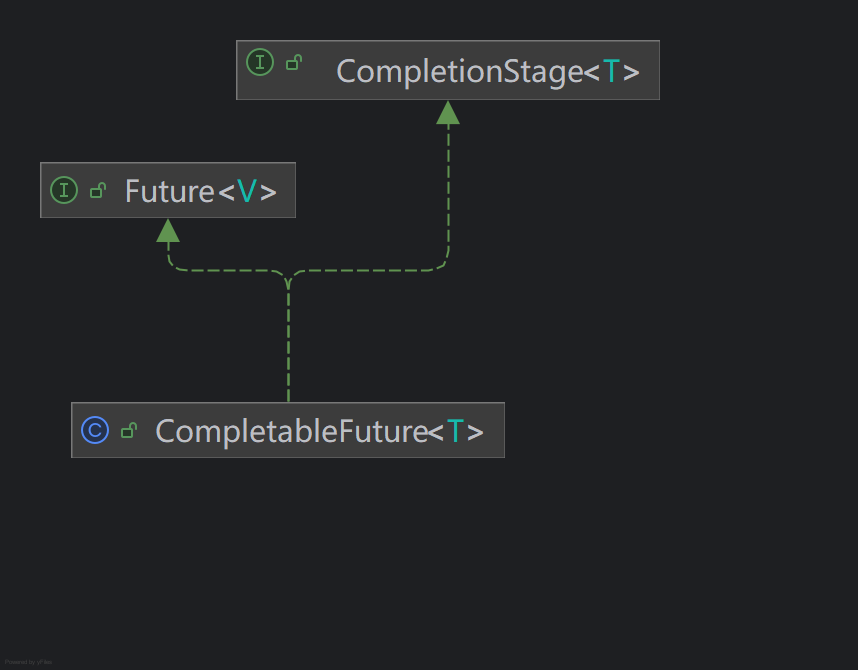
CompletableFuture 是 Future 的一个具体实现,因此它也支持 Future 的基本功能(如封装任务结果);具备编排任务的功能在 CompletionStage 接口中定义
CompletableFuture 内部定义两个关键属性:result 和 stack,result用于存储当前 CF 的结果, stack 表示当前 CF 完成后需要触发的依赖动作,依赖动作可以有多个,以栈的形式进行存储,当前 CF 中的 stack 表示栈顶元素
这种方式和 “观察者模式” 很相似,每个依赖动作都封装在一个单独的 Completion 子类中,对应的类结构如下:
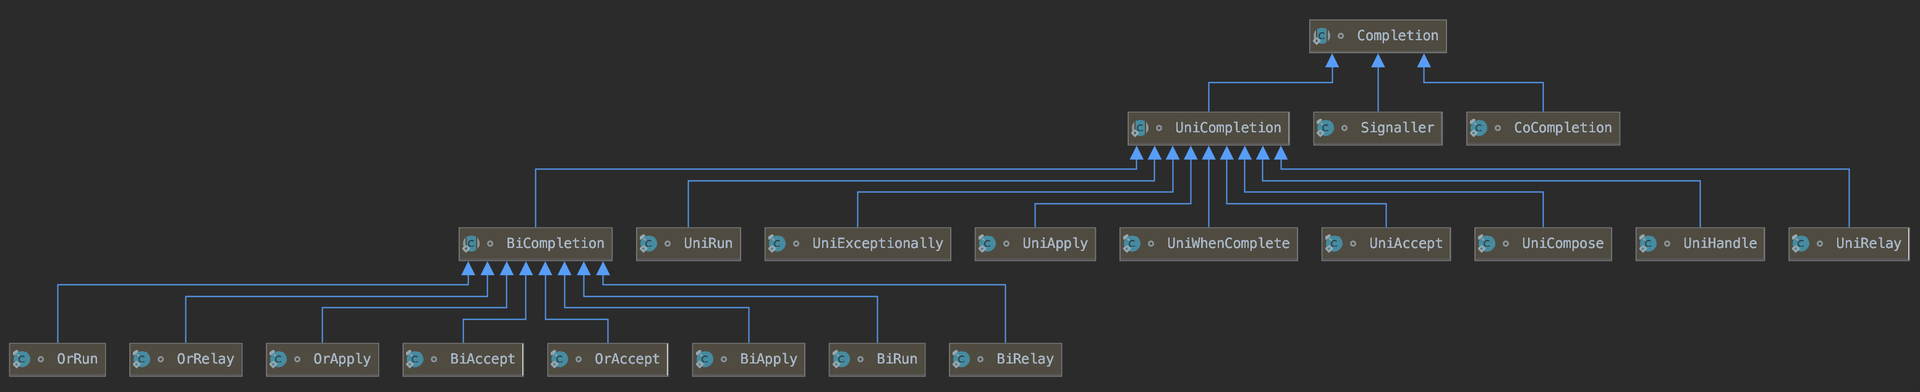
例如对于一元依赖的处理(thenApply)是通过 UniApply 定义的后置处理,二元依赖(thenCombine)则是通过 BiApply 定义的后置处理
零依赖
一般带有任务的 CompletableFuture 的工厂方法实现如下:
private static final boolean USE_COMMON_POOL =
        (ForkJoinPool.getCommonPoolParallelism() > 1);

private static final Executor ASYNC_POOL = USE_COMMON_POOL ?
        ForkJoinPool.commonPool() : new ThreadPerTaskExecutor();

/*
	如果不提供 Executor,则按照系统的可并发配置选择 ForkJoin 线程池或单线程线程池
	一般情况下,为了更好地利用 CPU 资源,推荐使用自定义的线程池
*/
public static <U> CompletableFuture<U> supplyAsync(Supplier<U> supplier) {
    return asyncSupplyStage(ASYNC_POOL, supplier);
}

public static <U> CompletableFuture<U> supplyAsync(Supplier<U> supplier,
                                                   Executor executor) {
    return asyncSupplyStage(screenExecutor(executor), supplier);
}

static <U> CompletableFuture<U> asyncSupplyStage(Executor e,
                                                 Supplier<U> f) {
    if (f == null) throw new NullPointerException();
    CompletableFuture<U> d = new CompletableFuture<U>();
    /*
    	创建一个 AsyncSupply,并使用 executor 执行这个任务
    	具体的 AsyncSupply 在后文会有介绍
    */
    e.execute(new AsyncSupply<U>(d, f));
    return d;
}
不带执行任务,只有返回结果的 CompleteableFuture 的工厂方法实现如下:
public static <U> CompletableFuture<U> completedFuture(U value) {
    // 创建时将 result 设置为给定的值
    return new CompletableFuture<U>((value == null) ? NIL : value);
}
一元依赖
thenApply 的实现源码如下:
public <U> CompletableFuture<U> thenApply(
    Function<? super T,? extends U> fn) {
    return uniApplyStage(null, fn);
}

private <V> CompletableFuture<V> uniApplyStage(
    Executor e, Function<? super T,? extends V> f) {
    if (f == null) throw new NullPointerException();
    Object r;
    /*
    	如果在编排下一个任务之间当前的 CF 已经完成了,则直接执行后续的编排任务
    */
    if ((r = result) != null)
        return uniApplyNow(r, e, f);

    /*
    	如果编排时任务还没有完成,则将本次的任务封装为一个 UniApply 类型的 Completion,
    	并将新创建的 CF 的 stack 的 next 指向当前的 CF,同时将当前 CF 的 stack 替换为 UniApply
    */
    CompletableFuture<V> d = newIncompleteFuture();
    unipush(new UniApply<T,V>(e, d, this, f));
    return d;
}
unipush 的实现如下:
final void unipush(Completion c) {
    if (c != null) {
        // CAS 将创建的 CF 压入到当前依赖栈
        while (!tryPushStack(c)) {
            /*
            	本次 CAS 失败,但是当前任务已经执行完成,则无需再压入依赖栈,
            	直接执行后续编排任务
            */
            if (result != null) {
                NEXT.set(c, null);
                break;
            }
        }
        /*
        	当前 CF 的执行任务已完成,唤醒后续的编排任务
        */
        if (result != null)
            c.tryFire(SYNC);
    }
}

final boolean tryPushStack(Completion c) {
    Completion h = stack;
    NEXT.set(c, h);         // CAS piggyback
    return STACK.compareAndSet(this, h, c);
}
上面已经提及到在入栈前、入栈中 CF 执行完毕后的情况,那么在入栈后、任务执行完之后是如何执行的呢?这个可以在定义 CF 的时候找到对应的处理逻辑,以 supplyAsync 工厂方法为例,对应的创建代码如下:
public static <U> CompletableFuture<U> supplyAsync(Supplier<U> supplier,
                                                   Executor executor) {
    return asyncSupplyStage(screenExecutor(executor), supplier);
}

static <U> CompletableFuture<U> asyncSupplyStage(Executor e,
                                                 Supplier<U> f) {
    if (f == null) throw new NullPointerException();
    CompletableFuture<U> d = new CompletableFuture<U>();
    // 直接使用线程池异步执行封装后的任务
    e.execute(new AsyncSupply<U>(d, f));
    return d;
}

@SuppressWarnings("serial")
static final class AsyncSupply<T> extends ForkJoinTask<Void>
    implements Runnable, AsynchronousCompletionTask {

    public void run() {
        CompletableFuture<T> d; Supplier<? extends T> f;
        if ((d = dep) != null && (f = fn) != null) {
            dep = null; fn = null;
            if (d.result == null) {
                try {
                    /**
                    	实际运行任务,并将当前 CF 的 result 设置为对应的任务返回结果
                    */
                    d.completeValue(f.get());
                } catch (Throwable ex) {
                    d.completeThrowable(ex);
                }
            }
            /*
            	唤醒后续编排的任务
            */
            d.postComplete();
        }
    }
}

final void postComplete() {
    CompletableFuture<?> f = this; Completion h;
    while ((h = f.stack) != null ||
           (f != this && (h = (f = this).stack) != null)) {
        CompletableFuture<?> d; Completion t;
        // CAS 弹出当前 stack 的元素
        if (STACK.compareAndSet(f, h, t = h.next)) {
            if (t != null) {
                if (f != this) {
                    pushStack(h);
                    continue;
                }
                NEXT.compareAndSet(h, t, null); // try to detach
            }
            /*
            	tryFire 为 Completion 的任务执行方法
            */
            f = (d = h.tryFire(NESTED)) == null ? this : d;
        }
    }
}
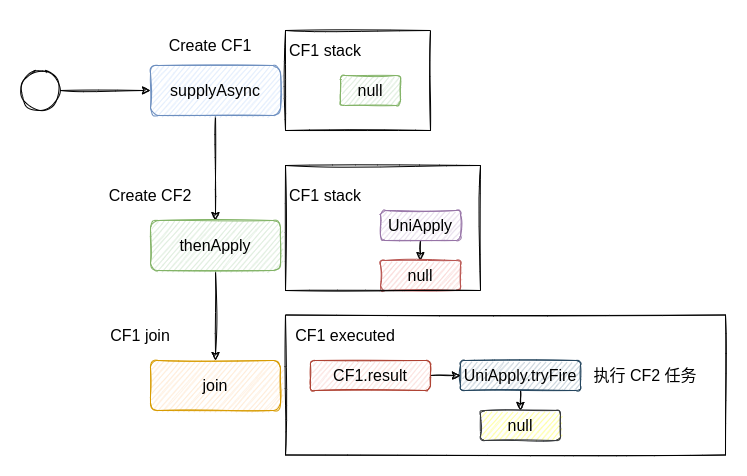
除了在任务执行完后会调用 postComplete 来处理编排任务,显示地调用 join 和 get 方法也会在得到返回结果时调用 postComplete 来处理后续的编排任务
一元依赖的执行过程简要如下图所示:
二元依赖
对于如下的依赖任务,一般是通过 thenCombine 来编排另一个 CF
在这个过程中,需要考虑的一个问题是对于后置依赖 CF3 的触发动作会不会多次触发?实际上,在 Completion 继承的 ForkJoinTask 中存在一个 status 字段,当尝试执行此 Completion 前会检查这个状态是否已经被触发过,如果已经触发过则不会再触发
thenCombine 的实现如下:
public <U,V> CompletableFuture<V> thenCombine(
    CompletionStage<? extends U> other,
    BiFunction<? super T,? super U,? extends V> fn) {
    return biApplyStage(null, other, fn);
}

private <U,V> CompletableFuture<V> biApplyStage(
    Executor e, CompletionStage<U> o,
    BiFunction<? super T,? super U,? extends V> f) {
    CompletableFuture<U> b; Object r, s;
    if (f == null || (b = o.toCompletableFuture()) == null)
        throw new NullPointerException();
    CompletableFuture<V> d = newIncompleteFuture();
    /*
    	如果此时的 CF1 和 CF2 没有执行完成,那么需要将后置任务都挂载到
    	CF1 和 CF2 的 stack 上
    */
    if ((r = result) == null || (s = b.result) == null)
        bipush(b, new BiApply<T,U,V>(e, d, this, b, f));
    else if (e == null)
        d.biApply(r, s, f, null);
    else
        try {
            // 使用自定义的线程池执行这两个合并任务
            e.execute(new BiApply<T,U,V>(null, d, this, b, f));
        } catch (Throwable ex) {
            d.result = encodeThrowable(ex);
        }
    return d;
}
假设此时这两个 CF 都没有执行完相关的任务,那么会将后置的任务挂载的这两个 CF 中,对应的源码如下:
/*
	b 在这里代表的是 CF2,
	c 表示的是带有 b 的后置任务
*/
final void bipush(CompletableFuture<?> b, BiCompletion<?,?,?> c) {
    if (c != null) {
        while (result == null) {
            /*
            	尝试挂载到 CF1 的 stack 上
            */
            if (tryPushStack(c)) {
                if (b.result == null)
                    /*
                    	已经挂载到 CF1 的 stack,由于 CF2 此时也没有完成,因此也需要挂载到 CF2
                        这是为了尽可能地减少后置任务的唤醒时间
                    */
                    b.unipush(new CoCompletion(c));
                else if (result != null)
                    /*
                    	此时,两个 CF 都已经执行完成,因此直接唤醒后置任务即可
                    */
                    c.tryFire(SYNC);
                return;
            }
        }
        /*
        	走到这说明 CF1 已经执行完成,但不确定 CF2 是否已经执行完成
        	因此只需挂载到 CF2,让 CF2 触发后置任务即可
        */
        b.unipush(c);
    }
}
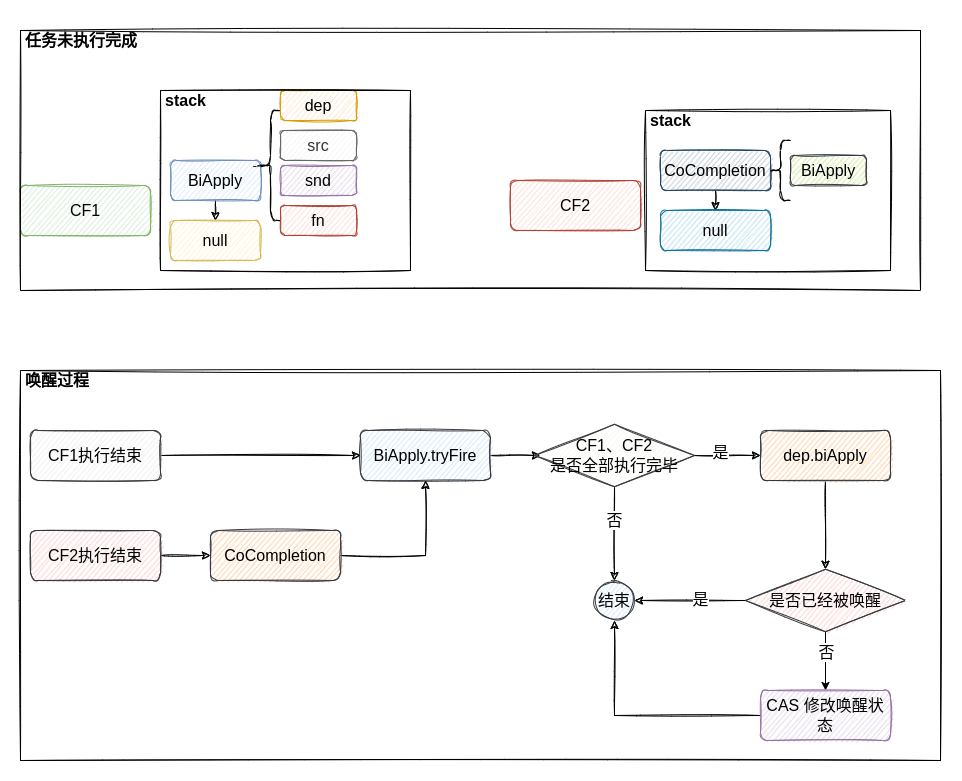
比较关心的是 BiApply,它定义了后置触发任务的相关动作:
@SuppressWarnings("serial")
static final class BiApply<T,U,V> extends BiCompletion<T,U,V> {
    BiFunction<? super T,? super U,? extends V> fn;

    /*
    	dep:thenCombine 返回的 CF
    	src:CF1
    	snd:CF2
    	fn:后置任务
    */
    BiApply(Executor executor, CompletableFuture<V> dep,
            CompletableFuture<T> src, CompletableFuture<U> snd,
            BiFunction<? super T,? super U,? extends V> fn) {
        super(executor, dep, src, snd); this.fn = fn;
    }

    final CompletableFuture<V> tryFire(int mode) {
        CompletableFuture<V> d;
        CompletableFuture<T> a;
        CompletableFuture<U> b;
        Object r, s; BiFunction<? super T,? super U,? extends V> f;
        if ((d = dep) == null || (f = fn) == null
            || (a = src) == null || (r = a.result) == null
            || (b = snd) == null || (s = b.result) == null
            || !d.biApply(r, s, f, mode > 0 ? null : this))
            return null;
        dep = null; src = null; snd = null; fn = null;
        return d.postFire(a, b, mode);
    }
}
当 CF1 和 CF2 都执行完成后,会执行 biApply 方法,对应的实现如下:
final <R,S> boolean biApply(Object r, Object s,
                            BiFunction<? super R,? super S,? extends T> f,
                            BiApply<R,S,T> c) {
    Throwable x;
    tryComplete: if (result == null) { // 注意:这里的 result 是返回的 CF 的 result
        if (r instanceof AltResult) {
            if ((x = ((AltResult)r).ex) != null) {
                completeThrowable(x, r);
                break tryComplete;
            }
            r = null;
        }
        if (s instanceof AltResult) {
            if ((x = ((AltResult)s).ex) != null) {
                completeThrowable(x, s);
                break tryComplete;
            }
            s = null;
        }
        try {
            /*
            	这里会对唤醒状态进行一次检查,防止被重复唤醒
            */
            if (c != null && !c.claim())
                return false;

            /*
            	将两个 CF 的执行结果作为参数,唤醒后置任务
            */
            @SuppressWarnings("unchecked") R rr = (R) r;
            @SuppressWarnings("unchecked") S ss = (S) s;
            completeValue(f.apply(rr, ss));
        } catch (Throwable ex) {
            completeThrowable(ex);
        }
    }
    return true;
}
claim 方法的定义如下:
final boolean claim() {
    Executor e = executor;
    /*
    	CAS 修改当前任务的状态,最终只有一个 CF 的唤醒会成功
    	因此避免了重复唤醒
    */
    if (compareAndSetForkJoinTaskTag((short)0, (short)1)) {
        if (e == null)
            return true;
        executor = null; // disable
        e.execute(this);
    }
    return false;
}
对应的执行流程如下:
多元依赖
多元依赖的实现主要是通过 allOf 和 anyOf 方法来实现的,以较为复杂的 allOf 为例,在处理的过程中会将 CF 编排成一个平衡二叉树的数据结构,不断通过子节点唤醒父节点的形式完成回调的处理
假设现在存在如下的多元依赖 CF:
CompletableFuture<Object> cf3 = cf1.thenApply(CompletableFutureTest::task3);
CompletableFuture<Object> cf4 = cf1.thenCombine(cf2, CompletableFutureTest::task4);
CompletableFuture<Object> cf5 = cf2.thenApply(CompletableFutureTest::task5);
CompletableFuture<String> cf6 = CompletableFuture.allOf(cf3, cf4, cf5).thenApply(v -> {
    CompletableFutureTest.task6(cf3.join(), cf4.join(), cf5.join());
    return "result";
});
那么使用 allOf 在处理过程中对 cf6 的编排结构如下:

以 allOf 为例,对应的实现源码如下:
static CompletableFuture<Void> andTree(CompletableFuture<?>[] cfs,
                                       int lo, int hi) {
    CompletableFuture<Void> d = new CompletableFuture<Void>();
    if (lo > hi) // empty
        d.result = NIL;
    else {
        CompletableFuture<?> a, b; Object r, s, z; Throwable x;
        int mid = (lo + hi) >>> 1;
        /*
        	将这些 CF 够造成二叉树的编排形式
        */
        if ((a = (lo == mid ? cfs[lo] :
                  andTree(cfs, lo, mid))) == null ||
            (b = (lo == hi ? a : (hi == mid+1) ? cfs[hi] :
                  andTree(cfs, mid+1, hi))) == null)
            throw new NullPointerException();
        if ((r = a.result) == null || (s = b.result) == null)
            a.bipush(b, new BiRelay<>(d, a, b));
        else if ((r instanceof AltResult
                  && (x = ((AltResult)(z = r)).ex) != null) ||
                 (s instanceof AltResult
                  && (x = ((AltResult)(z = s)).ex) != null))
            d.result = encodeThrowable(x, z);
        else
            d.result = NIL;
    }
    return d;
}
BiRelay 的实现如下:
@SuppressWarnings("serial")
static final class BiRelay<T,U> extends BiCompletion<T,U,Void> { // for And
    BiRelay(CompletableFuture<Void> dep,
            CompletableFuture<T> src, CompletableFuture<U> snd) {
        super(null, dep, src, snd);
    }
    final CompletableFuture<Void> tryFire(int mode) {
        CompletableFuture<Void> d;
        CompletableFuture<T> a;
        CompletableFuture<U> b;
        Object r, s, z; Throwable x;
        /*
        	依赖的前置 CF 都完成的情况下,才触发当前 CF 节点的后置回调处理
        */
        if ((d = dep) == null
            || (a = src) == null || (r = a.result) == null
            || (b = snd) == null || (s = b.result) == null)
            return null;
        if (d.result == null) {
            if ((r instanceof AltResult
                 && (x = ((AltResult)(z = r)).ex) != null) ||
                (s instanceof AltResult
                 && (x = ((AltResult)(z = s)).ex) != null))
                d.completeThrowable(x, z);
            else
                d.completeNull();
        }
        src = null; snd = null; dep = null;
        return d.postFire(a, b, mode);
    }
}
参考:
[1] https://tech.meituan.com/2022/05/12/principles-and-practices-of-completablefuture.html

 浙公网安备 33010602011771号