cygwin配置个人环境,android模拟器root映象和Babun
零、Windows命令行个人设置
@echo off

:: Temporary system path at cmd startup
::set PATH=%PATH%;"C:\Program Files\Sublime Text 2\"

:: Add to path by command

DOSKEY as=adb shell $*
::adb -d : directs command to the only connected USB device. returns an error if more than one USB device is present.
DOSKEY ads=adb -d shell $*
::adb -e : directs command to the only running emulator. returns an error if more than one emulator is running.
DOSKEY aes=adb -e shell $*
::-s <specific device> - directs command to the device or emulator with the given serial
::                       number or qualifier. Overrides ANDROID_SERIAL environment variable.
:: DOSKEY ass=shift && adb -s %0 shell $*

:: Commands

DOSKEY ls=dir /B
::DOSKEY sublime=sublime_text $*
    ::sublime_text.exe is name of the executable. By adding a temporary entry to system path, we don't have to write the whole directory anymore.
::DOSKEY gsp="C:\Program Files (x86)\Sketchpad5\GSP505en.exe"
::DOSKEY alias=notepad %USERPROFILE%\Dropbox\alias.cmd

:: Common directories

::DOSKEY dropbox=cd "%USERPROFILE%\Dropbox\$*"
::DOSKEY research=cd %USERPROFILE%\Dropbox\Research\

:: 某些时候经常使用的命令打印出来以便配合鼠标复制
DOSKEY ps=@echo sqlite3 /data/data/xx_package_name/databases/xx.db

call cmd.exe
:: Check whether the NDK_ROOT environment variable existes.
if not exist "%NDK_ROOT%" ( echo NDK_ROOT is not set
 set NDK_ROOT=F:\Android\android-ndk-r10
 )

echo NDK_ROOT=%NDK_ROOT%

:: call another a bat program from a bat program, but the parent one don't exit.
:: CALL %NDK_ROOT%\ndk-build.cmd %*

DOSKEY ndkb=%NDK_ROOT%\ndk-build.cmd $*

setlocal enabledelayedexpansion
:: Get a file name only as DOSKEY for arm-linux-androideabi-*.exe in the target directory
for %%c in (%NDK_ROOT%\toolchains\arm-linux-androideabi-4.8\prebuilt\windows\bin\arm-linux-androideabi-*.exe) do (
 set "file_name_only=%%~nc"
 set "file_alias=!file_name_only:~22!"
 echo map a DOSKEY for a!file_alias! ^<--^> !file_name_only!
 DOSKEY a!file_alias!="%%c" $*
)
:: Check whether the NDK_ROOT environment variable existes.
if not exist "%NDK_ROOT%" ( echo NDK_ROOT is not set
set NDK_ROOT=F:\Android\android-ndk-r10
)
echo NDK_ROOT=%NDK_ROOT%
:: call another a bat program from a bat program, but the parent one don't exit.
:: CALL %NDK_ROOT%\ndk-build.cmd %*
DOSKEY ndkb=%NDK_ROOT%\ndk-build.cmd $*
setlocal enabledelayedexpansion //循环里使用变量必须的设置,否则不能感知变量赋值
:: Get a file name only as DOSKEY for arm-linux-androideabi-*.exe in the target directory
for %%c in (%NDK_ROOT%\toolchains\arm-linux-androideabi-4.8\prebuilt\windows\bin\arm-linux-androideabi-*.exe) do (
set "file_name_only=%%~nc" //从循环变量c里获取文件的名字(不包括后缀.exe)
set "file_alias=!file_name_only:~22!" //截取字符串,从22位开始到结束,延迟变量使用!var!表示
echo map a DOSKEY for a!file_alias! ^<--^> !file_name_only! //<>等需要转义,转义字符为^
DOSKEY a!file_alias!="%%c" $* //等同于linux shell的别名
)
在当前目录生成一个文件夹arm-linux-androideabi_bin_cmd存放cmd批处理,这个批处理相当于目标exe的快捷方式,使用%NDK_ROOT%环境变量。
@echo off

:: setx NDK_ROOT F:\Android\android-ndk-r10
if not exist "%NDK_ROOT%" (
echo The Envirenment variable NDK_ROOT isn't be set.
echo Press any key to exit please.
pause>nul & exit
)

:generate_mapped_cmd_files

mkdir arm-linux-androideabi_bin_cmd

setlocal enabledelayedexpansion

set armEAbiBinSubPath=toolchains\arm-linux-androideabi-4.8\prebuilt\windows\bin
set outputPath=arm-linux-androideabi_bin_cmd
:: Get a file name only as DOSKEY for arm-linux-androideabi-*.exe in the target directory
for %%c in (%NDK_ROOT%\%armEAbiBinSubPath%\arm-linux-androideabi-*.exe) do (
 set "file_name_only=%%~nc"
 set "file_alias=!file_name_only:~22!"
 echo @echo off>%outputPath%/!file_alias!.cmd
 echo CALL %%NDK_ROOT%%\%armEAbiBinSubPath%\%%~nxc %%*>>%outputPath%/!file_alias!.cmd
)
echo OK, see the directory %outputPath%
pause>nul
arun.cmd: adb push xxfile && && adb chmod 6755 xxfile && adb shell ls xxfile && adb shell xxfile
@SET dstPath=/data/local/tmp
@SET dstFilePath=%dstPath%/%~n1

@adb push %1 %dstFilePath%
::@echo [OK]push %1 %dstFilePath%

:: @echo chmod 6755 %dstFilePath% ^^^&^^^& ls -l %dstFilePath% ^^^&^^^& %dstFilePath% ^^^&^^^& exit | CALL adb shell

:::: should be call in a console, or auto-exit when dragging a file into this bat file.
:: @CALL adb shell "chmod 6755 %dstFilePath% && ls -l %dstFilePath% && %dstFilePath%"
:: @adb shell "chmod 6755 %dstFilePath% && ls -l %dstFilePath% && %dstFilePath%"

@goto end

:echo_dont_wrap_example
:: ECHO don't wrap
@echo off
set /p="hello "<nul
set /p="world "<nul
echo again
echo new line
:: Result:
::  hello world again
::  new line

:end
一、cygwin配置个人环境
这里不算adb root来让设备上的adbd进程以root身份运行(为什么要asu是因为cygwin记不住进入adb shell历史命令)
#为什么使用每次adb shell su -c "< your command >",借助终端的记忆来记住常用命令,而且设备shell暂未发现记住历史和补全功能,所以以后asu命令就代表在设备上以root身份执行后续命令。

alias assu='function adbshellsu() { /cygdrive/f/Android/sdk/platform-tools/adb.exe shell su -c "$*"; unset -f adbshellsu; }; adbshellsu'
使用安装cygwin的setup.ex,如,32位下的安装wget:/setup-x86.exe -q --packages=wget
# base-files version 4.1-1

# /etc/profile: executed by the command interpreter for login shells.
http://stackoverflow.com/questions/18547881/shell-script-to-set-environment-variables,在已存在shell控制台中执行脚本设置变量的方法:
如某setenv.sh内容是export PATH="/home/my/bin/:$PATH"为了执行后时PATH变量到当前已存在shell生效,要通过source ./setenv.sh 或 . ./setenv.sh 来执行
your home directory (~)
- .profile
- .vimrc
alias adb=/cygdrive/f/Android/sdk/platform-tools/adb.exe
alias agcc=/cygdrive/f/Android/android-ndk-r10/toolchains/arm-linux-androideabi-4.6/prebuilt/windows/bin/arm-linux-androideabi-gcc.exe
alias a="/cygdrive/f/Android/sdk/platform-tools/adb.exe shell"
alias al='function adbshelllsl() { /cygdrive/f/Android/sdk/platform-tools/adb.exe shell su -c "ls -l $*"; unset -f adbshelllsl; }; adbshelllsl'
alias asu='function adbshellsu() { /cygdrive/f/Android/sdk/platform-tools/adb.exe shell su -c "$*"; unset -f adbshellsu; }; adbshellsu'

alias emulator=/cygdrive/f/Android/sdk/tools/emulator.exe
alias agdb=/cygdrive/f/Android/android-ndk-r10/toolchains/arm-linux-androideabi-4.6/prebuilt/windows/bin/arm-linux-androideabi-gdb.exe

alias dx='/cygdrive/f/Android/sdk/build-tools/build-tools-21.1.2/dx.bat'
alias aapt='/cygdrive/f/Android/sdk/build-tools/build-tools-21.1.2/aapt.exe'
alias agdb='/cygdrive/d/Developer/ndk/android-ndk-r9d/toolchains/arm-linux-androideabi-4.6/prebuilt/windows-x86_64/bin/arm-linux-androideabi-gdb.exe'
- .profile
# base-files version 4.1-1

# ~/.profile: executed by the command interpreter for login shells.

#The copy in your home directory (~/.profile) is yours, please feel
# free to customise it to create a shell  environment to your liking.

# User dependent .profile file

# This file is not read by bash(1) if ~/.bash_profile or ~/.bash_login exists.
# base-files version 4.1-1

# ~/.bashrc: executed by bash(1) for interactive shells.
二、VIM编辑器设置及其编码设置
1、让ubuntu支持GBK编码
Ubuntu默认对中文只支持UTF-8编码,可以通过一些修改让Ubuntu支持GBK编码。
首先用gedit /var/lib/locales/supported.d/local来修改 /var/lib/locales/supported.d/local文件,在文件中添加如下内容:
zh_CN.UTF- 8 UTF- 8
en_US.UTF- 8 UTF- 8
zh_CN.GBK GBK
zh_CN.GB2312 GB2312
接着用sudo dpkg-reconfigure --force locales强制更新设置
2、设置Vimrc支持GBK
set fileencodings=utf-8,gbk,gb2312
- .vimrc
set nocompatible
filetype on
filetype indent on

"colorscheme ron        " elflord ron peachpuff default 设置配色方案,vim自带的配色方案保存在/usr/share/vim/vim72/colors目录下

syntax on
set backspace=2
set showmatch
set matchtime=5

"set backspace=2    " 设置退格键可用

set autoindent        " 设置自动对齐(缩进):即每行的缩进值与上一行相等;使用 noautoindent 取消设置
"set smartindent        " 智能对齐方式

"support c/c++ shift"
set cin

set tabstop=4        " 设置制表符(tab键)的宽度
set softtabstop=4     " 设置软制表符的宽度
set shiftwidth=4    " (自动) 缩进使用的4个空格
set cindent            " 使用 C/C++ 语言的自动缩进方式
set cinoptions={0,1s,t0,n-2,p2s,(03s,=.5s,>1s,=1s,:1s     "设置C/C++语言的具体缩进方式

set mouse=a            " Enable mouse usage (all modes)    "使用鼠标
set number            " Enable line number    "显示行号

set noexpandtab
colorscheme desert

set fileencodings=utf-8,ucs-bom,gb18030,gbk,gb2312,cp936 "Vim在打开文件时会根据fileencodings选项来识别文件编码,fileencodings可以同时设置多个编码,Vim会根据设置的顺序来猜测所打开文件的编码。
set termencoding=gbk "该选项代表输出到客户终端(Term)采用的编码类型,因为我在cygwin的options菜单里设置了text的Locale=C,Character set = gbk。
set encoding=utf-8
set fileencoding=utf-8
"set fileencodings=utf-8,gbk,utf-16,big5

"if has("win32")
"  set fileencoding=chinese
"else
"  set fileencoding=utf-8
"endif

set langmenu=zh_CN.UTF-8
language messages zh_CN.UTF-8

"解决菜单乱码
source $VIMRUNTIME/delmenu.vim
source $VIMRUNTIME/menu.vim
"set font
set guifont=Nsimsun

"--命令行设置--
set showcmd            " 命令行显示输入的命令
set showmode        " 命令行显示vim当前模式

这里是从:原始文件==>远程机器读取-(传送)==> 客户机终端显示(带编码,默认是客户机locale,可以在终端设置,如cygwin的options-text)
原文貌似这里:http://blog.163.com/little_320/blog/static/38789520091116103325859/
摘自:http://blog.chinaunix.net/uid-21843387-id-106001.html
此文讲解的是vim编辑多字节编码文档(中文)所要了解的一些基础知识,注意其没有涉及gvim,纯指字符终端下的vim。
vim编码方面的基础知识:
1. 存在3个变量:
encoding—-该选项使用于缓冲的文本(你正在编辑的文件),寄存器,Vim 脚本文件等等。你可以把 'encoding' 选项当作是对 Vim 内部运行机制的设定。
fileencoding—-该选项是vim写入文件时采用的编码类型。
termencoding—-该选项代表输出到客户终端(Term)采用的编码类型。
2. 此3个变量的默认值:
encoding—与系统当前locale相同,所以编辑文件的时候要考虑当前locale,否则要设置的东西就比较多了。
fileencoding—vim打开文件时自动辨认其编码,fileencoding就为辨认的值。如果fileencoding为空则保存文件时采用encoding的编码,如果没有修改encoding,那值就是系统当前locale了。
termencoding—默认空值,也就是输出到终端时不进行编码转换。
由此可见,编辑不同编码文件需要注意的地方不仅仅是这3个变量,还有系统当前locale和文件本身编码以及自动编码识别、客户运行vim的终端所使用的编码类型3个关键点,这3个关键点影响着3个变量的设定。
如果有人问:为什么我用vim打开中文文档的时候出现乱码?
答案是不确定的,原因上面已经讲了,不搞清楚这3个关键点和这3个变量的设定值,出现乱码是正常的,若不出现乱码那反倒是凑巧的。
再来看一下常见情况下这三个关键点的值以及在这种情况下这3个变量的值:
1. locale—目前大部分Linux系统已经将utf-8作为默认locale了,不过也有可能不是,例如有些系统使用中文locale zh_CN.GB18030。在locale为utf-8的情况下,启动vim后encoding将会设置为utf-8,这是兼容性最好的方式,因为内部处理使用utf-8的话,无论外部存储编码为何都可以进行无缺损转换。locale决定了vim内部处理数据的编码,也就是encoding。
2. 文件的编码以及自动编码识别—这方面牵扯到各种编码的规则,就不一一细讲了。但需要明白的是,文件编码类型并不是保存在文件内的,也就是说没有任何描述性的字段来记录文档是何种编码类型的。因此我们在编辑文档的时候,要么必须知道文档保存时是以什么编码保存的,要么通过另外的一些手段来断定编码类型,这另外的手段,就是通过某些编码的码表特征来断定,例如每个字符占用的字节数,每个字符的ascii值是否都大于某个字段来断定这个文件属于何种编码,这种方式vim也使用了,这就是vim的自动编码识别机制了,但这种机制由于编码各式各样,不可能每种编码都有显著的特征来辨别,所以是不可能 100%准确的。对于GB2312编码,由于中文是使用了2个ASCII值高于127的字符组成汉字字符的,因此不可能把gb2312编码的文件与 latin1编码区分开来,因此自动识别编码的机制对于gb2312是失败的,它只会将文件辨识为latin1编码。此问题同样出现在gbk,big5上等,因此我们在编辑此类文档时,需要手工设定encoding和fileencoding。如果文档编码为utf-8时,一般vim都能自动识别正确的编码。
3. 客户运行vim的终端所使用的编码类型(同第二条一样,这也是一个比较难以断定的关键点)。第二个关键点决定着从文件读取内容和写入内容到文件时使用的编码,而此关键点则决定vim输出内容到终端时使用的编码,如果此编码类型和终端认为它收到的数据的编码类型不同,则又会产生乱码问题。在 linux本地X环境下,一般终端都认为其接收的数据的编码类型和系统locale类型相符,因此不需关心此方面是否存在问题。但如果牵涉到远程终端,例如ssh登录服务器,则问题就有可能出现了。例如从1台locale为GB2310的终端(称作客户机)ssh到locale为utf-8的系统(称作服务器)并开启vim编辑文档,在不加任何改动的情况下,服务器返回的数据为utf-8的,但客户机认为服务器返回的数据是gb2312的,按照 gb2312来解释数据,则肯定就是乱码了,这时就需要设置termencoding为gb2312来解决这个问题,此问题更多出现在我们的 windows desktop机远程ssh登录服务器的情况下,这里牵扯到不同系统的编码转换问题,所以又与windows本身以及ssh客户端有很大相关性。在 windows下存在两种编码类型的软件,一种是本身就为unicode编码方式编写的软件,另一种是ANSI软件,也就是程序处理数据直接采用字节流,不关心编码。前一种程序可以在任何语言的windows上正确显示多国语言,而后一种则编写在何种语言的系统上则只能在何种语言的系统上显示正确的文字,对于这两种类型的程序,我们需要区别对待。以ssh客户端为例,我们使用的putty是unicode软件,而secure CRT则是ANSI软件。对于前者,我们要正确处理中文,只要保证vim输出到终端的编码为utf-8即可,就是termencoding=utf-8。但对于后者,一方面我们要确认我们的windows系统默认代码页为cp936(中文windows默认值),另一方面要确认vim设置的termencoding= cp936。
最后来看看处理中文文档最典型的几种情况和设置方式:
1. 系统locale是utf-8(很多linux系统默认的locale形式),编辑的文档是GB2312或GBK形式的(Windows记事本默认保存形式,大部分编辑器也默认保存为这个形式,所以最常见),终端类型utf-8(也就是假定客户端是putty类的unicode软件)
则vim打开文档后,encoding=utf-8(locale决定的),fileencoding=latin1(自动编码判断机制不准导致的),termencoding=空(默认无需转换term编码),显示文件为乱码。
解决方案1:
首先要修正fileencoding为cp936或者euc-cn(二者一样的,只不过叫法不同),注意修正的方法不是:set fileencoding=cp936,这只是将文件保存为cp936,正确的方法是重新以cp936的编码方式加载文件为:edit ++enc=cp936 (可以简写为: e ++enc=cp936)。
解决方案2:
临时改变vim运行的locale环境,方法是以LANG=zh_CN vim abc.txt的方式来启动vim,则此时encoding=euc-cn(locale决定的),fileencoding=空(此locale下文件 编码自动判别功能不启用,所以fileencoding为文件本身编码方式不变,也就是euc-cn),termencoding=空(默认值,为空则等 于encoding)此时还是乱码的,因为我们的ssh终端认为接受的数据为utf-8,但vim发送数据为euc-cn,所以还是不对。此时再用命令: set termencoding=utf-8将终端数据输出为utf-8,则显示正常。
2. 情况与1基本相同,只是使用的ssh软件为secure CRT类ansi类软件。
vim打开文档后,encoding=utf-8(locale决定的),fileencoding=latin1(自动编码判断机制不准导致的),termencoding=空(默认无需转换term编码),显示文件为乱码。
解决方案1:
首先要保证运行secure CRT的windows机器的默认代码页为CP936,这一点中文windows已经是默认设置了。其他的与上面方案1相同,只是要增加一步,:set termencoding=cp936
解决方案2:
与上面方案2类似,不过最后一步修改termencoding省略即可,在此情况下需要的修改最少,只要以 locale为zh_CN开 启vim,则encoding=euc-cn,fileencoding和termencoding都为空即为encoding的值,是最理想的一种情 况。
可见理解这3个关键点和3个参数的意义,对于编码问题有很大助力,以后就可以随心所欲的处理文档了,同时不仅仅是应用于vim,在其他需要编码转换的环境里,都可以应用类似的思路来处理问题解决问题。
三、更好的Cygwin
四、ROOT模拟器
cygwin

- emulator -avd AVD_for_Galaxy_Nexus_by_Google -qemu -nand system,size=0x1f400000,file=D:/Developer/sdk/system-images/android-17/default/armeabi-v7a/system_rooted.img
其中,-avd <name> ;0x1f400000是指给/system分区500MB的空间。
- 系统启动后 adb shell mount | grep system
/dev/block/mtdblock0 /system yaffs2 ro 0 0
mount -o rw,remount -t yaffs2 /dev/block/mtdblock3 /system
mount -o remount /dev/block/mtdblock3 /system
/dev/block/mtdblock0 /system yaffs2 rw 0 0
- 修改前
$ adb shell ls -l /system/xbin/su
-rwsr-sr-x root root 67080 2013-02-13 15:24 su
- 下载Chainfire的SuperSU的UPDATE zip包,并解压缩
$ adb push d:/Developer/sdk/su /system/xbin/
247 KB/s (75364 bytes in 0.297s)
user@pc ~
$ adb shell ls -l /system/xbin/su
-rw-rw-rw- root root 75364 2008-02-29 03:33 su
$ adb shell ls -ld /system/
drwxr-xr-x root root 2013-02-13 15:24
$ adb shell chmod 06755 /system
$ adb shell chmod 06755 /system/xbin/su
$ adb install d:/Developer/sdk/Superuser.apk
- 在模拟器里,进入SuperSu,会提示更新二进制文件,选择常规方法即可。
- 以后通过这个启动
emulator -avd AVD_for_Galaxy_Nexus_by_Google -qemu -nand system,size=0x1f400000,file=D:/Developer/sdk/system-images/android-17/default/armeabi-v7a/system_rooted.img
修改配置文件从AVD Manager.exe启动还是恢复成system.img。
.android\avd\
AVD_for_Galaxy_Nexus_by_Google.ini
avd.ini.encoding=UTF-8
path=C:\Users\Sansan\.android\avd\AVD_for_Galaxy_Nexus_by_Google.avd
path.rel=avd\AVD_for_Galaxy_Nexus_by_Google.avd
target=android-17
.android\avd\AVD_for_Galaxy_Nexus_by_Google.avd
- hardware-qemu.ini文件
disk.systemPartition.initPath = D:\Developer\sdk/system-images\android-17\default\armeabi-v7a\/system.img
- config.ini文件
image.sysdir.1=system-images\android-17\default\armeabi-v7a\
而把产生的某些image文件: .android\avd\AVD_for_Galaxy_Nexus_by_Google.avd\下的userdata-qemu.img, userdata.img, cache.img删除掉类似恢复出厂。
五、Android SDK 配置
增强 find_java.bat的容错性(F:\Android\sdk\tools\lib\find_java.bat)
@echo off
rem Copyright (C) 2007 The Android Open Source Project
rem
rem Licensed under the Apache License, Version 2.0 (the "License");
rem you may not use this file except in compliance with the License.
rem You may obtain a copy of the License at
rem
rem      http://www.apache.org/licenses/LICENSE-2.0
rem
rem Unless required by applicable law or agreed to in writing, software
rem distributed under the License is distributed on an "AS IS" BASIS,
rem WITHOUT WARRANTIES OR CONDITIONS OF ANY KIND, either express or implied.
rem See the License for the specific language governing permissions and
rem limitations under the License.

rem This script is called by the other batch files to find a suitable Java.exe
rem to use. The script changes the "java_exe" env variable. The variable
rem is left unset if Java.exe was not found.

rem Useful links:
rem Command-line reference:
rem   http://technet.microsoft.com/en-us/library/bb490890.aspx

rem Query whether this system is 32-bit or 64-bit
rem See also: http://stackoverflow.com/a/24590583/1299302
reg Query "HKLM\Hardware\Description\System\CentralProcessor\0" | findstr /i "x86" > NUL && set "arch_ext=32" || set "arch_ext=64"

::DEBUG PRINT arch_ext
::echo %%arch_ext%% = "%arch_ext%"


rem Check we have a valid Java.exe in the path. The return code will
rem be 0 if the command worked or 1 if the exec failed (program not found).
for /f "delims=" %%a in ('"%~dps0\find_java%arch_ext%.exe" -s') do set java_exe=%%a
if not defined java_exe goto :CheckFailed

:SearchJavaW
rem Check if we can find a javaw.exe at the same location than java.exe.
rem If that doesn't work, just fall back on the java.exe we just found.
for /f "delims=" %%a in ('"%~dps0\find_java%arch_ext%.exe" -s -w') do set javaw_exe=%%a
if not exist "%javaw_exe%" set javaw_exe=%java_exe%

::DEBUG PRINT java_exe javaw_exe
::echo %%java_exe%% = "%java_exe%" %%javaw_exe%% = "%javaw_exe%"

goto :EOF


:CheckFailed
echo.
echo ERROR: No suitable Java found. In order to properly use the Android Developer
echo Tools, you need a suitable version of Java JDK installed on your system.
echo We recommend that you install the JDK version of JavaSE, available here:
echo   http://www.oracle.com/technetwork/java/javase/downloads
echo.
echo If you already have Java installed, you can define the JAVA_HOME environment
echo variable in Control Panel / System / Avanced System Settings to point to the
echo JDK folder.
echo.
echo You can find the complete Android SDK requirements here:
echo   http://developer.android.com/sdk/requirements.html
echo.
goto :EOF
--
六、模拟器网络
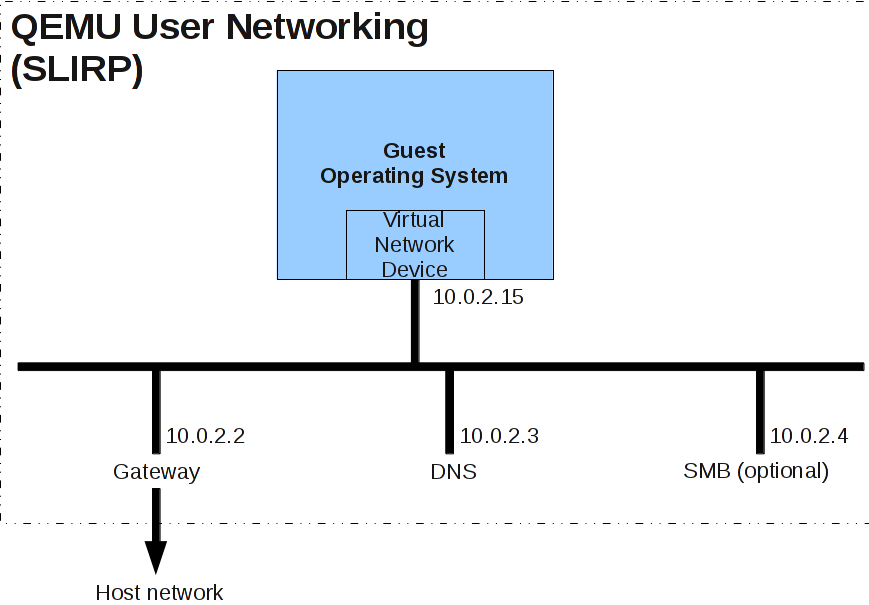
The emulator provides versatile networking capabilities that you can use to set up complex modeling and testing environments for your application. The sections below introduce the emulator's network architecture and capabilities.
Network Address Space
Each instance of the emulator runs behind a virtual router/firewall service that isolates it from your development machine's network interfaces and settings and from the internet. An emulated device can not see your development machine or other emulator instances on the network. Instead, it sees only that it is connected through Ethernet to a router/firewall.
The virtual router for each instance manages the 10.0.2/24 network address space — all addresses managed by the router are in the form of 10.0.2.<xx>, where <xx> is a number. Addresses within this space are pre-allocated by the emulator/router as follows:
Network Address Description 10.0.2.1 Router/gateway address 10.0.2.2 Special alias to your host loopback interface (i.e., 127.0.0.1 on your development machine) 10.0.2.3 First DNS server 10.0.2.4 / 10.0.2.5 / 10.0.2.6 Optional second, third and fourth DNS server (if any) 10.0.2.15 The emulated device's own network/ethernet interface 127.0.0.1 The emulated device's own loopback interface Note that the same address assignments are used by all running emulator instances. That means that if you have two instances running concurrently on your machine, each will have its own router and, behind that, each will have an IP address of 10.0.2.15. The instances are isolated by a router and can not see each other on the same network. For information about how to let emulator instances communicate over TCP/UDP, see Connecting Emulator Instances.
Also note that the address 127.0.0.1 on your development machine corresponds to the emulator's own loopback interface. If you want to access services running on your development machine's loopback interface (a.k.a. 127.0.0.1 on your machine), you should use the special address 10.0.2.2 instead.
Finally, note that each emulated device's pre-allocated addresses are specific to the Android emulator and will probably be very different on real devices (which are also very likely to be NAT-ed, i.e., behind a router/firewall)
Local Networking Limitations
Android applications running in an emulator can connect to the network available on your workstation. However, they connect through the emulator, not directly to hardware, and the emulator acts like a normal application on your workstation. This means that the emulator, and thus your Android applications, are subject to some limitations:
- Communication with the emulated device may be blocked by a firewall program running on your machine.
- Communication with the emulated device may be blocked by another (physical) firewall/router to which your machine is connected.
The emulator's virtual router should be able to handle all outbound TCP and UDP connections/messages on behalf of the emulated device, provided your development machine's network environment allows it to do so. There are no built-in limitations on port numbers or ranges except the one imposed by your host operating system and network.
Depending on the environment, the emulator may not be able to support other protocols (such as ICMP, used for "ping") might not be supported. Currently, the emulator does not support IGMP or multicast.
Using Network Redirection
To communicate with an emulator instance behind its virtual router, you need to set up network redirection on the virtual router. Clients can then connect to a specified guest port on the router, while the router directs traffic to/from that port to the emulated device's host port.
To set up the network redirection, you create a mapping of host and guest ports/addresses on the emulator instance. There are two ways to set up network redirection: using emulator console commands and using the ADB tool, as described below.
Setting up Redirection through the Emulator Console
Each emulator instance provides a control console the you can connect to, to issue commands that are specific to that instance. You can use the
redirconsole command to set up redirection as needed for an emulator instance.First, determine the console port number for the target emulator instance. For example, the console port number for the first emulator instance launched is 5554. Next, connect to the console of the target emulator instance, specifying its console port number, as follows:
telnet localhost 5554Once connected, use the
redircommand to work with redirection. To add a redirection, use:add <protocol>:<host-port>:<guest-port>where
<protocol>is eithertcporudp, and<host-port>and<guest-port>sets the mapping between your own machine and the emulated system, respectively.For example, the following command sets up a redirection that handles all incoming TCP connections to your host (development) machine on 127.0.0.1:5000 and will pass them through to the emulated system's 10.0.2.15:6000.:
redir add tcp:5000:6000To delete a redirection, you can use the
redir delcommand. To list all redirection for a specific instance, you can useredir list. For more information about these and other console commands, see Using the Emulator Console.Note that port numbers are restricted by your local environment. this typically means that you cannot use host port numbers under 1024 without special administrator privileges. Also, you won't be able to set up a redirection for a host port that is already in use by another process on your machine. In that case,
redirgenerates an error message to that effect.Setting Up Redirection through ADB
The Android Debug Bridge (ADB) tool provides port forwarding, an alternate way for you to set up network redirection. For more information, see Forwarding Ports in the ADB documentation.
Note that ADB does not currently offer any way to remove a redirection, except by killing the ADB server.
Configuring the Emulator's DNS Settings
At startup, the emulator reads the list of DNS servers that your system is currently using. It then stores the IP addresses of up to four servers on this list and sets up aliases to them on the emulated addresses 10.0.2.3, 10.0.2.4, 10.0.2.5 and 10.0.2.6 as needed.
On Linux and OS X, the emulator obtains the DNS server addresses by parsing the file
/etc/resolv.conf. On Windows, the emulator obtains the addresses by calling theGetNetworkParams()API. Note that this usually means that the emulator ignores the content of your "hosts" file (/etc/hostson Linux/OS X,%WINDOWS%/system32/HOSTSon Windows).When starting the emulator at the command line, you can also use the
-dns-server <serverList>option to manually specify the addresses of DNS servers to use, where <serverList> is a comma-separated list of server names or IP addresses. You might find this option useful if you encounter DNS resolution problems in the emulated network (for example, an "Unknown Host error" message that appears when using the web browser).Using the Emulator with a Proxy
If your emulator must access the Internet through a proxy server, you can use the
-http-proxy <proxy>option when starting the emulator, to set up the appropriate redirection. In this case, you specify proxy information in<proxy>in one of these formats:http://<machineName>:<port>or
http://<username>:<password>@<machineName>:<port>The
-http-proxyoption forces the emulator to use the specified HTTP/HTTPS proxy for all outgoing TCP connections. Redirection for UDP is not currently supported.Alternatively, you can define the environment variable
http_proxyto the value you want to use for<proxy>. In this case, you do not need to specify a value for<proxy>in the-http-proxycommand — the emulator checks the value of thehttp_proxyenvironment variable at startup and uses its value automatically, if defined.You can use the
-verbose-proxyoption to diagnose proxy connection problems.Interconnecting Emulator Instances
To allow one emulator instance to communicate with another, you must set up the necessary network redirection as illustrated below.
Assume that your environment is
- A is you development machine
- B is your first emulator instance, running on A
- C is your second emulator instance, also running on A
and you want to run a server on B, to which C will connect, here is how you could set it up:
- Set up the server on B, listening to
10.0.2.15:<serverPort>- On B's console, set up a redirection from
A:localhost:<localPort>toB:10.0.2.15:<serverPort>- On C, have the client connect to
10.0.2.2:<localPort>For example, if you wanted to run an HTTP server, you can select
<serverPort>as 80 and<localPort>as 8080:
- B listens on 10.0.2.15:80
- On B's console, issue
redir add tcp:8080:80- C connects to 10.0.2.2:8080
Sending a Voice Call or SMS to Another Emulator Instance
The emulator automatically forwards simulated voice calls and SMS messages from one instance to another. To send a voice call or SMS, use the dialer application or SMS application, respectively, from one of the emulators.
To initiate a simulated voice call to another emulator instance:
- Launch the dialer application on the originating emulator instance.
- As the number to dial, enter the console port number of the instance you'd like to call. You can determine the console port number of the target instance by checking its window title, where the console port number is reported as "Android Emulator (<port>).
- Press "Dial". A new inbound call appears in the target emulator instance.
To send an SMS message to another emulator instance, launch the SMS application (if available). Specify the console port number of the target emulator instance as as the SMS address, enter the message text, and send the message. The message is delivered to the target emulator instance.
You can also connect to an emulator instance's console to simulate an incoming voice call or SMS. For more information, see Telephony Emulation and SMS Emulation.
ping
默认模拟器是不支持ping命令,相关问题Can i use ping command in the android emulator
有人(Mehmet Mersin)回答:
It seems like Qemu user networking mode (default for android emulator) does not support ICMP protocol (ping). So you cannot ping a host in android emulator without changing network settings.
http://wiki.qemu.org/Documentation/Networking#User_Networking_.28SLIRP.29
If you just want to see if you can access a certain host, you can try to connect to a port you know it's open using netcat (nc). For example to check if you can access www.baidu.com, you can try connecting port 80 (HTTP)
nc -v www.baidu.com 80You will see a message like this if connection is successful
Connection to www.baidu.com 80 port [tcp/www] succeeded!If you really want to be able to use ping, you can follow the steps in this blog post. Sorry, instructions are for linux only. But it may give you an idea on how to do it in windows.
http://emulatorforandroid.blogspot.jp/2013/04/enabling-ping-and-icmp-on-android.html
从http://androidxref.com/4.3_r2.1/xref/external/ping/ping.c里可看到ping使用ICMP套接字,而使用ICMP套接字是有条件的。
内核参数是net.ipv4.ping_group_range,是一对整数,指定了允许使用ICMP套接字的组ID的范围。默认值为1 0,意味着没有人能够使用这个特性。
手动修改下:sudo sysctl -w net.ipv4.ping_group_range='0 2147483647'
当然你可以直接去写/proc/sys/net/ipv4/ping_group_range文件。
如果系统不支持这个特性,在创建套接字的时候会得到"Protocol not supported"错误,而如果没有权限,则会得到"Permission denied"错误。
参考 https://sturmflut.github.io/linux/ubuntu/2015/01/17/unprivileged-icmp-sockets-on-linux/
参考 http://lwn.net/Articles/422330/
Socket(2) is restricted to the group range specified in "/proc/sys/net/ipv4/ping_group_range" (or the owner of CAP_NET_RAW). It is "1 0" by default, meaning that nobody except root may create ping sockets. Setting it to "100 100" would gain permissions to the single group, "0 65535" would enable it for the world.
参考 http://stackoverflow.com/questions/8290046/icmp-sockets-linux
在Android上,搜索到代码http://androidxref.com/4.3_r2.1/xref/system/core/rootdir/init.rc#95显示write /proc/sys/net/ipv4/ping_group_range "0 2147483647"
查看命令:
cat /proc/sys/net/ipv4/ping_group_range
sysctl net.ipv4.ping_group_range
The default value on the android emulator maybe "1 0" or not exist. To Add,
解决命令,也许需要权限:
echo 0 2147483647 > /proc/sys/net/ipv4/ping_group_range
sysctl -w net.ipv4.ping_group_range='0 2147483647'
User Mode Linux连接网络有三种方式,分别是slirp, tuntap和uml_switch.
slirp方式最简单, 只要安装slirp软件,在启动时指定eth0=slirp,并将UML的ip设置为10.0.2.15即可, 但是这个方法只支持TCP和UDP,不支持ICMP,因此ping不能主机.
tuntap方式稍微复杂一些, 启动时指定eth0=tuntap,,,192.168.1.201, 这样会在主机上安装一个IP为192.168.1.201的tap设备,UML中设置同一网段的IP即可.
uml_switch的方法最为强大, uml_switch命令会创建一个虚拟交换机,并在主机上安装一个tap设备, 如uml_switch –tap tap1 –unix /tmp/switch1, 将会生成tap1设备和虚拟交换机/tmp/switch1, UML只要指定eth0=daemon,,unix,/tmp/switch1即可连上指定的交换机.
。。。。

 浙公网安备 33010602011771号