Kafka、Logstash、Nginx日志收集入门
目录
五、错误记录
Nginx作为网站的第一入口,其日志记录了除用户相关的信息之外,还记录了整个网站系统的性能,对其进行性能排查是优化网站性能的一大关键。
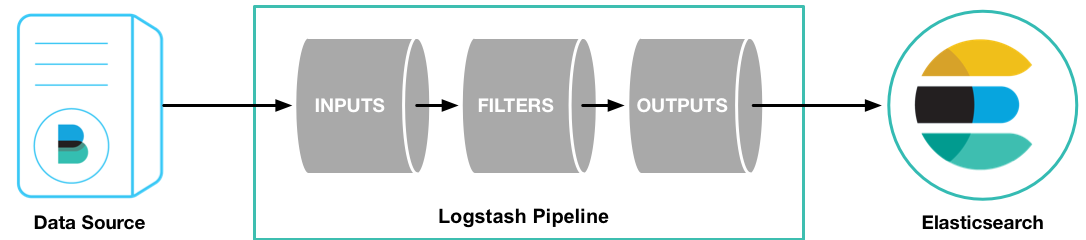
Logstash是一个接收,处理,转发日志的工具。支持系统日志,webserver日志,错误日志,应用日志,总之包括所有可以抛出来的日志类型。一般情景下,Logstash用来和ElasticSearch和Kibana搭配使用,简称ELK,本站http://www.wenzhihuai.com除了用作ELK,还配合了Kafka进行使用。它使用JRuby编写,开源,主流,免费,使用简单。
kafka是一个分布式的基于push-subscribe的消息系统,它具备快速、可扩展、可持久化的特点。它现在是Apache旗下的一个开源系统,作为hadoop生态系统的一部分,被各种商业公司广泛应用。它的最大的特性就是可以实时的处理大量数据以满足各种需求场景:比如基于hadoop的批处理系统、低延迟的实时系统、storm/spark流式处理引擎。
下面是本站日志系统的搭建
一、Nginx日志
为了配合ELK的使用,把日志变成json的格式,方便ElasticSearch对其检索。
    log_format main '{"@timestamp":"$time_iso8601",'
      '"host": "$server_addr",'
      '"clientip": "$remote_addr",'
      '"size": $body_bytes_sent,'
      '"responsetime": $request_time,'
      '"upstreamtime": "$upstream_response_time",'
      '"upstreamhost": "$upstream_addr",'
      '"http_host": "$host",'
      '"url": "$uri",'
      '"xff": "$http_x_forwarded_for",'
      '"referer": "$http_referer",'
      '"agent": "$http_user_agent",'
      '"status": "$status"}';

    access_log  logs/access.log  main;
然后执行nginx -t检验配置,nginx -s reload重启nginx即可。
注意:
1.这里的单引号用来标识不换行使用的,如果没有的话,Logstash会每一行都发送一次。
2.格式一定一定要规范。
二、Logstash
下载安装的具体请看Logstash官网,这里只讲讲如何配置
输入
input {
    file {
        type => "nginx_access"
        path => "/usr/share/nginx/logs/access.log"
        codec => "json"
    }
}
过滤
filter,由于本站没有涉及到很复杂的手机,所以不填
输出
output {
    stdout{
        codec => rubydebug
    }
    kafka {
        # 如果是多个["IP Address 1:port1", "IP Address 2:port2", "IP Address 3"]
        bootstrap_servers => "119.29.188.224:9092"    # 生产者
        topic_id => "nginx-access-log"    #设置写入kafka的topic
        # compression_type => "snappy"    #消息压缩模式,默认是none,可选gzip、snappy。
        codec => json       #一定要加上这段,不然传输错误,${message}
    }
    elasticsearch {
        # 如果是多个["IP Address 1:port1", "IP Address 2:port2", "IP Address 3"]
        hosts => "119.29.188.224:9200"    #Elasticsearch 地址,多个地址以逗号分隔。
        index => "logstash-%{type}-%{+YYYY.MM.dd}"    #索引命名方式,不支持大写字母(Logstash除外)
        document_type => "%{type}"    #文档类型
    }
}
具体字段:
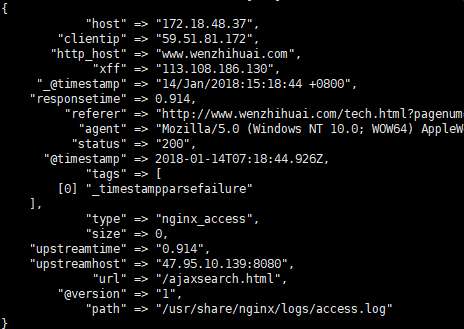
stdout:控制台输出,方便tail -f查看,可不要
kafka:输出到kafka,bootstrap_servers指的是kafka的地址和端口,topic_id是每条发布到kafka集群的消息属于的类别,其中codec一定要设置为json,要不然生产者出错,导致消费者是看到${message}。
elasticsearch:输出到elasticsearch,hosts指的是elasticsearch的地址和端口,index指的命名方式
然后启动Logstash:
nohup bin/logstash -f config/nginxlog2es.conf --path.data=tmp &
tail -f 查看nohup
三、kafka
kafka的原理请看kafka入门,我就不写了。下面是安装步骤:
目前的云服务器都用了NAT转换公网,如果不开启外网,kafka会默认使用内网私有地址访问,所以要开启外网访问
只需要在config/server.properties里加入:
advertised.host.name=119.29.188.224改变默认端口:
advertised.host.port=9200启动步骤:
(1)ZooKeeper启动
bin/zookeeper-server-start.sh config/zookeeper.properties
(2)启动Kafka
nohup bin/kafka-server-start.sh config/server.properties &
(3)创建一个topic
bin/kafka-topics.sh --create --zookeeper localhost:2181 --replication-factor 1 --partitions 1 --topic test
查看topic数量
bin/kafka-topics.sh --list --zookeeper localhost:2181
(4)生产者发送消息
bin/kafka-console-producer.sh --broker-list localhost:9092 --topic test
(5)消费者接收消息
bin/kafka-console-consumer.sh --bootstrap-server localhost:9092 --topic test --from-beginning
(6)删除
删除kafka存储的日志,在kafka的config/server.properties的log.dirs=/tmp/kafka-logs查看
此处只进行到第二步即可。
四、Spring Boot与Kafka
(1)在父pom.xml中添加:
<dependencyManagement>
    <dependencies>
        <dependency>
            <groupId>org.springframework.data</groupId>
            <artifactId>spring-data-releasetrain</artifactId>
            <version>Fowler-SR2</version>
            <scope>import</scope>
            <type>pom</type>
        </dependency>
        <dependency>
            <groupId>org.springframework.boot</groupId>
            <artifactId>spring-boot-dependencies</artifactId>
            <version>1.5.9.RELEASE</version>
            <type>pom</type>
            <scope>import</scope>
        </dependency>
    </dependencies>
</dependencyManagement>
(2)在消费者模块中添加:
    <parent>
        <artifactId>micro-service</artifactId>
        <groupId>micro-service</groupId>
        <version>1.0-SNAPSHOT</version>
    </parent>
配置文件:
# 本地运行端口
server.port=8082
# kafka地址和端口
spring.kafka.bootstrap-servers=119.29.188.224:9092
# 指定默认消费者group id
spring.kafka.consumer.group-id=myGroup
# 指定默认topic id
spring.kafka.template.default-topic=nginx-access-log
# 指定listener 容器中的线程数,用于提高并发量
spring.kafka.listener.concurrency=3
# 偏移量,最好使用latest,earliest会从kafka运行起开始一直发送
spring.kafka.consumer.auto-offset-reset=latest
# 心跳检测
spring.kafka.consumer.heartbeat-interval=100
(5)接收消息
@Component
public class MsgConsumer {
@KafkaListener(topics = {"nginx-access-log"})
public void processMessage(String content) {
System.out.println(content);
}
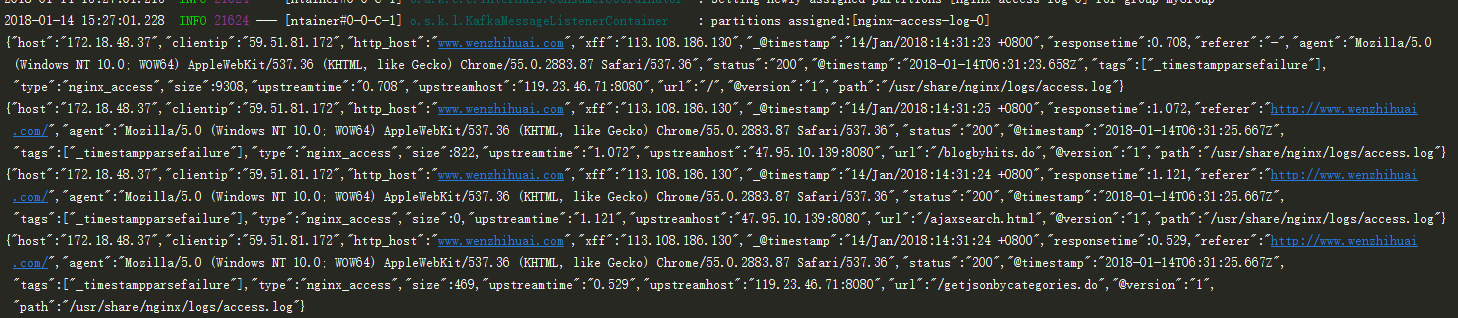
}(6)测试
运行之后点击网站http://www.wenzhihuai.com可看到:
五、错误记录
(1)与Spring的包冲突:
Error starting ApplicationContext. To display the auto-configuration report re-run your application with 'debug' enabled.
2018-01-05 11:10:47.947 ERROR 251848 --- [           main] o.s.boot.SpringApplication               : Application startup failed

org.springframework.context.ApplicationContextException: Unable to start embedded container; nested exception is org.springframework.boot.context.embedded.EmbeddedServletContainerException: Unable to start embedded Tomcat
    at org.springframework.boot.context.embedded.EmbeddedWebApplicationContext.onRefresh(EmbeddedWebApplicationContext.java:137) ~[spring-boot-1.5.9.RELEASE.jar:1.5.9.RELEASE]
    at org.springframework.context.support.AbstractApplicationContext.refresh(AbstractApplicationContext.java:537) ~[spring-context-4.3.11.RELEASE.jar:4.3.11.RELEASE]
    at org.springframework.boot.context.embedded.EmbeddedWebApplicationContext.refresh(EmbeddedWebApplicationContext.java:122) ~[spring-boot-1.5.9.RELEASE.jar:1.5.9.RELEASE]
    at org.springframework.boot.SpringApplication.refresh(SpringApplication.java:693) [spring-boot-1.5.9.RELEASE.jar:1.5.9.RELEASE]
    at org.springframework.boot.SpringApplication.refreshContext(SpringApplication.java:360) [spring-boot-1.5.9.RELEASE.jar:1.5.9.RELEASE]
    at org.springframework.boot.SpringApplication.run(SpringApplication.java:303) [spring-boot-1.5.9.RELEASE.jar:1.5.9.RELEASE]
    at org.springframework.boot.SpringApplication.run(SpringApplication.java:1118) [spring-boot-1.5.9.RELEASE.jar:1.5.9.RELEASE]
    at org.springframework.boot.SpringApplication.run(SpringApplication.java:1107) [spring-boot-1.5.9.RELEASE.jar:1.5.9.RELEASE]
解决办法:去掉父pom.xml文件里所有关于spring的包,只保留spring boot的即可
(2)消费者只接受到${message}消息(原图已失效)
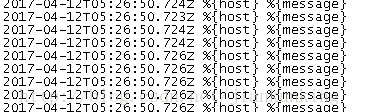
解决办法:
一定要在output的kafka中添加
codec => jsonposted on 2019-11-29 16:29 ExplorerMan 阅读(340) 评论(0) 收藏 举报


 浙公网安备 33010602011771号