
Django + Uwsgi + Nginx 实现生产环境部署
uwsgi介绍
uWSGI是一个Web服务器,它实现了WSGI协议、uwsgi、http等协议。Nginx中HttpUwsgiModule的作用是与uWSGI服务器进行交换。
要注意 WSGI / uwsgi / uWSGI 这三个概念的区分。
- WSGI是一种Web服务器网关接口。它是一个Web服务器(如nginx,uWSGI等服务器)与web应用(如用Flask框架写的程序)通信的一种规范。
- uwsgi是一种线路协议而不是通信协议,在此常用于在uWSGI服务器与其他网络服务器的数据通信。
- 而uWSGI是实现了uwsgi和WSGI两种协议的Web服务器。
- uwsgi协议是一个uWSGI服务器自有的协议,它用于定义传输信息的类型(type of information),每一个uwsgi packet前4byte为传输信息类型描述,它与WSGI相比是两样东西。
uWSGI的主要特点如下:
- 超快的性能
- 低内存占用(实测为apache2的mod_wsgi的一半左右)
- 多app管理(终于不用冥思苦想下个app用哪个端口比较好了-.-)
- 详尽的日志功能(可以用来分析app性能和瓶颈)
- 高度可定制(内存大小限制,服务一定次数后重启等)
Django + Uwsgi + Nginx:
Django+Uwsgi+Nginx生产环境在linux下部署,能承受高并发,本文项目以上节Celery_test为题
上节Celery_test项目链接:https://www.cnblogs.com/Eric15/articles/9465638.html


# python
一个基于python的开源web框架

# Uwsgi
一是一个web服务器,也可以当做中间件

# Nginx
常用高性能代理服务器

#uwsgi.py
django项目携带的一个wsgi接口文件
Nginx介绍:
Nginx是一个Http和反向代理服务器
什么是反向代理服务器呢?

正向的就是由浏览器主动的想代理服务器发出请求,经代理服务器做出处理后再转给目标服务器
反向的就是不管浏览器同不同意,请求都会经过代理服务器处理再发给目标服务器
这其中的区别就是必须经过Nginx反向代理服务器,这就有了使用Nginx的几个好处:

安全:不管什么请求都要经过代理服务器,这样就避免了外部程序直接攻击web服务器
负载均衡:根据请求情况和服务器负载情况,将请求分配给不同的web服务器,保证服务器性能
提高web服务器的IO性能:这个我也没看懂,总结来说就是请求从客户端传到web服务器是需要时间的,
传递多长时间就会让这个进程阻塞多长时间,而通过反向代理,就可以在反向代理这完整接受请求,然后再
传给web服务器,从而保证服务器性能,而且有的一些简单的事情(比如静态文件)可以直接由反向代理处理,不经过web服务器
部署流程:
首先客户端请求服务资源,
nginx作为直接对外的服务接口,接收到客户端发送过来的http请求,会解包、分析,
如果是静态文件请求就根据nginx配置的静态文件目录,返回请求的资源,
如果是动态的请求,nginx就通过配置文件,将请求传递给uWSGI;uWSGI 将接收到的包进行处理,并转发给wsgi,
wsgi根据请求调用django工程的某个文件或函数,处理完后django将返回值交给wsgi,
wsgi将返回值进行打包,转发给uWSGI,
uWSGI接收后转发给nginx,nginx最终将返回值返回给客户端(如浏览器)。
*注:不同的组件之间传递信息涉及到数据格式和协议的转换
作用:
1. 第一级的nginx并不是必须的,uwsgi完全可以完成整个的和浏览器交互的流程;
2. 在nginx上加上安全性或其他的限制,可以达到保护程序的作用;
3. uWSGI本身是内网接口,开启多个work和processes可能也不够用,而nginx可以代理多台uWSGI完成uWSGI的负载均衡;
4. django在debug=False下对静态文件的处理能力不是很好,而用nginx来处理更加高效。
Uwsgi安装使用
1)安装Uwsgi
pip3 install uwsgi
安装成功,测试情况:
创建test.py文件:vim test.py
# test.py
def application(env, start_response):
    start_response('200 OK', [('Content-Type','text/html')])
    return [b"Hello World"] # python3
    #return ["Hello World"] # python2
运行:
uwsgi --http :8000 --wsgi-file test.py
浏览器输入网址:http://192.168.1.145:8000/ (本地输:127.0.0.1:8000)
测试结果: 正常

2)Uwsgi启动Django
Django自启动:
python manag.py runserver 0.0.0.0:9000
uwsgi启动Django方式一:
uwsgi --http :9000 --module mysite.wsgi #mysite =项目名
# eg:
uwsgi --http :9000 --module Celery_test.wsgi
uwsgi启动Django方式二(推荐):
把参数写到配置文件里,命名celery_uwsgi.ini,放在Celery_test项目下:
如果是在virtualenv虚拟环境下开发,需加上代码:
virtualenv = /home/nan/.envs/mxonline # 虚拟环境路径
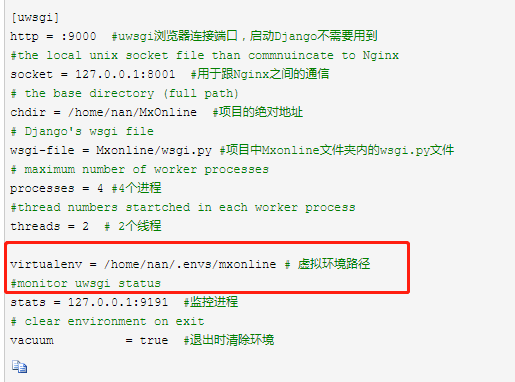
[uwsgi]
http = :9000  #uwsgi浏览器连接端口,启动Django不需要用到
#the local unix socket file than commnuincate to Nginx
socket = 127.0.0.1:8001  #用于跟Nginx之间的通信
# the base directory (full path)
chdir = /home/alex/CrazyEye  #项目的绝对地址
# Django's wsgi file
wsgi-file = Celery_test/wsgi.py #项目中Celery_test文件夹内的wsgi.py文件
# maximum number of worker processes
processes = 4 #4个进程
#thread numbers startched in each worker process
threads = 2  # 2个线程

#monitor uwsgi status
stats = 127.0.0.1:9191  #监控进程
# clear environment on exit
vacuum          = true  #退出时清除环境
配置好后,需要通过下面命令启动Django:
root@nan-virtual-machine:/Celery_test# uwsgi celery_uwsgi.ini #在Celery_test项目下执行
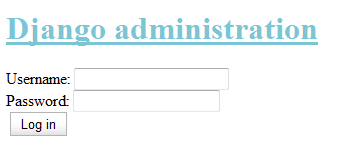
浏览器访问网址:http://192.168.1.145:9000/admin
页面效果:
注:uwsgitop :9191 查看进程监控

python环境下uwsgitop需安装:pip3 install uwsgitop
Nginx安装使用
1、安装
sudo apt-get install nginx   #安装
sudo /etc/init.d/nginx start    # start nginx
浏览器访问:http://192.168.1.145/
显示:
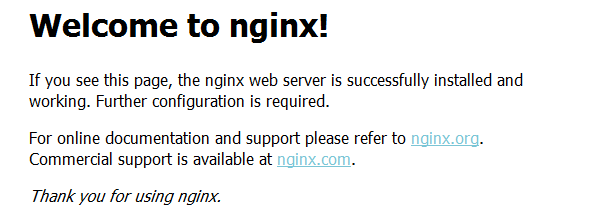
安装成功!
* 安装程序把nginx以服务的形式安装在系统中,相关的程序及文件路径如下:
- 程序文件: /usr/sbin/nginx目录中.
- 全局配置文件:/etc/nginx/nginx.conf
- 访问日志文件:/var/log/nginx/access.log
- 错误日志文件:/var/log/nginx/error.log
- 站点配置文件:/etc/nginx/sites-enabled/default
2、copy nginx下的uwsgi_params文件到你的Django项目目录下,不用作任何改动:
uwsgi_params文件是Nginx向uWSGI传递的参数,用于项目中Nginx配置文件(celery_nginx.conf)运行时调用
#cp 源文件 目标文件
cp ./uwsgi_params /Celery_test
    # ./ :当前目录
    # ../:上级目录
    # /  :根目录
3、为Celery_test项目生成Nginx配置文件 :celery_nginx.conf
# celery_nginx.conf

# the upstream component nginx needs to connect to
upstream django {
    # server unix:///path/to/your/mysite/mysite.sock; # for a file socket
    server 127.0.0.1:8001; # 用于与uwsgi通信,与uwsgi设置保持一致
}

# configuration of the server
server {
    # the port your site will be served on
    listen      8000; #监听的端口
    # the domain name it will serve for
    server_name .example.com 192.168.1.145; # 服务器地址
    charset     utf-8;

    # max upload size
    client_max_body_size 75M;   # adjust to taste

    # Django media
    location /media  {
        alias /Celery_test/media;  # 用户下载上传等静态文件路径
    }

    location /static {
        alias /Celery_test/static; # 静态文件路径,本项目静态文件路径在根目录下的Celery_test项目中
    }

    # Finally, send all non-media requests to the Django server.
    #一切动态的访问均交由Django自己处理
    location / {
        uwsgi_pass  django;
        include     /Celery_test/uwsgi_params; # the uwsgi_params file you installed ,uwsgi_params的路径
    }
}
为 celery_nginx.conf 做一个软连接,将此配置文件生成一个快捷方式,放到:/etc/nginx/sites-enabled/ 下,如软连接不行,则将该配置文件复制或移动到/etc/nginx/sites-enabled/ 下
ln -s ./celery_nginx.conf /etc/nginx/sites-enabled/
4、在Django的setting中配置:STATIC_ROOT ,用于将Django所有静态文件cp一份放置在一个地方,方便Nginx调用
 或:
或:
接着执行命令:python manage.py collectstatic ,
命令执行完成,会在项目当前路径下生成一个 all_static_files 目录,里面有所有静态相关文件,然后我们再把项目中celery_nginx.conf配置文件的static静态文件路径改成all_static_files :
alias /Celery_test/all_static_files ,至此,便完成了。
此步骤作用:将所有app静态文件都copy到一个统一的目录,方便Nginx访问。
5、重启Nginx:
/etc/init.d/nginx restart
6、启动uwsgi:
uwsgi celery_uwsgi.ini
此时启动Nginx 和Uwsgi,django项目就可以实现高并发啦!
线上部署大概步骤完成,我们来完整走一遍程序:
注:如果是在virtualenv虚拟环境下开发的项目,需要部署到线上,请参考:https://www.cnblogs.com/Eric15/articles/9593662.html
1、Nginx
1)Nginx安装及启动:
sudo apt-get install nginx   #安装
sudo /etc/init.d/nginx start    # start nginx
2)copy nginx下的uwsgi_params文件到你的Django项目目录下,不用作任何改动:
#cp 源文件 目标文件
cp ./uwsgi_params /Celery_test
    # ./ :当前目录
    # ../:上级目录
    # /  :根目录
3)为Celery_test项目生成Nginx配置文件 :celery_nginx.conf ,放置于Celery_test项目目录下
# celery_nginx.conf

# the upstream component nginx needs to connect to
upstream django {
    # server unix:///path/to/your/mysite/mysite.sock; # for a file socket
    server 127.0.0.1:8001; # 用于与uwsgi通信,与uwsgi设置保持一致
}

# configuration of the server
server {
    # the port your site will be served on
    listen      8000; #监听的端口
    # the domain name it will serve for
    server_name .example.com 192.168.1.145; # 服务器地址
    charset     utf-8;

    # max upload size
    client_max_body_size 75M;   # adjust to taste

    # Django media
    location /media  {
        alias /Celery_test/media;  # 用户下载上传等静态文件路径
    }

    location /static {
        # alias /Celery_test/static; # 静态文件路径,本项目静态文件路径在根目录下的Celery_test项目中
        alias /Celery_test/all_static_files; # 静态文件路径
    }

    # Finally, send all non-media requests to the Django server.
    #一切动态的访问均交由Django自己处理
    location / {
        uwsgi_pass  django;
        include     /Celery_test/uwsgi_params; # the uwsgi_params file you installed ,uwsgi_params的路径
    }
}
4)为 celery_nginx.conf 做一个软连接,将此配置文件生成一个快捷方式,放到:/etc/nginx/sites-enabled/ 下,如软连接不行,则将该配置文件复制或移动到/etc/nginx/sites-enabled/ 下:
ln -s ./celery_nginx.conf /etc/nginx/sites-enabled/
5)
1、在Django的setting中配置:STATIC_ROOT ,用于将Django所有静态文件cp一份放置在一个地方,方便Nginx调用:
STATIC_ROOT = 'all_static_files' # all_static_files可以随便命名
2、接着执行命令:
python manage.py collectstatic
3、将静态文件路径配置到celery_nginx.conf中:
location /static {
        # alias /Celery_test/static; # 静态文件路径,本项目静态文件路径在根目录下的Celery_test项目中
        alias /Celery_test/all_static_files; # 静态文件路径
    }
2、uWSGI
1)uWSGI安装:
pip3 install uwsgi
2)配置uWSGI配置文件:celery_uwsgi.ini ,放于Celery_test项目目录下:
[uwsgi]
http = :9000  #uwsgi 即浏览器的访问端口,Nginx+uwsgi时不需要用到,
#the local unix socket file than commnuincate to Nginx
socket = 127.0.0.1:8001  #用于跟Nginx之间的通信
# the base directory (full path)
chdir = /home/alex/CrazyEye  #项目的绝对地址
# Django's wsgi file
wsgi-file = Celery_test/wsgi.py #项目中Celery_test文件夹内的wsgi.py文件
# maximum number of worker processes
processes = 4 #4个进程
#thread numbers startched in each worker process
threads = 2  # 2个线程

# virtualenv = /home/nan/.envs/Celery_test  # 虚拟环境路径
#monitor uwsgi status
stats = 127.0.0.1:9191  #监控进程
# clear environment on exit
vacuum          = true  #退出时清除环境
至此,Nginx、uWSGI相关配置便配置完成,接下来启动服务便可以了:
1、启动Nginx:
/etc/init.d/nginx start
# /etc/init.d/nginx restart
# 或
service Nginx start
2、进入Celery_test项目目录下执行(启动uwsgi):
uwsgi celery_uwsgi.ini
访问url:http://192.168.1.145:8000/index ,即可成功访问首页
请求:
浏览器访问 → Nginx监听192.168.1.145::8000 处理请求(解包HTTP请求,静态自己处理并返回数据,动态转给uwsgi处理)→uwsgi → Django,
响应:
Django → uwsgi → Nginx →浏览器

 浙公网安备 33010602011771号