@vue/cli 3.0 + Element-UI项目搭建
一、环境搭建
1、安装node (node -v查询版本号)
node 安装 ---- 官网下载安装
2、安装淘宝镜像
npm install -g cnpm --registry=https://registry.npm.taobao.org
3、安装 webpack,以全局的方式安装
npm install webpack -g
(这里因为外网限制速度很慢,可以先Ctrl+C取消安装,执行下面语句,再执行上面胡语句,你就会发现速度快上很多
npm config set registry https://registry.npm.taobao.org
)
4、全局安装vue以及脚手架vue-cli(3.0以后使用的不是vue-cli,之前已经安装vue-ci的,需要先执行 npm uninstall vue-cli -g 进行卸载)
npm install -g @vue/cli@3.0 .0 (使用 @vue/cli -V 查询版本号,安装3.0需要node版本在8.0+及以上)
5、创建vue项目 element-manage-system是你起的项目名称
vue create element-manage-system

这里如果你是第一次用3.0版本的话,只有两个选项,
这里是 让你选的,第一个是默认配置,一般选第二个,自己配置,这里选择最后一个

当你选择后会出现上面图上的东西,这里你可以自由选择用哪些配置,按上下键 选择哪一个,按空格键确定,所有的都选择好后,按enter键进行下一步

是否使用history,项目中多使用hash值方式,故输入N回车

下一步之后问询问你安装哪一种 CSS 预处理语言,你随意选择,我是一直用的less

上面这个是问你选择哪个自动化代码格式化检测,配合vscode编辑器的 Prettier - Code formatter插件,推荐选择 ESLint + Standard config

这里第一个选项是问你是否保存刚才的配置,选择确定后你下次再创建新项目 就有你以前选择的配置了,保留默认即可

上边这俩意思问你想babel,postcss,eslint这些配置文件放哪? 第一个是:放独立文件放置 第二个是:放package.json里 这里推荐放单独配置文件,推荐选第一个

上边倒数第二行问你是否将以上这些将此保存为未来项目的预配置吗? 最后一个是描述项目,你随意选择,点击确定就开始下载模板了

见到这个提示就表示已经创建成功啦
查看项目结构

6、运行当前项目
npm run serve

启动服务npm run serve, 这里发现少了vue.config.js文件,那配置怎么搞?
在项目根目录新增vue.config.js,配置如下
module.exports = {

    /* 部署应用包的基本URL */
    /* baseUrl 从 Vue CLI 3.3 起已弃用 ,请使用publicPath */
    //  baseUrl: process.env.NODE_ENV === "production" ? "./" : "./",
    publicPath: process.env.NODE_ENV === "production" ? "./" : "./",

    /* 生产环境构建文件的目录 defalut: dist */

    outputDir: "dist",

    /* 放置生成的静态文件目录(js css img) */

    assetsDir: "static",

    /* 指定生成的index.html 输出路径 相对 default: index.html */

    indexPath: "index.html",

    /* 指定生成文件名中包含hash default: true */

    filenameHashing: true,

    /* 多页模式下 */

    /* pages: {
      index: {
        // page 的入口
        entry: "src/index/main.js",

        // 模板来源
        template: "public/index.html",

        // 在 dist/index.html 的输出
        filename: "index.html",

        // 当使用 title 选项时,
        // template 中的 title 标签需要是 <title><%= htmlWebpackPlugin.options.title %></title>
        // title: "Index Page",

        // 在这个页面中包含的块,默认情况下会包含
        // 提取出来的通用 chunk 和 vendor chunk。
        chunks: ["chunk-vendors", "chunk-common", "index"]
      },

      // 当使用只有入口的字符串格式时,
      // 模板会被推导为 `public/subpage.html`
      // 并且如果找不到的话,就回退到 `public/index.html`。
      // 输出文件名会被推导为 `subpage.html`。
      // subpage: "src/subpage/main.js"
    } */

    /* 是否保存时 lint 代码 */
    lintOnSave: process.env.NODE_ENV === "production",

    /* 是否使用编译器 default: false */
    runtimeCompiler: false,

    /* 默认babel-loader会忽略node_modules中的文件,你想显示的话在这个选项中列出来 */
    // transpileDependencies: [],

    /* 生产环境的source map */
    productionSourceMap: true,

    // crossorigin: "",
    integrity: false,
    configureWebpack: {
        resolve: {
            alias: {
                'assets': '@/assets',
                'components': '@/components',
                'views': '@/views',
            }
        }
    },
    // css相关配置
    css: {

        // 是否使用css分离插件 ExtractTextPlugin
        extract: true,

        // 开启 CSS source maps?
        sourceMap: false,

        // css预设器配置项
        loaderOptions: {},

        // 启用 CSS modules for all css / pre-processor files.
        modules: false
    },

    devServer: {
        port: 8080,
        host: "0.0.0.0",
        https: false,
        // 自动启动浏览器
        open: false,
        proxy: {
            "/api": {
                //代理路径 例如 https://baidu.com
                target:  "https://baidu.com",
                // 将主机标头的原点更改为目标URL
                changeOrigin: true,
                ws: true,
                pathRewrite: {
                    "^/api": ""
                }
            }
        }
    }
};
再次执行 npm run serve ,服务起来了,这是可以在浏览器看一下页面,完美

6、安装element-ui
npm i element-ui -S (cd 进入到项目根目录)
二、项目初期搭建
上面已经正常启动了项目,下面说明一下公共配置
1、main.js(主文件)
import Vue from "vue";
import App from "./App.vue";
import router from "./router";
import store from "./store";
import ElementUI from "element-ui";
import Axios from "axios";

Vue.config.productionTip = false;
Vue.use(ElementUI)
Vue.prototype.axios = Axios

new Vue({
  router,
  store,
  render: h => h(App)
}).$mount("#app");
2、router(路由跳转配置)
router作用:简单理解就是帮助组件之间跳转用的。
这里为了性能都采用懒加载,还有这里不管先登陆登陆页面 默认跳转组件为 Main.vue
import Vue from "vue";
import Router from "vue-router";
import Home from "./views/Home.vue";


Vue.use(Router);

export default new Router({
  mode: "history",
  base: process.env.BASE_URL,
  routes: [
    {
      path: "/",
      name: "home",
      component: Home
    },
    {
      path: "/about",
      name: "about",
      // route level code-splitting
      // this generates a separate chunk (about.[hash].js) for this route
      // which is lazy-loaded when the route is visited.
      component: () =>
        import(/* webpackChunkName: "about" */ "./views/About.vue")
    },
    {
      path: "/JSON",
      name: "JSON",
      component: () =>
          import(/* webpackChunkName: "about" */ "./views/JSON.vue")
    }
  ]
});
3、axios
axios作用:axios主要是用于向后台发起请求的,还有在请求中做更多是可控功能。
npm install axios 执行安装,完成后配置main.js
import Vue from "vue";
import App from "./App.vue";
import router from "./router";
import store from "./store";
import ElementUI from "element-ui";
import Axios from "axios";

Vue.config.productionTip = false;
Vue.use(ElementUI)
Vue.prototype.axios = Axios

new Vue({
  router,
  store,
  render: h => h(App)
}).$mount("#app");
基本的配置就完成了,下面可以开始进行开发啦
接口数据模拟
很多时候前端在后端接口还没有开发完成的时候,需要前端自己模拟数据,这个其实也很简单。
首先在public文件夹下新建api/user.json文件,当然新建的文件夹和json文件名字是可以随意命名的。
{
  "status": 200,
  "data": [
    "Jack",
    "Tom",
    "Rose"
  ]
}
<template>
</template>
<script>
    export default {
        name: "JSON",
        mounted() {
            this.axios.get('/api/user.json').then((res) => {
                console.log(res, 'success')
            }).catch((err) => {
                console.log(err, 'error')
            })
        }
    }
</script>
<style scoped>
</style>
APP.Vue新增JSON.Vue入口
<template>
  <div id="app">
    <div id="nav">
      <router-link to="/">Home</router-link> |
      <router-link to="/about">About</router-link> |
      <router-link to="/JSON">JSON Data</router-link>  // 新增入口
    </div>
    <router-view />
  </div>
</template>
配置router.js文件
{
  path: "/JSON",
  name: "JSON",
  component: () =>
      import(/* webpackChunkName: "about" */ "./views/JSON.vue")
}
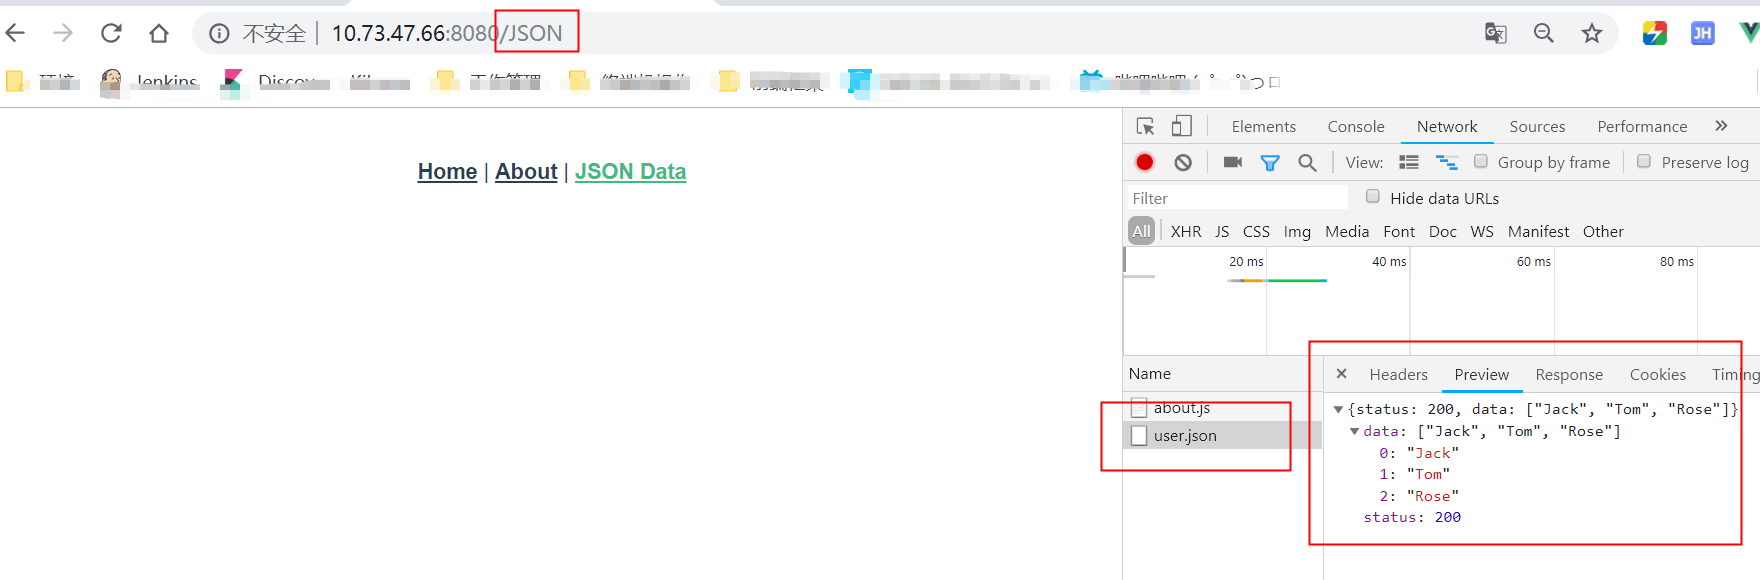
浏览器打开页面,就能见到JSON的入口啦
切换JSON Data,可能F12的Network,可以看到user.json 的数据
![]()

 浙公网安备 33010602011771号