
jenkins部署java项目到远程linux上,脚本文件和项目一起上传到gogs上,直接执行gogs上的脚本文件来执行项目
(1)新建maven项目
pom.xml的配置


<project xmlns="http://maven.apache.org/POM/4.0.0" xmlns:xsi="http://www.w3.org/2001/XMLSchema-instance"
  xsi:schemaLocation="http://maven.apache.org/POM/4.0.0 http://maven.apache.org/xsd/maven-4.0.0.xsd">
  <modelVersion>4.0.0</modelVersion>

    <groupId>cn.demo</groupId>
    <artifactId>jenkins_jar</artifactId>
    <version>0.0.1-SNAPSHOT</version>
    <packaging>jar</packaging>
    <name>jenkins_jar</name>
    <url>http://maven.apache.org</url>

    <build>
        <finalName>jenkins_jar</finalName>
        <plugins>
            <plugin>
                <inherited>true</inherited>
                <groupId>org.apache.maven.plugins</groupId>
                <artifactId>maven-compiler-plugin</artifactId>
                <version>3.1</version>
                <configuration>
                    <source>${compiler.source}</source>
                    <target>${compiler.target}</target>
                    <encoding>${project.build.sourceEncoding}</encoding>
                </configuration>
            </plugin>

            <plugin>
                <groupId>org.apache.maven.plugins</groupId>
                <artifactId>maven-jar-plugin</artifactId>
                <version>2.6</version>
                <configuration>
                    <archive>
                    <!-- 添加index则不从mainfest中读取classpath,而是从Index.list中读取 -->
<!--                         <index>true</index> -->
                        <manifest>
                            <mainClass>cn.demo.jenkins_jar.demo.Demo</mainClass>
                        </manifest>

                    </archive>
                </configuration>
            </plugin>

             <plugin>
               <groupId>org.apache.maven.plugins</groupId>
                <artifactId>maven-assembly-plugin</artifactId>
                <version>2.4.1</version>
                <executions>
                    <execution>
                        <id>${project.version}</id><!--名字任意 -->
                        <phase>package</phase>   <!-- 绑定到package生命周期阶段上 -->
                        <goals>
                            <goal>single</goal>   <!-- 只运行一次 -->
                        </goals>

                        <configuration>
                            <descriptors>   <!--描述文件路径-->
                                <descriptor>script.xml</descriptor>
                            </descriptors>
                            <!--这样配置后,mvn deploy不会把assembly打的zip包上传到nexus-->
                            <attach>false</attach>
                        </configuration>

                    </execution>

                </executions>

            </plugin>
</plugins>

</build>

    <properties>
        <project.build.sourceEncoding>UTF-8</project.build.sourceEncoding>
        <compiler.source>1.7</compiler.source>
        <compiler.target>1.7</compiler.target>
        <junit.version>4.12</junit.version>
    </properties>

    <dependencies>
        <dependency>
            <groupId>junit</groupId>
            <artifactId>junit</artifactId>
            <version>${junit.version}</version>
            <scope>test</scope>
        </dependency>
    </dependencies>

</project>
>maven-assembly-plugin插件指定的 script.xml文件 (文件存放的位置:直接在项目下 (非src))
script.xml
<assembly xmlns="http://maven.apache.org/plugins/maven-assembly-plugin/assembly/1.1.2"
         xmlns:xsi="http://www.w3.org/2001/XMLSchema-instance"
         xsi:schemaLocation="http://maven.apache.org/plugins/maven-assembly-plugin/assembly/1.1.2
          http://maven.apache.org/xsd/assembly-1.1.2.xsd">

    <id>script</id>

    <formats><!--打包的文件格式 -->
        <format>zip</format>
    </formats>

    <fileSets>
        <fileSet>
            <directory>script</directory><!--需要打包的目录 -->
            <outputDirectory>/</outputDirectory> <!-- 打包后输出的路径 输出子啊target目录下 -->
        </fileSet>
    </fileSets>

</assembly>
在该项目下直接新建文件夹 script ,在文件夹下新建脚本文件 start.sh 内容如下
start.sh
#!/bin/sh
cd /root/home/program/pro_java/

#得到进程ID pid,kill该进程
pid=`cat /root/home/program/pro_java/pid`
if [ -n "$pid" ]
then
    echo "kill -9 的pid:" $pid
    kill -9 $pid
fi

#执行jar,并将进程挂起,保存进程ID到 pid文件
echo "Execute shell Finish"
BUILD_ID=dontKillMe nohup java -jar /root/home/program/pro_java/jenkins_jar.jar  & echo "$!" > pid
(2)新建jenkins项目,选择构建maven项目,开始配置
项目名称:新建项目时,填的名称
描述:这里是对项目的描述,解释 自己定义就行了 不影响

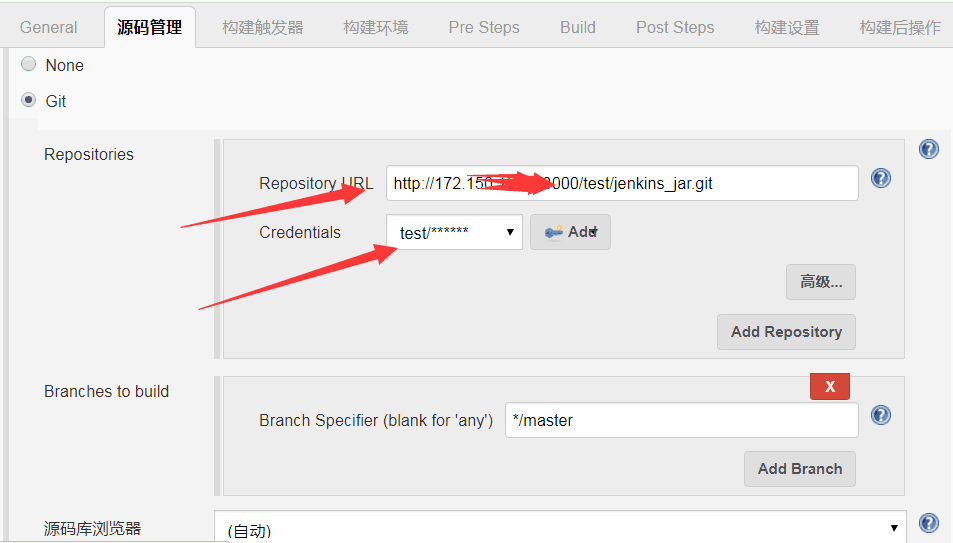
源码管理: Git
Repository URL:这里填gogs的仓库地址
Credential:这里选择gogs的登录账号和密码(如果没有就点击右侧的add按钮,添加 只需要填写 用户名和密码就可以了)
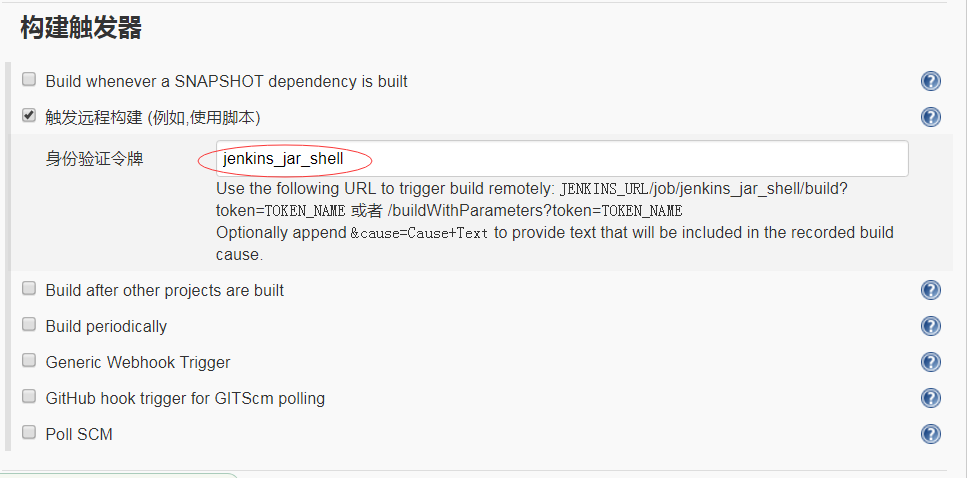
构建触发器(这里的配置其实都没什么影响,随便写个令牌,只要选中了触发远程构建就行了,在gogs上对应的仓库里配置web钩子就行)
使用web钩子的作用:只有远程代码有push ,jenkins就会自动构建 (推荐使用)
也可以不选择触发远程构建,选中Poll SCM 配置 H/5 * * * * 表示每5分钟检查一次代码,发现有变动就触发构建 ,但是这种效率不好,不推荐
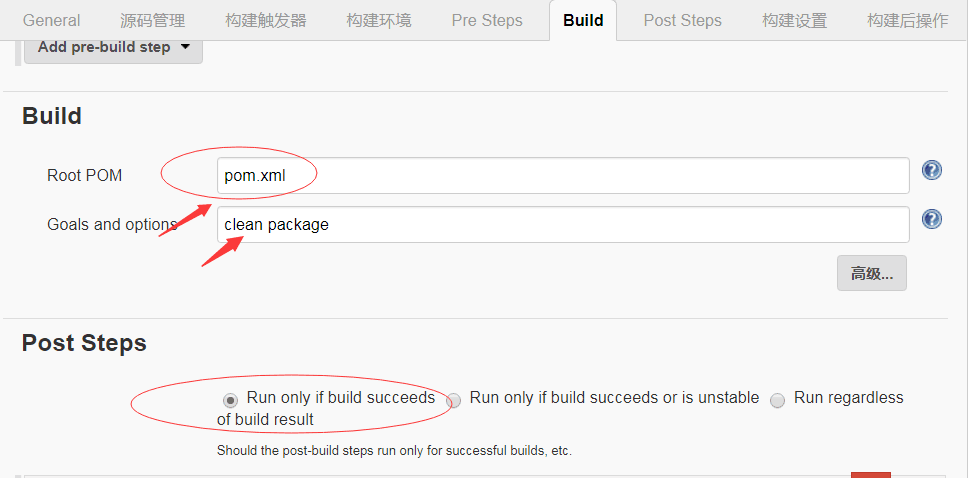
Build 执行构建pom.xml
执行 maven命令clean package,先clean项目,再重新打包编译
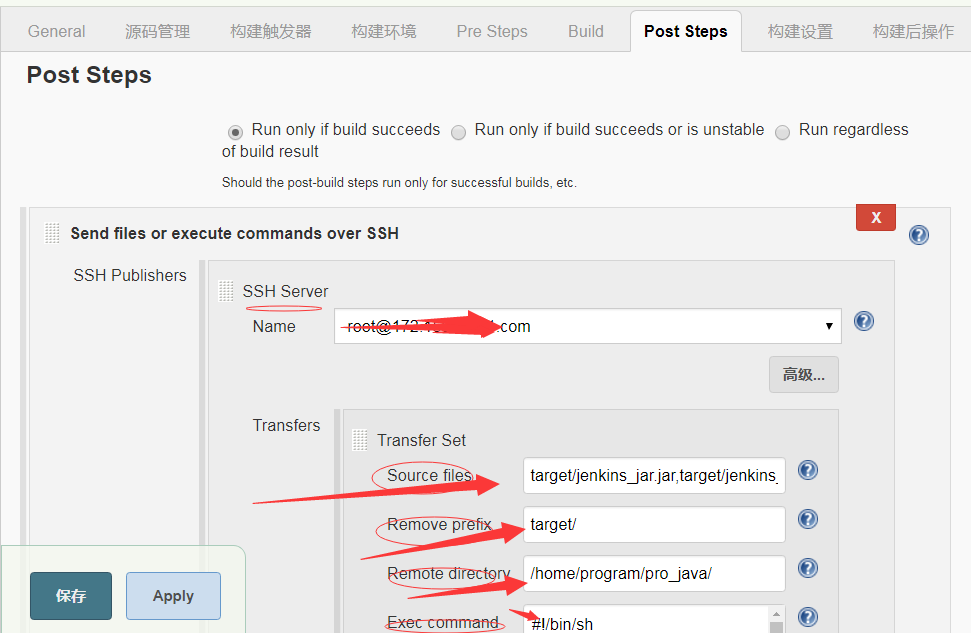
Post Steps:这个勾中第一个就行了,表示构建成功时才运行
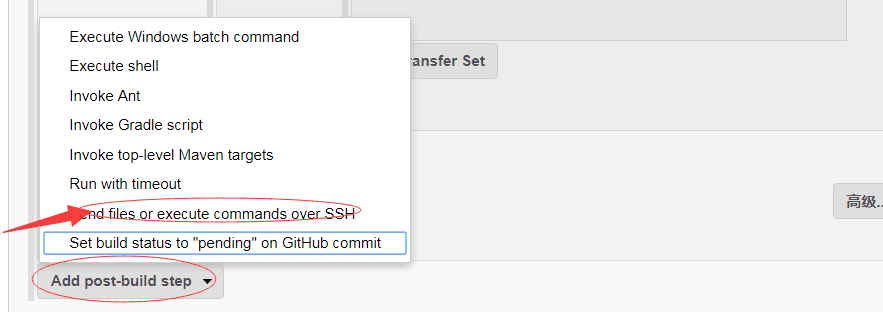
点击 add-post build step
选择 send files or execute commands over SSH
进入如下配置
SSH Server ,
Name: root@172.150.12.32 //安装publish over SSH插件,进行系统设置时的配置 Name名
Source files: target/jenkins_jar.jar,target/jenkins_jar-script.zip 将项目的jar包传送到服务器,将打包shell脚本的zip压缩包传给服务器 //表示需要传送的文件,多个文件用逗号分开
remove prefix:远程linux需要移除的目录名
Remote Directory:远程linux接收这些文件的目录
Exec Command:执行的脚本命令,命令如下
#!/bin/sh
cd /root/home/program/pro_java/ #进入远程目录
unzip -o -d /root/home/program/pro_java/ jenkins_jar-script.zip #将存放脚本文件的压缩包解压
cd jenkins_jar #打开解压后的文件夹
sh start.sh #执行该脚本 该脚本文件内容在文章开头 (1)中
配置到此结束,可以执行构建了
 posted on

 浙公网安备 33010602011771号